

Table of Contents:
- Recommended Equipment
- Finding and Challenging Vorago
- Standard Attacks
- Phases
- Siesmic and Tectonic Equipment
With a combat level of 240 and 250,000LP, Vorago is the strongest monster in RuneScape and to survive and defeat him you will need the very best equipment. His most powerful attacks are capable of dealing damage of up to 10,000 and so it is highly recommended to boost your maximum Life points as high as possible.
Melee:
- Helmet: Malevolent helm > Superior tetsu helm > Torva full helm > Bandos helmet > Verac's helm > Other Barrows helms
- Body: Malevolent cuirass > Superior tetsu body > Torva platebody > Bandos chestplate > Verac's brassard > Other Barrows bodies
- Legs: Malevolent greaves > Tetsu legs > Torva platelegs > Bandos tassets > Verac's plateskirt > Other Barrows legs >
- Gloves: Razorback gauntlets > Pneumatic gloves > Torva gloves Goliath gloves > Bandos gloves
- Boots: Steadfast boots > Torva boots > Bandos boots > Dragon boots
- Cape: Completionist cape > TokHaar-Kal-Ket > Fire cape > Any skillcape
- Weapon: Noxious scythe/Drygore longsword/rapier/mace > Lava whip > Chaotics
- Off-hand: Chaotic kiteshield > Divine spirit shield > Dragonfire shield > Off-hand drygores > Off-hand chaotics
Magic:
- Helmet: Tectonic mask > Superior seasinger's hood > Virtus mask > Ganodermic visor > Hood of subjugation > Ahrim's hood >
- Body: Tectonic robe top > Superior seasinger's robe top > Virtus robe top > Ganodermic poncho > Garb of subjugation > Ahrim's robe top
- Legs: Tectonic robe bottom > Superior seasinger's robe bottom > Virtus robe legs > Ganodermic leggings > Gown of subjugation > Ahrim's robe skirt
- Gloves: Celestial handwraps > Static gloves > Virtus gloves > Spellcaster gloves > Gloves of subjugation > Ganodermic gloves
- Boots: Ragefire boots > Virtus boots > Ganodermic boots > Boots of subjugation
- Cape: Completionist cape > TokHaar-Kal-Mej > God capes > Any skillcape
- Weapon: Seismic wand/Noxious staff > Staff of darkness > Chaotic staff/Virtus wand > Staff of light/Ahrim's wand/Wand of treachery
- Off-hand: Seismic singularity > Virtus book > Ahrim's book of magic > Ward of subjugation
Ranged:
- Helmet: Sirenic mask > Superior death lotus hood > Pernix cowl > Armadyl helmet > Karil's coif
- Body: Sirenic hauberk > Superior death lotus chestplate > Pernix body > Armadyl chestplate > Karil's top
- Legs: Sirenic chaps > Superior death lotus chaps > Pernix chaps > Armadyl chainskirt > Karil's skirt
- Gloves: Ascension grips > Tracking gloves > Pernix gloves > Swift gloves > Armadyl gloves
- Boots: Glaiven boots > Pernix boots > Armadyl boots
- Cape: Completionist cape > TokHaar-Kal-Xil > Ava's alerter > Ava's accumulator > Any Skill cape
- Weapon: Ascension crossbow/Noxious longbow > Strykebow/Death lotus dart > Royal crossbow/Chaotic crossbow/Zaryte bow > Crystal bow > Karil's crossbow
- Off-hand: Eagle-eye kiteshield > Elysian spirit shield > Off-hand ascension crossbow > Off-hand death lotus dart > Off-hand chaotic crossbow Karil's off-hand pistol crossbow
Finding and Challenging Vorago:
Vorago can be found by entering the cave north of Falador. Before entering the cave, you must choose to either enter the non-instanced area or create your own instance for 1,000,000gp per hour.
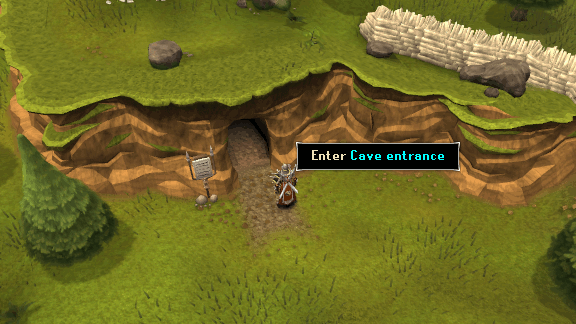
Once you've entered the cave, jump across the stones north of the rope down to the lower level. Once there, you will find the head of Vorago waiting to be challenged (Note: If you've chosen to enter the non-instanced cave, Vorago will not be there if a battle has already started).

Once you've accepted Vorago's challenge, all players in the area will be asked if they wish to join you. After a 20 second wait, Vorago will unleash a blast that deals 50,000 damage spread between all players that have accepted the challenge and the fight will begin.
- Standard melee attack: Damage can be shared between players within range of it.
- Standard magic attack: He will always target the furthest player with this move, but damage can be shared between multiple players if any are standing close to the target.
- AoE drain - If Vorago hasn't been able to attack for some time, he will drain all the run energy of his main target and damage them heavily.
- AoE stack - If a player has been standing under the boss for some time they will take significant damage. If the person getting hit is Vorago's primary target they will also be stunned for a while.
- At the end of each phase, Vorago will pick a random spot in the room to jump to. There will be a shadow warning on the ground that will show where he is heading for. Anyone within this area will be damaged by the lowest of either half of their life points or a number dependant on how close they were to Vorago. He will perform this attack 3 times.
The battle is split up into five phases, each with a different arena and set of special attacks used by Vorago. At the end of each phase, Vorago will smash through the floor into the next cave and all players will fall with him. Also, after phase 1, 2 and 4 you will have obtained a piece of the Maul of Omens. This weapon is used to deal the killing blow to Vorago.
Phase 1:
Throughout this phase Vorago will launch glowing red projectiles at the most distant player. The attack follows that player and cannot be avoided. It deals base damage of 2,000 and increases up to 7,000 if other players are caught in the blast radius. The objective of the first phase is to lure Vorago to a cliffside so that one person call pull the maul piece out of his body.
First, lure Vorago to the north east side of the area, whilst a player sneaks up the cliffside. Luring Vorago to that corner will stop him launching his special attack at the person climbing the cliffside. Once that player has reached the top, lure Vorago to the Cliffside (he must be EXACTLY opposite the person on the cliffside - dots aligned on the minimap), and someone who is south of Vorago must use provoke to make him turn his back to the player on the Cliffside allowing them to jump onto his back and remove the Ancient weapon piece (a) for the maul. Once you have it, continue to damage Vorago until he ends the phase by smashing through the floor.
Phase 2:
This phase requires excellent teamwork to get past, otherwise the whole team will die. In this phase, a group of 5 players must, in an organised order, provoke Vorago off each other, one after the other.
Vorago must be provoked off the player in sequence, so five players (one after the other) must take turns in drawing his attention. Vorago will apply a bleed damage to all 5 players so be sure to have freedom. If Vorago hits someone twice in a row, they will be dealt 4,500 damage plus a second bleed effect.
After 5 rotations, Vorago will do 3 normal attacks and a warning message will appear. You must stop attacking Vorago immediately when you see this message otherwise your attacks will be redirected to Vorago's target.
Afterwards you will see a pink gravity ball appear nearby. Lure Vorago into it to destabalise him. This process must be repeated three times before a cutscene will play in which you must repeatedly click Vorago to bring him to his knees, and then damage him until the Ancient weapon piece (b) for the maul loosens.
Now repeat the entire phase again and the maul piece will fall out. The same player who picked up the first weapon piece must pick the second weapon piece up here. Vorago will now smash through the floor again.
Phase 3:
Note: The special abilities and attacks used by Vorago from now on rotates each week and follows this sequence: Ceiling Collapse > Scopulus > Vitalis > Green Bomb > Team Split.
Ceiling Collapse: Vorago will fire a magical blast straight up, causing some rocks to crash. If a player gets trapped, they will suffer heavy damage and be unable to move. Players can free trapped teammates by spending some of their Life Points to remove the debris. This phase requires Vorago's Life Points to be exhausted before advancing to the 4th phase.
Scopulus: At the start of this phase, Vorago will summon two level 200 Scopulus. These 'twins' must be killed to damage Vorago and grow stronger the closer they are to each other and so must be kept apart by using Provoke to distract them. When one is killed, the other will become much stronger and accurate. To make things more difficult, you must repeat the action of 5 players provoking Vorago in sequence throughout this phase while dealing with the Scopluli at the same time. After killing both of them, you can damage Vorago until he ends the phase.
Vitalis: Vorago will spawn magical orbs that will release 5 Vitalis creatures per orb. Depending on the party size, Vorago will spawn multiple orbs. Players can prevent Vitalis from being spawned by standing near the orbs before they explode, taking heavy damage (this damage can be mitigated with multiple people near the orbs.) This phase requires Vorago's Life Points to be exhausted before advancing to the 4th phase.
Green Bomb: Vorago will spawn a special and highly unstable bomb. Note that Vorago will spawn multiple green bombs depending on the party size. In order to survive, the players must pass the green bomb from one person to another. Doing so will cause 1,000 damage. However, if a player holds the green bomb for too long, or passes it to another player who has already had the bomb during the spawn cycle, they will be hit for 10,000 unblockable damage. This phase requires Vorago's Life Points to be exhausted before advancing to the 4th phase.
Team Split: This phase only has one new special attack that is added along with the attacks from phase 2. Vorago will color players red or green and will create a red and green box, both with 2x2 dimensions. Players will then have approximately 10 seconds to get within the box of their color or will suffer upwards of 9,000 unblockable damage. Note that you aren't guaranteed to be the same color if Vorago performs this attack more than once. This phase requires Vorago's Life Points to be exhausted before advancing to the 4th phase.
Phase 4:
As soon as this phase starts, Vorago will begin to charge up an attack capable of hitting up to 10,000 if you fail to avoid it. This is done by hiding behind the waterfall in one corner of the room before he unleashes the attack. After the fire attack, Vorago will choose a random player to create a stone clone of. This clone is identical to the player in terms of stats and can use abilities capable of hitting over 2,000.
Only the cloned player can damage it and while any clones are alive, the damage dealt to Vorago is reduced to 1/10th. Once again, your team must use the provoke rotation to distribute Vorago's damage during this phase. When he has used his fire attack three times, you will be able to damage him enough to free the Ancient weapon handle for the maul, after which Vorago will smash through the floor for a final time.
Phase 5:
The final phase is perhaps the simplest phase assuming the majority of your team has survived. The objective is to finally kill Vorago by lowering his Life points to the point at which the holder of the Maul of Omens can deal the final blow. (Note: This phase is tailored to how many people started the fight, so if you've suffered heavy losses during the previous phases, then Vorago will over power your team and INSTA-KILL everyone). Every now and then, Vorago will siphon (watch out for the warning message), so to be sure to stop attacking him then or risk killing a member of your team.
At the very end of the fight with Vorago on his last remaining LP, you will receive a notification telling you to use the Maul of omens. Whoever has the Maul must left click on it in their inventory to finish him off and a cutscene in which Vorago is finally defeated will follow! Afterward a red orb appears and you can take your loot and leave via the portal.
Seismic and Tectonic Equipment:
Vorago's most prized drops are the Seismic wand and Seismic singularity. However, he also drops Tectonic energy which is used to make the most powerful magic armor available.
| Tectonic | ||||
| Name | Image | Bonuses | ||
| Magic Bonus | Armor Bonus | Prayer Bonus | ||
| Tectonic mask |  |
23 | 435 | 2 |
| Tectonic robe top |  |
34 | 500 | 3 |
| Tectonic robe bottom |  |
29 | 479 | 2 |
| Complete set | 86 | 1414 | 7 | |
| Seismic Weapons | |||
| Name | Image | Bonuses | |
| Damage | Accuracy | ||
| Seismic wand |  |
0 | 2458 |
| Seismic singularity |  |
0 | 2458 |
This Special Report was written by Javezz. Thanks to Bob for corrections.
This Special Report was entered into the database on Wed, Jul 31, 2013, at 04:55:05 PM by Javezz, and it was last updated on Thu, Feb 26, 2015, at 07:20:00 PM by Javezz.
If anything is incorrect or missing, or if you have any new information to submit to this database, please submit it to us on our Content Submissions Forums.
If you see this guide on any other site, please report it to us so we can take legal action against anyone found stealing our content. This guide is copyrighted by RuneHQ, and its use on other sites is expressly forbidden. Do not ask if you can use our guides or images, the answer is and always will be NO!
Print this page with images - Back to the Special Report Index Page - Back to Top
