

Table of Contents:
- Requirements
- Location
- Getting Started
- Basic Information
- Animals and How to Obtain Them
- Caring for the Animals
- Resources and Potions
- Farmers' Market
- Achievement Tasks
Before you are able to take part in any activities on the Ranch, you must meet the following requirements:
- 42 Farming
- 45 Construction
- Have 100 beans (the currency of Player-Owned Farms)
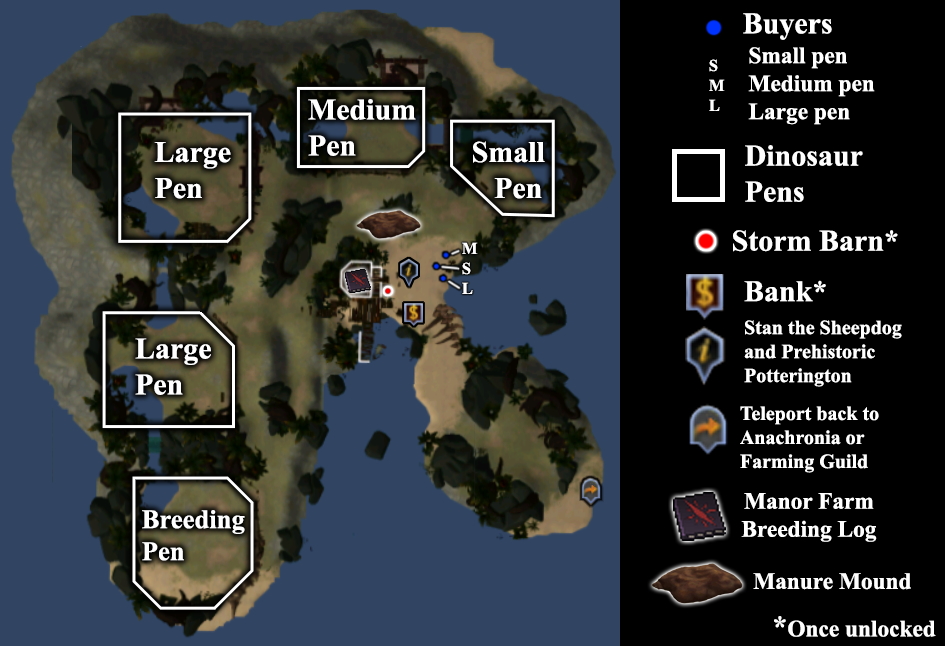
The Ranch Out of Time is on an island just off the coast of Anachronia. There are two ways to reach the Ranch Out of Time. The first is to walk from the Anachronia Base Camp to the mystical tree by the Aquatic jadinkos and using that mystical tree to teleport to the Ranch. The other is to walk into the Farming Guild, walk up the stairs, and then walk out onto the North balcony to the use the mystical tree located there. Taking either of these routes will put you on the Southeast corner of the Ranch's island. Walk Northwest to find Prehistoric Potterington and the rest of the Ranch.
You will not be able to start raising ranch animals until you have purchased deeds for at least 1 pen. To do this, right click Prehistoric Potterington and choose "Farmers' Market." In the tab labeled "Farm Upgrades" you will find the deeds for all the the Ranch's pens. In order to build any pens on the Ranch you must meet the required Farming and Construction levels in addition to having the resources to build them (see our Anachronia Base Camp guide for information on resources). Building each pen yields Construction. All this information is laid out in the table below.
Note that even though Granny Potterington gives you access to the Farmers' Market, she doesn't have the deeds for anything on the Ranch, so you must do this part on the Ranch proper by talking to Prehistoric Potterington instead.
| Paddock/Pen | Required Levels | Deed Cost | Resources Needed | Construction Experience |
Maximum # of Animals |
| Small Dinosaur Paddock |
|
100 beans | 1,000  Wood Wood1,000  Vines Vines1,000  Stone Stone |
3,000 | 6 |
| Medium Dinosaur Paddock |
|
500 beans | 25,000 Wood 25,000 Vines25,000 Stone |
4,000 | 4 |
| Large Dinosaur Paddock I |
|
1,000 beans | 75,000 Wood 75,000 Vines75,000 Stone |
5,000 | 3 |
| Large Dinosaur Paddock II |
|
1,000 beans | 75,000 Wood 75,000 Vines75,000 Stone |
5,000 | 3 |
| Breeding Pen | 55 Construction | 1,000 beans | 100,000 Wood 100,000 Vines100,000 Stone |
5,000 | 4 |
Just like at Player-Owned Farms, animals can only be sold on the Grand Exchange and will stack in the bank if they are unchecked. Once you have checked the animal, it will take up its own slot within your bank and, while it cannot be sold on the Grand Exchange, it can be traded with players around you.
Clicking on either a paddock gate or an animal will open the animal interface. Within this new window there are several bits of information. At the very top in capital yellow letters you will see your animal's name. Clicking an arrow to either side of the window will enable you to scroll through all the animals in that pen. See the list below for more about the various information on the interface.
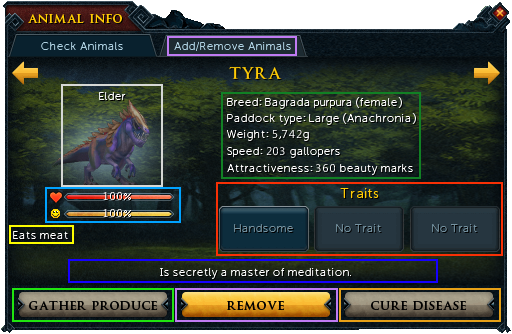
- Purple - The second tab along the top will change the interface so that you can add and remove animals to the paddock without closing the window. Using the "Remove" button at the bottom of this interface will always close the window and place the animal in your inventory.
- Silver - This area provides a view of the animal in question and informs you of its age above it.
- Dark Green - Here you will find several bits of information including what breed it is and which pen it belongs in. You will also see their Weight, Speed, and Attractiveness ratings. As of now, these stats do not matter. In the future there may be contests where animals are graded on these stats.
- Light Blue - These bars inform you of the animal's Health and Happiness. Keeping these at higher levels increases the likelihood of the animal breeding.
- Yellow - This tells you what types of food your animal will eat.
- Red - traits are shown here. Clicking on one of them will give you a description of the trait.
- Dark Blue - This is a random description added to each pet. It is just here for amusement.
- Light Green - At each new Growth stage this button will become bright yellow. Clicking it will allow you to earn experience and (usually) gather resources from that animal.
- Orange - When bright yellow, your pet will have an Illness. Clicking on it will enable you to check your animal's symptoms and cure it.
Animals and How to Obtain Them
At the Ranch Out of Time there are a total of 14 different species which you can obtain, raise, and sell. Each species has several different breeds, ranging from only 4 to 11 different ones. The table below explains where to find each of the different species' breeds as well as the Farming level required to check and raise them.
| Breed | Obtaining | Pen Size |
| Frog - 42 Farming | ||
| Common green frog (Checked / Unchecked) |
Bought from the Farmers' Market | Small |
| Golden poison frog | Breeding Only | |
| Phantasmal poison frog | ||
| Sky-blue poison frog | ||
| Cactoad* | ||
| Jadinkos - 76 Farming | ||
| Amphibious Jadinkos (Checked / Unchecked) |
Found while hunting Amphibious jadinkos; autoloots to inventory | Medium |
| Aquatic Jadinkos (Checked / Unchecked) |
Found while hunting Aquatic jadinkos; autoloots to inventory | |
| Camouflaged Jadinkos (Checked / Unchecked) |
Found while hunting Camouflaged jadinkos; autoloots to inventory | |
| Cannibal Jadinkos (Checked / Unchecked) |
Found while hunting Cannibal jadinkos; autoloots to inventory | |
| Carrion Jadinkos (Checked / Unchecked) |
Found while hunting Carrion jadinkos; autoloots to inventory | |
| Common Jadinkos (Checked / Unchecked) |
Found while hunting Common jadinkos; autoloots to inventory | |
| Diseased Jadinkos (Checked / Unchecked) |
Found while hunting Diseased jadinkos; autoloots to inventory | |
| Draconic Jadinkos (Checked / Unchecked) |
Found while hunting Draconic jadinkos; autoloots to inventory | |
| Igneous Jadinkos (Checked / Unchecked) |
Found while hunting Igneous jadinkos; autoloots to inventory | |
| Shadow Jadinkos (Checked / Unchecked) |
Found while hunting Shadow jadinkos; autoloots to inventory | |
| Luminous Jadinkos* | Breeding Only | |
| Varanusaur - 97 Farming | ||
| Feral Dinosaur (Checked / Unchecked) |
Found while slaying Feral dinosaurs; chance to obtain from Irwinsson's Hunter Mark Shop's Dinosaur Egg option (80 hunter marks) | Medium |
| Ripper Dinosaur (Checked / Unchecked) |
Found while slaying Ripper dinosaurs; chance to obtain from Irwinsson's Hunter Mark Shop's Dinosaur Egg option (80 hunter marks) | |
| Venomous Dinosaur (Checked / Unchecked) |
Found while slaying Venomous dinosaurs; chance to obtain from Irwinsson's Hunter Mark Shop's Dinosaur Egg option (80 hunter marks) | |
| Hypnotic Dinosaur* | Breeding Only | |
| Arcane Apoterrasaur - 98 Farming | ||
| Arcane Apoterrasaur (Checked / Unchecked) |
Found while skinning Arcane apoterrasaurs (autoloots to inventory); chance to obtain from Irwinsson's Hunter Mark Shop's Dinosaur Egg option (80 hunter marks) | Large |
| Arcane apoterrasaur iratum | Breeding Only | |
| Arcane apoterrasaur natura | ||
| Arcane Apoterrasaur Lucidum* | ||
| Brutish Dinosaur - 100 Farming | ||
| Brutish Dinosaur (Checked / Unchecked) |
Found while slaying Brutish dinosaurs; chance to obtain from Irwinsson's Hunter Mark Shop's Dinosaur Egg option (80 hunter marks) | Large |
| Beach dinosaur | Breeding Only | |
| Forest dinosaur | ||
| Magnificent Dinosaur* | ||
| Salamanders - 102 Farming | ||
| Green Salamander (Checked / Unchecked) |
Purchased from Farmers' Market. Found while Hunting salamanders; autoloots to inventory | Small |
| Black salamander | Breeding Only | |
| Orange salamander | ||
| Red salamander | ||
| Wytchfire Salamander* | ||
| Scimitops - 104 Farming | ||
| Scimitops (Checked / Unchecked) |
Found while skinning Scimitops (autoloots to inventory); chance to obtain from Irwinsson's Hunter Mark Shop's Dinosaur Egg option (80 hunter marks) | Large |
| Scimitops blavum | Breeding Only | |
| Scimitops palus | ||
| Scimitops Lucidum* | ||
| Bagrada Rex - 106 Farming | ||
| Bagrada Rex (Checked / Unchecked) |
Found while skinning Bagrada rex (autoloots to inventory); chance to obtain from Irwinsson's Hunter Mark Shop's Dinosaur Egg option (80 hunter marks) | Large |
| Bagrada nemus | Breeding Only | |
| Bagrada purpura | ||
| Bagrada Lucidum* | ||
| Spicati Apoterrasaur - 108 Farming | ||
| Spicati Apoterrasaur (Checked / Unchecked) |
Found while skinning Spicati apoterrasaur (autoloots to inventory); chance to obtain from Irwinsson's Hunter Mark Shop's Dinosaur Egg option (80 hunter marks) | Large |
| Spicati apoterrasaur purpura | Breeding Only | |
| Spicati apoterrasaur tilia | ||
| Spicati Apoterrasaur Lucidum* | ||
| Asciatops - 110 Farming | ||
| Asciatops (Checked / Unchecked) |
Found while skinning Asciatops (autoloots to inventory); chance to obtain from Irwinsson's Hunter Mark Shop's Dinosaur Egg option (80 hunter marks) | Large |
| Asciatops acta | Breeding Only | |
| Asciatops aurum | ||
| Asciatops Lucidum* | ||
| Corbicula Rex - 112 Farming | ||
| Corbicula Rex (Checked / Unchecked) |
Found while skinning Corbicula rex (autoloots to inventory); chance to obtain from Irwinsson's Hunter Mark Shop's Dinosaur Egg option (80 hunter marks) | Large |
| Corbicula gelum | Breeding Only | |
| Corbicula malum | ||
| Corbicula Lucidum* | ||
| Oculi Apoterrasaur - 115 Farming | ||
| Oculi Apoterrasaur (Checked / Unchecked) |
Found while skinning Oculi apoterrasaur (autoloots to inventory); chance to obtain from Irwinsson's Hunter Mark Shop's Dinosaur Egg option (80 hunter marks) | Large |
| Oculi apoterrasaur glacies | Breeding Only | |
| Oculi apoterrasaur oceanum | ||
| Oculi Apoterrasaur Lucidum* | ||
| Malletops - 117 Farming | ||
| Malletops (Checked / Unchecked) |
Found while skinning Malletops (autoloots to inventory); chance to obtain from Irwinsson's Hunter Mark Shop's Dinosaur Egg option (80 hunter marks) | Large |
| Malletops palus | Breeding Only | |
| Malletops purpura | ||
| Malletops Lucidum* | ||
| Pavosaurus Rex - 118 Farming | ||
| Pavosaurus Rex (Checked / Unchecked) |
Found while skinning Pavosaurus rex (autoloots to inventory); chance to obtain from Irwinsson's Hunter Mark Shop's Dinosaur Egg option (80 hunter marks) | Large |
| Pavosaurus desertum | Breeding Only | |
| Pavosaurus nemus | ||
| Pavosaurus Lucidum* | ||
Caring for the Animals
Now that you know where to obtain all of the animals for your Ranch, let us now go over how to take care of them all.
Animals on the Ranch will each progress from egg to elder. The amount of time between ages, and the amount of Farming experience gained at each threshold, varies by species. Note that if you miss gathering experience and resources for one of the growing stages, you will still obtain it when you gather at the next one. For example, if you put an Asciatops egg in a pen and do not check it until it is an adolescent, you will receive both the 12,500 and 18,000 Farming experience, as well as 130 Spark chitin as appropriate, when you gather the produce.
Also be aware that the experience value will alter depending upon the animal's Health and Happiness as well as boosts. The example above would only be correct under the condition that the asciatops' Health and Happiness were both at 100%! The values for experience below are assuming that your animal is both 100% Happy AND Healthy and you do not have any boosts active. A sick animal with 0% Health and Happiness will only provide 10% of the harvesting experience. Please see the Health and Happiness section below for how to improve your animal's stats.
| Animal | Egg to Baby | Baby to Adolescent | Adolescent to Adult |
Adult to Elder | Egg to Breedable | Egg to Elder | |||||||
| Time | XP | Time | XP | Time | XP | Time | XP | Time | XP | Time | XP | ||
| Frog | 1h 12m |
500 | 1h 48m |
750 | 3h 36m |
1,500 | 5h 24m |
2,250 | 6h 36m |
2,750 | 12h | 5,000 | |
| Salamander | 8h | 3,000 | 12h | 4,500 | 1d | 9,000 | 1d 12h |
13,500 | 1d 20h |
16,500 | 3d 8h |
30,000 | |
| Jadinko | 6h 48m |
3,000 | 10h 12m |
4,500 | 20h 24m |
9,000 | 1d 6h 36m |
13,500 | 1d 13h 24m |
16,500 | 2d 20h |
30,000 | |
| Varanusaur | 11h | 5,500 | 16h 30m |
8,250 | 1d 9h |
16,500 | 2d 1h 30m |
24,750 | 2d 12h 30m |
30,250 | 4d 14h |
55,000 | |
| Brutish Dinosaur |
18h | 11,000 | 1d 3h |
16,500 | 2d 6h |
33,000 | 3d 9h |
49,500 | 4d 3h |
60,500 | 7d 12h |
110,000 | |
| Arcane Apoterrasaur |
17h 31m* |
10,500 | 1d 2h 16m* |
15,750 | 2d 4h 32m* |
31,500 | 3d 6h 48m* |
47,250 | 4d 3m* |
57,750 | 7d 6h 51m* |
105,000 | |
| Scimitops | 19h | 12,500 | 1d 4h 30m |
18,000 | 2d 9h |
35,500 | 3d 13h 30m |
54,000 | 4d 8h 30m |
66,000 | 7d 22h | 120,000 | |
| Bagrada Rex |
19h 31m* |
12,500 | 1d 5h 16m* |
18,750 | 2d 10h 32m* |
37,500 | 3d 15h 48m* |
56,250 | 4d 11h 19m* |
68,750 | 8d 3h 7m* |
125,000 | |
| Spicati Apoterrasaur |
20h | 13,000 | 1d 6h |
19,500 | 2d 12h |
39,000 | 3d 18h |
58,500 | 4d 14h |
71,500 | 8d 8h |
130,000 | |
| Asciatops | 21h 30m* |
14,000 | 1d 8h 11m* |
21,000 | 2d 16h 32m* |
42,000 | 4d 47m* |
63,000 | 4d 22h 12m* |
77,000 | 8d 23h* |
140,000 | |
| Corbicula Rex |
21h 46m* |
15,000 | 1d 8h 39m* |
22,500 | 2d 17h 17m* |
45,000 | 4d 1h 55m* |
67,500 | 4d 23h 39m* |
82,500 | 9d 1h 35m* |
150,000 | |
| Oculi Apoterrasaur |
1d | 16,100 | 1d 12h |
24,150 | 3d | 48,300 | 4d 12h |
74,250 | 5d 12h |
88,550 | 8d | 162,800 | |
| Malletops | 1d 1h |
17,500 | 1d 13h 30m |
26,250 | 3d 3h |
52,500 | 4d 16h 30m |
78,750 | 5d 17h 30m |
86,250 | 10d 10h |
165,000 | |
| Pavosaurus Rex |
1d 2h 31m* |
19,000 | 1d 15h 46m* |
28,500 | 3d 7h 32m* |
57,000 | 4d 23h 18m* |
85,500 | 6d 2h 47m* |
104,500 | 11d 2h 5m* |
190,000 | |
Opening an animal's interface will present you with two percentage bars just below their image. These bars let you know how happy and how healthy your animal is. Keeping these at higher levels increases the likelihood of the animal breeding and the amount of experience received when harvesting produce from them. These bars are affected a few different ways: Honey and Milk, Food, and Illness.
Though they are not obtained the same way, how you use these items and the functions they perform are similar. To use them on your animals, you do not need to step into the pen with them, just use the item on the specific animal. This will increase the appropriate stat(s) and consume the item. Note that diseased animals and eggs will refuse to eat these items. For more information on these resources, view the appropriate section of our Player-Owned Farms special report.
When you have animals in a pen you will need to add food to the trough for them to eat. If they are given the proper food, animals will heal slightly and become a little bit happier each time. In turn, failing to feed them will cause these stats to lower and for them to potentially become sick. Animals consume different amounts of food based on their pen size (see the table below).
| Small Pens | Medium Pens | Large Pens | |||
| Animal | Food Consumption Rate | Animal | Food Consumption Rate | Animal | Food Consumption Rate |
| Frogs | 1 food every 18 minutes | Jadinko | 3 food every 36 minutes (Averaging 1 food every 12 minutes) |
Brutish Dinos | 6 food every 54 minutes (Averaging 1 food every 9 minutes) |
| Apoterrasaurs | |||||
| Salamanders | Varanusaurs | 'Tops | |||
| Rexes | |||||
Each trough can hold a maximum of 1,000 pieces of food. These can be added noted or unnoted and from inside or outside of the pen. Clicking the trough will give you the option to select how much you wish to deposit. Adding food to a trough will automatically turn it to mush. As a result, you will not be able to reclaim any food put into them, but you can withdraw the mush created. Each animal will eat at least 1 type of mush. You can see these foods listed on the interface below the Health and Happiness bars. Or you can see the table below for which types they eat.
| Animal | Flowers | Insects | Meat | Seeds |
| Frog | X | |||
| Salamander | X | X | X | |
| Jadinko | X | |||
| Varanusaur | X | |||
| Brutish Dinosaur | X | |||
| Apoterrasaur | X | |||
| 'Tops | X | |||
| Rex | X |
Where to Obtain Food
- Flowers
- Woad leaves are arguably the only flower worth using as food on the Ranch or at Player-Owned Farms. They can be bought in any quantity from Wyson the gardener in Falador for 25 Coins each.
- It is worth mentioning that several flowers are used to make honeycomb varieties that improve the stats of an animal. See the appropriate section of our Player-Owned Farms guide for more information.
- Insects
- Pet shops are the best place to obtain two items that can be turned into buggy mush: Beetle bits and Flies. None of the items stack, but they are fairly cheap from the store (expensive from the Grand Exchange, but doable if you have the coins to spare). Because the stock of the pet stores is independent by player, it is recommended to buy all of your insects from the pet shop in Yanille, the pet shop closest to a bank. To speed this process up, you can use a BoB familiar, even a Pack yak and make use of its Winter storage ability.
- Players with 103 Farming can plant Stinkshroom spore in a mushroom patch to harvest later. A fully grown patch yields 40 Stinkflies. Unlike the Beetle bits and Flies sold in pet stores, Stinkflies stack in your inventory.
- Seeds
- Barberry seeds can be bought relatively cheaply (typically less than 50 Coins each) on the Grand Exchange.
- When harvesting Arc berries from the patch on Tuai Leit, it is typical to receive 6 to 10 seeds of the berries that were harvested.
- Seeds can also be collected in large batches from your Kingdom, however, this takes a bit of time and it is of better value to sell other collected products and purchase seeds outright.
- Pickpocketing Master farmers - just West of the Manor grounds or within Draynor Village market - is a quick easy way to get a handful of various seeds as well.
- Meat - must be raw
- It is important to note that while many of the species you can raise eat meat, this doesn't include fish! None of the ranch animals will eat fish.
- Cows can be slaughtered North East of Lumbridge or West of the Crafting Guild for quick collection.
- Grizzly bears can be found in the East Ardougne Mine near the Player-Owned Farms location allowing for quick slaughter and collection.
- After completion of As a First Resort, you can buy several raw meats from Chargurr; including 6 Raw bird meat packs that contain 50 pieces each.
Like animals encountered in the real world, animals in your Ranch Out of Time can become sick. Thankfully, treating your animals in Gielinor is far more simple. You will know that your animal is sick because the "Cure disease" button at the bottom right of their interface will become yellow and allow you to click it. If you have unlocked the status icons upgrade from the Farmers' Market, sick animals will have a skull icon above them in the pen.
This will open a new interface which will allow you to check various parts of your animal and to administer treatment when you have discovered its ailment - you do not need any special items to treat your animals. Some illnesses have similar symptoms, so be sure to check each body section. Thankfully, an animal cannot die due to their illness; but their health and happiness do lower as a result of it and they will not breed. Curing the animal will earn you Farming experience based on the animal and its age: 5% of its harvesting experience (meaning eggs cannot get sick) for the stage, or 1% if it is an elder. For exact experience, see the table below.
| Animal | Baby | Adolescent | Adult | Elder |
| Frog | 25 | 37.5 | 75 | 222.5 |
| Salamander | 150 | 225 | 450 | 135 |
| Jadinko | 150 | 225 | 450 | 135 |
| Varanusaur | 275 | 412.5 | 825 | 247.5 |
| Brutish Dinosaur |
550 | 825 | 1,650 | 495 |
| Arcane Apoterrasaur |
10,500 | 525 | 1,575 | 472.5 |
| Scimitops | 625 | 900 | 1,775 | 540 |
| Bagrada Rex |
625 | 937.5 | 1,875 | 562.5 |
| Spicati Apoterrasaur |
650 | 975 | 1,950 | 585 |
| Asciatops | 700 | 1,050 | 2,100 | 630 |
| Corbicula Rex |
750 | 1,125 | 2,250 | 675 |
| Oculi Apoterrasaur |
805 | 1,207.5 | 2,415 | 742.5 |
| Malletops | 875 | 1,312.5 | 2,625 | 787.5 |
| Pavosaurus Rex |
950 | 1,425 | 2,850 | 855 |
If you administer the wrong treatment, the animal's health and happiness will drop. You will then be presented with the examining options again and your animal will have rerolled their symptoms. Despite displaying new symptoms, the illness will not have changed.
Most of the time animals will randomly become sick on their own, but it is possible to make your animals sick by failing to feed them. This comes in handy because in order to complete the "Animal Whisperer" task, you will need to cure 100 animals of their ailments. Animals with the Sickly trait, for example, are also more likely to fall ill.
| Bone Rattle | Curse | ||
|
Head |
|
|
|
Eyes |
|
|
|
Legs & Feet |
|
|
|
Stomach |
|
|
| Dry Nose | Flu | ||
|
Head |
|
|
|
Eyes |
|
|
|
Legs & Feet |
|
|
|
Stomach |
|
|
| Foot-in-Mouth | Wooting Cough | ||
|
Head |
|
|
|
Eyes |
|
|
|
Legs & Feet |
|
|
|
Stomach |
|
|
On each of the pens you have the ability to add a Farm totem, purchased from the Farmers' Market (200 Beans). But what do those do? When an elder of any given species is placed into a pen with a totem attached to it, you will enable its tier 1 perk. Placing a second elder of the same species within your other pen and adding a Farm totem to it will enable the tier 2 perk. See the table below for what species can enable what perks.
| Animal | Perk Name | Tier 1 Perk | Tier 2 Perk |
| Small Pen | |||
| Frog | Flycatcher | Yield from harvesting Stinkshroom is doubled. | |
| Salamander | La la la la | XP gained from catching salamanders is increased by 5%. | |
| Medium Pen | |||
| Jadinko | The Old Black Magic | The duration of juju potions you consume is increased by 30 seconds. | |
| Varanusaur | Envenomed | When mixing weapon poison or antipoison potions, there is a 10% chance that you will make 4 doses instead of 3. | |
| Large Pens | |||
| Brutish Dinosaur | Stubborn | The healing from Regenerate is increased by 50%. | The healing from Regenerate is increased by 100%. |
| Arcane Apoterrasaur | Arcane Elements | When crafting elemental runes, you will craft an additional rune per essense. | When crafting elemental runes, you will craft an additional 2 runes per essense. |
| Scimitops | Living Mountain | Your chance of finding Geodes while Mining is increased by 1%. | Your chance of finding Geodes while Mining is increased by 2%. |
| Bagrada Rex | King of Beasts | Provides a 5% chance of not consuming a bomb when thrown. | Provides a 10% chance of not consuming a bomb when thrown. |
| Spicati Apoterrasaur | Butterfly Effect | Provides a chance to spawn a Guthixian butterfly when harvesting produce from animals adolescent or older. | Provides a chance to spawn a Guthixian butterfly when harvesting produce from animals adolescent or older. |
| Asciatops | Powerful Beast | Increases your chance to score a critical hit while Mining by 3% | Increases your chance to score a critical hit while Mining by 6% |
| Corbicula Rex | No Fear | Increases the chance of scoring a critical hit with the Meteor Strike ability by 20%. | Increases the chance of scoring a critical hit with the Meteor Strike ability by 40%. |
| Oculi Apoterrasaur | Steak Out | When skinning a Big Game Hunter dinosaur, you have a 3% chance of receiving an additional piece of meat. | When skinning a Big Game Hunter dinosaur, you have a 5% chance of receiving an additional piece of meat. |
| Malletops | Armoured Hide | Increases the duration of the Barricade ability by 1.8 seconds. | Increases the duration of the Barricade ability by 3.6 seconds. |
| Pavosaurus Rex | Rep-tile | Any Farming Guild reputation you earn is increased by 5%. | Any Farming Guild reputation you earn is increased by 10%. |
Now that you have your first few animals and you've raised them to adulthood, you can begin the arduous task of having them reproduce. Note that only Adults and Elders can breed and the breed type do not have to match to produce offspring, only the species type - ie breeding a Phantasmal poison frog with a Golden poison frog will work. When you first start working on the Ranch, your animals will only be able to breed in the breeding pen, and only after you have constructed it. You can make it possible for the animals to breed in the other pens by unlocking that ability from the Farmers' Market.
To make sure your animals are capable of breeding, be sure you have at least 1 male and 1 female of your chosen species in the pen, ensure they are fully healthy and happy, have food in their trough, are not diseased, are adults or elders, and then proceed to wait. After a certain amount of time, they will produce offspring. It is suggested to promptly move it to a normal pen to grow if you were breeding them in the breeding pen. This is because the pen can only fit 4 animals in it. Once there are 4 in the pen, no more babies can be bred.
Unlike the breeding pen, the normal pens also do not have "Failure Mitigation". This is where after 5 failed breeding attempts are made, you are guaranteed to have your animals breed. You can increase your chances of breeding by enabling the tier 1 or tier 2 Rabbit perk on your Farmers' Market and by using animals with the Studly and/or Virile traits.
Be aware that placing 2 animals of the same sex within a breedable pen may still "produce" offspring. In this situation, the animals will "have decided to raise a child together and have adopted a baby". It is not SUPER common to occur, but it is still possible. This method of "breeding" is not affected by the failure mitigation mechanic.
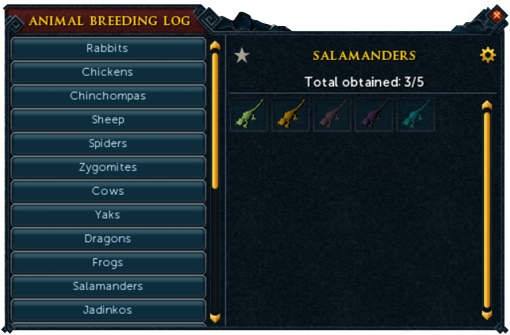
It is possible to keep track of which animal breeds you have produced in 2 ways. Firstly, you can view the breeding log by clicking on the dog next to Prehistoric Potterington (Stan the sheepdog), or you can pick up a copy of the Manor Farm breeding log from the table just inside the Manor farm. Depending on your settings, adjusted via the cog in the top right of the window, you can click on any of the animal breeds and announce if you have or have not managed to breed it. All animals bred will appear vividly colored, while unbred ones will be faded out.
When you obtain a "shiny" breed of an animal, you will need to wait until it is an adolescent before you can see the difference within the pen and animal interface. While a lot of ranch animal breeds can only be obtained through breeding, all of the shiny breeds fall into this category. In the breeds and species table, the shiny breeds are noted with an *. If the animal is in your bank, inventory, or a trade window, it will look like a normal animal of that species, but you will see "Shiny!" written just below the sex if you hover over it. Note that using a shiny animal to breed will not increase your chances of obtaining another shiny animal! You will still need the appropriate traits to increase your chances.
As seen on the interface, every animal has between 1 and 3 traits. These traits actively influence actions of your animal. For example, animals with the Sickly trait get sick more often than most animals. See the table below for the various traits and what they do.
| Trait | Descirption | Information |
| Big boned | This animal puts on weigh more easily. | Will weigh more than most |
| Butterface | A fantastic physical specimen, just not much to look at. | Additional Weight and Speed, Reduced Attractiveness |
| Chatty | This animal won't be quiet. | No purpose |
| Charmed | This animal is happier and healthier than other animals | More Health & Happiness than others |
| Constipated | This animal never produces dung. | You will never have reason to muck out this animal's pen |
| Curvy | This big-boned beauty will win many competitions, just not a race. | Additional Weight and Attractiveness, Reduced Speed |
| Enigmatic | You're not sure what this trait does. If, indeed, it does anything. | Effects (if any) are not yet known |
| Exalted | This animal is so special it awards more XP on harvesting. | Can only be be in the 3rd slot |
| Fearless | Why are you running? Dogs aren't dangerous. | No purpose |
| Fortunate | This animal is considered very special and farmers will pay more beans for it. | Can only be be in the 3rd slot - earns you 10% more beans when sold |
| Freak of Nature | This creature is a medical marvel. Curing it is worthwhile. | Gain more experience than normal for curing this animal |
| Fussy Eater | This animal puts on less weight. | Lower weight than most animals |
| Genetic Inferiority | Offspring of this animal are less likely to have multiple traits. | Reduces chance to produce offspring with multiple traits |
| Genetic Instability | The unusual genetics in this animal means its offspring are more likely to have multiple traits. | Greatly improves chance to produce offspring with multiple traits |
| Genetic Mutation | The unusual nature of this animal means its offspring are more likely to have multiple traits. | Improves chance to produce offspring with multiple traits |
| Genius | This animal is super smart. | No Purpose |
| Giver | This animal awards more XP when harvested. | Gain 3% more experience when gathering produce from animals |
| Glistening | This animal is more likely to produce shiny offspring. | Increases the chances to produce a "shiny" breed baby by 6% |
| Golden Gift | There are no golden eggs, but this creature will occasionally pass...'nuggets'. Wash hands after handling. | Obtain a few pieces of gold in addition to produce when harvesting |
| Good Breeding | This animal carries some rare breed ancestry in its genetics. | Increases the chance the offspring will be a different breed |
| Handsome | This animal is better looking than most others. | Increased Attractiveness |
| Hyperactive | This animal is faster than most others. | Increased Speed |
| Immune | This animal is practically immune to disease. | Any time this animal isn't sick, its health will default to 100% |
| Insane | This animal thinks it's a biscuit. We have no idea why. | No purpose |
| Jovial | This animal always sees the glass as half full. | Any time this animal isn't sick, its happiness will default to 50% |
| Joyful | This animal is almost always happy. | Any time this animal isn't sick, its happiness will default to 100% |
| Limited Efficiency | Harvesting this animal will award more materials, but at the cost of lower XP and bean value. | -2% beans when sold - Decreased experience gained when harvesting, but extra produce obtained |
| Lithe | Fast and beautiful, but not terribly sturdy. | Additional Speed and Attractiveness, Reduced Weight |
| Lucky | This animal is worth more beans when sold. | +2% beans when sold |
| Mysterious | Does something mysterious.... or nothing, but if nothing it does so mysteriously. | Effects(if any) are not yet known |
| Nice but Dim | Generous with XP, but less popular with farmers and is not so good with materials on harvesting. | -10% beans when sold - Decreased produce obtained when harvesting, but extra experience gained |
| Nightmare | Kill it with fire! | Greatly reduced Attractiveness |
| Old at Heart | This animal ages faster than most others. | Ages 5% faster than normal |
| Perfected | This animal is a perfect example of its breed. | Increased Weight, Speed, and Attractiveness |
| Plain | This animal is not as attractive as some of the other animals. | Reduced Attractiveness |
| Prize Specimen | A shining example of what this breed is capable of. | Greatly increased Weight, Speed, and Attractiveness |
| Producer | This animal awards more materials when harvested. | Possibility of gaining more produce when harvesting |
| Radiant | This animal is practically shining. | Greatly increases the chances to produce a "shiny" breed baby by 10% - Slot 3 trait only |
| Ravensworn | This animal knows the secret handshake and has knowledge of the deeper mystery that is the Ravensworn. It won't share. | Requires Ravensworn title to occur. Unlike at Player-Owned Farms, breeding dinosaurs with this trait does not unlock any achievements. |
| Regular | This animal produces dung regularly. | Increased amount of manure production |
| Robust | This animal is more resistant to disease. | Any time this animal isn't sick, its health will default to 50% |
| Sickly | This animal gets sick more easily. | Decreased Health |
| Slowpoke | This animal is slower than most others. | Decreased Speed |
| Smelly | This animal smells really bad. | Decreased Attractiveness |
| Sparkling | There's something almost 'shiny' about this animal. | Increases the chances to produce a "shiny" breed baby by 4% - Best combined with Glistening and/or Radiant |
| Stingy | This animal isn't as generous with harvested materials. | Possibility of gaining less produce when harvesting |
| Stressed | This animal suffers from 'performance anxiety'. | Decreased chances to Breed successfully |
| Strong Genes | This animal is more likely to produce offspring of the same breed. | Increases the chance the offspring will be the same breed |
| Studly | This animal has a much higher breeding chance than other animals. | Greatly increases chances to Breed successfully |
| Sullen | This animal always sees the glass as half empty. | Greatly decreased Happiness |
| Surly | This animal is unpleasant and so worth fewer beans. | -5% beans when sold |
| Taker | This animal isn't as generous with harvested XP. | 3% less experience when gathering produce from animals |
| Unlucky for Some | Other farmers will happily purchase this animal, but it's not so good for you for XP or materials. | +5% beans when sold - Decreased produce and experience when harvested |
| Virile | This animal has a higher breeding chance than some others. | Increases chances to Breed successfully |
| Whimsical | You're not sure what this trait does. If, indeed, it does anything. | No purpose |
| Young at Heart | This animal ages much slower than most others. | Ages 5% slower than normal |
When breeding, the most helpful traits include the following...
- Shiny, Glistening, and Radiant - Increase your chances of producing a "Shiny" breed. Note that the chances stack so having 1 of each will give you a 10% increase.
- Good Breeding - Increased chance of producing different breeds.
- Genetic Instability and Genetic Mutation - Increased chances offspring will have multiple traits.
- Studly and Virile - Increased chances of breeding.
- Charmed, Immune, Jovial, Joyful, and Robust - Increased Health and/or Happiness
After completing the breeding log, one of the most efficient trait setups for attaining beans and produce consistently would be a breeding pair where both have the Immune and Joyful traits (to maximize experience and harvest output), and then picking traits like Nice but Dim or Producer traits on them depending on what the player is most looking to gain from the pair. Because the odds of the offspring having a trait from the parents is high, these benefits will generally pass onto the offspring to maximize your gains. As an added benefit of the Jovial and Immune traits, the odds of the animal getting sick despite having no food drop significantly, and they will continue to produce offspring at a normal rate as long as they remain healthy.
As mentioned before, the breeding pen has a failure mitigation mechanic. This guarantees that you will have to wait no more than 5 breeding cycles before you will obtain an offspring, assuming there is space within the breeding pen. Each species' breeding cycle lasts a different amount of time. Thus you could be waiting 5 minutes for a baby or up to a week. Once you have purchased the ability to have animals breed outside the breeding pen it is still suggested that you use it. In addition to being another place where the animals can breed, they are 5 times less likely to successfully breed a baby in any other pen, their breeding cycle functions as 5 times longer in other pens, and the failure mitigation mechanic does not apply to the other pens. The table below displays the data for breeding within the breeding pen.
| Species | Breeding Cycle | Maximum Breeding Time |
| Frog | 3 hours 20 minutes |
16 hours 40 minutes |
| Salamander | 16 hours 45 minutes |
3 days 11 hours 45 minutes |
| Jadinko | 11 hours 40 minutes |
2 days 10 hours 20 minutes |
| Varanasaur | 13 hours 20 minutes |
2 days 18 hours 40 minutes |
| Brutish Dinosaur | 18 hours 20 minutes |
3 days 19 hours 40 minutes |
| Arcane Apoterrasaur | 18 hours 20 minutes |
3 days 19 hours 40 minutes |
| Scimitops | 18 hours 20 minutes |
3 days 19 hours 40 minutes |
| Bagrada Rex | 20 hours | 4 days 4 hours |
| Spicati Apoterrasaur | 20 hours | 4 days 4 hours |
| Asciatops | 20 hours | 4 days 4 hours |
| Corbicula Rex | 20 hours | 4 days 4 hours |
| Oculi Apoterrasaur | 21 hours 40 minutes |
4 days 12 hours 20 minutes |
| Malletops | 21 hours 40 minutes |
4 days 12 hours 20 minutes |
| Pavosaurus Rex | 23 hours 20 minutes |
4 days 20 hours 40 minutes |
Now that you have produced some offspring, you will need to sell them to the appropriate buyer. When selling animals, not every animal will gain you the same amount of beans. Though you can sell at any age, for all species, adolescence is the age that will award you the most beans. See the table below for base bean prices you will earn for each age group.
Around the clearing with Prehistoric Potterington you will notice various NPCs. These are who will purchase your animals.
- The person North East of Stan and Prehistoric Potterington will buy 12 animals from your Small pen and reset daily.
- To the North West of Stan and Prehistoric Potterington is the person who will buy 8 Medium pen animals and reset every other day.
- And on the South West of Stan and Prehistoric Potterington is the Large pen buyer who will purchase 6 animals and reset every 3 days.
The buyer who will show up when a location resets is initially based upon what animals you have in the associated size pens. If the pen is empty, it will default to the lowest level animal for the size. If the pens have different types of animals in them, however, you have an even chance of either one showing up.
Alternatively, you can speak to Prehistoric Potterington about Contract options to have the opportunity to advertise that you are are looking for a specific buyer. These are done for each pen size individually and can be reset to the standard game mechanic by speaking with her again.
| Animal | Buyer | Age | ||||
| Egg | Baby | Adolescent | Adult | Elder | ||
| Frogs | Anphi (frog collector) | 10 | 21 | 108 | 91 | 75 |
| Salamanders | Steven (salamander commander) | 36 | 72 | 360 | 306 | 252 |
| Jadinkos | Papa Mambo (jadinko jailer) | 64 | 129 | 648 | 550 | 453 |
| Varanasaurs | Laniakea (varanasaurs dinosaur buyer) | 64 | 129 | 1,260 | 550 | 453 |
| Brutish Dinosaurs | General Bentnoze (brutish dinosaur buyer) | 207 | 414 | 2,070 | 1,759 | 1,449 |
| Arcane Apoterrasaurs | Glout (arcane associate) | 193 | 387 | 1,935 | 1,644 | 1,354 |
| Scimitops | Doric (scimitops handler) | 211 | 423 | 2,115 | 1,798 | 1,481 |
| Bagrada Rexes | Daya (bagrada rex buyer) | 221 | 443 | 2,214 | 1,882 | 1,550 |
| Spicati Apoterrasaurs | Wizard Ilona (spicati selector) | 230 | 459 | 2,295 | 1,951 | 1,607 |
| Asciatops | Evil Dave (asciatops buyer) | 252 | 504 | 2,520 | 2,142 | 1,765 |
| Corbicula Rexes | Thok (rex wranger) | 274 | 547 | 2,736 | 2,325 | 1,915 |
| Oculi Apoterrasaurs | Odd Billy (bird fancier) | 301 | 603 | 3,015 | 2,562 | 2,110 |
| Malletops | Moia (malletops master) | 327 | 655 | 3,276 | 2,785 | 2,293 |
| Pavosaurus Rexes | Irwinsson (rex rider) | 360 | 720 | 3,600 | 3,060 | 2,520 |
Note that in addition to age, there are several other factors that influence the amount of beans you will receive for each animal sold. From lowest to highest, these include:
- -10% - Nice but Dim trait
- -5% - Surly trait
- -2% - Limited Effency trait
- +2% - Lucky trait
- +5% - Unlucky for Some trait
- +5% - Animal farmer outfit
- +10% - Master farmer outfit
- +10% - Fortunate trait
- +10% - Buyer's desired breed
- +10% - Buyer's desired trait
- +25% - Buyer's desired breed and trait
- +52% - Highest possible bonus - Lucky, Unlucky for Some, and Fortunate traits + Master farmer outfit + desired breed and trait
Alternatively, you can sell any animal to Baby Shakes, a baby troll found on Granny Potterington's porch at the Player-Owned Farms. This baby troll will happily purchase any animal for 10% of the price that a normal animal buyer would. This provides players with a way to sell animals when the buyer they need is not present, as unlike other buyers, Baby Shakes is always present at the Manor farm.
While Baby Shakes is the official name of this person, his name varies. Every time he buys an animal from a player, he will say, "YUM! Me like [animal name]!" The troll's name will then become the name of the animal he was just sold, similar to the way the Baby troll pet's name functions. For example, if a player were to sell Baby Shakes a salamander named Bernie, the troll's name would become Bernie.
Upon reaching a new growth stage, animals will typically give you resources in addition to the experience discussed earlier. All animals on the Ranch will provide produce when they reach the ages of adolescent, adult, and elder. The following is the amount of produce obtained without any boosts, such as the Unlucky for Some trait. All of these items are used in the Herblore skill. The table below shows all resources the animals will produce at each of those three stages, the amount at each stage, and their use(s).
You can access the Farmers' Market by Right clicking on Prehistoric Potterington. This will open a new window that has 3 tabs. All items within the store are purchased using Beans.
| Item | Beans | Description |
| Small dinosaur pen deed | 100 | Allows you to construct a small dinosaur pen (houses 6 dinosaurs). |
| Medium dinosaur pen deed | 500 | Allows you to construct a medium dinosaur pen (houses 4 dinosaurs). |
| Large dinosaur pen deed I | 1,000 | Allows you to construct your first large dinosaur pen (houses 3 dinosaurs). |
| Large dinosaur pen deed II | 1,000 | Allows you to construct a second large dinosaur pen (houses 3 dinosaurs). |
| Dinosaur breeding pen deed | 1,000 | Allows you to construct a dinosaur breeding pen (houses 4 dinosaurs). |
| Bank Chest | 300 | Upgrades the farm's deposit box to a bank chest. |
| Farm totem | 200 | Farm totems, once attached to a pen, enable that animal's perk. |
| Noted Produce | 3,000 | Unlocking this will mean that all animal produce is noted upon harvesting. |
| Seasonaliser wheel | 5,000 | A machine that can be used to artificially set the season on your farm. |
| Multiple trait boost (small) | 6,000 | Unlocking this gives all small animals an increased chance of having multiple traits. Stacks with parent traits. |
| Multiple trait boost (medium) | 9,000 | Unlocking this gives all medium animals an increased chance of having multiple traits. Stacks with parent traits. |
| Multiple trait boost (large) | 12,000 | Unlocking this gives all large animals an increased chance of having multiple traits. Stacks with parent traits. |
| Animals can now breed in small dinosaur pens | 6,000 | Unlocking this gives a chance for dinosaurs in your small dinosaur pen to breed. The chance is lower than the breeding pen and does not have any failure mitigation. |
| Animals can now breed in medium dinosaur pens | 8,000 | Unlocking this gives a chance for dinosaurs in your medium dinosaur pen to breed. The chance is lower than the breeding pen and does not have any failure mitigation. |
| Animals can now breed in large dinosaur pens | 10,000 | Unlocking this gives a chance for dinosaurs in your large pens to breed. The chance is lower than the breeding pen and does not have any failure mitigation. |
| Storm barn deeds | 5,000 | Allows you to build a storm barn to store up to 15 checked animals. |
| Storm barn extension 1 (+15 spaces)* |
20,000 | Expands your storm barn by 15 spaces. |
| Storm barn extension 2 (+30 spaces)* |
20,000 | Expands your storm barn by 30 spaces. |
* Must purchace the previous tier/pen first.
| Item | Beans | Description |
| Green frog* | 100 | Frogs can be placed in small dinosaur pen. |
| Green salamander* | 100 | Salamanders can be placed in small dinosaur pen. |
| Name Re-roller | 50 | Use on an animal to re-roll its name and get a different one. |
| Trait Re-roller | 300 | Use on an animal to re-roll one of its traits, potentially getting something better, you may also get the same trait. |
| Small animal pen kit | 500 | Can be used to construct a small animal pen in place of planks and nails. |
| Medium animal pen kit | 1,500 | Can be used to construct a medium animal pen in place of planks and nails. |
| Large animal pen kit | 2,500 | Can be used to construct a large animal pen in place of planks and nails. |
| Supreme growth potion (sundry) | 1,000 | Can be used on any mushroom, hops, allotment and evil turnip patches to grow the plant to full near instantly. |
| Supreme growth potion (leafy) | 1,000 | Can be used on any herb, flower, cactus, vine and belladonna patches to grow the plant to full near instantly. |
| Supreme growth potion (bushy) | 1,200 | Can be used on any bush patches (including the one at Herblore Habitat) to grow the plant to full near instantly. |
| Supreme growth potion (fruity) | 2,400 | Can be used on any fruit and calquat tree patches to grow the plant to full near instantly. |
| Supreme growth potion (woody) | 4,000 | Can be used on any wood, spirit and elder tree patches to grow the plant to full near instantly. |
* Must have appropriate level and pen built to purchase.
| Item | Beans | Description | Notes |
| Master farmer outfit blueprint | 1,000 | Buy blueprints to discover how to craft master farmer outfit pieces. | 20 Invention and 80 Farming required to create outfit pieces. |
| Master farmer fragment pack | 2,000 | A pack of 3,600 master farmer fragments, which is enough to craft one outfit piece. | Must have the Master farmer outfit blueprint to purchase. |
| Trevor the magical zygomite | 10,000 | Unlocks Trevor, the magical zygomite override pet. | Must have completed the "Ever So Clever" Achievement to purchase. |
| Herbicide | 10,000 | Herbicide destroys selected herbs dropped in combat, giving you 2x the usual cleaning XP in Herblore. | |
| Seedicide | 10,000 | Seedicide destroys selected seeds dropped in combat, giving you 2x the usual planting XP in Farming. | |
| Herbicide hoarder upgrade | 25,000 | Upgrade herbicide with herb hoarding - picks up herbs not burned. | Must own Herbicide to purchase. |
| Seedicide stealer upgrade | 25,000 | Upgrade seedicide with seed stealing - picks up seeds not destroyed. | Must own Seedicide to purchase |
| Farm deeds (+titles) | 250,000 | Unlocks some titles, primarily 'the Master Farmer'. | Must own the Master farmer outfit and have all pens built to purchase. Titles include: "Granny [Username]", "[Username] Potterington", "Grandma/Grandpa [Username]", and "[Username] the Master Farmer" |
| Status icons | 1,500 | Displays magical icons above animals to show if they need harvesting or healing. | |
| Harvest potion | 1,000 | Harvest potions let you harvest special produce from allotment patches. | Vial contains only 1 dose. |
Several Farming Achievements must be completed at the Ranch Out of Time. These tasks can be found in the Skills section under the "Farming" tab in the Achievements section of the Hero tab. There are a total of 22 tasks to complete here, some of which can be completed at the Player-Owned Farms. Please see our Skill Achievements guide for the tasks and how to complete them.
This Special Report was written by 3ter 1. Thanks to ChathMurrpau for corrections.
This Special Report was entered into the database on Sat, Nov 30, 2019, at 05:17:35 PM by Chath, and it was last updated on Mon, Mar 29, 2021, at 06:23:13 PM by 3ter1.
If anything is incorrect or missing, or if you have any new information to submit to this database, please submit it to us on our Content Submissions Forums.
If you see this guide on any other site, please report it to us so we can take legal action against anyone found stealing our content. This guide is copyrighted by RuneHQ, and its use on other sites is expressly forbidden. Do not ask if you can use our guides or images, the answer is and always will be NO!
Print this page with images - Back to the Special Report Index Page - Back to Top
