

Table of Contents
As if Nex wasn't difficult enough, Jagex has decided to give us this monstrosity that is often referred to as "Hardmode Nex". She is a level 7,000 boss with 3,000,000 health points who uses Magic and Melee to attack those foolish enough to pay her a visit and chance receiving her max hit of 7,000.
While she does use Melee, she will only use it if aggro'd onto you (Basing) or if you are within Melee distance of her wing span; her wings will deal hits as they flap.
It is recommended to protect from Magic when at a distance. More experienced players can time her attacks and soul split flick.
Much the same as defeating the regular version of Nex, to arrive here you will need to travel to the God Wars Dungeon with at least 70 Agility, Constitution, Ranged, and Strength as well as a Frozen key. Once inside the Dungeon, you will need to walk South and enter the door to the East of Armadyl's Eyrie. From here you will be able to climb down the stairs then walk through a door into the main area of the Zarosian encampment.
Within the encampment, you will need to kill 40 followers unless garbed in Ancient ceremonial robes (boots, gloves, legs, mask, top). When you have the required kill count, you will be able to enter the door to the East where you will find Ashuelot Reis, who acts as a bank enabling you to gear up as necessary. Please see below for suggestions on gear.
Now that you are properly prepared, you can look for the hidden door found on the wall South of the barrier that leads to the typical Nex encounter and jump on in with your comrades. It is suggested that you are part of a 7 man group when entering this encounter. Be sure to delegate positions before entering so that everyone is prepared to perform their responsibilities during the fight.

Since it is not particularly suggested to go visit the Angel of Death naked, nor to Melee attack her, below you will find several gear suggestions.
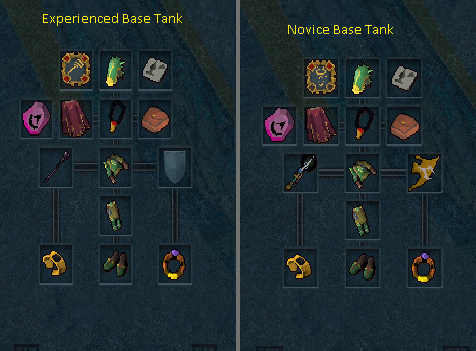
Base Tank:
| Slot | Item | ||
| Best | Better | Good | |
| Head | Achto Primeval Mask | Primeval Mask | Superior Seasinger's hood |
| Body | Achto Primeval Robe Top | Primeval Robe Top | Superior seasinger's robe top |
| Legs | Achto Primeval Robe Legs | Primeval Robe Legs | Superior seasinger's robe bottom |
| Feet | Achto Primeval Boots | Primeval Boots | Ragefire Boots |
| Hands | Deathtouch Bracelet | Spellcaster Gloves | Static Gloves |
| Necklace | Amulet of souls | Reaper necklace | Dragonrider Amulet |
| Aura | Supreme Runic Accuracy | Penance | Reverence |
| Ring | Superior Leviathan Ring | Ring of Death | Leviathan Ring |
| Superior Scrimshaw of the Elements | Scrimshaw of the Elements | Illuminated God Book | |
| Ammunition | Large rune pouch | Small rune pouch | Tirannwyn quiver 4 |
| Weapon(s) | Staff of Sliske + Seismic wand + Merciless Kiteshield | Noxious Staff + Seismic wand + Arcane Spirit Shield | Seismic wand + Arcane Spirit Shield |
| Cape | Completionist/Max cape | Superior Reefwalker's cape | Reefwalker's cape |
For a novice Angel of Death base tank, it is HIGHLY recommended to use Penance aura with an Arcane spirit shield to save you a lot of food until you become more experienced. Once you have become more experienced, you should be more comfortable with basing. And then, using your staff switch to help your team with DPS will become one of your objectives.
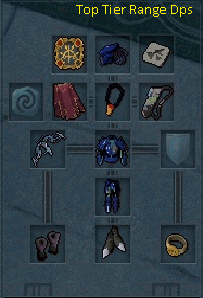
Top Tier Ranged DPS:
| Slot | Item | ||
| Best | Better | Good | |
| Head | Sirenic mask | Pernix cowl | Superior Elite Void Knight range helm |
| Body | Sirenic hauberk | Pernix body | Superior Elite Void Knight top |
| Legs | Sirenic chaps | Pernix chaps | Superior Elite Void Knight robe |
| Feet | Flarefrost Boots | Pernix boots | Glaiven Boots |
| Hands | Nightmare Gauntlets | Pernix Gloves | Superior Elite Void Knight gloves |
| Necklace | Amulet of souls | Reaper necklace | Farsight snap shot necklace |
| Aura | Reckless | Supreme Sharp Shooter | Master Sharpshooter |
| Ring | Asylum Surgeon's Ring | Ring of Death | Archers Ring (i) |
| Superior Scrimshaw of Cruelty | Scrimshaw of Cruelty | Illuminated God Book | |
| Ammunition | Tirannwyn quiver 4 | Tirannwyn quiver 3 | Tirannwyn quiver 2 |
| Weapon(s) | Seren Godbow | Noxious Longbow | Ascension crossbows(offhand) |
| Cape | Completionist/Max cape | TokHaar-Kal-Xil | Ava's accumulator |
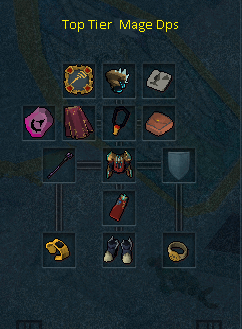
Max Tier Magic DPS:
| Slot | Item | ||
| Best | Better | Good | |
| Head | Tectonic mask | Virtus mask | Superior Elite Void Knight Mage Helm |
| Body | Tectonic robe top | Virtus robe top | Superior Elite Void Knight Top |
| Legs | Tectonic robe bottom | Virtus robe legs | Superior Elite Void Knight robe |
| Feet | Hailfire Boots | Virtus boots | Ragefire Boots |
| Hands | Deathtouch Bracelet | Spellcaster Gloves | Superior Elite Void Knight gloves |
| Necklace | Amulet of souls | Reaper necklace | Dragon Rider amulet |
| Aura | Maniacal | Supreme Runic Accuracy | Dark Magic |
| Ring | Asylum Surgeon's Ring | Ring of Death | Seer's Ring (i) |
| Superior Scrimshaw of the Elements | Scrimshaw of the Elements | Illuminated God Book | |
| Ammunition | Large runic pouch | Small runic pouch | Tirannwyn quiver 4 |
| Weapon(s) | Staff of Sliske | Noxious Staff | Superior Zuriels Staff |
| Cape | Completionist/Max cape | TokHaar-Kal-Mej | God cape |
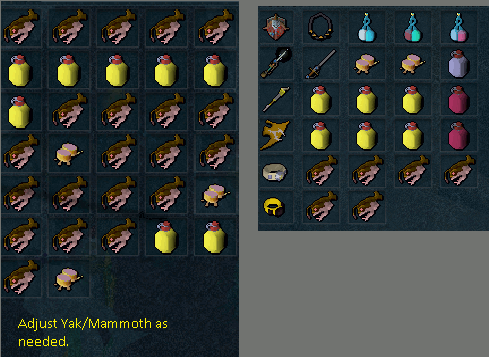
Use of a Yak or Mammoth Beast of Burden is suggested for novices to this boss; use of a Steel Titan is a good alternative for those who are more experienced. Inventory items suggested include:
- Enhanced Excalibur
- Ring of Vigour
- Luck of the Dwarves
- Guthix Staff
- Supreme Overload Potion (6)
- Super Prayer Renewal Potion (6)
- Replenishment Potion (6)
- Weapon Poison++ Flask (6)
- Super Restore Flask (6)
- Saradomin Brew Flask (6)
- Rocktails
- Antipoison (if not using Venomblood perk)
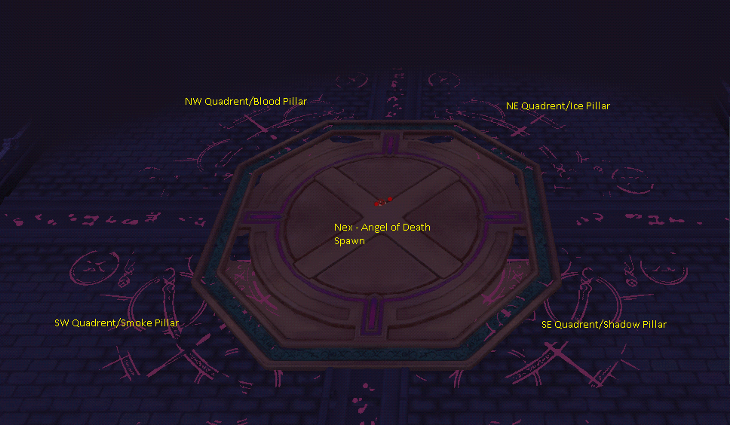
Below is an image of the arena where you will be facing the Angel of Death.
This phase will last from 3,000,000 hp - 1,800,000 hp. During this phase, Nex has several special attacks which we will detail below.
Power from the elements:
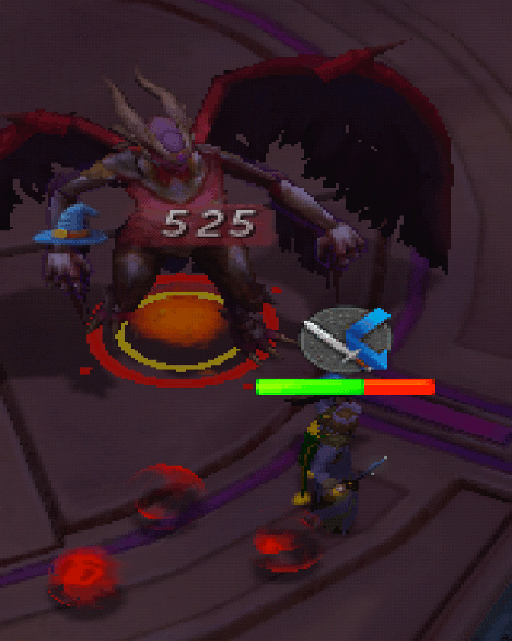
Nex will jump to the center of the arena; as she lands she will be facing one of the 4 quadrants. Your base, or designated team mate, will want to stand in the quadrant that Nex is facing. Standing in this quadrant will deal 3,500 damage X 3; for a total of 10,500. Doing this will prevent 20 enrage from being added to Nex. If your Base, or designated team mate, fails to make it to the quadrant and take the damage 20 enrage will be added.
The elemental/Quadrant damage can be reduced with defensives like.
- Resonance
- Debilitate
- Reflect
- Barricade
- +Shield Dome Spell (Ancients)
The rest of your team will want to be evenly spread throughout the other 3 quadrants that Nex did not face at this time. These will temporarily be divided by ice walls and spawn 1 Blood reaver in each of them.
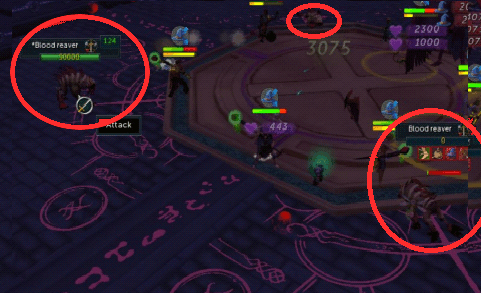
Blood Reavers:
The Blood reavers that spawn will have 50,000 Life points each.
Once spawned, they will slowly walk towards Nex in the center of the arena. Your team will want to kill them as fast as possible. Stuns/binds/ice spells/entangle all work to stop them and buy time to attack. If any of the Blood reavers reach Nex, they will instantly die and be absorbed to heal her for half of their remaining life points, increase her enrage, and deal damage back to your team.
Shadow Orbs:
These will be spawned when Nex calls out "Let the shadow engulf you. Give in to it".
She will drop 3 red shadow orbs from the sky onto the location of every player in the instance. Moving 1 square from each dropped orb will prevent any damage.
If you stand on any of the remaining orbs or fail to move, you will take heavy damage. Avoid standing on these red orbs until they disappear later when Nex reaches 1,800,000 hp.
Amalgamation/Praesul Spawns:
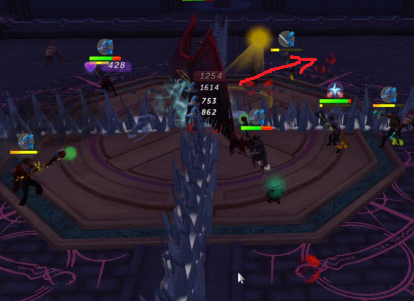
When Nex reaches 2,100,000 hp, she will summon 4 Amalgamations which will spawn in the center like so:
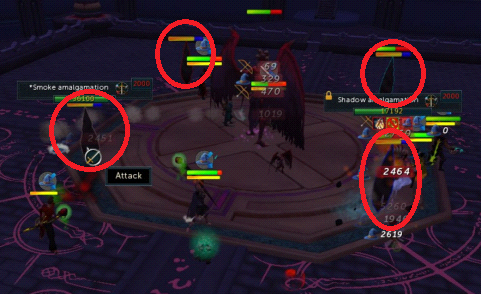
Be sure that you are not standing close to the spawn point of these Amalgamations or you will be hit with 4,000 damage when they appear. Standing on the crosshairs will help ensure you are in a safe location.
If you fail to destroy each of the 4 Amalgamations before the timer above it runs out(image below), then the corresponding praesul will spawn at its full 300,000 hp rather than the weakened 150,000 hp.
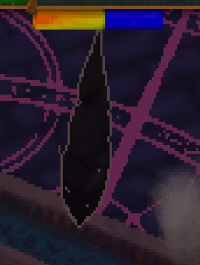
Once these Amalgamations are destroyed or timed out, then the 4 Praesul will spawn from each quadrant.
| Direction | Quadrant | Praesul |
| North West | Blood | Cruor |
| North East | Ice | Glacies |
| South East | Shadow | Umbra |
| South West | Smoke | Fumus |
Your team will want to designate Praesul tanks from the start. This way, once they spawn, you can immediately claim/voke your assigned Praesul and tank him, while you and your team continues to attack Nex down to 1,800,000 hp.
Keep in mind these Praesul have adrenaline bars that you can Siphon. Also note that they can stun you when they get 50% adrenaline for Asphyxiate. Using Anticipate before they get to 50% adrenaline is a simple solution. Try to save Freedom ability for emergencies; for example, they catch you with a stun and you are low hp.
This phase will last from 1,800,000 hp - 600,000 hp. During this phase, Nex has several special attacks which we will detail below.
Before we get into her specials, note that once this phase begins, all red shadow orbs will disappear and she will no longer use the previous attacks. Take your team and the Praesul to the South East corner to kill them 1 at a time in the following order...
The order you kill the Praesul is the same order pillars will be unlocked later in the fight (at 600,000 hp). At this point, to reduce the damage she deals to the team, the Base tank should take Nex North until all of the Praesul are killed.
While killing the Praesul, be ready to handle the attacks below.
Ice Prisons:
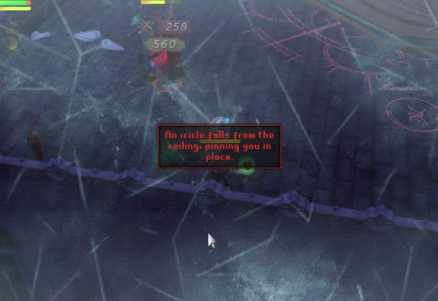
This attack will is initiated when Nex calls out "You..Stay..Down!"
She will choose 1 - 2 Players to "freeze". You will know when this happens to you as your screen turns white and you get stunned. Use Freedom and move away from any surrounding team mates to avoid the 5x5 area of attack damage of the icicle.
The Icicle you, or your team mates, are trapped in is attackable and has 100,000 health. If destroyed it will break the player free. However, this is not recommended as it is a waste of time and effort. After a few seconds the icicle will melt, the player is freed and will take a 2,000 bleed for 6 hits. This bleed increases when close to other players; so, be sure to keep your distance until this bleed is finished.
There is no way to cancel this bleed. And it should not to be taken lightly. Be sure to keep eating; keep in mind you can eat to full health while inside the icicle to be more prepared.
Shadow Pool Death Dots:
For this attack, Nex sends out a black/purple cloud that can land anywhere within the arena. As seen below....
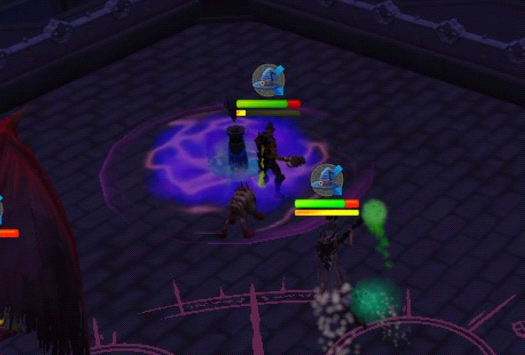
These shadow pools need to be dealt with as fast as possible to essentially disarm them. If not dealt with properly, they will deal 37,500 damage equally to each team member.
At least 3 players will want to be standing in the purple perimeter before activating the artifact within the center. Doing this will split the damage to a manageable amount between the players inside the perimeter. Be cautious running to the Shadow pool because activating the artifact by yourself will result in an almost guaranteed death.
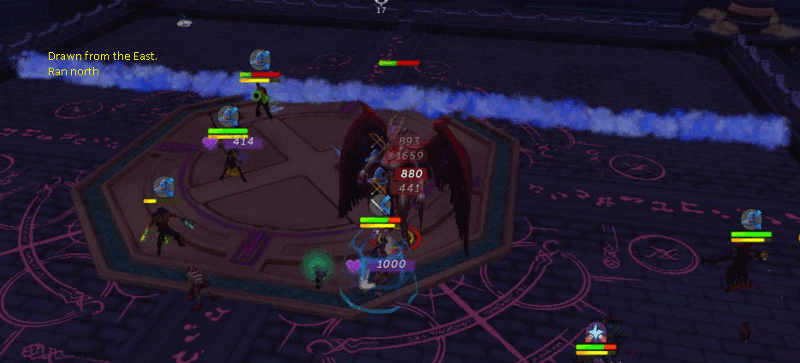
Smoke Beams:
This attack is targeted at 2 random players in the arena. And is initiated with one of 2 phrases within your chat box:
- "Nex draws smoke towards you from the east"
- Run to the North or South wall.
- "Nex draws smoke towards you from the north"
- Run to the East or West wall.
This is the final phase and will last from 600,000 hp until her defeat.
At this point Nex will become invulnerable and only attack with Magic. If your team killed the Praesul in the correct order earlier, you will need to make your way to the Shadow pillar, in the South East corner, and work counter clockwise, destroying each pillar completely as you go.
Each pillar has an effect that you and your team will endure until it is destroyed.
| Direction | Quadrant Pillar | Effect |
| South East | Shadow | Shadows spawn at players feet and deal heavy damage rapidly if standing still (up to 4,800 per tick). You will want to keep moving until they stop. Be aware of other players shadow trail as it can damage you as well. |
| North East | Ice | Your screen will start with a slight frost and slowly become a more solid white. Use of the Freedom ability will clear it. If this is not cleared after a certain time, the player will be stunned and take a bleed similar to the icicle attack. |
| North West | Blood | Nex slowly heals from Damage taken. |
| South West | Smoke | This pillar will drain the players prayer points, stats, and overload timers as well as give Nex the ability to poison players. This can be negated with the Venomblood perk or a simple Antipoison potion. |
After all the pillars are destroyed Nex will become attackable again.
Instakill and Pulse Bomb
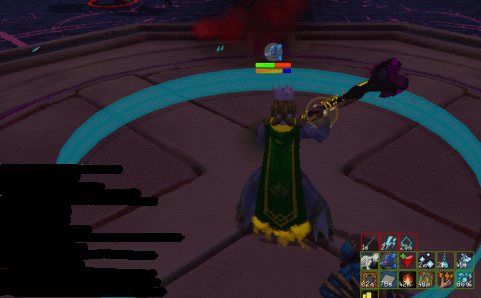
Throughout the last 600,000 hp, Nex will target 1 player at a time with an instakill/bomb mechanic. If you get targeted you will receive a chat pop up, "Nex has marked you to take the full force of the elements" and a blue bar will appear above your head.
To avoid instakill, the player must be standing inside the flashing blue circle located in the center of the arena. Stand here until the blue bar is filled orange.
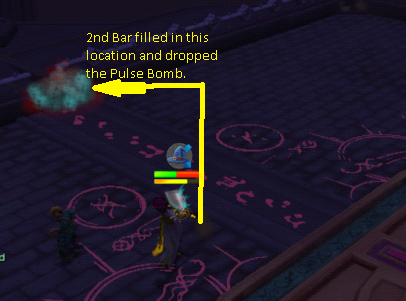
After this a 2nd bar will appear, but this time once its full, the player will drop a bomb wherever they are standing. This bomb will deal rapid 3,000 damage to any player standing within its radius.
It is very important not to drop a bomb in the center or near your team mates! Instead drop them along the edges of the arena.
Stay calm and deal with this mechanic for the rest of the fight. Good luck with your first Angel of Death kills and drops! I hope this helps.
Now that you've managed to kill the Angel of Death, there are several rewards that are highly sought after. These include:
- Wand of the Praesul
- Imperium Core
- Praesul Codex
- Blood Tentacle
- Intricate Chests
- The Praesul
- The Promised Gift

To access the main drop table and have a chance to roll one of the previously listed items, you must be top 2 tanks or top 5 Damage Per Second.
In a 7 man team, everyone will roll the main drop table. The Praesul drop rate will scale to the amount of players in the fight so that smaller teams are better rewarded, up to the maximum of 7 players.
If in a 7+ size team, participation drops will be awarded to 3 players who did not make the top 7. So that up to 10 players may receive drops, but only 7 will have a chance to roll for a valuable unique items.
This Special Report was written by Tres and ChathMurrpau.
This Special Report was entered into the database on Tue, Sep 26, 2017, at 08:31:04 PM by ChathMurrpau, and it was last updated on Sun, Feb 02, 2020, at 07:33:34 PM by Chath.
If anything is incorrect or missing, or if you have any new information to submit to this database, please submit it to us on our Content Submissions Forums.
If you see this guide on any other site, please report it to us so we can take legal action against anyone found stealing our content. This guide is copyrighted by RuneHQ, and its use on other sites is expressly forbidden. Do not ask if you can use our guides or images, the answer is and always will be NO!
Print this page with images - Back to the Special Report Index Page - Back to Top
