

20 Crafting
Must be able to kill a level 40 foe
Requires a team of people - the higher their Crafting levels, the smaller that team can be.
-
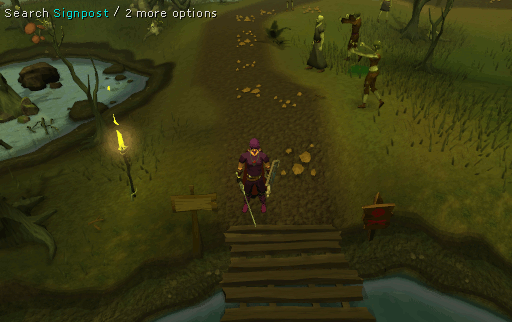
Make your way south through the Mort Myre Swamp. Once you have passed the small island with the Nature Grotto, continue heading south down and round the winding path. When you have reached the surroundings of Mort'ton, search the sign and you will notice it has some teeth marks on it.
-
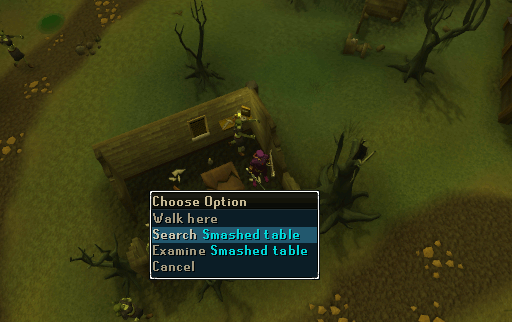
Head southeast and enter the house with a broken table inside of it. Search the table and the shelf to find a Diary (Herbi Flax), 2 Grimy tarromins, and a Grimy rogue's purse (used in the Jungle Potion quest. Now, pick up the 2 Vials from the ground.
-
Read the Diary (Herbi Flax) to learn that the inhabitants of Mort'ton have been affected by the temple just northeast of the village. The diary also explains that tarromin is used in a temporary cure that makes the afflicted townspeople intelligible for a short period of time. Enter the house to the northeast and use both 2 Vial with the sink to fill the water. Clean the 2 Grimy tarromins and add them to the 2 Vials of water. Then, use the 2 Ashes with the vials. By doing so, you will acquire 2 vials filled with Serum 207 (3).
-
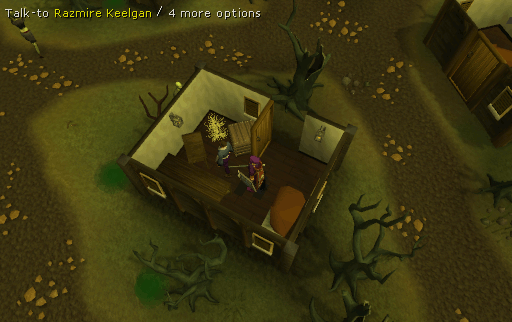
Once you have finished making the serum, head north to the general store and use it with the Afflicted (Razmire). He will temporarily turn into Razmire Keelgan and thank you. Ask him all the available options to find out what is going on. He will then ask you to kill 5 Loar shades.
-
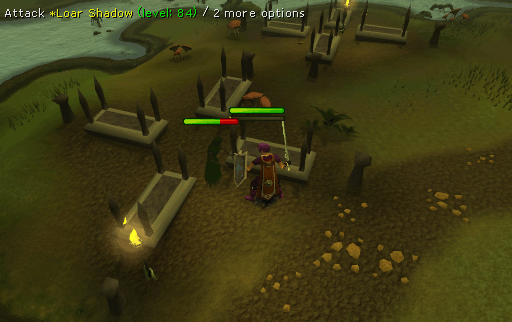
Kill 5 Loar shades wandering around the village, and take their Loar remains back to the general store. Use another dose of Serum 207 on Afflicted (Razmire) again. He will take the corpse and examine it. He will then tell you to take the remaining corpses to Ulsquire Shauncy.
Note: You must kill the 5 Loar shades yourself. Simply picking up or buying Loar remains will not work.
-
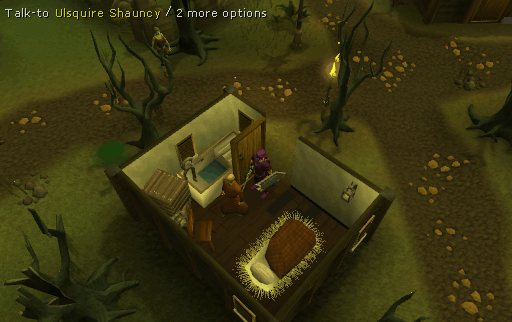
Enter the house to the southeast, and use a dose of Serum 207 on the Afflicted (Ulsquire). Show him the Loar remains and ask him all the available option.
-
Return to the general store and use another dose of Serum 207 on Afflicted (Razmire) again. Take a look at what he sells, and stock up on a vial Olive oil (3), 5 Planks, 5 Limestone bricks, 5 Timber beams, and 25 Swamp pastes
-
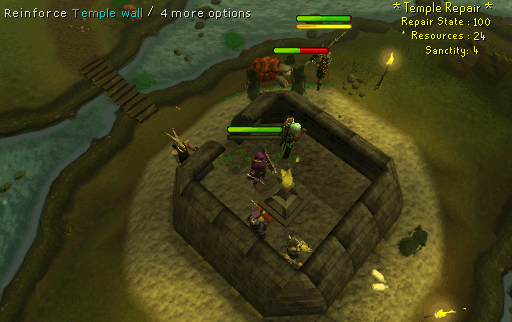
Now, head northeast to the temple. Click on one of the walls and your character will start repairing it. Once it has been repaired for a 100 percent and your Sanctity is at least above 10%, then light the flaming altar using a Tinderbox. Use the Olive oil (3) with the flame and it will turn into Sacred oil (3). Keep repairing the temple till you reach at least 20% Sanctity. When you have gain 20% Sanctity, use the remaining Serum 207 on the flame to transform it into a permanent cure, Serum 208.
Note: At this point, it is advised to switch to world 88, the official Shades of Mort'ton mini-game world. Make sure that there are several people repairing the temple as well as several attacking the shades, as shades can and will tear the temple down completely. Defending the temple from shades also increases your Sanctity.
-
Chop down one of the trees scattered around the village. Use the Sacred oil (3) with it to make Pyre logs. This will use up 2 doses of oil. Head to one of the funeral pyres scattered around the edges of the village. Use the Pyre logs on the funeral pyres and then use a Loar remains with it. Now, light the funeral pyre using a Tinderbox to set its spirit free. Pick up the Bronze key that appears on the stand.
Note: For cremating a shade, you do not always receive a key. If you did not receive a key from burning the remains, then kill another Loar shade. Restock on the required materials and cremate the new set remains again.

-
Take key back to Ulsquire Shauncy and use a dose of Serum 208 to cure him for good. He will congratulate and give you your reward
Note: It is recommended that you also use the Serum 208 on Afflicted (Razmire) to gain unlimited access to his stores.
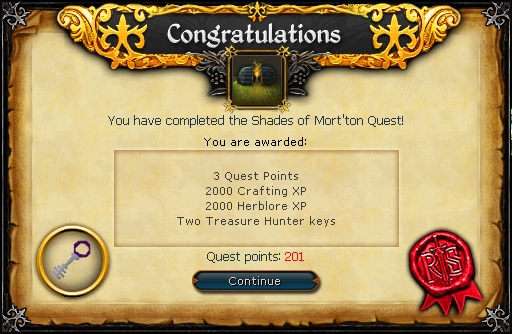
Congratulations! Quest Complete!
Mort'ton Shade Burning mini-game:
The keys received setting shades to rest allows you to access the Mort'ton tombs, to the north of the village. In these tombs you can kill higher level shades and use the keys obtained by cremating them to loot various chests. For more information, refer to the Mort'ton Shade Burning mini-game guide.
This Quest Guide was written by corbear007,jalech99, darksole17, and leaderofdarkness. Thanks to DRAVAN, Spurs335, jordan23140, pootlepixie, andro_girl, Demonichell, I Play RS, havoc_cat, mastersiosk, pokemama, racerzed36, 12345jack1, diamondi3ack, Kitty0333100, Eragon7985, Mobstar777, gaurdian852, Alfawarlord, Sylanne, Javezz, Mr Style, and Jarkur for corrections.
This Quest Guide was entered into the database on Mon, Oct 18, 2004, at 12:05:32 PM by Weezy, and it was last updated on Fri, Dec 29, 2017, at 12:17:39 AM by Numerous One.
If anything is incorrect or missing, or if you have any new information to submit to this database, please submit it to us on our Content Submissions Forums.
If you see this guide on any other site, please report it to us so we can take legal action against anyone found stealing our content. This guide is copyrighted by RuneHQ, and its use on other sites is expressly forbidden. Do not ask if you can use our guides or images, the answer is and always will be NO!
Print this page with images - Back to the Quest Guide Index Page - Back to Top
