

Level 20 Crafting
Must be able to kill a level 40 foe
Requires a team of people:
The higher their crafting levels the smaller that team can be.
Items purchasable at Mort'ton shop: (General Store) Hammer, Olive oil; (Building-supplies Store) 5 Limestone bricks, 5 Limestone, 10 Swamp paste, 5 Planks
-
Head into the Swamps of Mort Myre and Head South.
Once you have passed the Nature Spirit Quest island, continue heading south down and round the winding path.
When you first come into Mort'ton search the sign at the entrance, you will notice it has teeth marks on the sign.

-
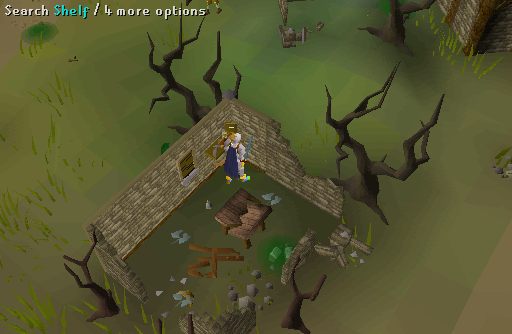
Head south-southeast from this and you will notice a house that has a broken table inside it.
Search this table and the shelf. You will then get three Herbs and a Diary. Click the Herbs to ID them, you will get two Tarromin and one Rogues purse (Rogues purse is a Herb used in Jungle Potion Quest).
-
Read the Diary and you find out that the people of Mort'ton have been affected by the temple just north east of the house.
It also explains that Tarromin is used in a "temporary cure" that makes the Afflicted townspeople intelligible for a short period.
-
Add Tarromin to the Vial of water.
-
Cut down a tree and keep that log for later. Then use the ashes with the Tarromin Filled Vial to get Serum 207. (A word of warning: you need to speak to the General Store owner twice and the Priest twice, so do not use your Serum on other people unless you brought spare Tarromin.) Use your second Tarromin on a Vial of water and add Ashes to make a second vial of Serum 207.
-
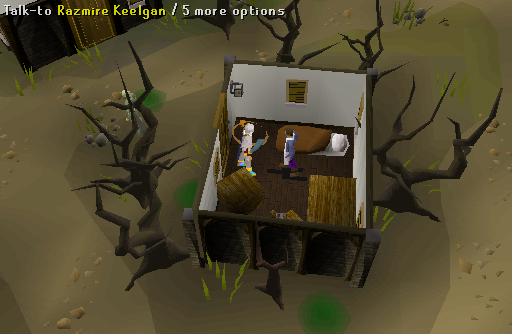
Once you have finished making the serum, go and use it in the General Store on Razmire Keelgan (1 used, 5 left). After a brief thank you, ask him all the options so you know what's going on. Then he'll ask you to go and kill five shades (you don't need to use his stores yet so don't worry). Note that this quest 'keeps count' of how many shades you've killed after you accept this assignment, so the number of remains you already have (or pick up) don't matter - you must kill five yourself.
-
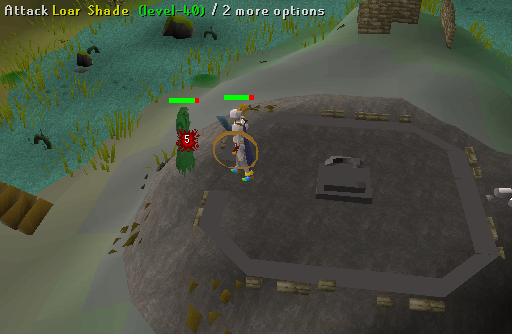
Kill five Shades and take the remains back to the General Store and use another dose of Serum 207 on Razmire (2 gone, 4 left). He'll take a corpse and examine it. He will then tell you to take a corpse to Ulsquire Shauncy.
-
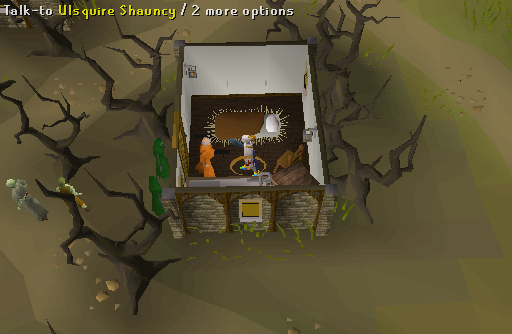
Go to the house with the water drop on the minimap and use a dose of potion on Ulsquire Shauncy (3 gone, 3 left). After showing him the corpse speak to him again before the potion wears off. After listening to every option head back to the shop (if you want you can do this option earlier) and use another dose on Razmire (4 Doses gone, 2 Left).
-
Stock up on a Hammer, Swamp paste (about 10 should be enough, it depends on amount of people), 5 Planks, 5 Limestone, 5 Limestone rocks and 1 Olive oil. Then head northeast of the shop to the temple. (You may want to switch to World 377 or a large populated one at this point in order to find enough people to repair the temple.) Click on a wall and your character will start repairing it, wait until it is at 100 percent repaired and your Sanctity is at least above 10%
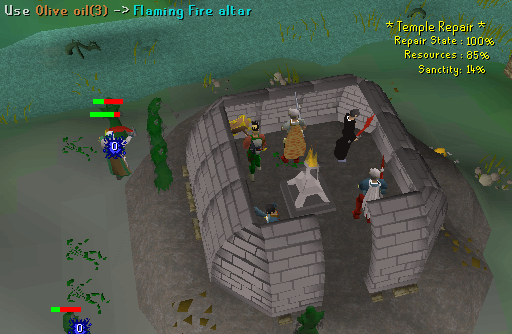
Tip: Make sure there are several people repairing the temple and several attacking the shades, as shades CAN and WILL attack the temple and tear it down completely. Players defending the temple also accure Sanctity.
-
Once this is done, the flame in the centre of the temple can be lit using a Tinderbox. Use the Olive oil (bought from the shop) on the flame and now you'll have Sacred oil. If you want, you can also use a Serum 207 on this flame, if your sanctity is at least 20%, to make it into the permanent cure, Serum 208. Now use the Sacred oil with the other Logs you chopped earlier to make Pyre logs. Kill another shade for Loar remains (or just pick up any from the ground) and head south.
-
Scattered around the edges of the town are holy altars that are used for cremations.
Head to any one of these, it's not important which one. Use the Pyre logs on the altar, then use the remains on the altar, light these using your Tinderbox and a key will appear. Take the key (this is used for the doors north of the shop but isn't needed in the quest.)

-
Once you have burned the remains and taken the key head back to Ulsquire and use another dose of potion on him (5 doses used, 1 left).
-
He will congratulate you on putting the shade to rest.
Note: For the permanent cure, you need 20% sanctity and then you must use serum 207 on the sacred flame then give it to the people as serum 208. It is recommended to use this on Razmire so that you have ready access to his Stores in the future.
Another tip: If the world you are on does not have enough people to build the temple, switch to World 377 (or the most populated member world), but buy your Olive oil before switching, as it is harder to purchase where many people are trying to buy it.
The key generated when setting the shade to rest allows you to access the Mort'ton tombs (entrance located north of the store). Here you can kill higher level shades (Phrin, Riyl, Asyn, Fiyr) and use your keys to open chests and get loot such as armour, weapons, runes, and Fine cloth (which, along with Hollow bark and cash, can be made into Splitbark armour by the Wizard at the Wizard Tower). See the Mort'ton Shade Burning Special Report for complete details.
NOTE: Keys aren't generated 100% of the time when setting shades to rest so if you didn't get one during the quest, you can keep trying until you do.
This Old School Quest Guide was written by corbear007, jalech99, and darksole1. Thanks to DRAVAN, Spurs335, jordan23140, pootlepixie, andro_girl, Demonichell, I Play RS, havoc_cat, mastersiosk, pokemama, racerzed36, 12345jack1, McSwindler, Ondmagi, JojosPoro, Princess Pam, and Lilyeelie for corrections.
This Old School Quest Guide was entered into the database on Mon, Oct 18, 2004, at 12:05:32 PM by Weezy, and it was last updated on Fri, Apr 14, 2017, at 05:42:08 AM by L1ttleR3d.
If anything is incorrect or missing, or if you have any new information to submit to this database, please submit it to us on our Content Submissions Forums.
If you see this guide on any other site, please report it to us so we can take legal action against anyone found stealing our content. This guide is copyrighted by RuneHQ, and its use on other sites is expressly forbidden. Do not ask if you can use our guides or images, the answer is and always will be NO!
Print this page with images - Back to the Old School Quest Guide Index Page - Back to Top
