

- Abridged: 6 Dungeoneering
- Unabridged: 30 Attack, Magic, and Ranged
- Abridged: 750 Dungeoneering experience and 75 Dungeoneering tokens.
- Unabridged: 3,750 experience in Attack, Magic, or Ranged.
- Replay: up to 224 Dungeoneering tokens.
Table of Contents:
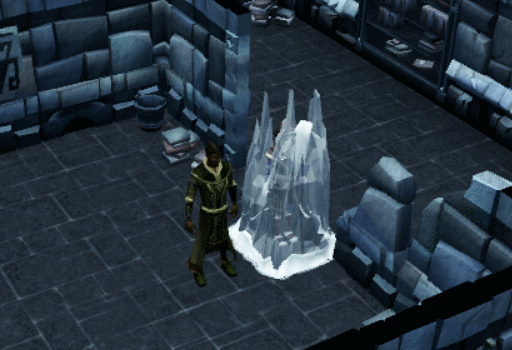
To start the Sagas, you must first unfreeze Skaldrun from a random frozen floor of complexity level 2 or higher. To unfreeze him, you light a fire next to him with logs and a Tinderbox or cast a fire spell on him. Once he has been rescued, you must speak to him fully before he will return to the surface. Once he has returned to the surface, he will be found West of the Gorajo hoardstalker and you can speak to him to start the Sagas.
The Sagas can be completed multiple times. However, you will only gain the full rewards the first time you complete them. During future replays, you will only receive Dungeoneering tokens. For each Saga there is a base number of tokens you will receive for completion. Unfortunately, with each successive replay, your reward will be reduced by 20% until after you have done it 4 times, as you will always earn at least 20% of the base token reward. This token reduction will reset daily at midnight Game Time.
When you lobby during a saga, if you have reached a checkpoint, you will be able to continue from that point when you ask Skaldrun about that story once again. Be aware that you cannot have more than one story going at a time. So, if you have started and reached a check point in one saga, if you choose to start another one, all progress will be lost in the first saga.
To be able to start the Sagas, there are several objects that must be found within a regular dungeon beforehand. These items serve to jog Skaldrun's memory. So, if you haven't found the object, you can't tell him about it and remind him. To begin this saga, you must have found the Bearskin (often near Skaldrun) on floors 1-11.
After finding these objects, you will always need to talk with Skaldrun about each one before the option to complete it will become available. Note that he will only remember 1 item at a time, so it is not advised to wait to talk to him until after you have found all 5 objects. It is perfectly acceptable to wait to complete The Sagas until you have access to them all though.
Each Saga has an abridged and unabridged version. You may play the abridged version of a Saga if you don't have the required levels, however, the reward you receive will be less. By playing the unabridged version, you gain the rewards for both versions. Completing the unabridged version of the Sagas is also a requirement for: Hard Daemonheim Tasks and Master quest cape, as well as the (Trimmed) Completionist cape.
For an unabridged completion, you must complete the following actions during the Saga...
- Investigate the rocky debris as Sir Owen and collect ore.
- Collect 2 Heim Crabs and a Gold charm - Use them on the summoning Obelisk (located in the room with the bridge after the ice puzzle room) and talk to the Gorajo familiar.
- Pick up the Broken Sword in the Agility puzzle room. It will crumble to rust, but save some ore.
- Pick up the Fractite pickaxe as Sir Owen and mine the Zephyrium rock for ore.
In this Saga you will be controlling Ozan, Sir Owen, and Araine. If anyone of these people die in the dungeon, it will end the Saga and you must start over. This is because, in the story you are being told, all 3 people survive. They will all start with 320 of 800 health. Be aware that Human enemies will focus their attacks on you, while animals will focus on your allies. You can swap between who you are by clicking their image in the top left corner, or by right-clicking the person and choosing the "switch" option. As you swap people, the other 2 will follow you. Right-clicking also offers the "wait"/"call" and "talk to" options.
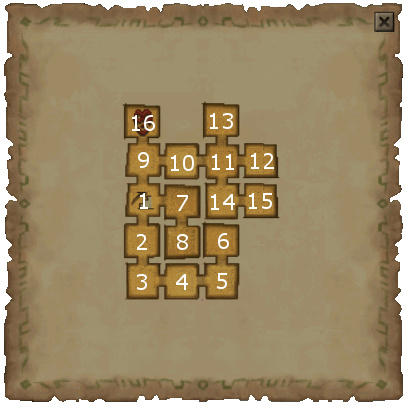
The map below indicates which room each step takes place in, for easy reference.
-
You will appear in the start room of this dungeon as Sir Owen. Collect the 4 Dusk eels in the North East corner and either spread them amongst the team or keep them on the main person you are controlling. Then enter the South door as Ariane. Before going in, open her spell book and select her active spell. You will need to do this EVERY time you swap to her.
-
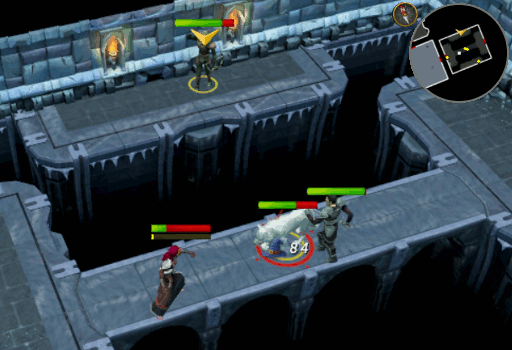
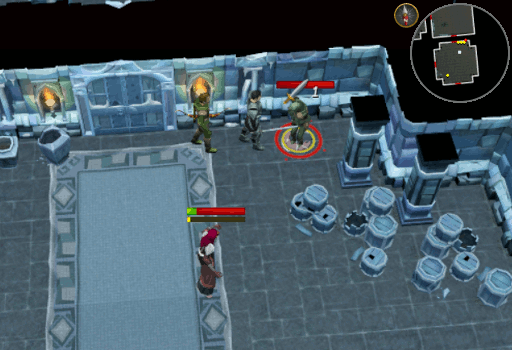
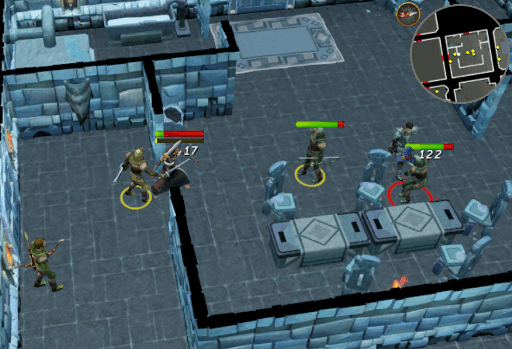
In the next room, you will find: a wolf and 3 bandits (2 melee and 1 ranged). Step into the room, right-click the ranged bandit and choose to "mark" him, this will cause everyone in your group to target this enemy. Once they are dead, move onto another bandit, then the last one, and finally the wolf. Once all of the enemies are killed, pick up the gold charm, 2 Heim crabs (do not eat if you are doing unabridged!), and a Dusk eel. Change to Sir Owen and check the Rocky debris in the North West corner, he should find come Novite ore. Swap to Ozan and open enter the next room to the South.

-
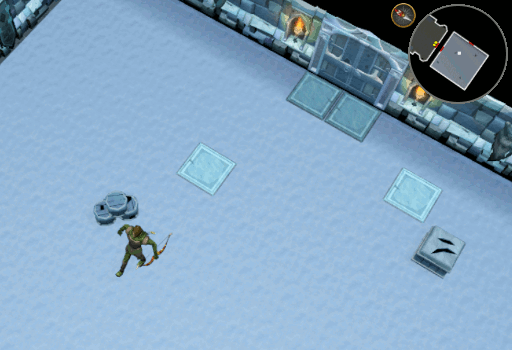
This room is an icy pressure pad puzzle that is never the same each time you complete this Saga. The goal is to stand on each one of the 4 pressure pads to unlock the door. You can slide both straight and diagonally. Attempting this puzzle with Sir Owen or Ariane will result in them slipping and Ozan making fun of them. Once you have made it through the door on the East side, Sir Owen and Ariane will teleport with him into the next room.
-
Upon entering the next room, swap to Ariane as soon as possible. There will be 2 archer bandits (one on either side of the walkway) and a wolf in the middle. Start with the bandits and finish by killing the wolf. Once the room is clear, use the Summoning obelisk near the West door to call a Cub skinweaver. Ariane will speak with it and then tell the others briefly what she learned. Enter the door to the East.
-
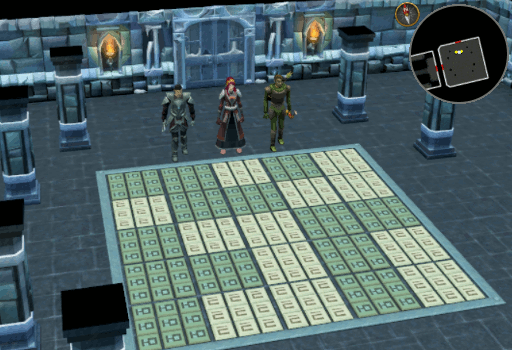
Here you will find a Runecrafting flip puzzle. As you should still be Ariane, simply use her to complete it. If you had swapped players at some point, become Ariane and complete the puzzle. When you choose to "Imbue" a tile, it and one tile at each of the 4 directions will all flip over to the opposite side (like a + sign), from green to yellow or vice versa. Choosing to "Force" a tile will change just that one tile to the other color, at the cost of some of her health so use it sparingly. Note that it will be possible to complete the board without having to force any tiles, but there is no perk for doing such. The puzzle is complete, and the door unlocks when the entire board is 1 color, be it green or yellow. Open the door to the North and prepare to go in.
-
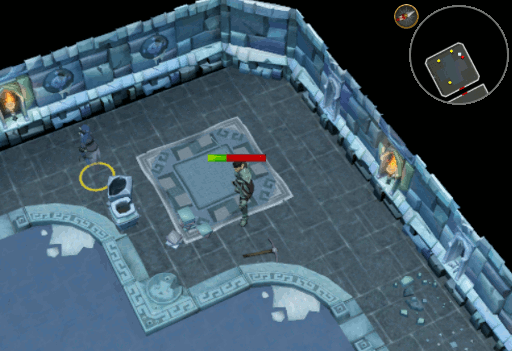
In this next room you will find 3 Mysterious shades. It is not necessary to kill them, however, doing so may provide your team with more Dusk eels. If you decide to kill them, it is recommended to do so as Ozan since they are weak to Ranged. Otherwise, choose your healthiest person to run in and grab the Green rectangle key on the East side of the pond. Be sure to tell the other 2 to wait in the Flip tile room so that they are not hit by the shades. Once you have the key, and potentially more food, return to the Start room either by walking or using the Home Teleport; remember to use Ozan to travel through the Icy room if you decide to walk.
-
Now back at the Start room, unlock and enter the Green rectangle room to the East. Once inside you will find 2 pressure pads. Place Ozan and Sir Owen each on one of the pads; it does not matter who is on which one. Then use Ariane to Imbue energy on the Runed door.
-
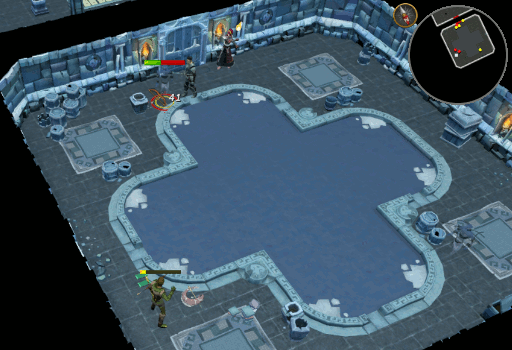
Upon imbuing the door, Ariane will be teleported into and trapped within the next room. Pick up the Crimson triangle key in the South West corner. Next right-click one of the large round crystals and choose the "get premonition" option. This will cause 6 dust clouds to appear on several of the crystals in the room. You will notice that they are in a specific order; this order will always be the same, however, you must get at least one premonition or you will be shocked even if you touch the correct first crystal. Now that you have learned the order, you must touch each of these crystals in that specific order.
- South - red
- West - blue
- West - blue
- North - green
- West - green
- South - yellow

-
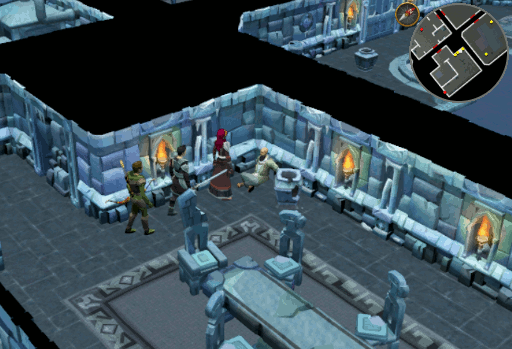
Now back at the Start room, unlock and enter the Crimson triangle room to the North. In this room you will find 2 archer bandits and a wolf. Enter as Ariane (remember to make sure you have your spell set) and mark one of the bandits, kill him then the other bandit and finally the wolf. With the room now clear, swap to Ozan and enter the door to the East.
-
On the East side of the room you will notice a Guard standing next to the door. The aim here is to charm the guard into not guarding the door. To do so, Ozan will need to use the following chat options.
- [Charm]What are you guarding?
- Isn't guarding a door in these dungeons a little...redundant?
- Who put you up to guarding the door?
- Why are you bothering to guard it?

-
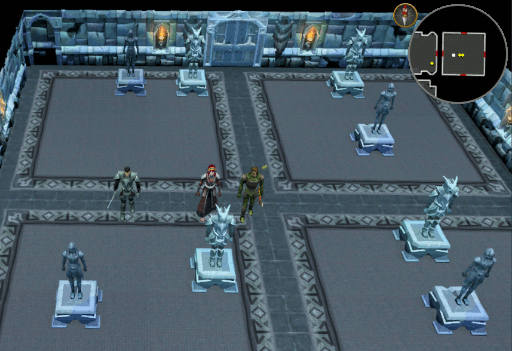
In this room you will find a statue matching puzzle. The goal here is to make the placements of the South statues match those in the North half of the room. Tell Ozan and Ariane to wait in the middle or Northern end of the room. Not doing so can make it difficult to move the statues appropriately because they can get in the way. To move the statues, stand on one side of the statue and click to push. Alternatively, you can right-click and choose to "pull" the statue. Once they are all in the correct position the doors will unlock.
-
This step and the next one can be skipped if you do not wish to complete the Saga Unabridged. Still as Sir Owen, open the door to the East. Inside you will find another pond with 3 Mysterious shades around it and a Fractite pickaxe in the South Eastern corner. Simply run in and grab the pickaxe then leave. Alternatively, if you wish, you can swap to Ozan and call Ariane so that the 3 of you can fight the shades and potentially collect more Dusk eels. Now that you have the pickaxe, return to previous room with the Potato farming guard and mine the Zephyrium rock in the North West corner. The Eastern room will now be complete. Swap to Ozan and enter the Northern door.
-
Within this room you will find an agility course. Walk Ozan on to the grooves on the floor, under the blades, past the swinging pendulum, and finally past the spinning blades. Of these, the spinning blades is the only one you have to do anything special to pass safely. You will be safe from as long as you stand as far away from it as possible when running past. Now through the maze, investigate the Broken longsword in the South Eastern corner. Upon picking it up, it will disintegrate and leave you with Bathus ore. Walk around the outer wall of the room and go through the door in the South West corner before rejoining the others.
-
Swap to Ariane and enter the Southern room. Before entering, remember to open the spell book and set her main spell! Inside the Southern room you will find 3 bandits, one melee and two ranged. Enter the room and kill them all. Once the room is clear, enter the Eastern door. You can enter this room as any of them.
-
Inside this room you will find the final key, the Gold crescent key, in the South East corner. Near the North West corner, you will also find Pikkupstix sitting on the floor. Grab the key and talk to Pikkupstix. You can ask him about why Carn left him here and if he is injured, but make sure you tell him to leave the dungeon. Then return to the room just North of the start room.
-
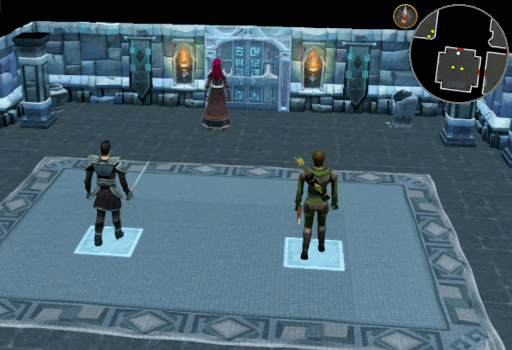
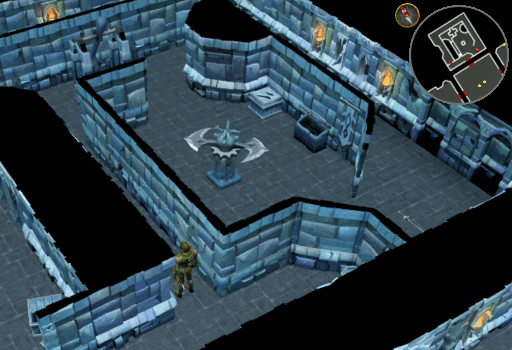
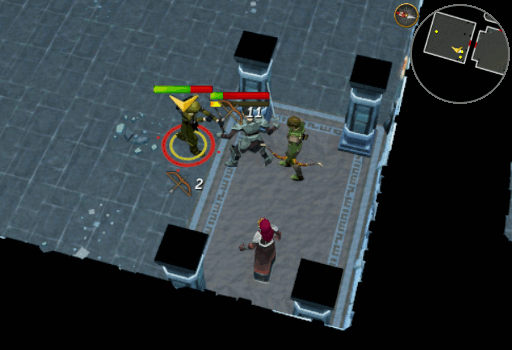
Open the final door and inside you will find Carn with 2 polar bears and a behemoth that seems to be under some sort of spell. You will be given 3 options on whom can reply to Carn, pick whichever you like as these choices do not affect the outcome of the Saga; alternatively, you can choose to end the conversation and move on to the fight. Once the conversation is complete, attack the polar bears first, they must be killed before you can damage Carn. Be sure to stand on either side of the door on what appear to be mats (as seen in the image). These are areas that will be safe from the rocks the behemoth will cause to fall from the ceiling. Once the fight with Carn has ended, you will need to choose what should be done with the behemoth; once again, your choice does not affect the saga.
-
When you have made your choice, a conversation will take place, then you will appear back in Daemonheim with Skaldrun where you will receive your reward.
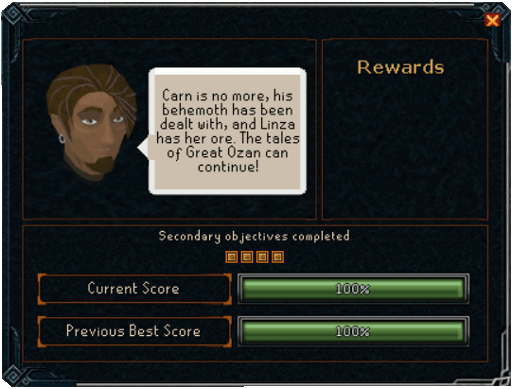
Congratulations! You have completed the Three's Company Saga!
This Miniquest Guide was written by ChathMurrpau, Rooskii, and Greg. Thanks to Zandahar for corrections.
This Miniquest Guide was entered into the database on Fri, Jan 17, 2020, at 10:32:33 PM by Alk12, and it was last updated on Sat, Jan 25, 2020, at 09:51:34 PM by Chath.
If anything is incorrect or missing, or if you have any new information to submit to this database, please submit it to us on our Content Submissions Forums.
If you see this guide on any other site, please report it to us so we can take legal action against anyone found stealing our content. This guide is copyrighted by RuneHQ, and its use on other sites is expressly forbidden. Do not ask if you can use our guides or images, the answer is and always will be NO!
Print this page with images - Back to the Miniquest Guide Index Page - Back to Top
