

- Archaeology journal
- Archaeology teleport
- Master Archaeologist's outfit
- Digsite pendant (Option 1)
- Varrock Lodestone and walk East
| Acting Guildmaster Reiniger | Drew | Easty | Ezreal | ||||
| Examiner | Head of Research | Helen | Matty Ock | ||||
| Museum guard | Researcher | Terry Balando | Velucia |
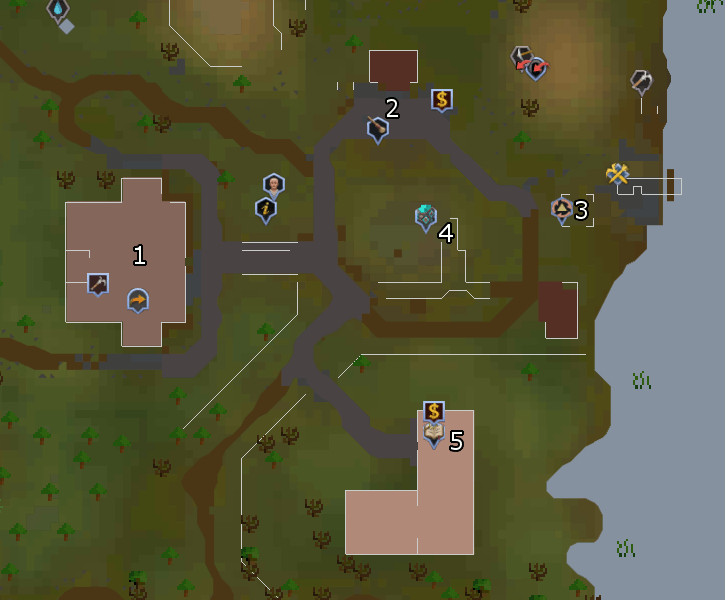
- Main Building
The main area of the Archaeology Guild is the Archaeology building. Within these walls are a majority of the NPC for the guild.

- Outside
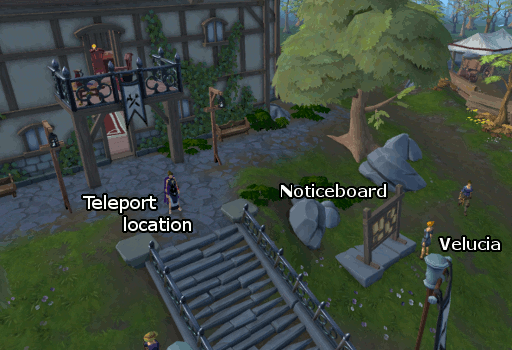
Just outside of the building is where you will end up if you teleport via the Archaeology journal, Master archaeologist’s outfit, or an Archaeology teleport scroll. Nearby, you will also find Velucia and the collector information Noticeboard (also visible via the Archaeology journal). The Noticeboard is where you can learn about the collectors, their various collections, and if you have turned them in or not.
- Ground Floor
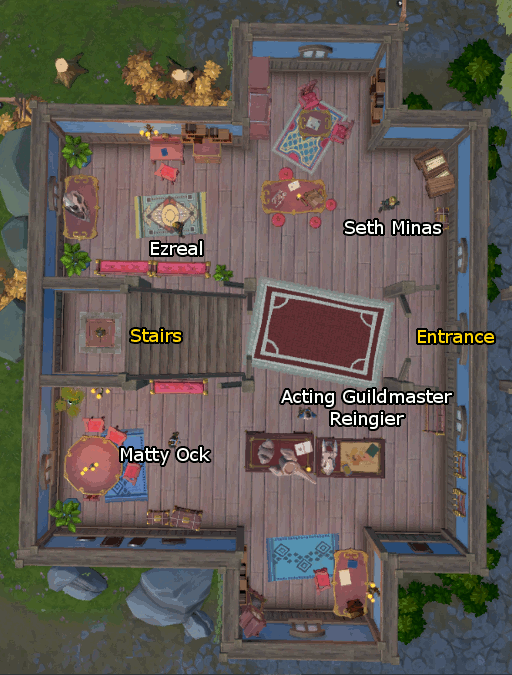
The Ground floor of the building houses is where the important people in the Guild are located. Just North of the door you will find Seth Minas, he is the manager for the Varrock Dig Site. Before beginning the tutorial, he will direct you toward Acting Guildmaster Reiniger near the shore to the East. Once you have completed that, he will have a few specific phrases that he will say as you reach specific milestones, but nothing more when you talk to him.
To the West of him is Ezreal. He operates the Archaeology Guild Shop where you can purchase various items for Chronotes depending upon what qualification you have earned. Majority of his items are unlocks/one time purchases, but he also sells several items which boost your Archaeology skilling.
Directly South of Ezreal is the staircase that leads to the second floor. Just beyond that is Matty Ock, who, I’m sure you can guess, buys and sells Mattocks. His mattocks include Bronze through Rune only; anything higher you will have to make or purchase from the Grand Exchange System... or be incredibly lucky to obtain, but more on that later. Note that this is the only shop in this area where you use Coins, everyone else uses Chronotes.
East of Matty and South of the door we find Acting Guildmaster Reiniger near her desks after you have completed the tutorial. One desk includes 2 Cup of tea spawns (note that these may be under the desk not on it) and the other holds the Dig sites map. Clicking this map will enable you to teleport to the various sites around Gielinor once you have the necessary Archaeology level to access them.
- Second Floor
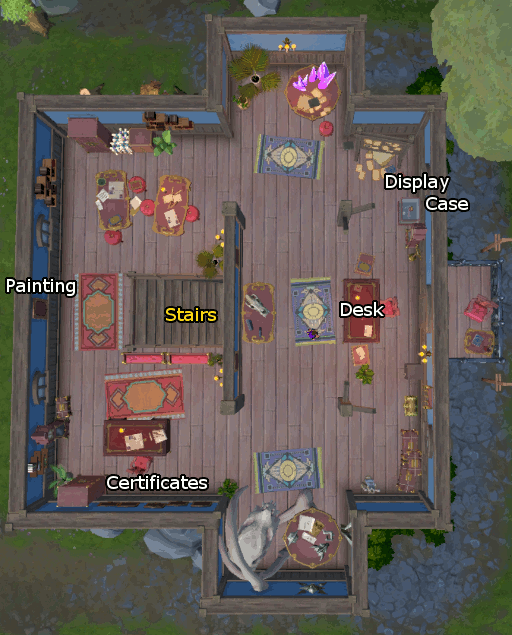
While the second floor holds far fewer people, none in fact, it still houses several places of note. Directly West of the stairs, you will see an empty frame on the wall. Here you can hang 1 of 10 images which are unlocked by completing the collections for Art Critic Jacques – paintings unlocked correspond to those within each collection and "The God Wars" unlocks once you have all others. On the wall to the South we find a collection of the Qualification certificates which you have earned.
Along the Eastern side of the room we find the highlights of the second floor, Guildmaster Tony’s desk and his display case. The desk serves 2 functions. The first is to supply you with additional Archaeology journals if needed – you can have multiple, but this is not necessary or particularly beneficial. The second function is that you can study Complete tomes at his desk to earn experience. Note that if you have multiple tomes, you can click the desk once to study all of them. As mentioned previously, this area also contains his display case. This is where Guildmaster Tony's mattock is kept – it is the best possible mattock in Gielinor. To access the case, you will need either a Shadowy key (1/10k chance to obtain from Ancient casket) or a Distorted key (9/10k chance to obtain). Note that only the Shadowy key will enable you to obtain the mattock, the Distorted key will only earn you experience when used (equal to that of a Complete tome).
- Outside
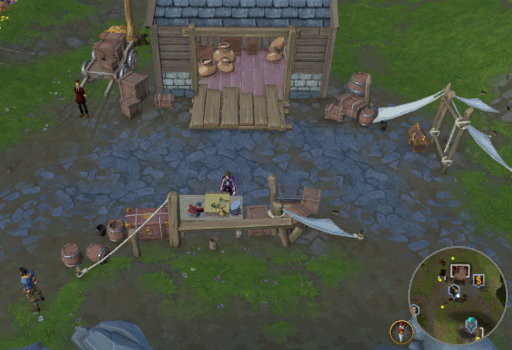
- Workbench & Donation Cart
North East of the main building is the main workbench and material storage location. Here you can store your collected materials and repair damaged Artefacts. On the West side of the building to the North is a Museum guard with a cart where you can donate repaired artefacts to the Museum. Doing so will only earn you 40% of the Chronotes you would have otherwise received, however, turning in certain number of artefacts will complete "The Donator" achievements. And on the East side of the building is a bank chest.
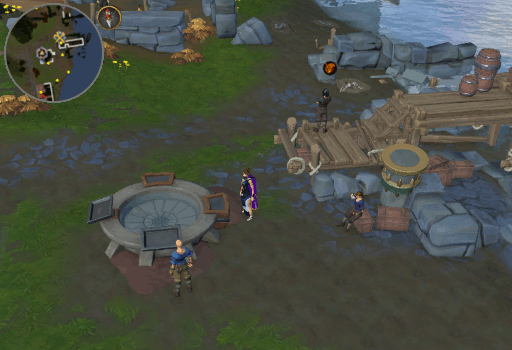
- Screening
Farther East, near the coast, is the screener. Here you can use soils collected at the various dig sites to break it down into experience as well as occasional materials and artefacts. This method of screening soils will provide you with all materials available at a dig site (depending on your skill level) as opposed to using an Auto-screener v1.080 to obtain just the materials available at the specific hotspot you are excavating. See our Screening section for what materials are available from each soil and see our Hotspots section for which material each location has to offer.
On the dock nearby, you will find Acting Guildmaster Reiniger before starting the tutorial. Helen and Drew can also be found on and around the dock.
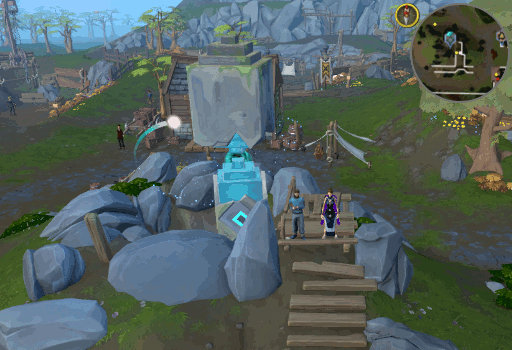
- Monolith
In the center of the area is a large Monolith. Here is where all of your qualification ceremonies will take place. It is also where you will offer Relics to harness their powers. See the Monolith section of our Archaeology guide for more details. Note that Easty can be found near the Monolith. If you some how manage to lose one of the Relics you have acquired, he can return it to you.
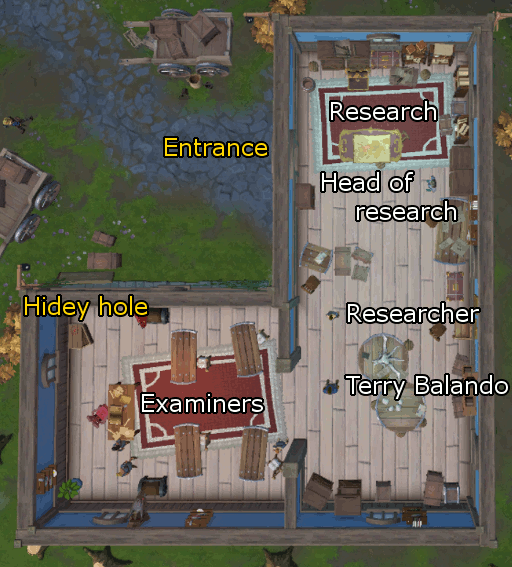
- Research (Exam Centre)
The final location of importance in the Archaeology Guild is the Exam Centre. This building is important because it acts as the hub for sending out Research missions. See our Research guide for more information about these missions (requires Associate qualification). In addition to the Research notes table and the Head of Research, you will also find a Researcher, several Examiners, Terry Balando and a Treasure Trails hidey-hole within this building.
This Guild Guide was written by ChathMurrpau. Thanks to 3ter 1 for corrections.
This Guild Guide was entered into the database on Tue, Aug 25, 2020, at 02:38:22 AM by Chath, and it was last updated on Mon, Feb 20, 2023, at 04:47:53 PM by KsbSingle.
If anything is incorrect or missing, or if you have any new information to submit to this database, please submit it to us on our Content Submissions Forums.
If you see this guide on any other site, please report it to us so we can take legal action against anyone found stealing our content. This guide is copyrighted by RuneHQ, and its use on other sites is expressly forbidden. Do not ask if you can use our guides or images, the answer is and always will be NO!
Print this page with images - Back to the Guild Guide Index Page - Back to Top
