

Table of Contents
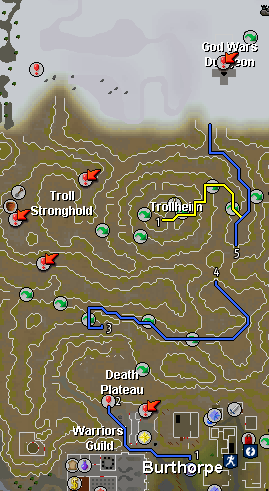
You must have completed Troll Stronghold and have either 60 Strength or Agility to pass the boulder blocking the way to the dungeon from Trollheim.
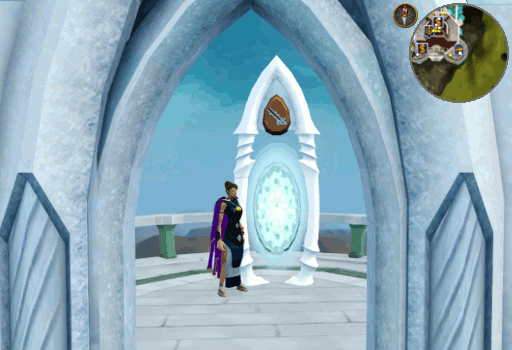
The absolute fastest way to make it into the God Wars Dungeon, and to whichever specific boss you are looking to pick a fight with, is by attuning the boss portal in the Max Guild. This can be re-tuned for free the first time and for 100,000 gold coins every time after that. Using this method will teleport you into the specific boss' encampment, allowing you to skip the main area of the dungeon.
Since not everyone can access the Max Guild, for most people the fastest way to reach the God Wars Dungeon is via the God Wars Dungeon Teleport spell or the tablet. These require 61 Magic and completion of The Mighty Fall, but will teleport you past the boulder blocking the path to the dungeon.
If you don't have access to this spell, the next fastest way to reach the dungeon is via the Trollheim Teleport spell or tablet which require 61 Magic and completion of Eadgar's Ruse. This will teleport you to the summit of Trollheim; you'll need to climb down the mountain and make your way to the boulder as indicated by the yellow line on the map below.
If you don't have access to either of these spells and tablets, you'll need to make your way to the dungeon from Burthorpe via the Death Plateau as indicated by the blue line on the map below. Note that if you do use this route, you'll need a pair of Climbing boots.
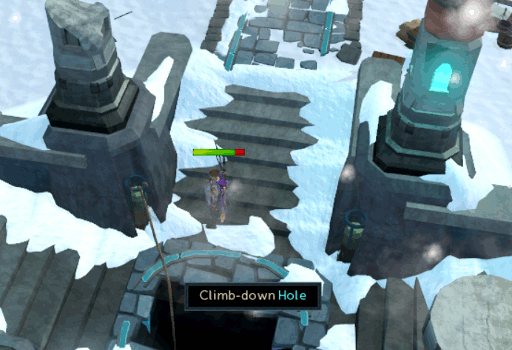
To enter the Icy Region itself, after you pass the Thrower trolls, you will have to shift a rock or climb through a crevice. To do so you need either 60 Strength or 60 Agility respectively.
After you pass this obstacle, your stats and run energy will start to drain because of the cold environment, so you should go to the dungeon itself as fast as possible!Note that this area is inhabited by aggressive Ice wolves (levels 71 and 95), so using Deflect/Protect from Melee is recommended for lower leveled players.
If it is your first time here, there will be a dying knight near the entrance, requesting you to deliver a letter to Sir Tiffy in Falador. You can read this if you want, but you don't have to deliver it to enter the dungeon.
For a detailed map of the battlegrounds, click here.
Most of the bosses within the God Wars Dungeon have no weaknesses; the exception to this is K’ril Tsutsaroth, who has a weakness to fire.
Because the bosses possess no weaknesses, it is possible to use any one of the combat styles successfully down here. Since the desired gear of a particular style does not change between bosses, here you will find master tables of the recommended gear for any particular style and the bosses will list which styles may be most successfully used.
Note that if you are using Virtus, Pernix, or Torva gear, it is not necessary to equip a Shard of Zaros or other God faction item as this will protect you from their aggression.

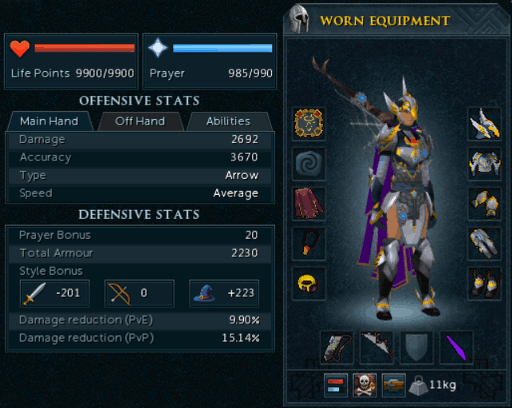
*Place ammunition within Tirannwn quiver (4, 3, 2, 1) if possible.
Inventory Gear:
Suggestions of inventory items to pack include:
- Shark / Monkfish / Rocktail
- (Super) Restore flask
- Holy / Supreme / Overload flask
- If possible, bring Yak or Mammoth filled with extra food. If you do not need excess food a Steel Titan is another good option.
When you climb down the rope, you will enter the main area of the God Wars Dungeon. It’s filled with monsters, which are the gods’ minions. They are battling each other and anyone who isn’t showing allegiance to their god.
The best way to protect yourself within the dungeon is to equip a Zaros item; this will protect you from all followers. The simplest option is the Shard of Zaros, which is obtained by completing Fate of the Gods.
If you have not completed the quest, the next best way to make the monsters not aggressive toward you, is to equip an item of each god. A cheap setup would be:
- Amulet: Armadyl pendant
- Cape: Zamorak cape
- Weapon: Ancient mace (works as Bandos item)
- Torso: Monk’s robe (works as Saradomin item)
As long as you are wearing something similar, you will be safe in the dungeon unless you unequip an item. If you do, all the monsters of that god faction that you’ve unequipped the item of will attack you!
The equipment listed in this guide is only a suggestion. You can alter it to best suit you, but remember to try and take at least a Zamorak item and an item of the god's general you're going too. Cheap alternatives are Holy or Unholy symbols and Saradomin or Zamorak cape from the Mage Arena.
Apart from the slightly stronger versions of Imps, Goraks, and Bloodvelds, there are also a few monsters that can only be found here.
- Aviansies (Armadyl)
- Knights of Saradomin
- Saradomin priests
- Cyclopes (Bandos)
- Orks (Bandos)
- Giants (Bandos)
- Goblins (Bandos)
Each god faction also has Spiritual rangers, mages, and warriors. These monsters can be given as an assignment; the Spiritual mages are a much-desired task. With their 83 Slayer requirement, they are the only monster in RuneScape that can drop Dragon boots.
Around the main room lie the camps of the five gods, and each needs a specific skill or item to enter. Note: Stat boosting potions or items will NOT work.
| Location | God Faction | General | Items/Levels Needed |
 Bandos' Stronghold To the West. |
Bandos | 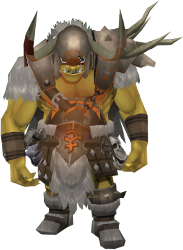 General Graardor |
70 Strength. Bang on the big door and you will enter the stronghold. |
 Zamorak's Fortress To the North. |
Zamorak | 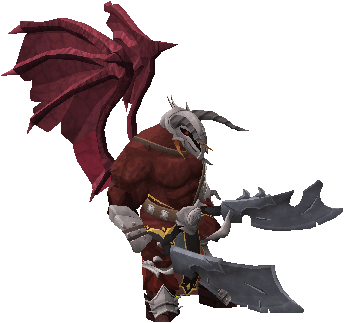 K’ril Tsutsaroth |
70 Constitution Your Prayer points will be drained to 0 as soon as you to cross. Prayer points will also be drained if you use the Max Guild portal. |
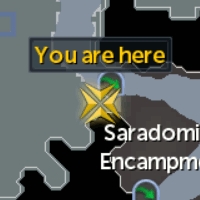 Saradomin's Encampment To the East. |
Saradomin | 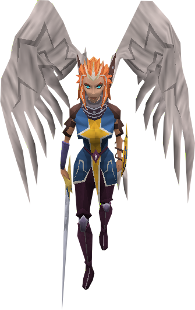 Commander Zilyana |
70 Agility You must climb down a rocky wall to access the main part of the camp and a second wall to access the Boss room. |
 Armadyl's Eyrie To the South. |
Armadyl | 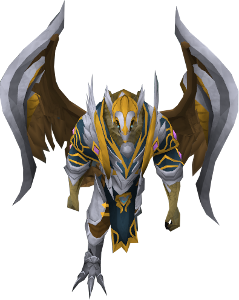 Kree’arra |
70 Ranged It is separated from the main hall by a huge chasm; you can cross by clicking on the gong hanging above it, which will teleport you across. |
 Ancient Prison To the South, a bit East of Armadyl’s Eyrie. |
Zaros | 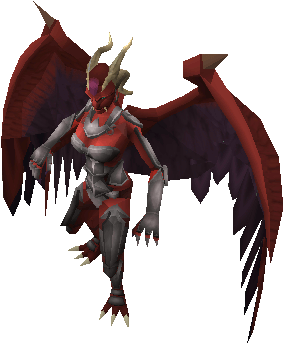 Nex |
70 Constitution, 70 Agility, 70 Ranged, and 70 Strength and the Frozen key*. You will enter the door East of Armadyl’s Eyrie, climb down the stairs, then enter another door into the main room. |
*To obtain the key, you need to kill the followers of the other four gods IN their camps until a piece drops. This may take about 50 kills per god. You will then need to assemble the key to be able to use it 5 times before you need to recharge it. It will cost between 10,000-50,000 coins per charge depending on your Smithing level. At level 99, it will cost you 1 Million coins to fully charge your key (100 charges max).
In each camp, you will find followers of that faction as well as Zamorak minions. However, there are only Zamorak monsters in Zamorak’s Fortress.
To enter the general’s room inside each camp, you will need 40 kills of that god’s minions. For example, you can kill 40 Aviansies to enter the room of the Armadyl general, Kree’arra.
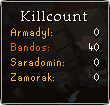
In the above image, you see how when you reach the required kill count to enter the Boss' room in the desired encampment, the text will change color. In this example we see that the player has the necessary 40 kill count to enter General Graardor's room within Bandos' Stronghold.
If you leave the dungeon, your kill count will be reset! Do not leave unless you are prepared to start over killing creatures.
Each general is always accompanied by three sergeants. They can drop the special armor or weapons and shards of the godsword blade, but only the generals can drop a hilt. All generals have two attack styles. This includes one single combat and one multi-combat so every person in the room can get hit.
Inside each boss room is an altar. Unfortunately, you can only use this once every 10 minutes. The teleport function will take you just outside the boss room; though this does not mean you are out of danger if you’re not wearing the right god item!
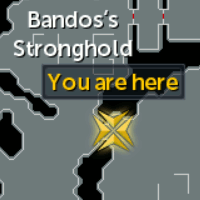
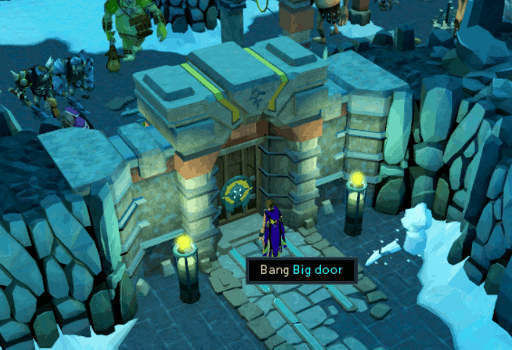
To the West of the dungeon is Bandos' Stronghold. Simply bang on the big door to enter.
The Bandos’ Stronghold is kept by General Graardor. This giant monster is accompanied by Sergeant Steelwill (Magic), Sergeant Grimspike (Ranged), and Sergeant Strongstack (Melee).
You can also use the Bandos pool in Oo’glog to keep Bandos' followers from attacking you for an hour (excluding for Graardor and his sergeants) if you do not wish to equip a Bandosian item or do not have one.
It is strongly suggested to use either a Melee or a Magic gear setup when fighting General Graardor. Of these two, Melee is the preferred method for most people.
Once you have geared up, your first requirement, after arriving to the dungeon, is to acquire your 40 kill count of Bandosian followers. You can easily get this by killing Goblins or Hobgoblins. A fast and easy method is to attack Orks near the Stronghold door with auto retaliate turned on, as they will become aggressive even if you are wearing a god faction item; they are mad you killed their friend(s) and are seeking revenge!
General Graardor attacks with both Melee and Ranged styles. Below we see a bit about how he uses these methods of attack.
| Attack Style | His Actions | How to React |
| Melee | He will punch at you, dealing up to 3,000 damage; though it tends to be around 2,000 damage most of the time. | Use Deflect/Protect from Melee. |
| Ranged | He will smash his hands to the ground and create a shockwave that covers a large area of the room as well as all people within the area, but only damages up to about 2,000 damage. | Use Deflect/Protect from Ranged. |
When entering the room, you should be prepared to use Deflect/Protect from Melee or Soul Split. General Graardor and the sergeants will immediately attack, so the first person in will need to be ready! If in a team, the rest should follow in and, while using Soul Split, attack General Graardor.
Once he is dead, you can kill off the minions; preferably starting with Sergeant Steelwill, as your armor is weak to Magic.
When they are all dead and the loot is collected, you should prepare for the next fight if you are staying for more. Use Freedom and Surge or Escape to stall your adrenaline bar so that you can use thresholds sooner in the following fight(s). Waiting around the middle of the room will place you close to his spawn location. Be sure to have Deflect/Protect from Melee on when General Graardor appears and attack him as quickly as possible to kill him off again.
If you’re running low on Prayer, you can use the altar inside the room to refill your Prayer points. Unfortunately, it will only work once every 10 minutes. If you try to use it again too soon, you will receive a message informing you how much longer before you can use it. This altar is also how you can leave the room when you are ready. This is done by right clicking and choosing Teleport. Other forms of teleportation out of this room will also work as per normal.
Hard Mode Strategy:
For this type of instance, it is suggested to use Magic so that you can run about the room and avoid General Graardor's Melee hits. As with Normal Mode, you will need to acquire a kill count of 40 Bandosian followers before being able to enter the Boss room.
Ensure that you are careful to not run under him during the fight as he can bind you in place and essentially trample you. Along with increased health, during Hard Mode General Graardor has 3 special abilities.
| Phrase | His Actions | How to React |
| "Graardor Mad" | Basically a berserker stage, he will temporarily deal more damage and have a higher attack speed. | Once out of attack range, use stationary abilities such as Asphyxiate can be taken advantage of at this time. Despite there being danger in this attack, successfully handling it can increase kill speeds, you will just need to be caredful. At the very least you will want to counter with Deflect/Protect from Melee and the Devotion ability. |
| "Graardor Protect" | He will enter a prayer stance. While he is praying, any attacks done to him will be deflected back to you. | Cease attacking Graardor during this period of time. It is a good opportunity to use Soul Split on one of the minions or to use a defensive ability. |
| "Graardor Smash" | He will smash the ground, causing the ceiling to come loose. Shadows on the ground will mark where chunks of rock will land. If you are crushed by a rock, you will suffer upwards of 1,000-1,500 damage per rock. | Rocks will fall aiming for your location; running around the edge of the room, while keeping an eye on Graardor, is suggested. Use surge and eat when necessary until the rocks stop falling. |
When beginning the fight, you will want to stand in one of the corners to draw General Graardor to you before beginning your laps around the room. It is recommended to conserve your surge ability for when he uses his Smash ability as you may need to rapidly avoid falling rocks.
Running from corner to corner, occasionally stop and attack General Graardor while being careful to not allow him to get too close, so you can avoid his Melee attacks. Thus you will want to avoid using Sunshine or Death's Swiftness since you are "tied" so a specific location if you want the bonus when it is active.
As with Normal Mode, focus your attacks on General Graardor first and take the minions out once he is down. When you have collected the loot, return to a corner of the room to await his respawn; using Freedom and Surge or Escape to stall your adrenaline for the next fight(s). Should you need to recharge your prayer points, the altar in the room will still be useable once every 10 minutes. And available the entire round in order to leave the fight. A 1-click teleport method is recommend to be brought in case you need to make a fast retreat.
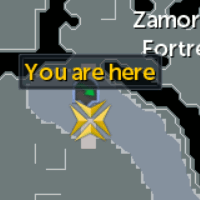
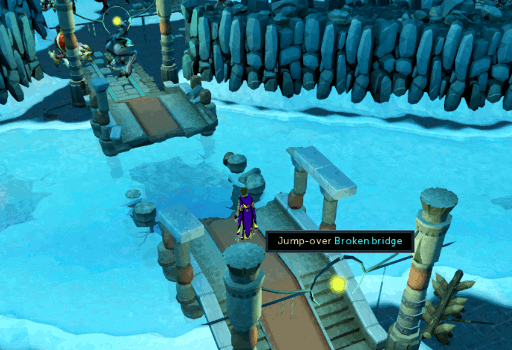
On the North side of the dungeon you will find Zamorak's fortress.To access this area, you will need to jump over the broken bridge. In order to jump over this bridge, 70 Constitution is required and jumping across it will drain your Prayer points to 0. Note that if you use the Max Guild portal to arrive here, your prayer will still be drained.
In the boss room you will find K’ril Tsutsaroth and his three bodyguards: Tsanon Karlak (Melee), Balfrug Kreeyath (Magic), and Zakl’n Gritch (Ranged).
Normal Mode Strategy:
It is strongly suggested to use either a Magic or a Melee gear setup when fighting K’ril Tsutsaroth. Of these two, Magic is the preferred method for most people.
Once you have geared up, your first requirement, after arriving to the dungeon, is to acquire your 40 kill count of Zamorakian followers. You can very easily get this by killing Imps. Since they should only take moments to kill, this is by far the quickest and easiest boss room to access and shouldn't take more than 5-10 minutes.
K’ril Tsutsaroth is perhaps one of the easiest bosses to kill in the dungeon as he is the only one with an actual weakness; Fire spells. However, he should still not be taken lightly as his attacks are very powerful. Due to his weakness, using Fire surge or Blood blitz is highly recommended for this fight. It is also suggested to use a Demon horn necklace and an Attuned ectoplasmator to restore your prayer 150 points for each Infernal ashes drop you receive.
K’ril Tsutsaroth uses both Melee and Magic during the fight. It is highly suggested to not use prayers at all when fighting him. This is because Prayer tends to trigger his special; not using prayer will not guarantee he will not use his special but it greatly reduces it. His attacks are as follows:
| Attack Style | His Actions | How to React |
| Melee | He will simply hit you with his giant scimitars, dealing up to 1,100 damage. | Take the damage if you are trying to avoid the special, otherwise use Deflect/Protect from Melee to reduce the attack by about half. |
| Magic | He will jump in the air and slam a scimitar into the ground. This will send out a shockwave of magical orange flames capable of hitting up to 600. | Take the damage if you are trying to avoid the special, otherwise deflect/Protect from Magic and continue attacking. |
| Special | He occasionally will jump into the air and shout "YARRRRR!", before slamming back into the ground and unleashing a cloud of black smoke. This attack is capable of hitting up to 5,800 damage, as well as poisoning and draining Prayer points. However, the damage can be spread out between players if they are standing close to the target. | Use of Debilitate can greatly reduce the damage taken if timed properly. Beyond this, ensure your health is always as high as possible. |
When entering the room, remember to not use Deflect/Protect from Melee or Soul Split as use of prayers/curses encourages his special. K’ril Tsutsaroth and the sergeants will immediately attack, so the first person in will need to be ready!
Once he is dead, you can kill off the minions; preferably starting with Zakl’n Gritch, as your armor is weak to Ranged.
When they are all dead and the loot is collected, you should prepare for the next fight if you are staying for more. Use Freedom and Surge or Escape to stall your adrenaline bar so that you can use thresholds sooner in the following fight(s). If you're in a team, it is very helpful to have a tanker stand in the middle of the room to be the focus of his attack while the others attack from the North East corner. If you are in the fight solo, the South Western corner is the best place to fight him from as your Area of Effect attacks will cover more of the monsters within the room when you use them.
If you’re running low on Prayer, you can use the altar inside the room to refill your Prayer points. Unfortunately, it will only work once every 10 minutes. If you try to use it again too soon, you will receive a message informing you how much longer before you can use it. This altar is also how you can leave the room when you are ready. This is done by right clicking and choosing Teleport. Other forms of teleportation out of this room will also work as per normal.
Hard Mode Strategy:
For this type of instance, it is still suggested to use Magic. As with Normal Mode, you will need to acquire a kill count of 40 Zamorakian followers before being able to enter the Boss room.
Ensure that you are careful to not run under him during the fight as he can bind you in place and essentially trample you. Along with increased health, during Hard Mode K’ril Tsutsaroth looses his previous special and weakness to fire, but has 3 new special abilities.
| Phrase | His Actions | How to React |
| Run, coward! | He will tell the player to run, then charge towards you and can hit over 1,000 if you don't make him run into a wall. | Step to the side out of his path. K'ril is immune to attacks during this special, but you can resume attacking after he hits the wall. |
| You cannot stand against Zamorakian might! | He will occasionally spawn spikes under his target. These hit over 900 every two seconds, until the player moves away. | Move off of the spikes and lure K'ril onto them. This will ofcourse cause you to stop taking damage as well as wound him with a small bleed. |
| Die in the name of Zamorak! | He will go into a rage and start to rapidly hit you with increased strength for several seconds using both Magic and Melee. This will hit anyone standing in the direction he is facing, lasting for 8 ticks and hitting about 2,000 each time. | Use of surge to escape his attack is the easiest method. Can this not be performed, deflect/protect from Melee or Magic in conjunction with Debilitate or Devotion is suggested. Use of Freedom or Anticipate may also need to be used to prevent yourself from being trapped under his feet. |
Because K’ril Tsutsaroth no longer has his Prayer smashing special, you can now freely use Prayers/Curses. Soul split is suggested if you have the level for it, otherwise Protect/Deflect from Ranged is a good alternative if you are in Magic gear.
When beginning the fight, you will want to stand in one of the corners to draw K’ril Tsutsaroth to you before beginning your laps around the room. Running from corner to corner, occasionally stop and attack K’ril Tsutsaroth while being careful to not allow him to get too close, so you can avoid his Melee and Special attacks. Thus you will want to avoid using Sunshine or Death's Swiftness since you are "tied" so a specific location if you want the bonus when it is active. Use of Metamorphosis, Combust, and other abilities that allow you to keep moving are necessary.
As with Normal Mode, focus your attacks on K’ril Tsutsaroth first and take the minions out once he is down. When you have collected the loot, return to the West side of the arena to await his respawn; using Freedom and Surge or Escape to stall your adrenaline for the next fight(s). Should you need to recharge your prayer points, the altar in the room will still be useable once every 10 minutes. And available the entire round in order to leave the fight. A 1-click teleport method is recommend to be brought in case you need to make a fast retreat.
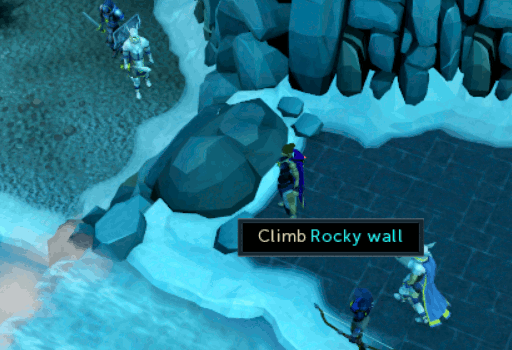
Saradomin's camp is set up on the East side of the dungeon down a rocky wall. To climb down, you need 70 Agility.
The Boss room is guarded by Commander Zilyana and her most trusted followers: Starlight (Melee), Growler (Magic), and Bree (Ranged).
Normal Mode Strategy:
When fighting Commander Zilyana, any style of gear is acceptable. Of these though, Melee is the suggested method if you can use a Noxious scythe, otherwise Magic is a good alternative.
Once you have geared up, your first requirement, after arriving to the dungeon, is to acquire your 40 kill count of Sardominist followers. Getting the kill count may take a while, as all of the followers are 100+ combat. However, these are often fighting Zamorakian minions, so you can attack these with little concern to your own health.
If using Magic to fight Commander Zilyana, it is suggested to use water spells, preferably Ice Barrage or Blitz. Note: Do NOT use Bloodfire spells as this will enrage her and make her attacks more powerful. Commander Zilyana attacks with Magic and Melee. See Below for more details.
| Attack Style | His Actions | How to React |
| Melee | Zilyana uses her sword to rapidly hit her target which is also capable of hitting up to 1,600. | Use Deflect/Protect from Melee. |
| Magic | Zilyana will raise her sword in the air and it will begin to glow blue before unleashing a magic lightning attack capable of hitting up to 1,600 on multiple targets. | Step a few paces away to avoid the Area of Attack. Or Deflect/Protect from Magic and use Devotion if you really do not want to move. |
Both of these attacks only work at close range, so if you are using Magic or Ranged, it is recommended to hit Commander Zilyana while running around the edge of the room.
When entering the room, remember to use Deflect/Protect from Melee or Soul Split. Commander Zilyana and the sergeants will immediately attack, so the first person in will need to be ready!
Once she is dead, you can kill off the minions; preferably starting with whichever minion is using the style your armor is weak to.
When they are all dead and the loot is collected, you should prepare for the next fight if you are staying for more. Use Freedom and Surge or Escape to stall your adrenaline bar so that you can use thresholds sooner in the following fight(s). When waiting for her to respawn, your location is up to personal preference. You can wait 1 space away from the middle of the Western wall so that Growler can easily be hit with any Area of Effect abilities. Or in the center so that Commander Zilyana, Starlight, and Growler can all be within Area of Effect range.
If you’re running low on Prayer, you can use the altar inside the room to refill your Prayer points. Unfortunately, it will only work once every 10 minutes. If you try to use it again too soon, you will receive a message informing you how much longer before you can use it. This altar is also how you can leave the room when you are ready. This is done by right clicking and choosing Teleport. Other forms of teleportation out of this room will also work as per normal.
Hard Mode Strategy:
For this type of instance, it is still suggested to use Magic. As with Normal Mode, you will need to acquire a kill count of 40 Saradominist followers before being able to enter the Boss room.
Ensure that you are careful to not run under her during the fight as she can bind you in place and essentially trample you. Along with increased health, during Hard Mode Commander Zilyana now will need to be fought in phases.
| Phase | Details |
| First | This is basically the same as the normal fight, but her attacks are stronger. However, once you get her health down to 0, she will fully heal and enter her second phase. |
| Second | Zilyana gains an additional ability. She can now charge the tiles on the floor with lightning which can hit over 1,000 damage if you don't avoid it. When her health reaches 50 in this phase, she will collapse to the floor and a new bar will appear under the health bar. You must now finish her off with an ultimate ability before the bar fills up, otherwise she will heal 12,500 and resume fighting. |
When beginning the fight, it is recommended to start near the Southern side of the arena. For Commander Zilyana, her Hard Mode fight is nearly identical to her normal fight. The main difference here is the fact that she now will fight you in two phases. Even here, the second phase is the only real difference. She will gain a new lightning ability that, once summoned, will remain in place until her death. There is no limit to how many of these 3X3 radius attacks can be summoned.
When she reaches 50 health she will collapse to the floor and you must finish her off using an ultimate ability before the bar above her head fills. Failing to do so, she will regain 12,500 health and begin fighting you once more. This being the cause, it is suggested to bring an Adrenaline potion to help avoid this.
As with Normal Mode, focus your attacks on Commander Zilyana first and take the minions out once she is down. When you have collected the loot, return to South side of the arena to await her respawn; using Freedom and Surge or Escape to stall your adrenaline for the next fight(s). Should you need to recharge your prayer points, the altar in the room will still be useable once every 10 minutes. And available the entire round in order to leave the fight. A 1-click teleport method is recommend to be brought in case you need to make a fast retreat.
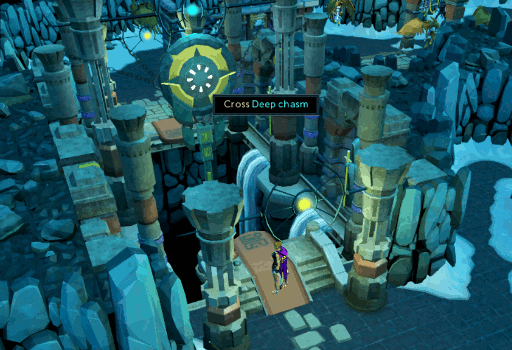
Armadyl's Eyrie is found on the South side of the dungeon and can only be accessed by crossing the deep chasm with 70 Ranged.
In the Eyrie's boss room, you will find Kree'arra and his bodyguards: Wingman Skree (Magic), Flight Kilisa (Melee), and Flockleader Geerin (Ranged).
Normal Mode Strategy:
When fighting Kree'arra, it is highly suggested to use Ranged gear, though Magic can also work alright here. Melee will NOT work against Kree'arra, his minions, or any of the Aviansies within his encampment.
Once you have geared up, your first requirement, after arriving to the dungeon, is to acquire your 40 kill count of Armadylean followers. The best method is to kill Aviansies as they drop noted Adamant bars which are highly sought after for quick/easy money.
Kree'arra uses all 3 attack styles. His attacks are as follows:
| Attack Style | His Actions | How to React |
| Melee | Rarely used, but very dangerous as Kree'arra will rapidly hit his target twice, dealing up to 1,500 with each hit for a total of 3,000. | This can be completely avoided by simply keeping your distance from Kree'arra. |
| Magic | Kree'arra will fire a blue tornado that can hit up to 1,000 damage. | Both of these attacks can occur at the same time. If they do, it is suggested to Deflect/Protect from Ranged as, when wearing Ranged gear to fight, your tolerance to Magic should be stronger. Otherwise Deflect/Protect from the appropriate colored wind. |
| Ranged | Kree'arra will fire a blast of wind that is highly accurate and capable of hitting up to 1,500 damage. |
When entering the room, remember to use Deflect/Protect from Magic or Ranged or Soul Split. Kree'arra and the sergeants will immediately attack, so the first person in will need to be ready!
Once he is dead, you can kill off the minions; preferably starting with Wingman Skree as he uses Magic, which your armor is weak to.
When they are all dead and the loot is collected, you should prepare for the next fight if you are staying for more. Use Freedom and Surge or Escape to stall your adrenaline bar so that you can use thresholds sooner in the following fight(s). Because Kree'arra’s Magic and Ranged tornadoes can move you around, it is suggested to stand next to the door or within a corner of the room regardless if you are killing him solo or in a team.
If you’re running low on Prayer, you can use the altar inside the room to refill your Prayer points. Unfortunately, it will only work once every 10 minutes. If you try to use it again too soon, you will receive a message informing you how much longer before you can use it. This altar is also how you can leave the room when you are ready. This is done by right clicking and choosing Teleport. Other forms of teleportation out of this room will also work as per normal.
Hard Mode Strategy:
For this type of instance, it is still suggested to use Ranged. As with Normal Mode, you will need to acquire a kill count of 40 Armadylean followers before being able to enter the Boss room.
Ensure that you are careful to not run under him during the fight as he can bind you in place and essentially trample you. Along with increased health, during Hard Mode Kree'arra will continue to use his attacks from Normal Mode as well as a new special.
Depending on how many people are in the room, Kree'arra is able to use multiple attacks at once. Which attack used is chosen at random and could be the same one back to back or could go back and forth between styles.
When the fight begins Kree'arra will summon yellow and blue tornadoes that move around the room until he is defeated. They can hit up to 3,000 damage every 2 seconds until you die or move.
Occasionally he will perform his new special. Kree'arra will shout "Storms, align to me!" this then forms a barricade of tornadoes around him and makes him invulnerable to your attacks. After several seconds of this, he will shout "Feel the power of Armadyl!" and launch the tornadoes at you. Again, if you don't avoid these, you will be dealt rapid, heavy damage, so it is best to move away from them.
As with Normal Mode, focus your attacks on Kree'arra first and take the minions out once he is down. When you have collected the loot, return to a corner of the room or the door to await his respawn; using Freedom and Surge or Escape to stall your adrenaline for the next fight(s). Should you need to recharge your prayer points, the altar in the room will still be useable once every 10 minutes. And available the entire round in order to leave the fight. A 1-click teleport method is recommend to be brought in case you need to make a fast retreat.
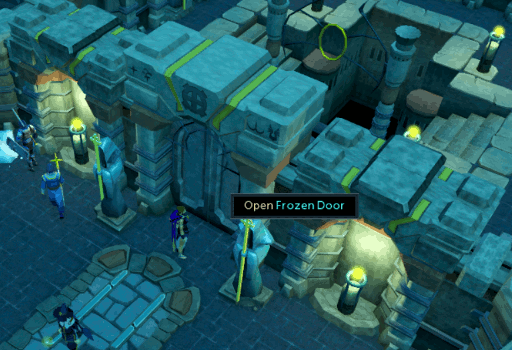
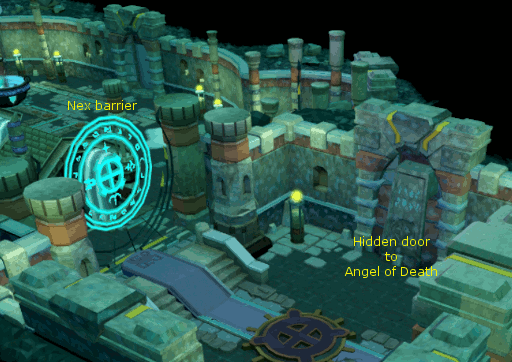
To the South of the dungeon is a huge frozen door that is designed to forever seal in Zaros' strongest general - Nex. Opening this door requires a Frozen key. To obtain this key you will have to kill followers of the other four gods in their encampments.
Once through the frozen door you will find yourself in a small room without monsters; climb down the stairs in the center of the room and you will now be in another safe room. Make sure to equip your Shard of Zaros and an Ancient Ceremonial set (boots, gloves, legs, mask, top). If you do not have the ceremonial set, you will be required to kill 40 of the monsters within the next area before you can enter the gateway to Nex's chamber. A full set of Ancient ceremonial robes, a Frozen key, and 10 million Coins can be given to Ashuelot Reis to permanently remove the required kill count for Nex.
When you are ready, enter the door to the main room. Here you will find Ancient Rangers, Ancient Mages, Ancient Warriors, and Blood reavers. These monsters will be aggressive toward you unless you are wearing a Shard of Zaros. Once you have your kill count, you can enter the barrier room to the East. Here you can bank with Ashuelot Reis and prepare for your battle with Nex. Once ready, banish the prison barrier and enter.
Important Notes: Nex is combat level 1,001 and is considered to be one of the more dangerous monsters in RuneScape. If you enter her lair unprepared, you can die within a matter of seconds. Also, do not try to solo Nex as an inexperienced player. It is best to duo or mass if you are learning or inexperienced.
You will be using Ranged and Magic to kill Nex as she often prays Melee. Below you will see the only gear that differs slightly from the normal 3 gear set-ups offered above. In some cases you will be required to tank and the below reflects the gear you should use.
Tanking Setup:
| Slot | Item | |
| Ranged | Magic | |
| Head | Superior void knight ranger helm | Superior void knight mage helm |
| Body | Superior elite void knight top | |
| Legs | Superior elite void knight robe | |
| Boots | Torva boots | |
| Gloves | Superior void knight gloves | |
| Cape | Reference Gear tables above for options. | |
| Two-handed Weapon | Reference Ranged tables above for options. | Reference Magic tables above for options. |
| Main-hand Weapon | ||
| Off-hand Weapon | ||
| Shield | ||
| Necklace | ||
| Ring | ||
| Ammunition | ||
| Aura | ||
| Shard of Zaros | ||
Inventory:
- 3 Holy/Supreme Overloads
- 2 Super restore flasks
- 5 Saradomin Brews
- Rest of the inventory should be Rocktails.
- If using a Yak or Mammoth, it should be filled with Rocktails/Sharks. Or you can choose to take a Nihil familiar that boosts your combat style.
Strategy:
Tankers should use a Noxious longbow until the Ice Phase. Then, they should always switch to a shield/shieldbow on Ice Phase. This so you can barricade the ice prison.
Nex is very strong and has a complicated attack pattern. As a result, this guide is only a general guideline. Every team has their own strategies and tricks.
Always stay together so Nex won’t run around the room as this will only make the fight longer.
Phases Summary/Reminder:
| Smoke Phase |
| Use Anticipation/Freedom repeatedly. |
| Pray Deflect from Magic. |
| Kill Fumus (North-West). |
| Shadow Phase |
| Move from the black shadows under you. |
| Pray Deflect from Ranged. |
| Kill Umbra (North-East). |
| Blood Phase |
| Don't use bleeds during this phase. |
| Do not attack Nex during Siphon (this will heal her). |
| Pray Deflect from Magic. |
| Kill Cruor (South-East). |
| Ice Phase |
| Free allies in icicles and run from Contain |
| Pray Deflect from Magic. |
| Kill Glacies (South-West). |
| Zaros Phase |
| Finish her and run away from her Wrath. |
| Pray Deflect from Magic. |
| Watch her prayers! |
Initial Phase:
Once you have passed the barrier and entered her prison, Nex will appear in the center and summon her four mages - Fumus (smoke), Umbra (shadow), Cruor (blood), and Glacies (ice); one in each corner of the room. This phase lasts for around 20 seconds and she will be unagressive.
Smoke Phase:
Use Anticipate/Freedom a lot to prevent being dragged into Melee distance. When this happens, she turns off your prayers and hits you for 2,000 to 3,000 damage. Attack Nex down to 160,000 health and kill Fumus (North-West).
Note: Deflect/Protect from Magic this phase.
Also keep an eye out for the special attacks listed below.
| Phrase | Effect of Attack | How to Avoid |
| Let the virus flow through you! | One of the players will get the virus. It will spread to players that are standing next to that player. This virus will hit you, lower your combat stats and drain your prayer points. | Just ignore the virus, sip from your super restore when needed and hold your position. |
| There is… NO ESCAPE! | Nex will run back to the center. If you are caught in this attack you can get hit for 4,000 damage or more. Most people use Bleeds to damage her over time. | As you are standing on the crossroads, just run a few steps aside. She will return to the center, attack her again. |
| None | Nex will pull you to her, disabling your prayers. | Just toggle your prayers back on and continue fighting. |
Shadow Phase:
Now you have to move away from her as the closer you are, the more you get hit. Attack Nex to 120,000 life points and kill Umbra (North-East). If your screen gets darker, you have to take more distance.
Note: Deflect/Protect from Range during this phase.
| Phrase | Effect of Attack | How to Avoid |
| Fear the shadow! | Shadow traps appear under every player. | Avoid the black shadow under you. If you fail to do so you'll get hit for 4,000 damage! Move away from your position, but don’t run over other people’s traps as you can get hit by EVERY trap. |
| Embrace darkness! | The room turns dark and everyone close to Nex will get hit for a large amount of damage. | As you are Ranging or Maging from a safe distance, you won’t too much of a problem with this attack. |
Blood Phase:
If you are duoing and both have Onslaught, use it after Nex is down with her Siphon. This should bring her to 80,000 health fairly quickly. Alternatively, you could use Sunshine/Death's Swiftness, drink an Adrenaline potion and use thresholds.
Attack Nex to 80,000 life points and kill Cruor (South-East).
Note: Do not use any bleeds during this phase, as these will heal her.
| Phrase | Effect of Attack | How to Avoid |
| I demand a blood sacrifice! | Nex will cast a blood barrage on someone, halving your prayer points and healing herself. | She will turn 1 person red. This person has to be 10 steps away from Nex or she'll hit them for 1,000 or more damage, and heal 10,000 health. When onslaughting, players tend to ignore this attack, as they'll do the 10,000 damage within a matter of seconds. |
| A siphon will solve this! | Nex will kneel down for about 3 seconds and summon up to three blood reavers. All damage done to her during this time will HEAL her. She will also kill the blood reavers from the last siphon and heal herself with their remaining lifepoints. | Stop attacking Nex! Instead, hit the blood reavers so the next siphon will heal her less. |
Ice Phase:
This is one of the most dangerous phases for tankers.
It either starts off with an Ice Prison or Contain. Both attacks are dangerous, but the damage can be avoided, and they are both used multiple times during this phase. The first special is based on whether Nex ended with a Blood sacrifice or a siphon in the previous phase.
- Blood sacrifice makes the first attack a Contain
- Siphon makes the first attack an Ice prison.
During Ice Prison, have your friend free you by clicking the one ice pillar of the prison. If you have a shield and a 100% adrenaline, use freedom followed by barricade to bypass the damage, instead.
During Contain, try to stay away from Nex until she's done with her attack. Getting hit by Contain deactivates your prayers, stuns you (this can be cleared using Freedom), and hits you for at least 1,000 damage, unless you move away.
Note: Always use Freedom followed by eating up to max health, because if your partner doesn't free you in time you will get hit with 8,000 damage!
As soon as you have Nex down to 40,000 health, kill Glacies (South-West). Beware of Ice Prison whilst killing the minion.
| Phrase | Effect of Attack | How to Avoid |
| Contain this! | Nex will make a 2x2 box surrounded by ice around her. If you are caught inside your prayers will be disabled and you will take some damage. | Just get away from her. If you are trapped, be ready to heal and put your prayer back on. |
| Die now, in a prison of ice! | Nex will freeze a player in a some stalagmites. The player himself can’t break his prison but the others can. If the player is still in the prison after 3 seconds, they will get hit up to 8,000 damage and their prayers will be disabled. | If you are in the prison, heal to or above maximum lifepoints and spam click outside the box so you will move as soon as you are free. If one of your teammates is trapped, free them by clicking on the stalagmites. |
Zaros Phase:
After killing the final minion, Nex heals herself back to 70,000 health. She'll start out with using Soul split (prayers). After a few attacks, she'll use a deflection prayer. This prayer differs from time to time and can kill you if you don't pay attention, seeing how it reflects/deflects damage dealt back to you.
Just like every other phase, bring her health down and kill her.
Important side note: Upon dying, Nex uses Wrath (prayer/curses). This can potentially kill you if you stand in it and are low health. Best thing to do as soon as she dies is to run away to avoid being damaged.
| Phrase | Effect of Attack | How to Avoid |
| NOW, THE POWER OF ZAROS! | (only at the start of this phase)Nex will heal 70,000 lifepoints at the start of the phase. | Unavoidable. |
| Taste my wrath! | When she dies, Nex will activate Wrath. | Run away from her and keep your lifepoints high. |
Hard Mode Strategy:
If the fight above was not hard enough for you then you may want to check out Nex: Angel of Death. It is the same Zarosian General you love, but even more difficult to defeat. See our Nex: Angel of Death Special Report to learn how to take her on.
The tables below contain the unique drops of each of the 5 God Wars Dungeon Generals.
| General Graardor | |||
 Bandos boots |
 Bandos chestplate |
 Bandos tassets |
 Bandos gloves |
 Bandos helmet |
 Bandos warshield |
 Bandos hilt |
 Decaying tooth |


| Commander Zilyana | |||
 Saradomin sword |
 Saradomin's hiss |
 Saradomin's murmur |
 Saradomin's whisper |
 Armadyl crossbow |
 Off-hand Armadyl crossbow |
 Saradomin hilt |
 Auburn lock |
| Kree'arra | |||
 Armadyl boots |
 Armadyl chestplate |
 Armadyl chainskirt |
 Armadyl gloves |
 Armadyl helmet |
 Armadyl buckler |
 Armadyl hilt |
 Giant feather |


The Godswords are level 75 two-handed weapons crafted from the hilts and shards dropped by the Generals. Each possesses a powerful special attack, or passive effect which can be switched between by using the sword on the altar in the room of the General who drops the corresponding hilt e.g. the Armadyl godsword must be used on the altar in Kree'arra's room.
| Godsword | Special Attack | Passive Effect |
 Armadyl godsword |
Armadyl's Judgement requires 50% adrenaline/special attack energy and deals up to 250% weapon damage. | This has a 1/4 chance to activate during combat and raises your Attack and Strength level by 1 each time it activates up to 10% of your base Attack and Strength levels. |
 Bandos godsword |
Warstrike requires 100% adrenaline/special attack energy and deals up to 200% weapon damage and drains your target's Defence. | This has a 1/4 chance to activate during combat and drains your opponent's Defence level by 1 each time it activates down to 90% of their base Defence level. |
 Saradomin godsword |
Healing Blade requires 50% adrenaline/special attack energy and deals up to 170% weapon damage and restores Life points by 50% of the damage dealt and Prayer points by 2.5%. | This has a 1/4 chance to activate during combat and restores 3% of your Life points and Prayer points each time. |
 Zamorak godsword |
Ice Cleave requires 60% adrenaline/special attack energy and deals 175% weapon damage and freeze your target for 10 seconds. | This has a 1/4 chance to activate during combat and freezes your target for for 6 seconds. |
This Special Report was written by ChathMurrpau. Thanks to Previous guide writers: Ghou, Zaros Ultor, Javezz, and Telle as well as: Atod, Sccrluk9, Jett_Man, Tuo_Templar, Dea-Proximo, axeking187, Jakesterwars, Tokenblack20, Bob, Crypto416, Sir Brendan8, Sailorscoutx, 4everawake, Richie_S, Scorpia126, Cyberp0lice, Darkblitz, Ludo, Alfawarlord, Bazzy, Egekalaycan, Sarawr, watkinsted, Rooskii, Haxorze, Ksb Single, and Sirius XM for corrections.
This Special Report was entered into the database on Sun, Dec 02, 2007, at 12:30:24 AM by Jakesterwars, and it was last updated on Wed, Jul 13, 2022, at 01:09:06 PM by Robbie.
If anything is incorrect or missing, or if you have any new information to submit to this database, please submit it to us on our Content Submissions Forums.
If you see this guide on any other site, please report it to us so we can take legal action against anyone found stealing our content. This guide is copyrighted by RuneHQ, and its use on other sites is expressly forbidden. Do not ask if you can use our guides or images, the answer is and always will be NO!
Print this page with images - Back to the Special Report Index Page - Back to Top
