

- Croesus Front
- Gear
- The Arena
- The Fight
- Attack Rotation
- Number of Players
- Contribution Points
- Rewards
To reach the Croesus front, travel to the Senntisten cathedral and then exit out the Eastern door. Note that the first time you exit these doors you will get a cutscene. After exiting the cathedral, you will walk down a long pathway before finding yourself in a large open area. Within each of the corners will be 1 of 4 types of skilling nodes: Fishing, Hunter, Mining, and Woodcutting. Each area has several deceased Lumbridge and Varrock guards which you can collect fungus from if you have at least 88 in the associated skill.
Like during the Croesus encounter, the nodes here can be shiny/sparkling (Enriched), normal, or brown (depleted). Unlike the Croesus encounter, however, the Enriched nodes require a higher level (92 vs 88) and they give you enriched versions of the fungus harvested. These fungi collected have several uses including being fed to Player-Owned Farms critters (Zygomites and Chinchompas), making potions, Cooking, and completing several items dropped by Croesus. See the associated item or guide for more information about them.

Generally speaking, there are only a few things that are NEEDED when completing a Croesus encounter.
- Pickaxe, Hatchet, and Small net (toolbelt works, but augmented items are great too)
- Stat restore potion(s)
- Super restore (recommended)
- Fishing potion
- Hunter potion
- Mining potion
- Woodcutting potion
- Burning thingies (best to worst)
- Sana's fyrtorch
- Orthen furnace core
- Logs (Protean recommended as they stack)
- 15-18 EMPTY inventory spaces
While those are all that are technically required, additional gear can make the process of successfully defeating Croesus much easier. As such below are the recommended gear setups for each corner of the arena. Don't worry if you can't get or use any of the items below, simply use the best that you can and have fun!
| Fishing | Hunter | Mining | Woodcutting | |
| Outfit | Fury shark | Volcanic trapper | Magic golem | Nature's sentinel |
| Cape | Fishing | Hunter* | Mining* | Woodcutting* |
| Tool | Fishing rod-o-matic OR (Augmented) Crystal fishing rod |
Magic butterfly net OR Enhanced yaktwee stick |
(Augmented) Pickaxe of earth and song OR (Augmented) Crystal pickaxe |
(Augmented) Crystal hatchet OR Dragon hatchet |
| Aura | Call of the Sea | Tracker | Quarrymaster OR Berserker |
Lumberjack |
| Familiar | Granite lobster OR Ibis |
Arctic bear OR Spirit kyatt/graahk/larupia |
Gargoyle OR Lava titan |
Beaver |
In addition to all the awesome gear listed above, there are are few other great things you may want to use:
- (Grasping) rune pouch - Filled with Soul runes, Body runes, Fire runes, and Earth runes to cast Crystal mask. This will block 1 hit from any Croesus attack (excluding fairy ring). Mask will deplete in 5 minutes or when you are hit by an attack.
- Artificer's measure - Enables you to restore the statues a little faster.
- Any main-hand or off-hand weapon with mobile perk - Reduces cooldown for Bladed Dive/Surge/Escape. Alternatively the Shadow's Grace relic will do the same.
- Tagga's corehammer - +10% Critical strike chance and +34 critical strike damage. Can also receive Deathspore arrow tips.
- Grace of the elves - Seren spirits.
- Brooch of the Gods - Blessings of the Gods and Skilling urns/effigies (caution that this can use up to 4 inventory slots if you have each type of urn)
- Luck of the dwarves - Increased drop luck.
- Ring of Whispers - Invisible skill boost.
- Pontifex shadow ring - Reduces stat drain and enables you to gain better troves. Not necessary once boosted to T6 as the effects are passive.
- Perfect plus potion - Grants 4hr boosts (5% increased Fishing success and 5% chance of double logs when Woodcutting). Perfect juju fishing and Perfect juju woodcutting potions can also work, but only last 1hr.
- Oo'glog or Anachronia mud bath - Increases your Hunter level by 8 and removes human smell making hunting easier.
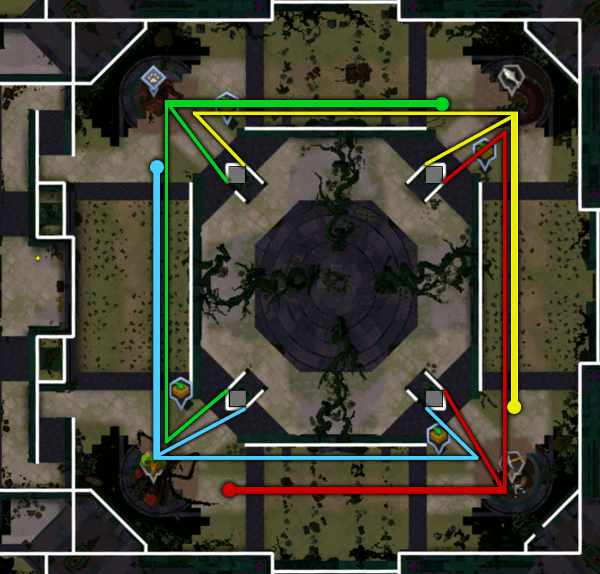
Now that you have prepared for the encounter, let us give you a little tour. Croesus' arena is a giant square wherein she resides at the center. By the entrance is Gorvek, who can be right clicked to teleport to any of the corners, and a drop chest. In each of the 4 corners is a boss corpse containing 3 skilling nodes, 3 dead guards with skilling nodes, a deposit box, and a statue. The goal of the fight is to collect resources to restore the statues. This will stun Croesus and reveal her core which you must then deplete of resources. Doing so will defeat her and grant you rewards.
Note that there are no skill or quest requirements in order to defeat Croesus, though higher levels will enable you to defeat her faster.
For more information about each specific corner and the corridors between them, see the sections below.
While each corner is focused on one specific skill, all four of them share the same features:
- Boss corpse (contains 3 skilling nodes)
- Dead guards (3, each with a skilling node)
- Deposit box
- Statue to restore
When harvesting from any of the bosses, it is in your best interest to collect from the shiny/sparkling node whenever possible as this will help deplete the boss faster and earn you more points. It is also very important to avoid collecting from the brown (decayed) node as you will collect Rotten fungus, lose contribution points, AND replenish the boss carcass. Note that the shiny/normal/decayed node locations on the boss will regularly change while you are depleting the carcass. As the node locations only have a finite number of positions, it is possible that the locations will not actively change as it will "roll" the same placement.
This corner contains a Dagganoth corpse from which to harvest Fungal spore. These resources/skill are associated with the color blue. In order to restore Vendi's statue in this corner, you will need 15 Fungal algae and Calcified fungus resources.
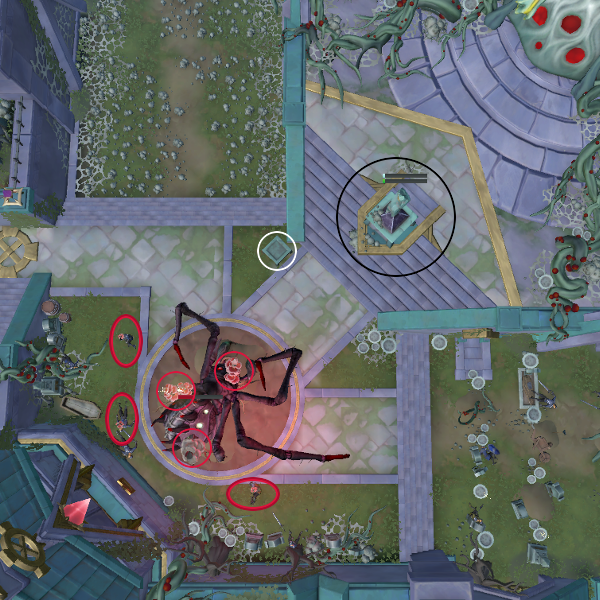
This corner contains a Araxyte corpse from which to harvest Timber fungus. These resources/skill are associated with the color red. In order to restore Sana's statue in this corner, you will need 15 Fungal spore and Fungal algae resources.
This corner contains a Mole corpse from which to harvest Calcified fungus. These resources/skill are associated with the color yellow. In order to restore Tagga's statue in this corner, you will need 15 Timber fungus and Fungal spore resources.

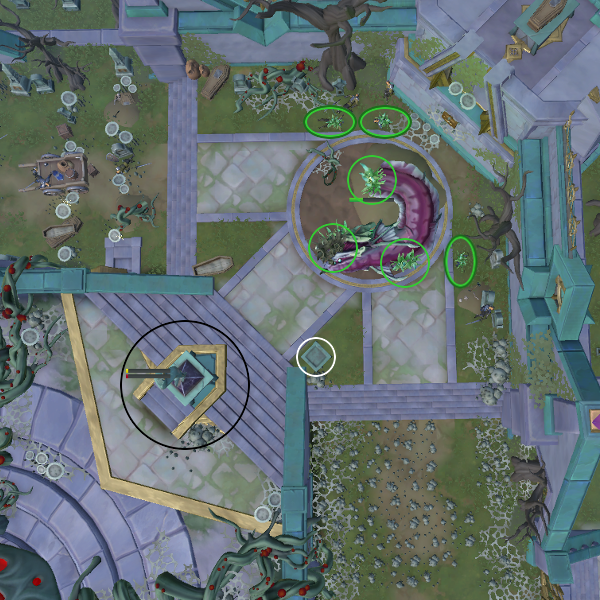
This corner contains a Leviathan corpse from which to harvest Fungal algae. These resources/skill are associated with the color green. In order to restore Ophalmi's statue in this corner, you will need 15 Calcified fungus and Timber fungus resources.
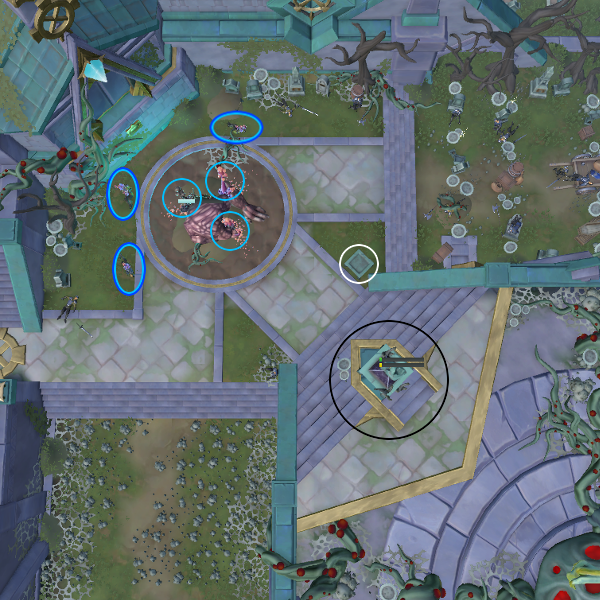
Within the Croesus arena, there are 2 types of corridors you will need to traverse from one corner to the next. On two ends are Mushroom Obstacles and on the other 2 ends are Mushroom Minefields. Keep in mind that you should not attempt to transverse from 1 corner to the next if the Blue blob has just landed as it can make it difficult to reach the middle for the Energy fungus.
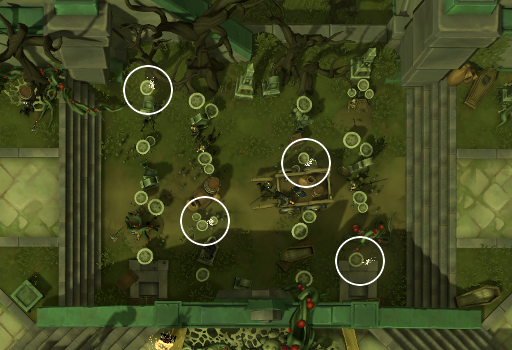
On the North and South ends of the arena (traveling East to West/West to East) are 4 rows of 4 large mushrooms. In order to reach the opposite corner, you will need to climb over the 4 shiny mushrooms (1 per row). Note that climbing over a mushroom obstacle that is not shiny will enrage Croesus and drain ALL FOUR of your stats 10 levels (7 with Pontifex shadow ring). Note that the specific mushrooms which are shiny only changes after every kill.
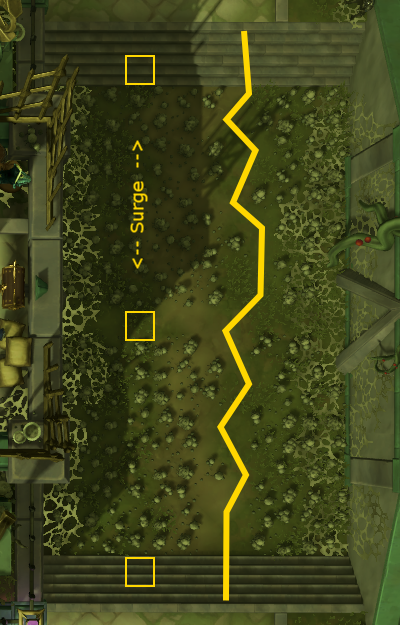
On the East and West ends (traveling North to South/South to North) are large patches of mushrooms. Within the field there is a path running roughly North to South and one running directly East to West at the midpoint. Stepping on any of the mushrooms results in draining ALL FOUR stats by 10 levels (7 with Pontifex shadow ring) and one of the resources in your inventory will rot.
To avoid this damage you can either simply walk along the clear path or you can Bladed Dive/Surge across. When doing this, you want to ensure that you are on the very bottom step of the stairs leading to the Minefield. If you are going to Surge first (or Double Surge), you will want to make sure that you walk straight onto the final step. If you step diagonally into the "start" point, you will also Surge diagonally and thus end up in the mushrooms and take damage. For this reason, many people will use Bladed Dive to the midpoint and then Surge to the other end.
Now that we know where pretty much everything is within the arena, let's cover the basics on how to defeat Croesus. To start out, you will need to ensure that everyone in your group is aware of their roles. Depending on the Number of Players you have participating, this will change how much work you need to do and where you will end up toward the end of the kill. The description below is based off an 8-man kill wherein the carcass is poisoned before leaving the corner. Once everyone is clear in their task(s), someone will need to interact with Croesus to begin the kill. For efficiency, this should always be 1 designated person so the others can stand at the ready in their corner. It is also recommended to ensure that all participants are ready before actively beginning an encounter. This is frequently done by each person typing "R" in the local chat, but may be done differently depending on how your group functions.
With the fight instigated, the attack rotation will begin, more on this later. You will now want to begin collecting resources from the boss carcass in your corner. Once again, you want to focus your collecting from the shiny node and avoid collecting from the decayed one. Above the carcass you will notice a bar that fills as you are collecting from the nodes - or emptying if you are collecting from the decayed node. Your goal is to empty the boss of resources until the bar completely fills and resets. Once the Boss carcass has been depleted, you will now be able to poison the carcass. Doing this slows down how fast the carcass "respawns" resources. To poison a depleted carcass, ensure that you have at least 10 Rotten fungus in your inventory and then attempt to harvest from the boss. Poisoning a carcass will cause the bar above it to decrease by half and refill half as fast.
With the boss emptied and poisoned, you will want to ensure you have AT LEAST 15 resources in your inventory - this is why you need empty spaces. It is highly advised to have 16 or 17 just in case you are hit by an attack as you travel to your designated statue. Once you have all the resources you need, you will begin to travel counter-clockwise (anti-clockwise) around the arena. Depending on your role in the group, you will be taking these supplies to either the statue in the next corner or the one in the corner just after it. Once you reach your destinated statue, you will need to interact with it to deposit your resources. Note that the bars above the statues represent the resources that it requires/has - each bar is color coded to the associated skill/resource. The bar on top is always the resource 1 corner away and the bottom is the resource from 2 away (on the opposite side of the arena). You will also note that piles on the sides of the statues behave similarly in that the pile to the left of the statue is always the closest resource while the pile on the right is the resource from across the arena.
Once the statue has both of the needed resources, you can begin to restore it. This will take several ticks wherein you will receive Construction experience. Note that the statue will be restored more rapidly if you have an Artificier's measure equipped. When fully restored, you will have the option to begin praying at the statue. Before doing so, it is HIGHLY recommended to confirm that the remainder of your group is ready. Praying at a statue will progress the fight and cannot be undone once completed. Note that it is possible to partially pray a statue, but you should exercise caution when doing so. Miss-timing the stop or someone being unaware you pre-prayed a statue can "force" the progress of the fight forward.

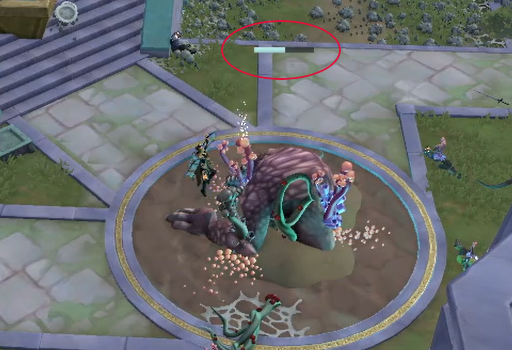
After at least one statue has been fully prayed at, Croesus will pause her attack rotation and reveal her core wherein you will find 1 large resource node. As per extensive testing, this node is always random and will only remain accessible for a limited amount of time - 15 seconds per statue prayed at. While the middle is open, you will want to interact with the resource node. This will cause you to start "collecting" from it, earning you experience and dealing damage to Croesus. The amount of damage you deal depends on a few factors and your base damage is (your current skill level X 10) per hit - this can be affected by stat drain. The number of carcasses that are clear while the middle is open will also affect the amount of damage you do per hit.
- 1 carcass = 25% Base damage
- 2 carcass = 50% Base damage
- 3 carcass = 100% Base damage
- 4 carcass = 150% Base damage
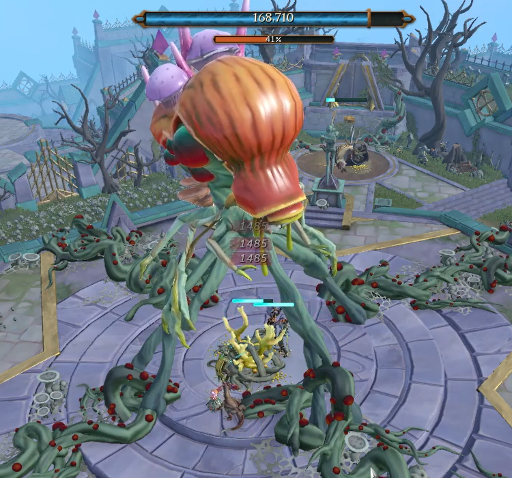
Assuming you manage to fully damage Croesus before the timer runs out(small blue bar above the node), the encounter will be complete and your rewards will be in the chest by Gorvek. If you have failed to fully damage her, however, her skirt will drop and everyone will be kicked from the center. If you have prayed at all 4 statues, she will also gain a large amount of enrage which will most likely cause the encounter to fail. If not all of the statues had been prayed at, you will have the chance to complete any remaining statues and gain the 15 seconds for them as well. Note that nothing resets so you will have the same enrage as before. Having completed the encounter, with or without successfully killing Croesus, everyone will want to return to their starting positions and prepare for another encounter. Note that while all other boss encounters can still spawn a new boss up until the instance timer reaches 0:00, here you will no longer be able to start an encounter once the timer hits 1 minute remaining.
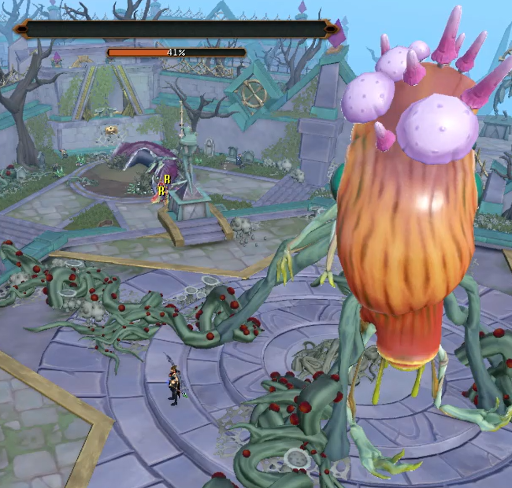
Above you may have noticed that we mentioned Croesus becoming enraged. As an encounter is progressing, she is slowly getting angrier - the speed at which this occurs changes depending on how many are present in the encounter. In addition to it increasing with time simply passing, participants getting hit by any of her attacks will also increase her enrage. If she becomes fully enraged, tracked by the orange bar just beneath her blue health bar, the encounter will fail.

In addition to the attacks making Croseus' enrage increase, several of the attacks will also cause one or more of your skills to drain. The amounts drained will be covered below, however, it is worth noting that stat restore potions will "heal" you. This is important as, similar to Croesus' enrage bar, you have a purple stat bar that appears over your head when hit. If this stat bar empties, you will be removed from the encounter and placed next to Gorvek at the top of the stairs. When this happens, the remainder of your group can continue without you. Should they successfully complete the kill, you will gain neither a kill count nor any drops regardless of what your score was before you were kicked.
Once a Croesus encounter starts, she will begin her attack rotation. Each attack will occur approximately 12 seconds after the previous one and, luckily, it is possible to see her launch each attack several seconds before they hit, provided your camera is in a good position. Note that not EVERY player in an instance will be hit with every attack below. As such, it is helpful to either communicate with your team via voice chat or to use Alt-1 to track the rotation - be aware that you will need to let it know when the Energy Fungus has been cleared to accurately begin the next rotation timing.
- 0:13 - Red Spore Bomb
- 0:25 - Fairy Ring
- 0:37 - Slime Mould
- 0:49 - Yellow Spore Bomb
- 1:01 - Hard Fungus (Stun)
- 1:13 - Sticky Fungus
- 1:25 - Green Spore Bomb
- 1:37 - Fairy Ring
- 1:49 - Slime Mould
- 2:01 - Blue Spore Bomb
- 2:13 - Hard Fungus (Stun)
- 2:21 - Sticky Fungus
- 2:25 - Energy Fungus
The time that each consecutive rotation begins will vary depending on how rapidly your group is able to clear the Energy fungi. Once they are cleared, the rotation will begin at the same pace; 13 seconds after the clear you will have a red spore bomb, 25 seconds... etc.
As you may have noticed above, there are 6 types of attacks within Croesus' rotation. These include Spore Bombs, Fairy Ring, Slime Mould, Hard Fungus, Sticky Fungus, and Energy Fungus.
-
Spore Bomb: Croesus will launch a bomb at the location you were standing at when she tosses her bomb. When it lands, there will be a 3x3 cloud which will drain 15 levels of the associated skill (based on the cloud color) per tick you are standing within the cloud. Red - Woodcutting, Yellow - Mining, Green - Fishing, Blue - Hunter. Note that the Pontifex shadow ring will reduce it to 11 levels of drain. Simply move away from the area, before or after they land, to avoid stat drain.

-
Fairy Ring: A fairy ring will spawn beneath you, first noticed by a small dust cloud and then mushrooms appearing in concentric circles around you. Remaining within the center of the fairy ring will cause you to teleport to ANY of the 4 corners (including the one you are currently in), rot 1 of the resources in your inventory, and slightly enrage Croesus. While this can be used to help you travel around the arena, that is best saved for when you are comfortable with how the encounter works. Until that time, simply step out of it when you see it begin to spawn. Pontifex shadow ring has no affect on this mechanic.
-
Slime Mould: Croesus launches a Slime Mould at you. They will land somewhere within a 7x7 area around where you are standing when she tosses it. Once they land, the Slime Mould will start chasing you. Luckily, they can be blocked by various bits of terrain; use caution though as they can still attack you at an angle. Should they hit you, you will suffer a 25% stat drain in ALL FOUR skills and one of your resources will be rotted. The amount of damage can be reduced to 18.75% with a Pontifex shadow ring. Note that you CAN get hit and drained from someone else's Slime Mould. If they are not interacted with in approximately 6 seconds after they land, they will implode and no longer be an issue.
-
Hard Fungus: Croesus launches a Hard Fungus that will land where you were standing when she begins the attack. When the fungus lands, you will be temporarily stunned if you are struck by it. Failing to remove the stun (Freedom) will cause you to have ALL FOUR stats drained 20%, or 15% with a Pontifex shadow ring. Note that using Anticipate/Freedom just before the fungus hits or simply moving out of the way will prevent you from becoming stunned.
-
Sticky Fungus: Croesus will cause a Sticky Fungus to spawn at some players feet, regardless of where they are or were standing when the attack begins. Failing to escape the fungus after a few ticks will begin to drain ALL FOUR stats 10% (7.5% with Pontifex shadow ring) every tick for up to 5 hits. To escape the Sticky Fungus, you or a teammate must burn it away. This can be done with Timber fungus, regular logs, Protean logs, Orthen furnace core, OR Sana's Fyrtorch. Note that while the last 2 items are the fastest, they also MUST be equipped to work. Also be aware that you will NOT be able to Surge/Escape/Bladed Dive immediately after clearing the fungus. You will need to walk at least one space before you are able to use those abilities. As such, use caution when crossing a Minefield if this attack is nearing.
-
Energy Fungus: At Croesus' base in each of the corners, she will spawn an Energy Fungus and use Sticky Fungus on some of the players. If you have a Sticky Fungus, you will need to have it removed before you can assist with the Energy Fungus. Once spawned, you will see 2 bars above each Energy Fungus. The top one is their health bar and the bottom one is their timer - both of the amounts in these bars are shared among all 4 Energy Fungi. The goal is to completely remove them (empty the top bar) before the timer runs out. Failing to do this will enrage Croesus 40%. Simply clicking the Energy Fungus in your quadrant will begin to clear it. Clearing this attack is worth the most Contribution Points so it is HIGHLY recommended to not miss it when it occurs.
While the actual actions that need to occur during a Croesus encounter remain the same, the actions you personally need to take will differ depending upon how many participants are present. Roles include:
- Short - This person will collect resources and take them to the statue 1 place counter-clockwise.
- Long - This person will collect resources and take them to the statue 2 places counter-clockwise.
- Rotting - This person will poison 1 (or more) of the boss carcasses by attempting to harvest from it with 10 Rotten fungus in their inventory. As this role can also be done by someone performing another role instead of as a separate role and can be done either before OR after running resources (the carcass just needs to be poisoned before it refills) it is important that the team assess this before beginning. That way you can ensure all corners follow a consistent plan so that all 4 carcasses get poisoned before they refill. If you are not the person poisoning the carcass, it can be helpful to contribute Rotten fungus to your teammate who is. Note that Ironmen/Ironwomen CANNOT accept Rotten fungus from teammates regardless if it is traded or dropped.
- Floater - This is an extra role that tends to only apply in a 5 person setting. This person is frequently used to run the short resources in a 5-man team, but can also be used as the Rotter.
As fewer and fewer people participate, the amount of time to complete a kill and the number of actions you need to perform will increase. Once you have reached the point of doing a 3-man kill, the roles listed above will not particularly apply.
Depending on exactly how many people are present during a mass, there may not be much to do. Simply avoid the attacks and collect resources to put into the table unless you are assigned/claim one of the roles; be sure to not skip the Sticky Fungus attack if it occurs. Note that it is possible that there will be no real coordination with a Mass.
Completing an 8-man kill at Croesus is one of the most basic and easiest to do. With this method, you will have 2 people assigned to each start corner. The first person will take their supplies to the 1st statue counter-clockwise and the other person will take their supplies to the 2nd statue counter-clockwise. Once they arrive to their designated locations, the resources should be added and the statue rebuilt once ready. For rotting the carcasses, you have a few options depending on what your group wants to do.
- Short role collects and poisons carcass
- Long role collects and poisons carcass
- Short and long each collect 5 Rotten fungus and short (or long) poisons
Reminder that the poisoning of the carcasses can be done before OR after taking the resources to the appropriate statue as long as it is before the carcass resets. Regardless of your chosen method, ensure the whole team is aware of who will be poisoning and when. Once the statues are all built and the group is ready, pray at the statues and clear her core to complete the fight.
For a 7-man kill, 3 of the corners will have 2 people (short and long) while the 4th corner will only have 1 person (long). As Hunter can be the most rapidly depleted corner if the person is using the Volcanic trapper set, it is recommended to have this be your solo corner, however, the method works with any of the corners as solo.
Regardless of which corner chosen to be solo, that person will collect at least 16 resources and place them in the table. They will then collect at least 16 resources which they will run 2 statues counter-clockwise; potentially after poisoning the carcass (if your group poisons as long role before leaving the corner). The person who is running short for the corner 1 statue clockwise (ie Fishing short if Hunter is solo) will deposit their collected resources into the appropriate statue and then collect the resources from the table and run those 1 statue counter-clockwise. If the person in the solo corner is lagging particularly far behind the other corners, it is a good use of time for any that pass by to either help empty the carcass or to donate some Rotten fungus as needed.
When each person reaches their designated statue, they should add the resources and restore the statue after all have been added. Once the group is ready, pray at the statues and clear her core to complete the fight.
With 6-man kills half of the corners will have 2 people (short and long) and the other half of the corners will have 1 (long). It is recommended that the solo corners are opposite sides (Hunter and Mining (<-recommended) or Fishing and Woodcutting) to avoid overlap of short and long runners.
On the corners with only 1 person, they will collect at least 16 resources and place them within the table before collecting at least another 16 resources for themselves. They will poison the carcass if applicable, then run their resources 2 statues counter-clockwise. Like with the 7-man run, those who are 1 statue clockwise from the solo corners and are running short, they will deposit their initial resources into the appropriate statue then collect the resources from the table and take them 1 statue counter-clockwise. If those in the solo corners are lagging particularly far behind the other corners, it is a good use of time for any that pass by to either help empty the carcass or to donate some Rotten fungus as needed.
When each person reaches their designated statue, they should add the resources and restore the statue after all have been added. Once the group is ready, pray at the statues and clear her core to complete the fight.
On a 5-man kill, it is suggested to have 1 person on each corner (long) and a floater. The main people for each corner, excluding the corner where the floater starts, will collect at least 16 resources and place them in the table. They will then collect the resources they need to run 2 statues counter-clockwise and poison a carcass; they will poison the carcass they start or finish at depending on the teams decision of when to poison.
The floater will collect at least 16 resources then run 1 statue counter-clockwise and add it to the statue. From here, they will take the resources in the table and run another 1 statue counter-clockwise. This will continue until they have made a full circle around the arena and each statue has their short run resources. From here, they are welcome to assist any of their other teammates as necessary. Note that it is also possible to use your floater as the de-facto poisoner, however, that decision is up to your group and how you interact.
When each person reaches their designated statue, they should add the resources and restore the statue after all have been added. Once the group is ready, pray at the statues and clear her core to complete the fight.
To complete a 4-man kill, there should be 1 person in each corner. They should collect at least 16 resources and place them within the table. Once the table is full, they should collect their own resources and Rotten fungus; they will poison the carcass they start or finish at depending on the teams decision of when to poison.. At this point you will run either 1 or 2 statues counter-clockwise depending on if your group runs short-long or long-short.
Assuming your group runs short-long, you will first take your resources 1 statue counter-clockwise and deposit them in the statue. You will next grab the resources from the nearby table then proceed to run 2 statues counter-clockwise and deposit them in the statue which you will restore. Conversely, if your group runs long-short, you will first run 2 statues counter-clockwise then take the resources 1 statue counter-clockwise and restore that statue. Either way, once the group is ready, pray at the statues and clear her core to complete the fight.
This is the point where Croesus kills begin to get mildly interesting as you will want to mix and match your gear, aura, and familiar based on which set of tasks you need to complete. Note that this set of tasks can be technically be completed with any of the 4 corners as the backup statue, however, there is no real benefit for which statue you choose to be the backup. The main difference will be per person in the group depending on what skills they do or don't want to train and thus which position they choose from below.
Player 1 - start in Hunter
Woodcutting Gear + Beaver familiar + Tracker aura
- Gather at least 15 Spores and deposit in table
- Gather 10 Spores and rot Hunter
- Gather at least 15 Spores and run to Woodcutting statue
- Gather at least 15 Timber and run to Fishing statue
- Collect from Fishing table (holding 15 Algae)
- Restore Fishing statue
Player 2 - start in Mining
Fishing Gear + Gargoyle/Lava Titan familiar + Call of the Sea aura
- Gather at least 15 Calcified and run to Fishing statue
- Gather at least 15 Algae and deposit in table
- Gather 10 Algae and rot Fishing
- Gather at least 15 Algae and run to Woodcutting statue
- Gather 10 Timber and rot Woodcutting
- Restore Woodcutting statue
Player 3 - start in Woodcutting
Woodcutting Gear + Gargoyle/Titan familiar + Quarry Master aura
- Gather at least 15 Timber and run to Mining statue
- Run to Hunter and collect table (15 Spores)
- Run at least 15 Spores to Mining statue
- Gather 10 Calcified and rot Mining
- Gather at least 15 Calcified and keep hold of it
- Restore Mining statue
Once Fishing, Woodcutting, and Mining statues are restored, pray all 3 and clear the core. If you won't clear it in time, everyone should bail to Hunter corner to restore the statue and pray again (Player 1 and Player 3 have the resources to contribute).
For duo encounters, only 3 statues will be restored and prayed at. Note that this set of tasks can be technically be completed with any of the 3 corners being the ones completed. However, the ones used below are chosen due to the amount of time it takes to collect the resources needed for the Hunter statue, thus it is the one not restored
Rusher - start in Mining
Fishing Gear + Gargoyle/Lava Titan familiar + Lumberjack aura
- Gather at least 25 Calcified and rot Mining
- Run to Fishing statue and collect at least 35 Algae (20 will need to be turned into Rotten fungus)
- Rot Fishing
- Run to Hunter and rot
- Run to Woodcutting statue and contribute Fishing
- Gather 25 Timber and Rot, keep 15 Timber for final statue
- Restore Woodcutting statue
Prepper - Start in Hunter
Woodcutting Gear + Arctic Bear familiar + Tracker aura
- Gather at least 15 Spores and deposit in table
- Gather 15 more spores
- Run to Woodcutting statue
- Gather 15 Timber and harvest until teammate has Leviathan nearly empty
- Run to Fishing statue
- Run to Hunter and collect from table for final statue
- Return to Fishing and restore statue
Once Fishing and Woodcutting statues are restored, pray both and clear the core. As this will not quite clear the center, everyone should bail to Mining corner just before the timer ends. Here they will need to restore the statue and pray again.
UNDER CONSTRUCTION
While completing a Croesus encounter, most actions you are performing will earn/lose points. These points are announced at the end of a kill and will determine how much of a reward you will receive. In order to receive the total number of possible drops (12), you will need to have at least 420 points; only 60 are required for a chance to receive one of her unique drops (1/600 drop chance). The amount of points per qualifying action are listed in the table below.
| Action | Points |
| Harvest enhanced (shiny) node | +3 |
| Harvest normal node | +2 |
| Harvest rotten node | -2 |
| Rotting a cleared Boss carcass | +20 |
| Clear teammate's Sticky Fungus | +10 |
| Contribute resource to statue | +2 (per resource) |
| Restore statue (up to +75 per statue) | +1 (per xp drop) |
| Remove Energy Fungus | +5 (per tick) |
| Damage to Croesus' core | +2 (per xp drop) |
| Clicking Green/Blue core sparkles | +2 |
| Clicking Yellow core sparkles | +1 |
| Clicking Red core sparkles | -2 |
As clearing the Energy Fungus provides the most points during an encounter, it is highly important to do your best to not miss clearing it when the time comes. It is suggested that 4-man groups go through the full attack rotation at least twice to ensure all participants can receive the max possible drops.
Once an encounter has completed, all rewards will be collected in the chest just South of Gorvek. Rewards will continue to collect in the chest until it reaches capacity, you manually take/bank them, or until you lobby/sign off. When you lobby or sign off, any rewards that are currently in the chest will be transferred to your bank. If there is not enough space in your bank, the remaining items will appear in your inventory. If there is not enough space between your bank and your inventory for all items, any that do not fit will drop to the ground and be lost. Note that if the chest is filled, without you lobbying/signing off, it will begin to overflow to the ground just in front of it. As such, it is suggested to empty it after every 2 or 3 hours. Note that if you are in a group with Loot Share on, your items will also drop to the floor; simply turn off Loot Share to solve this.
As mentioned previously, the number of drops you will receive per encounter is based on the number of points scored. The point values per drop is the following.
- 0 drop rolls = 0 - 19 points
- 1 drop roll = 20 - 69 points
- 2 drop rolls = 70 – 129 points
- 3 drop rolls = 130 – 189 points
- 4 drop rolls = 190 – 239 points
- 5 drop rolls = 240 – 279 points
- 6 drop rolls = 280 – 309 points
- 7 drop rolls = 310 – 339 points
- 8 drop rolls = 340 – 359 points
- 9 drop rolls = 360 – 379 points
- 10 drop rolls = 380 – 399 points
- 11 drop rolls = 400 - 419 points
- 12 drop rolls = 420+ points
The main drop table includes the following items. For each point threshold above, you will get 1 roll on the table below.
| Cockatrice egg (40-50 Noted) | Coins(125k-175k) | Croesus foultorch | |||||
| Croesus spore sack | Croesus sporehammer | Croesus's enriched root | |||||
| Cryptbloom boots (incomplete) | Cryptbloom bottoms (incomplete) | Cryptbloom gloves (incomplete) | |||||
| Cryptbloom helm (incomplete) | Cryptbloom top (incomplete) | Crystal key (8-12 Noted) | |||||
| Grapevine seed (10-14) | Grimy dwarf weed (17-23 Noted) | Grimy kwuarm (17-23 Noted) | |||||
| Grimy toadflax (17-23 Noted) | Hydrix bolt tips (38-42 | Inert adrenaline crystal (7-9 Noted) | |||||
| Kwuarm seed (5) | Limpwurt root (35-45 Noted) | Magic logs (120-180 Noted) | |||||
| Medium plated orikalkum salvage (3-5 Noted) | Mort myre fungus (45-55 Noted) | Necrite stone spirit (35-45) | |||||
| Onyx dust (23-27) | Raw rocktail (45-55 Noted) | Red spiders' eggs (45-55 Noted) | |||||
| Scripture of Bik | Soul rune (120-180) | Uncut diamond (15-25 Noted) | |||||
| Uncut dragonstone (11-13 Noted) | Uncut emerald (35-45 Noted) | Uncut onyx | |||||
| Uncut ruby (35-45 Noted) |
In addition to the main drop table above, you will also have the same amount of rolls on the secondary drop table below. Note that the Troves listed below are still subject to the "maximum of X per hour" limit.
| Chaos die reroll token | Croesus flakes (3-13) | Crystal triskelion fragment 1 | |||
| Crystal triskelion fragment 2 | Crystal triskelion fragment 3 | Elder Trove (Bik, T1) | |||
| Elder Trove (Bik, T2) | Elder Trove (Bik, T3) | Manuscript of Bik | |||
| Resonant anima of Bik* (20-50) | Resonant anima of Bik (tradeable)* (20-50) | Sealed clue scroll (elite) | |||
| Sealed clue scroll (master) | Starved ancient effigy |
* The non-tradeable version will only be received before the Pontifex shadow ring has been upgraded with 1,000 anima of Bik (tradeable or non-tradeable).
This Special Report was written by Sy Accursed. Thanks to ChathMurrpau for corrections.
This Special Report was entered into the database on Wed, May 18, 2022, at 11:26:04 PM by Chath, and it was last updated on Thu, Sep 29, 2022, at 11:49:21 PM by Chath.
If anything is incorrect or missing, or if you have any new information to submit to this database, please submit it to us on our Content Submissions Forums.
If you see this guide on any other site, please report it to us so we can take legal action against anyone found stealing our content. This guide is copyrighted by RuneHQ, and its use on other sites is expressly forbidden. Do not ask if you can use our guides or images, the answer is and always will be NO!
Print this page with images - Back to the Special Report Index Page - Back to Top
