

Table of Contents:
- Getting Started
- Important Locations
- Summoning Items
- Summoning Pouches
- Summoning Familiars
- Summoning Scrolls
- Dungeoneering Summoning
- Ancient Summoning
- Pets
- Training Routes
- Capes of Accomplishment
Before getting to work training Summoning, it is highly recommended to complete Wolf Whistle as this will award you with enough experience to reach level 4, 275 Gold charms, and teach you the basics of creating pouches.
Once you are ready to begin training Summoning, you will need to begin by creating pouches. These can then be used to either summon familiars or to create scrolls. Before you can create pouches though, you will need to obtain the appropriate charm (most often Gold, Green, Crimson, or Blue), an empty Pouch, plenty of Spirit shards, and the tertiary ingredient item required to make your chosen pouch. Be aware that the type of charm, number of Spirit shards, and the specific item used to create the pouch will always differ depending on the specific pouch created.
Once you have the items for the specific pouch(es) you are creating, you'll need to go to one of the obelisks found throughout Gielinor. Once there, click on it to bring up this interface:
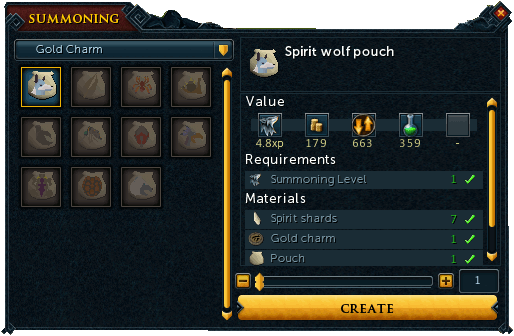
Based on the items in your inventory, your chosen pouch should be automatically selected. If not, you can search through the options based on the type of charm you are working with. Once the correct pouch is selected, you will see the necessary ingredients listed in the Right side of the window. Any that are not marked with a green check are missing. If you have all needed items, you will see how many you can create. Click the "Infuse" button when ready to make them. Voila, you now have 1 or more pouches and are on your way to 99 and beyond!
At this point you have several options. You can sell the newly created pouches on the Grand Exchange, use them to summon the associated familiar, create scrolls to activate the special of a summoned familiar (only works with the familiar the scroll is created from), or a combination of the options. See the associated sections of the guide for more information on familiars and their scrolls.
While training Summoning, there are several locations which are important. These include: Shops (Bogrog and Lord Amlodd's Exchange), Obelisks, Small Obelisks, and Pet Shops/Incubators.
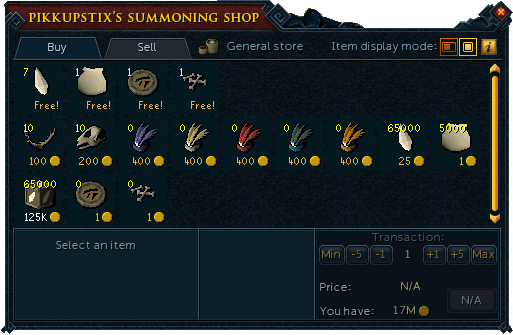
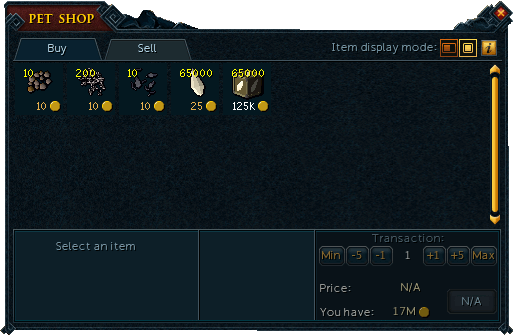
In total, there are 5 Summoning stores located throughout Gielinor where you can purchase Pouches, Spirit shards, and several other items related to Summoning by Right clicking the person and choosing "Trade". Note that the shop in Taverley (stock shared by Pikkupstix and Magestix) also has several free items which can be claimed and used as seen on the interface below. NONE of the other shops offer free items.
Shop locations include:
| Closest City | Location | Map |
| Taverley | Pikkupstix's/Magestix's Summoning Shop, near the East Gates | 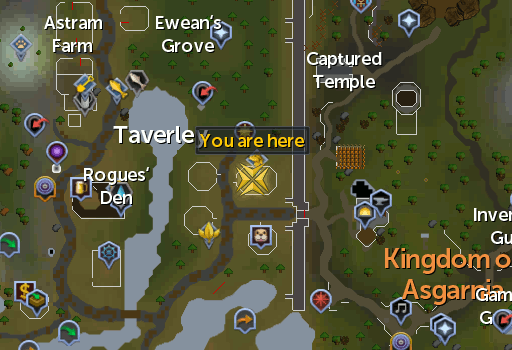 |
| Burgh de Rott | Summoning Supplies (Wishing Well), within the Nature's Grotto + |  |
| Gu'Tanoth | Bogrog's Summoning Shop, on the Northern edge of the city |  |
| Prifddinas* | Summoning Supplies (Lord Amlodd), in Amlodd district (West side of the city) | 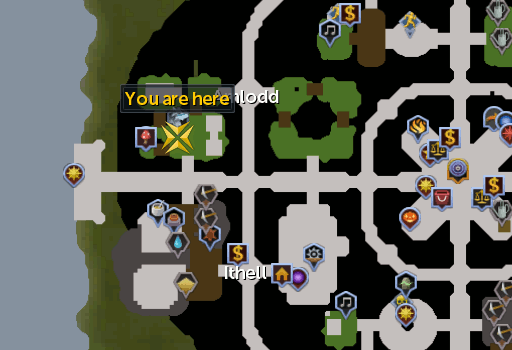 |
*Requires completion of Plague's End to access.
+Requires completion of Nature Spirit and Wolf Whistle to access.
Bogrog and Lord Amlodd's Exchange
At level 21 Summoning you can begin to exchange your created pouches and scrolls to Bogrog and Lord Amlodd. Doing this, you will get back 70% of the Spirit shards used to make each pouch and for every 10 scrolls you will get 30% of the Spirit shards used to make the pouch the scrolls are made from. After you have completed the Hard Tirannwn Tasks, Lord Amlodd provides an additional 10% Spirit shards. Right click on either Bogrog or Lord Amlodd and select "Swap". Within the interface you will see a list of all pouches on one tab and scrolls on the second.
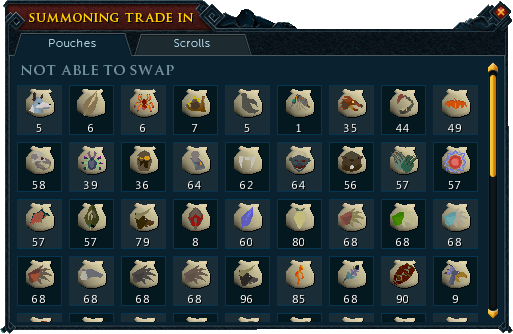
Note that you must have a Summoning level above the level required to infuse the pouch you wish to swap. If you hover over a pouch that you cannot trade, it will inform you of the level necessary to swap it if yours is too low. If you do not have any pouches or scrolls to swap, there will only be 1 section of the interface as seen above, however, if you have 1 or more they will appear at the top of the interface in a section labeled as "Able to swap for shards". The numbers below the pouch images is the value of shards you will receive if swapped out.
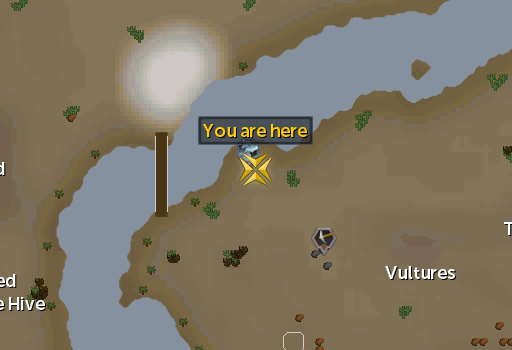
As previously mentioned, Obelisks are required to combine your ingredients into a pouch. There are a total of 9 of these Obelisks around Gielinor. See the table below for their locations and see Training Routes for suggestions on how to efficiently make use of them. Click map images below for a larger view of the area.
| Map | Closest City | Location | Requirements |
 |
Taverley | Pikkupstix's/Magestix's Summoning Shop, near the East Gates | None |
 |
Gu'Tanoth | Bogrog's Summoning Shop, on the Northern edge of the city | None |
 |
Burgh de Rott | Within the Nature Spirit Grotto, on the South side of Mort Myre | Completion of Nature Spirit |
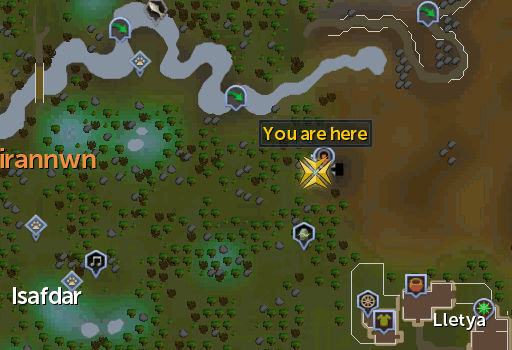 |
Lletya | Inside the Isafdar entrance to the Underground Pass, North Eastern section of Tirannwn | Partial completion of Regicide |
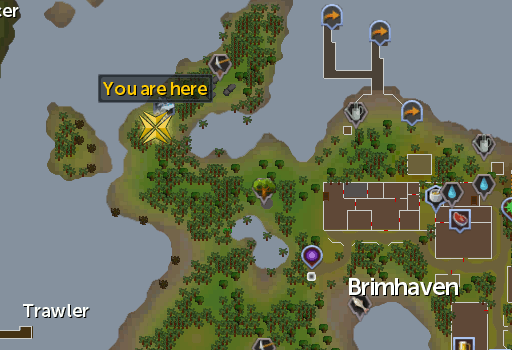 |
Brimhaven | North West of Brimhaven on the coast | None |
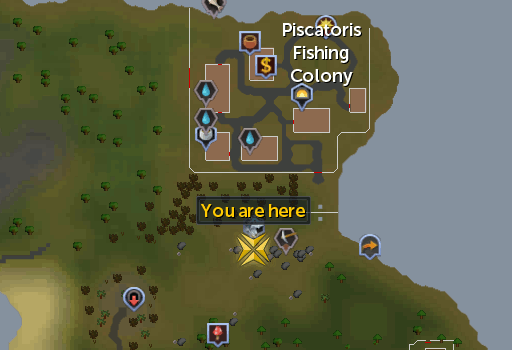 |
Piscatoris Fishing Colony | Inside a cave accessed through a trapdoor found just South of the Piscatoris Fishing Colony | None |
 |
Sophanem | In a cave accessed via a hole in the ground found North East of Sophanem | None |
 |
Prifddinas | Amlodd Section of Prifddinas, West side of the city | Completion of Plague's End |
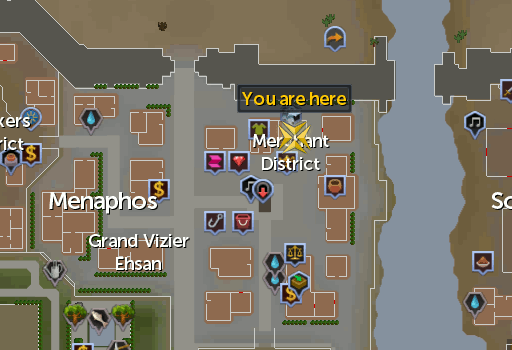 |
Menaphos | North East corner of the Merchant District | Completion of The Jack of Spades |
Summoning a familiar requires and drains a certain number of Summoning points which will continue to be drained while it is summoned. This means that at some point, you can run out of Summoning points. While the familiar will not disappear if you reach 0 Summoning points, any of its Right click abilities will no longer function until you have restored them. This can be accomplished several ways: at an Obelisk, consuming Summoning/Super restore potions, using the Ardougne cloak 4 once daily (familiar must be summoned), or at a Small obelisk.
In addition to renewing your Summoning points, these Small obelisks can also be used to access the Familiarisation Distraction and Diversion though they CANNOT be used to create pouches and/or scrolls.
| Surface | Dungeon | ||
| Duel arena, near the entrance to the minigame | South of White Wolf Mountain, near the Fruit Tree patch | Heroes' Guild, near the runite rocks | Zanaris, near the Fairy Ring |
| Shantay Pass | South of Relleka, near the POH-portal | Grand Tree mine, near the silver rocks | Brimhaven dungeon, near the Black demons |
| North of Burgh de Rott | Etceteria, south of the castle | Stronhold of Security, near the entrance on first floor | Taverly dungeon, near the blue Dragons |
| West of Canifis | Jatizo, south of the bank | Varrock Sewers, in the area with Moss giants and Deadly red spiders | Keldagrim, northwest of the Hop patch |
| Draynor Village Bank, south of the Willow trees | Neitiznot, west of the city walls | Keldagrim, near the mine south of the Construction shop | Fremennik Slayer Dungeon, near the entrance |
| Pollnivneach, near the POH-portal | Northeast of Heroes' Guild | Tzhaar, between the furnace and the Fairy Rings | Dwarven mines, north of the agility shortcut |
| Northeast of Sophanem, outside the city walls | Lunar Isle, east of the city | King Black Dragon Lair | Waterbirth Island Dungeon, near the northern 2-man door on the first floor |
| Next to the bridge between Edgeville and the Grand Exchange | Feldip Hills, near the Fairy Rings | Scarabite Dungeon | Giant Mole Liar, in center of the dungeon |
| Rogues' Castle in High Wilderness | East of Castle Wars | Desert Slayer Dungeon, in center of the bottom floor | Edgeville Dungeon, in the Wilderness part with Skeletons and Black demons |
| Port Sarim, north of the chapel | South of the Tyras Camp | Ice Queen Caves, in the Queen's throne room | Ogre Enclave |
| Musa Point, near the entrance to the Volcano Dungeon | North-west of Lletya | ||
| Near the mine north of Shilo Village | Between the Fight Arena and Port Khazard | ||
| Shilo Village, north-west of the general store | Fishing Guild, east of the bank | ||
| Ape Atoll, west of the Magic shop | South of Combat Training Camp | ||
| North of the Battlefield | Tree Gnome Stronghold, next to the Spirit Tree | ||
| Mos Le'Harmless, near the entrance of the dungeon | North of the Barbarian Assault complex | ||
| North of the Ectofuntus | West of Oo'glog | ||
In order to have some Pets, it is necessary to first hatch them from their egg. This can be done by placing an egg within an incubator at a Pet shop.
| City | Location | Map |
| Taverley | South of the Summoning shop |  |
| Yanille | West of the Wizards' Guild |  |
In addition to finding incubators here, you can also purchase dogs (must talk to Pet shop owner), pet food, and Spirit shards. Stock includes:
To train Summoning, there are various items which are of great use.
| Item | Use | How To Obtain |
 Pouch |
Required for making pouches | Purchased from a Summoning Shop for 1 Coins |
 Binding contract |
Required for Ancient Summoning | Tetracompass (powered) reward and Player Made |
 Spirit shards |
Required for making pouches and Binding contract | Purchased from a Summoning Shop for 25 Coins |
 Gold charm |
Required for certain pouches | Wolf Whistle reward and Monster drop, see more information below |
 Green charm |
Required for certain pouches | Monster drop, see more information below |
 Crimson charm |
Required for certain pouches | Monster drop, see more information below |
 Blue charm |
Required for certain pouches and Binding contract | Monster drop, see more information below |
 Abyssal charm |
Required for all Abyssal familiar pouches | Monster drop |
 Elder charm |
Required for Nightmare muspah pouches | Monster drop |
 Obsidian charm |
Required for all Obsidian familiar pouches | Monster drop |
 Ravager charm |
Required for Void ravager pouches | Purchased from the Void Knight's Outpost for 2 commendation points each |
 Shifter charm |
Required for Void shifter pouches | Purchased from the Void Knight's Outpost for 2 commendation points each |
 Spinner charm |
Required for Void spinner pouches | Purchased from the Void Knight's Outpost for 2 commendation points each |
 Torcher charm |
Required for Void torcher pouches | Purchased from the Void Knight's Outpost for 2 commendation points each |
 Talon beast charm |
Required for Talon beast pouches | Monster drop |
 Summoning potion (3) |
Consumed to restore 72-317 Summoning points (70 + 25% of total Summoning points) and 15 Summoning spell points per dose | Player Made |
 Super restore (3) |
Consumed to restore Summoning level and up to 327 Summoning points per dose | Player Made |
 Spiritual prayer potion (6) |
Consumed to restore 15 Summoning spell points per dose | Player Made |
 Summoning renewal (3) |
Consumed to restore up to 545 Summoning points and 60 Summoning spell points over 6 minutes per dose | Player Made |
 Powerburst of feats (4) |
Consumed to make all familiar specials cost 0 Summoning spell points for 10 seconds per dose (2 minute cooldown) | Player Made |
| Shaman's Outfit | Worn to gain 1% experience bonus per piece (additional 1% for wearing full outfit) |
Won from Treasure Hunter or Familiarisation |
      Spirit Gems |
Worn for a chance to save Charms when making Pouches | Monster drop, see more information below |
 / / 99/120 Skill cape |
Worn for a 2% chance to save Charms when making Pouches | Purchased from Pikkupstix or Elen after reaching level 99 |
This is perhaps the most annoying part of summoning: getting the charms. Monsters which drop these usually do not drop them in bunches (only few do) and it isn't a guaranteed drop. However, there are lots of monsters which drop charms, from low level to high level ones! The difference between high and low level monsters is that the high level monsters have a higher charm dropping rate and they are also known to drop higher level charms more often. It may even appear that a monster which is hard to beat drops multiple charms at once!
There are four main types of charms: Gold, Green, Crimson, and Blue. The Gold charm is the most common drop, and it requires the lowest level to use. Charms can also be purchased with Zeal points obtained from the Soul Wars minigame.
The table below gives several monsters which commonly drop the charms. Please note, however, that if we were to list all monsters which drop charms, it'd take ages for your browser to load all data! That's why we have selected a few monsters which have a considerable drop rate. For all monsters which drop charms, please check out the charms in the items database. It may be useful to know that some, or all, are located in the Chaos Tunnels.
| Charm | Common Droppers |
Gold charm |
Abberant spectre, Ankou (all levels), Dagannoth (all levels), Fire Giant, Giant Rock Crab (10), Hellhound, Ice giant, Ice Warrior, Infernal Mage, Jogre, Giant bat,Moss giant, Ogre, Rock Crab, and Turoths (all levels) |
Green charm |
Basilisk, Black dragon, Bloodveld, Bronze dragon, Dagannoth (all levels), Giant Rock Crab (10), Green Dragon, Jelly, Jogre, Kurask, Metal Dragons (all), Turoth (all levels), Wild dog, and Wolf (all levels) |
Crimson charm |
Abyssal demon Cockroach soldier, Dagannoth (all levels), Dust Devil, Earth Warrior, Gargoyle, Giant Rock Crab (10), Greater Demon, Metal Dragons (all), Nechryael, Pyrefiend, Rock Lobster, Shadow Warrior, and Waterfiend |
Blue charm |
Black dragon, Dark Beasts, Gargoyle, Giant Rock Crab (10), Green Dragon, Kalphite soldier, Metal Dragons (all), Mummy, and Tormented Wraiths |
Abyssal charm |
Abyssal guardian, Abyssal leech, and Abyssal walker |
Obsidian charm |
TzHaar creatures |
In addition to killing monsters for charms, there are 2 other Hunting options: Charming Moth and Charm sprites.
Charming Moth
88 Hunter and 83 Agility are required to catch a Charming Moth. They are found in level 26-30 Eastern Wilderness and will drop a random 1 of the 4 main charm types (Gold, Green, Crimson, or Blue) with each successful catch and can even possibly award you with a Crystal triskelion fragment (1, 2, or 3).
When catching Charming Moth, you must do it barehanded; you cannot use a Butterfly net or Butterfly jar. Each time you successfully catch one, you will receive your loot and release the moth. Typically, this catch and release will occur 1-5 times before the Charming Moth will despawn. As for experience, in addition to 665 Hunter experience earned, you will also get 125 Agility experience per successful capture.
Charm Sprites
72 Hunter is required to begin catching Charm sprites. They are found South West of the Tree Gnome Stronghold and can be quickly reached via the Eagle's Peak lodestone or the Spirit tree within the Stronghold (location 2, requires completion of Tree Gnome Village). These guys do not drop the charms themselves, however, they will drop Gold, Green, Crimson, Blue, and Mystical. 5 of the same type slices are used to create 1 of the same type charm; such as 5 Gold charm slices making 1 Gold charm. The Mystical charm slice can account for any of the other types of slices to complete the charm if you don't have enough slices.
In order to begin catching Charm sprites, you will first need to speak with Yaktwee Swinmari Cianta in order to purchase a Yaktwee stick and Sprite lure (4,000 Coins total). With the Yaktwee stick equipped, click a shaking bush to throw the Sprite lure at it. This will cause 1-3 Charm sprites to leave the bush and you must click each one to capture it. See our Hunter guide for more information about upgrading your Yaktwee stick and other achievements you can accomplish.
Spirit gems are items worn in the pocket slot that have a chance to save a charm when making pouches. This charm saving can only happen so many times before the gem will be destroyed. The better the quality of the gem, the higher the chance to save a charm and the more charges it will have.
The lower tier gems (Spirit sapphire, Spirit emerald, and Spirit ruby) can be obtained by killing monsters which drop charms. Whereas the higher tier ones can be obtained via Treasure Hunter and the oysters in an Aquarium of your Player Owned House.
Charging Gems
When Spirit gems are initially obtained, they will stack in your bank. Unfortunately, once a gem has been equipped (activated) it will no longer stack with the others in your bank, even if you have multiple active gems of the same charge. As such, to more effectively manage your spirit gems, it is possible to combine the same tier gem up to 1,000 charges - note that the 1,000 charges is based on the total number of charges each type of gem has not the number of charges it currently has.
In order to combine gems, you will need to Right click and "use" a gem on another of the same tier, ie Spirit sapphire with a Spirit sapphire. This will give you an active spirit gem (noted by the (a) after the item name) that has the number of charges from the 2 gems combined. For example, if you used 2 brand new Spirit sapphire with no charges used, you will have one with 20 charges ("charges used: 0/20"). Using a Spirit sapphire with 5 charges with an unused one will give you a gem that has "charges used: 5/20".
Hovering over an active spirit gem will tell you the amount of charges on a charged spirit gem. This amount is always presented as a fraction where the first number represents the amount of charges that have been used and the second represents the total possible charges that can be gotten from the gem before it will disintegrate. Again, keep in mind that this second number cannot exceed 1,000. As such, a combined Spirit ruby will only go up to 990 charges and a Spirit onyx will only up up to 960 charges. Alternatively, you can "Inspect" a gem to see how many charges it has. Note that if you have not used ANY charges on a combined gem, inspecting it will give you the option to separate them and either keep or discard the gems it separates into. The gems will be inactive and once again stack with the others in your bank.
| Item | Chance To Save | Charges | Maximum Gems Combined |
Spirit sapphire |
10% | 10 | 100 |
Spirit emerald |
20% | 20 | 50 |
Spirit ruby |
30% | 30 | 33* |
Spirit diamond |
40% | 40 | 25 |
Spirit dragonstone |
50% | 50 | 20 |
Spirit onyx |
60% | 60 | 16* |
*Note that these gems cannot reach a full 1,000 due to the number of charges per gem
Forging Gems
Do you have a buuuuunch of Spirit sapphire when you'd rather have some Spirit onyx? Well, there's good news and bad news; the good news is that you can make that dream a reality, the bad news is that it will cost you. This can be done by forging 3 spirit gems of a tier into 1 gem of the next tier up. Unfortunately, with every forge up, some of the charges will be lost due to the number of gems needed to create the next tier. For example: combining 3 Spirit sapphire into a Spirit emerald means that you lost 10 charges as you went from having 30 (across 3 gems) to having 20 charges (on 1 gem).
Despite losing charges, many still consider it favorable to forge gems as you will gain a higher chance of saving a gem while making pouches.
| Upgraded To... | Cumulative Gems Used / Charges Lost | ||||
| Spirit sapphire |
Spirit emerald |
Spirit ruby |
Spirit diamond |
Spirit dragonstone |
|
Spirit emerald |
3 / 10 | ||||
Spirit ruby |
9 / 60 | 3 / 30 | |||
Spirit diamond |
27 / 230 | 9 / 140 | 3 / 50 | ||
Spirit dragonstone |
81 / 760 | 27 / 490 | 9 / 220 | 3 / 70 | |
 Spirit onyx |
243 / 2,370 | 81 / 1,560 | 27 / 750 | 9 / 300 | 3 / 90 |
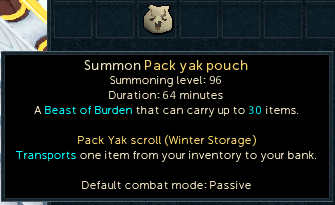
Creating pouches is the primary method to training Summoning. In order to create a Summoning pouch, you will need to ensure you have the supplies necessary to create one (or more). The items needed for each individual pouch can be found in the table below. Once made, these pouches can be used to summon familiars, create scrolls, sold either on the Grand Exchange or to a player for Coins, or traded to Bogrog/Lord Amlodd for a portion of the Spirit shards used to make it. Note that hovering over a pouch will present the following information:
Clicking the scroll or familiar name below will take you to its row in the associated table.


 Flowers


*Notes
- Fate of the Gods required.
- In Pyre Need required.
- Not created with an obelisk. The machine used to create this pouch can be upgraded to increase the stats of the pouch/familiar.
- Tier 1 - 14 Summoning
- Tier 2 - 44 Summoning
- Tier 3 - 84 Summoning
- Can also be created with the same number of Elder energy
In order to summon a familiar, you must first obtain a Summoning pouch. This can either be made by yourself or purchased. Regardless of how you obtain the pouch, you must possess the appropriate level in order to summon it, this level is the same as what is needed to create the pouch, as well as enough Summoning points to call the familiar forth. Note that you can only summon ONE familiar at a time. Also be aware that while the familiar is active, your Summoning points will continue to decrease - if it reaches 0, you will be unable to use any special ability scrolls. To refill your Summoning points, you can either consume an appropriate potion or recharge at a (small) obelisk. Note that if you have completed all Ardougne Achievements you will also have the ability to use the "Renew points" option once daily with an active familiar.
Right clicking on the Summoning icon  on your action bar will present you with several options. The ones available when a familiar/pet is not summoned are:
- Summon Pet - Summons your most recently active pet.
- Open Pet Interface - Opens the "Pets" tab in Customisations allowing you to look at Legendary, Companion, Follower, Boss, and Skilling pets and allows you to choose one to summon if desired.
- Settings - Opens the game settings for Summoning (also accessible manually: Settings -> Gameplay -> Skills & Experience -> Summoning). This area enables you to choose how you interact with pets/familiars as well as determine their reaction in combat.
- Cancel - Closes the window.
With a pet or familiar summoned, you will have several other options. Note that not all options below will be available at all times.

- Cast "Familiar Special Ability" - Uses a scroll to activate the Familiar's special. This option will always say Cast, however, the special ability name will change to match the active familiar.
- Attack - Enables you to select the target for your familiar to attack. Will not work for all familiars.
- Summon Pet - Summons your most recently active pet.
- Open Pet Interface - Opens the "Pets" tab in Customisations allowing you to look at Legendary, Companion, Follower, Boss, and Skilling pets and allows you to choose one to summon if desired.
- Dismiss - Sends your familiar/pet away. Using this with an item pet will send it away forever and you will need to obtain a new one. Using it with an active familiar will destroy it and you must summon a new one.
- Call Follower - Brings your familiar/pet next to you. Often used if a pet gets stuck around a corner or is not visible.
- Follower Details - Opens the tab that provides you with information about your summoned familiar/pet. Note that the window will still open if you do not have a familiar, it will just tell you "Familiar currently unavailable". See below for more information about the details seen.
- Interact - Enables you to interact with your familiar in various ways including talking to them (must be 10 levels above what is needed to make the pouch), take/give items if applicable, perform special abilities, and emotes. Options vary depending on what is summoned.
- Renew Familiar - Enables you to renew the timer on your familiar. Must have pouch in your inventory.
- Give BoB - Places items from your inventory into your Beast of Burden's inventory. Items are taken from the top of your inventory to the bottom until the Beast can accept no more.
- Take BoB - Takes items your Beast of Burden is carrying and places them into your inventory. Items are taken from the top of the BoB's inventory to the bottom until you can accept no more.
- Restore Points - Restores you Summoning points. Requires completion of all Ardougne Achievements and an active familiar.
- Settings - Opens the game settings for Summoning (also accessible manually: Settings -> Gameplay -> Skills & Experience -> Summoning). This area enables you to choose how you interact with pets/familiars as well as determine their reaction in combat.
- Cancel - Closes the options window.
As mentioned above, selecting the "Follower Details" option will provide you with the following information. Note that if you have summoned a Beast of burden using a Legendary pet that the window options will be a little different (farthest left image).
Many people choose to turn off the ability to click on an active familiar. This is because it can cause complications while in combat. To turn this off/on you will need to go to Settings and choose "Hide familiar options" (3rd option below the "Familiar Interaction" heading). With the box checked it means that you will only be able to interact with your familiar via the Summoning icon. Right clicking a pet while this option is checked will only enable you to examine it, the "hide familiar options" box must be unchecked if you want more.
All summoned familiars have abilities. These are not abilities that require a scroll, they are inherent to each specific familiar, though some do require you to interact with the familiar to activate. Some of these abilities are combat based while others are skill based. Choosing the right familiar for what you're doing is important. See the table below for the ability of each familiar as well as other important information. Note that clicking the Familiar's name or the special ability name will take you to the corresponding row in the pouch table or scroll table respectively.
| Familiar Name | Level | Duration (Minutes) | Experience per Summon | Default Combat | Other |
| Spirit wolf | 1 | 16 | 0.1 | Aggressive |
|
| Dreadfowl | 4 | 16 | 0.1 | Aggressive |
|
| Meerkats | 4 | 48 | 1 | Cannot Fight |
|
| Spirit spider | 10 | 16 | 0.2 | Aggressive |
|
| Thorny snail | 13 | 16 | 0.2 | Aggressive |
|
| Spirit pack pig | 14 | 16 | 0.8 | Passive |
|
| Spirit prayer pig | 14 | 16 | 0.8 | Passive |
|
| Spirit war pig | 14 | 16 | 0.8 | Aggressive |
|
| Granite crab | 16 | 16 | 0.2 | Aggressive | |
| Spirit mosquito | 17 | 16 | 0.5 | Aggressive |
|
| Desert wyrm | 18 | 16 | 0.4 | Aggressive |
|
| Spirit scorpion | 19 | 16 | 0.9 | Aggressive |
|
| Spirit tz-kih | 22 | 16 | 1.1 | Aggressive |
|
| Albino rat | 23 | 16 | 2.3 | Aggressive |
|
| Spirit kalphite | 25 | 16 | 2.5 | Aggressive |
|
| Compost mound | 28 | 32 | 0.6 | Aggressive |
|
| Giant chinchompa | 29 | 32 | 2.9 | Aggressive |
|
| Vampyre bat | 31 | 32 | 1.5 | Aggressive |
|
| Honey badger | 32 | 32 | 1.6 | Aggressive |
|
| Beaver | 33 | 32 | 0.7 | Cannot Fight |
|
| Void ravager | 34 | 32 | 0.7 | Aggressive |
|
| Void shifter | Aggressive |
|
|||
| Void spinner | Passive |
|
|||
| Void torcher | Aggressive |
|
|||
| Bronze minotaur | 36 | 32 | 3.6 | Aggressive |
|
| Bull ant | 40 | 32 | 0.6 | Aggressive |
|
| Macaw | 41 | 32 | 0.8 | Cannot Fight | |
| Evil turnip | 42 | 32 | 2.1 | Aggressive |
|
| Spirit cockatrice | 43 | 32 | 0.9 | Aggressive |
|
| Spirit coraxatrice | |||||
| Spirit guthatrice | |||||
| Spirit pengatrice | |||||
| Spirit saratrice | |||||
| Spirit vulatrice | |||||
| Spirit zamatrice | |||||
| Spirit pack pig | 44 | 64 | 0.8 | Passive |
|
| Spirit prayer pig | 44 | 32 | 0.8 | Passive |
|
| Spirit war pig | 44 | 32 | 0.8 | Aggressive |
|
| Iron minotaur | 46 | 32 | 4.6 | Aggressive |
|
| Pyrelord | 46 | 32 | 2.3 | Aggressive |
|
| Magpie | 47 | 32 | 0.9 | Aggressive |
|
| Bloated leech | 49 | 32 | 2.4 | Aggressive |
|
| Spirit terrorbird | 52 | 32 | 0.8 | Aggressive |
|
| Abyssal parasite | 54 | 32 | 1.1 | Aggressive |
|
| Spirit jelly | 55 | 48 | 5.5 | Aggressive |
|
| Ibis | 56 | 32 | 1.1 | Cannot Fight |
|
| Steel minotaur | 56 | 48 | 5.6 | Aggressive |
|
| Spirit graahk | 57 | 48 | 5.7 | Aggressive |
|
| Spirit kyatt | 57 | 48 | 5.7 | Aggressive |
|
| Spirit larupia | 57 | 48 | 5.7 | Aggressive |
|
| Karamthulhu overlord | 58 | 48 | 5.8 | Aggressive |
|
| Smoke devil | 61 | 48 | 3 | Aggressive |
|
| Abyssal lurker | 62 | 48 | 1.2 | Aggressive |
|
| Spirit cobra | 63 | 64 | 3.1 | Aggressive |
|
| Stranger plant | 64 | 48 | 3.2 | Aggressive |
|
| Barker toad | 66 | 32 | 1 | Aggressive |
|
| Mithril minotaur | 66 | 64 | 6.6 | Aggressive |
|
| War tortoise | 67 | 48 | 0.7 | Aggressive |
|
| Bunyip | 68 | 48 | 1.4 | Passive |
|
| Fruit bat | 69 | 48 | 1.4 | Cannot Fight |
|
| Ravenous locust | 70 | 32 | 1.5 | Aggressive |
|
| Arctic bear | 71 | 32 | 1.1 | Aggressive |
|
| Phoenix | 72 | 32 | 7 | Aggressive |
|
| Obsidian golem | 73 | 64 | 7.3 | Aggressive |
|
| Granite lobster | 74 | 48 | 3.7 | Aggressive |
|
| Praying mantis | 75 | 64 | 3.7 | Aggressive |
|
| Adamant minotaur | 76 | 64 | 7.6 | Aggressive |
|
| Forge regent | 76 | 48 | 1.5 | Aggressive |
|
| Talon beast | 77 | 48 | 3.8 | Aggressive |
|
| Giant ent | 78 | 48 | 1.6 | Aggressive |
|
| Fire titan | 79 | 64 | 7.9 | Aggressive |
|
| Ice titan |
|
||||
| Moss titan |
|
||||
| Hydra | 80 | 48 | 1.6 | Aggressive |
|
| Nightmare muspah | 81 | 64 | 1.6 | Passive |
|
| Brawler demon | 81 | 32 | 8 | Aggressive |
|
| Deacon demon |
|
||||
| Executioner demon |
|
||||
| Lava titan | 83 | 64 | 8.3 | Aggressive |
|
| Spirit dagannoth | 83 | 64 | 4.1 | Aggressive |
|
| Spirit pack pig | 84 | 102 | 0.8 | Passive |
|
| Spirit prayer pig | 84 | 64 | 0.8 | Passive |
|
| Spirit war pig | 84 | 64 | 0.8 | Aggressive |
|
| Reborn phoenix | 84 | 32 | 7 | Aggressive |
|
| Swamp titan | 85 | 64 | 4.2 | Aggressive |
|
| Rune minotaur | 86 | 144 | 8.7 | Aggressive |
|
| Blood nihil | 87 | 96 | 8.7 | Aggressive |
|
| Ice nihil |
|
||||
| Shadow nihil |
|
||||
| Smoke nihil |
|
||||
| Ghast | 87 | 64 | 1.8 | Aggressive |
|
| Unicorn stallion | 88 | 64 | 1.8 | Passive |
|
| Light creature | 88 | 64 | 9 | Passive |
|
| Geyser titan | 89 | 64 | 8.9 | Aggressive |
|
| Wolpertinger | 92 | 64 | 4.6 | Aggressive |
|
| Abyssal titan | 93 | 48 | 1.9 | Aggressive |
|
| Iron titan | 95 | 64 | 4.7 | Aggressive |
|
| Pack yak | 96 | 64 | 4.8 | Passive |
|
| Steel titan | 99 | 64 | 4.9 | Aggressive |
|
| Pack mammoth | 99 | 64 | 10 | Passive |
|
Next off we have the Summoning scrolls. These are used to release the Familiar's special ability and are made by going to an obelisk with pouches, switching menu tabs, then choosing the correct scroll's symbol for the pouches you have.
With a summoned familiar, you can either keep the scrolls in your inventory or use up to 500 scrolls on the associated familiar for it to hold them. This will enable you to use the auto-fire feature, wherein your familiar will automatically use a scroll after 1-15 attacks. Note that if the scrolls are in your inventory YOU must activate the scrolls manually. The rate of use (1-15 attacks) can be set by clicking the auto-fire rate button in the follower details interface (orange button above) and typing the desired number.
See the table below for what each scroll can do and other pertinent information. Note that clicking the Pouch/Familiar's name in the table below will take you to its row on the pouch table above as the pouch is needed both to summon the familiar that must be active as well as to create the scrolls themselves.
| Scroll | Pouch/Familiar Needed | Level Required | Ability | Points Used | Experience Gained When Activated |
 Ghast scroll (Ghastly Request) * |
Ghast | 0 | Restores 100 Prayer points | 20 | 0 |
 Spirit Wolf scroll (Howl) |
Spirit wolf | 1 | Causes NPC opponents to flee from the battlefield | 3 | 0.1 |
 Meerkat scroll (Fetch Casket) |
Meerkats | 4 | Digs for a coordinate, compass or scan clue without causing a wizard to appear | 12 | 0 |
 Dreadfowl scroll (Dreadfowl Strike) |
Dreadfowl | 4 | Magic attack that damages up to 30 | 3 | 0.1 |
 Spirit Spider scroll (Egg Spawn) |
Spirit spider | 10 | Spawns a random amount of red spider eggs | 6 | 0.2 |
 Thorny Snail scroll (Slime Spray) |
Thorny snail | 13 | Attack that damages up to 80 | 3 | 0.2 |
 Spirit Pig scroll (Bacon Blast) |
Spirit pack pig, Spirit prayer pig, & Spirit war pig | 14 | Launches flaming bacon at your target, dealing magic damage | 11 | 0.2 |
 Granite Crab scroll (Stony Shell) |
Granite crab | 16 | Boosts your Defence by 4 | 12 | 0.2 |
 Spirit Mosquito scroll (Pester) |
Spirit mosquito | 17 | Commands mosquito to attack | 3 | 0.5 |
 Desert Wyrm scroll (Electric Lash) |
Desert wyrm | 18 | Magic attack that does 50 damage and stuns your opponent | 12 | 0.2 |
 Spirit Scorpion scroll (Venom Shot) |
Spirit scorpion | 19 | Change of making a Range attack of yours be slightly poisonous, if the arrows can be poisoned in the first place | 6 | 1 |
 Spirit Tz-Kih scroll (Fireball Assault) |
Spirit Tz-Kih | 22 | Hits two nearby enemies up to 70 damage | 6 | 1.1 |
 Albino Rat scroll (Cheese Feast) |
Albino rat | 23 | Stores 4 cheese in the rat's inventory | 6 | 2.3 |
 Spirit Kalphite scroll (Sandstorm) |
Spirit kalphite | 25 | Strikes up to 5 enemies for up to 20 damage | 6 | 2.5 |
 Compost Mound scroll (Generate Compost) |
Compost mound | 28 | Fills nearby compost bin with a chance of making supercompost | 12 | 0.6 |
 Giant Chinchompa scroll (Explode) |
Giant chinchompa | 29 | Detonates the chinchompa, damaging nearby enemies | 3 | 2.9 |
 Vampyre Bat scroll (Vampyre Touch) |
Vampyre bat | 31 | Damages up to 120 with a chance of restoring 20 of your own Life Points | 4 | 1.6 |
 Honey Badger scroll (Insane Ferocity) |
Honey badger | 32 | Reduces its Defence to increase its Attack and Strength | 12 | 1.6 |
 Beaver scroll (Multichop) |
Beaver | 33 | Cuts up to 3 logs on a nearby tree | 3 | 0.7 |
 Void scroll (Call to Arms) |
Void familiars | 34 | Teleports you to Pest Control | 3 | 0.7 |
 Bronze Minotaur scroll (Bronze Bull Rush) |
Bronze minotaur | 36 | Magic attack that damages up to 40 with a chance of stun | 6 | 3.6 |
 Bull Ant scroll (Unburden) |
Bull ant | 40 | Restores run energy based on your Agility level | 12 | 0.6 |
 Macaw scroll (Herbcall) |
Macaw | 41 | Chance of making herbs | 12 | 0.8 |
 Evil Turnip scroll (Evil Flames) |
Evil turnip | 42 | Magic attack that drains an opponent's Ranged skill | 6 | 2.1 |
 Spirit Cockatrice scroll (Petrifying Gaze) |
Spirit cockatrices and other variants | 43 | Deals up to 100 damage as well as reducing a combat skill (varies between types of Cockatrices) | 3 | 0.9 |
 Iron Minotaur scroll (Iron Bull Rush) |
Iron minotaur | 46 | Magic attack that damages up to 60 with a chance of stun | 6 | 4.6 |
 Pyrelord scroll (Immense Heat) |
Pyrelord | 46 | Smelts a gold bar into an item of jewellery witout a furnace | 6 | 2.3 |
 Magpie scroll (Thieving Fingers) |
Magpie | 47 | +2 Thieving boost | 12 | 0.9 |
 Bloated Leech scroll (Blood Drain) |
Bloated leech | 49 | Heals stat damage, poison, and disease at the cost of some Life Points | 6 | 2.5 |
 Spirit Terrorbird scroll (Tireless Run) |
Spirit terrorbird | 52 | +2 Agility boost and restores run energy based on your Agility level | 8 | 0.8 |
 Abyssal Parasite scroll (Abyssal Drain) |
Abyssal parasite | 54 | Magic attack that gives you a Prayer point if it hits | 6 | 1.1 |
 Spirit Jelly scroll (Dissolve) |
Spirit jelly | 55 | Magic attack that damages up to 120 and drains the opponent's Attack | 6 | 5.5 |
 Ibis scroll (Fish Rain) |
Ibis | 56 | Produces fish up to Bass | 12 | 1.1 |
 Steel Minotaur scroll (Steel Bull Rush) |
Steel minotaur | 56 | Magic attack that damages up to 90 with a chance of stun | 6 | 5.6 |
 Spirit Graahk scroll (Goad) |
Spirit graahk | 57 | Commands your graahk to attack | 3 | 5.7 |
 Spirit Kyatt scroll (Ambush) |
Spirit kyatt | 57 | Commands your kyatt to attack with an instant hit and potentially high damage | 3 | 5.7 |
 Spirit Larupia scroll (Rending) |
Spirit larupia | 57 | Magic-based attack which also drains opponent's Strength | 6 | 5.7 |
 Karamthulu Overlord scroll (Doomsphere) |
Karamthulhu overlord | 58 | Damages up to 160 | 3 | 5.8 |
 Smoke Devil scroll (Dust Cloud) |
Smoke devil | 61 | Damages up to 80 and up to 60 on nearby opponents | 6 | 3.1 |
 Abyssal Lurker scroll (Abyssal Stealth) |
Abyssal lurker | 62 | +4 boost to Agility and Thieving | 20 | 1.9 |
 Spirit Cobra scroll (Ophidian Incubation) |
Spirit cobra | 63 | Transforms an egg into a Cockatrice egg | 3 | 3.2 |
 Stranger Plant scroll (Poisonous Blast) |
Stranger plant | 64 | Attack with a 50% chance of poison and inflicting 2 damage | 6 | 3.2 |
 Mithril Minotaur scroll (Mithril Bull Rush) |
Mithril minotaur | 66 | Magic attack that damages up to 120 with a chance of stun | 6 | 6.6 |
 Barker Toad scroll (Toad Bark) |
Barker toad | 66 | Damages up to 180 | 6 | 1 |
 War Tortoise scroll (Testudo) |
War tortoise | 67 | Boosts your Defence level by 8 | 20 | 0.7 |
 Bunyip scroll (Swallow Whole) |
Bunyip | 68 | Allows you to eat uncooked fish if you have the level to cook it | 3 | 1.4 |
 Fruit Bat scroll (Fruitfall) |
Fruit bat | 69 | Produces random fruit nearby | 6 | 1.4 |
 Ravenous Locut scroll (Famine) |
Ravenous locust | 70 | Destroys opponent's food | 12 | 1.5 |
 Arctic Bear scroll (Arctic Blast) |
Arctic bear | 71 | Magic attack that damages up to 150 with a chance to stun | 6 | 1.1 |
 Phoenix scroll (Rise From The Ashes) |
Phoenix and Reborn phoenix |
72 | Your opponent turns into ashes on the ground causing phoenix to be reborn, healing all of its health, and damaging nearby enemies. The lower the phoenix's heath before casting, the higher to the damage dealt to the nearby enemies | 8 | 5 |
 Obsidian Golem scroll (Volcanic Strength) |
Obsidian golem | 73 | Boosts your Strength by 9 | 12 | 7.3 |
 Granite Lobster scroll (Crushing Claw) |
Granite lobster | 74 | Damages up to 140 as well as removing up to 5 Defence from opponent | 6 | 3.7 |
 Praying Mantis scroll (Mantis Strike) |
Praying mantis | 75 | Binds, causes Magic-based damage, and drains player's Prayer points | 6 | 3.8 |
 Adamant Minotaur scroll (Adamant Bull Rush) |
Adamant minotaur | 76 | Magic attack that damages up to 160 with a chance of stun | 6 | 7.6 |
 Forge Regent scroll (Inferno) |
Forge regent | 76 | Magic attack that can unequip your opponent's weapon or shield | 6 | 1.5 |
 Talon Beast scroll (Deadly Claw) |
Talon beast | 77 | Commands Talon beast to do 3 Magic attacks | 6 | 11.7 |
 Giant Ent scroll (Acorn Missile) |
Giant ent pouch | 78 | Damages up to 170 on up to 3 enemies and a chance of acorns being dropped | 6 | 1.6 |
 Elemental Titan scroll (Titan's Constitution) |
Fire, Ice, or Moss titan | 79 | Boosts Defence and Constitution greatly | 20 | 7.9 |
 Hydra scroll (Regrowth) |
Hydra | 80 | Use on a Farming tree stump to instantly grow back | 6 | 1.6 |
 Nightmare Muspah scroll (Siphon Self) |
Nightmare muspah | 81 | Extracts Elder, Incandescent, Luminous and Radiant Divination energy from the muspah and adds it to its inventory. | 20 | 2 |
 Lesser Demon scroll (Ring Of Fire) |
Brawler, Deacon, or Executioner demon | 82 | Deals damage to multiple nearby targets | 12 | 3.9 |
 Spirit Dagannoth scroll (Spike Shot) |
Spirit dagannoth | 83 | Range attack that damages up to 180 and stuns | 6 | 4.2 |
 Lava Titan scroll (Ebon Thunder) |
Lava titan | 83 | Magic attack that drains your opponent's Special Attack energy | 4 | 8.3 |
 Swamp Titan scroll (Swamp Plague) |
Swamp titan | 85 | Area effect Magic that can poison your enemies | 6 | 4.3 |
 Rune Minotaur scroll (Rune Bull Rush) |
Rune minotaur | 86 | Magic attack that damages up to 190 with a chance of stun | 6 | 8.6 |
 Nihil scroll (Annihilate) |
Nihil | 87 | Damages your target and stuns them for a short time | 20 | 1.6 |
 Unicorn Stallion scroll (Healing Aura) |
Unicorn stallion | 88 | Heals up to 15% of your Life Points | 20 | 1.8 |
 Light Creature scroll (Enlightenment) |
Light creature | 88 | Gives you an enlightened state for 6 minutes with the following effects:
|
20 | 1.6 |
 Geyser Titan scroll (Boil) |
Geyser titan | 89 | Damages a player, more depending on their armor | 6 | 8.9 |
 Wolpertinger scroll (Magic Focus) |
Wolpertinger | 92 | Boosts your Magic level by 7 | 20 | 4.6 |
 Abyssal Titan scroll (Essence Shipment) |
Abyssal titan | 93 | Transports all pure essence from your inventory and titan's to your bank | 6 | 1.9 |
 Iron Titan scroll (Iron Within) |
Iron titan | 95 | Iron titan's next attack will be three powerful melee attacks | 12 | 4.8 |
 Pack Yak scroll (Winter Storage) |
Pack yak | 96 | Use special on an item in your inventory to send it to your bank | 12 | 4.8 |
 Pack Mammoth scroll (Mammoth Feast) |
Pack mammoth | 99 | Automatically uses food stored in the familiar, healing the player. | 20 | 10 |
 Steel Titan scroll (Steel Of Legends) |
Steel titan | 99 | Steel titan's next attack will be four powerful Ranged attacks | 12 | 5 |
* This scroll CANNOT be made. 25 scrolls will be acquired for every purchase of a Ghast pouch
Summoning has a great use inside the dungeons of Daemoheim. The higher your summoning level, the better the familiars you can summon. There are 6 different types of familiars, all with varying uses.
- Bloodrager
- Melee attack familiar
- Ores used to summon
- Sundering strike ability - deals damage and reduces the target's Defence (amount based on tier)
- Passive ability - invisible Defence boost (1% times tier)
- Deathslinger
- Ranging attack familiar
- 2 logs used to summon
- Poisonous shot - attacks target with a poison arrow (damage based on tier)
- Stormbringer
- Magic attack familiar
- Plant used to summon
- Snaring wave ability - deals damage and may immobilize the target (amount based on tier)
- Hoardstalker
- Foraging familiar - collects ore, logs, and raw fish, up to their tier level
- Hides used to summon
- Aptitude ability - invisible boost to all non-combat skills (levels based on tier)
- Worldbearer
- Beast of burden familiar - number of slots based on tier (12-30)
- Torn bags used to summon
- Second wind ability - restores 20-40% of your run energy (amount based on tier)
- Skinweaver
- Healing familiar
- Cooked fish used to summon
- Glimmer of light ability - heals you (amount based on tier)
- Passive ability - provides 25-250 extra health when food is eaten


With the release of Archaeology, a new form of Summoning was introduced. Unlike with normal summoning, Ancient Summoning pouches are made by making a Binding contract then killing 1 of several types of demons with the Binding contract in your inventory. The specific type of demon killed will create the varying types of pouches. Before a Binding contract can be made, you must first complete Dagon Bye Mystery/Achievement.
| Binding Contract | Level | Experience | Monster | Familiar Ability | Scroll | Scroll Ability |
 Binding contract (hellhound) |
45 | 38 | Hellhound | Absorbs 10% of any damage dealt to you by taking the hit itself. |  Hellhound scroll (Soul Food) |
Heals for 10% of its max health (2,000 life points). |
 Binding contract (waterfiend) |
50 | 42.8 | Waterfiend | Grants a 5% chance while training Mining, Fishing, Woodcutting, Divination or Archaeology to duplicate the gained resource and store it within itself. Can carry up to 20 items. |  Waterfiend scroll (Straight Flush) |
Teleports all items stored within the familiar's inventory to your bank. |
 Binding contract (blood reaver) |
73 | 66.4 | Blood reaver | Deals 25% of your healing done as damage to its target. |  Blood reaver scroll (Blood Siphon) |
Transfers 10% of the familiars max health to you. |
 Binding contract (gargoyle) |
75 | 73.7 | Gargoyle | Grants an invisible +12 Mining level boost. |  Gargoyle scroll (Hammer Rock) |
Your next mining swing will deal 50% more damage. |
 Binding contract (abyssal demon) |
85 | 73.7 | Abyssal demon | The summoning familiar will automatically teleport to the target and deal damage when it teleports. |  Abyssal demon scroll (Abyssal Block) |
Bind and Teleblock the target for 9.6 seconds. |
 Binding contract (kal'gerion demon) |
90 | 79.1 | Kal'gerion demon | Summons a level 126 combat familiar. |  Kal'gerion demon scroll (Crit-i-Kal) |
You and surrounding players will gain a +5% critical hit chance for 15 seconds. |
 Binding contract (ripper demon) |
96 | 82.3 | Ripper demon | Deal more damage to the target according to how much missing health it has. |  Ripper demon scroll (Death From Above) |
Familiar will 'jump' attack and deal 200-320% of its max hit in damage. |
While there are several types of pets and followers attainable, only 2 types will be discussed below: those that have Summoning requirements and legendaries.
Summoning Required Pets
The table below lists all the current pets that have a specific Summoning requirement. The table also includes a bit of extra information pertinent to caring for your pet. All pets below are items within the game unless noted with an asterisk (*). Some pets have several growth stages while others don't, but all of the item pets listed below can be fed; only the Pet kitten requires food. In order to have an item pet follow you, you will need to drop it from your inventory. Note that only 1 follower/pet/familiar can be active at a time. If you dismiss one of the item pets (or fail to feed your Pet kitten), it will run away and you will need to obtain another one; pick it up to have it stop following you and return to item form. Please note that your pet will also be lost if you die while it is following you. None item pets can be "summoned" via the Customisation interface.
Like with familiars, it is possible to speak to your pet if you are 10+ Summoning levels above the required level. For example: to obtain a Raven chick you must have level 50, thus you must have level 60 in order to speak with it. There are a few exceptions to this though. In order to speak with Pet kitten/Pet cat you will need a Catspeak amulet (or one of the upgraded versions), to speak with a Baby monkey you will need a Monkeyspeak amulet, TzRek-Jad can always be spoken to, dragons cannot be spoken to regardless of level, and the Chameleon can only be spoken to if you use the boost option on the Summoning cape to reach level 100 temporarily.
| Pet | Requirements | Notes | |
| Baby | Adult | ||
 Pet kitten |
 Pet cat |
1 Summoning Completion of Gertrude's Cat |
Quest reward; additional purchased from Gertrude. MUST be fed as a Pet kitten; Cooked/raw fish or Bucket of milk. Both Pet kitten and Pet cat can catch mice (adults more successfully). Can be made into hell or purple variants. There are 3 additional growth stages depending on how you care for your cat: Overgrown, Wily, and Lazy. |
 Bulldog puppy |
 Bulldog |
4 Summoning | Purchased from Pet Shops for 500 Coins. Eats raw meat (not fish) and gnaws on Bones. |
 Dalmatian puppy |
 Dalmatian |
||
 Greyhound puppy |
 Greyhound |
||
 Labrador puppy |
 Labrador |
||
 Sheepdog puppy |
 Sheepdog |
||
 Terrier puppy |
 Terrier |
||
| N/A |  Creeping hand |
4 Summoning 5 Slayer |
Purchased reward from Soul Wars (5 Zeal and (un)stuffed Crawling hand). Eats Leather gloves. |
 Minitrice |
N/A | 4 Summoning 25 Slayer |
Purchased reward from Soul Wars (25 Zeal and (un)stuffed Cockatrice head). Eats Limpwurt root. |
 Baby basilisk |
N/A | 4 Summoning 40 Slayer |
Purchased reward from Soul Wars (40 Zeal and (un)stuffed Basilisk head). Eats Eye of newt. |
 Baby kurask |
N/A | 4 Summoning 70 Slayer |
Purchased reward from Soul Wars (70 Zeal and (un)stuffed Kurask head). Eats Bones. |
| N/A |  Abyssal minion |
4 Summoning 85 Slayer |
Purchased reward from Soul Wars (85 Zeal and (un)stuffed Abyssal demon head). Eats Ashes. |
| N/A |  Rune guardian |
4 Summoning Completion of Rune Mechanics |
Quest reward. Needs to be revitalized at a Runecrafting altar to feed it. |
 Baby gecko |
 Gecko (adult) |
10 Summoning 27 Hunter |
Caught using Hunter. Eats Flies as a baby. Eats Flies and Beetle bits as an adult. |
 Baby platypus |
 Platypus |
10 Summoning 27 Hunter Completion of As a First Resort... |
Caught using Hunter. Eats raw fish and Ground fishing bait as a baby. Eats raw fish and Fishing bait as an adult. |
| N/A |  Pig |
14 Summoning Completion of Bringing Home the Bacon |
Quest reward. Eats Onion and Wheat. |
| N/A |  Broav |
23 Summoning Completion of While Guthix Sleeps |
Caught using Hunter. Eats Mort myre fungus. |
 Baby penguin |
 Penguin (pet) |
30 Summoning | Penguin egg obtained from the Penguin keeper and must be incubated at a Pet Shops. Eats raw fish. |
 Milk tooth creature |
 / / Healthy/Decayed Tooth creature |
37 Summoning Completion of A Fairy Tale Part III - Battle at Orks Rift |
First one purchased from Tooth fairy in exchange for 5 teeth; additional are free. Eats Bucket of milk. Will grow into a Tooth Creature (healthy) unless you feed it Chocolatey milk. |
 Baby giant crab |
 Giant crab |
40 Summoning 32 Slayer Completion of Recipe for Disaster: Pirate Pete |
Obtained by trading Nung a Crunchy claw token. Eats raw fish. |
 Raven chick |
 Raven |
50 Summoning | Raven egg obtained from Bird nest and must be incubated at a Pet Shop. Eats Ground fishing bait as baby. Eats Fishing bait as adult. |
 Baby squirrel |
 Squirrel |
60 Summoning 29 Hunter |
Caught using Hunter. Eats Nuts. |
 Guthix chick* |
 Guthix raptor* |
70 Summoning | Bird's egg obtained from Bird nest and must be incubated at a Pet Shop. Cannot be fed. Option to view as baby, young adult, or adult once hatched. |
Saradomin chick* |
 Saradomin owl* |
||
Zamorak chick* |
 zamorak hawk* |
||
| N/A |  Ex-ex-parrot* |
71 Summoning Completion of Rocking Out |
Obtained by speaking to Bill Teach and getting a Magical cage from him (option 2 = "speak about Rocking Out"). Next speak with 50 Ships Mufassah to receive an Ex-parrot to use on the Magical cage. This will create an Ex-parrot in a magic cage to use on the stone slab West of the Cave horror dungeon entrance. This will cause the Ex-parrot in a magic cage to disappear and unlock the Ex-ex-parrot. Cannot be fed. |
 Cute phoenix eggling* |
N/A | 72 Summoning Completion of In Pyre Need |
Phoenix egg obtained from the Phoenix Lair activity. Cannot be fed. Clap to hatch the egg. |
 Mean phoenix eggling* |
N/A | Phoenix egg obtained from the Phoenix Lair activity. Cannot be fed. Kick the egg to hatch it. |
|
| N/A |  Hermit crab |
80 Summoning | Caught while Fishing at the Prifddinas waterfall. Eats raw fish. Can purchase cosmetics for it. |
 Baby raccoon* |
 Raccoon* |
80 Summoning 27 Hunter |
Caught using Hunter. Cannot be fed. There are 3 separate colors which can be caught: brown, grey, and red. Option to view as baby or adult in customisations interface. |
 Baby sneakerpeeper spawn* |
 Sneakerpeeper spawn* Sneakerpeeper spawn* |
80 Summoning 80 Dungeoneering |
Purchased for 85,000 Dungeoneering tokens from Rewards trader. Cannot be fed. Option to view as baby or adult in customisations interface. |
 Vulture chick |
 Vulture |
85 Summoning | Vulture obtained from killing Vulture and must be incubated at a Pet Shop. Eats Ground fishing bait as baby. Eats Fishing bait as adult. |
 Baby chameleon* |
 Chameleon* |
90 Summoning | Chameleon egg obtained on Cairn Isle (West of Shilo Village) and must be incubated at a Pet Shop. Cannot be fed. Option to view as baby or adult in the customisations interface once hatched. Speaking to the chameleon when out will enable you to choose what color you want it to be. |
 Baby monkey |
 Monkey (pet) |
95 Summoning 27 Hunter |
Caught using Hunter. Eats Banana. |
 Baby dragon* |
N/A | 99 Summoning | Eggs (Black, Blue, Green, and Red) are obtained as a drop from each color dragon (Black, Blue, Green, and Red) and must be incubated at a Pet Shop. Cannot be fed. Each color obtained separately. Option to view as hatchling or baby in the customisations interface once hatched. |
| N/A |  TzRek-Jad* |
99 Summoning 99 Slayer |
Purchased reward from Soul Wars (100 zeal points and a Fire cape). Cannot be fed. |
*Non-item pets. Accessed via customisation tab.
Below you will find a few recommended routes to comfortably make your pouches. For a list of all obelisks, in case these pathways do not suit you, please visit the Obelisks section above.
Making pouches through Taverley is one of the most efficient ways to train your Summoning level.
Via Taverley Bank
- Requirements: None.
- Bring: As many empty pouches as you have (they are stackable), as many spirit shards as you have (they are stackable), as many charms of the material you need as you have (they are stackable), boots of lightness (optional), spotted/spottier cape (optional) and penance gloves (optional). The last three items reduce weight, which allows you to run longer. Fill the rest of your inventory with the relative item you need for the creature.
- Route: From the Taverley bank (south of the lodestone) run east across the bridge, then slightly north to find Pikkupstix's house. Inside you'll see the summoning obelisk to create your pouches. Run south, then east across the bridge, back to the bank. Deposit your Summoning pouches, withdraw your relative items and repeat!
Via Hot-Air Balloon
- Requirements: Enlightened Journey quest, level 50 Firemaking, need to have unlocked the Castle Wars balloon.
- Bring: As many empty pouches as you have (they are stackable), as many spirit shards as you have (they are stackable), as many charms of the material you need as you have (they are stackable), ring of duelling, normal log, boots of lightness (optional), spotted/spottier cape (optional) and penance gloves (optional). The last three items reduce weight, which allows you to run longer. Fill the rest of your inventory with the relative item you need for the creature.
- Route: From Castle Wars, go outside and then north. Travel to Taverley by hot air balloon, then continue north until you get to Pikkupstix's house. Once there, go down the ladder and create the pouch you wish you use. Teleport back to Castle Wars, deposit your Summoning pouches, withdraw your willow log and relative items and repeat! Make sure you replace your ring of dueling when it breaks!
Via Player Owned House (POH)
- Requirements: House in Taverley, Glory Amulet in Skill Hall or Portal Room in your house (optional), Ancient magiks unlocked (optional), Canifis Portal (optional).
- Bring: As many empty pouches as you have (they are stackable), as many spirit shards as you have (they are stackable), as many charms of the material you need as you have (they are stackable), House Teleport Runes/Tablet (1 Law, 1 Earth, 1 Air), Ring of duelling (optional), boots of lightness (optional), spotted/spottier cape (optional) and penance gloves (optional). The last three items reduce weight, which allows you to run longer. Fill the rest of your inventory with the relative item you need for the creature.
- Route: First teleport to your house, go outside and head east. Once there, go down the ladder and create the pouch you wish you use. Now there are three methods of getting to a bank.
- Method 1: Glory Amulet - Once finished crafting pouches, return to your house, and then go to your skill hall. Teleport to Edgeville, bank, restock on materials and then teleport back to your house.
- Method 2: Teleport Room (Canifis) - Once finished crafting pouches, return to your house, and then go to your portal room. Use the portal to Canifis, bank, restock on materials and then teleport back to your house.
- Method 3: Ring of dueling - Once finished crafting pouches, use your ring of dueling to teleport to Castle Wars. Bank, restock on materials and then teleport back to your house. Make sure you replace your ring of dueling when it breaks!
Via Games Necklace
- Requirements: None.
- Bring: As many empty pouches as you have (they are stackable), as many spirit shards as you have (they are stackable), as many charms of the material you need as you have (they are stackable), boots of lightness (optional), spotted/spottier cape (optional), and penance gloves (optional). The last three items reduce weight, which allows you to run longer. Fill the rest of your inventory with the relative item you need for the creature.
- Route: Use your Games necklace to teleport to the Games Room area and head out towards the Rogue's Den or Warriors' Guild. There, access your bank account and grab all your supplies and head south towards Pikkupstix's house. Repeat this process by teleporting to the Games Room.
There is yet another effective way to make pouches, which is fairly easier to use than the Taverley method. You must have completed the Swan Song quest to enter the Piscatoris Fishing Colony and use their bank. You must have completed A Fairy Tale Part II - Cure a Queen quest to use the quick route to Piscatoris itself. Please keep in mind, there are no Summoning Shops in this area, so if you run out of shards, you will have to visit a shop for more supplies
Via Fairy Rings
- Requirements: Completed A Fairy Tale II and wielding a Lunar staff or Dramen staff.
- Bring: As many empty pouches as you have (they are stackable), as many spirit shards as you have (they are stackable), as many charms of the material you need as you have (they are stackable), boots of lightness (optional), spotted/spottier cape (optional), and penance gloves (optional). The last three items reduce weight, which allows you to run longer. Fill the rest of your inventory with the relative item you need for the creature.
- Route: While in Zanaris, head over to the main Fairy Ring and insert the code AKQ to go straight towards Piscatoris. When you're on Piscatoris, head a little north-east until you reach a trapdoor. Open it and head inside. Continue this path to make your pouches because it's relatively fast if you can put in the code fast and bank fast.
Via Piscatoris Fishing Colony Bank
- Requirements: Completed Swan Song.
- Bring: As many empty pouches as you have (they are stackable), as many spirit shards as you have (they are stackable), as many charms of the material you need as you have (they are stackable), boots of lightness (optional), spotted/spottier cape (optional), and penance gloves (optional). The last three items reduce weight, which allows you to run longer. Fill the rest of your inventory with the relative item you need for the creature.
- Route: When you are done banking in the bank, go out of the city and go through the underground tunnels until you reach the outside world of Piscatoris. When you're out, head west until you reach the trapdoor and open and go down. Make your pouches and head back to the bank and repeat as many times needed. This is the fastest way to make pouches and requires little things to do it.
Via Spirit Kyatt
- Requirements: 57 Summoning.
- Bring: As many empty pouches as you have (they are stackable), as many spirit shards as you have (they are stackable), as many charms of the material you need as you have (they are stackable), boots of lightness (optional), spotted/spottier cape (optional), and penance gloves (optional). The last three items reduce weight, which allows you to run longer. Also bring a Ring of duelling and a summoned Spirit Kyatt. Fill the rest of your inventory with the relative item you need for the creature.
- Route: Bank at Castle wars, then interact with your Spirit Kyatt and select teleport. This teleports you just south of the obelisk. Run north, go down the ladder, make your pouches. Afterwards, use your Ring of duelling to teleport back to Castle wars. Repeat as many times as you need to.
Via Ardougne Boat
- Requirements: None.
- Bring: 50-60k gp and as many empty pouches as you have (they are stackable), as many spirit shards as you have (they are stackable), as many charms of the material you need as you have (they are stackable), boots of lightness (optional), spotted/spottier cape (optional), and penance gloves (optional). The last three items reduce weight, which allows you to run longer. Fill the rest of your inventory with the relative item you need for the creature.
- Route: When you are done banking in East Ardougne, head over to the docks and take a trip over to Brimhaven. When you're on Brimhaven, head towards the House Portal and head West and follow the banks of the ocean to get to there. Refer to the Obelisk Locations Section of the guide to see exactly where it is. When your done teleport to Ardougne and continue. This method is NOT advised due to the fact it's long travels and you use a massive amount of runes in the process.
Via Player Owned House (POH)
- Requirements: Own a house in Brimhaven (40 Construction).
- Bring: Glory amulet charged and as many empty pouches as you have (they are stackable), as many spirit shards as you have (they are stackable), as many charms of the material you need as you have (they are stackable), boots of lightness (optional), spotted/spottier cape (optional), and penance gloves (optional). The last three items reduce weight, which allows you to run longer. Fill the rest of your inventory with the relative item you need for the creature.
- Route: Teleport to Edgeville using your glory and grab either the runes needed for your house teleport or a tele-tab and grab your ingredients and such for the pouches. Teleport to your house and head wWest and along the banks of the ocean until you reach there. Refer to the Obelisk Locations Section of the guide to see exactly where it is. Repeat this process by teleporting to Edgeville and continuing from there. Also, this method is still not advised due to the time it takes and amount of running needed.
- Requirements: None.
- Bring: As many empty pouches as you have (they are stackable), as many spirit shards as you have (they are stackable), as many charms of the material you need as you have (they are stackable), boots of lightness (optional), spotted/spottier cape (optional), and penance gloves (optional). The last three items reduce weight, which allows you to run longer. Fill the rest of your inventory with the relative item you need for the creature. Brining Watchtower teleport runes or tablets is also recommended.
- Route: When you are done banking in the Yanille bank, leave the city through its western entrance. Once outside, go south east to the Gu'tanoth path. Follow the path northwards until you come to a small summoning hut with the obelisk. Teleport or run back to Yanille using the same route and repeat this proces. Alternatively, you can use a Mithril grapple (requires 21 Range, 39 Agility, 38 Strength to us) to leave and access Yanille via the Agility shortcut in the southern city wall, if you do not have the requirements for the Watchtower teleport spell.

Once you have achieved level 99, you may visit Pikkupstix to purchase a Summoning cape for 99,000 Coins.
Once you have achieved level 120, Pikkupstix will sell you the Summoning master cape for 120,000 Coins.
Discount
Note that as of December 2018, another one of Mod Daze's Easter Eggs have been found. This enables you to purchase a Skillcape for half price (only from Pikkupstix, not Elen) if you are wearing a Ring of Charos (a). Be aware that "Half price" is 92,000 Coins as the experience at level 92 is approximately half way to level 99.
This Skill Guide was written by ChathMurrpau. Thanks to previous guide writers: Terr002, niekjepiek, Jakesterwars, Harkalino, Xander_7, and Alfawarlord as well as Job_is_God, Arkayla, Rokern, Devildog, Choramizzu1, Jett_Man, Serty456, NuclearMan, Skidryn, jontyshankys, Gonza211, DRAVAN, Sheep01, Draggy, Iriel_Red, pipedreamer, Angrymaster, Trigonseven, tweedgnomish, Debateman3, Kassandra, Sundista, Fire Goblin4, Morgan_and_Garrison, Bladekill133, Komnodragon1, Monado, Jaapie23, drmars, Spike31x, Omega, Thehi, Radmite, Master_Of_Stuff, Sccrluk9, Skeletonmat, Siegflare, Bladerman970, gabe0002, x_timowns_x, PKER2408, Tinychris1, Mega_Gamer05, Sanru, Darkblitz, diamondi3ack, theman200005, dragoon889, Zfreak23, Sire_TRM, Hilwin1, Draconic, spiderdude10, pieceofcake8, pucas37, nickstud, Egekalaycan, Omega, Jasper, Javezz, Parsonsda, Jarkur, Noble K, A2 304, Ksb Single, and 3ter 1 for corrections.
This Skill Guide was entered into the database on Tue, Jan 22, 2008, at 06:22:38 PM by sheep01, and it was last updated on Sun, May 01, 2022, at 02:32:43 PM by Chath.
If anything is incorrect or missing, or if you have any new information to submit to this database, please submit it to us on our Content Submissions Forums.
If you see this guide on any other site, please report it to us so we can take legal action against anyone found stealing our content. This guide is copyrighted by RuneHQ, and its use on other sites is expressly forbidden. Do not ask if you can use our guides or images, the answer is and always will be NO!
Print this page with images - Back to the Skill Guide Index Page - Back to Top
