

| Pet cat (any age or color will do) | Monkeyspeak amulet or Cramulet containing it | 17 Regular ghostly ink | 29 Greater ghostly ink | ||||
| 20 Powerful ghostly ink | 10 Basic/Regular/Greater ritual candle |
| Combat equipment, preferably tier 70 power armor or better and tier 80 weaponry or better | Food and combat potions | ||
| Pollnivneach travel method (Ring of slaying, Pollnivneach Teleport, Slayer cape) | Het's Oasis travel method (Ring of duelling, Wicked hood, Mystical sand seed) | ||
| Ungael Ritual Site travel method (Underworld Grimoire 2, Ungael teleport incantation) | Um Ritual Site travel method (Underworld Grimoire 2, City of Um teleport incantation) |
| Scabaras' Favour | Perfect roses | Perfect irises | Perfect hydrangeas | ||||
| Perfect hollyhocks | Crondis' Favour | Het's Favour | Apmeken's Favour | ||||
| Soul beacon (corrupted) | Soul beacon |
-
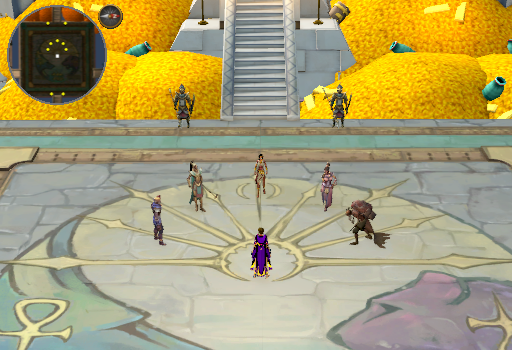
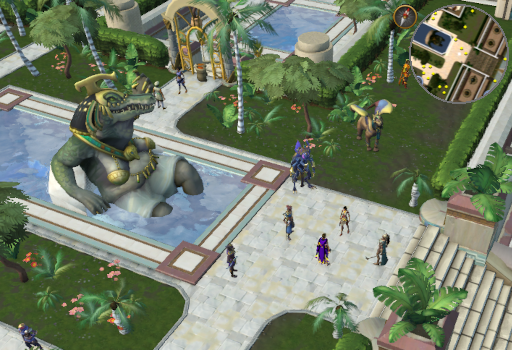
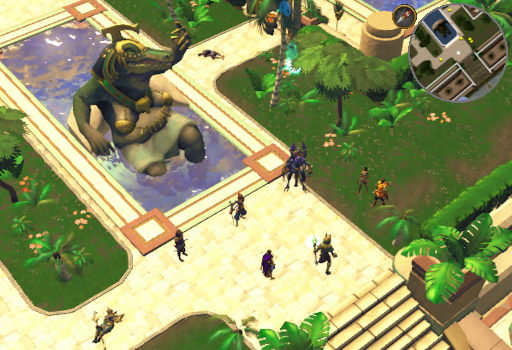
Enter the palace of Menaphos and agree that you want to do the quest. Then talk to Pharaoh Leela in the center of the room. Accept the quest when prompted. Leela will say that in preparation for Amascut's assault, she has some tasks for you. This will be interrupted by a guard bringing news that "something is wrong with the sun." Spoiler, it's an eclipse. This suggests an accelerated timeline to Leela, so she changes her plans and asks you to go to Sophanem and assist Ozan in convincing the people there to shelter in the better defended walls of Menaphos.
-
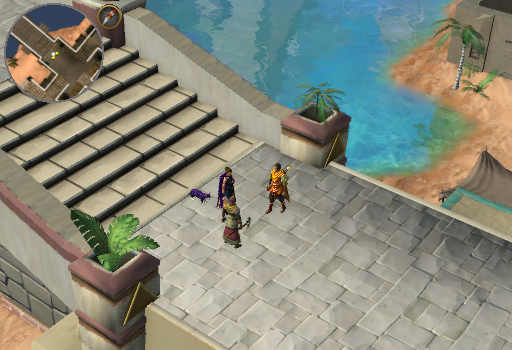
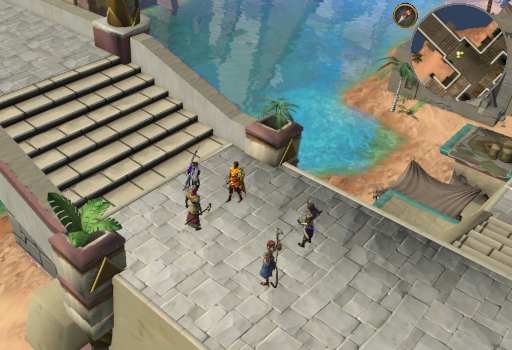
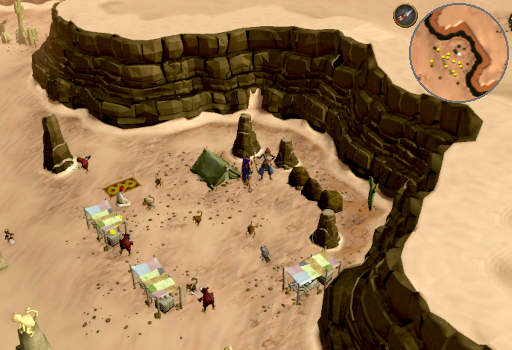
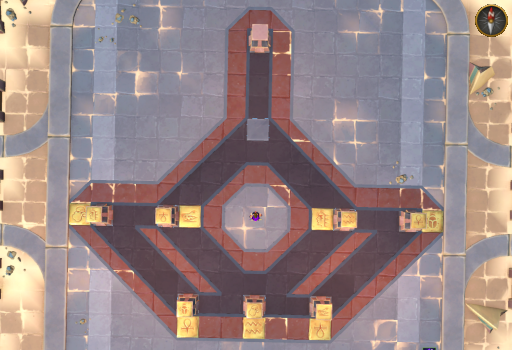
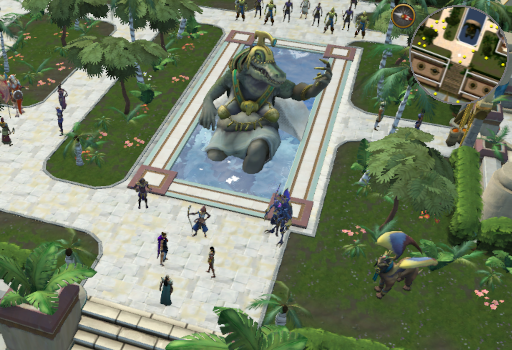
Grab your cat or kitten and enter Sophanem through the adjoining gate by interacting with the guards. Cross the bridge and talk to Ozan, choosing to continue the quest when prompted. You will be told about 5 citizens who aren't cooperating and asked to help convince them to enter Menaphos.
-
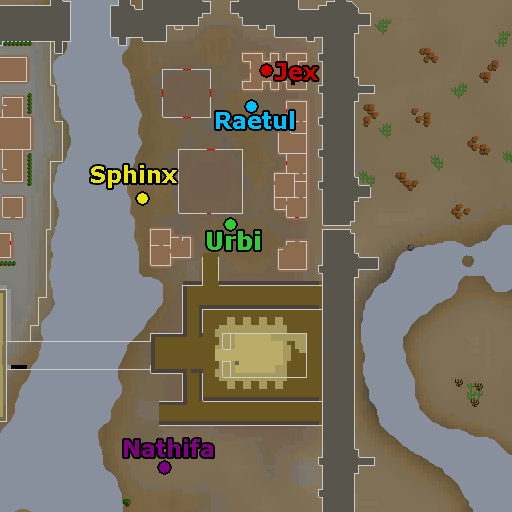
You can deal with the first 4 of the citizens in any order (we will cover them alphabetically), but Nathifa must be talked to last. With the exception of Nathifa, all of them are on the North side of town. If you leave the city at any point before completing this step or the next, return to Ozan on the bridge and talk to him to continue.
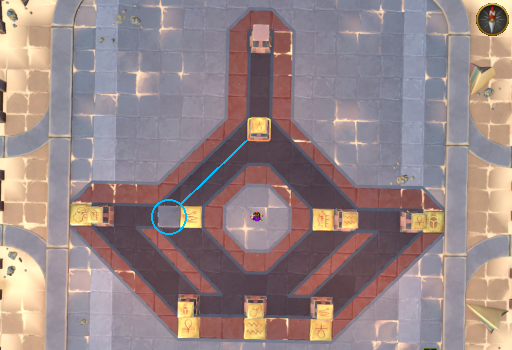
- Head to the temple in the North East corner of town and talk to him inside. You will point out that Icthlarin would want Jex to be safe from Amascut and that will be all the convincing he needs.
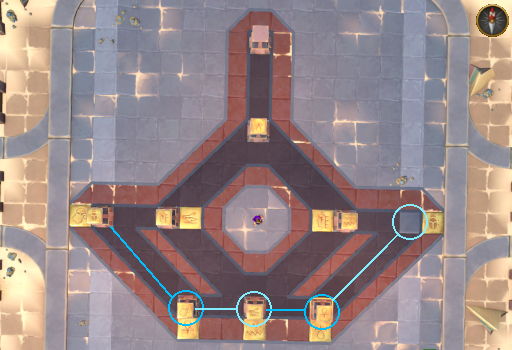
- Talk to Raetul by his stall just South of Jex's temple. Explaining the eclipse to him will be enough to convince him to take shelter in Menaphos.
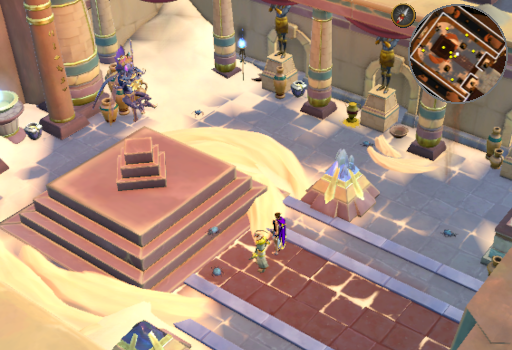
- Make sure you have your cat, kitten, or variant thereof following you, then talk to the Sphinx to the West of the Southern pyramid. Your feline buddy will communicate that The Devourer is coming. You will ask the Sphinx to protect the cats of Menaphos and the Sphinx will agree. You do not need your Catspeak amulet or a Cramulet containing it to complete this step.
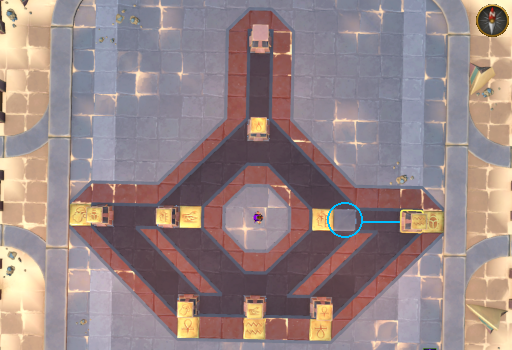
- Talk to Urbi by her stall South of the Southern pyramid. You will point out that any weapons she wants to sell will have a better market inside Menaphos where the guards are centered. Money will be enough incentive to convince her.
-
Nathifa
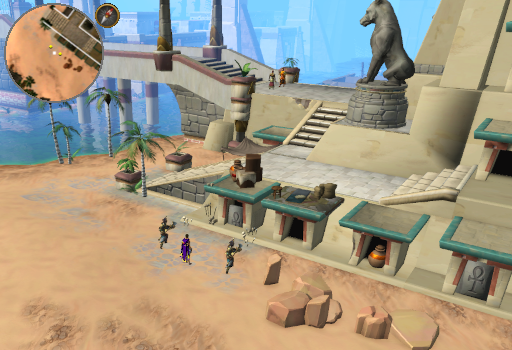
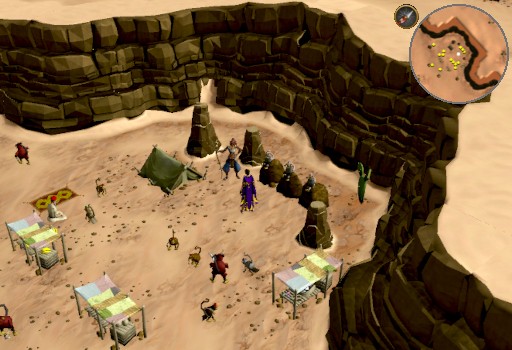
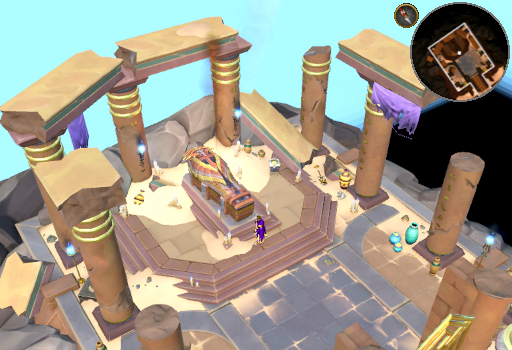
Make your way to the Sophanem slayer dungeon entrance and talk to Nathifa just South of it. It will become obvious that Nathifa is just a guise The Devourer is taking to watch your preparations. Complete any of the dialog options you like, but the third one will continue the quest. She will try to convince you to join her rather than fighting her; in exchange she will devour your soul last. Once the conversation ends and Amascut leaves, return to Ozan.
-
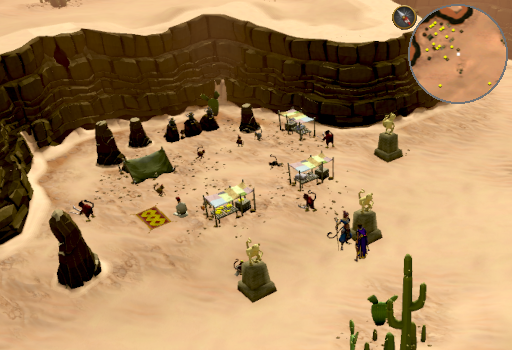
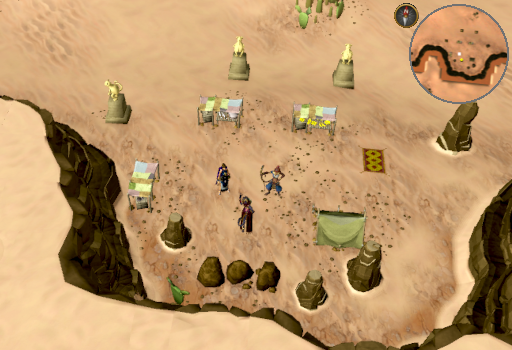
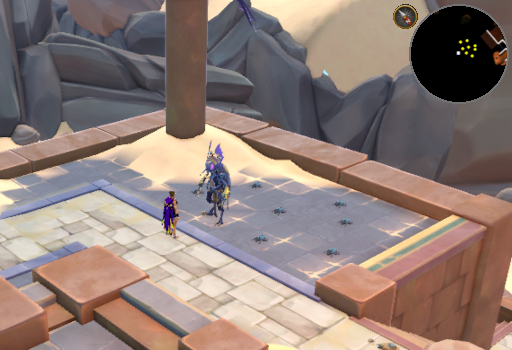
Ozan will ask you to check on the entrance to the slayer dungeon, just to make sure it's secure. Once you're sure you're ready to fight, inspect the dungeon entrance to the South. You will have to fight 4 waves of enemies. They are modeled after the slayer monsters from the dungeon, but you don't need the Slayer levels they require or to have Feather of Ma'at with you to beat them. Furthermore, Het and Apmeken will arrive to help, taking some of their attention off of you. After each wave, talk to Het or Apmeken to continue to the next wave. If you leave at any point, you will have to start again from wave 1.
Note that these monsters can hit rather hard. As such it is recommended to pace yourself and try not to take on too many at once. Should you have issues, running away far enough will cause them to shift their attention to Het and Apmeken. This being the case, you TECHNICALLY can make it through all 4 waves without fighting. It just will take longer than if you helped wipe out the enemies.
- Wave 1
- 2 Salawa akh
- 1 Feline akh
- 1 Corrupted scarab
- 3 human akh (2 Melee, 1 Magic)
- Wave 2
- 1 Salawa akh
- 1 Feline akh
- 1 Corrupted scarab
- 4 human akh (2 Melee, 1 Magic, 1 ranged)
- Wave 3
- 1 Salawa akh
- 2 Feline akh
- 2 human akh (1 Melee, 1 Ranged)
- 3 Imperial guard akh (1 warrior, 2 ranger)
- Wave 4
- Wave 1
-
Return to Ozan and talk to him. You will learn from Het that Scabaras has requested an audience with you at the Temple of Isolation.
-
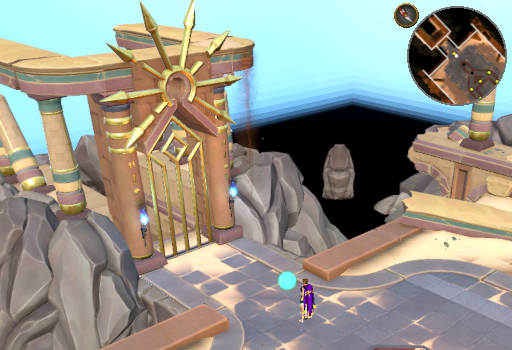
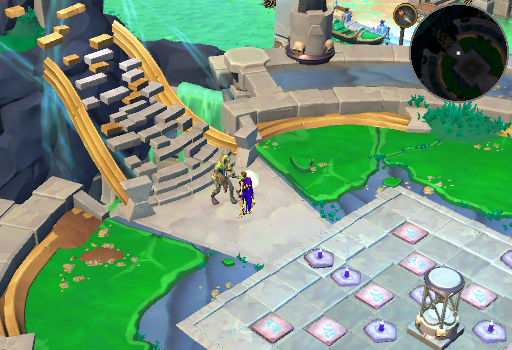
Make your way to Pollnivneach. Enter the cave on the North East side of the cliffs (West of the Player-Owned House portal), run South past the Profane Scabarites to the boat, and take it to the Temple of Isolation, continuing the quest when prompted. Climb the stairs to the top of the temple and speak to Scabaras. He will tell you that you must find and obtain the last fragment of Tumeken. Once it is time, he will reveal its location to you. But before then, you must gain the favor of the children of Tumeken. He will inform you that responding to his summons and embarking on this quest is enough to earn his favor and give a you a gold medallion, Scabaras' Favour. Now you need the rest.
-
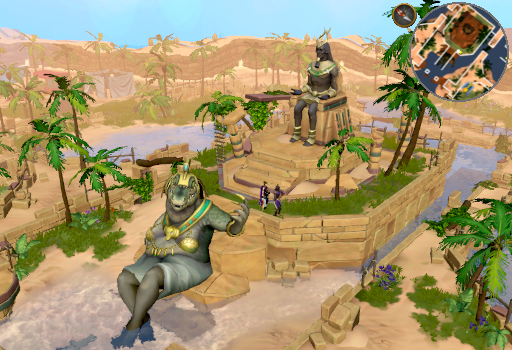
Travel to Het's Oasis and speak to Het on the West. Continue the quest when prompted. You will find yourself by the statue of Het in the center. Descend the stairs and talk to Het again. He will say that to earn his favor you will need to complete a lap of the Agility course. You can do this from where you appeared in the instance, but you will have to continue the course to get back to Het. When you have returned to him, speak to Het again and he will agree to give you his favor.
Note: the fastest way to get to Het's Oasis is by using a Ring of duelling.
-
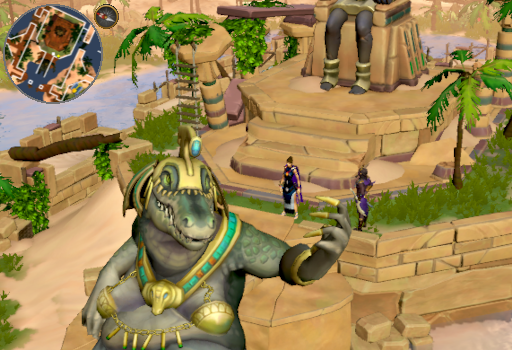
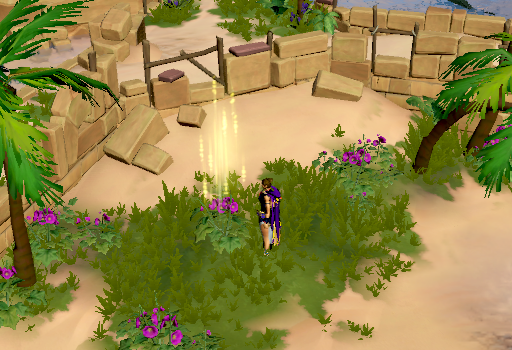
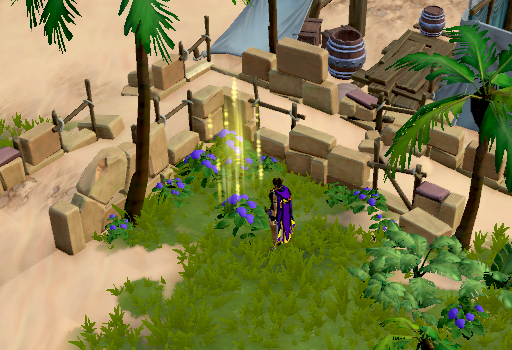
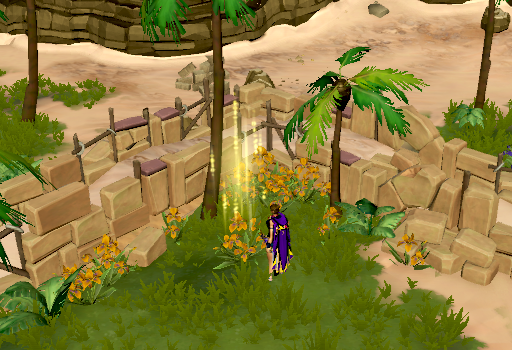
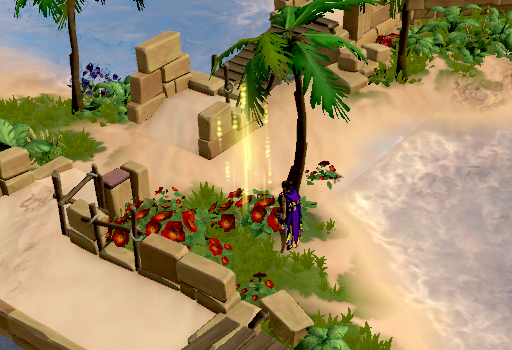
As you finish with Het, Crondis will tell you that she wants a perfect flower from each bush around the Oasis. Unfortunately, that means you'll have to complete the course again to get to them all and return to Crondis. Irritatingly, inside the instance you cannot walk around the East bank, so be prepared to double back.
Flower Location
Click for in game viewPerfect hollyhocks 
Perfect hydrangeas 
Perfect irises 
Perfect roses 
-
Return to Crondis and Het. In exchange for all the perfect flowers, Crondis will give you one of her old teeth, Crondis' Favour. Het will give you a keffiyeh, Het's Favour. Crondis will tell you that Apmeken has returned to the monkey colony, so you should seek out her favor there.
-
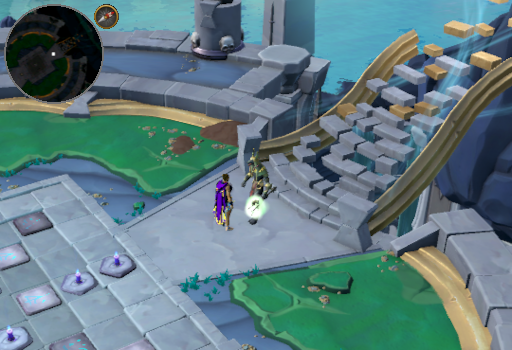
Make sure you have your Monkeyspeak amulet (or Cramulet containing it) then head to the Monkey colony North of the Bandit Camp lodestone. Attempt to talk with Apmeken and the wise monkeys will wonder why you're talking to no one. Apmeken will ask you to talk to her somewhere quieter and begin following you.
Note: the fastest way to reach the Monkey colony is by teleporting to the Desert Bandit Camp using an Enlightened amulet, Bandit Camp Teleport, any Magic Carpet to the colony, or the Bandit camp lodestone then circling around to the North side of the cliffs.
-
Walk away from the colony a short distance (if you go a tile North of the Northern monkey statues, that's far enough) and talk to Apmeken again. She says she wants to reveal herself to them but then she starts a miserable depression spiral because she can't bear to let her kind see her. She will agree to give you her favour if you help her deal with her shame. Complete any of the dialog you'd like, option 3 will allow you to continue. She will agree to get a Choc ice with you in Nardah.
-
Because she is following you, you cannot simply teleport to Nardah. If you teleport away, you will have to return to the colony and talk to her, at which point she will begin following you again. Speak to the Rug merchant at the colony and teleport to Nardah. Once there, make your way to Rokuh and speak with him. He will be in awe of seeing one of the gods personally and will give each of you a Choc ice free of charge. This will remind Apmeken of what she stands for and will agree to show herself to the monkey colony. Before heading back, stop in the Nardah bank and ensure that you are geared for combat. Once ready, you can use the nearby Rug Merchant to get back OR your preferred teleport method as she would meet you there anyway if you lose her.
-
When you return to the monkey colony, click the quest marker to proceed and you will find the area deserted (no pun intended). Amascut will appear and you'll learn that most of the monkeys fled, but the wise monkeys were transformed into beasts very much like the bosses from Do No Evil. You will have to fight all of them, although they are much weaker than the original 3. If you are using Necromancy, you will get the most value out of Soul Split. Otherwise, we recommend using the protection/deflection prayer that blocks damage from the combat style you are weakest to (example, if you are using ranged, protect/deflect melee). If you leave the area at any time, you will need to start the entire fight over.
The Eruni-alike, Kikazaru, will spawn 1, 2, 3, and 4 lesser demons upon starting the fight and then reaching 75, 50, and 25% lifepoints respectively. He is immune to damage until the demons are slain, so leave him until last so that Apmeken is free to help you clear out the demons. We recommend dealing with the Leeuni-alike, Iwazaru, first. Every now and then he will unequip your helmet slot, but with higher level combat gear this is a negligible issue. After that, deal with the Ayuni-alike, Mizaru. If you are using ranged, consider killing him first instead or getting him caught on terrain so you can safe spot him. Otherwise, just do damage, don't die, and enjoy the fight. Note that if you kill Kikazaru first, you could technically leave the other 2 to Apmeken. The only reason she has issues with Kikazaru is because she doesn't recognize his immunity when the lesser demon(s) are spawned and keeps attacking him to no avail.
-
Once the 3 beasts are defeated, talk to Apmeken and she will give you a tuft of her fur, delicately woven into a ribbon: Apmeken's Favour. With all 4 favours, return to Scabaras in his Temple of Isolation.
-
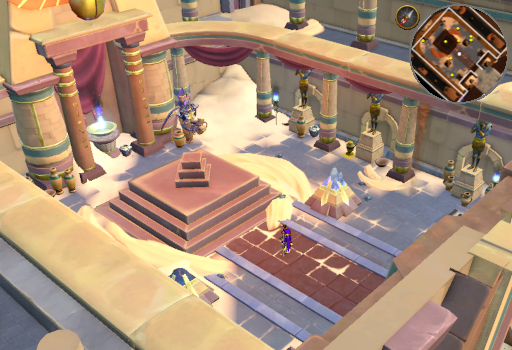
Talk to Scabaras and you will be told to enter the Temple of Tumeken. You will commune with Tumeken in the temple and find yourself in his tomb. All the gods' favors will be gone. If you leave the tomb for any reason, you need only return to the boat that takes you to the Temple of Isolation to pick up where you left off.
-
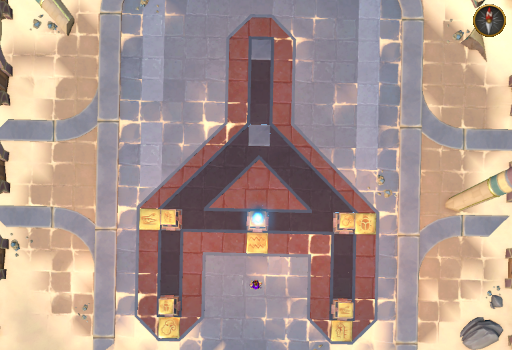
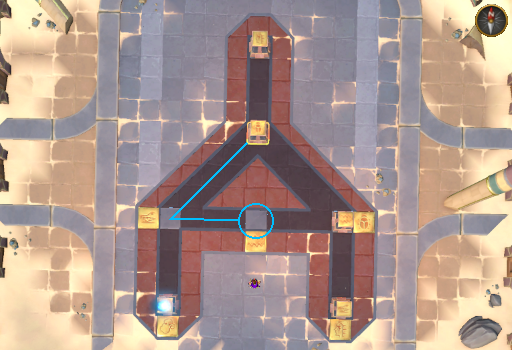
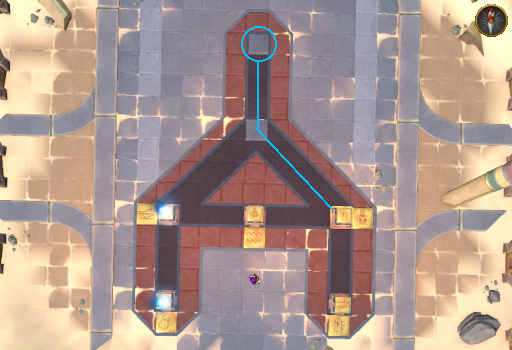
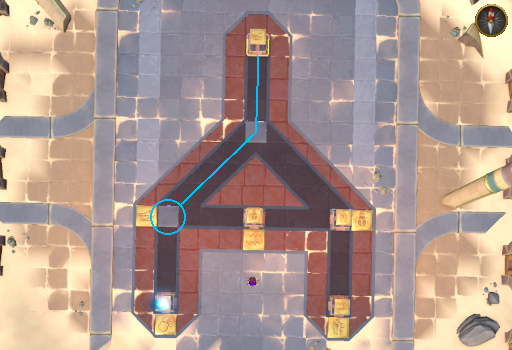
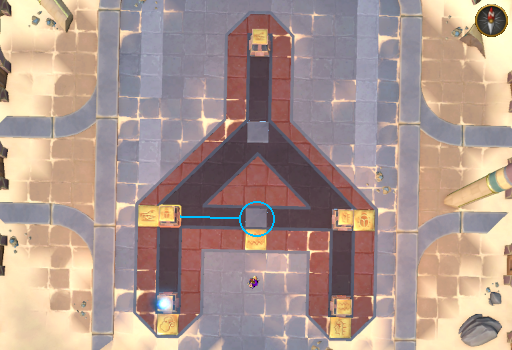
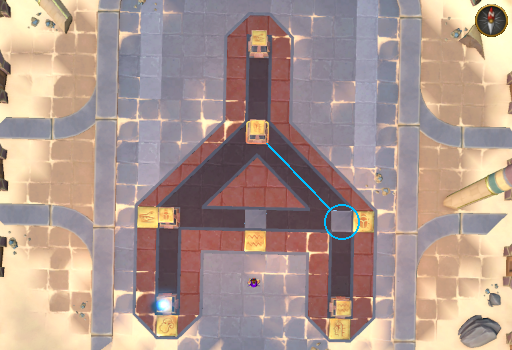
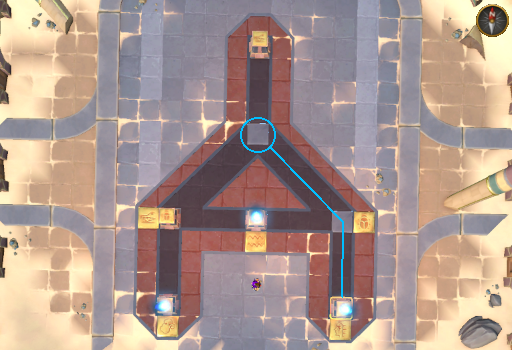
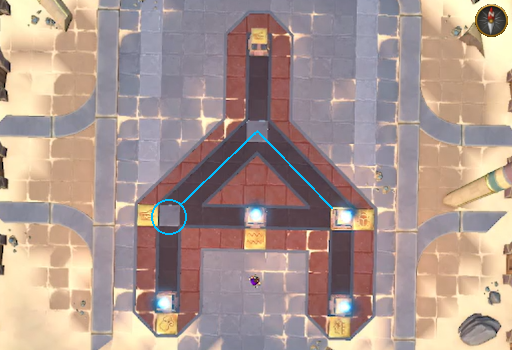
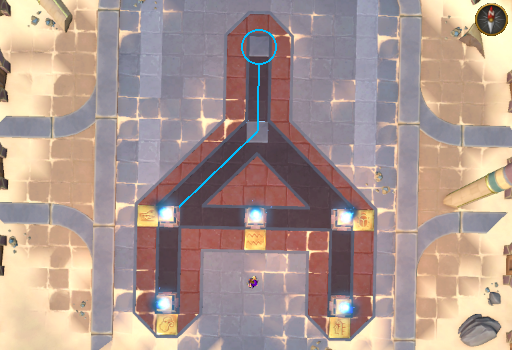
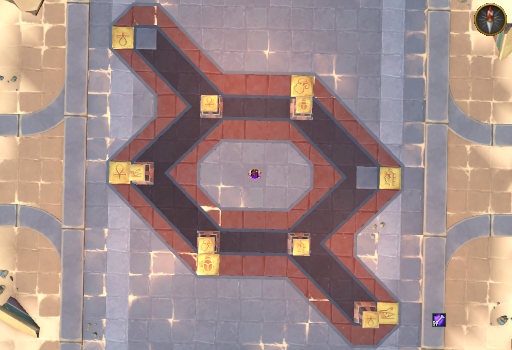
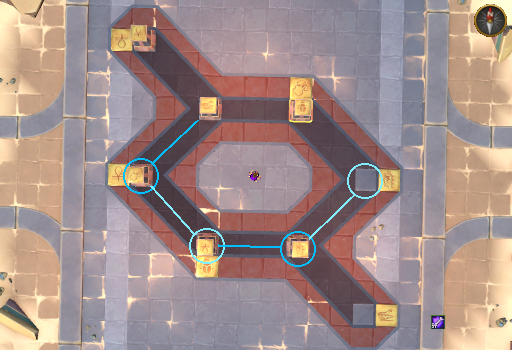
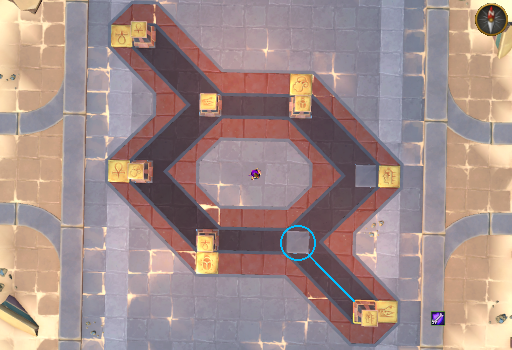
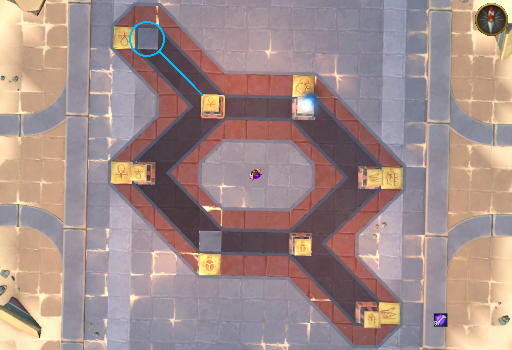
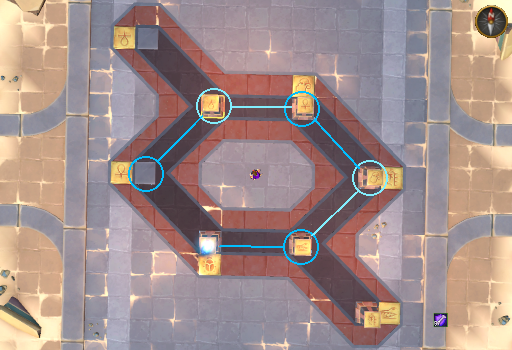
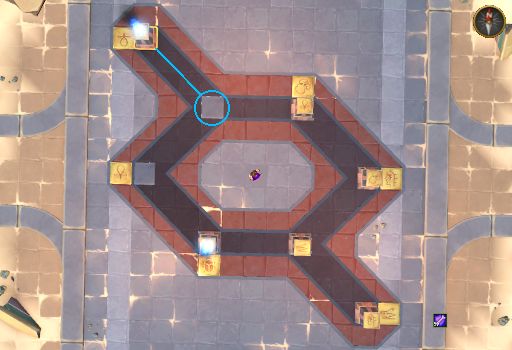
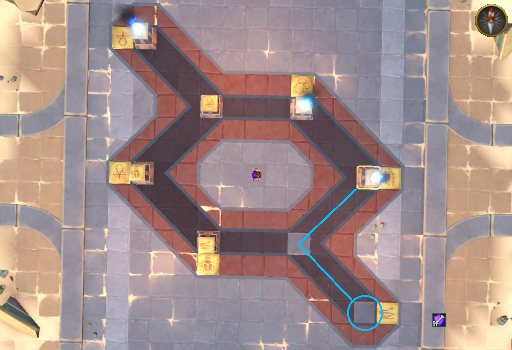
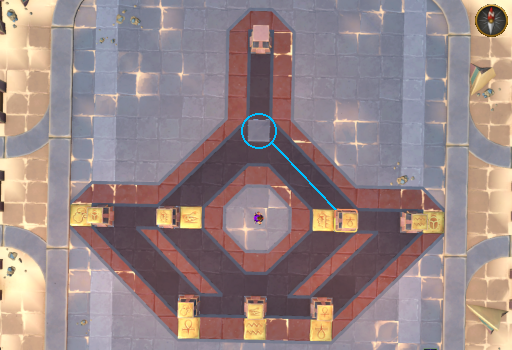
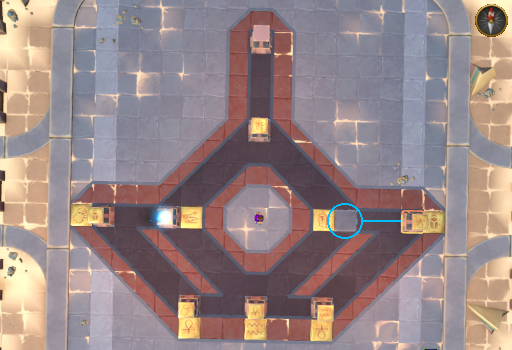
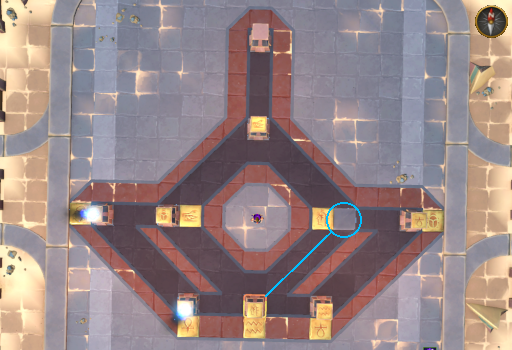
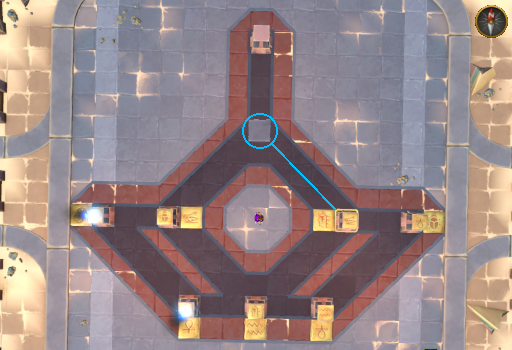
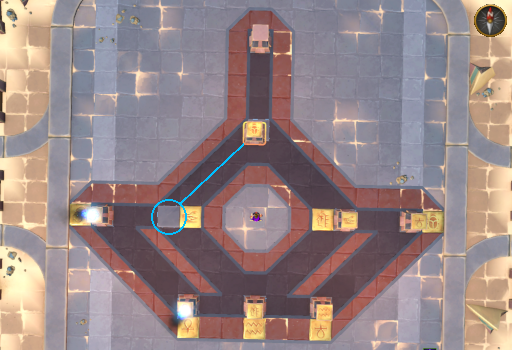
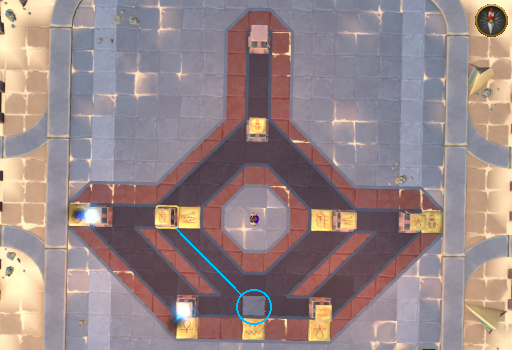
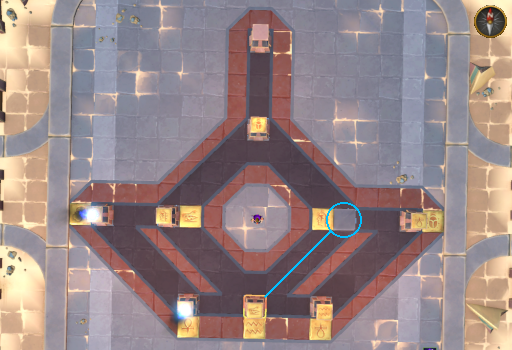
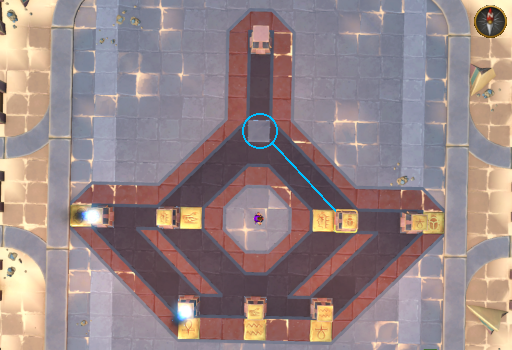
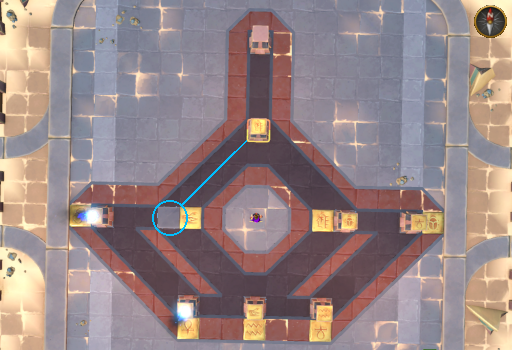
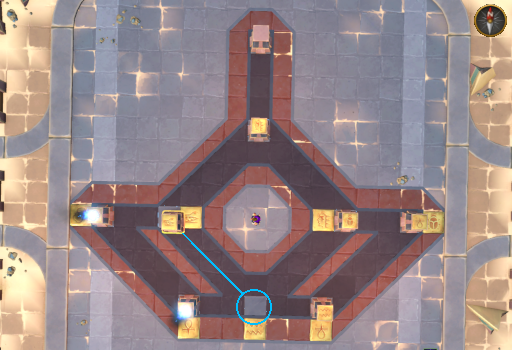
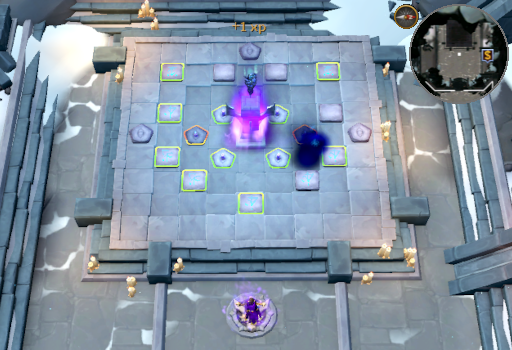
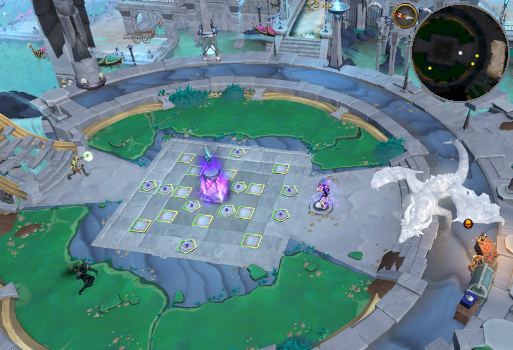
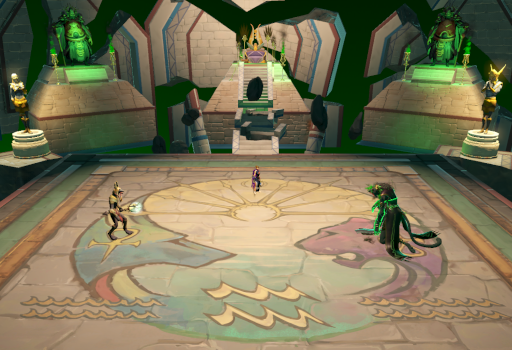
You will now have to complete 3 puzzle rooms to reach Tumeken's bau. Each has several plinths representing members of the desert pantheon that must be aligned with the matching floor symbol. Plinths can only move along black paths 1 space at a time and only to empty spaces. Once a plinth is in the correct location, it will cause a blue flame to spout from the top of it.
If you wish to figure out the puzzles for yourself, as there are many solutions, solve the current puzzle then talk to the Memory of Tumeken and pass through the gate to proceed. This will be repeated for the second puzzle. Solve, talk, pass through. Once you have completed all 3 puzzles, skip ahead to here to resume following the guide.
Let us begin the puzzles...
-
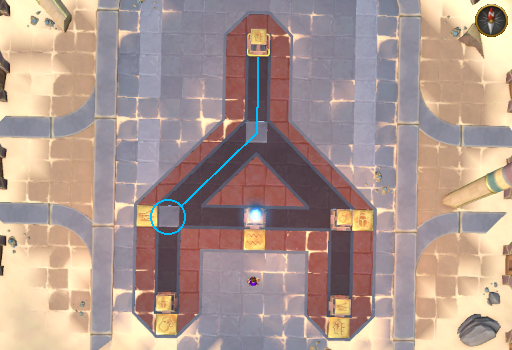
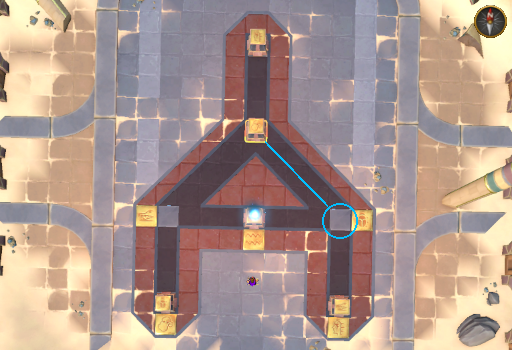
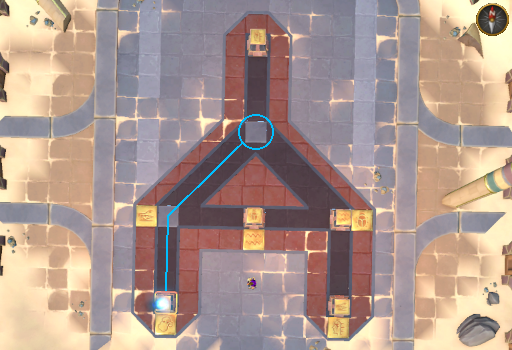
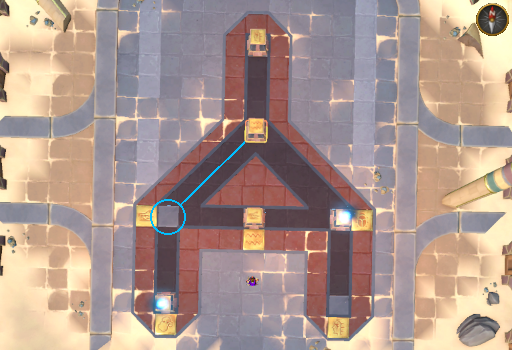
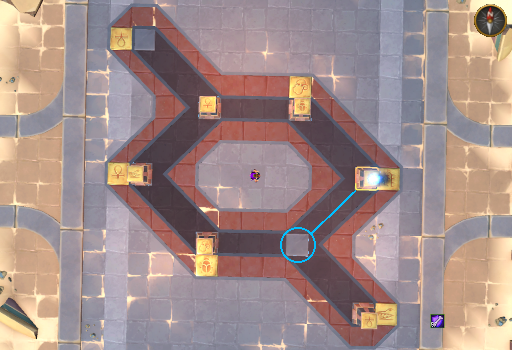
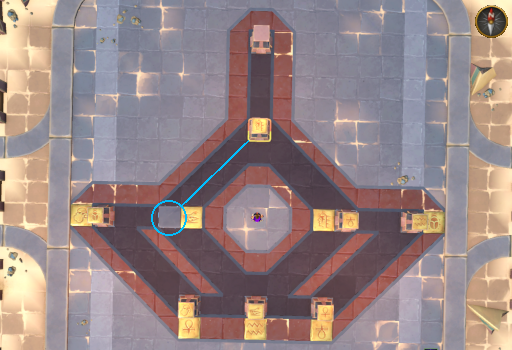
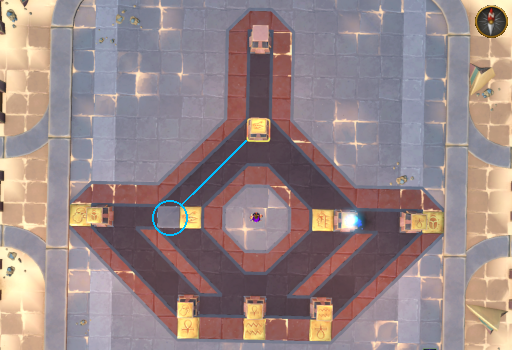
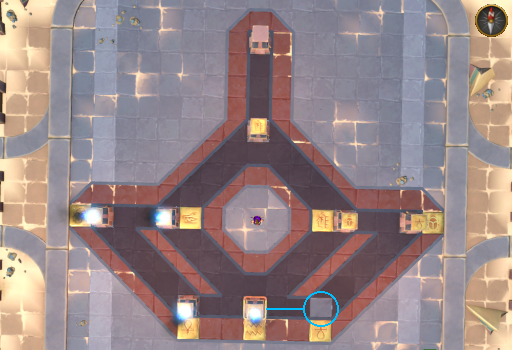
Move Het North East, then North.
-
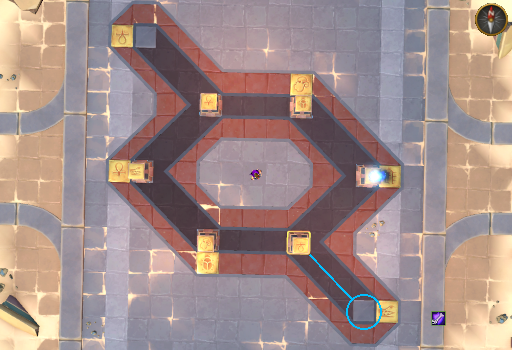
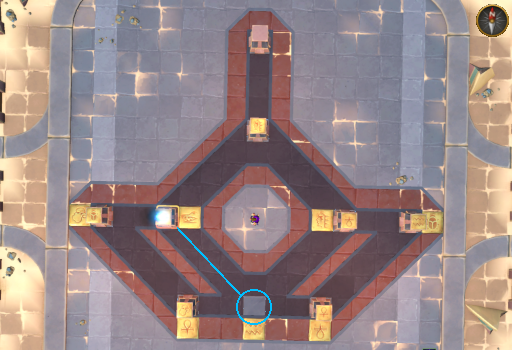
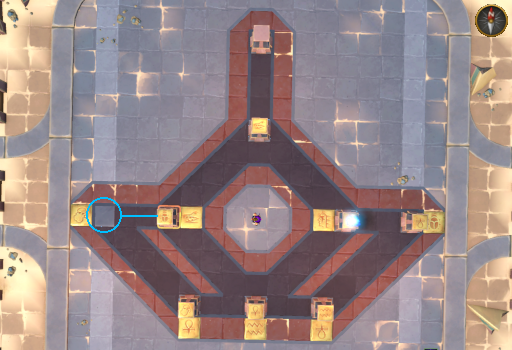
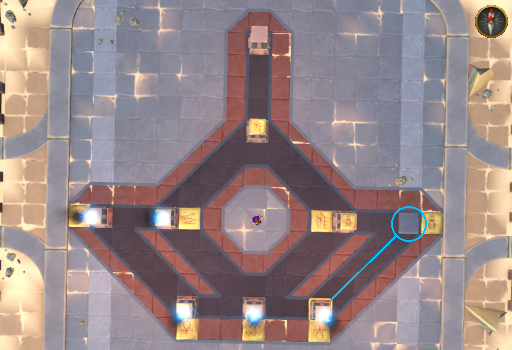
Move Apmeken North West.
-
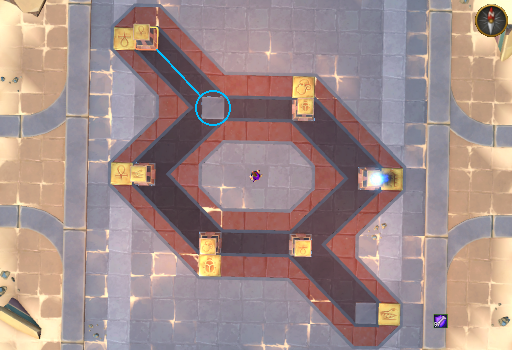
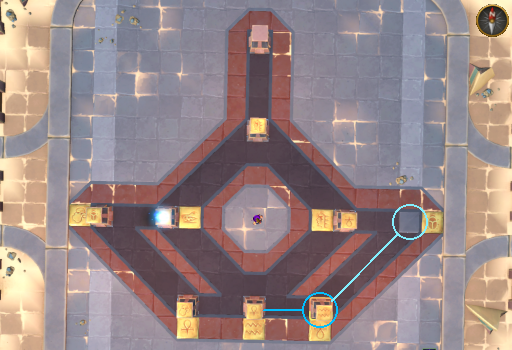
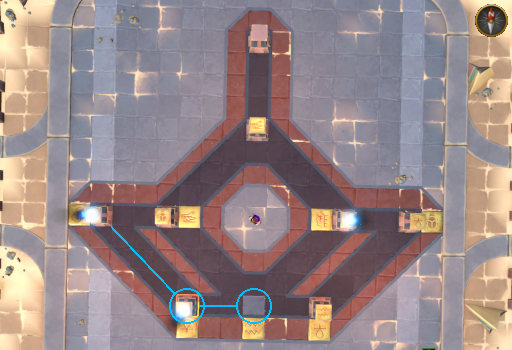
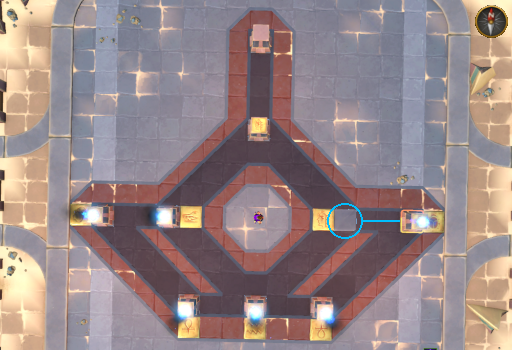
Move Elidinis East.
-
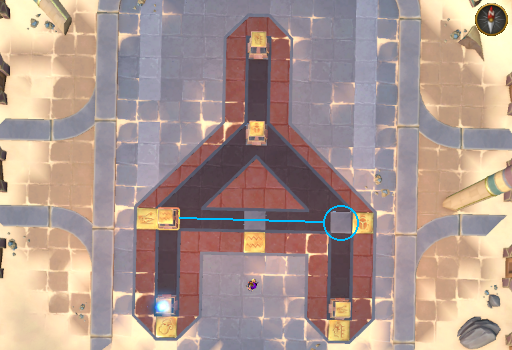
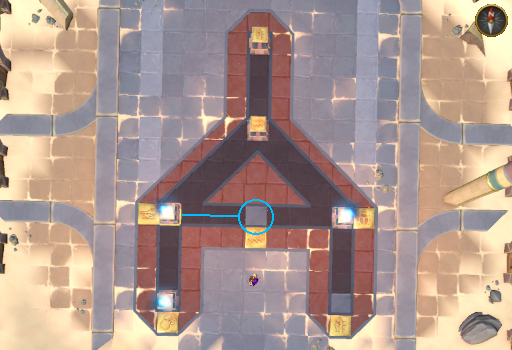
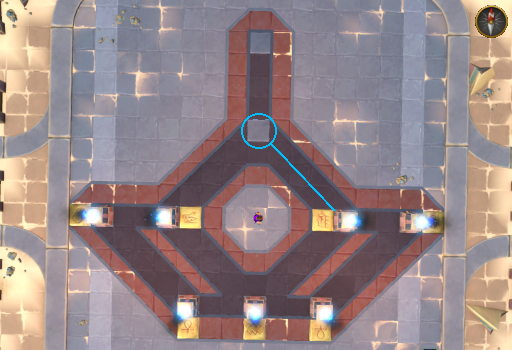
Move Scabaras North, then East.
-
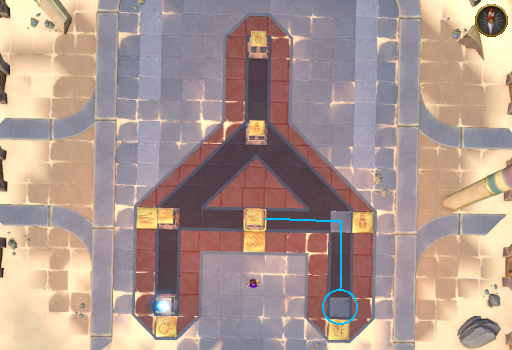
Move Apmeken South West, then South.
-
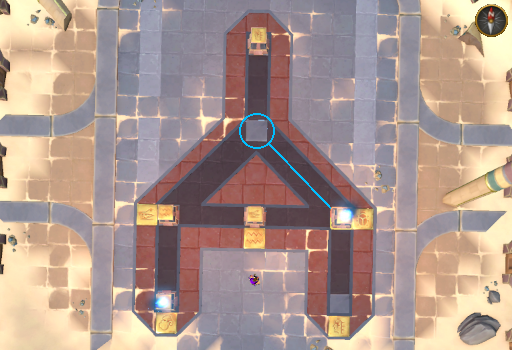
Move Scabaras West and then North East.
-
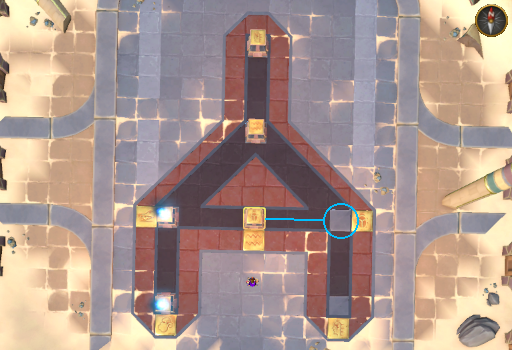
Move Elidinis West 2 spaces.
-
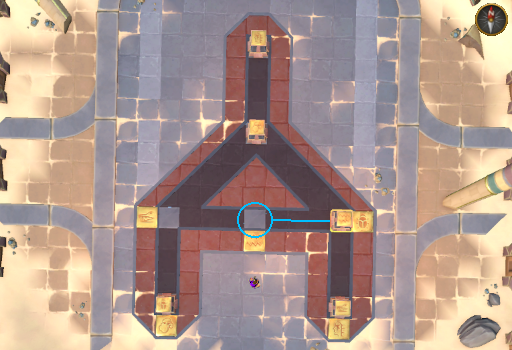
Move Crondis North, then West.
-
Move Scabaras South East.
-
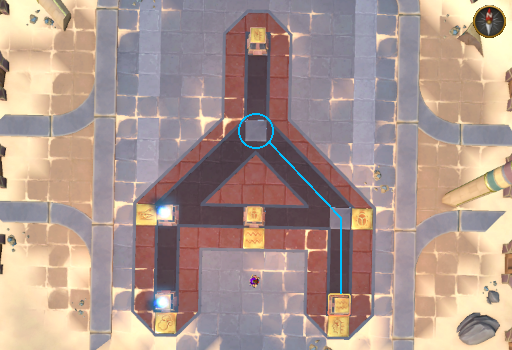
Move Elidinis North East.
-
Move Crondis West.
-
Move Scabaras West.
-
Move Elidinis South East, then South.
-
Move Het South, then South East.
-
Move Crondis North East, then North.
-
Move Scabaras West.
-
Move Het North West.
-
Move Elidinis North, then West.

-
Move Het South East, then South.
-
Move Scabaras North East, then South East.
-
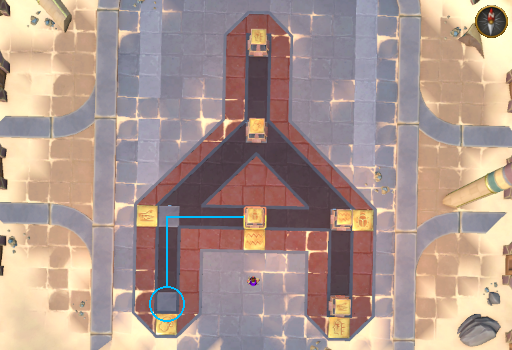
Move Crondis South, then South West.
-
Move Het North East, then North.
-
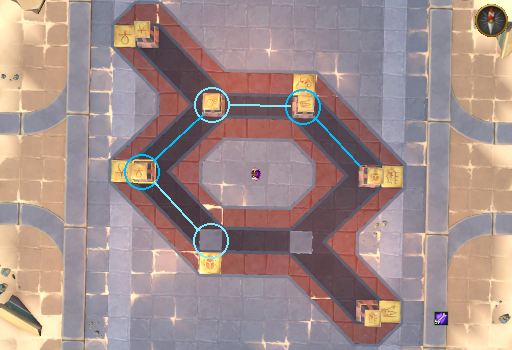
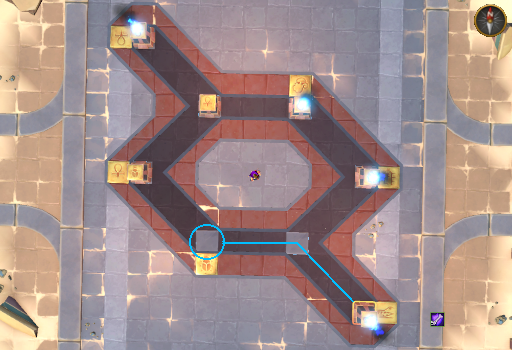
The second puzzle is a bit more complicated.
-
Move Het North East.
-
Move Amascut North West.
-
Move Icthlarin North West.
-
Move Crondis, Apmeken, Amascut, and Het clockwise 1 space.
-
Move Het South East.
-
Move Scabaras, Crondis, Apmeken, and Amascut clockwise 1 space.
-
Move Scabaras, Crondis, and Apmeken clockwise 1 space.
-
Move Icthlarin South East.
-
Move Scabaras, Crondis, Apmeken, Icthlarin, and Amascut clockwise 1 space.
-
Move Amascut North West.
-
Move Scabaras and Crondis clockwise 1 space.

-
Move Icthlarin and Apmeken counter-clockwise 1 space.
-
Move Het North West and then North East.
-
Move Crondis East then South East.
-
Move Scabaras and Icthlarin counter-clockwise 1 space
-
Move Het North East.
-
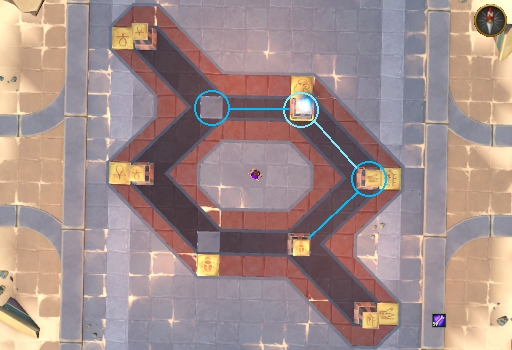
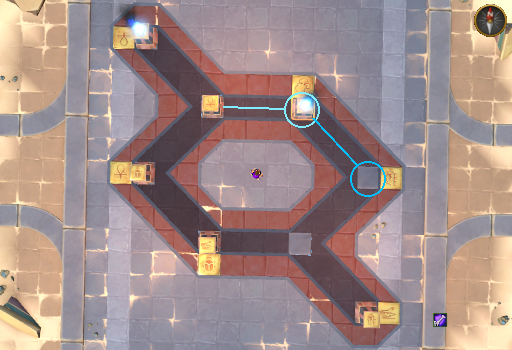
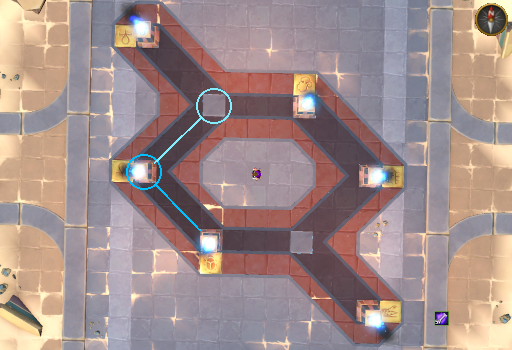
The third puzzle is by far the most complicated as there is a blocking pillar whose only purpose is to get in the way.
-
Move Amascut North East.
-
Move Het East.

-
Move Scabaras, Apmeken, Crondis, and Icthlarin clockwise 1 space.
-
Move Elidinis East.
-
Move Amascut South East.
-
Move Het North East.
-
Move Crondis North West.
-
Move Icthlarin and Elidinis clockwise 1 space.
-
Move Amascut East.
-
Move Het South East.

-
Move Crondis North East.
-
Move Scabaras East.
-
Move Apmeken and Icthlarin clockwise 1 space.
-
Move Het South West.
-
Move Crondis South East.
-
Move Scabaras North East.
-
Move Het North West.
-
Move Crondis South West.
-
Move Scabaras South East.
-
Move Het North East.
-
Move Crondis North West.
-
Move Elidinis West.
-
Move Amascut South West.
-
Move Scabaras East.
-
Move Het South East.
-
Move Amascut North East.
-
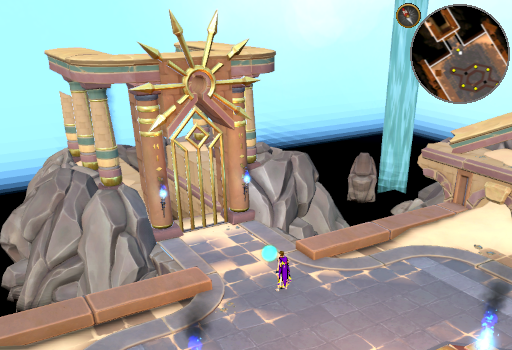
Open the gate to the North and then open the sarcophagus. Another Memory of Tumeken will appear. Talk to it to learn of Tumeken's heroic sacrifice.
-
When the dialog ends, you will be back in the Temple of Isolation. Go down the stairs and talk to Scabaras. The scarabs representing his emotions will merge with Tumeken's bau.
-
Return to Menaphos and talk to Pharaoh Leela at the entrance to the Imperial district. Continue the quest when prompted. Talk to her again and she will ask that you lend your expertise to planning where the Menaphites guards should be stationed. Really this just means that you'll relay the battle plans that the council members have put together to Leela.
Note: the fastest way to reach the palace is by using Leela's favour to teleport to the Imperial district.
-
Talk to Urluk, just to the South West of Leela. Continue the conversation until it reaches its conclusion, at which point you will have been told what is needed and where.
-
Report back to Leela and she will have you speak with each of the gods and Commander Akhomet before returning to the Pharaoh once more. Talking to Commander Akhomet, she will tell you what the Menaphite guards bring to the table, continuing only when the dialog ends. Then talk to each of the gods: Apmeken, Crondis, Het, and Scabaras to learn about the forces that each of them have brought to aid the city. Return to Leela only once you have completed each conversation.
-
Talk to Pharaoh Leela again and help her match each set of forces to the best job for them:
- Who should defend the main gates?
- Akhomet's forces.
- Who should flank the enemies at the main gate?
- Apmeken's forces.
- Who should hold the East gate to Sophanem?
- Het's forces.
- Who should patrol and watch over the tomb and cavern entrances?
- Scabaras' forces.
- Who should tend to the wounded and manages supply lines?
- Crondis' forces.
- Who should defend the main gates?
-
After the forces have gone to their posts, Icthlarin will appear and inform you that Amascut's forces are attcking Um as well. Vorkath's ghost has been a huge help keeping them at bay. When you're done exploring the dialog, choose the option to "Continue Quest" and Icthlarin will ask you to use a ritual to sever Amascut's army from the power sustaining them.
-
Make sure you have your ghostly inks and your ritual candles, then travel to the Ungael ritual site and grab the Soul beacon (corrupted) from the room to the East (it's atop a pedestal on the North side of the room). You will find it has become corrupted, so you will need to perform an Ensoul Beacon ritual to fix it before you take it to the Um ritual site.
-
Step back over to the Ungael ritual site then click the focus pedestal and choose the "Ensoul beacon" ritual. Set up 6 light sources, 3 Change II glyphs, 2 Elemental III glyphs, and 2 Commune III glyphs - making use of any glyphs/candles you may have already placed. Then head to the platform and begin the ritual. Shadow rifts will appear during the ritual. While they are present, it will fight against your ritual progress. Simply click on them to dispel them like most ritual disturbances. After the ritual, the Soul beacon (Eclipse of the Heart) will fly over to the cliffside. Go interact with it. It will do something weird... I'm sure it's nothing.
Note: the fastest ways to reach the Ungael ritual site are the Underworld Grimoire 2's teleport option and the Ungael teleport incantation.
-
Head to the Um ritual site, click the quest icon, and continue the quest when prompted. Vorkath will fly in to say hello. Cross to the North side of the site and talk to Icthlarin. Once the dialog ends, you can place your focus and select the ritual: Powerful Ritual of Severance.
-
Set up 10 light sources, 5 Change II glyphs, 3 Elemental III glyphs, and 3 Commune III glyphs. Begin the ritual. Amascut's forces will try to disrupt the ritual, but Icthlarin and Vorkath will stop them. They've got it handled, so just let the ritual continue.
Note: the fastest ways to reach the Um ritual site are the Underworld Grimoire 2's teleport option and the City of Um teleport incantation.
-
Before you go any further, take some time to prepare yourself for the final battle. Bring your best food, potions, and familiar. Once ready, talk to Icthlarin on the North side of the Um ritual site. He will teleport you to the Worker district of Menaphos rather than the palace for... somewhat flimsy reasons. You will now need to run, with him following you, through the city back to the Imperial district. Due to the fighting, you will be unable to use the Shifting Tombs quick access and any sort of teleportation will take you out of the instance so you will have to go the long way. Thankfully, none of the combatants you wander by will impede your progress.
-
Make your way back to the Imperial district and talk to Pharaoh Leela there. After a few lines of dialog, Amascut will arrive in a cutscene. When the cutscene ends, the final battle begins, so familiarize yourself with the fight before going in (see the next step). Exhaust Tumeken's dialog after he appears. The final line of dialog before the fight is Amascut saying, "Come mortal. Prove that you are as worthy as they claim. That you have the will to stand against the vision of a goddess!"
-
The fight is pretty straight forward. For most of the fight she will be attacking you with Magic attacks (energy balls - Left hand) and Ranged attacks (energy bolts - Right hand) from phase 2 to the end. She has 800,000 hitpoints. Phases begin when she reaches 600k (phase 2), 400k (phase 3), and 200k (phase 4) hitpoints. If you need to leave the area for any reason, you can re-enter by speaking with Leela. Many will find having voiceovers active for this battle helpful as she will yell several phrases for the attacks.
Phase 1, 2, and 3
During the first 3 phases, Amascut will follow the below attack rotation. If you phase her at any point in this rotaion, she will temporarily become (mostly) immmune to damage (conjures can still hit her) before starting the rotation from the top.
4 Autoattacks - Soul obelisk - Autoattack - 4 or 5 Shadow dashes - 4 Autoattacks - Corruption bomb - 3 Autoattacks - Corruption bomb - 2 Autoattacks - Corruption bomb - 22 Autoattacks - REPEAT
Phase 4
Things will change when you get her to 200,000 hitpoints and enter the final phase. You will be taken to a new square shaped arena, her vision of the Golden Palace, and she will heal back up to 350,000 health. As with the other phase changes, she will briefly be immune as the begining of the phase. Once she is once again vulnerable, she will repeat the attack rotation below until she is defeated.
4 Autoattacks - Soul obelisk - 4 Autoattacks - Sanctum Shockwave - 4 Autoattacks (during Sanctum Shockwave) - Corruption bomb - 4 Autoattacks - Sanctum Shockwave - 4 Autoattacks - Corruption bomb - 4 Autoattacks - Corruption bomb - 3 Autoattacks - Corruption bomb - 2 Autoattacks - Corruption bomb - Autoattack - Sanctum Shockwave - 5 Autoattacks (during Sanctum Shockwave) - REPEAT
Soul Obelisk
She will summon a number of soul obelisks equal to the phase number you are currently in. The first obelisk appears to the West, the second appears to the East, the third appears to the South, and in phase 4 you will have one in each corner of the arena. Each obelisk will initially spawn with 15k health, but this will immediately drop to 7.5k hitpoints. This will then slowly increase over time until it regains full health. At that time, the obelisk will begin to throw Magic attacks at you. Damaging the obelisk below full health will stop the Magic attacks but it will resume healing to reach fill health again. Obelisks can be fully destroyed, however, if the attack rotation continues long enough the defeated obelisk(s) will be resummoned. Note that the East and West Obelisks can only reach to about the middle of the arena, as such, during phase 1 you could completely ignore it and for phase 2 just remove either the East OR West one depending on where you choose to stand.
Possible Voiceover Cues: "All strength withers.", "Grovel.", "I am the one who devours.", and "Your soul is WEAK!"
Shadow Dash
Players who have experience with Kerapac the Bound will recognize this style of attack. A progress bar will appear above her. When it fills, she will dash to your location and start doing rapid Melee damage to you. Stepping 2-3 tiles away will get you beyond the reach of this attack, at which point she will begin charging up to do it again. This will repeat 4 more times for a total of 5 dashes.
After the 3rd dash, as she is charging for the 4th, Tumeken's light will appear in the center of the room. If you can get her to stand in it, she will be stunned for several seconds, and will not dash at you a 5th time. While she is frozen in place, you will have plenty of time to unload your strongest attacks on her. Note that if you play with a skybox filter on that it may be difficult to see the area that the light encompases. Turning off any skybox will help with this issue.
Be sure you are careful about where you stand during her dashes. This is because when she does this during following phases, an echo of her will appear and mimic the same attack in the locations she did this attack on the previous phase. Thus, when you get to phase 3, she will be performing this attack herself, there will be an echo mimicking it at the locations she did it in phase 2, AND an echo mimicking it at the locations she did it in phase 1. The easiest strategy for this is to simply keep all of the locations close together for each phase. For example, in phase 1, try to keep all the dash locations on the West side of the room then all the dashes in phase 2 on the East side. This will allow you room to use the rest of the room to avoid this attack during phase 3.
Voiceover Cues (in order) : "I AM.", "THE GOD.", "OF.", "DESTRUCTION."
Corruption Bomb
While this major attack is easy to avoid, it happens a lot during the final phase. She will raise her arms to the sky and then thrust them downwards. A few seconds later, a barrage of corruption will fall from the sky, dealing typeless damage in various locations around the arena you are standing. Watch the indicators on the floor and run a few tiles to somewhere clear of the attack. This attack happens periodically during the first 3 phases, but isn't very dangerous compared to her other attack. In the final phase, she uses this attack quite a lot, so pay close attention to your positioning.
Possible Voiceover Cues:
(Phases 1 - 3) "Bend the knee.", "Fall to the shadow.", "There can be no light without darkness.", and "Unworthy!"
(Phase 4) "I will tear this world asunder!", "Mwahahaha", and "You are nothing."
Sanctum Shockwave
This attack will only occur during phase 4 and is very similar to the waves of corruption that Nakatra uses. Indicator lines will appear on the floor as corruption builds up under different parts of the room. Stand outside of the areas that are indicated, moving as the locations change. If you are standing in them when they go off, you will take typeless damage. Thankfully, the explosions are rather slow so aren't too hard to avoid.
Once you have depleted her hitpoints entirely, you will be done with the fight.
-
Amascut will try to unleash a massive attack to kill you, but Icthlarin will take the shot for you. This will be what convinces her that she has become the villain: killing the one person in her life that was still there for her.
-
She will, with your help, use the power that Tumeken gave you to restore Icthlarin to life before standing down. Make sure you have 4 free inventory spaces, talk to as many of the other characters present as you'd like, then to Icthlarin again to finish up and claim your rewards.
Congratulations, Quest Complete!
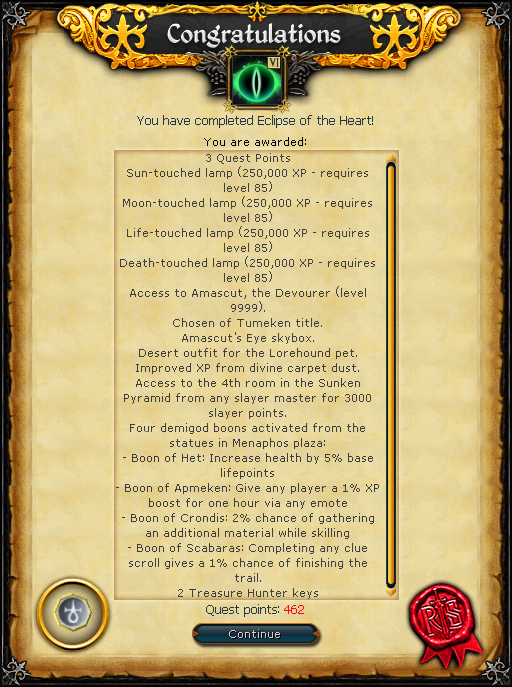
Post-Quest Rewards
Completing the quest gives access to 4 boons, each from one of the statues in the Menaphos plaza. To toggle each boon, click on the relevant statue. Note that by default they will be off when you complete the quest.
From North to South, the boons are as follows:
- Boon of Apmeken: Any time you perform an emote, it will give players within 8 tiles of you a +1% XP boost for 1 hour.
- Boon of Scabaras: Completing any clue scroll step has a 1% chance of finishing the entire clue.
- Boon of Het: Increases your base lifepoint maximum by 5%.
- Boon of Crondis: Any time you obtain materials with a gathering skill, there is a 2% chance to obtain an additional material.
This Quest Guide was written by Sy Accursed, 3ter 1, ChathMurrpau.
This Quest Guide was entered into the database on Fri, Aug 01, 2025, at 12:05:02 AM by Chath, and it was last updated on Mon, Aug 11, 2025, at 01:51:35 AM by Chath.
If anything is incorrect or missing, or if you have any new information to submit to this database, please submit it to us on our Content Submissions Forums.
If you see this guide on any other site, please report it to us so we can take legal action against anyone found stealing our content. This guide is copyrighted by RuneHQ, and its use on other sites is expressly forbidden. Do not ask if you can use our guides or images, the answer is and always will be NO!
Print this page with images - Back to the Quest Guide Index Page - Back to Top
