Must be able to handle level 100 monsters in a multi-combat zone.
Make your way to Mort'ton through the Mort Myre swamp. Once there, make your way through Burgh De Rott in the direction of the Haunted Mine. Access main entrance to the mine on top of the hill the mine by crawling down the Cart tunnel.

Once inside, walk north over the green stones until you reach the entrance to the lair.
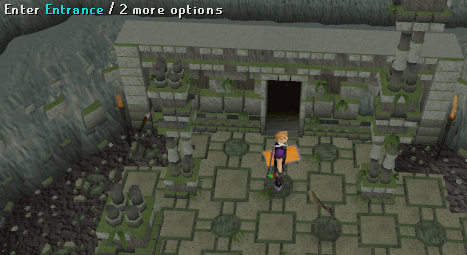
Part I - Reaching the bank:
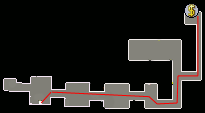
-
Enter the the lair, look 2 squares to the north of the entrance and you will notice a trap. Small lines on the floor represent floor traps. In order to disable these trap you need to right-click "Search" them. To avoid running over traps by accident it is recommended that you turn auto-retaliate off.
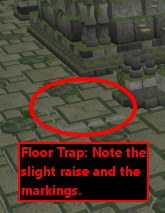
-
Walk to the east while keeping attention to the floor. Half-way the second room is another trap
The walls to the east are not as normal as they are supposed to be. Right-click and "Search" the wall to disable the wall trap.
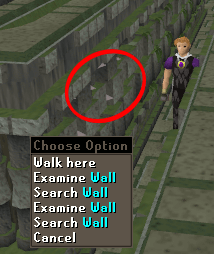
-
Keep walking east as long as you can. Don't forget to disable those wall and floor traps along the way.
-
Once you reach the end of the hallway you no longer have to worry about monsters attacking you. Continue north up the hallway to the bank. Keep an eye out for wall traps ahead.
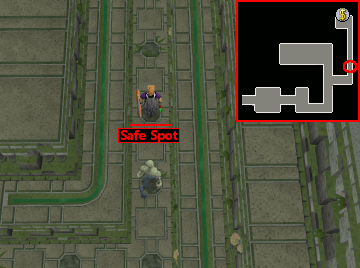
-
Now that you have reached your bank you should restock on food and/or potions. When you have your supplies, continue north and enter the "Passageway".
Note: 100 coins are need to use this service (a Ring of Charos will not help).
Part II - The dungeon:
-
Once inside the dungeon head to the west side of the "n" shaped room. There are floor traps everywhere. Take the southwestern most passageway when you have reach the western side of the room.
-
In the room with the Giant skeleton are no traps. Enter the northern doorway.
-
Walk to the middle of the room you are currently in, then take the western entrance. Do not click directly on the passageway! If you do, you will walk on a trap.
-
Make your way to the north of the next corridor. The walls on both sides of the corridor are covered with wall traps. You can pick one side and disable one wall trap, or you can walk half way up the eastern wall and switch to the western wall.
-
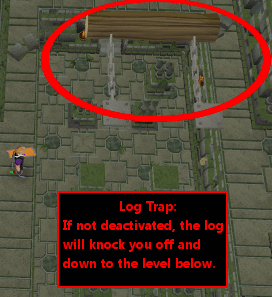
You have reached your only log trap. Use the pillars to jump to the far west side of the room and disable the trap. Now jump back and head north while the log is inactive. Right-click on the pillars to jump.
-
The next corridor has two spear traps: one near the beginning and the other a few squares after.
-
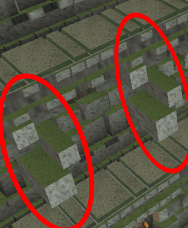
Now, you should spot two wall pushers. Wait until they are done pushing air to walk between them. Repeat this process to get past the second trap.
-
The mini-map will show you the route you should jump . Start in northwest side and travel in a southeastern direction. Turn on protect from mage as you cross some level 94 skeletons, who will attack you with magic. Once you made it safely to the other side, disable the floor traps near the stairs and climb down the staircase.
-
The next room does not contain any traps. Take your time to prepare yourself for the battle against the boss. Head north when you are ready.
-
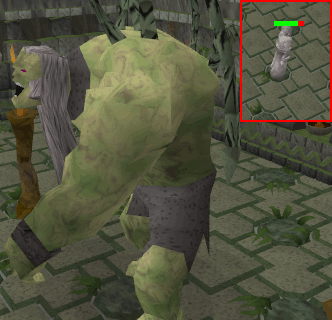
You will see a cut scene of the Grudge. Your prayer is drained in at a constant rate by the room. You can kill the boss without killing the stronger minions. The boss himself has two forms, both are level 114. The best strategy to use is to put on Protect from Melee and just take the slight damage Tarn's forms give you. When you have defeated Tarn you will receive 5K Slayer experience.
-
Now, continue north to his study and take Tarn's diary. Use this diary to enchant on your Salve amulet. Your amulet will now turn pink and give 20% to Attack and Strength while fighting the undead.
Note: If you have completed this mini-quest and the Smoking Kills, then you may teleport to Tarn's Lair using a Ring of slaying to train on Terror dogs.
Congratulations! Mini-Quest Complete!
This Miniquest Guide was written by Zevenberge and Sanru. Thanks to Bloodrain 13, AndyH, Alk12, bordag, Alfawarlord, Glass, Scorchy_Devil, Meowmix686, Mythiquedame, Fireball0236, Sccrluk9, Mythiquedame, Andro_Girl, Thehi, Realruth, Joec, Halk, Mego, and Cory for corrections.
This Miniquest Guide was entered into the database on Fri, Feb 16, 2007, at 12:16:56 PM by Alk12, and it was last updated on Mon, Oct 07, 2019, at 06:36:29 PM by Chath.
If anything is incorrect or missing, or if you have any new information to submit to this database, please submit it to us on our Content Submissions Forums.
If you see this guide on any other site, please report it to us so we can take legal action against anyone found stealing our content. This guide is copyrighted by RuneHQ, and its use on other sites is expressly forbidden. Do not ask if you can use our guides or images, the answer is and always will be NO!
Print this page with images - Back to the Miniquest Guide Index Page - Back to Top
