

To start playing this game, talk to a Fisherman at one of the start locations to obtain an Entry ticket. Each day, he will give you 2 Entry tickets. If you were unable to claim these tickets, you may claim them the following day as long as you do not already have 10 tickets. Additional tickets can be earned from catching heavy fish during during a competition.
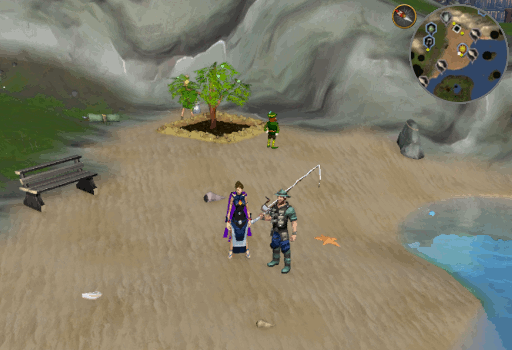
Locations to find a Fisherman include:
- Barbarian Outpost
- Barbarian Village
- Burgh de Rott
- Burthorpe
- Catherby
- Deep Sea Fishing Hub
- Draynor Village
- Fishing Guild
- Living Rock Caverns
- Lumbridge
- Lumbridge Swamp
- Menaphos Port District
- Menaphos VIP skilling area
- Piscatoris Fishing Colony
- Prifddinas Waterfall
- Shilo Village
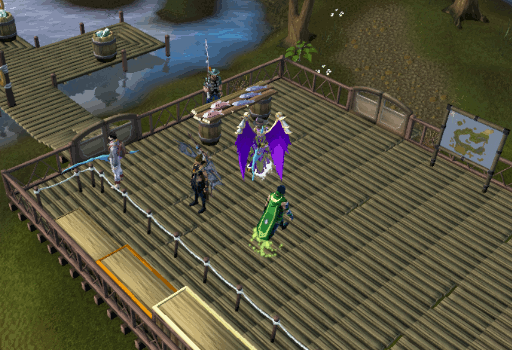
Upon arriving on Isla Anglerine, you will be placed in a group of players who have joined from the same world. You will have 5 minutes before the competition begins. Fishing with a clan or group of friends will help you earn more medals and tokens.
When the gates open the competition has begun! The competition lasts for 10 minutes. Competitions run every 20 minutes with a 5 minute grace period and a 5 minute waiting time between competitions. This game is mostly based on playing around with different hooks, weights, and bait in different areas of the island.
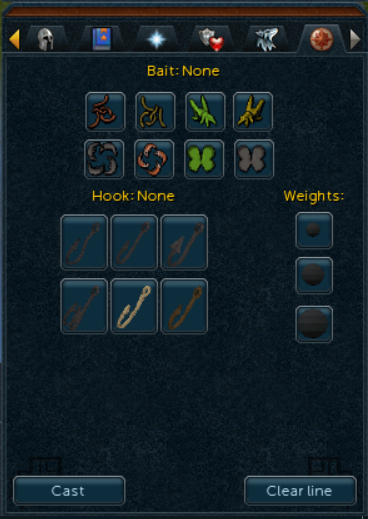
You will notice that you now have a menu for the items you can use. You MUST have at least one weight, bait, and hook before you can cast your line. These are selected by clicking them in your menu. You can then cast either by clicking a barrel or choosing the "cast" option on the lower left of your inventory screen. Choosing "Clear line" will remove all your tackle and you will need to select some before you can re-cast your line.
Sometimes it takes a moment for a bit of tackle to take effect and catch a fish. Be patient with it and click again if necessary!
Baits include:
 Worms Worms |
 Maggots Maggots |
 Locust Locust |
 Cricket Cricket |
||||
 Crayfish Crayfish |
 Shrimp Shrimp |
 Green moth Green moth |
 Grey moth Grey moth |
Hooks include:
 Standard Standard |
 Slim Slim |
 Large Large |
|||
 Double Double |
 Bone Bone |
 Wooden Wooden |
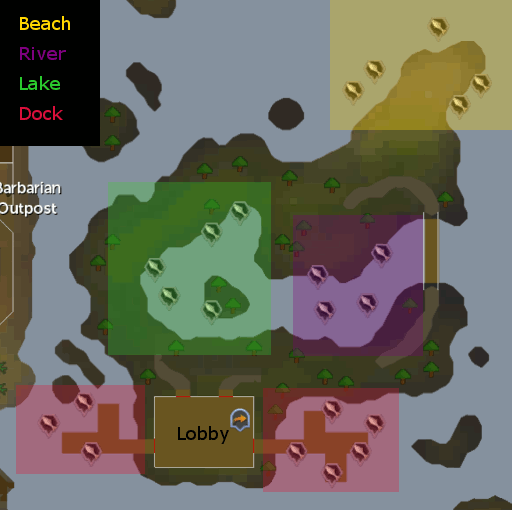
When on Isla Anglerine, there are four areas you can choose to fish at: docks, beach, river, or lake.
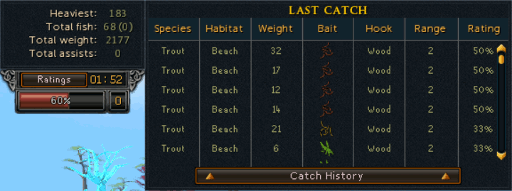
At the top of your screen you will find your catch history. This will tell you the species of the fish, where you caught it, the weight of the fish, and how accurate your lure was, as well as which bait, hook, and weight(s) you used. There are 6 different types of fish that you can catch: bass, cod, pike, herring, trout, and salmon. During each competition, one of these will be considered the "heavy breed". This is the one that everyone will be trying to catch. The interface will also tell you the best combinations you have found to catch each fish.
When choosing your bait, weights, and hook, keep in mind that you are aiming for 100% rating and the heaviest fish to earn the max reward. While fishing in certain areas you can fish up 2 different types of fish. Example: Herring and Cod can be fished at docks by switching your tackle.
NOTE: The combination for 100% rating is scrambled EACH time you play! You can't use the same one you did last tournament.

For each game, you can ask the Fisherman to give you a clue for the best lure combination. Note that you should ask him before the game actually begins - before being teleported to the lobby or while waiting for the game to actually begin. Each person will receive their own clue so it is advised to share amongst the others there. Using the "fishflingers" fc while on World 89 is highly advised. More people (who know how to play) makes it more likely for you to obtain medals.
Each clue will contain 3 bits of information: Type of fish, Where to catch it, and either the bait, hook, or distance to the fish. Example below.
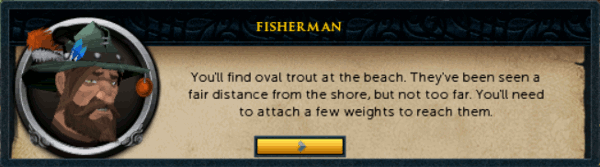
As can be seen with this example, we now know that we can catch a Trout at the beach with a weight of 3 or 4. How we cam to this conclusion can be seen in the coming sections.
| Clue | Color | Correct Bait |
| Leaping | Brown | Cricket |
| Green | Locust |
|
| Fluttering | Green moth |
|
| Gray | Grey moth |
|
| Shellfish | Crayfish |
|
| Red | Shrimp |
|
| Wiggling | Worms |
|
| Brown | Maggots |
| Clue | Correct Hook |
| That species is fairly normal and doesn’t need a special hook. A normal hook should catch them just fine. | Standard |
| That species has a small mouth, so you'll need to take that into account when choosing your hook. | Slim |
| That species tends to nibble its food, so a double hook helps to catch them. | Double |
| That species has a wide mouth, so you'll need to take that into account when choosing your hook. | Large |
| They're clever and can spot metal a mile off. You'd better think carefully about what type of hook you use. | Bone OR Wooden |
| Clue | Correct Distance |
| They've been spotted close to the shore, so you won't need much weight on your line to reach them. | 1 or 2 |
| They've been seen a fair distance from the shore, but not too far. You'll need to attach a few weights to your line to reach them. | 3 or 4 |
| They've been sighted far from the shore, so attach lots of weights to your line to reach them. | 5 or 6 |
Since the game only lasts a total of 10 minutes, the goal is to find the 100% Lure Combinations as fast as possible so that you can obtain Medals. Remember to share your Clues and call 100% combinations that you discover for others playing with you. Using the "fishflingers" fc while on World 89 is highly advised. More people (who know how to play) makes it more likely for you to achieve the goals.
Keep in mind that only ONE species will have any given Bait, Hook, or Weight. As such, it is suggested to begin by testing: Standard, Worms, 1 - unless you know a specific Bait, Hook, or Fish for that location. From here you will want to begin testing various Hooks.
The best place to start when attempting to find 100% is with the Hooks. Despite there being 6 hooks to choose from, in reality, there are 3 sets of hooks. Hook sets are as follows:
| Hook 1 | Hook 2 | |
| Set 1 | Standard |
Slim |
| Set 2 | Large |
Double |
| Set 3 | Bone |
Wooden |
If changing from the Standard hook to a Bone one gets you +33%, then your desired hook is a Wooden one.
If changing from the Standard hook to a Bone one gets you +16%, then your desired hook is a Wooden one.
If changing from the Standard hook to a Bone one gets you 0%, then your desired hook is a Large or Double hook.
Once you have discovered your Hook, you can begin to work on the Bait used. Like the Hooks, Bait has similarities between them that can be used to find the correct bait faster. Baits have both a similiar color and a similar shaped bait.
| Bait | Similar Color | Similar Shape |
| Cricket |
Maggots |
Locust |
| Maggots |
Cricket |
Worms |
| Worms |
Shrimp |
Maggots |
| Crayfish |
Grey moth |
Shrimp |
| Grey moth |
Crayfish |
Green moth |
| Green moth |
Locust |
Grey moth |
| Locust |
Green moth |
Cricket |
| Shrimp |
Worms |
Crayfish |
The easiest way to solve for the correct bait is to imagine them on an octagon. Each of the cardinal directions are 2 baits that have a similar color (or shape) and the intermediate sides are ones with similar shape (or color). You will then want to try a bait on the opposite corner of the octagon. So for example, you would want to change from Shrimp to Green moth, Locust, or Cricket to best know what to try next.
If changing from Worms to Grey moth gets you +33%, then your desired bait is Grey moth.
If changing from Worms to Grey moth gets you +16%, then your desired bait is Crayfish or Green moth.
If changing from Worms to Grey moth gets you 0%, then your desired bait is Locust or Cricket.
If changing from Worms to Grey moth gets you -16%, then your desired bait is Shrimp or Maggots.
Finally we reach the strategy for discovering the proper weight. At this point, if you are not at 100%, you should be at either 66% or 83%. If you are not at 1 of those ratings, then you have not found the correct Hook or Bait.
When trying to discover the proper weight, it is advised to start on weight 4, catch a fish, then switch to weight 2. If your rating increases with this change, the correct weight is either 1, 2, or 3. Conversely, if the rating decreases, then it is either 4, 5, or 6. The amount the rating changes will also help you to narrow down your options.
If you are at 66% rating and changing from 4 to 2 gets you 0%, then your desired weight is 3.
If you are at 66% rating and changing from 4 to 2 gets you +16%, then your desired weight is 1.
If you are at 83% rating and changing from 4 to 2 gets you 0%, then your desired weight is 6.
If you are at 83% rating and changing from 4 to 2 gets you -16%, then your desired weight is 5.
Once you have found the 100% lure combination for any fish, you can start attracting big fish. Note that you only have a chance to attract big fish when there are others in the game with you. Also be aware that big fish cannot spawn within 4 paces of one another, so you will want to distance yourself from any current big fish if you are aiming for your own.
When someone has hooked a big fish, a notification will appear in the chat box. That person will now need help to reel it in; up to 8 people can help per big fish. Each person can only be rewarded for helping with 6 big fish per game. Once you have assisted 6 times, you will no longer be informed when a big fish has been hooked and, though you can assist, you will no longer receive experience for it.
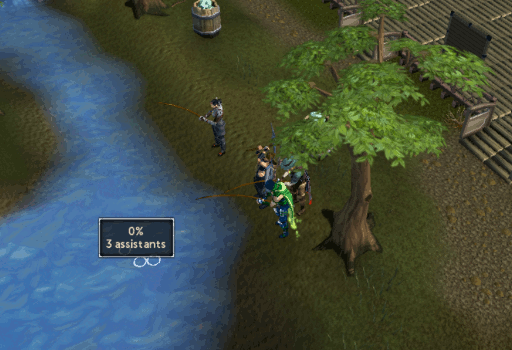
To help reel in a big fish, click the bubbling water near by. Note that your bait, hook, and weight to not affect your ability to help. Above the bubbling water you will see a box that lists how many are assisting and how close to catching the fish they are. Once the fish is fully caught, all who helped reel it in will be given credit for the weight of the fish - usually 220kg to 250kg. Now that the fish has been caught, the person who initially hooked the fish has the option to discard or re-cast to release the fish. Choosing to recast the fish will disable you from obtaining another one for a minute. You are only able to hook up to 3 big fish per game. Doing so will complete the "Master Angler" Achievement.
After 10 minutes have elapsed, everyone will be teleported back to the lobby area and the round scoreboard will appear. There are two tabs: Results and Details. Results will give the overall evaluation your catches during the competition. Details will list your personal scoring and records from all the competitions. Overall competition results can also be viewed by obtaining a Fish Flingers scorecard from the Fisherman.
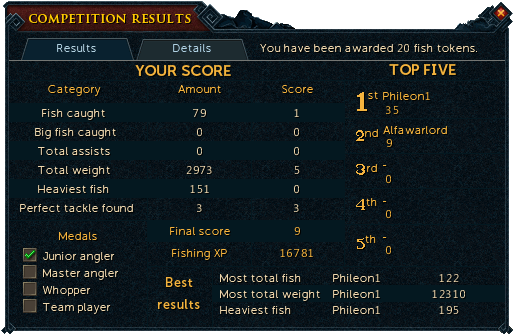
At most, you can obtain a score of 48 points. This score is derived from several factors in the game...
| Category | Factoring | Possible value |
| Fish Caught |
|
5 |
| Big Fish Caught | Amount X 2; up to 3 X 2 | 6 |
| Total Assists | 1 per; up to 6 | 6 |
| Total Weight | 1 for every 500kg; up to 10,000kg | 20 |
| Heaviest Fish | 1 for every 60kg; up to 180kg | 3 |
| Perfect Tackle Found |
|
8 |
| Total | 48 | |
For every game played, you will earn a certain amount of experience. The total amount of experience earned is dependent upon your Fishing level as well as your Score. At most, a player can earn 23,197 experience per game IF they are level 99 and get 48 points.
During the game, tokens can be earned several different ways during a game. For each of the occurances below, you will earn 1 token.
- Assist with 2 Big Fish (3 tokens max)
- Catch 4 fish
- Catch Big fish (3 tokens max)
- Find 2 Perfect tackle (3 tokens max)
At maximum, you can have 2,000 tokens at any given time.
Medals are earned by fulfilling any of the possible tasks listed below during a competition:
- Junior angler: Find the perfect tackle for three species.
- Master angler: Find the perfect tackle for all six species.
- Whopper: Catch 3 big fish.
- Team player: Assist in catching at least 6 big fish.
Best results are also given to players who score the highest in the following categories:
- Most total fish
- Most total weight
- Heaviest fish
If multiple people get the best results they will all be rewarded with points.
The top five competitors have the option to stand on the podium located in the lobby after a competition has ended. They may remain there until the end of the next competition.
Speak to the Fisherman to exchange Fish tokens for a variety of rewards.
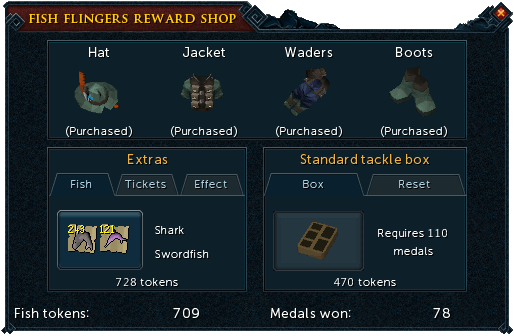
| Item | Image | Cost | Notes |
| Fishing hat |  |
140 Fish tokens | 1% Fishing bonus when worn. 5% for wearing full Fishing skillset. |
| Fishing jacket |  |
140 Fish tokens | |
| Fishing waders |  |
140 Fish tokens | |
| Fishing boots |  |
140 Fish tokens | |
| Raw fish (noted) |  |
Any number of Fish tokens | Gives a random number of noted fish based on your fishing level |
| Entry ticket |  |
100 Fish tokens | Allows you to enter a game of Fish Flingers. You are only allow to purchase this if you currently have less than 15 entry tickets. |
| Effect |  |
100 Fish tokens | Fish an extra fish during the next 20 minutes. No additional experience will be gained for the extra fish caught. It will not work on Divine fishing bubbles. |
| Beginner's tackle box |  |
110 Fish tokens and 20 Medals | Stores fishing supplies (See below) |
| Basic tackle box |  |
250 Fish tokens and 50 Medals | Stores fishing supplies (See below) |
| Standard tackle box |  |
470 Fish tokens and 110 Medals | Stores fishing supplies (See below) |
| Professional's tackle box |  |
900 Fish tokens and 230 Medals | Stores fishing supplies (See below) |
| Champion's tackle box |  |
1860 Fish tokens and 500 Medals | Stores fishing supplies (See below) |
The top five competitors have the option to stand on the podium located in the minigame lobby after a competition has ended. They may remain there until the end of the next competition.
Tackle boxes can potentially hold the following items...
Tools
Each level of tackle box can hold a different number of items, however, they can all hold these same tools.
Beginner's = 1, Basic = 2, Standard = 3, Professional's = 4, Champion's = 5.
| Item | Notes |
| Barbarian rod | Can be stored on toolbelt. Requires Barbarian Training. |
| Barb-tail harpoon | Obtained from Barb-tailed Kebbit. Allows you to catch faster than with a normal Harpoon. |
| Big cast net | Same as Big fishing net, except can be wielded. Quest reward. |
| Big fishing net | Can be stored on toolbelt. |
| Crayfish cage | Can be stored on toolbelt. |
| Fishing rod | Can be stored on toolbelt. |
| Fishing urns | Urns must have Rune attached. Any tier can be stored: cracked, fragile, fishing, strong, decorated. |
| Fly fishing rod | Can be stored on toolbelt. |
| Harpoon | Can be stored on toolbelt. |
| Karambwan vessel | Used during Tai Bwo Wannai Trio. |
| Lobster pot | Can be stored on toolbelt. |
| Oily fishing rod | Created during Heroes' Quest. |
| Sacred clay harpoon | Can only have 1 stored. Must be stored BEFORE selecting "Gain xp" option. |
| Small cast net | Same as Small fishing net, except can be wielded. Quest reward. |
| Small fishing net | Can be stored on toolbelt. |
| Volatile clay harpoon | Can only have 1 stored. Must be stored BEFORE selecting "Gain xp" option. |
Bait
Each level of tackle box has a different number of slots available and each slot can only hold so many of that type of bait. Beginner's = 1 slot of 150, Basic = 1 slot of 250, Standard = 2 slots of 400, Professional's = 3 slots of 650, Champion's = 3 slots of 1,000.
Baits include:
Gloves
Only the Professional's tackle box and the Champion's tackle box can hold gloves. They hold 1 or 2 respectively. Gloves include:
Fish
Each level of Tackle box can hold and remotely bank a specific number of fish per day. Beginner's holds 6 and banks 25, Basic holds 12 and banks 50, Standard holds 18 and banks 100, Professional's holds 24 and banks 200, Champion's holds 30 and banks 200.
ANY type of Raw Fish can be placed into the tackle box and/or automatically banked.
Other
In addition to the items already listed, it is also possible to store your Fishing skillset here. Note that you will still need to wear the outfit to obtain the bonus experience. Placing your set in here is simply good for saving bank space. All tackle boxes can hold the set.
This Distraction/Diversion Guide was written by ChathMurrpau. Thanks to Previous Guide writer: Jakesterwars as well as Ryman201, Motion_Man, Read639, Knowname, Zidane3838, Mr Tudjay, Sirius XM, 3ter 1, and Ksb Single for corrections.
This Distraction/Diversion Guide was entered into the database on Thu, Apr 22, 2010, at 09:54:45 PM by Jakesterwars, and it was last updated on Mon, Dec 17, 2018, at 04:44:49 AM by Chath.
If anything is incorrect or missing, or if you have any new information to submit to this database, please submit it to us on our Content Submissions Forums.
If you see this guide on any other site, please report it to us so we can take legal action against anyone found stealing our content. This guide is copyrighted by RuneHQ, and its use on other sites is expressly forbidden. Do not ask if you can use our guides or images, the answer is and always will be NO!
Print this page with images - Back to the Distraction/Diversion Guide Index Page - Back to Top
