

Clue Steps
- Anagrams Clues
- Challenge Clues
- Simple/Vague/Riddle Clues
- Map Clues
- Puzzle Clues
- Coordinate Clue Explanation
- Coordinate Clue Locations
- Emote Clues
- Hidey holes
- Compass Clues
- Scan Clues
- Celtic Knot Clues
- Tower puzzle scroll
- Lockbox puzzle
- Skill riddle challenge
This guide provides complete solutions to the clues, so please be aware that it may contain spoilers. It can be difficult to search for the clue you are working on manually, most browsers will have a "Find" function, where you can type in words or phrases to help you find the clue you are working on. Simply use the "CTRL + F" feature and search for keywords or phrases. There are also many links coded into this guide that lead you to the RuneHQ Databases or Guides that give you more details on how to find the place or person you are seeking. Getting as much information before you start, can save you a lot of time.
| Clue level | Where found |
| Easy |
|
| Medium |
|
| Hard |
|
| Elite |
|
| Master |
There is a 1% chance of receiving a Master clue instead of a Elite clue when an Elite clue is found.
Some possible options are:
|
First read the clue, so that you know what type of clue it is. Gather the items you need. Then head to the spot indicated by the clue.
When you get to the spot specified by the clue you will get a casket.
This casket will either contain treasure or another clue.
So basically, follow each clue you get until you get a treasure. It's that simple!
Zaida is located in the Treasure Trail hub South of the Varrock Grand Exchange. Zaida runs the Treasure Trail Rewards Shop which allows you to buy many things that help complete clues. The shop sells items such as:
- The Globetrotter outfit pieces.
- Charges for the Globetrotter outfit
- The clue pet and clue titles
- Sealed clue scrolls: Easy, Medium, Hard, Elite.
- Reroll tokens: Easy, Medium, Hard, Elite.
- Untradable skipping tickets: Tower-skipping ticket (u), Lockbox-skipping ticket (u), Costume-skipping ticket (u), Knot-skipping ticket (u), Puzzle-skipping ticket (u).
If the Globetrotter outfit is lost it is reclaimable through an option on Zaida. She also has the ability to show you the hidey-hole log.
If you talk to Zaida she offers to downgrade a clue for you. This option works even if you have started a clue but it resets your progress and gives a clue of the next level down.
The Treasure trail collection log is an ingame log of the rewards received from completed clue scrolls.
The log is wearable in the pocket slot and is claimable and reclaimable from the crates behind Zaida.
The right-click option on the log brings up the reward collection long. It has 6 sections:
| Category | Contents |
| General clue rewards | Shows all possible rewards obtainable from any level clue (grayed out). Shows all general rewards and quantity of rewards recieved. |
| Easy clue rewards | Show all possible level specific rewards (grayed out). Shows all level specifc and quantity of rewards recieved. |
| Medium clue rewards | Show all possible level specific rewards (grayed out). Shows all level specifc and quantity of rewards recieved. |
| Hard clue rewards | Show all possible level specific rewards (grayed out). Shows all level specifc and quantity of rewards recieved. |
| Elite clue rewards | Show all possible level specific rewards (grayed out). Shows all level specifc and quantity of rewards recieved. |
| Master clue rewards | Show all possible level specific rewards (grayed out). Shows all level specifc and quantity of rewards recieved. |
The left-click option allows you to check your Treasure trail stats and gives information on Hidey-hole locations.
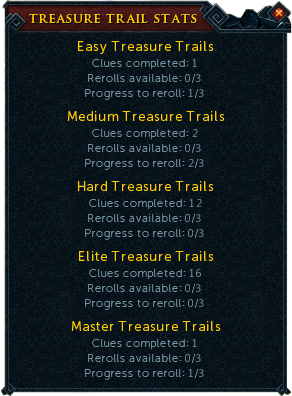
The Treasure trail stats option gives the number of clues completed, rerolls available (up to 3), and progress towards next reroll for each level of clue. Here is an example:
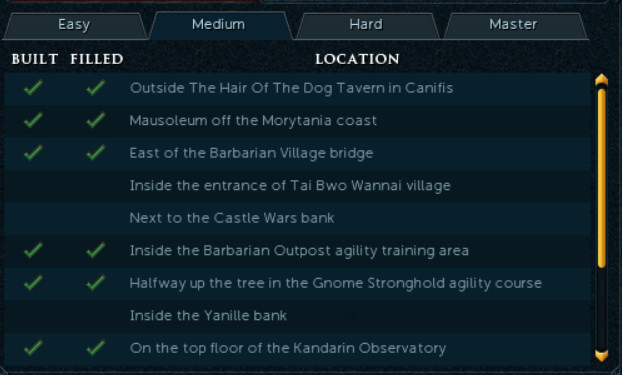
The Hidey-hole locations option brings up a list of all hidey-hole locations seperated by clue level. It gives a general location of the hidey-hole and has an are for check marks
when each specific hidey-hole has been built and filled. Here is an example:
Treasure Trail information board
The Treasure Trail information board is similar to the Treasure Trail collection log and shares many of the same options.
Two of the options are the Treasure trail stats and hidey-hole locations, these are the same as those offered in the collection log.
Additionally, it offers the option to see recently completed trails, which shows some recent casket values and the user who opened the casket.
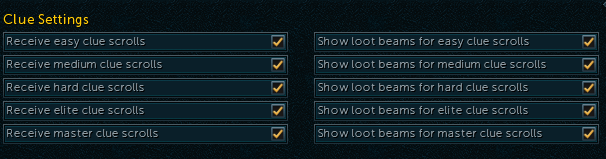
The final option gives the treasure trail options, this takes you to the settings menu and settings dealing with which clues you can receive
and if a loot beam will appear upon a clue scroll being dropped by a monster.
Completing a Treasure Trail and Reward Caskets
A clue is completed when the reward casket is granted not when the reward casket is opened. In the same way, Treasure Trail points are awarded when the reward casket is granted not when opened. Reward caskets stack in a player's inventory or bank based on level and can be opened at any point in any quantity desired. Upon completing a clue you will receive a message regarding the points earned, total points, and total clue completed for that tier of clue.
| Reward Casket Level | Base Points | Points at every Xth clue completed | ||||
| 10 | 50 | 100 | 250 | 500 | ||
Easy  |
1 | 2 | 4 | 8 | 16 | 32 |
Medium  |
2 | 4 | 8 | 16 | 32 | 64 |
Hard  |
4 | 8 | 16 | 32 | 64 | 128 |
Elite  |
8 | 16 | 32 | 64 | 128 | 256 |
Master  |
16 | 32 | 64 | 128 | 256 | 512 |
Number of steps and types of clues to complete a Treasure Trail
Each level of clue has a different number of steps required to complete the clue. Using a Totem of treasure on Anachronia decreases the number of steps but requires weekly setup. Each clue level also has a number of different clue types that will be chosen from when doing the clue. The below table shows the number of steps each level requires, the type of clues each level has, and the percent chance of getting each type clue.
| Clue Level | Steps without Totem |
Steps with Totem |
Percent chance of specific clue type | |||||||||
| Simple | Vague | Map | Emote | Riddle | Sextant | Anagram | Compass | Scan | Skill riddle | |||
| Easy |
3-5 | 2-4 | 24.24% | 25.25% | 25.25% | 25.25% | ||||||
| Medium |
4-6 | 3-5 | 20.20% | 20.20% | 20.20% | 20.20% | 19.19% | |||||
| Hard |
5-7 | 4-6 | 22.94% | 22.94% | 22.02% | 22.94% | 9.17% | |||||
| Elite |
5-7 | 4-6 | 45.51% | 54.49% | ||||||||
| Master |
6-8 | 5-7 | 25% | 25% | 10% | 20% | 20% | |||||
Lucky items affect the rewards from Clue scrolls adding a +1% chance for rarer clue specific rewards and a +1% chance drop bonus. The items that affect each level of clue scroll are different and are listed below.
| Level of lucky item | ||||
| Level of clue | Level 1 |
Level 2 |
Level 3 |
Level 4 |
| Easy |
Yes | Yes | Yes | Yes |
| Medium |
No | Yes | Yes | Yes |
| Hard |
No | No | Yes | Yes |
| Elite |
No | No | No | Yes |
| Master |
No | No | No | Yes |
Quest/Skill Level Requirements:
| Easy |
|
| Skill Reqs | Quest Reqs |
| None. | None. |
| Medium |
|
| Skill Reqs | Quest Reqs |
| None. |
|
| Hard |
|
| Skill Reqs | Quest Reqs |
|
Some of the above levels may be boostable. |
Additional quests may be required to complete the above quests. |
| Elite |
|
| Skill Reqs | Quest Reqs |
| None. |
Additional quests may be required to complete the above quests. |
| Master |
|
| Skill Reqs | Quest Reqs |
Some of the above levels may be boostable. |
Additional quests may be required to complete the above quests. |
The number and variety of items needed to complete a clue vary widely. They can be completed with a minimal number of items and investments. However, often with a heavy investment of time completing quests and investment of gold, the speed at which clues can be completed can be decreased greatly. Making the investments can be costly increasing the speed at which they are completed will often be offset by the increased number of clue rewards received.
Below are 3 categories of items that can help in your journey. Basic Items are general items that may help, Teleports are the items that help you teleport closer to a location these items are the main way to speed up clues, and the third section is an explanation of how the Globetrotter outfit works and helps with clues.
For Easy and Medium clues almost nothing is required. For Hard, Elite, and Master clues there are often NPCs that need to be fought. Because of this armor, food, and Weapons are a base requirement for doing the higher level clues.
A number of clue have a need to run for longer periods of time. Due to this fact items that help with run energy are helpful. The Agile top, Agile legs, and Boots of lightness all decrease your weight and allow you to run longer. The Explorer's ring 4 allows you to replenish some run energy 2 times per day.
Some abilities can help with running and speed also. Surge and Bladed dive help you move faster (Bladed dive requires dual wield weapons). Surge can be doubled with the Double Surge codex (tradeable). If you have a high enough level weapon that can be Augmented you can add the Moblie perk to it to decrease the cooldown on these abilities. Another perk often used for clues is the Glow worm perk which acts as the equivalent of a Bullseye lantern reducing the need to carry a light source with you.
For anagram clues, they will give a hint or detail of the person you need to speak to. It will then give a set of letters in random order
which must be rearranged to find the person's name. For example, Maker of Runescape xjaeg would be your clue. The answer would be Jagex so
you would then proceed to Jagex to the next clue.
Some of the people for the anagram clues will provide you with a challenge. It may be a puzzle or a challenge clue. It will list what is required
next to the anagram below. If it states "None" all that is required is to speak to the person.
"Anagrams below are in alphabetical order by the given anagram, all level clues are mixed together, using
CTRL + F to search and find is the fastest way to search for them."
| Medium Clues | |||
| Anagram | Person | Location | Secondary action |
| AHA JAR | Jaraah | In the Northern most building inside the Al Kharid walls, if you enter Het's Oasis you went to far North. Closest teleport: Ring of duelling option 1 then run South. |
None |
| ARC O LINE | Caroline | North of the church, in Witchaven or upstairs of the house, West of the Church,
in Witchaven, if you have completed the Kennith's Concerns quest. Closest teleport: Ardougne teleport |
Provides Challenge Clue. Speak to person again. Answer: 11 OR 0 if Salt in the Wound has been started. |
| ARE COL | Oracle | Closest teleport: Lassar Teleport or Combat bracelet (4) option 3 |
Provides Challenge Clue. Speak to person again. Answer: 48 |
| BAIL TRIMS | Brimstail | Enter the 'Cave Entrance', in the South-West corner of the Tree Gnome Stronghold. Closest teleport: Spirit Tree Teleport option 2 |
None |
| BOAST B | Sabbot | Found in the cave under the Death Plateau. | None |
| DT RUN B | Brundt | Longhall, in the center of Rellekka. Closest teleport: Fremennik Sea Boots 4 Rellekka teleport. |
Provides Challenge Clue. Speak to person again. Answer: 4 |
| EL OW | Lowe | Archery Store, in Varrock. Closest teleport: Varrock teleport or 'Chipped' Varrock teleport |
None |
| ERR CURE IT | Recruiter | Main square, in West Ardougne. Closest teleport: 'Chipped' Ardougne teleport from Dave's spellbook |
Provides Challenge Clue. Speak to person again. Answer: 20 |
| GOBLIN KERN | King Bolren | West of the Spirit Tree, in the Tree Gnome Village. Closest teleport: Spirit Tree Teleport option 1. |
None |
| GOT A BOY | Gabooty | In the center of Tai Bwo Wannai wandering around. Closest teleport: Tai Bwo Wannai Teleport |
Provides Challenge Clue. Speak to person again. Answer: 11 |
| HALT US | Luthas | Hut on the East side of the banana plantation, at
Musa Point. Closest teleport: Amulet of glory option 2 |
Provides Challenge Clue. Speak to person again. Answer: 33 |
| ICY FE | Fycie | Cave North of Rantz, at Feldip Hills. Closest teleport: Gnome Glider option 6. |
None |
| IM KROM | Rommik | Crafting Shop in Rimmington. Closest teleport: Rimmington tablet |
Provides Challenge Clue. Speak to person again. Answer: 7 |
| IZ A AMMO LOAD FOR MRS YAKKERS | Moldark, Emissary of Zamorak | North of Edgeville bank. Closest teleport: Amulet of glory option 1 or Slayer cape option 9 |
Provides Challenge Clue. Speak to person again. Answer: 7 |
| LARK IN DOG | King Roald | Ground floor, at Varrock Palace. Closest teleport:Varrock teleport |
Provides Challenge Clue. Speak to person again. Answer: 24 |
| ME IF | Femi | Entrance to Tree Gnome Stronghold. Closest teleport: Traveller's Necklace. |
None |
| NOD MED | Edmond | North-West corner of East Ardougne. Closest teleport: 'Chipped' Ardougne teleport. |
Provides Challenge Clue. Speak to person again. Answer: 3 |
| OK CO | Cook | Kitchen, at Lumbridge Castle. Closest teleport: Ring of respawn option 1 or Lumbridge lodestone |
Provides Challenge Clue. Speak to person again. Answer: 7 |
| OR A VILE | Valerio | Outside the Citharede Abbey East of Al Kharid. Closest teleport: Kharid-Et teleport or Al Kharid lodestone |
Provides Challenge Clue. Speak to person again. Answer: 17 |
| PEATY PERT | Party Pete | Party Room, in North-East Falador. Closest teleport: Skills necklace (4) option 4 |
None |
| R AK MI | Karim | Kebab store, North of Bank, at Al Kharid. Closest teleport: Al Kharid Lodestone |
Provides Challenge Clue. Speak to person again. Answer: 5 |
| SOY DRAIN | Ysondria | The Nexus in Lumbridge Swamp. Closest teleport: Enlightened amulet. |
Provides Challenge Clue. Speak to person again. Answer: 8 |
| WINSTON LANE | Nails Newton | Outside the Pick and Lute Inn in Taverley. Closest teleport: Taverly Lodestone |
Provides Challenge Clue. Speak to person again. Answer: 10 |
| Hard Clues | |||
| Anagram | Person | Location | Secondary action |
| A ZEN SHE | Zenesha | South-West corner of market square, in East Ardougne. Closest teleport: Standard Spellbook Ardougne teleport. |
Provides puzzle box. Complete and hand back. |
| ACE MATCH ELM | Cam the Camel | West of Het's Oasis (no Camulet needed.) Closest teleport: Ring of duelling option 1 |
Provides puzzle box. Complete and hand back. |
| AN PAINT TONIC | Captain Ninto | Tavern, in Gnome tunnel under White Wolf Mountain.
Must have started the Fishing Contest quest to access the tunnel. Closest teleport: Taverly Lodestone. |
Provides puzzle box. Complete and hand back. |
| ARR! SO I AM A CRUST, AND? | Ramara du Croissant | Furnace in the Piscatoris Fishing Colony. (requires Swan Song to be started.) Closest teleport: Fairy Ring A-K-Q or Phoenix Lair Teleport. |
Provides puzzle box. Complete and hand back. |
| BY LOOK | Bolkoy | General store (use ladder), in the Tree Gnome Village. | Provides Challenge Clue. Speak to person again. Answer: 13 |
| C ON GAME HOC | Gnome Coach | Usually at South side of the Gnome ball field, in the Tree Gnome Stronghold. | Provides Challenge Clue. Speak to person again. Answer: 6 |
| GULAG RUN | Uglug Nar | West of Jiggig and South of Castle Wars. Closest teleport:Ring of duelling (8) option 2. |
Provides puzzle box. Complete and hand back. |
| HE DO POSE. IT IS CULTRRL, MK? | Riki the sculptor's model | Blasidar the sculptor's house, in Keldagrim. Closest teleport: Luck of the dwarves Keldagrim option. |
Provides puzzle box. Complete and hand back. |
| I EAT ITS CHART HINTS DO U | Shiratti the Custodian | North of the fountain, at Nardah. Closest teleport: Desert amulet 2 or above option 1 |
Provides puzzle box. Complete and hand back. |
| I FAFFY RUN | Fairy Nuff | Fairy hospital (North of the bank), at the Lost City (Zanaris). Closest teleport: Any Fairy Ring. (You must have completed the Lost City Quest. If you have started A Fairy Tale Part II - Cure a Queen, you need to find the certificate at the Fairy Hospital and then use the Fairy Ring codes, in this order: AIR, DLR, DJQ, AJS.) |
Provides puzzle box. Complete and hand back. |
| LAND DOOMD | Odd old man | North of Limestone mine, North-East of Varrock. | Provides puzzle box. Complete and hand back. |
| O BIRDZ A ZANY EN PC | Cap'n Izzy No Beard | Agility Arena, at Brimhaven. Closest teleport: Spirit Tree teleport option 8 |
Provides Challenge Clue. Speak to person again. Answer: 33 |
| OR ZINC FUMES WARD | Wizard Frumscone | Basement of the Wizards' Guild at Yanille. (66 Magic needed, can use potions). Closest teleport: Yanille tablet. |
Provides puzzle box. Complete and hand back. |
| RED ART TANS | Trader Stan | Southern dock at Port Sarim. Closest teleport: Port Sarim Lodestone |
Provides puzzle box. Complete and hand back. |
| SEQUIN DIRGE | Queen Sigrid | Castle, at Etceteria in Kingdom of Miscellania. Closest teleport: Spirit Tree Teleport option 7. After completing the Blood Runs Deep quest she is found in the Miscellania Castle instead. Closest teleport:Ring of wealth (4) or Luck of the dwarves. |
Provides puzzle box. Complete and hand back. |
| SNAH | Hans | Lumbridge castle courtyard. Closest teleport:Slayer cape option 2, Lumbridge lodestone, or Ring of respawn option 1. Hans walks in a Clockwise circle around Lumbridge castle. Walking Counter-Clockwise around the castle is the fastest way to find him. |
None |
| Master Clues | |||
| Anagram | Person | Location | Secondary action |
| A PURE GLOW | Paul Gower | Found at Gower Farms a house South of Varrock or at the Life altar after the Gower Quest. To get to the Life Altar use the Disk of returning (Gower) in any bank area. Click the disk then choose the second option, "Behind the Scenes", once there look for the Life Altar portal, the one with green grass and flowers around it, in front of Clawdia. Enter the portal to get to the Gower brothers. | None |
| AH; WET ARM | Amaethwr Crwys | Farmer by Lletya fruit tree patch. Closest teleport: Attuned crystal teleport seed option 1. |
Provides Lockbox puzzle. Complete and hand in. |
| ERGO I DIG CLAY | Celia Diggory | East of Digsite Closest teleport: Master Quest Cape option 4 or Digsite pendant option 1. |
Provides Tower puzzle. Complete and hand in. |
| HATED | Death | Death's office Closest teleport: Draynor Village Lodestone |
None |
| HEAR A LADY RANT | Lady Trahaearn | Trahaearn Sector of Prifddinas | None |
| I SAW THE LIE | Ali the Wise | North-West Nardah | None |
| O EASTERN WISHES | Sensei Seaworth | On Tuai Leit | Provides Tower puzzle. Complete and hand in. |
| PIN HEIR ALL IN PLACE | Philipe Carnillean | Building South of East Ardougne Castle.
After Carnillean Rising quest ask Ceril Carnillean(in previously mention building) for Philipe's location. Closest teleport: 'Chipped' Ardougne teleport. |
None |
| PROFS LOSE WRONG PIE | Professor Onglewhip | Wizards' Tower, South of Draynor Village near the Eastern bookshelves. Closest teleport: Wicked hood teleport option, right-click to descend beam to bottom floor. |
Provides puzzle box. Complete and hand back. |
| QUIT THY BRINE RAT ROLL | Brother Tranquillity | Mos Le'Harmless or Harmony Island after starting The Great Brain Robbery | None |
| REIGN US IF IMMORTAL | Malignius Mortifier | North-West of Port Sarim near elemental wizards. Closest teleport: Captain's log or Port Sarim lodestone. |
Provides Lockbox puzzle. Complete and hand in. |
| TABOO RISES SHYLY | Soothsayer Sybil | The Heart of Gielinor (God Wars Dungeon 2) North of the entrance Closest teleport: The Heart teleport |
None |
| WE IRK OVER NAMESAKE | Ramokee skinweaver | Very bottom of Polypore Dungeon, South side | None |
| WINSOME LAD | Wise Old Man | Draynor Village Closest teleport: Amulet of glory (4) option 3. |
None |
| Unsorted level (Master, Hard, or Medium) | |||
| Anagram | Person | Location | Secondary action |
| A BAS | Saba | A cave in Burthorpe, North of the Warriors Guild. | None |
| ME AM THE CALC | Cam the Camel | West of Het's Oasis (no Camulet needed.) Closest teleport: Ring of duelling option 1 |
Provides puzzle box. Complete and hand back. |
| DO SAY MORE | Doomsayer | Lumbridge. | None |
| EEK ZERO OP | Zoo Keeper | South-West corner of the Zoo, at East Ardougne. | Provides Challenge Clue. Speak to person again. Answer: 40
41 if either Eagles' Peak or Hunt for Red Raktuber are completed. 42 if both Eagles' Peak and Hunt for Red Raktuber are completed. |
| KAY SIR | Sir Kay | Camelot castle, East of Seers' Village | None |
| RATIA | Taria | Gardner at Rimmington. | |
| STAB OB | Sabbot | In cave North of Troll Invasion. | None |
| THEM CALL CAME | Came the Camel | West of Het's Oasis (no Camulet needed.) Closest teleport: Ring of duelling option 1 |
Provides puzzle box. Complete and hand back. |
For some clues, when you are told to find a specific person, they will present you with a challenge before you get the next clue. The answer is found in the area where the challenger is located. When you get the answer, just talk to them again to give them the answer.
| Challenge Clues | Solution |
| What is 19 to the power of 3? | 6859 |
| How many fountains are there within the grounds of Camelot castle? | 6 |
| How many banana trees are in the plantation? | 33 |
| How many bookcases are there in the palace library? | 24 |
| How many buildings are there in the village? | 11 |
| How many cannons does Lumbridge castle have? | 7 |
| How many fisherman are on the fishing platform? | 11 OR 0 if Salt in the Wound has been started |
| How many flowers are there in the clearing below this platform? | 13 |
| How many gnomes on the Gnome ball field have red patches on their uniforms? | 6 |
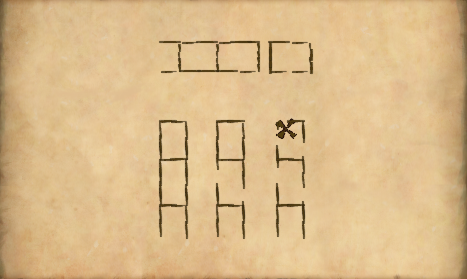
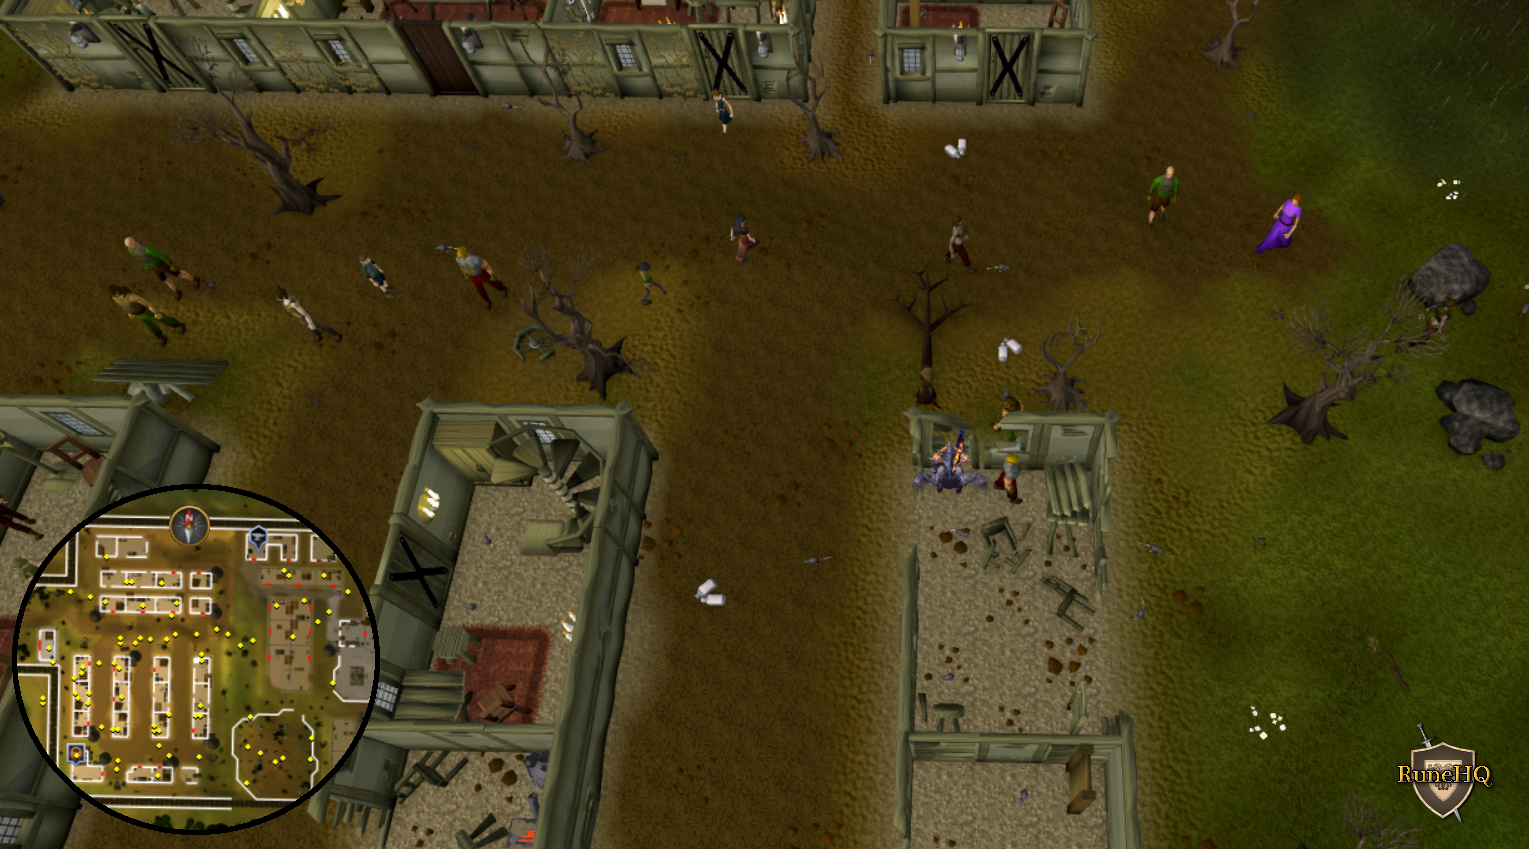
| How many houses have a cross on the door? | 20 |
| How many people are waiting for the next bard to perform? | 4 |
| How many pigeon cages are behind Jerico's house? | 3 |
| If x is 15 and y is 3, what is 3x + y? | 48 |
| I have 16 kebabs, I eat one myself and share the rest equally between 3 friends. How many do they have each? |
5 |
| What is 57 x 89 + 23? | 5096 |
| How many animals in the Ardougne Zoo? |
40
41 if either Eagles' Peak or Hunt for Red Raktuber are completed. 42 if both Eagles' Peak and Hunt for Red Raktuber are completed. |
| What is five times five plus three? | 28 |
| Number of tables in the Pick and Lute Inn? | 10 |
| How many ore rocks are there in the nearby copper and tin mine? | 8 |
| How many rocks in the Rimmington mine cannot be used to make bronze? | 7 |
| How many windows look out into the Citharede Abbey courtyard? | 17 |
| How many bottles are there on the stall to the East of Mr Ex? | 7 |
| King Arthur and Merlin sit at the round table with 8 knights. How many degrees does each one get? | 36 degrees/person |
| Easy Clues | |||
| Clue | Solution | Key Required | Puzzle Box |
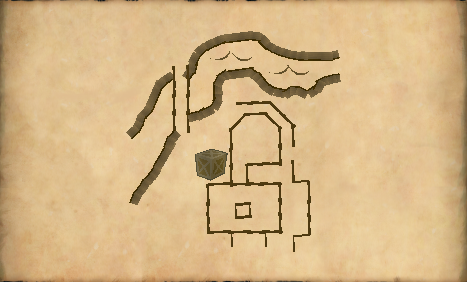
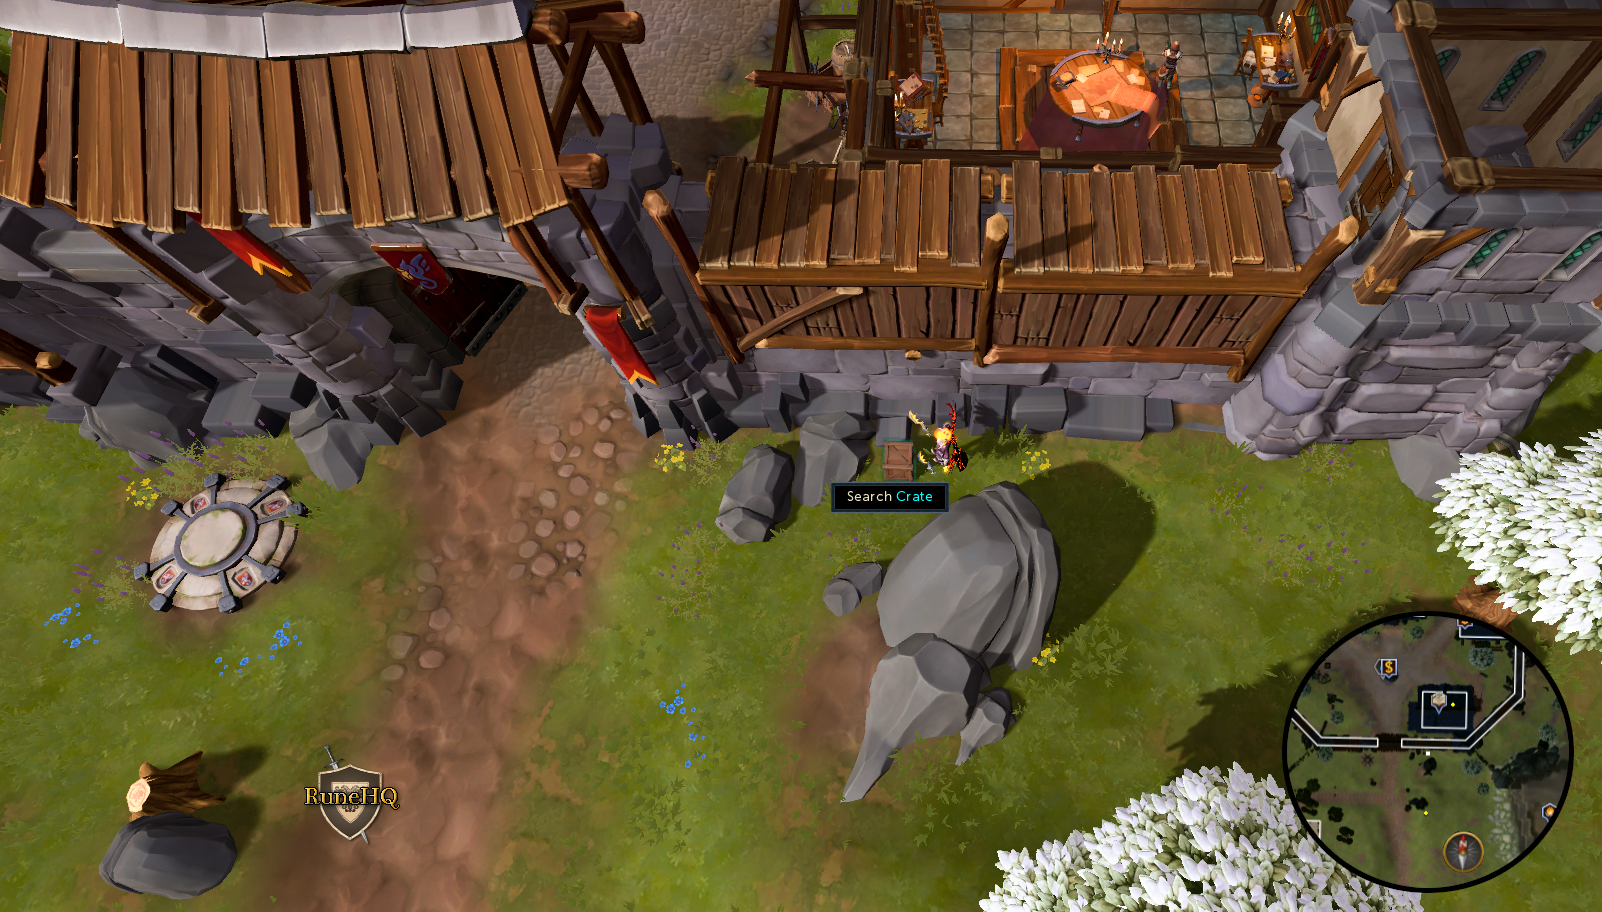
| A crate found in the tower of a church is your next location. | The church in East Ardougne, East of the furnace. Go up the ladder in the South-West corner. Closest teleport: Watchtower teleport then run North. |
||
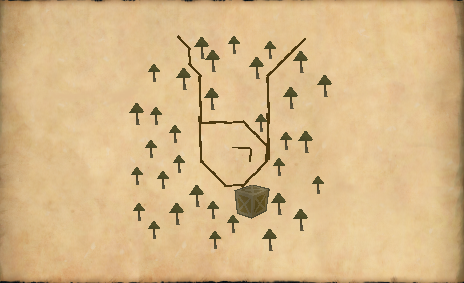
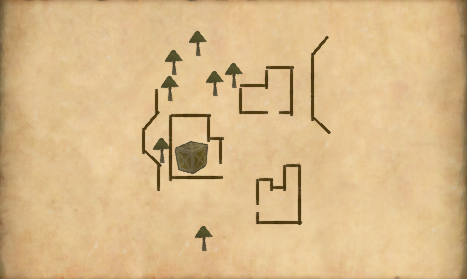
| Dig near some giant mushrooms, behind the Grand Tree. | Dig behind the large red mushroom behind the Grand Tree in the Tree Gnome Stronghold. Closest teleport: Spirit Tree Teleport Option 2 then run North it is behind the Grand Tree. Gnome Glider option 1 will place you in the tree. |
||
| Look in the ground floor crates of houses in Falador | The house East of Falador East bank. First crate on right. Closest teleport: Skills necklace option 2 (Mining Guild) |
||
| Search a barrel East of Challenge Mistress Fara, in Burthorpe. | In Burthorpe East of Challenge Mistress Fara. Inside the fence of a building there are 2 barrels located next to each other it is one of these. Closest teleport: Burthorpe lodestone |
||
| Search a barrel outside the mill, in Taverley. | In Taverley East of the bank just before the bridge. South of the mill, Jatix roams nearby. Closest teleport: Taverley lodestone |
||
| Search a barrel outside the Pick and Lute Inn, in Taverly. | In Taverley North of the Pick and Lute Inn and East of the house portal. North most barrel. Closest teleport:Taverley lodestone |
||
| Search in the south-east corner of the Artisan Dwarves' workshop in Falador | In the South-East corner of the Artisans' Workshop in South-East Falador. Closest teleport: Skills necklace option 2. |
||
| Search the boxes in one of the tents in Al Kharid. | In Al Kharid head East from the Silk trader into a tent. Closest teleport: Al Kharid lodestone or Gnome Glider option 4 |
||
| Search the boxes of Falador's General Store. | Look in the crates in the general store just North-North-East of Falador's West bank. Closest teleport: lodestone or Falador teleport spell |
||
| Search for a crate in a building in Hemenster. | Search the house in Hemenster that has a sewer pipe, East of the Fishing Guild. Closest teleport: Combat bracelet option 4 |
||
| Search the crates in Canifis. | The crate is in Rufus's Meat Emporium (just North of bank) in Canifis. Search the North crate. Closest teleport: Slayer cape option 2 |
||
| Search the crates near the Lumbridge Market. | Search the crates just North of the Lumbridge Fishing shop. Closest teleport: Lumbridge lodestone or Lumridge teleport spell |
||
| Search for a crate in Varrock Palace. | In Varrock Palace it's one of the crates in the kitchen the North-East room of the palace. Closest teleport: 'Chipped' Varrock teleport or Varrock teleport |
||
| Search for some drawers in the upstairs of a house in Rimmington. | Search drawers upstairs in the house with a range in Rimmington. Closest teleport: Rimmington tablet |
||
| Search the crates in a shop in Taverley. | In Taverley go to the Two-handed sword shop. Closest teleport: Taverly Lodestone |
||
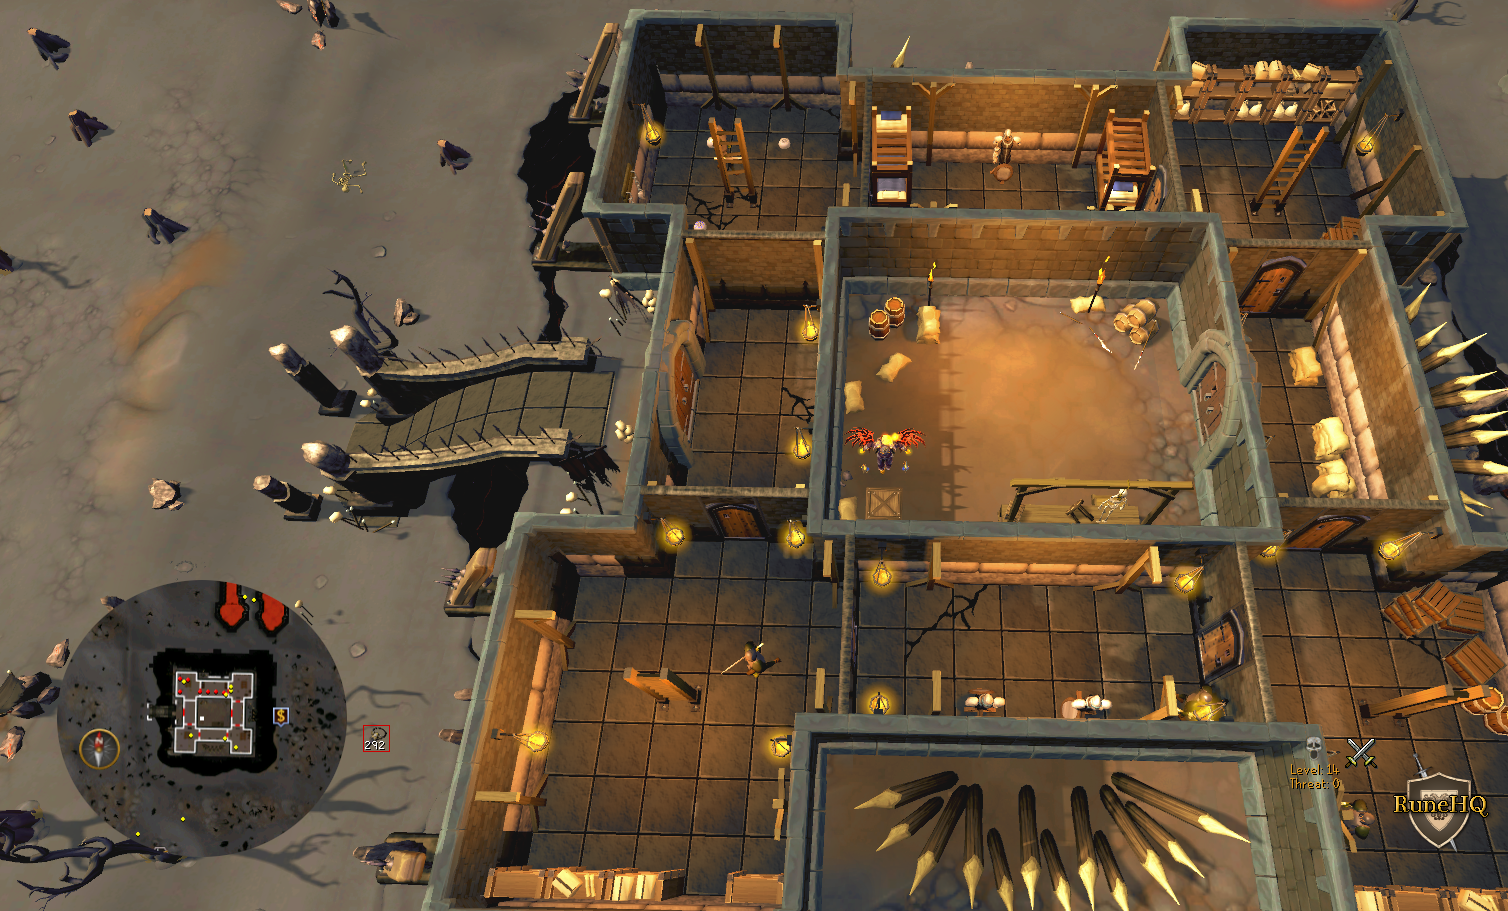
| Search the boxes in the Goblin House near Lumbridge. | Go to the Goblin house, on the East side of the River Lum, across the bridge from Lumbridge Castle North of the spit roast. The boxes are inside. Closest teleport: Lumbridge lodestone |
||
| Search the boxes in the house near the South entrance of Varrock. | Building just North-West of the Varrock Southern entrance with Benedict Encumberyak in it. Closest teleport: Varrock lodestone then run just North. |
||
| Search the boxes just outside the Armour Shop in East Ardougne. | The boxes lie between the plate body shop and the silk stall in the East Ardougne Market. Closest teleport: Ardougne teleport spell |
||
| Search the chests in Al Kharid Palace. | In Al Kharid enter the Palace through the main entrance. Go into the Eastern room, the "Ornate chest" is on the Southern wall of the room. Open and search the chest. Closest teleport: Al Kharid lodestone |
||
| Search through chests found in the upstairs of houses in Eastern Falador. | The chest is upstairs in the house North of the fountain in Eastern Falador. Closest teleport: Skills necklace option 2. |
||
| Search the chests found in the upstairs of shops in Port Sarim. | Search the Eastern chest upstairs in the Port Sarim Food Store. Closest teleport: Port Sarim Lodestone |
||
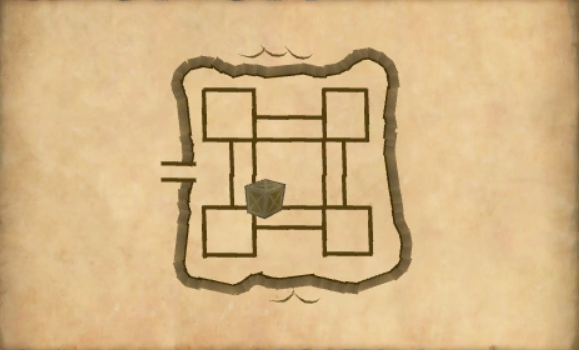
| Search the chest in the left-hand tower of Camelot Castle. | In Camelot Castle look in the chest at the very top of the Western tower. Closest teleport: Camelot teleport |
||
| Search the crates in the house at the north end of East Ardougne Market. | Northern most building in Ardougne (East) Market. (Building with rolls of cloth and sewing supplies.) Closest teleport: Ardougne teleport spell or Ardougne lodestone |
||
| Search the crates outside the bank in the north of East Ardougne. | Crates to the East of the door to the Northern bank in East Ardougne Closest teleport: Ardougne lodestone |
||
| Search the crates in the chicken coop in the farm north of Port Sarim. | North of Port Sarim inside the chicken pen by the cabbage farm. Closest teleport: Explorer's ring 4 or Spirit Tree teleport option 6 |
||
| Search the crates in the Port Sarim Fishing shop. | In Port Sarim it's the Northern-most crate in the fishing shop just North of the lodestone. Closest teleport: Port Sarim Lodestone |
||
| Search the crates in the house in Al Kharid with racks of silk. | In Al Kharid search the South-Western most crate in the house filled with racks of silk. House is connected to the Gem Merchants stall. Closest teleport: Al Kharid lodestone |
||
| Search the crate in the left-hand tower of Lumbridge castle. | Look upstairs in the guard tower in front of the Lumbridge castle. Closest teleport: Lumbridge teleport spell or Lumbridge lodestone |
||
| Search the crate in the most Northern house in Al Kharid. | In Al Kharid go to the house just West of the silk stall. The crate is in the South-West corner. Closest teleport: Al Kharid lodestone |
||
| Search the crate near a cart in Port Khazard. | in Port Khazard search the crate South of where the Trawler starts. Closest teleport: Lunar spellbook Khazard teleport or Fairy ring teleport code D-J-P. This clue may be a good option to use for the Globetrotter jacket. |
||
| Search the crates in a house in Yanille that has a piano. | In the building attached to the North wall of Yanille, North of the Wizards' Guild Tower and North-West of the Bank. Closest teleport: Yanille tablet. |
||
| Search the crates in East Ardougne's general store. | In East Ardougne located directly South of the church. Closest teleport: Clocktower Teleport |
||
| Search the crates in Draynor Manor | Search all possible crates and boxes on the third floor in the room to the left of the professor and machine, North end of room, in Draynor Manor. Closest teleport: Draynor Village lodestone. This clue may be a good option to use for the Globetrotter jacket. |
||
| Search the crates in Horvik's Armoury. | First building North East of Varrock's center there is an armoury, search the crates there. Closest teleport: Varrock teleport |
||
| Search the drawers of Hild and Penda's house in Burthorpe. | Third building South of the Burthorpe lodestone. Entrance is on the East. Closest teleport: Burthorpe lodestone |
||
| One of the sailors in Port Sarim is your next destination. | Talk to Captain Tobias in Port Sarim. Closest teleport: Port Sarim Lodestone |
||
| Search the crates in the Barbarian Village Helmet Shop. | In Barbarian Village look in the Southern-most crate in the shop. Closest teleport: |
||
| Search the crates in yard of Citharde Abbey. | East of Al Kharid, search the crates in the yard, South of the doors. Closest teleport: Al Kharid lodestone or Mask of the Yellow Wyrm. This clue may be a good option to use for the Globetrotter jacket. |
||
| Search the crates near a cart in Varrock. | South East of Varrock Palace, South of the tree farming patch. Closest teleport: 'Chipped' Varrock teleport |
||
| Search the drawers above the shops in Varrock. | In Varrock search the drawers in room above Clothes shop. Closest teleport: Varrock spell book teleport |
||
| Search the drawers in the ground floor of a shop in Yanille. | Go to the Hunter store in Yanille, search the drawers inside. Closest teleport: Yanille tablet. |
||
| Search the drawers in a house in Catherby. | In the house East of Catherby lodestone, North-East of fishing shop, South-East of archery shop. Search the drawers on the Northern wall. Closest teleport: Catherby Lodestone |
||
| Search the drawers in Ivy's house in Taverly | In Taverley in the house with the Crystal Chest, just West of the Summoning obelisk and Pikkupstix. Closest teleport: Taverly spell book teleport |
||
| Search the drawers in Catherby's Archery Shop. | Drawers are on the ground floor of Catherby's Archery shop. Closest teleport: Catherby lodestone |
||
| Search the drawers upstairs in the bank to the East of Varrock. | Go to the Varrock East bank and go up the the stairs. Closest teleport: 'Chipped' Varrock teleport |
||
| Search the drawers on the first floor of a building overlooking the Ardougne's Market. | House North of East Ardougne market; look upstairs (British 1st floor is upstairs; the bottom is the "ground floor"). Closest teleport: Ardougne spell book teleport or Ardougne lodestone. |
||
| Search the drawers in a house in Draynor Village. | In Draynor Village, the drawers are in the building South-East of the pottery shed, a few steps West of the door, in the building with the Mysterious Old Man. Closest teleport: Draynor Village lodestone or Amulet of glory (4) option 3 |
||
| Search the drawers upstairs in Falador's shield shop. | Go to the shop, located North of the Falador furnace, and go upstairs to search the drawers. Closest teleport: Falador spell book teleport or Falador lodestone. |
||
| Search upstairs in the houses of Seers' Village for some drawers. | Go to the house with the spinning wheel in Seers' Village. Closest teleport: Seers' Village lodestone. |
||
| Search for a crate on the ground floor of a house in Seer's Village. | Look in the house South/South-East of the Seers' Village pub (bar) and North of the church. Closest teleport: Seer's Village Lodestone. |
||
| Search the chest in the Duke of Lumbridge's bedroom. | Go to the second floor of Lumbridge Castle. Closest teleport: Slayer cape option 2, Lumbridge lodestone, or Ring of respawn option 1. |
||
| Search the chests in the Dwarven Mines. | The Western most chest by Hura in the Dwarven Mines. Closest teleport: Skills necklace option 5 (Invention guild). Then run East then North into the are with the Dwarfs. There will be a ladder to take down into the mine. The area is to the South-West. This is a good area to use surge/bladed dive to speed up the step. |
||
| Search the drawers found upstairs in the Westernmost Inn of East Ardougne. | In the pub North of the castle in East Ardougne, search the drawers located upstairs. Closest teleport: 'Chipped' Ardougne teleport |
||
| Search the drawers in Falador's Chain Mail Shop. | In Falador the chain mail shop is directly South of the castle. Search the Southernmost drawers inside. Closest teleport: 'Chipped' Falador teleport |
||
| Search the drawers in one of Gertrude's bedrooms. | Search the drawers in the South-East room of Gertrude's house, located West of Varrock. Closest teleport: Skills necklace option 4 then run South. |
||
| Search the drawers upstairs of houses in the Eastern part of Falador. | In Falador search the Nothern Closed Chest in the house to the North of the fountain in East Falador. Closest teleport: Skills necklace option 2. |
||
| Speak to Arhein in Catherby | Arhein  is on the docks in Southern of Catherby. is on the docks in Southern of Catherby. Closest teleport: 'Chipped' Camelot teleport |
||
| Speak to Doric | Doric is located in the house with anvils, East of the gate to Taverley. is located in the house with anvils, East of the gate to Taverley. Closest teleport: Falador Lodestone |
||
| Speak to Ellis in Al Kharid. | Ellis in the Tannery in Western Al Kharid. in the Tannery in Western Al Kharid.Closest teleport:Gnome Glider option 4 or Al Kharid lodestone |
||
| Speak to Gaius in Burthrope. | Gaius is located in the Sword shop in North-Eastern corner of Burthorpe. is located in the Sword shop in North-Eastern corner of Burthorpe. Closest teleport: Burthrope lodestone |
||
| Speak to Hans to solve the clue. | Hans is in the courtyard of Lumbridge Castle, in Lumbridge. is in the courtyard of Lumbridge Castle, in Lumbridge. Closest teleport:Slayer cape option 2, Lumbridge lodestone, or Ring of respawn option 1. Hans walks in a Clockwise circle around Lumbridge castle. Walking Counter-Clockwise around the castle is the fastest way to find him. |
||
| Speak to the bartender of the Blue Moon Inn in Varrock | Bartender  in the Blue Moon Inn North of Varrock lodestone. in the Blue Moon Inn North of Varrock lodestone. Closest teleport: Varrock lodestone |
||
| Speak to the Challenge Mistress in Burthorpe | Challenge Mistress Fara is South-West of the lodestone just South of the bank. Closest teleport: Burthorpe lodestone |
||
| Speak to the staff of Sinclair Mansion | Speak to Louisa  , in the Sinclair Manson North of Seers' Village. , in the Sinclair Manson North of Seers' Village. Closest teleport: Fairy Ring code C-J-R. |
||
| Speak to Ned in Draynor Village. | Ned in Draynor Village near his house North-East of the bank. in Draynor Village near his house North-East of the bank. Closest teleport: Amulet of glory option 3 |
||
| Speak to Sir Kay | Sir Kay is located in the Camelot Castle usually walking outside the castle by the door. is located in the Camelot Castle usually walking outside the castle by the door. Closest teleport: Fairy Ring code C-J-R. |
||
| Someone watching Het's Oasis is your next destination. | By Fadli's tent North-East of Het's Oasis talk to Jeed. The tent is marked as a bank on the minimap. Closest teleport: Ring of duelling option 1 |
||
| Talk to Zeke in Al Kharid. | Zeke  In the Scimitar shop North-West of the palace, in Al Kharid. In the Scimitar shop North-West of the palace, in Al Kharid. Closest teleport: Ring of duelling option 1 |
||
| Talk to the bartender of the Rusty Anchor in Port Sarim. | The Bartender in the Rusty Anchor Bar in Northern Port Sarim. in the Rusty Anchor Bar in Northern Port Sarim. Closest teleport: Spirit Tree teleport option 6. |
||
| Talk to the Squire in the White Knights' castle in Falador. | The Squire is located in the White Knights Castle in Falador. is located in the White Knights Castle in Falador. Closest teleport: Ring of respawn option 2 |
||
| Medium Clues | |||
| Clue | Solution | Key Required | Puzzle Box |
| A town with a different sort of night life is your destination. Search for some crates in one of the houses. | Search the crates in Canifis' Clothes Shop. Closest teleport: Slayer cape (t) option 8 |
||
| By the town of the dead, walk South down a rickety bridge, then dig near the spotted fungus. | Go to the bridge just West of Port Phasmatys, just outside of the North gate. Go slightly South of the bridge and dig
near the spotted mushroom/fungus. Closest teleport: Ectophial then run South ouside the city. |
||
| Find a crate close to the monk's that like to paaarty! | Search the crates in the building with monks South of East Ardougne. Closest teleport: Kandarin monastery Teleport (requires Easy Ardougne tasks) or Fairy Ring code D-J-P |
||
| Go to the village being attacked by trolls and search the drawers in one of the houses. | Go to the Northern part of Burthorpe (Closest teleport: Burthrope Lodestone). Go into Gaius's Two-Handed shop, it will show as a sword shop. When you try to open the drawers it says "wait til I get my hands on Penda, he's nicked the key again." Head to the house with Penda. It is across the street to the West third house to the South. You will need to pickpocket Pendra for the key. Use the key on the drawers. |  |
|
| Go to this building to be illuminated, and check the drawers while you are there. | The drawers near the bed on the 2nd floor of the Lighthouse. To open them you need a key dropped by a Market Guard (Rellekka). You must have started the Horror From The Deep quest to access the Lighthouse. | |
|
| In a town where everyone has perfect vision, seek some locked drawers in a house that sits opposite a workshop. | Go to the house in Seers' Village, South of the house with the Invention workbench and anvil. Search the drawers, they will be locked. Either follow the road to the West to the Ranging Guild or go North to the Sinclair Mansion. Find and kill a chicken to get the key for the drawers. (You can get the key before you visit the drawers to save time.) | |
|
| In a town where thieves steal from stalls search for some drawers in the upstairs of a house near the bank | East side of the river in East Ardougne, Jerico's house on the 2nd floor. You will need to kill a guard to get a key. | |
|
| In a town where wizards are known to gather search upstairs of the large house to the North. | Second floor of a house in Yanille - North of Wizards' Guild. You will need to kill a man on the first floor to get a key for the chest. Closest teleport: Yanille tablet. |
|
|
| In a town where the guards are armed with maces, search the upstairs room of the Public House. | Search the drawers in Ardougne's Tavern on the West side of the river. The drawers require a key. To get the key kill a Guard dog in the
garden area of Handelmort Mansion to the East across the river. Closest teleport: 'Chipped' Ardougne teleport |
|
|
| Probably filled with wizard socks. | Kill a spellwisp outside of the Wizards' Tower on the North-West side to get a key. The cupboard is on the 3rd floor of the Wizards' Tower, the room with a pair of leather boots in it. With the key in your inventory click on the cupboard and you will receive the next clue | |
|
| Search the upstairs drawers of a house in a village where pirates are known to have a good time. | Brimhaven, the house with the range in it. Kill a pirate in the nearby bar to get the key. | |
|
Speak to a Referee |
Gnome ball referee at the Gnome ball course, in the Tree Gnome Stronghold. Closest teleport: Spirit Tree Teleport option 2. |
||
Speak to Brimstail |
Enter the 'Cave Entrance', in the South-West corner of the Tree Gnome Stronghold. Closest teleport: Hazelmere's signet ring option 4 or Spirit Tree teleport option 2. |
||
Speak to Donovan , the family handyman. , the family handyman. |
Second floor of Sinclair Mansion, North of Camelot and Seers' Village. Closest teleport: Camelot teleport or Fairy Ring Code C-J-R |
||
Speak to Hajedy |
East of the fruit tree patch, at Brimhaven. Closest teleport: |
||
Speak to Kangai Mau |
The Shrimp and Parrot Tavern, in Brimhaven. Closest teleport: Spirit Tree Teleport option 8 |
||
Speak to Roavar |
At the bar, in Canifis. | ||
Speak to Ulizius |
The monk at the gate to the Mort Myre swamp, West of Canifis. Closest teleport: Fairy Ring Code C-K-S |
||
| Stand by your man. | Kill the level 2 Man downstairs to get a key. | |
|
| The dead, red dragon watches over this chest. He must really dig the view. | The chest in the most Southern room of the Exam centre (South of the Digsite) with a Dragon head hanging above it. Kill a barbarian in the Barbarian City for the key. | |
|
| The socks in these drawers are holier than thine, according to the tonsured owners. | Go to the Captured temple, South of the Goblin Village, kill a Zamorak monk to get a key.
Use the key on the drawers on the North-East side of the Edgeville Monastary (Prayer Guild). Closest teleport to get key: Wicked hood Mind Altar Teleport. Closest teleport to clue location: Combat bracelet option 3. |
|
|
| The gnomes' nearby cart must have collapsed under the weight of all the treasure in these boxes! | South-West of the Tree Gnome Stronghold and West of the Outpost. Near a broken cart search the crates. Closest teleport: Sixth-age circuit World Gate option then run West |
||
| The rock cakes to the South are definitely more edible than the two rocks I buried the treasure between. | In Gu'Tanoth (Ogre Area), dig between the two rocks in front of the Rock cake stall. Closest teleport: Gu'Tanoth Teleport |
||
| You have all of the elements available to solve this clue. Fortunately you do not have to go as far as to stand in a draft. | Search the crate inside the Elemental Workshop nearest to the entrance to the Air room. Closest teleport: Seers' Village Lodestone. |
|
|
| You'll need to have Doug deep into the distant past to get to these sacks. | Go into the winch at the Dig site just North of the Archaeology Guild. Descend the winch, if Doug Deeping isn't ther it is the wrong winch. The sacks with be on the Western wall. This clue requires most of the The Dig Site quest before the ability to use the winch is available. A rope may also be necessary to use the winch. Closest teleport:Digsite pendant (5) option 2 will place you directly next to the wrong winch. After teleporting head West the the other winch and go down. |
||
| You'll need to look for a town with a central fountain. Look for a locked chest in the towns chapel | Search the chest in the chapel in North-East Varrock (North of the museum). The chest says 'Property of Clocktower Monastery'. Go to the Monastery South-East of the Clocktower (South of Ardougne) and kill a Monk for the key. | |
|
King Bolren |
West of the Spirit Tree, in the Tree Gnome Village. | ||
| Hard Clues | |||
| Clue | Solution | Key Required | Puzzle Box |
| A strange little man who sells armour only to those who've proven themselves to be unafraid of dragons. | Oziach, the rune plate seller, in
Edgeville. Directly North of the Lodestone. Closest teleport: Edgeville Lodestone. |
 |
|
| Aggie I see. Lonely and Southern I feel. I am neither inside nor outside the house, yet no home would be complete without me. The treasure lies beneath me! | At Aggie the Witch's house in
Draynor Village, dig under the window in the South side of the house, South of cauldron. Closest teleport:Amulet of glory (4) option 3 |
||
| As you desert this town, keep an eye out for a set of spines that could ruin nearby rugs: dig carefully around the greenery. | In Nardah in the Kharidian Desert, dig on the the West side of the bigger cactus West of the Rug Merchant. Closest teleport: Desert amulet 2 or above option 1 |
||
| Come to the evil ledge, Yew know yew want to. Try not to get stung. | One step East of the Southern Yew tree in Edgeville. Closest teleport: Ring of respawn option 4, Amulet of glory (4) option 1, or Slayer cape option 9. |
||
| Generally speaking, his nose was very bent. | General Bentnoze in the Goblin Village, North of Falador. | |
|
| His head might be hollow, but the crates nearby are full of surprises. | The boxes West of The Golem quest start point at the Ruins of Uzer. Closest teleport: Desert amulet 4 option 2 |
||
| I am head of the Abbey with a cold breeze from the West. | Talk to Abbot Langley in Edgeville Monastery. Closest teleport: is Combat bracelet (4) option 3. |
||
| Identify the back of this over-acting brother. (He's a long way from home.) | Hamid the monk in the Western section of the Menaphos Worker District, by the water. Worker district teleport |
|
|
| If you look closely enough, it seems that the archers have lost more than their needles. | Search the big haystack in the Ranging Guild. Closest teleport: Combat bracelet option 4 |
||
| It seems to have reached the end of the line, and its still empty. | Enter the Dwarven Mines through one of the entrances. Head to Eastern part of the mine, search the Northern mine cart just East of the Coal Rocks. Closest teleport:Dungeoneering cape option 2 then run North |
||
| Mine was the strangest birth under the sun. I left the crimson sack, yet life had not begun. Entered the world, and yet was seen by none. | Down the rope into the cave beneath the Karamja volcano - pick up red spider eggs
and dig. Closest teleport: Amulet of glory (4) option 2, then run West and climb down the rope. |
||
| My Giant guardians below the market streets would be fans of rock and roll, if only they could grab hold of it. Dig near my purple smoke! | Under Varrock. Dig next to the cauldron with purple bubbling liquid in the Varrock Sewers by the Moss giants. Closest teleport: Dungeoneering cape option 0 then option 2 then run North |
||
| My name is like a tree, yet it is spelt with a 'g'. Come see the fur which is right near me. | Speak to the child Wilough ("Willow") in the center of Varrock, near the Fur merchant. Closest teleport: Varrock teleport |
|
|
| Navigating to this crate will be a trial. | In Rellekka, go to Swensen the Navigator's house. Search the crate in there. Closest teleport: is Rellekka teleport on Fremennik Sea Boots 4 |
||
| Often sought out by scholars of histories past, find me where words of wisdom speak volumes. | Speak to a Examiner in the Exam Centre at the Digsite. The Examiner always gives you a puzzle box. Closest teleport: Digsite pendant (5) option 3 |
|
|
| Read 'How to breed scorpions.' by O.W. Thathurt. | Go to the second floor of the Sorcerer's tower South of Seers' Village (East of the Ranging Guild). Search the bookcase on the Northern wall. Closest teleport: Spirit Tree Teleport Option M |
||
| 'Small shoe.' Often found with rod on mushroom. | Speak to the trainer in the Tree Gnome Stronghold Agility arena. Closest teleport: Spirit Tree teleport option 2 |
|
|
| There is no 'worthier' lord. | Lord Iorwerth in the Elf Camp (Regicide quest required). Closest teleport: Tirannwn quiver 3 or above option 6 After completion of Plague's End Lord Iorwerth (Prifddinas) will move to the Iorwerth section of Prifddinas located just North of the prayer altar. Closest teleport:Attuned crystal teleport seed option 7 |
|
|
| This aviator is at the peak of his profession. | Speak to gnome pilot at the top of White Wolf Mountain. Closest teleport: Gnome Glider option 2 |
|
|
| This lady wants me to find ancient scrolls. | Talk to Celia Diggory East of Digsite | |
|
| This village has a problem with cartloads of the undead. Try checking the bookcase to find an answer. | The bookcase in the antiques store in Shilo Village. Search the bookcase on the West wall. | ||
| When you get tired of fighting, go deep, deep down until you need an antidote. | In the Yanille Agility Dungeon go down a floor by praying at the Chaos altar, and then go to where the poison spiders are and search the crates next to the stairs. Closest teleport: Yanille tablet. |
||
| You will need to under cook to solve this one. | Search the crates in basement of Lumbridge Castle. Go down the trap door in the kitchen. The crate is in the South-East corner. Closest teleport: Ring of respawn option 1 or Lumbridge lodestone |
||
General Bentnoze |
Northern-most house at the Goblin Village North of Falador. Closest teleport: Wicked hood teleport to Mind altar. |
|
|
Citric Cellar |
Heckel Funch on the second floor (US)/first floor (UK) of the Grand Tree in the Tree Gnome Stronghold. | |
|
| Clue | Solution | Key Required | Puzzle Box |
Black Heather |
Bandit Camp, in the Wilderness.
This is located in the Wilderness be careful which items you take with you as they may be lost upon death. |
||
Hazelmere |
Second floor of the house on the Island, East of Yanille. Closest teleport: Yanille tablet. |
||
Kebab Seller |
Karim, in the Kebab Store in Al Kharid - South of the furnace. | ||
Keeper of Melzar's |
Oziach, the rune plate seller, in Edgeville. | ||
Lowe |
Lowe's Archery Store in Varrock, West of Varrock's East bank. | ||
| Speak to a party-goer in Falador | Speak to Lucy the bartender  , upstairs in the Falador party room. , upstairs in the Falador party room. |
||
Luthas |
Hut on the East side of the banana plantation, at Musa Point. | ||
Murphy |
At the pier in Port Khazard. Closest teleport: Lunar spellbook Khazard teleport or Fairy ring teleport code D-J-P. This clue may be a good option to use for the Globetrotter jacket |
||
Monk |
Brother Kojo, at the Clock Tower South of East Ardougne | ||
Oracle |
East of the Monastery (Prayer Guild), on top of Ice Mountain. | ||
Party Pete |
Party Room, in North-East Falador. | ||
Zoo Keeper |
Ardougne Zoo. | ||
| 46 is my number. My body is the colour of burnt orange and crawls among those with eight. Three mouths I have, yet I cannot eat. My blinking blue eye hides my grave. | The blue eye is the sapphire in the spider nest in Level 46 Wilderness. Try to dig below it with a Spade.
This is located in the Wilderness be careful which items you take with you as they may be lost upon death. |
||
| 'A bag belt only?', he asked his balding brothers. | Abbott Langley in the Monastery, West of Edgeville. | ||
| A great view - watch the rapidly drying hides get splashed. Check the box you were sitting on. | The house near Baxtorian Falls, South of the Barbarian Outpost. Go upstairs and search the boxes. | ||
| After a hard day of spraying back the vegetation, you mite want to pop to the nearby forge and search the crates. | Search the crates near the furnace in North-West Zanaris. Closest teleport: Any Fairy Ring. |
||
| After trawling for bars, go to the nearest place to smith them and dig by the door. | In Port Khazard, dig outside the building with the anvil. | ||
| And so on, and so on, and so on. Walking from the land of many unimportant things leads to a choice of paths. | On Etceteria, dig on the crossroad. Closest teleport: Spirit Tree Teleport option 7. |
||
| Being this far North has meant that these crates have escaped being battled over. | On the Khazard Battlefield South of West Ardougne, search the crates outside of the most North-Eastern building, near the Small obelisk. | ||
| Beware of the dog | Run over to the mansion in East Ardougne and kill a Guard dog to get the key. | ||
| Brush off the sand and then dig in the quarry. There is a wheely handy barrow to the East. Don't worry, permission has been granite to dig there. | In (Enakhra's) Quarry, South of the Bandit Camp (Desert) in the Kharidian Desert, dig just north of the barrow. Closest teleport: Bandit Camp Lodestone. |
||
| Covered in shadows, the centre of the circle is where you will find the answer. | Mort'ton, where all the roads meet in front of the general store. Closest teleport: Games necklace (8) option 6, next best option Drakan's medallion option 2. |
||
| Dig here if you are not feeling well after travelling through the desert. Ali heartily recommends it. | In, Pollnivneach dig near the well (not the fountain). | ||
| Don't forget to feed the chickens | Just kill any Chicken to get the drawer key. | ||
| Don't skip here, it's too muddy. You'll feel like a star if you dig here, though. | Go to Mudskipper Point. Dig at the starfish South of the fairy ring. | ||
| For any aspiring mage, I'm sure searching this bookcase will be a rewarding experience. | Go to the Mage Training Arena, North of Het's Oasis. Search the North-East bookcase on the second floor. | ||
| Four blades I have, yet draw no blood; Still I turn my prey to powder. If you are brave, come search my roof; it is there my blades are louder. | It is a crate in the top of Lumbridge windmill. Closest teleport:Draynor Village lodestone then run East to windmill. |
||
| Hay! Stop for a bit and admire the scenery, just like the tourism promoter says. | In the circular building West of the Fishing Guild and South of the Baxtorian Falls (near Hadley, search the hay bales (not the hay stack). | ||
| I am a token of the greatest love. I have no beginning or end. My eye is red, I can fit like a glove. Go to the place where it's money they lend, and dig by the gate to be my friend. | Refers to the Ruby ring in the Varrock West bank basement, dig next to the gates. Closest teleport:Ring of wealth (4) or Luck of the dwarves option 2 or Grand Exchange Teleport. |
||
| I lie lonely and forgotten in mid wilderness, Where the dead rise from their beds. Feel free to quarrel and wind me up and dig while you shoot their heads. | Under the crossbow in Graveyard of Shadows in the Level 20 Wilderness. Pick up crossbow and dig under it.
This is located in the Wilderness be careful which items you take with you as they may be lost upon death. |
||
| I'm sure they will let ya buy some things here, as long as you are in good 'ealth." | In Lletya in Tirannwn, search the crate in the General store. NOTE: Must have started Mourning's End Part I. | ||
| If a man carried my burden, he would break his back. I am not rich, but leave silver in my track. Speak to the keeper of my trail. | Talk to Gerrant the Fish Shop owner in Port Sarim. He will either ask you a question to which the answer is a "snail", or he will give you another clue. | ||
| If you didn't want to be here and in danger, you should lever things well enough alone. | In Level 51 Wilderness, dig under the spot you were teleported to upon pulling the lever in East Ardougne.
This is located in the Wilderness be careful which items you take with you as they may be lost upon death. |
||
| In a village made of bamboo, look for some crates under one of the houses. | Karamja, in Tai Bwo Wannai, South of Brimhaven | ||
| Must have lots of railings. or Must be full of railings. |
Search the boxes outside, on the North side of the house with the broken
multicannon (near where you start the Dwarf Cannon quest)(Near the coal trucks). Closest teleport: Combat bracelet (4) option 4. |
||
| My home is grey, and made of stone; A castle with a search for a meal. Hidden in some drawers I am, across from a wooden wheel | Search the drawers on the second floor of Lumbridge Castle - Inside the room with a spinning wheel. Closest teleport: Lumbridge lodestone or Ring of respawn option 1 |
||
| My name's a tirade, fishing is my trade, by the docks is where my fortune is made. | Speak to Gerrant in Port Sarim fishing shop Closest teleport: Port Sarim lodestone |
||
| North of the best monkey restaurant on Karamja, look for the centre of the triangle of boats and search there. | Go to North of Musa Point (Karamja), on the dock with three row boats, dock to the West of Lobster fishing dock. Search the middle crate. Closest teleport: Amulet of glory option 2. |
||
| Observe: in the crate just North of the stairs leading down, you will find the answer. | In the Observatory, search the box next to the stairs on the ground floor. | ||
| Probably filled with books on magic. | Search the most South-Western bookcase on the ground floor of Wizards' Tower. Closest teleport: Wicked hood teleport. |
||
| Property of Black Heather | Kill Black Heather in the Bandit Camp in the Wilderness.
This is located in the Wilderness be careful which items you take with you as they may be lost upon death. |
||
| Search the crates in the Guard House of the Northern Gate of East Ardougne. | In East Ardougne just North-West of the Market Square in the building in front of the field. There are guards milling around West of it. | ||
| Search the crates in the North-West most house in Al Kharid. | Located in the house South of gem trader in the most South West crate. | ||
| Search the crates in the shed just North of East Ardougne. | In East Ardougne North of the North bank by the diseased sheep - Inside the building that the wood cutter used to be in. | ||
| Search through some drawers found in Taverley's houses. | Look for three small houses in the South-West corner of Taverley. The drawers are in the Eastern house. | ||
| Search the drawers of houses in Burthorpe. | In Burthorpe search the drawers in the house directly North of the Loyalty Shop run by Xuan. | ||
| Search the tents in the Imperial Guard camp in Burthorpe for some boxes. | Go to Burthorpee, South of the Games room castle. Search the boxes between the two beds in the North-West tent. | ||
| Search in the basement of the Artisan Dwarves' workshop in Falador. | In Falador's Artisan's Workshop search two small crates stacked on top of each other in the room to the South of Sten, the dwarf in charge of laying new mining track. The crates are just in front of two shelves on the Northern wall. | ||
| Snah? I feel all confused, like one of those cakes... | Talk to Hans in Lumbridge Castle. Closest teleport:Slayer cape option 2, Lumbridge lodestone, or Ring of respawn option 1. Hans walks in a Clockwise circle around Lumbridge castle. Walking Counter-Clockwise around the castle is the fastest way to find him. |
||
| Sophind yourself some treasure by searching these boxes. | Near Sophanem, search the crates a very short distance South-West of the Pyramid Plunder pyramid. | ||
| Surprising? I bet he is.... | Sir Prysin on the first floor of Varrock castle. | ||
| The beasts to my East snap claws and tails. The rest to my West can slide and eat fish. The Northern are silly and jump and wail. Dig by my fire and make a wish. | Between the penguins and scorpions in the East Ardougne Zoo - Dig by the torch. Closest teleport: Clocktower Teleport. |
||
| The cheapest water for miles around, but they react badly to religious icons. | The Bandit Camp (Desert), South of the Bedabin Camp. Search the crates in the general store. Closest teleport: Bandit Camp Teleport or Enlightened amulet option 3. |
||
| The crate in the ground floor of a church is your next location | East Ardougne church - Next to ladder | ||
| The Keeper of Melzars...Spare? Skeleton? Anar? | Talk to Oziach the Rune Plate seller - West of Edgeville | ||
| The owner of this crate has a hunch that he put more than fish inside... | On the beach South of Brimhaven on Karamja, search the crate near Lubufu at the Karambwan fishing area. (Near the fishing spot North of Karamja lodestone). Closest teleport: Brimhaven tablet. |
||
| The treasure is buried in a small building full of bones. Here is a hint: it's not near a graveyard. | Dig in the building near the Odd Old Man, who is East of Varrock, near the limestone quarry. | ||
| This crate holds a better reward than a broken arrow. | A crate in the Ranging Guild near the most Northern ranging shop. | ||
| This crate is mine, all mine, even if it is in the middle of the desert. | It is in the Desert Mining Camp in the "middle" of the desert. Search the crate South of the cart near the camel. | ||
| This crate clearly marks the end of the line for coal. | Go to the building North-West of the Seers' Village bank. Search the crate on the North wall. | ||
| This cupboard has treasure, pirate pots and corsair cutlery. | In Brimhaven (Karamja), search the cupboard in the house East of the bar. Closest teleport: Spirit Tree Teleport option 8. |
||
| This temple is rather sluggish. The chest just inside the entrance, however, is filled with goodies. | In the underground temple West of Witchaven, search the chest on the Southern wall of the first room. Closest teleport: Ardougne Teleport Spell. |
||
| Throat mage seeks companionship. Seek answers inside my furniture if interested. | Search the drawers upstairs in the Necromancer's Tower, South of East Ardougne. Closest teleport: Fairy Ring code D-J-P |
||
| Try not to let yourself be dazzled when you search these drawers. | In East Ardougne, at Jimmy Dazzler's house North of the castle West of the Bar, search the drawers in the North-West corner, left set of drawers. | ||
| Try not to step on any aquatic nasties while searching this crate. | In the shack on the Fishing Platform that you go to during the Sea Slug quest. Talk Holgart or Jeb in Witchaven, East of Ardougne to get to the platform. | ||
| When no weapons are at hand, now is the time to reflect in Saradomins name! redemption draws closer. | Entrana in a drawer in the house with a Glassblowing pipe. It is not in the drawers with the glass blowing pipe but he drawers on the Southern wall. Closest teleport: Hot Air Balloon to Entrana. |
||
| While a sea view is nice, it seems this church has not seen visitors in a while. Dig outside the westmost wall by the broken fence for a reward. | Dig on the West side of the church South-East of Rimmington and South of Port Sarim. | ||
| You can cook food on me, but don't cook any foodles - that would just be wrong. | Go to Captain Klemfoodle and dig near the fire beside him. Closest teleport: Gnome glider option 5. |
||
| You don't need to go hopping mad - or take steps - to get this treasure: just be totally shellfish. | Head North of the Barbarian Outpost and South of the jumping stones. Dig on the Western most small shell on the ground. Closest teleport: Games necklace option 2. |
||
| You'll need to have dug deep in the distant past to get these sacks. | At the Dig Site, use a rope with the North-East winch. Then 'operate' the winch and search the sacks on the North-West wall. NOTE: You must have started The Dig Site Quest. | ||
| You will need to wash the old ash off your spade when you dig here, but the only water nearby is stagnant. | Speak to Pirate Pete to go to Braindeath Island. Cross the bridges and climb to the top of the mountain, where you will find a stagnant lake. Dig on the Western shore of the lake on top of the hill. (alternatively teleport #8 on the Dungeoneering skill cape will teleport to Braindeath Island) NOTE: Must have started Rum Deal Quest. |
| Easy Clue | ||
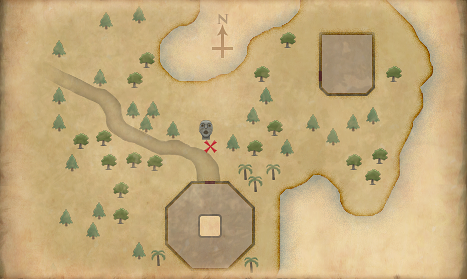
| Maps | Location | Image |
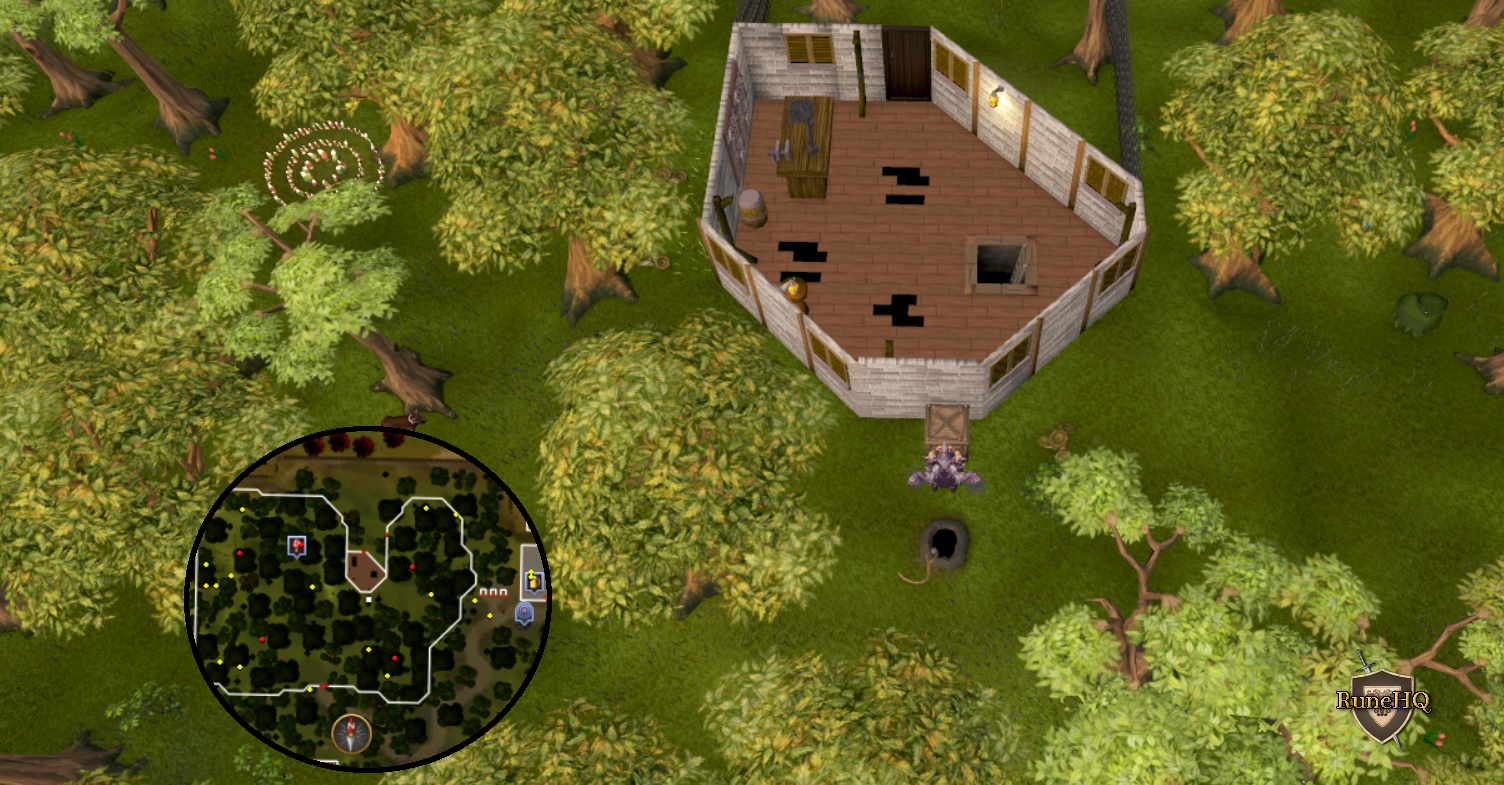
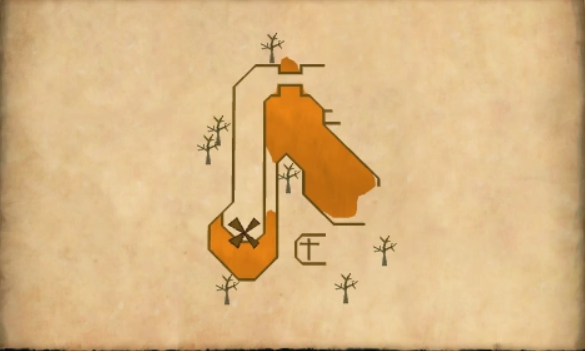
 |
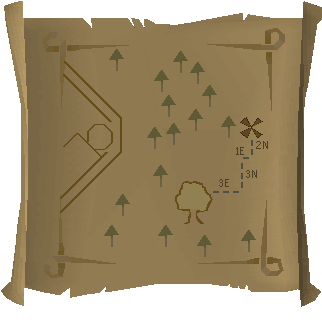
Varrock Mine Map - Dig 2 steps South of the tree, just North of the Varrock East mining site. Closest teleport: Digsite pendant option 1 then run West |
 Click the above image to enlarge! |
 |
Behind the Wizard's Tower Closest teleport: Fairy Ring code D-I-S |
 Click the above image to enlarge! |
 |
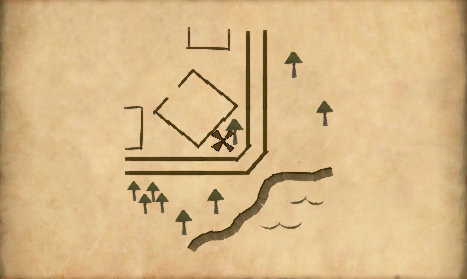
Road intersection just North of Falador. Closest teleport: Falador lodestone |
 Click the above image to enlarge! |
 |
Falador Useless Rock Area Map - Fenced area East-NorthEast of Falador's North entrance, full of useless rocks. Closest teleport:Wicked hood teleport to Body altar then run South |
 Click the above image to enlarge! |
 |
Brother Galahad's house across the river from Coal Trucks. Closest teleport: Combat bracelet option 4 then run North-West. |
 Click the above image to enlarge! |
 |
West of the Champions' Guild. South-West of Varrock lodestone. Closest teleport: Combat bracelet option 2 |
 Click the above image to enlarge! |
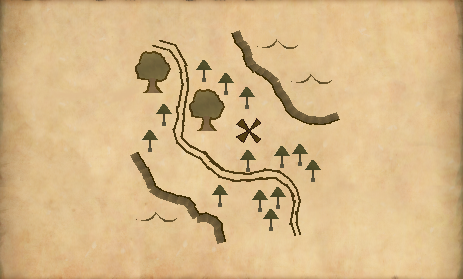
| Medium Clue | ||
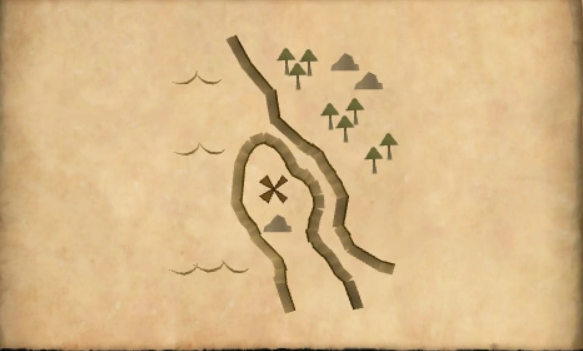
| Maps | Location | Image |
 |
Draynor Fishing Spot Map - South from Draynor's Bank Closest teleport: Amulet of glory option 3 |
 Click the above image to enlarge! |
 |
Dig West of Necromancer's Tower, just North of the Tower of Life. Closest teleport: Fairy Ring D-J-P. |
 Click the above image to enlarge! |
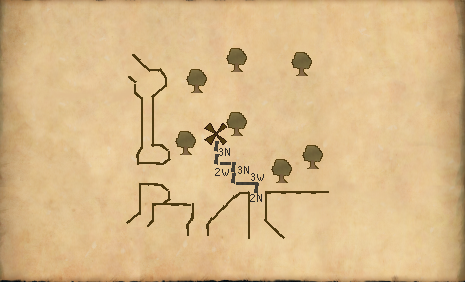
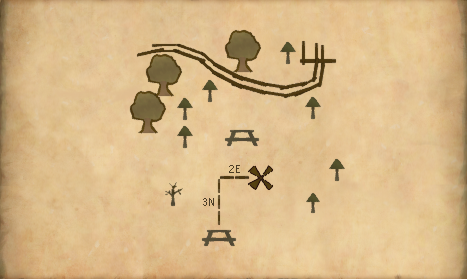
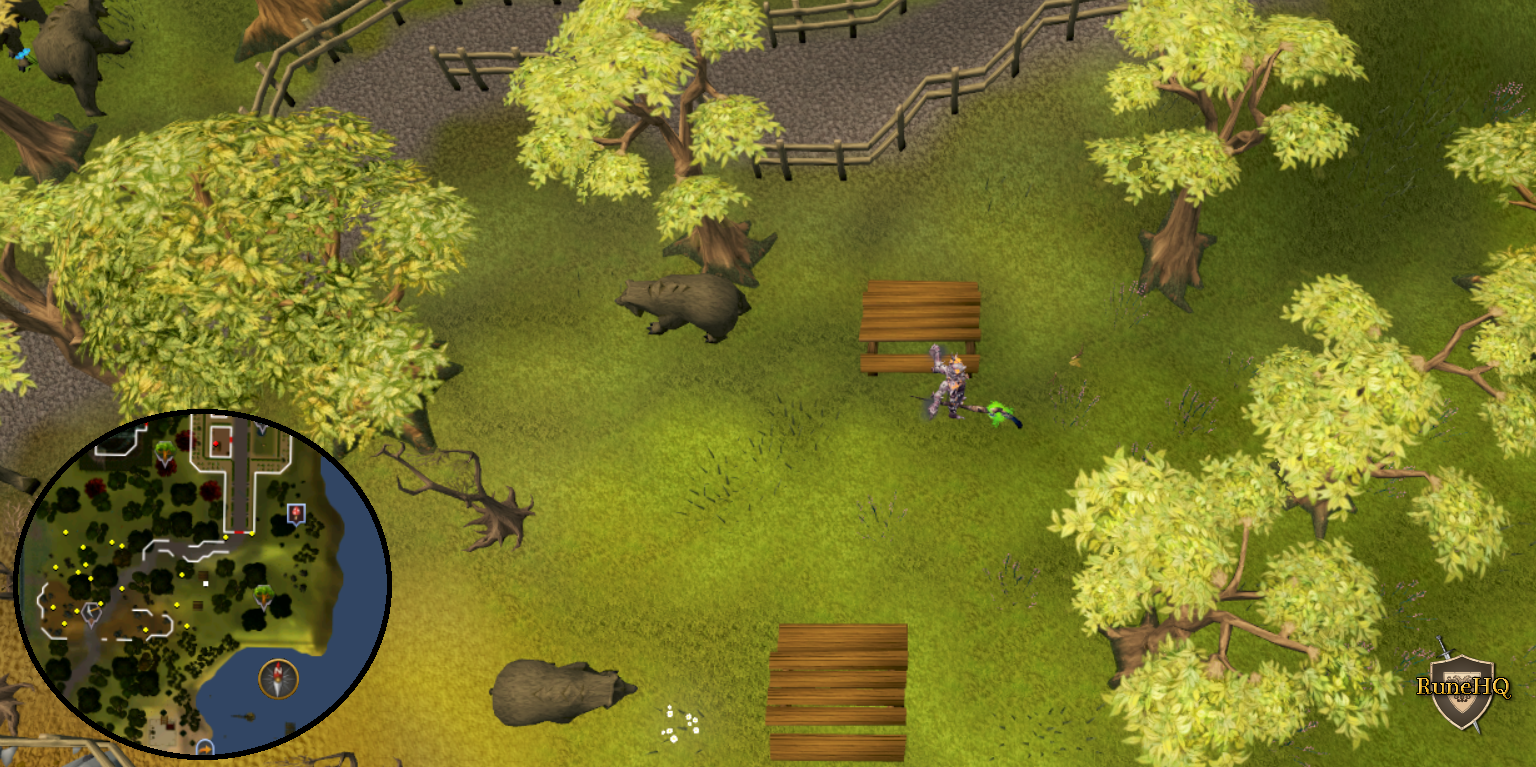
 |
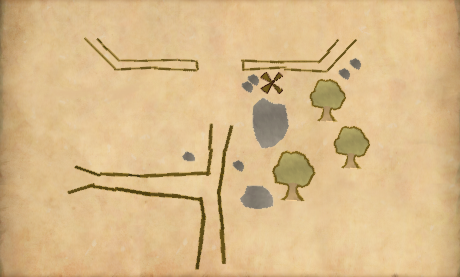
Dig on the fern just South-East of the Musician, South of the bridge to Rellekka Closest teleport: Fairy Ring C-J-R |
 Click the above image to enlarge! |
 |
Search a crate on the West side of the Clock Tower, which is South of Ardougne. |
 Click the above image to enlarge! |
 |
Near the lighthouse in Relleka. Closest teleport: Lighthouse Teleport |
 Click the above image to enlarge! |
 |
Inside McGrubor's wood, which is West of Seer's village. Closest teleport: Fairy Ring code A-L-S. |
 Click the above image to enlarge! |
 |
Miscellania. Just outside the castle entrance. Follow the steps and dig. Closest teleport: Miscellania Teleport. |
 Click the above image to enlarge! |
 |
West of the Chemist's house in Rimmington Closest teleport: Rimmington tablet |
 Click the above image to enlarge! |
 |
The Chaos Altar North of the Observatory. Stand and dig right next to the standards behind the altar. Closest teleport: Ourania Teleport (Lunar Spellbook) or 'Chipped' Ardougne teleport from Dave's spellbook. |
 Click the above image to enlarge! |
 |
Southern part of the path to Mort'ton. Closest teleport: Use either Drakan's medallion or Games necklace to get to Burgh de Rott. On West fence jump the fence in the middle at red fence spot on minimap. Run North-West past the mine entrance to the spot. |
 Click the above image to enlarge! |
 |
It's on the Hobgoblin peninsula that sticks out West of the Crafting Guild (below the Make over Mage - found directly West after exiting Falador by the South entrance). Closest teleport: Skills necklace. |
 Click the above image to enlarge! |
| Hard Clue | ||
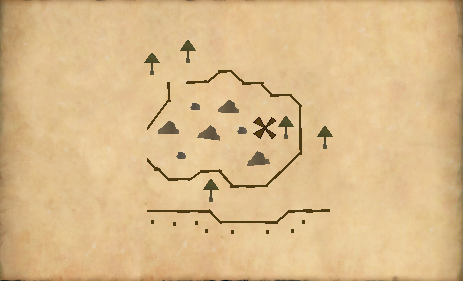
| Maps | Location | Image |
 |
Dark Warrior's Fortress in the Wilderness. Search the crate in the South-West corner of the area inside.
This is located in the Wilderness be careful which items you take with you as they may be lost upon death. |
 Click the above image to enlarge! |
 |
Search crate outside the house with range at goblin area near Observatory. Closest teleport: is 'Chipped' Watchtower teleport from Dave's spellbook. |
 Click the above image to enlarge! |
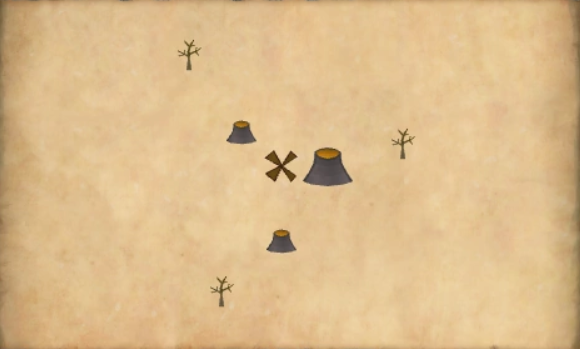 |
Level 50 Wilderness, East of the Agility Course. You will see 3 trees and 3 little volcanoes. Dig between the 2 North ones.
This is located in the Wilderness be careful which items you take with you as they may be lost upon death. |
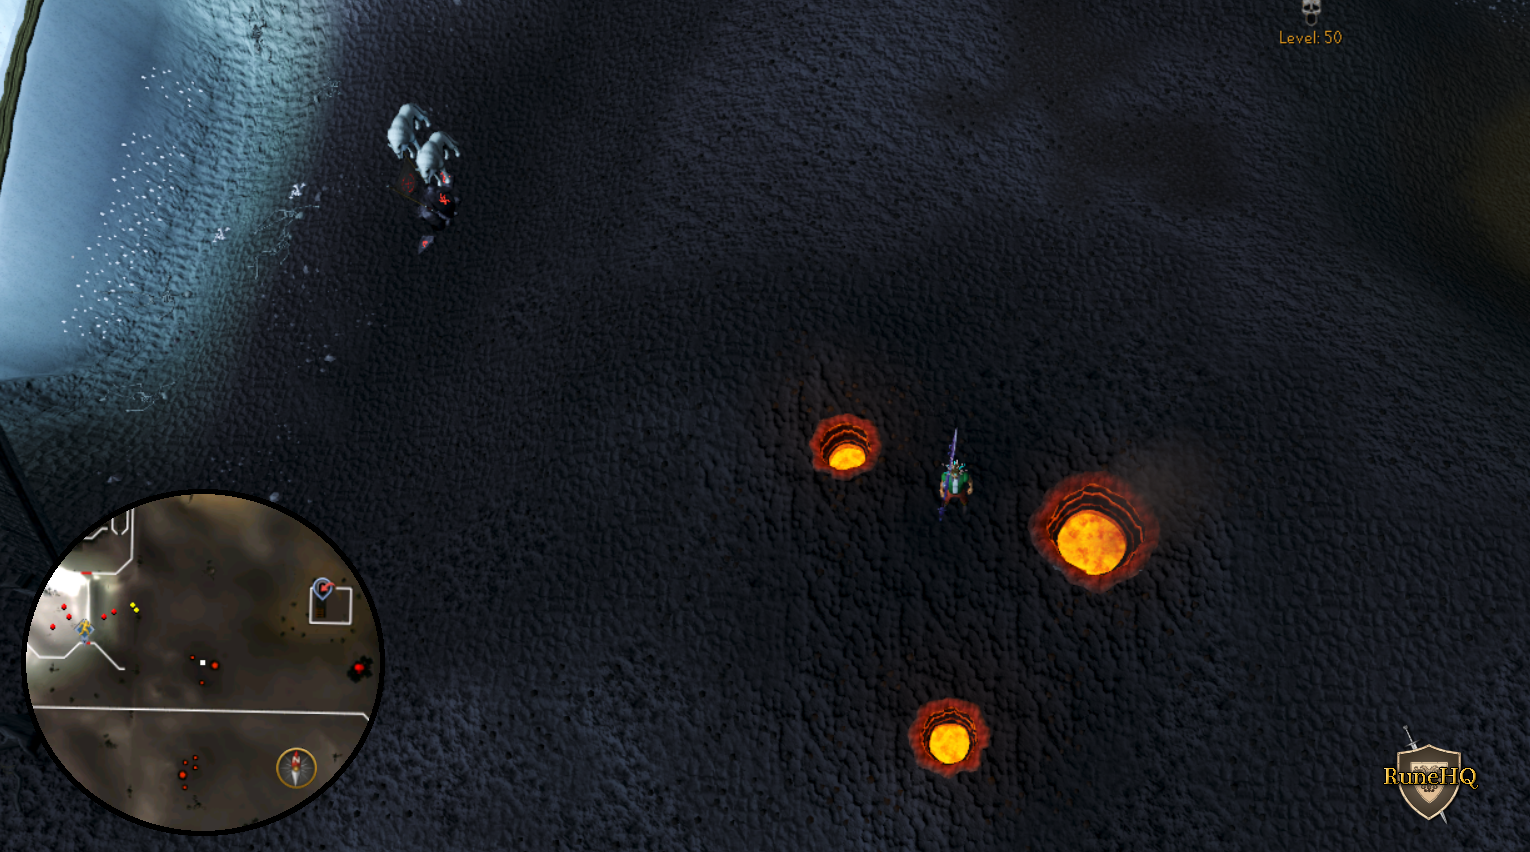 Click the above image to enlarge! |
 |
South of the Legends entrance, North-East of Ardougne. Closest teleport: is Fairy Ring B-L-R or Cape of legends teleport. |
 Click the above image to enlarge! |
 |
Dig in the North-West corner of the most Eastern ruined house in the middle row of buildings found in West Ardougne. Closest teleport: is using a 'Chipped' Ardougne teleport from Dave's spellbook. |
 Click the above image to enlarge! |
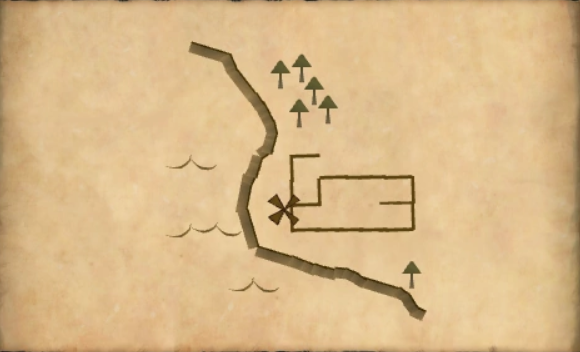
 |
In the South-East corner of Yanille, South of the bank. Closest teleport: Yanille tablet. |
 Click the above image to enlarge! |
 |
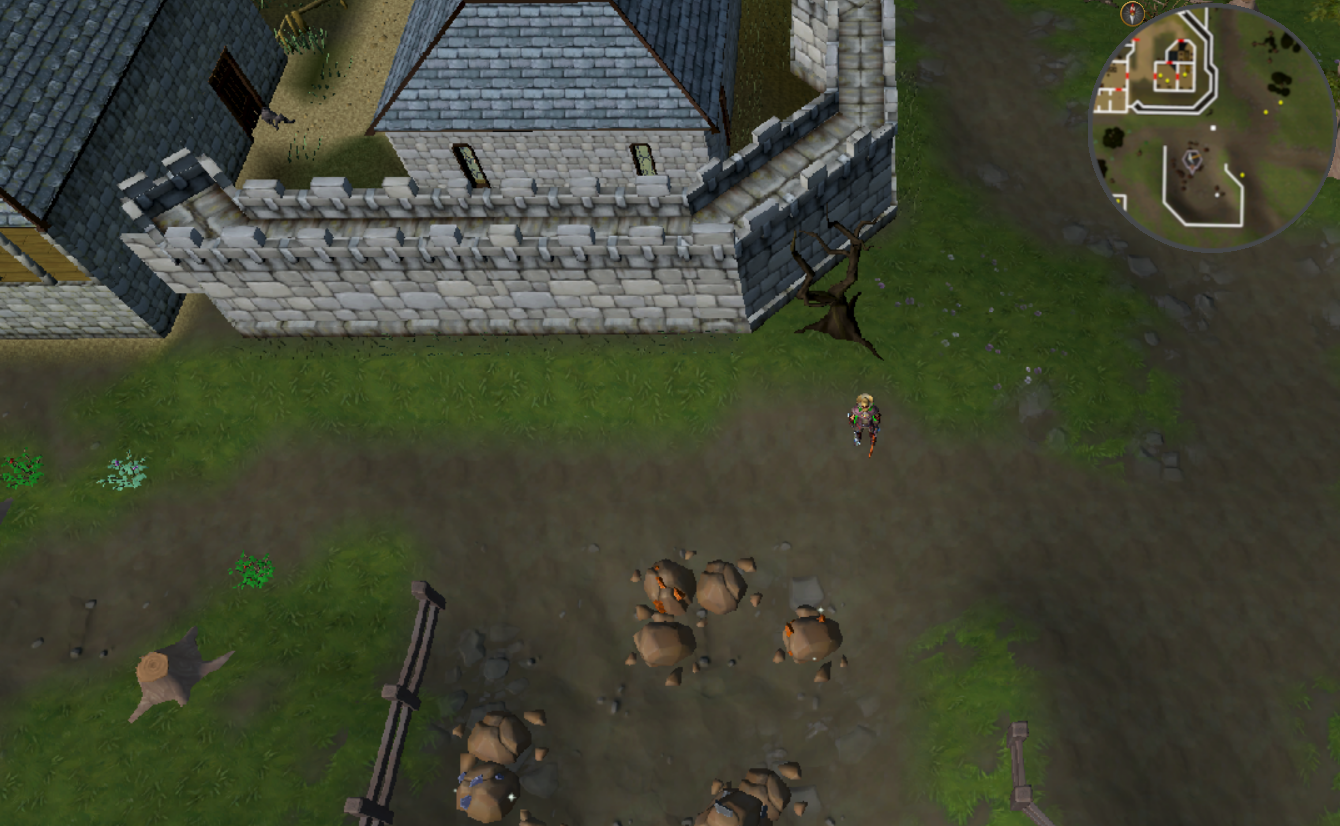
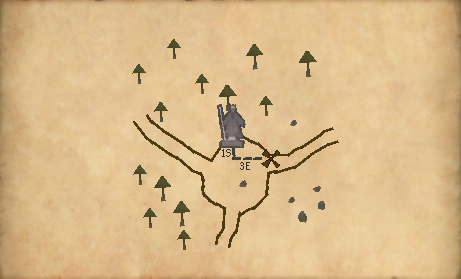
South of the Southern wall of Fort Forinthry. Directly East of the lodestone near the rocks. It is the only crate. Closest teleport: Fort Forinthry lodestone or Fort Forinthry Teleport |
 Click the above image to enlarge! |
| Clue level not known please submit level and picture of clue using the form at the end of the guide. Thanks | ||
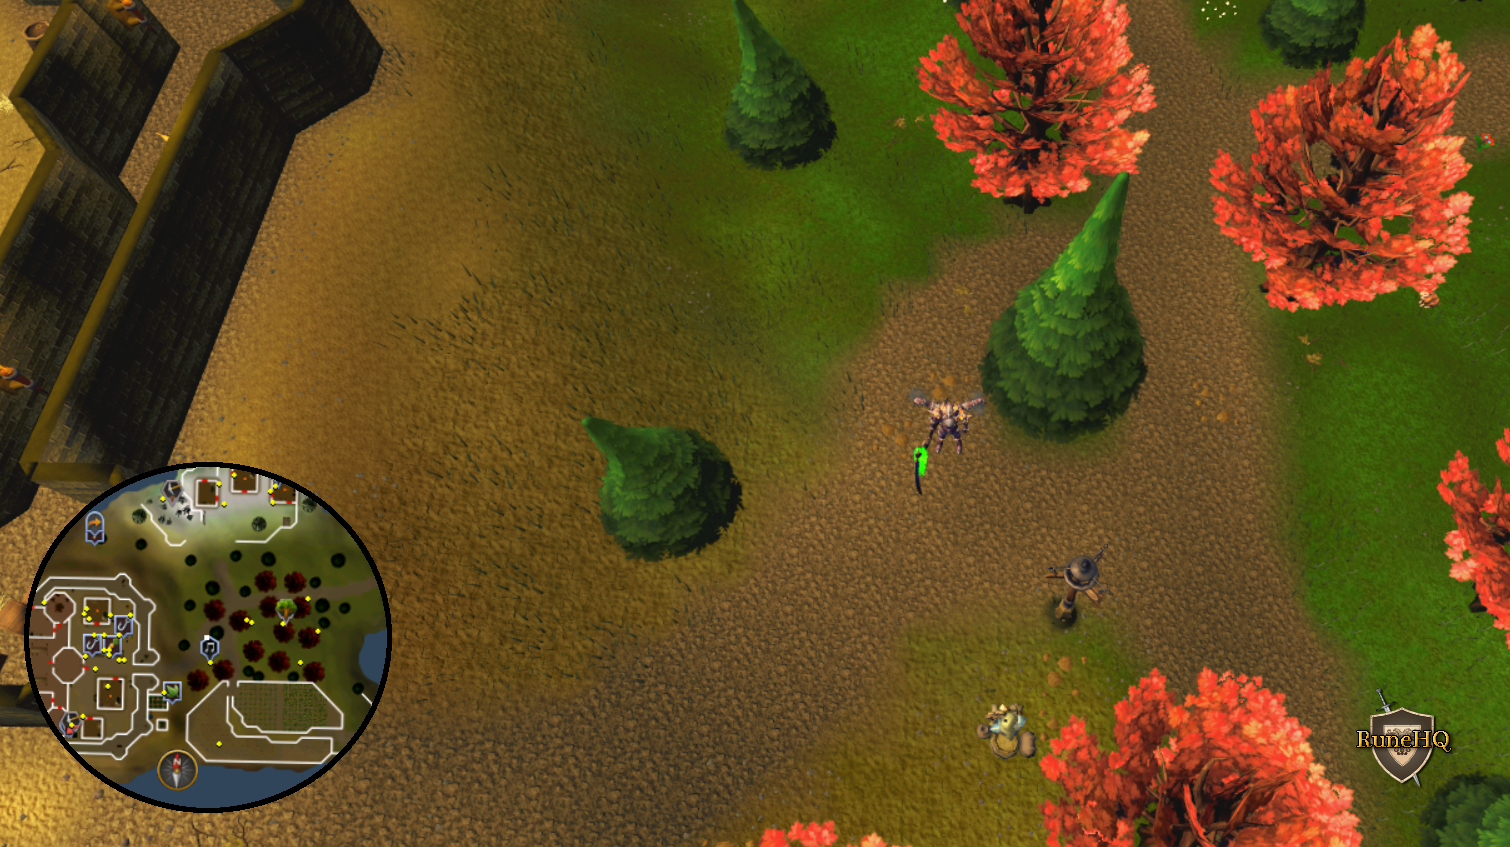
| Maps | Location | Image |
 |
East of the Ranged guild, near the most Eastern Magic tree. | 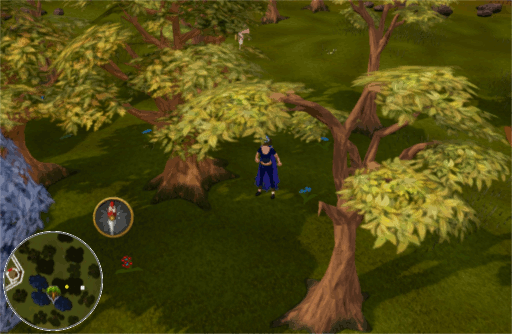 Click the above image to enlarge! |
When you get these clues, an NPC will ask you to solve the puzzle for them. Open the puzzle, and move the tiles around until it forms the complete picture. You can only move tiles into the empty space and if you close the puzzle before you complete it, you will start over. Once completed, talk to the NPC who gave you the puzzle and you will receive another clue.
There are a few options that are available to help with completion of the puzzle:
- There is a check button that will show which pieces are places correctly/incorrectly.
- There is a check box option to invert the keyboard controls.
- The hint option shows what the puzzle should look like when complete
| Puzzle Box | ||
Castle |
Maple Tree |
Troll |
Lumbridge Bridge |
General Graardor |
Black Dragon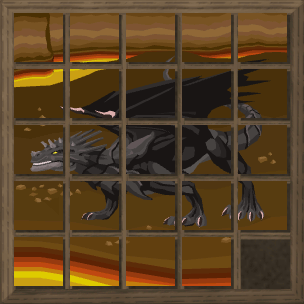 |
Corporeal Beast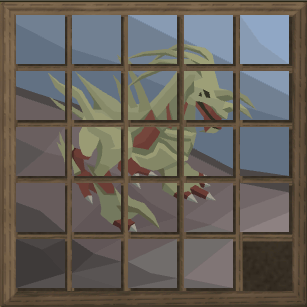 |
Araxxor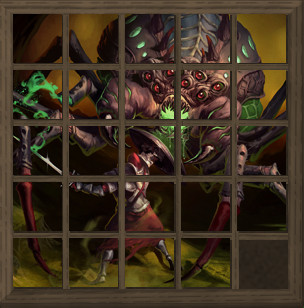 |
Archers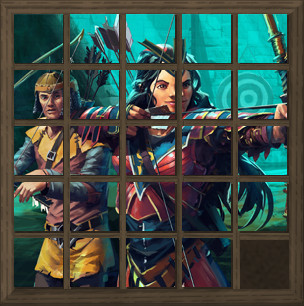 |
Wyvern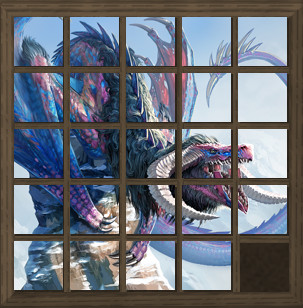 |
Elves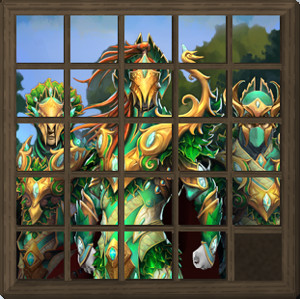 |
Gregorovic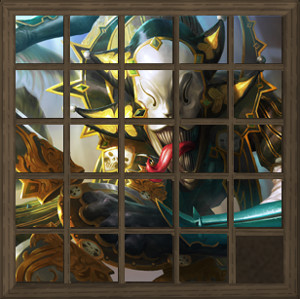 |
Nomad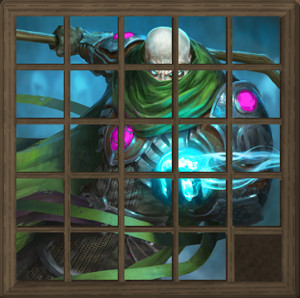 |
Sword of Edicts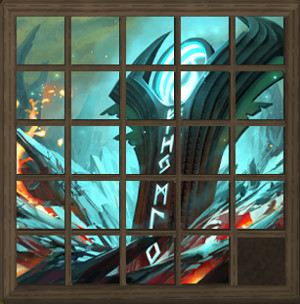 |
Tuska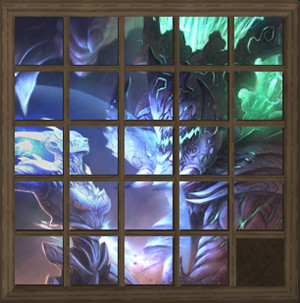 |
Vanstrom Klause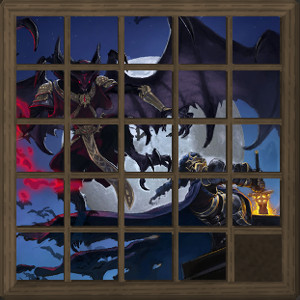 |
V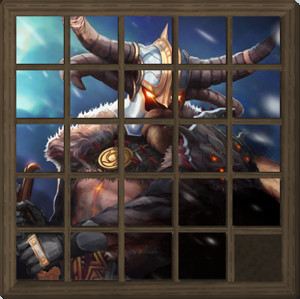 |
Adventurer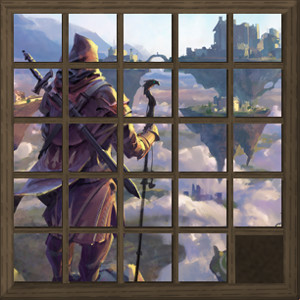 |
Werewolf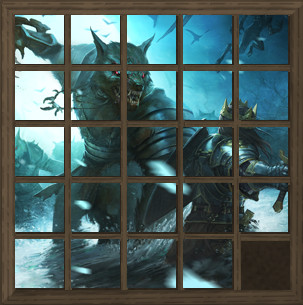 |
Helwyr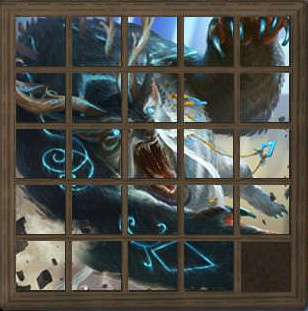 |
Nymora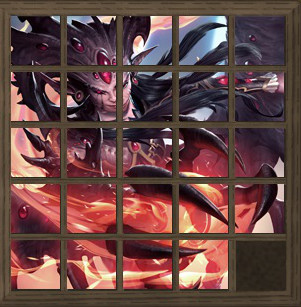 |
Clan Citadel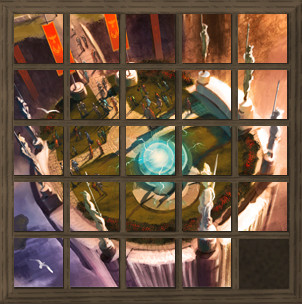 |
Wizard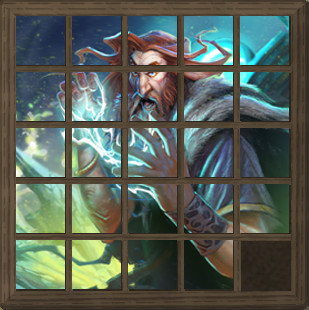 |
Strykwyrm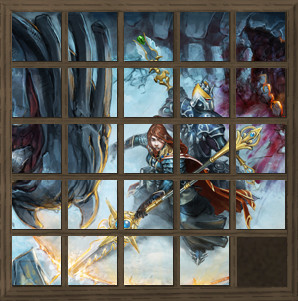 |
| Elite Bloodveld (Only available after finishing You Are It). 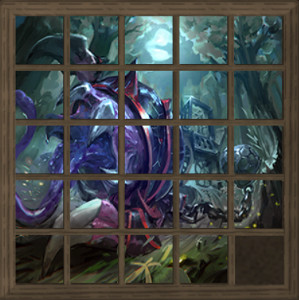 |
Menaphos Warrior |
|
Solving Puzzles:
The following basic technique will help you solve any of the puzzle challenges given to you. The general idea is to start at the top and work your way to the bottom of the puzzle. You only need to learn the order of the pieces and get them in in that order. The first piece correctly placed must be Red 1 (as marked in the image above), then Red 2, and work your way to Pink 5. Getting each section in order is becomes more difficult as you work your way to the end. If you happen to mess around with the puzzle making it unsolvable, then log out and start again.
- Red 12345
- Yellow 12345
- Green 12345
- Blue 1234
- Pink 12345
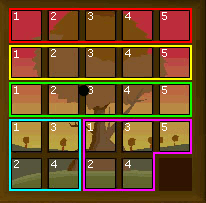
If you can follow this technique successfully, the puzzle almost solves itself.
If you are having some difficulties getting pieces in the correct order,
then here are some tips to help you follow the technique laid out in the previous section.
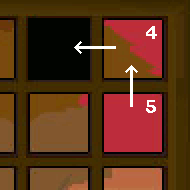
There is no way you will get 4 and 5 in place unless you do them together,
consecutively. You have Red 1, 2, 3, and 4 in position. Unless you have the black space available,
where 5 is meant to go, you cannot get 5 in without moving 4. Therefore, you need to move them both in together.
This may seem very obvious but is the hardest step of a puzzle, especially near the end. Here is an example.
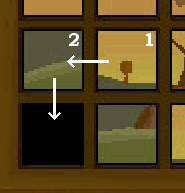
Here are Blue 1 and 2. Once you get to this stage it is becoming easier to solve the puzzle.
However again, the position shown is essential. Moving pieces around lots of times often helps.
Do not stick to moving only the pieces you need to place, move every unplaced piece.
Sometimes it is worthwhile, to move pieces that you have already placed correctly according to the basic technique.
Sometimes this is necessary so that you can place the blue and pink sections correctly. Do not let yourself get too far backward though.
Just start by undoing one piece at a time to help you. You should only have to move a couple of pieces to give yourself room to maneuver.
When working in the blue and pink areas, think of putting the pieces in the correct order by rotating clockwise or counterclockwise.
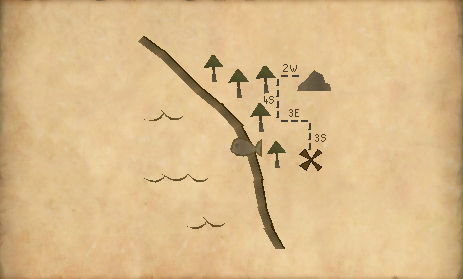
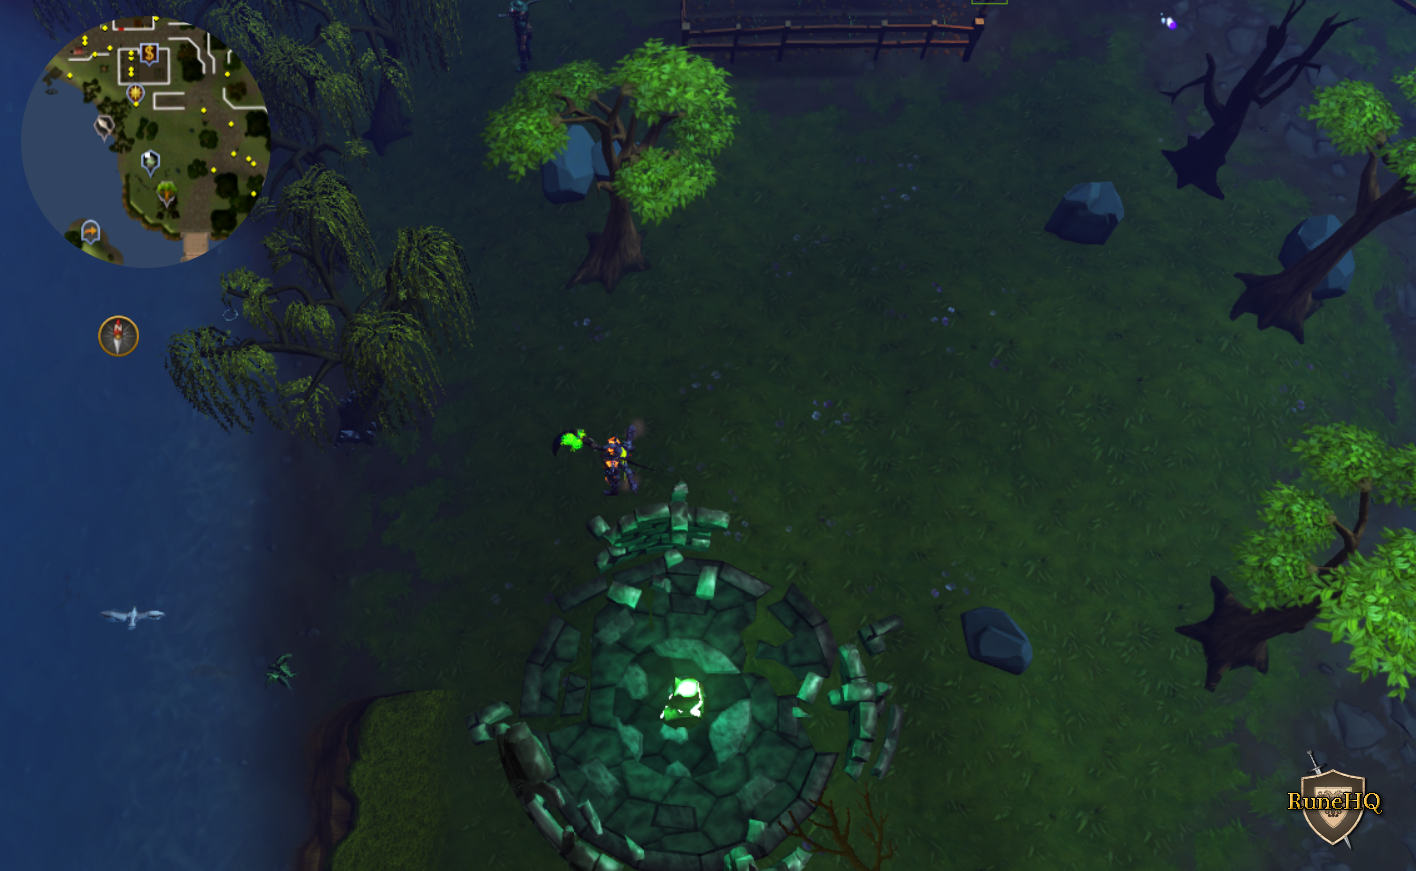
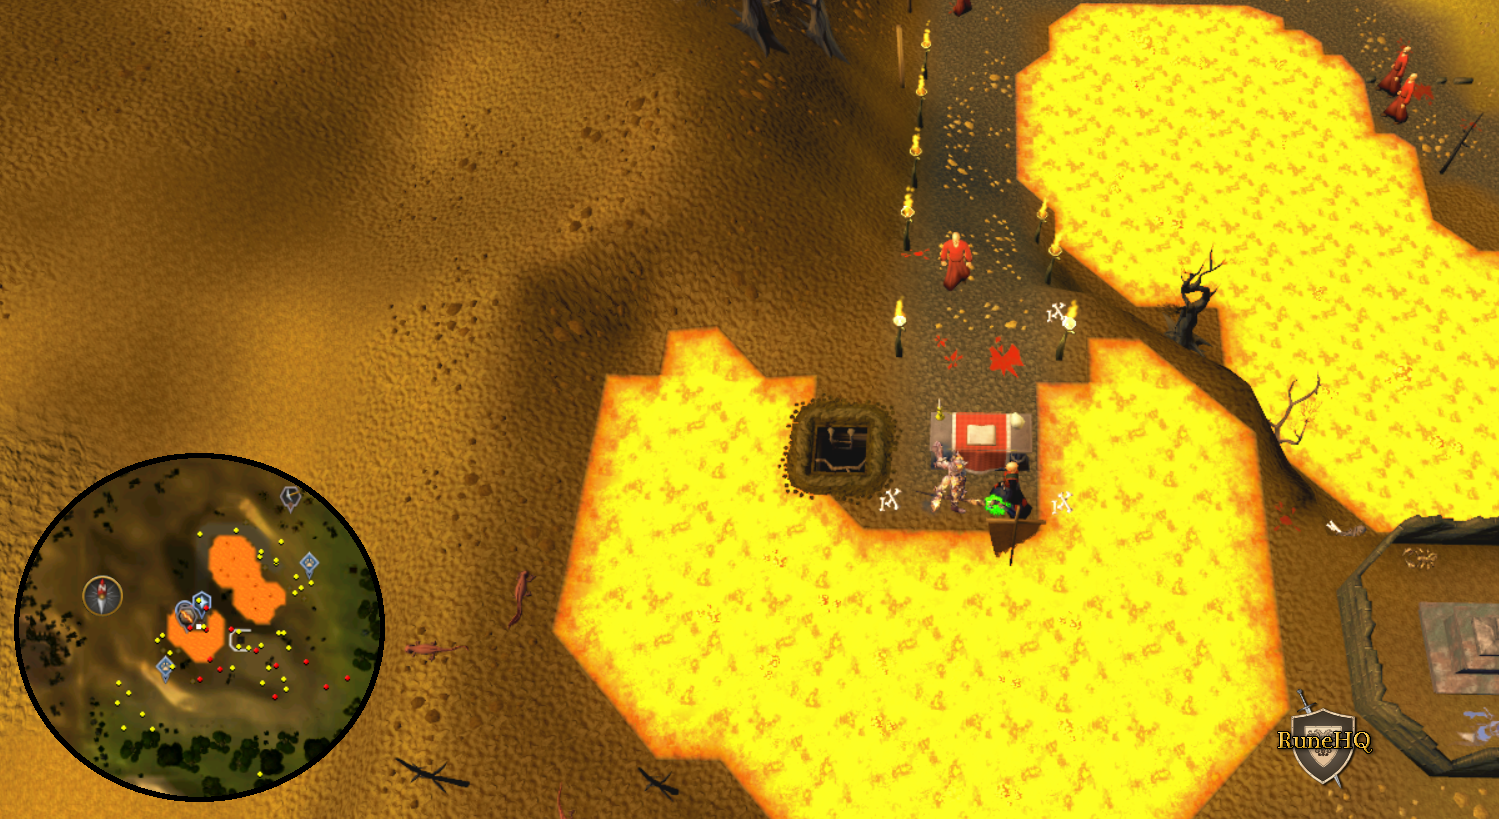
The coordinate clues are based on a system where you need to move a certain distance North or South and then a certain distance East or West. The center of the system is the Observatory North of CastleWars. These coordinates for the center location are 00 min North/South and 00 degrees 00 min East/West. "Min" stands for minutes and each minute is represented in RuneScape by one walkable square. (Note: Meerkat pouches and Fetch casket scrolls can be used to avoid spawning wizards).
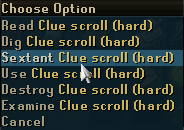
To do a coordinate clue the first thing to do is click on the clue and it will provide you with the coordinates.
Right-click the clue and click "Sextant Clue scroll." It will provide you with your current coordinates as a pop-up window and as text in your client chatbox
(if you do not get the client chatbox info check your chat box settings and change the settings).
Here is an example of how the process works.
For the coordinate clue from the picture above the clue was started at the Karamja lodestone.
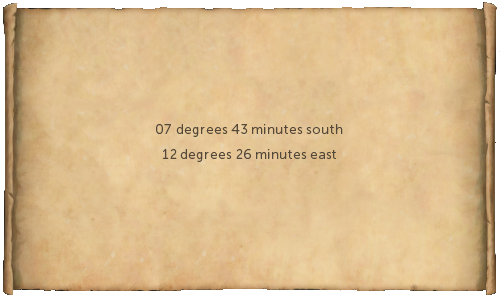
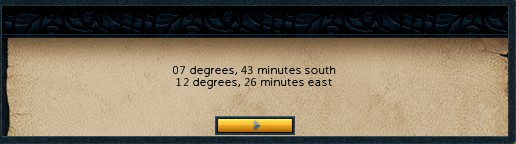
The coordinates we are heading to are:
07 degrees 43 minutes South
12 degrees 26 minutes East
Click the above image to enlarge!
Use the sextant to get your current coordinates and you get these coordinates for the Karamja lodestone.
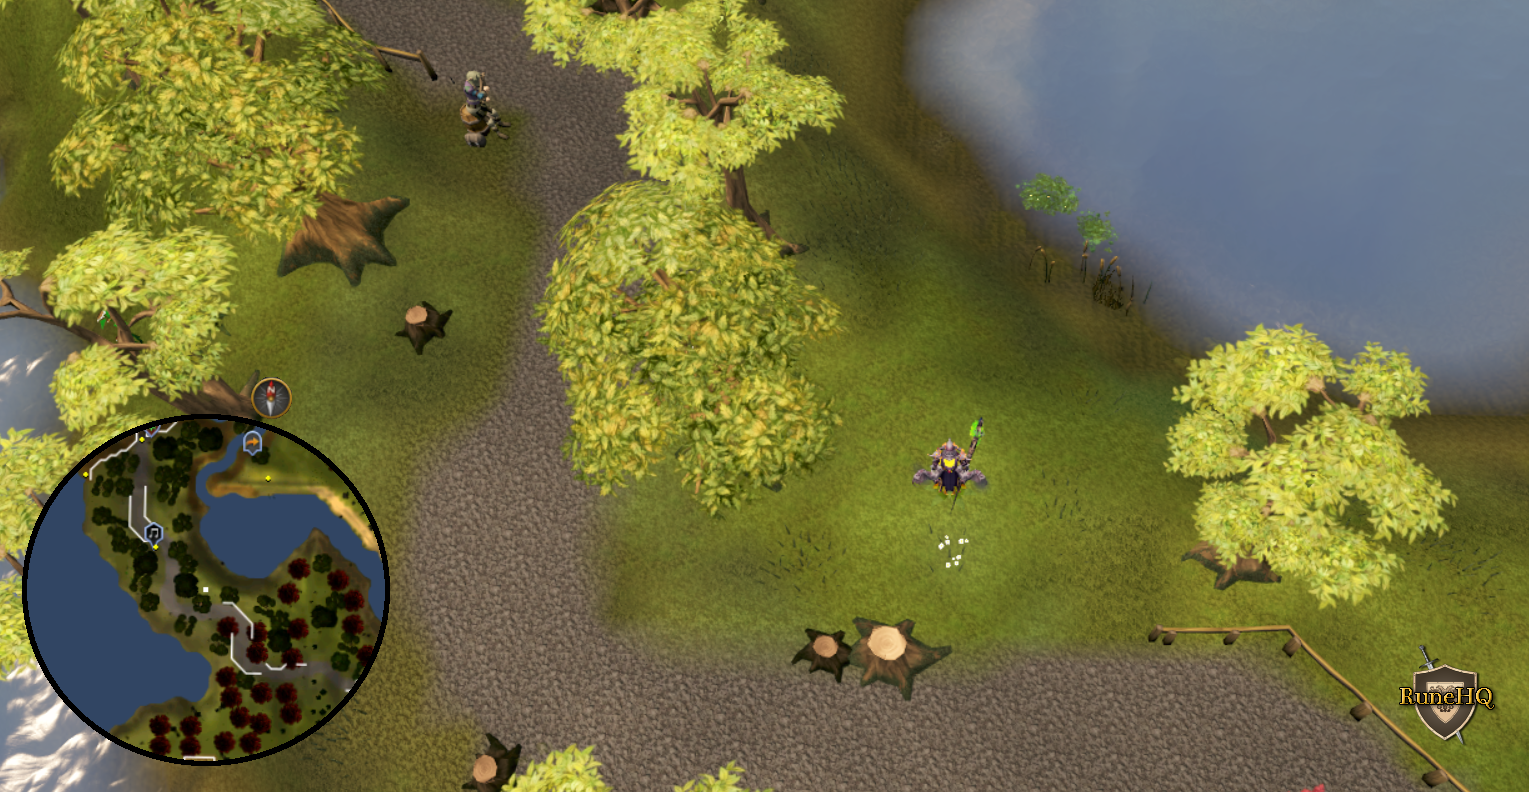
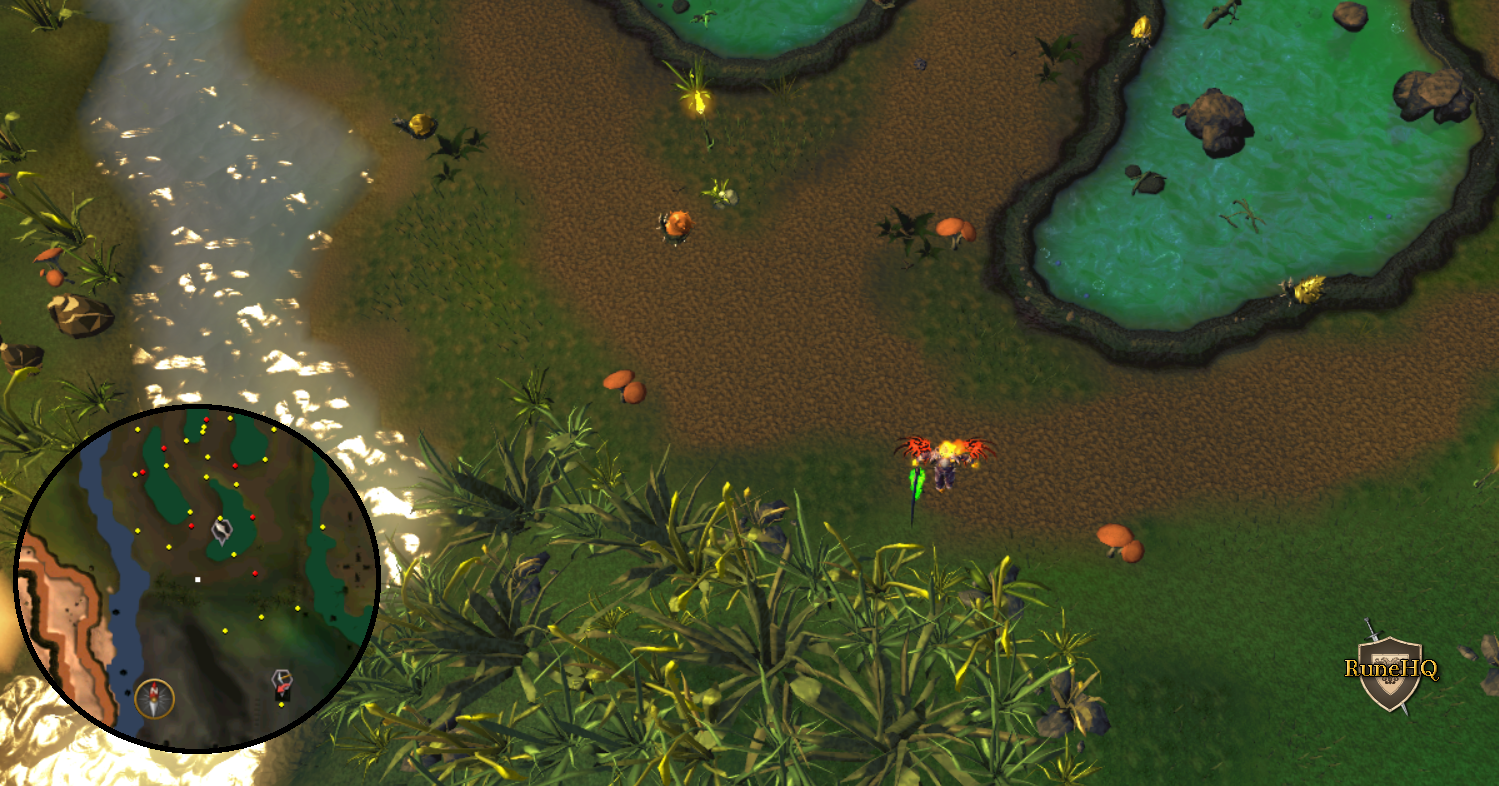
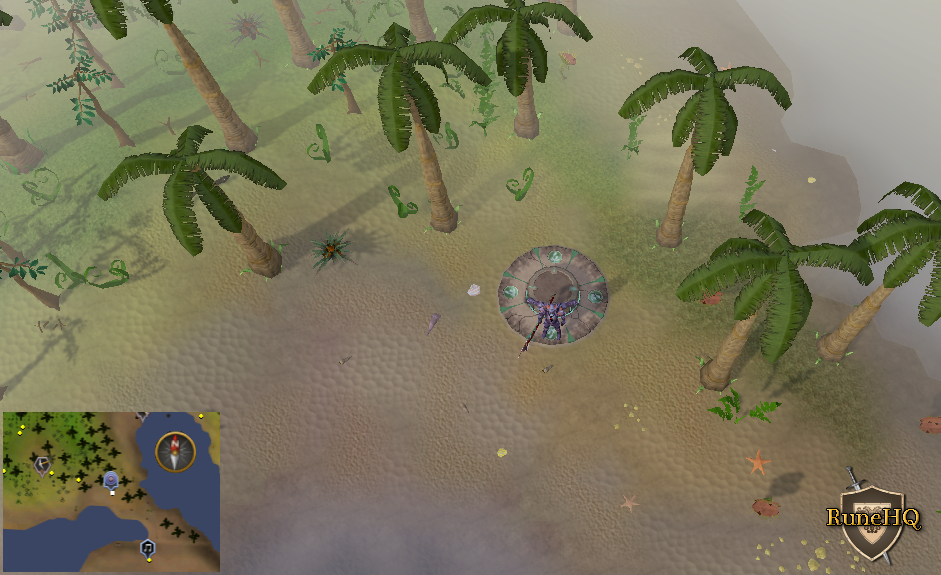
Based off of the coordinates you head East and South. The first stop is just East of the Gleaming Divination spot:

Click the above image to enlarge!
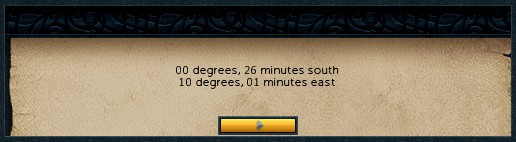
So the first thing you do is check the sextant and it gives the coordinates:
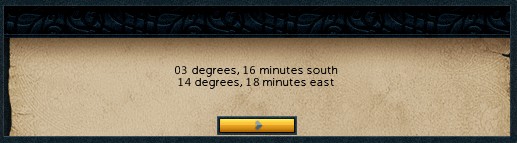
This means that you need to go around 4 degrees South and 2 degrees West.
Proceed by moving for a while heading South and slightly more East due to the way Karamja is set up we end up at the agility stepping
stones by the waterfall.

Click the above image to enlarge!
The coordinates for this location are:
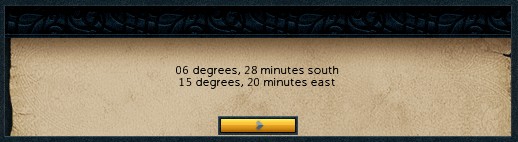
At this point, the North/South coordinate is much closer, but due to Runescape topology,
you first had to move more East to proceed South before you can correct the East/West coordinate.
Proceed by moving South a little but mostly West to just South of Shilo Village.

Click the above image to enlarge!
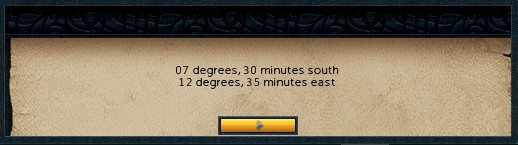
The sextant now shows:

At this point, the North/South coordinate is almost correct. The East/West coordinate still
needs a little adjustment. Keep moving and you are now in the middle of the Karamja Jungle.

Click the above image to enlarge!
Checking the sextant again to get the coordinates:
Now you are very close at this point. Now you can start counting each square you move
as 1 minute and get to the final location:
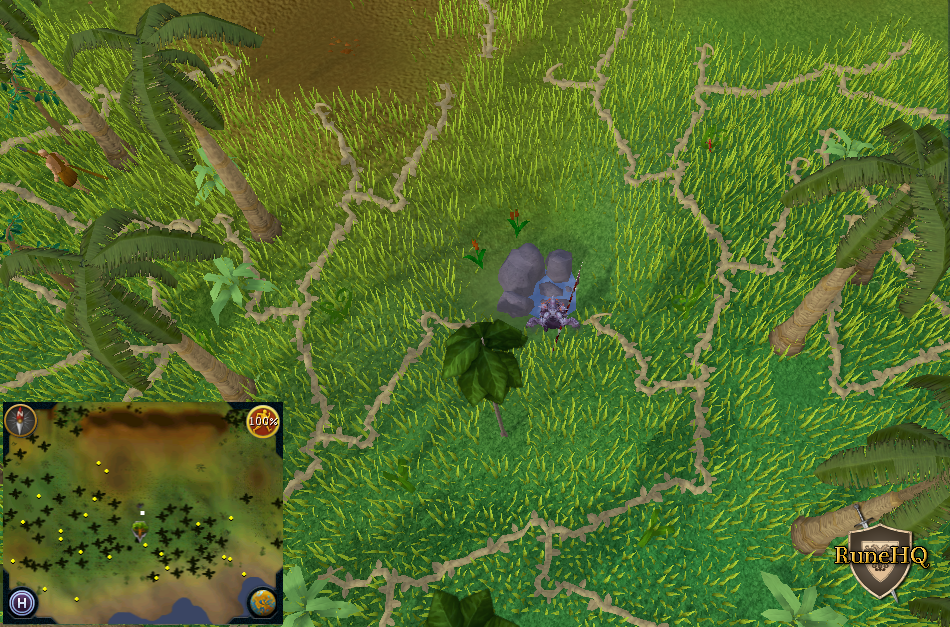
Click the above image to enlarge!
We check the sextant to make sure and they match.
Once the coordinates match choose the right-click option dig or use the Meerkat pouch
to dig and avoid the wizard.
The chart below provides the location of the coordinate clues. They are in numerical order based on the coordinates given. The fasted way to find the coordinates it to use "CTRL + F" and search by the first set of degree and minute given.
Degrees North or South
| ▣ | 00 Degrees | ▣ | 01 Degrees | ▣ | 02 Degrees | ▣ | 03 Degrees |
| ▣ | 04 Degrees | ▣ | 05 Degrees | ▣ | 06 Degrees | ▣ | 07 Degrees |
| ▣ | 08 Degrees | ▣ | 09 Degrees | ▣ | 11 Degrees | ▣ | 12 Degrees |
| ▣ | 13 Degrees | ▣ | 14 Degrees | ▣ | 15 Degrees | ▣ | 16 Degrees |
| ▣ | 17 Degrees | ▣ | 18 Degrees | ▣ | 19 Degrees | ▣ | 20 Degrees |
| ▣ | 21 Degrees | ▣ | 22 Degrees | ▣ | 24 Degrees | ▣ | 25 Degrees |
00 Degrees |
||
| Coordinate | Location | Image |
| 00 degrees 00 minutes North 07 degrees 13 minutes West (00.00 N, 07.13 W) |
Regicide area, North-East of Tyras Camp (near the entrance to his camp, before the thick forest pass) past a stick trap,
dig near the stone towards the back of the pond. You will be attacked by a Saradomin wizard. Closest teleport: Tirannwn quiver 2 or above option 3 otherwise Tirannwn lodestone. |
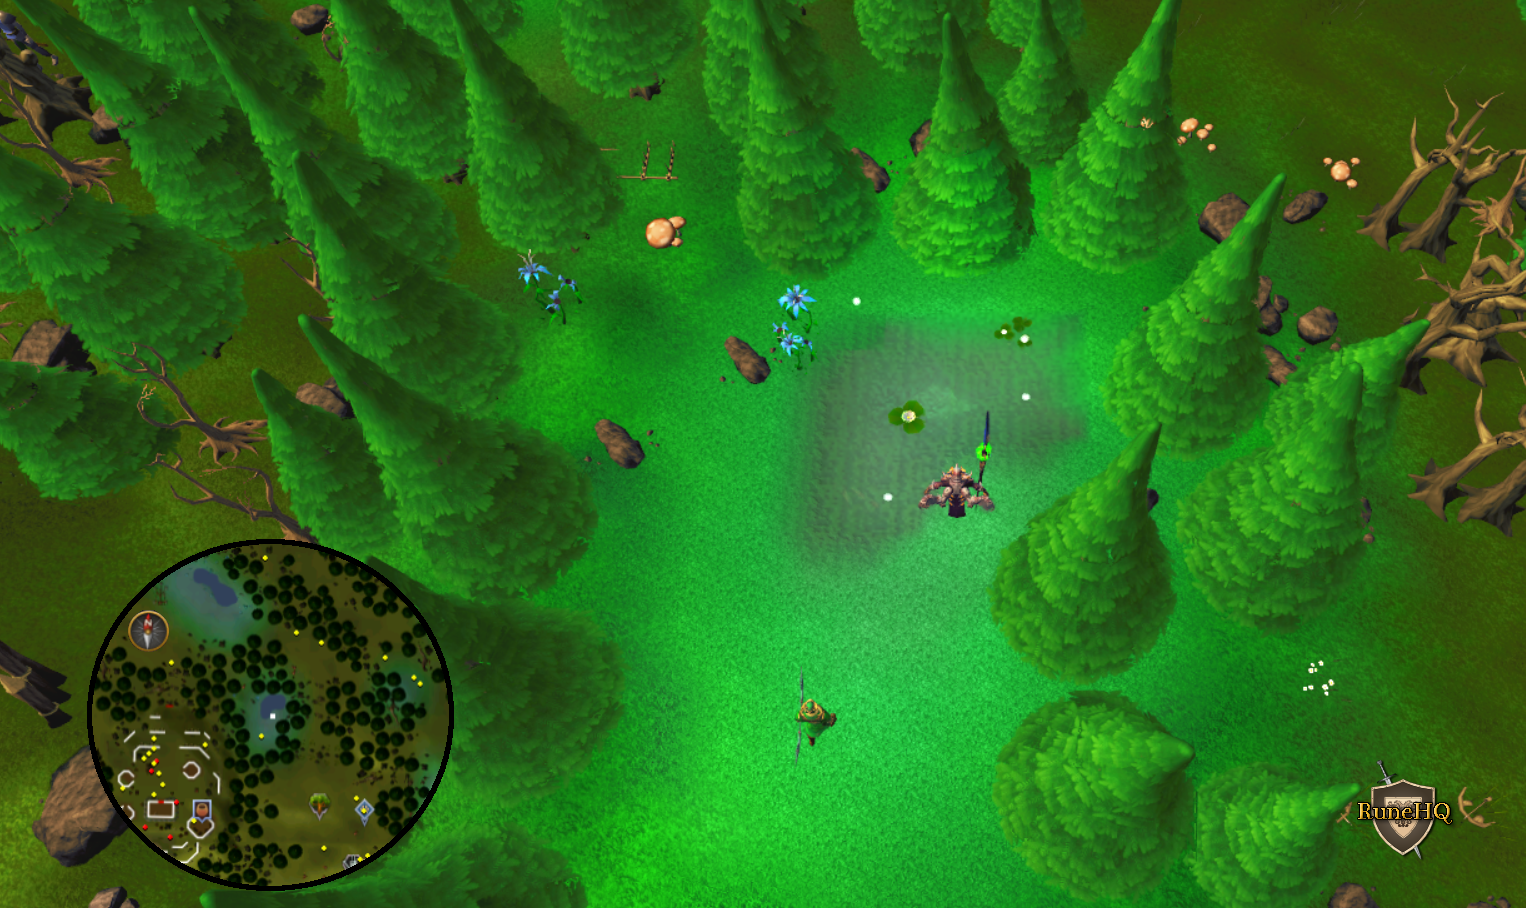
Click the above image to enlarge! 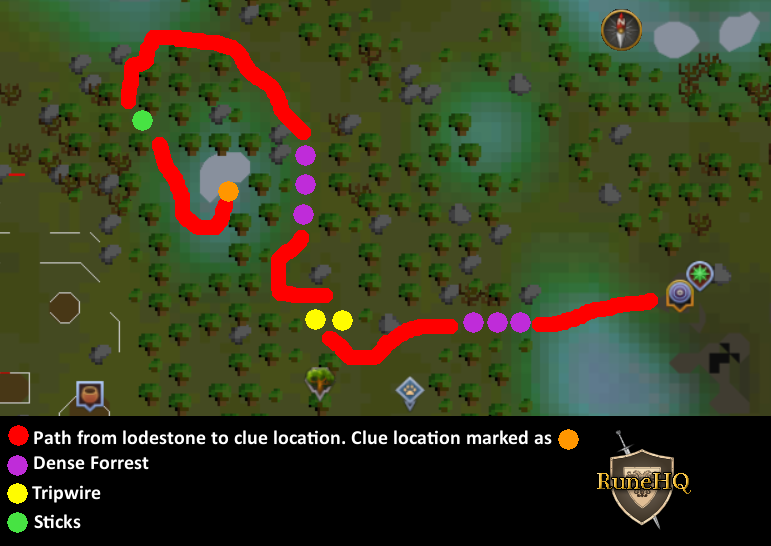
Click the above image to enlarge! |
| 00 degrees 05 minutes South 01 degrees 13 minutes East (00.05 S, 01.13 E) |
East opposite the Observatory, West of Tree Gnome Village - Dig on the SouthWest side of the Lonely Willow Tree |
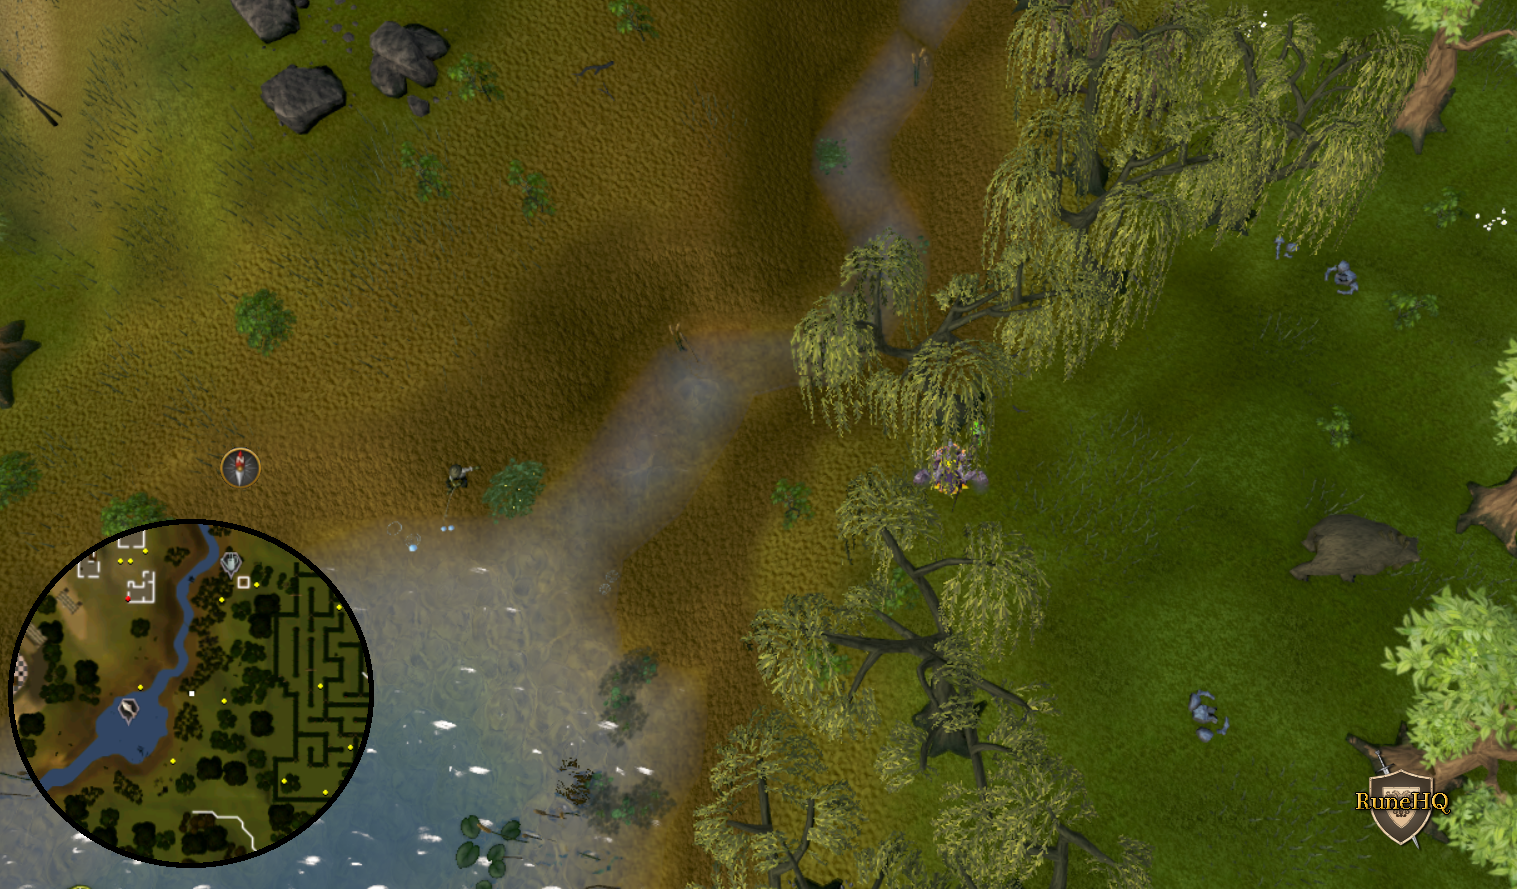 Click the above image to enlarge! |
| 00 degrees 13 minutes South 14 degrees 00 minutes East (00.13 S, 14.00 E) |
Between two small ponds on Musa Point, just West of the General Store. | 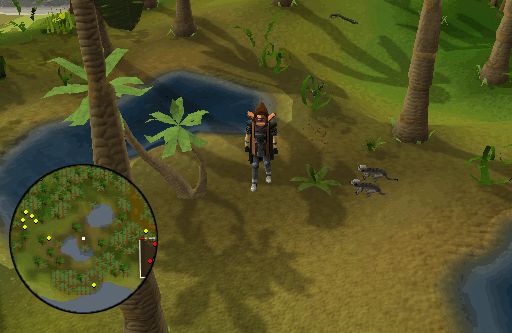 Click the above image to enlarge! |
| 00 degrees 18 minutes South 09 degrees 28 minutes East (00.18 S, 09.28 E) |
South-West of Brimhaven, just South of the entrance to Brimhaven Dungeon. Closest teleport: Karamja Lodestone |
 Click the above image to enlarge! |
| 00 degrees 20 minutes South 23 degrees 15 minutes East (00.20 S, 23.15 E) |
In Lumbridge swamp, at the Lost City quest start. Closest teleport: 'Chipped' Lumbridge teleport. |
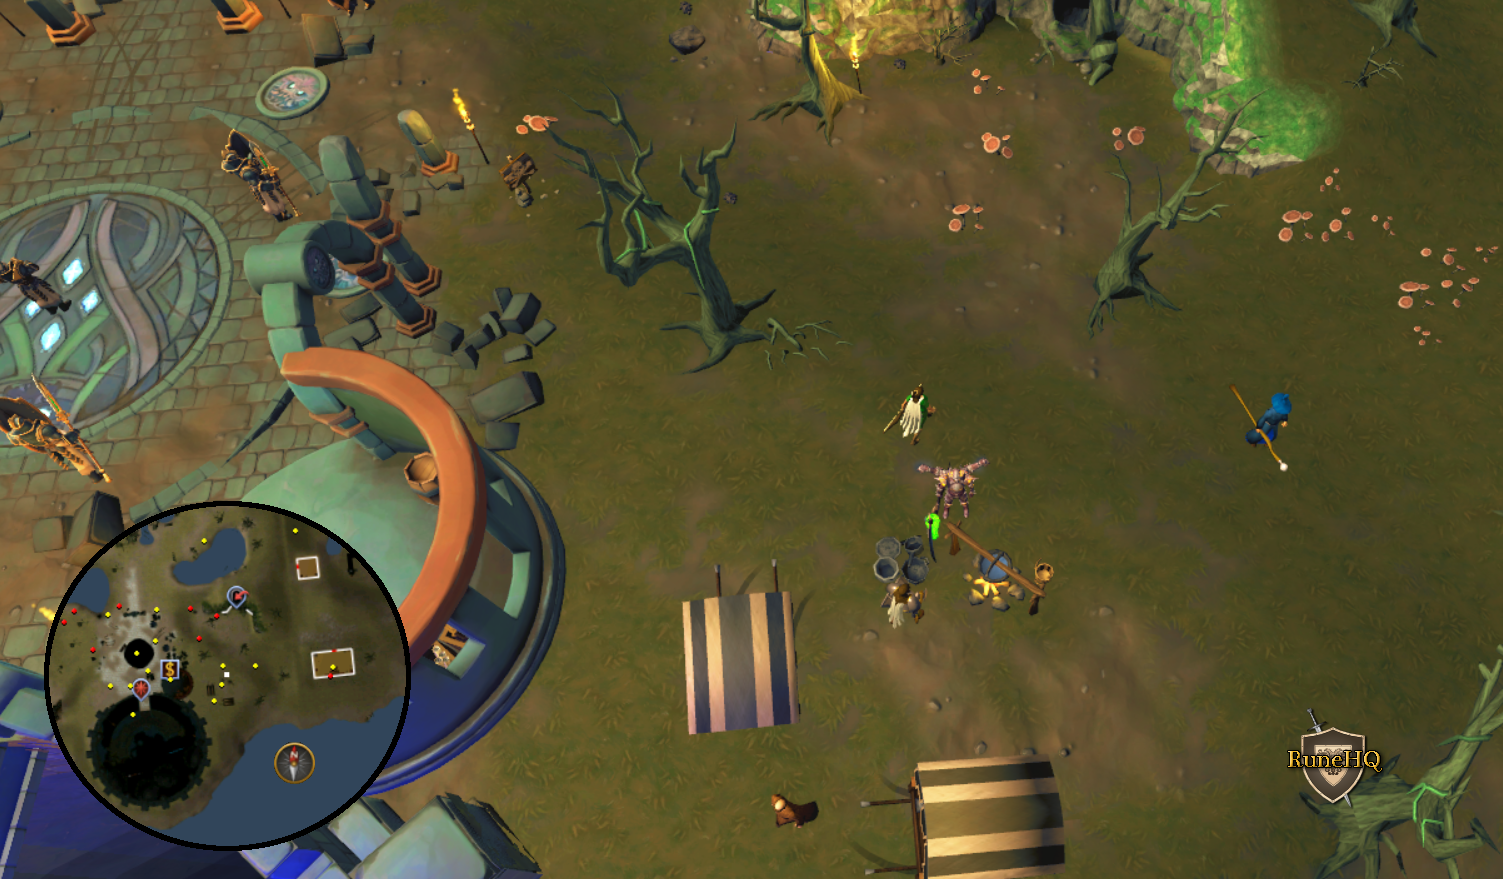 Click the above image to enlarge! |
| 00 degrees 50 minutes North 24 degrees 16 minutes East (00.50 N, 24.16 E) |
Lumbridge swamps, one step North of The Nexus' North pillar. Closest teleport: Enlightened amulet option 1 or 'Chipped' Lumbridge teleport. |
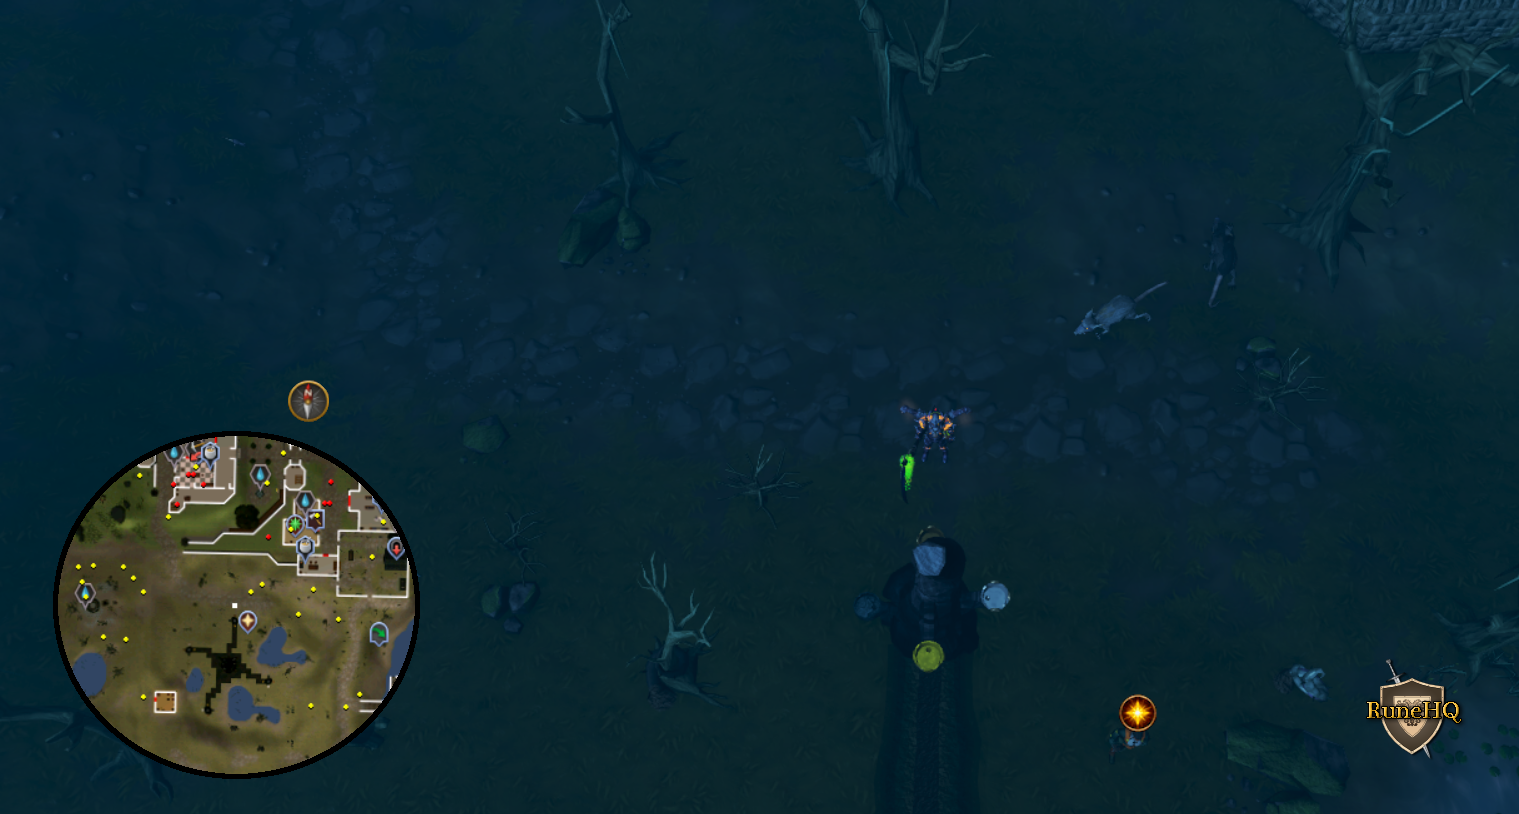 Click the above image to enlarge! |
| 00 degrees 31 minutes South 17 degrees 43 minutes East (00.31 S, 17.43 E) |
South of the Church located South of Rimmington, West of Port Sarim - Near the entrance to the Ice Caves | 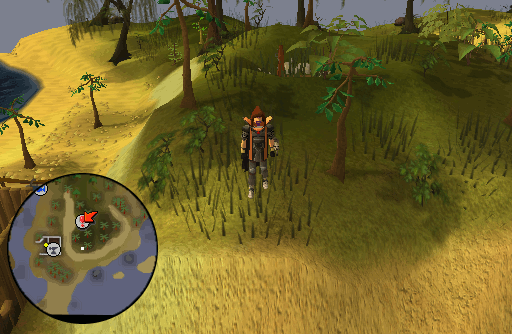 Click the above image to enlarge! |
| 00 degrees 52 minutes North 00 degrees 58 minutes East (00.52 N, 00.58 E) |
Goblin area North East of the Observatory, dig outside of the North East building. |  Click the above image to enlarge! |
| 00 degrees 54 minutes North 00 degrees 09 minutes East (00.54 N, 00.09 E) |
North East corner of the Observatory office building. | 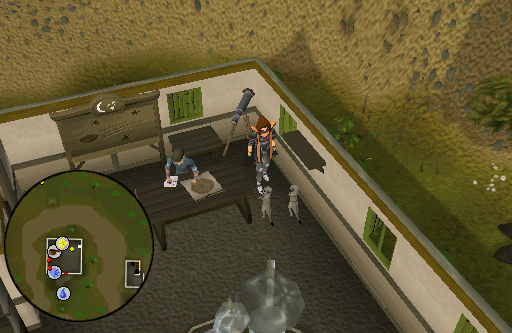 Click the above image to enlarge! |
01 Degrees |
||
| Coordinate | Location | Image |
| 01 degrees 18 minutes South 14 degrees 15 minutes East (01.18 S, 14.15 E) |
On top of the seaweed spawn, near Tiadeche, East of the harpie bug swarms across the river with the log in it. North of the fairy ring in Karamja, D K P |
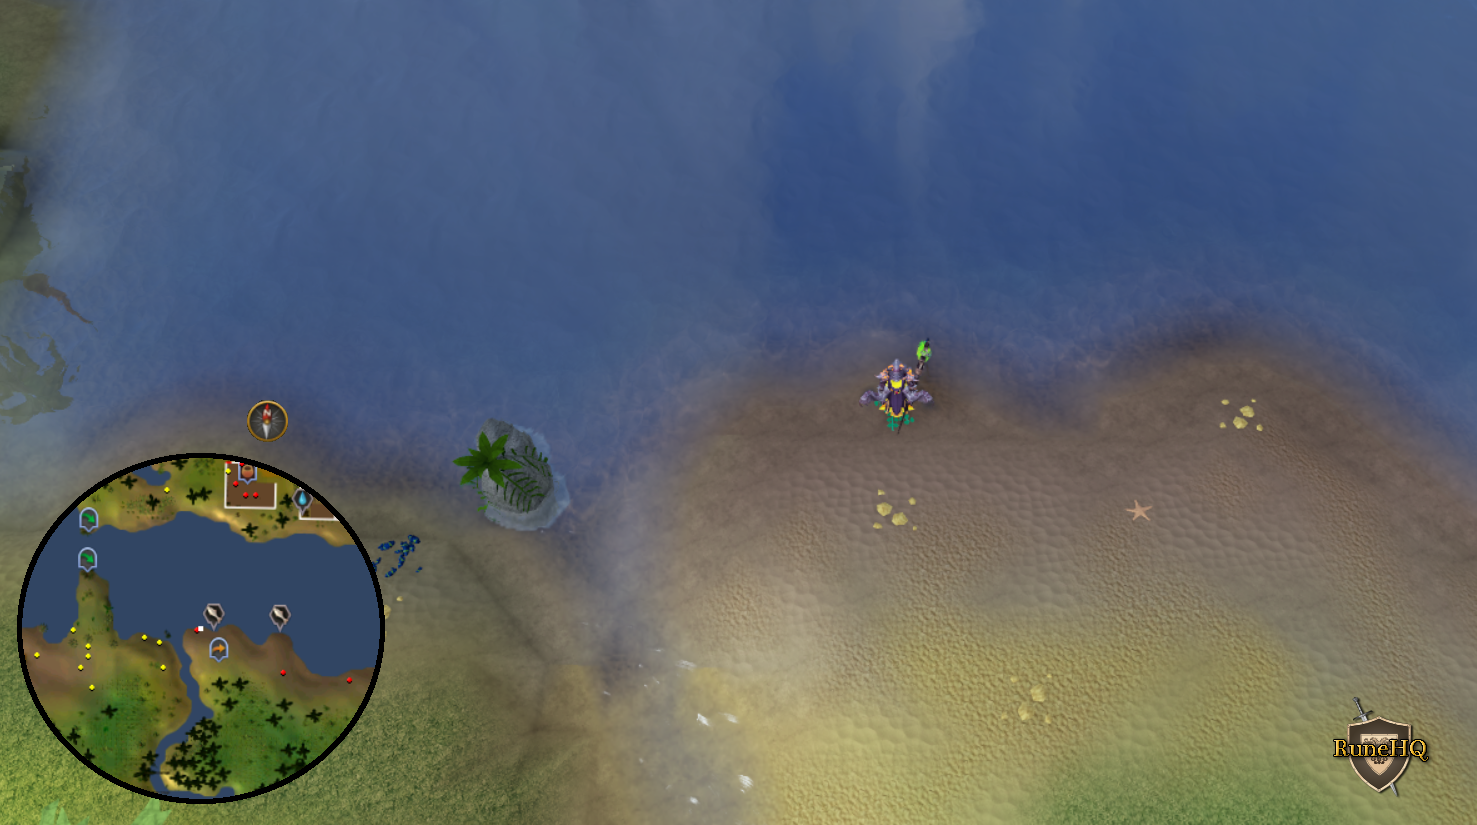 Click the above image to enlarge! |
| 01 degrees 24 minutes North 08 degrees 05 minutes West (01.24 N, 08.05 W) |
Regicide quest required. From lodestone go NorthWest, cross leaf trap. Then go NorthWest a little ways then turn and go SouthWest to stick trap. Cross stick trap and spot is just West of the dead tree. See map for path. |
 Click the above image to enlarge! 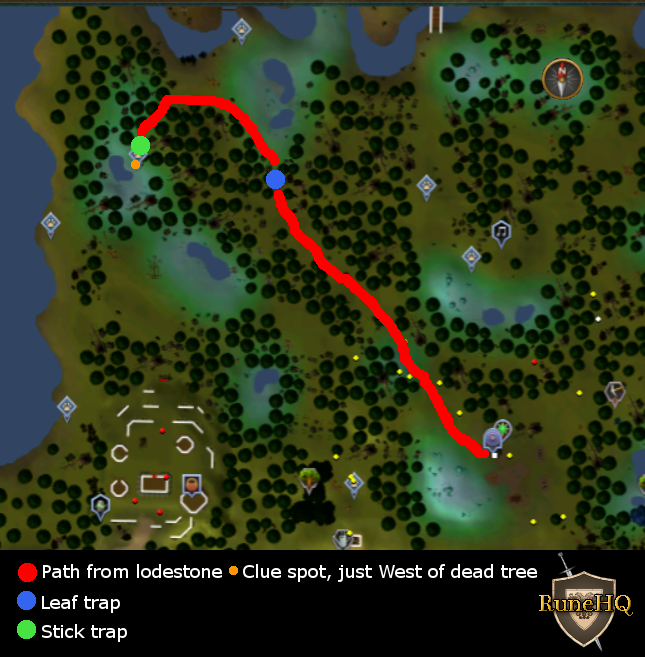 Click the above image to enlarge! |
| 01 degrees 26 minutes North 08 degrees 01 minutes East (01.26 N, 08.01 E) |
In the middle of the Moss Giant Island at its highest point, West of Brimhaven - You will need agility to get there. |
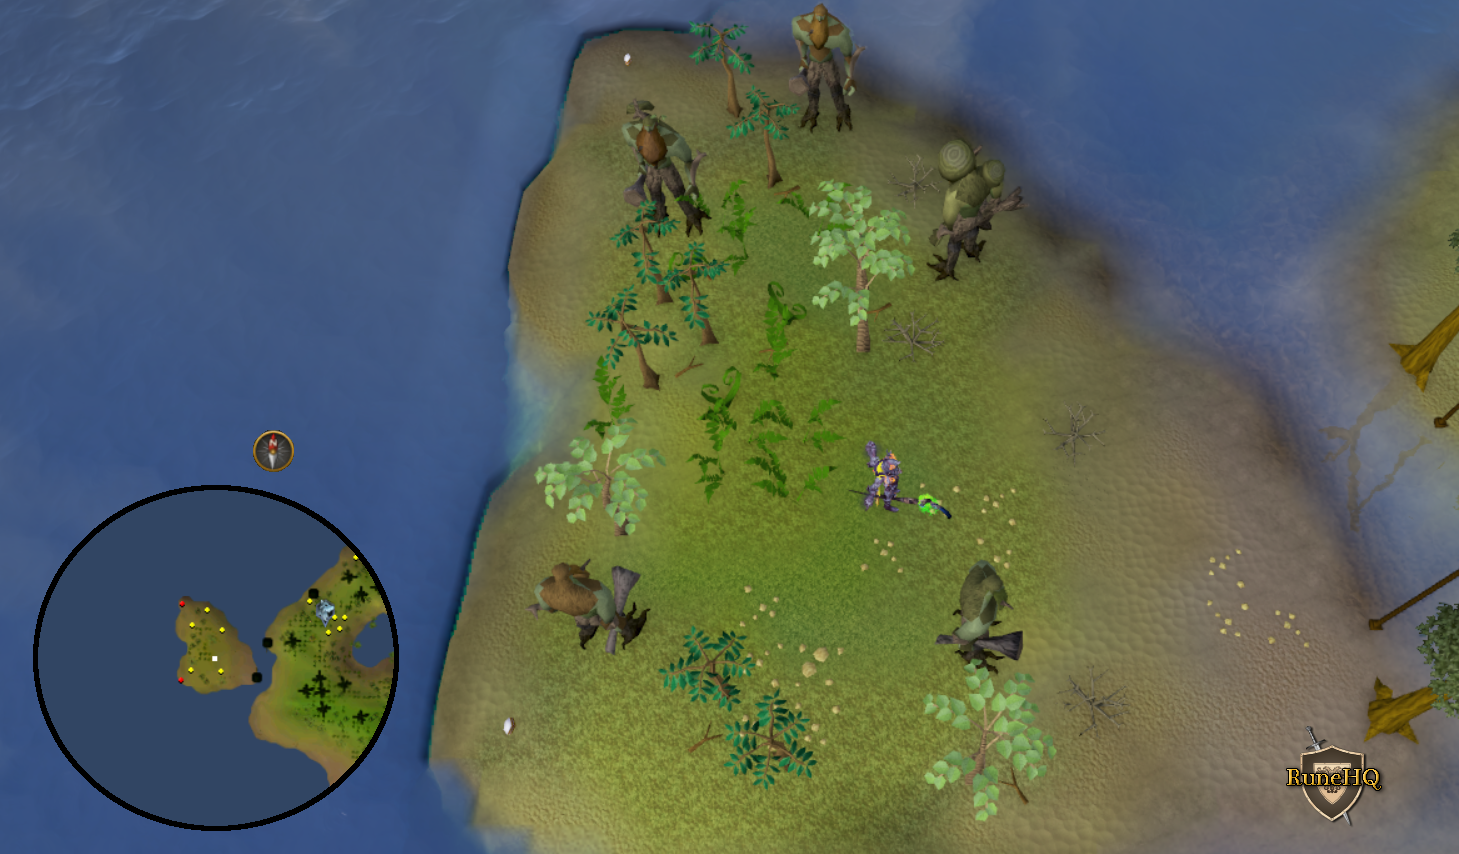 Click the above image to enlarge! |
| 01 degrees 35 minutes South 07 degrees 28 minutes East (01.35 S, 07.28 E) |
The Green Spider island East of Yanille. Closest teleport: Fairy Ring Code C-L-S. |
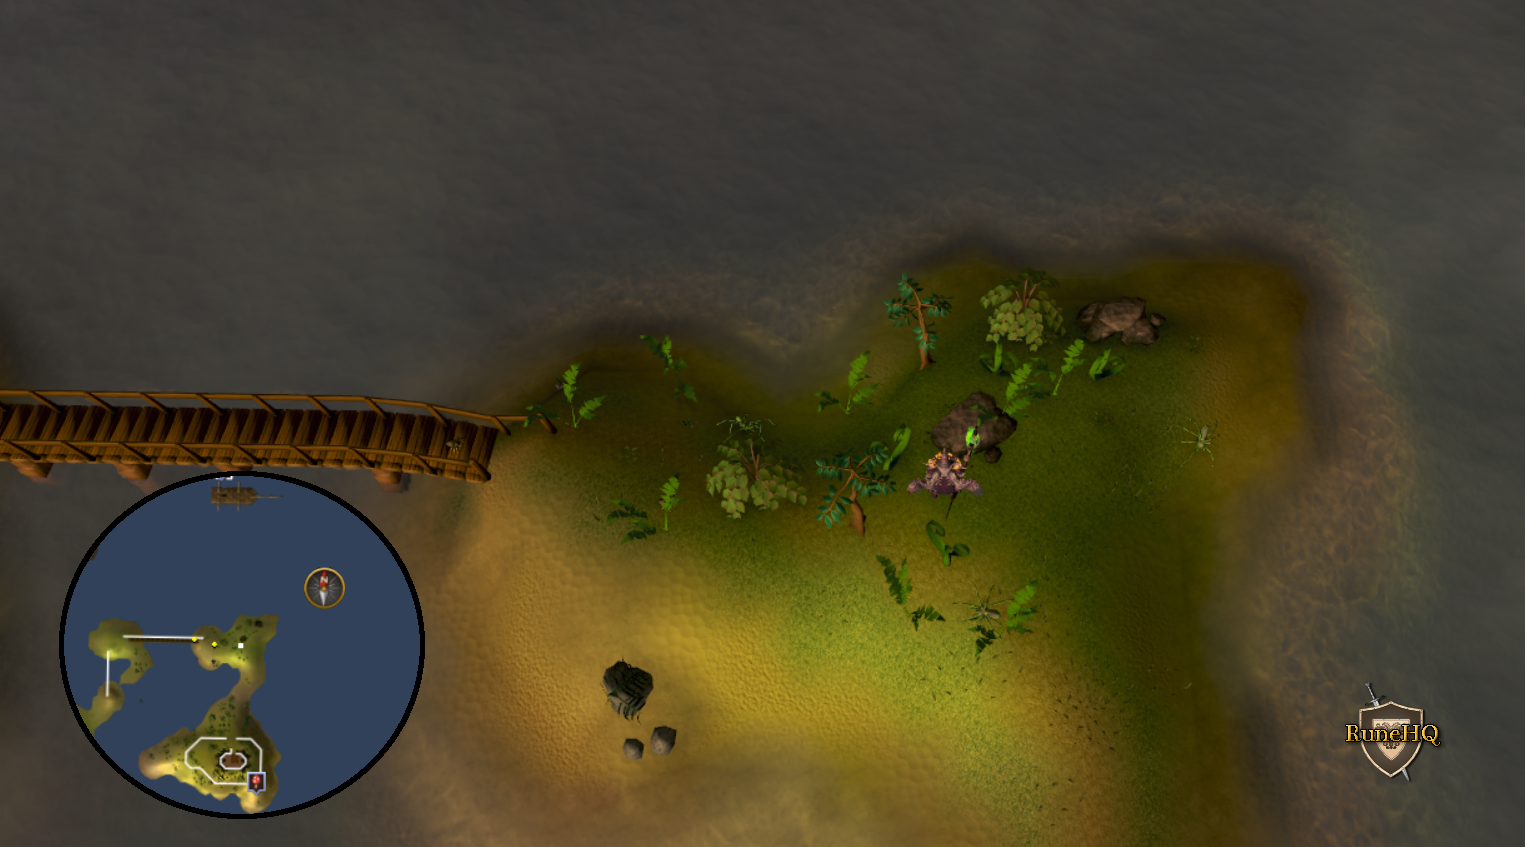 Click the above image to enlarge! |
02 Degrees |
||
| Coordinate | Location | Image |
| 02 degrees 33 minutes North 28 degrees 45 minutes East (02.33 N 28.45 E) |
Het's Oasis. Near the center North of the Statue of Het. You will be attacked by a Saradomin wizard. Closest teleport: Ring of duelling option 1. |
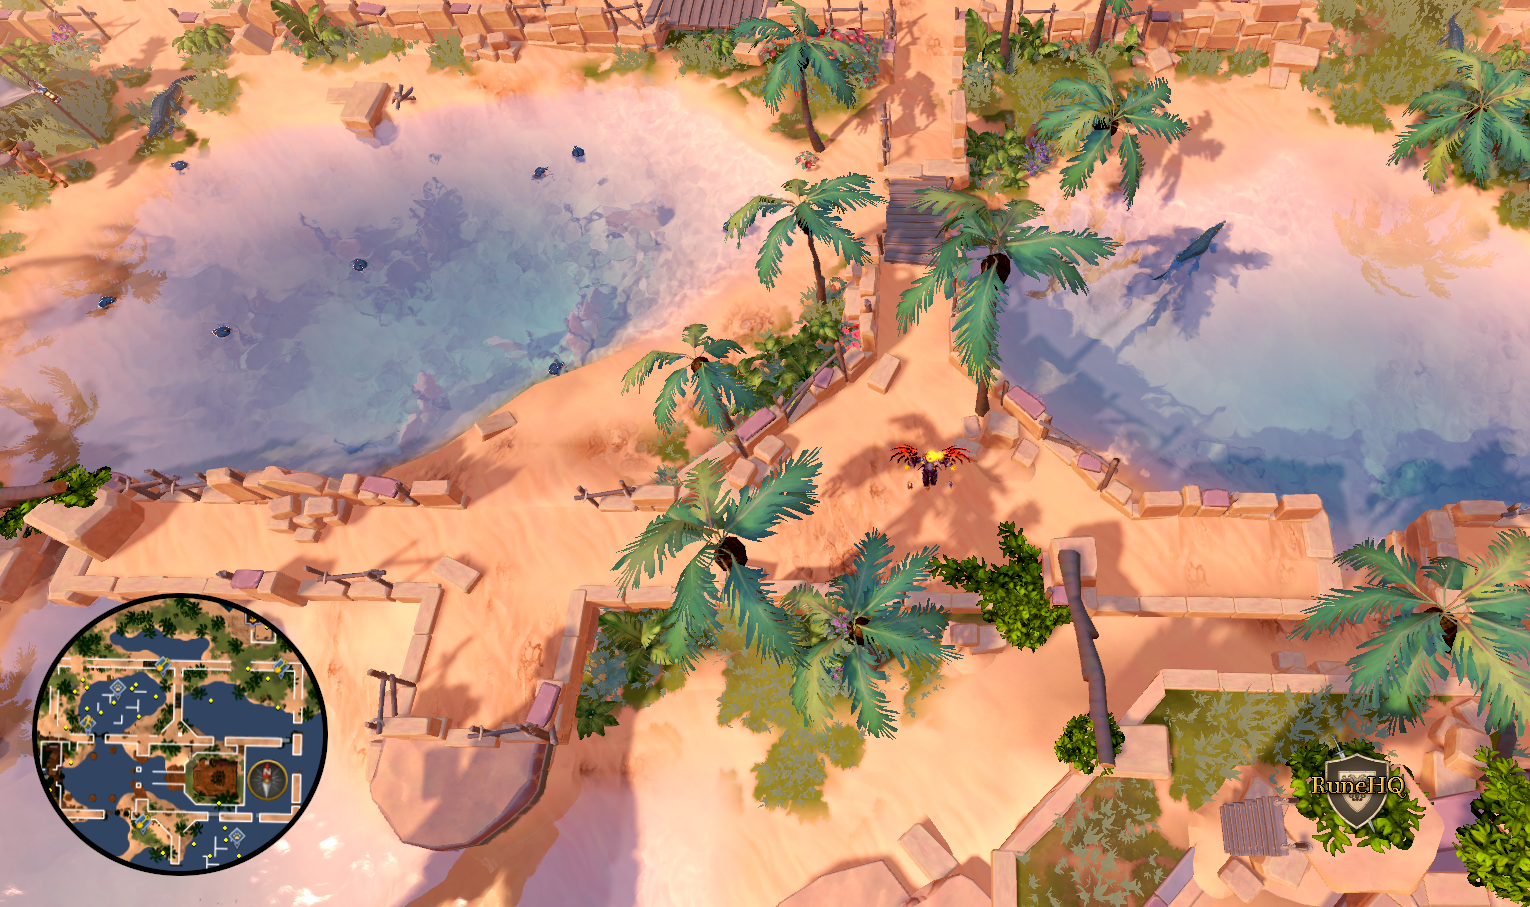 Click the above image to enlarge! |
| 02 degrees 50 minutes North 06 degrees 20 minutes East (02.50 N, 06.20 E) |
South of Ardougne, North of the Necromancer - Dig by the NorthEast side
of the group of 3 willow trees. Closest teleport: Fairy Ring Code D-J-P. |
 Click the above image to enlarge! |
| 02 degrees 50 minutes North 21 degrees 46 minutes East (02.50 N, 21.46 E) |
North-East of Draynor Village jail. Closest teleport: Amulet of glory option 3 |
 Click the above image to enlarge! |
03 Degrees |
||
| Coordinate | Location | Image |
| 03 degrees 03 minutes South 05 degrees 03 minutes East. (03.03 S, 05.03 E) |
South of Yanille, North-East of the Crystal tree on the West side of three bushes in a triangle. You will be attacked by a Saradomin wizard. |
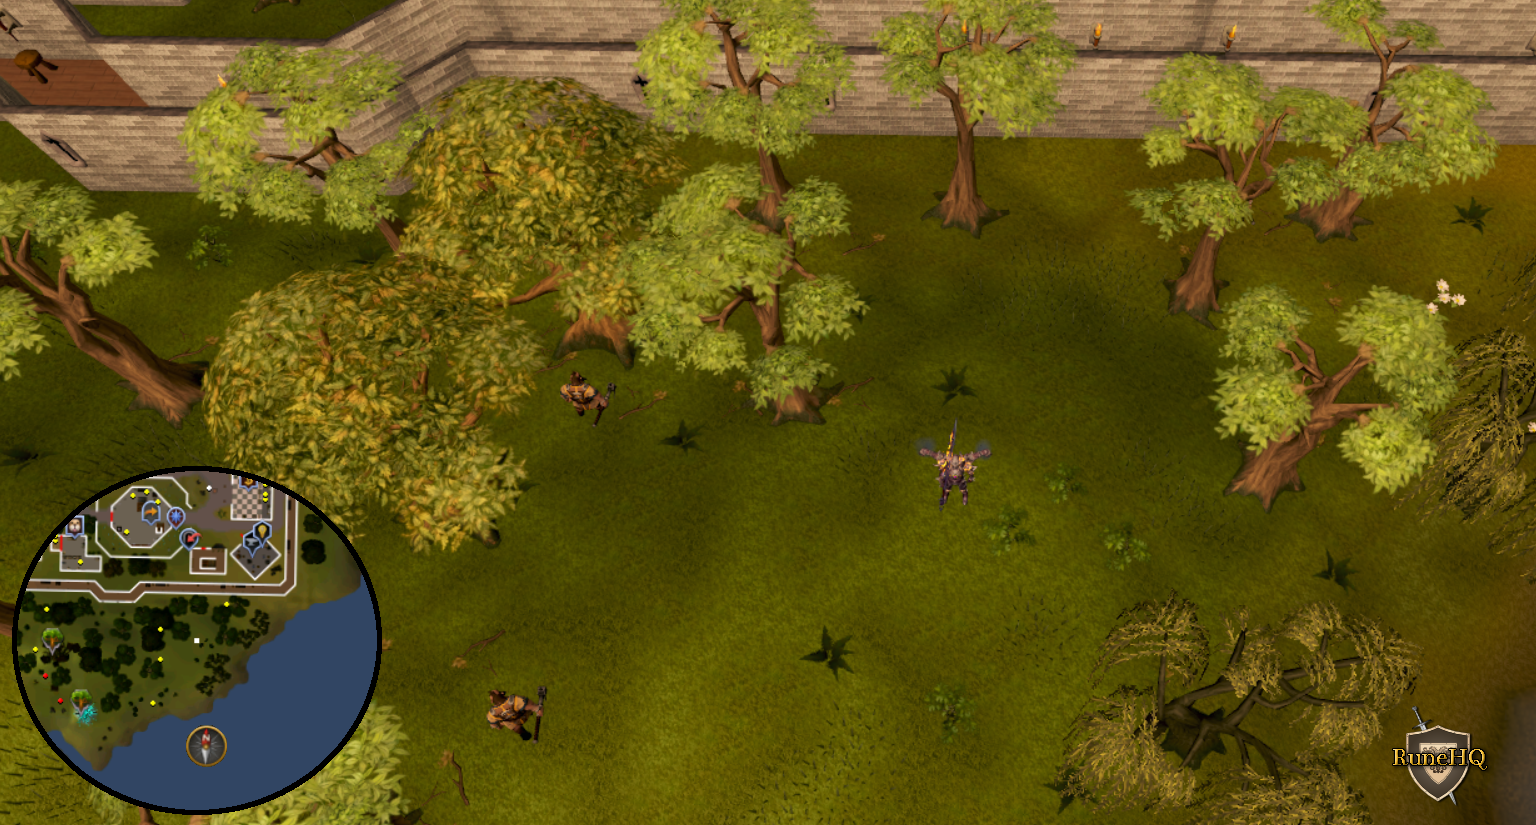 Click the above image to enlarge! |
| 03 degrees 35 minutes South 13 degrees 35 minutes East. (03.35 S, 13.35 E) |
Dig directly West of the Gleaming wisp energy rift Karamja. The spot is located just North of a tree. |
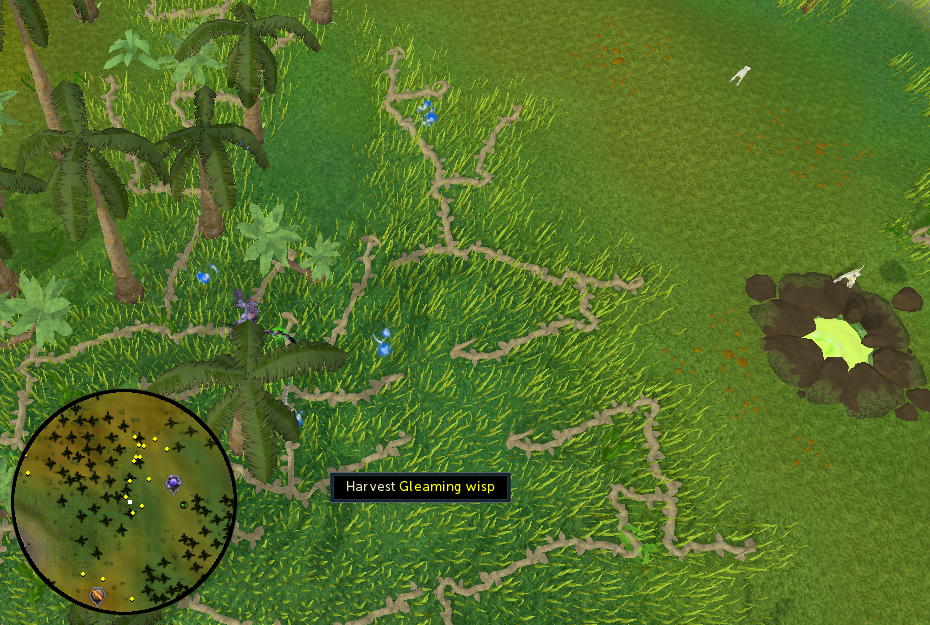 Click the above image to enlarge! |
| 03 degrees 39 minutes South 13 degrees 58 minutes East. (03.39 S, 13.58 E) |
South-West of the Karamja Divination Crater. You will be attacked by a Saradomin wizard. |
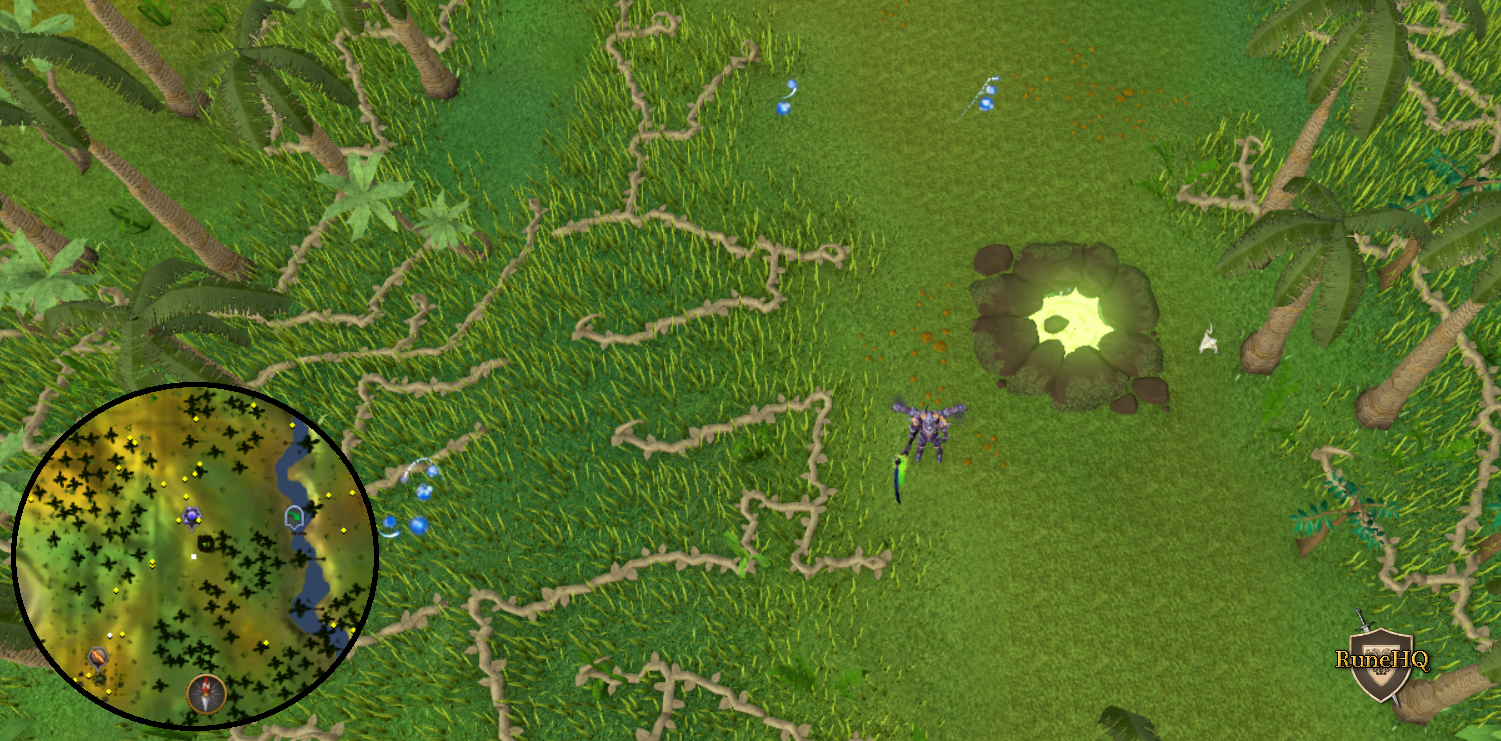 Click the above image to enlarge! |
| 03 degrees 45 minutes South 22 degrees 45 minutes East (03.45 S, 22.45 E) |
North side of the pond in Bedabin Camp. Dig between the two trees. You will be attacked by a Saradomin wizard. |
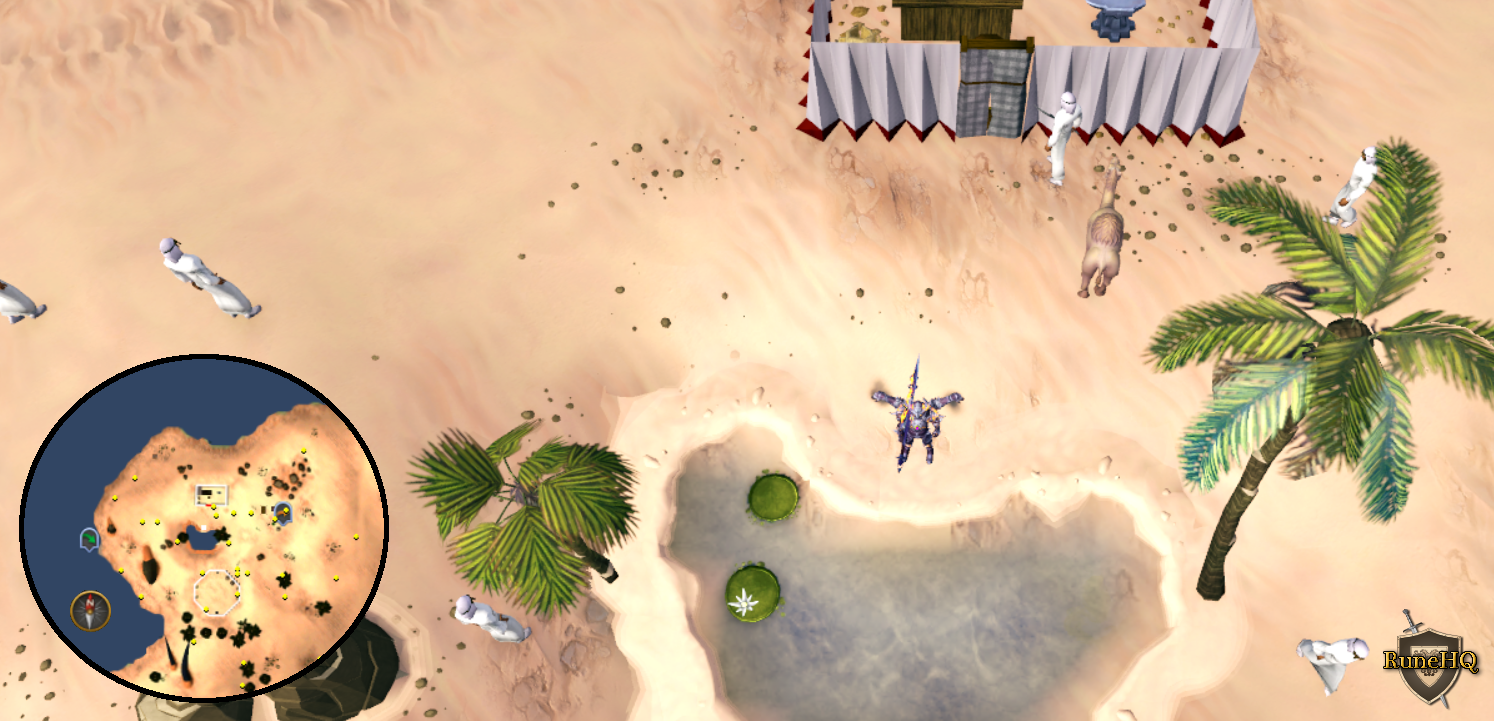 Click the above image to enlarge! |
04 Degrees |
||
| Coordinate | Location | Image |
| 04 degrees 00 minutes South 12 degrees 46 minutes East (04.00 S, 12.46 E) |
In the middle of the Nature Altar mine, North of Shilo Village. Closest teleport: Wicked hood Nature Altar Teleport. |
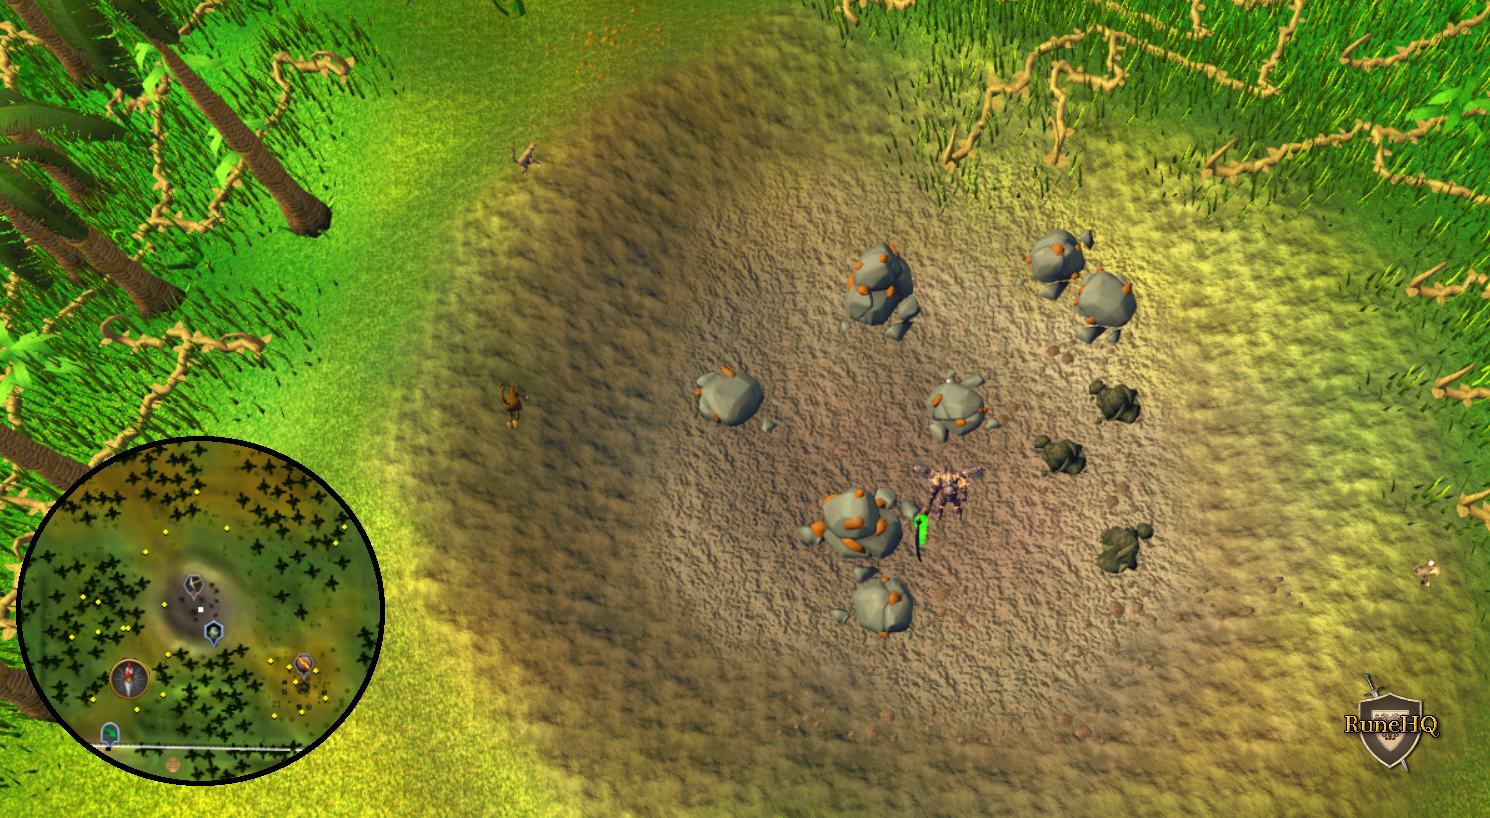 Click the above image to enlarge! |
| 04 degrees 03 minutes Sorth 03 degrees 11 minutes East (04.03 S, .3.11 E) |
It is at the farthest point in the Ogre City of Gu'Tanoth. You take the West path when you enter the main city and follow it, past the battlements and the broken bridge, across 1 final bridge. It is 3 steps West of the Eastern-most bone spawn. You must have either completed or started the Watchtower quest to reach this spot. You will be attacked by a Saradomin wizard. Closest teleport: Gu'Tanoth Teleport. |
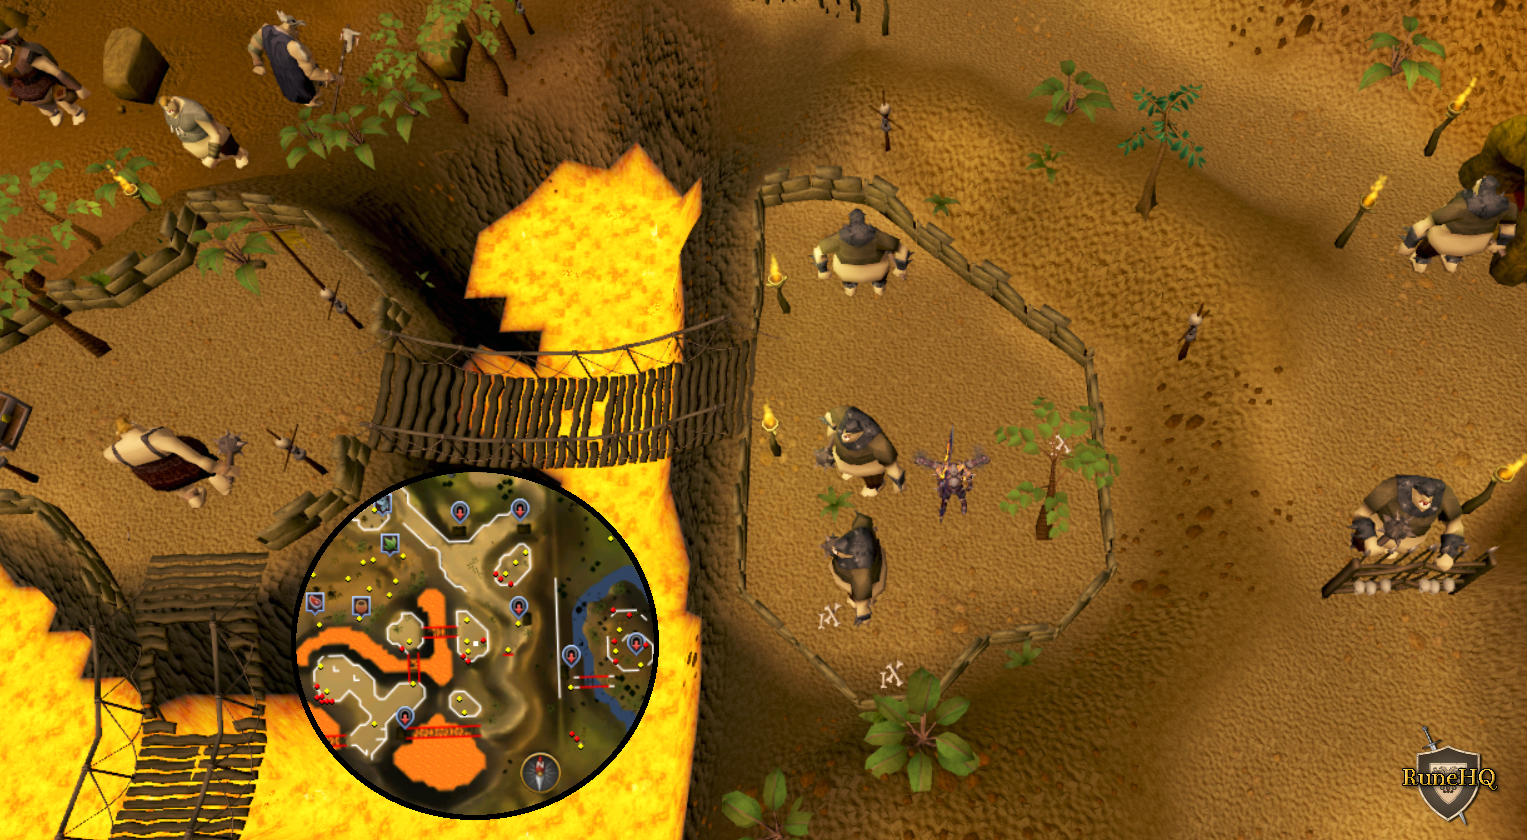 Click the above image to enlarge! 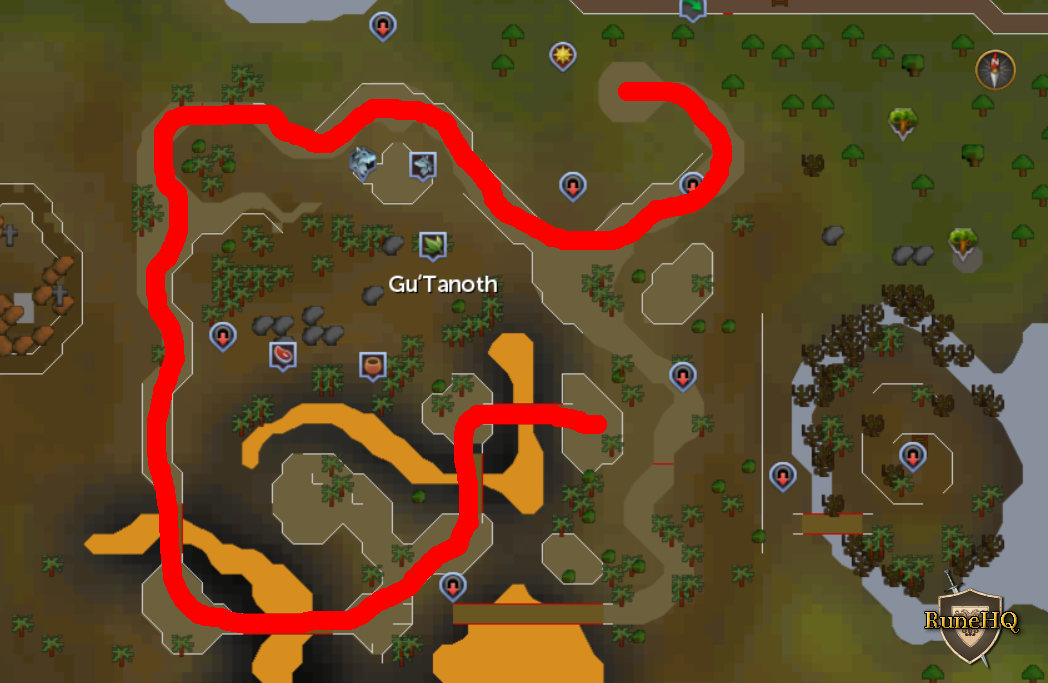 Click the above image to enlarge! |
| 04 degrees 05 minutes South 04 degrees 24 minutes East (04.05 S, 04.24 E) |
On the Ogre island South of Yanille. Enter through the cave entrance, located South of the South-Western corner of Gu'Tanoth. The clue is on the far East side of the island, in the gap of the spear wall. You will be attacked by a Saradomin wizard. Closest teleport: Gnome Glider option 6 then run North-West to cave entrance. |
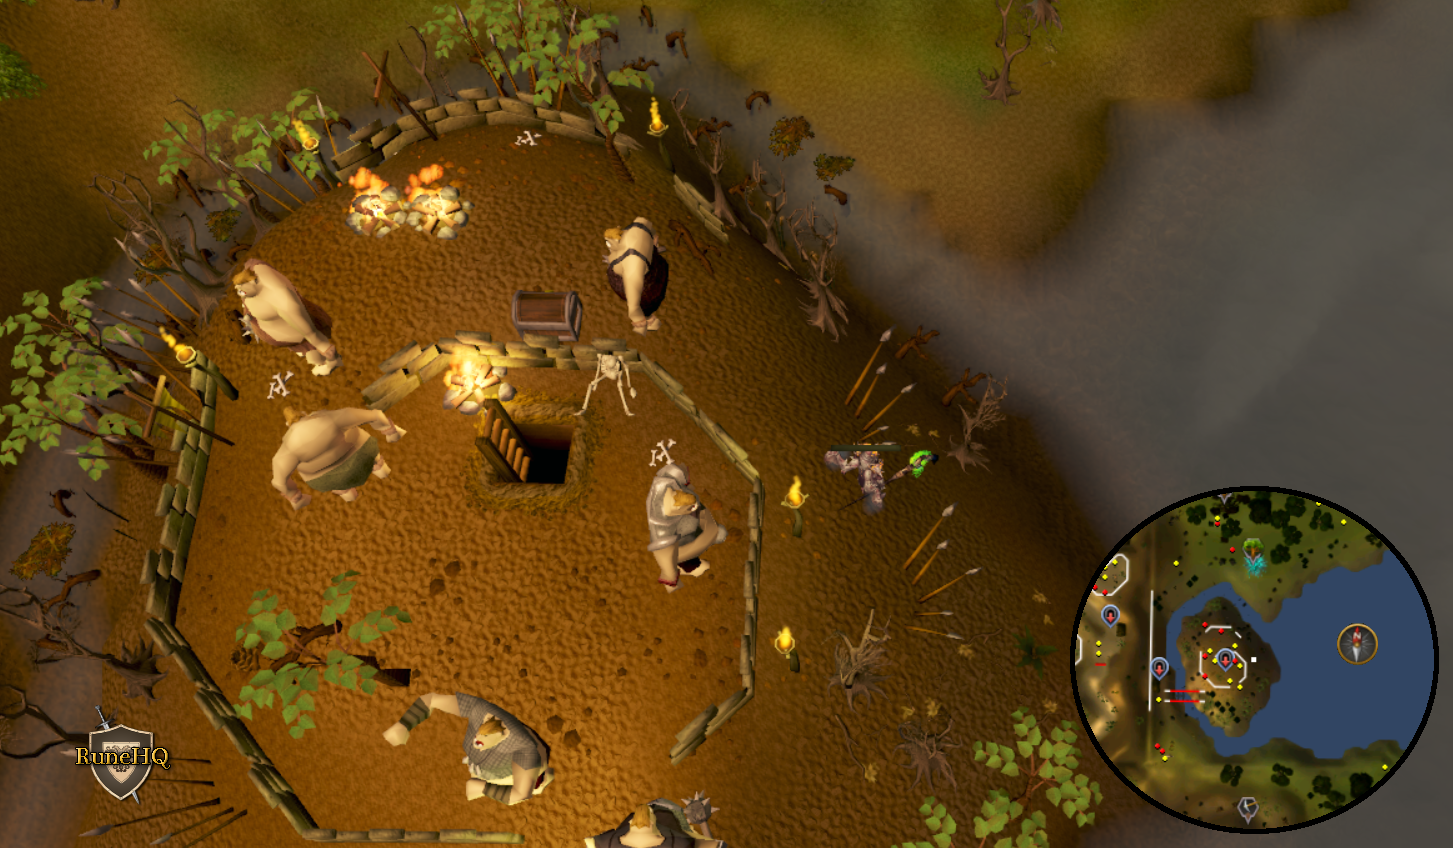 Click the above image to enlarge! 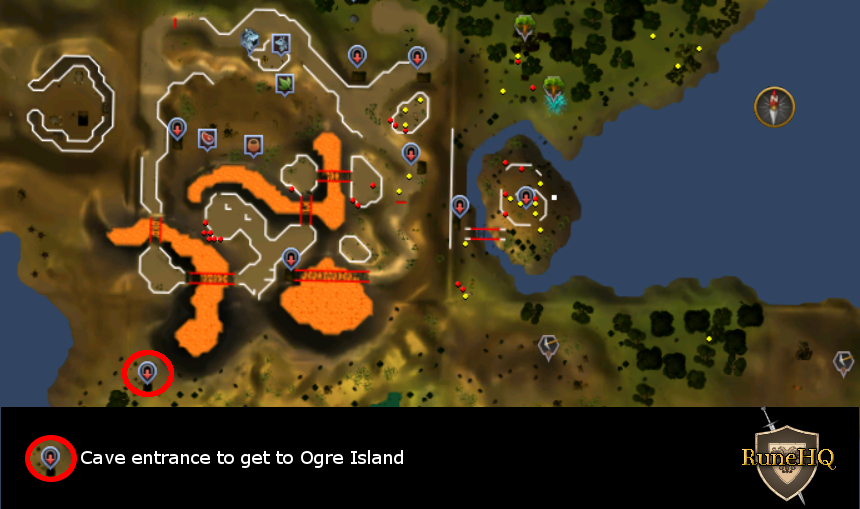 Click the above image to enlarge! |
| 04 degrees 13 minutes North 12 degrees 45 minutes East (04.13 N, 12.45 E) |
North-Eastern corner of Crandor, 5 steps East of the most Eastern Runite rock. |
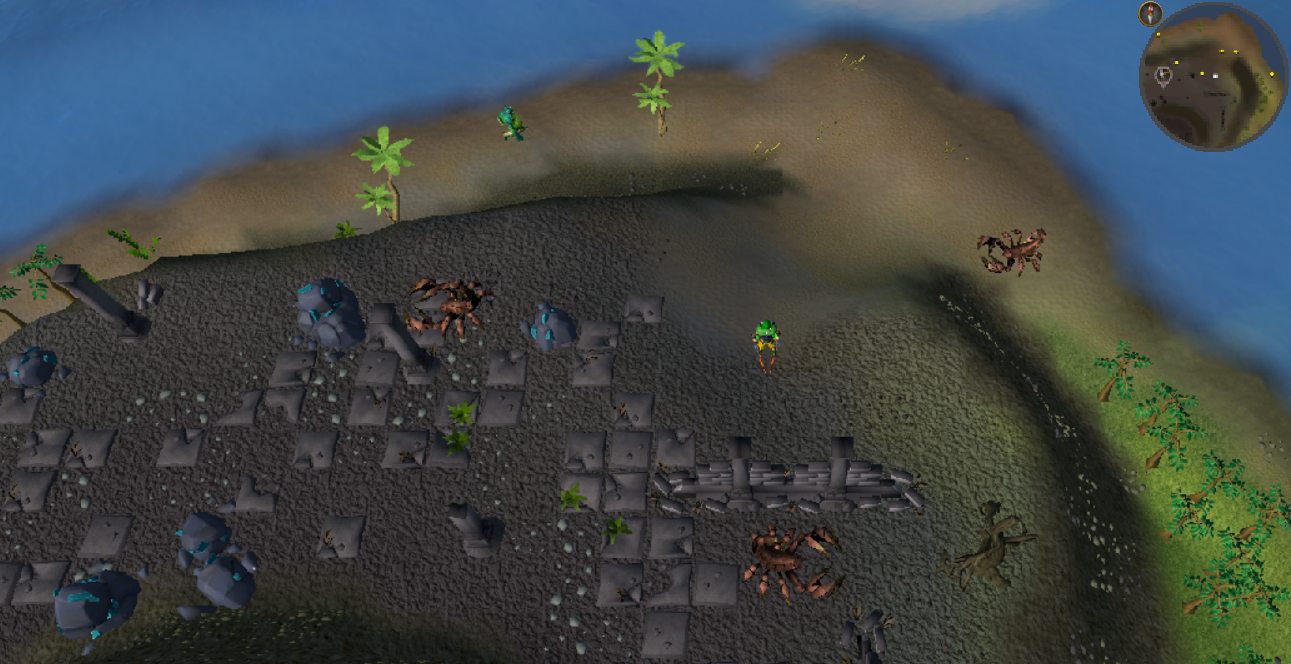 Click the above image to enlarge! |
| 04 degrees 16 minutes South 16 degrees 16 minutes East (04.16 S, 16.16 E) |
Inside the Karamja Shipyard, Southernmost house, at the window between 2 bookshelves. To enter the shipyard you will have started The Grand Tree, then proceed and give the Shipyard worker near the entrance the password Ka, Lu, Min. You will be attacked by a Saradomin wizard. |
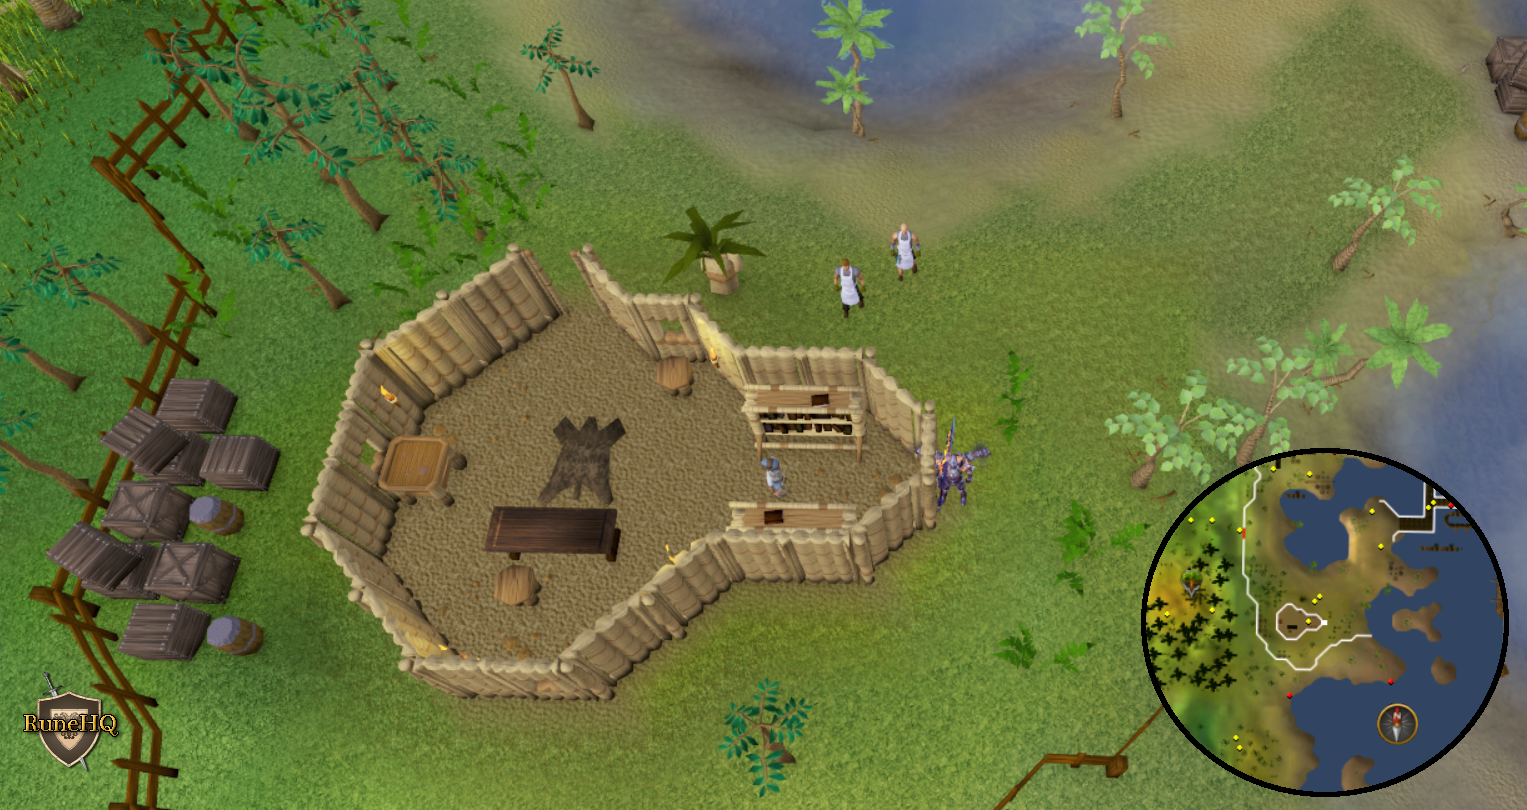 Click the above image to enlarge! |
| 04 degrees 41 minutes North 03 degrees 09 minutes West (04.41 N, 03.09 W) |
On the Arandar Pass to Tirannwn where you kill the mourner in the Mourning's Ends Part I Quest. Dig 1 step North of the Southern-most red spider egg spawn. You will be attacked by a Saradomin wizard. Closest teleport: Sixth-age circuit Option 2 |
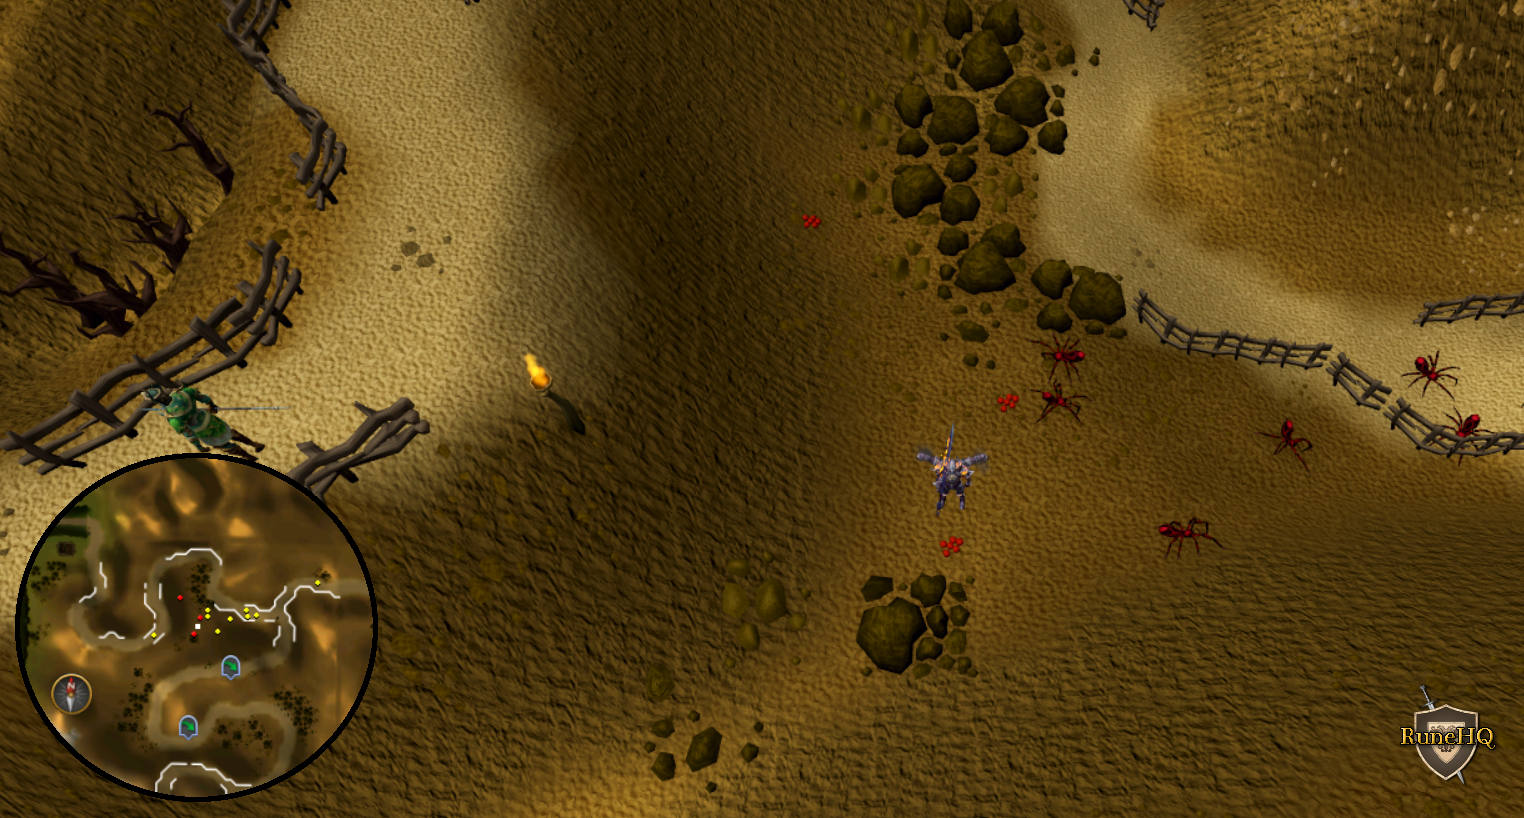 Click the above image to enlarge! |
05 Degrees |
||
| Coordinate | Location | Image |
| 05 degrees 20 minutes South 04 degrees 28 minutes East (05.20 S, 04.28 E) |
Dig right beside the most Northern rockslide in Feldip hills, by the plain rock mine. | 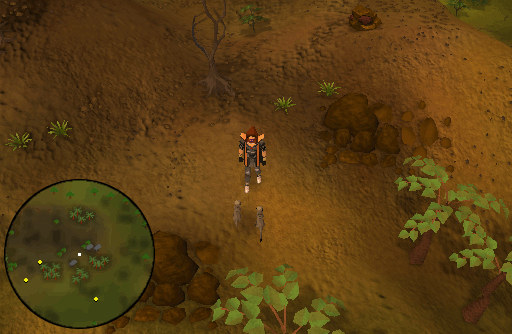 Click the above image to enlarge! |
| 05 degrees 37 minutes North 31 degrees, 15 minutes East (05.37 N, 31.15 E) |
Right behind the Nature Spirit's tree in Mort Myre swamp. You will be attacked by a Saradomin wizard. |
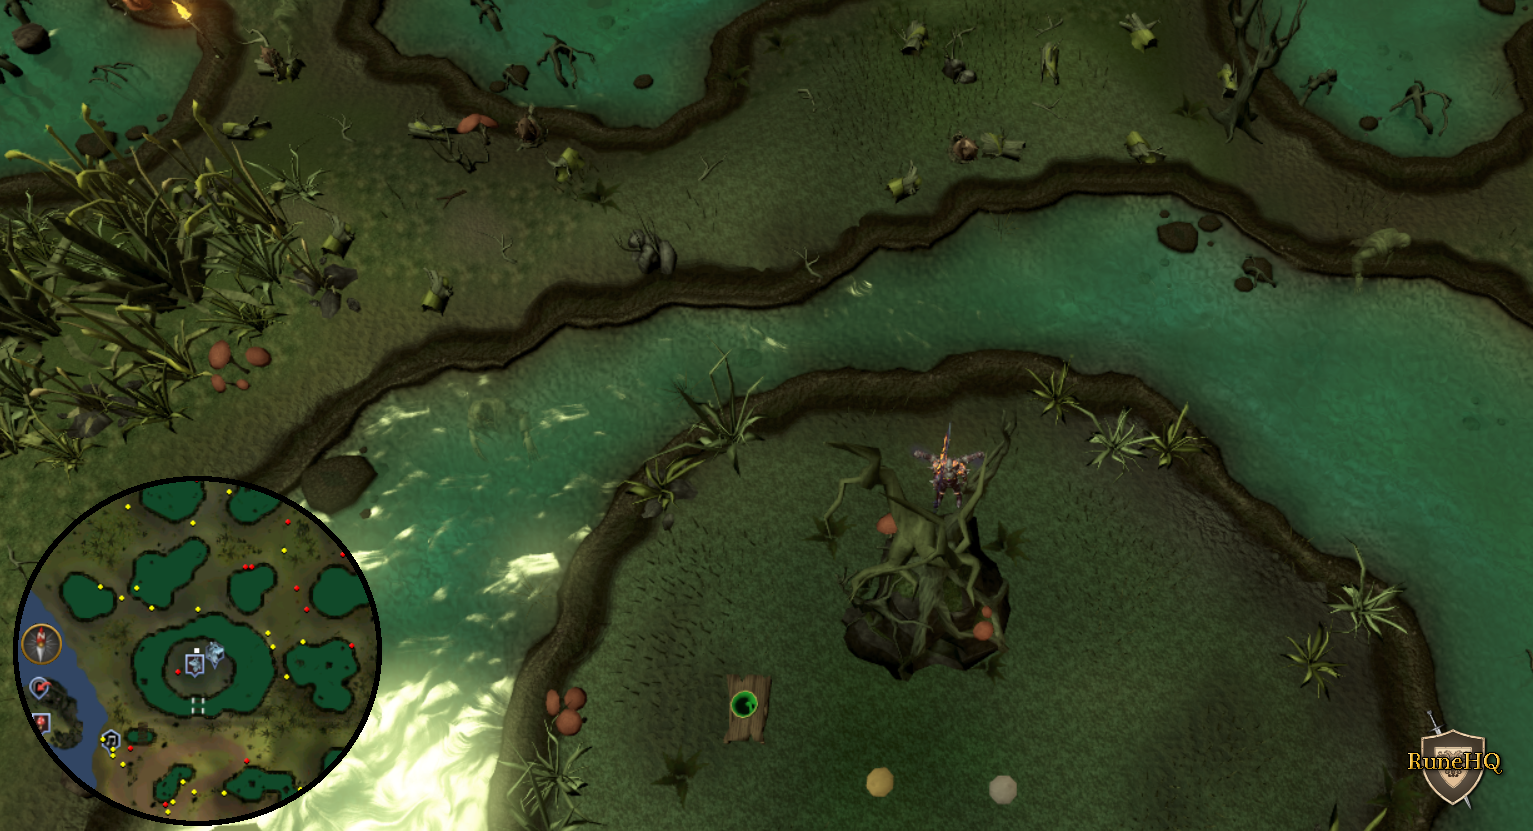 Click the above image to enlarge! |
| 05 degrees 43 minutes North 23 degrees 05 minutes East (05.43 N, 23.05 E) |
North of the Lumbridge windmill, next to the bridge South of the Champions' guild. |  Click the above image to enlarge! |
| 05 degrees 50 minutes South 10 degrees 05 minutes East (05.50 S, 10.05 E) |
On Cairn Isle just West of Shilo Village. You will be attacked by a Saradomin wizard. Closest teleport: Fairy Ring code C-K-R |
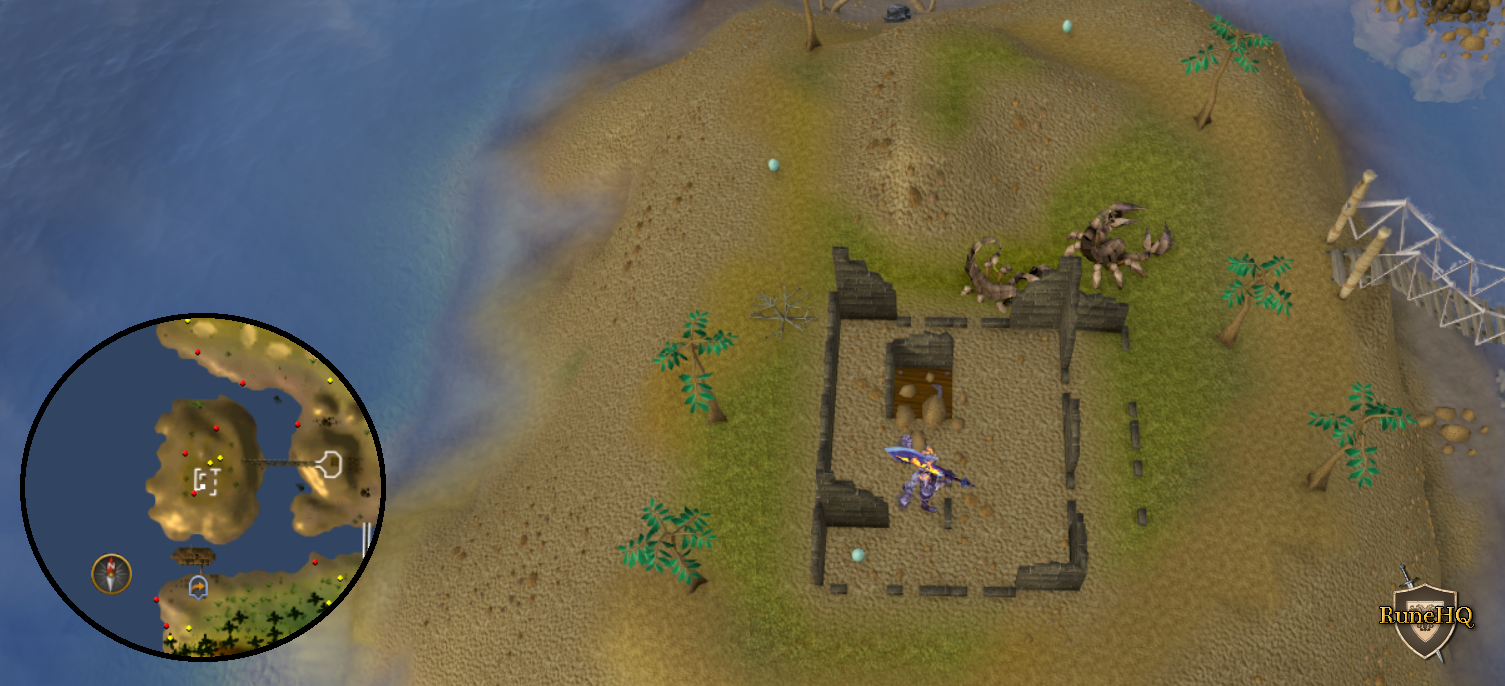 Click the above image to enlarge! |
06 Degrees |
||
| Coordinate | Location | Image |
| 06 degrees 00 minutes South 21 degrees 48 minutes East (06.00 S, 21.48 E) |
The far West end of the Desert Bandit Camp, between a cactus and the shoreline. You will be attacked by a Saradomin wizard. Closest teleport: Bandit Camp Teleport or Enlightened amulet option 3 |
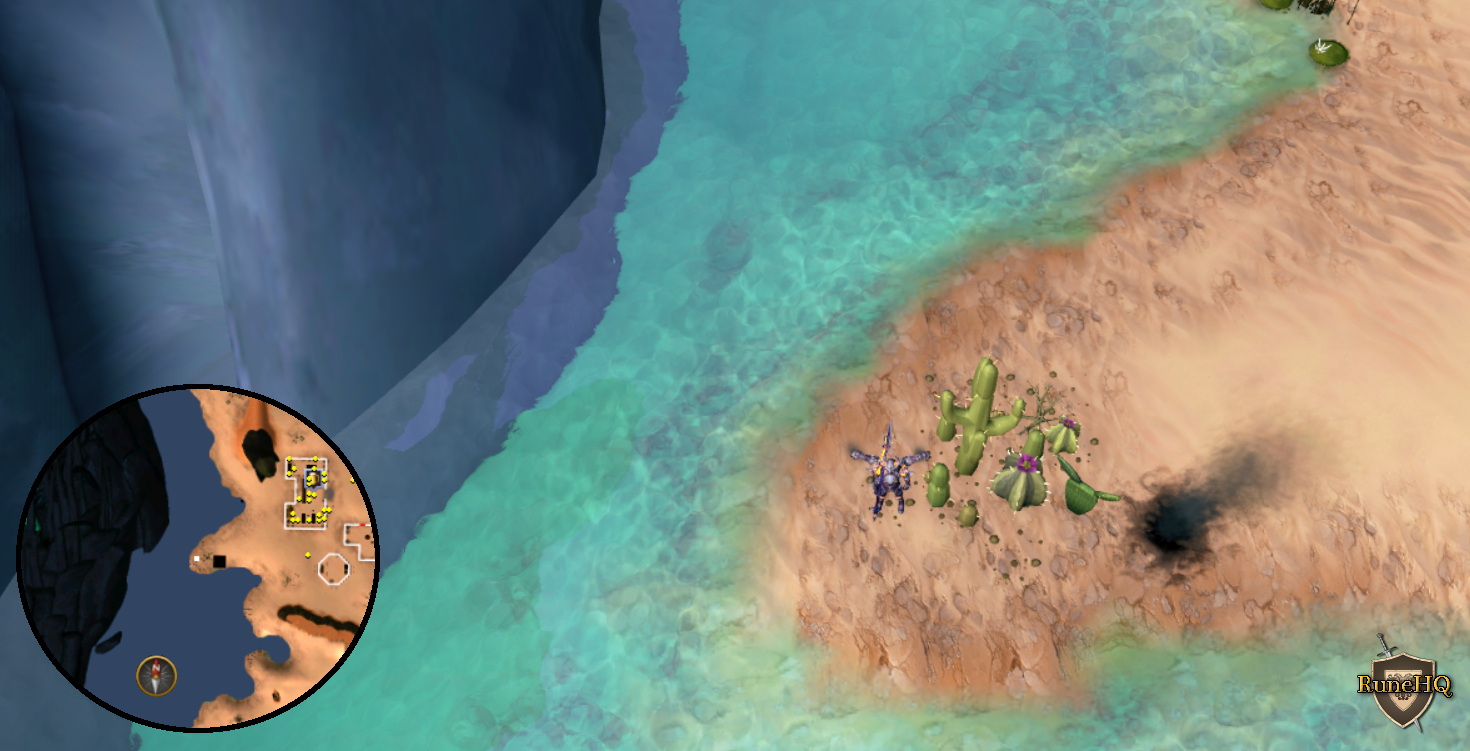 Click the above image to enlarge! |
| 06 degrees 11 minutes South 15 degrees 07 minutes East (06.11 S, 15.07 E) |
East part of Karamja, North of the stepping stones you can balance on which leads to a Jungle Forester. You will be attacked by a Saradomin wizard. Closest teleport: Gnome Glider option 5. |
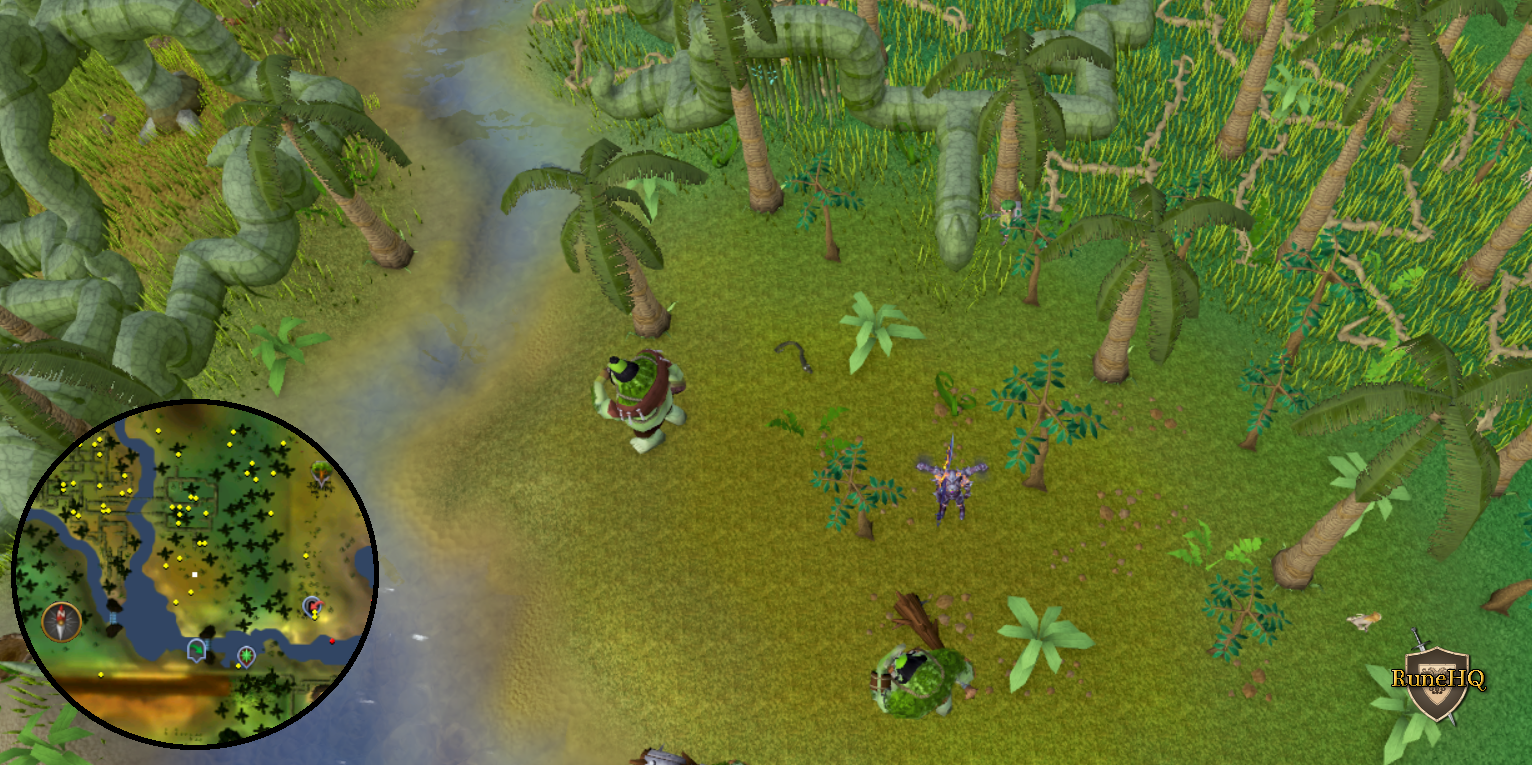 Click the above image to enlarge! |
| 06 degrees 31 minutes North 01 degrees 46 minutes West (06.31 N, 01.46 W) |
At a grouping of 3 lakes South-West of the Tree Gnome
Stronghold - dig between the 2 most Eastern lakes. Closest teleport: Sixth-age circuit option 2 or Master Quest Cape option 0. |
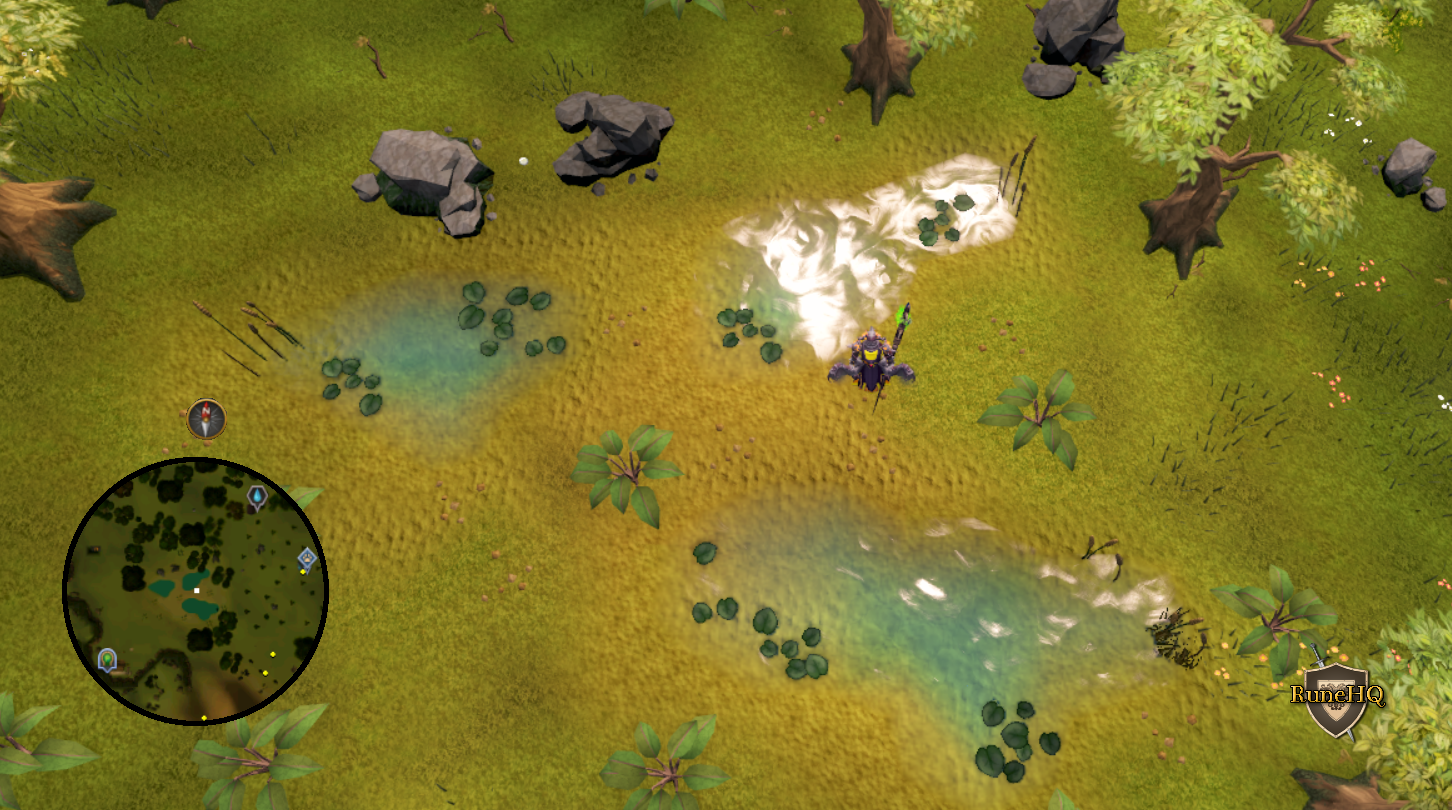 Click the above image to enlarge! |
07 Degrees |
||
| Coordinate | Location | Image |
| 07 degrees 05 minutes North 30 degrees 56 minutes East (07.05 N, 30.56 E) |
In Mort Myre swamp, South-West of the entrance gate, one pond South of the two fishing spots. Dig next to a rotten a tree. |
 Click the above image to enlarge! |
| 07 degrees 22 minutes North 14 degrees 15 minutes East (07.22 N, 14.15 E) |
South side of the scarecrow in the Wheat field next to the entrance to Taverley Dungeon. You will be attacked by a Saradomin wizard. Closest teleport: Taverly Lodestone. |
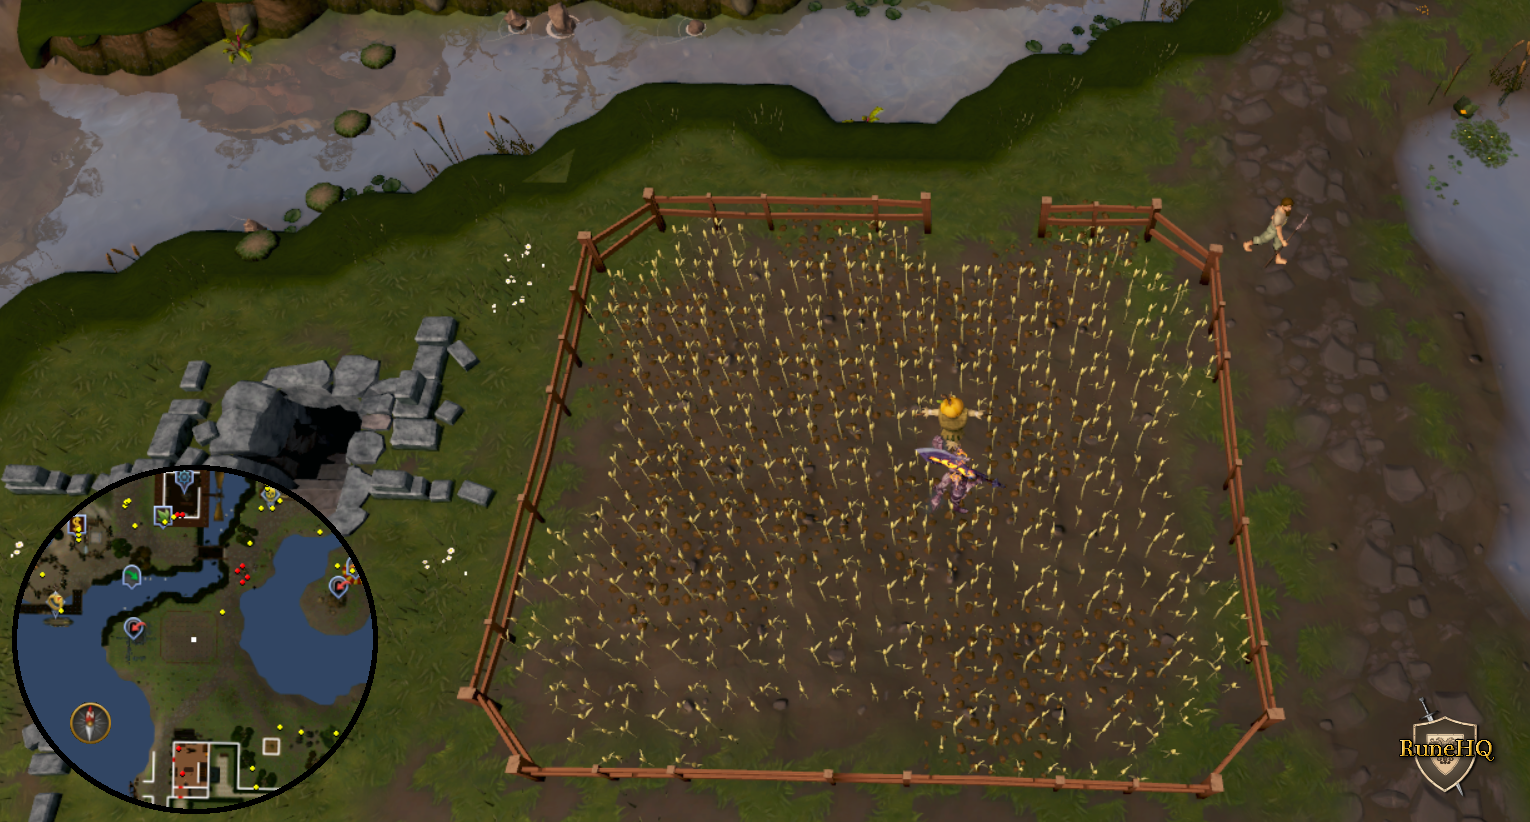 Click the above image to enlarge! |
| 07 degrees 33 minutes North 15 degrees 00 minutes East (07.33 N, 15.00 E) |
Near the Lady of the Lake, South-West of the gate leading to Taverley. Closest teleport: Taverley Hot Air Balloon. |
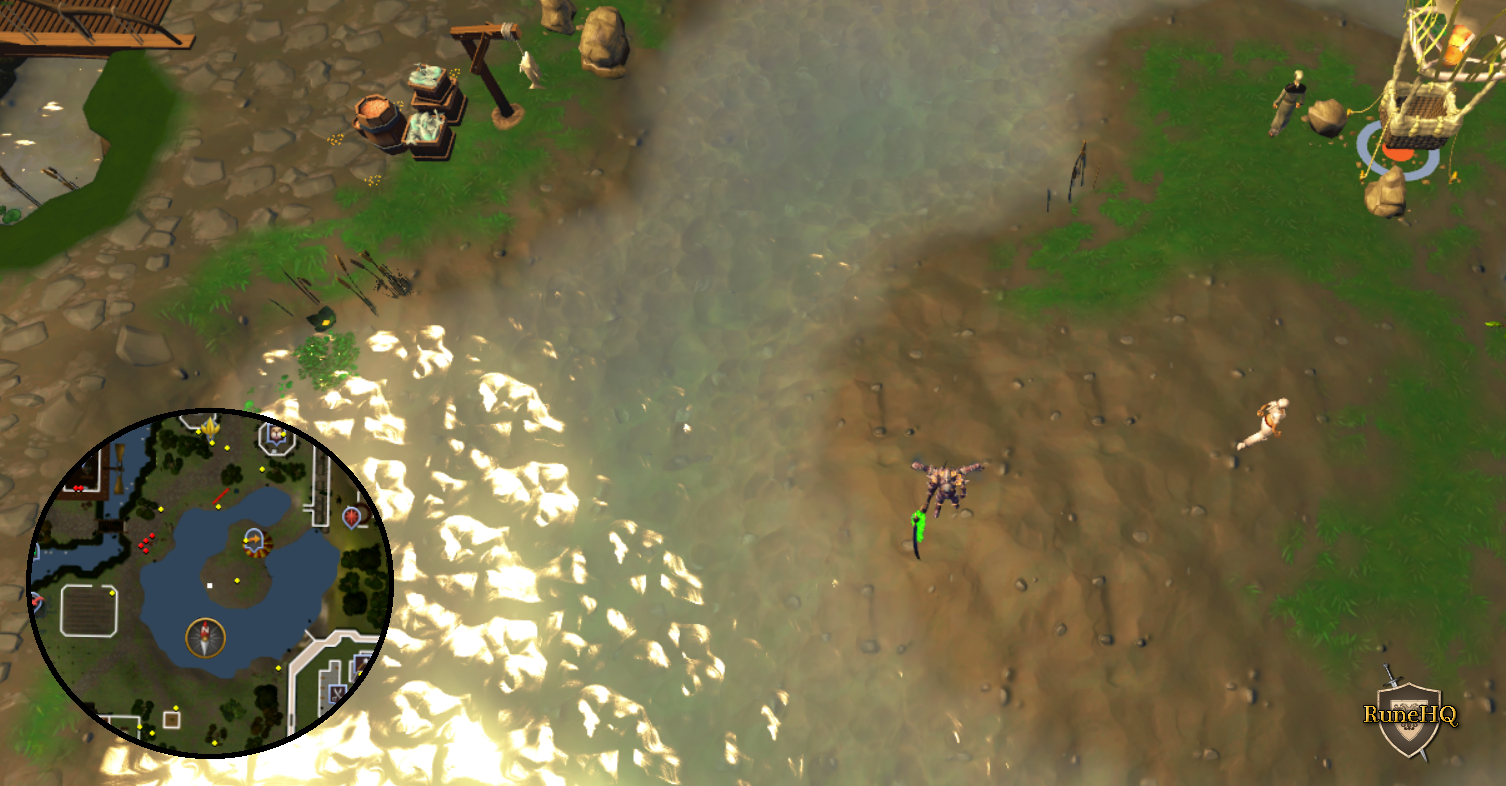 Click the above image to enlarge! |
| 07 degrees 41 minutes North 06 degrees 00 minutes East (07.41 N, 06.00 E) |
North-East of the Fishing Guild, South of Hemenster. You will be attacked by a Saradomin wizard. Closest teleport: Skills necklace option 1 |
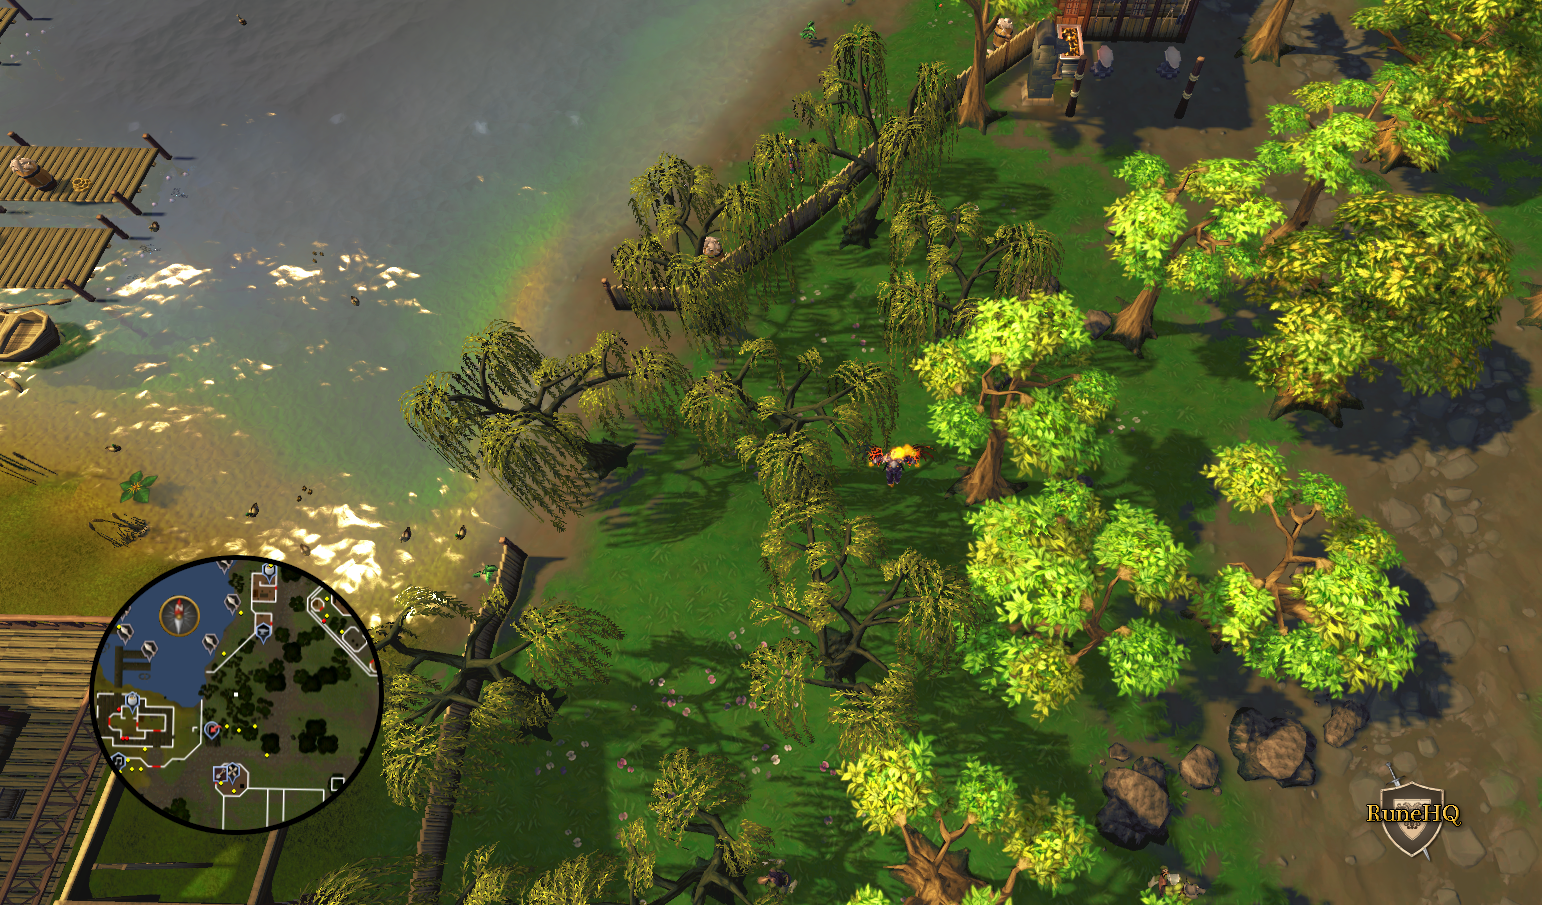 Click the above image to enlarge! |
| 07 degrees 43 minutes South 12 degrees 26 minutes East (07.43 S, 12.26 E) |
In the Kharazi Jungle. Southern edge of the Water Pool used in Legends' Quest. Must have started the Legends' Quest. Remember to bring your best Machete and your best hatchet with you. You will be attacked by a Saradomin wizard. |
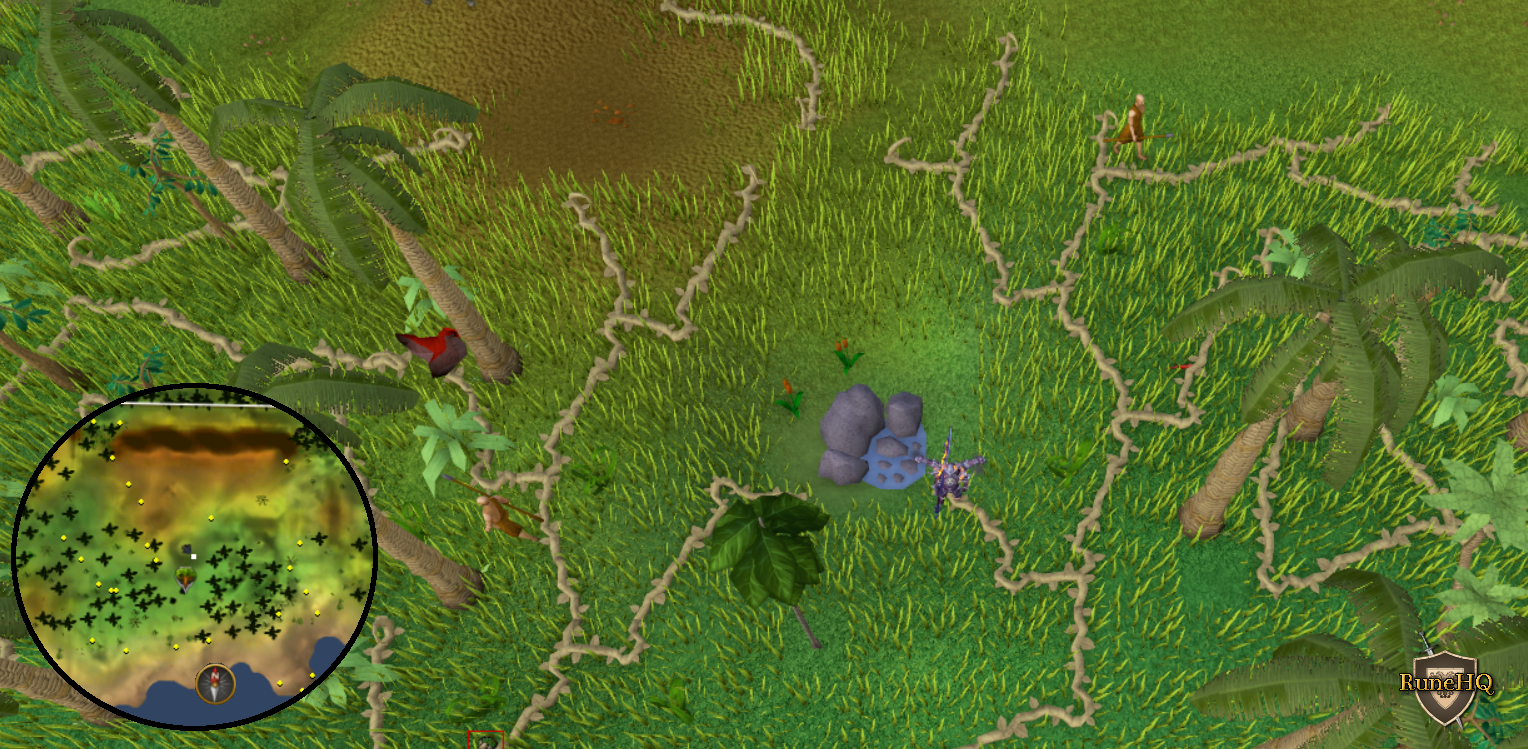 Click the above image to enlarge! |
08 Degrees |
||
| Coordinate | Location | Image |
| 08 degrees 03 minutes North 31 degrees 16 minutes East (08.03 N, 31.16 E) |
In the Mort Myre swamp, dig near the third lake South of the gate to the swamp. You will be attacked by a Saradomin wizard. Closest teleport: Fairy Ring B-K-R. |
 Click the above image to enlarge! |
| 08 degrees 05 minutes South 15 degrees 56 minutes East (08.05 S, 15.56 E) |
Inside the herblore habitat area, dig East of the most South-Western tree. You will be attacked by a Saradomin wizard. Closest teleport:Juju teleport spiritbag bought from Bettamax by Taverley bank for 2,000 gp. |
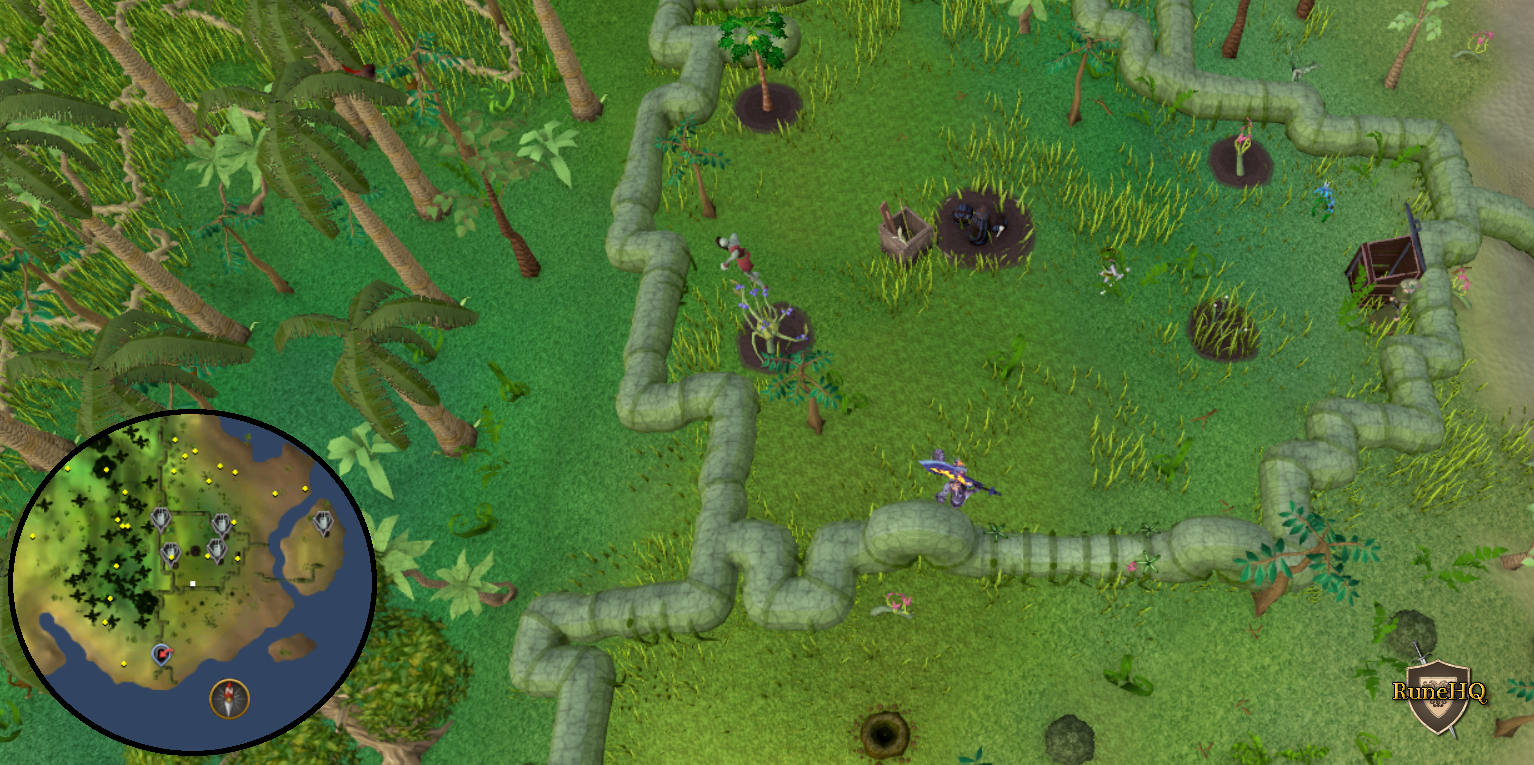 Click the above image to enlarge! |
| 08 degrees 26 minutes South 10 degrees 28 minutes East (08.26 S, 10.28 E) |
In the Kharazi Jungle, dig near a corpse on the small peninsula in the South-Western corner. The Legends' Quest is required to do this clue scroll. You will be attacked by a Saradomin wizard. Closest teleport: Fairy Ring C-J-S |
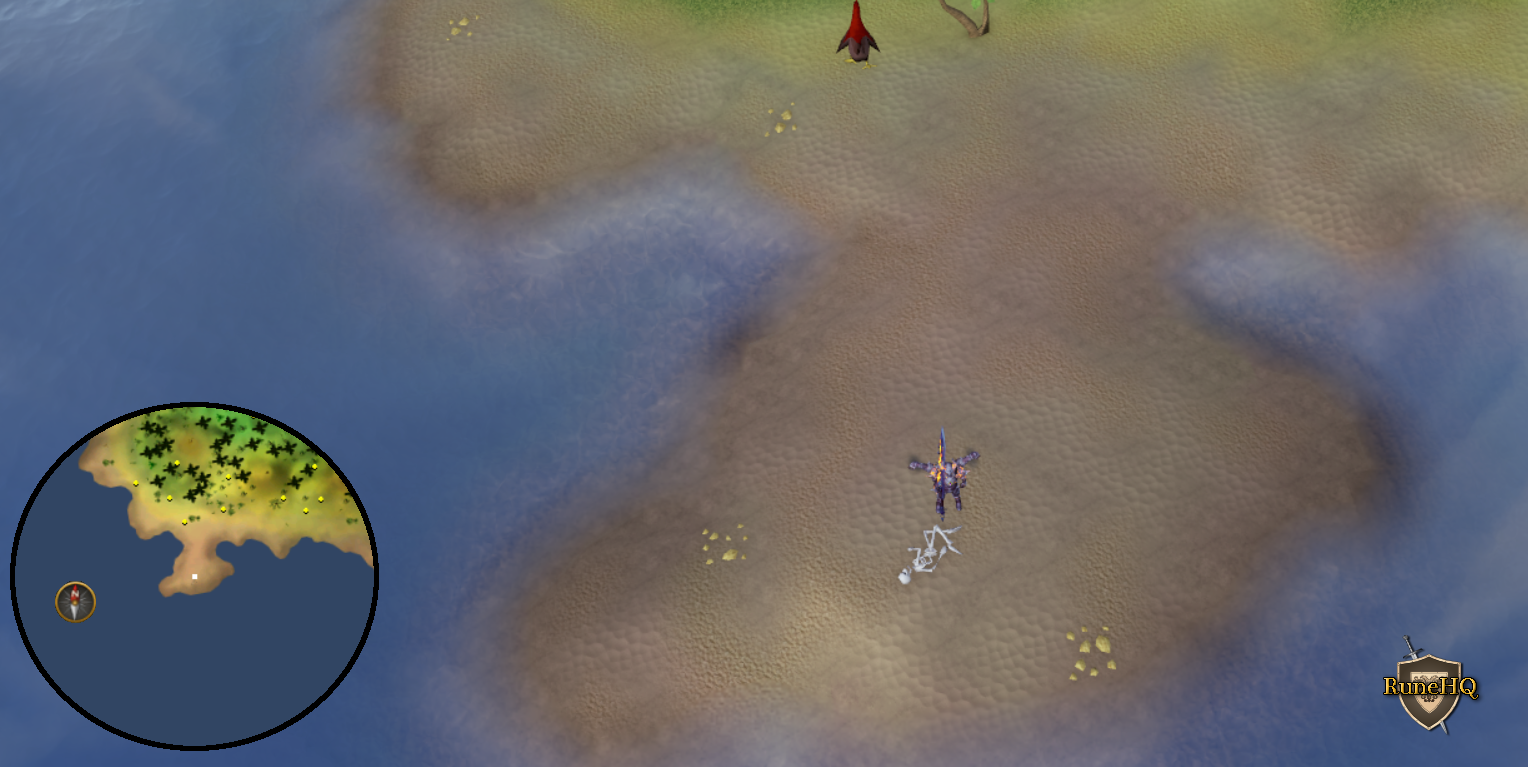 Click the above image to enlarge! |
| 08 degrees 33 minutes North 01 degrees 39 minutes West (08.33 N, 01.39 W) |
South-West corner of the Gnome Stronghold, cross a bridge to the terrorbird pen, exit the East-North-East gate of the pen and dig near the water. Closest teleport: Spirit Tree Teleport option 2 |
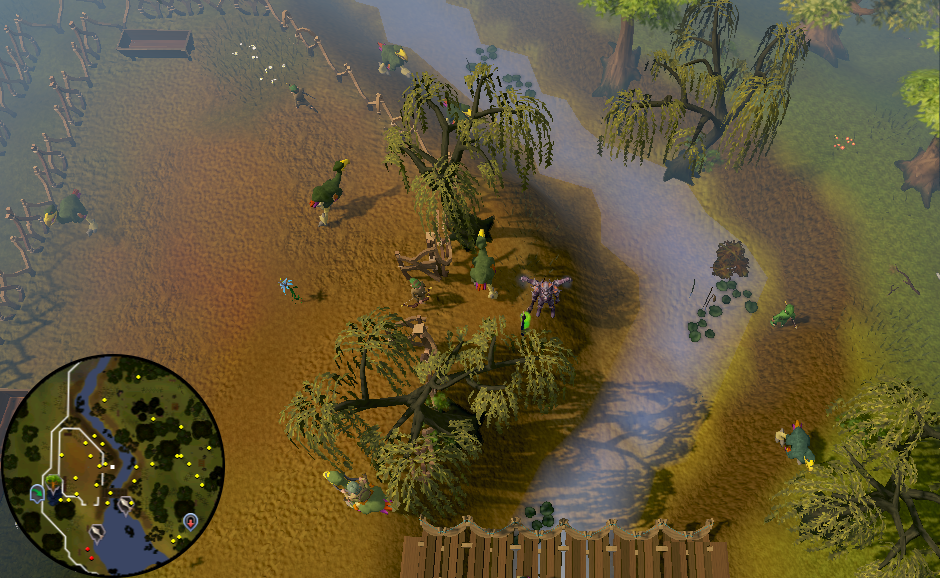 Click the above image to enlarge! |
09 Degrees |
||
| Coordinate | Location | Image |
| 09 degrees 22 minutes North 02 degrees 24 minutes West (09.22 N, 02.24 W) |
At the bottom of the path leading up Eagles' Peak, South-West of the Eagles' Peak lodestone. You will be attacked by a Saradomin wizard. Closest teleport: Eagles' Peak lodestone. |
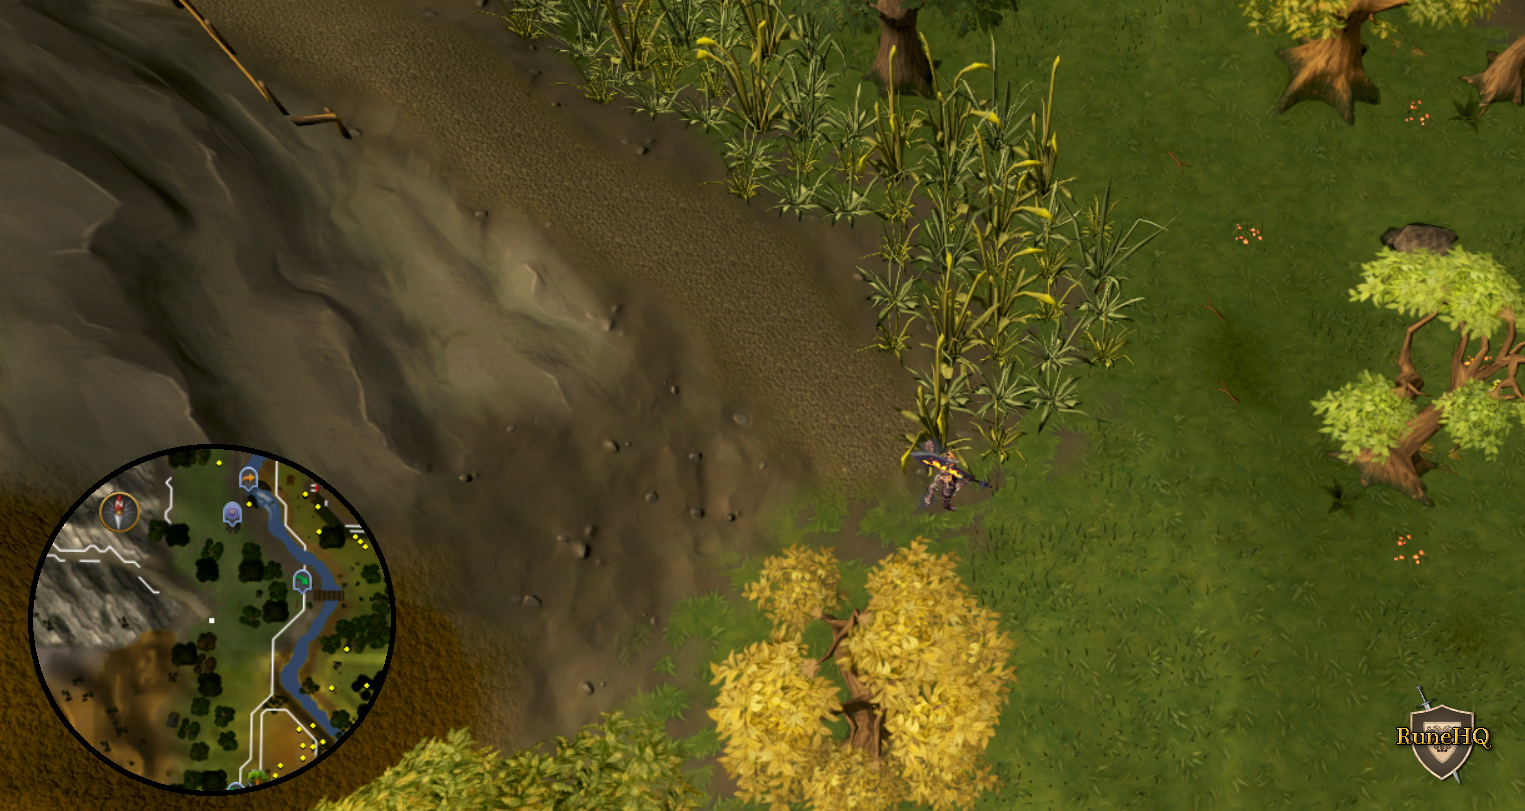 Click the above image to enlarge! |
| 09 degrees 33 minutes North 02 degrees 15 minutes East (09.33 N, 02.15 E) |
Baxtorian Falls, Second island on the Waterfall - You will need to bring a rope, Dig right before the dead tree on the edge of the waterfall |  Click the above image to enlarge! |
| 09 degrees 48 minutes North 17 degrees 39 minutes East (09.48 N, 17.39 E) |
West of the entrance to Ice mountain, South of the Oracle, between two trees. Closest teleport: Lassar Teleport Spell in Ancient Magic Spellbook. |
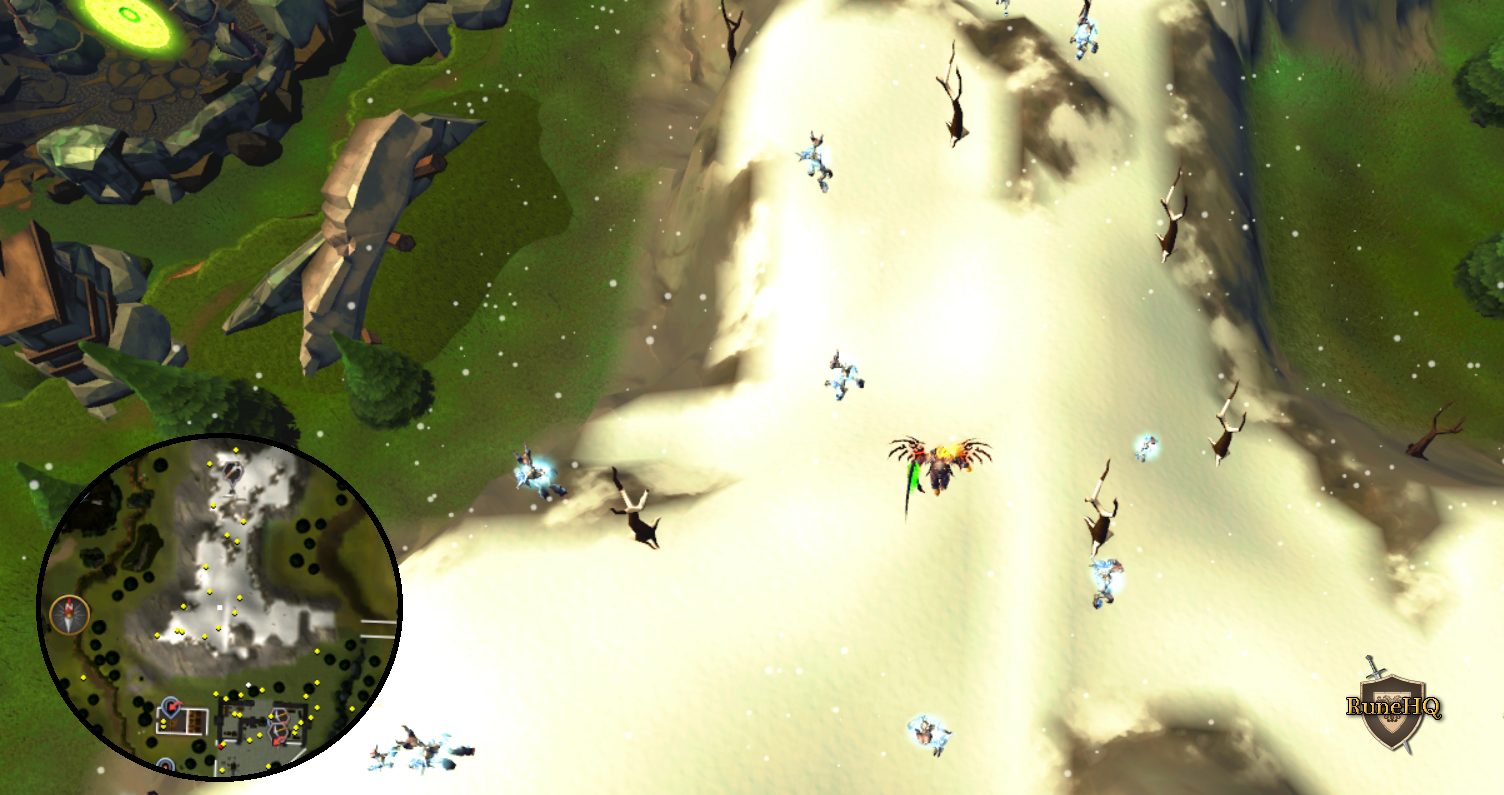 Click the above image to enlarge! |
11 Degrees |
||
| Coordinate | Location | Image |
| 11 degrees 03 minutes North 31 degrees 20 minutes East (11.03 N, 31.20 E) |
Off the path to the Canifis Slayer Tower. 6 steps North and 4 steps East of the last torch on the path before the tower fence. | 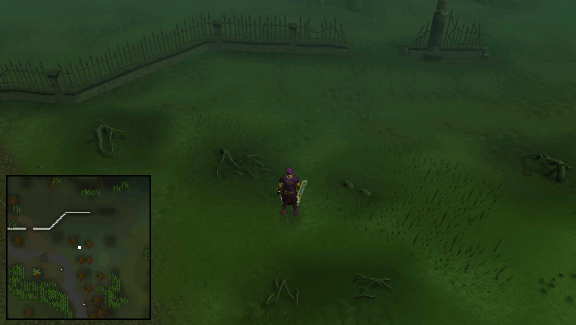 Click the above image to enlarge! |
| 11 degrees 05 minutes North 00 degrees 45 minutes West (11.05 N, 00.45 W) |
Between two swamps North-West of the Grand Tree. | 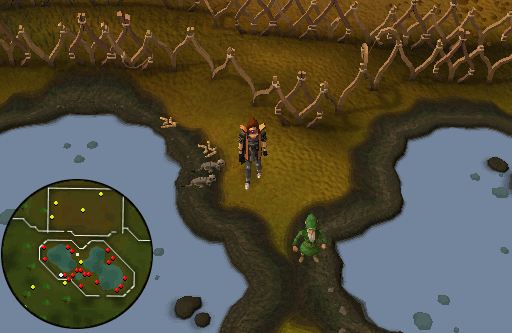 Click the above image to enlarge! |
| 11 degrees 41 minutes North 14 degrees 58 minutes East (11.41 N, 14.58 E) |
Outside the building South of the Burthorpe agility course, next to the hay bales. | 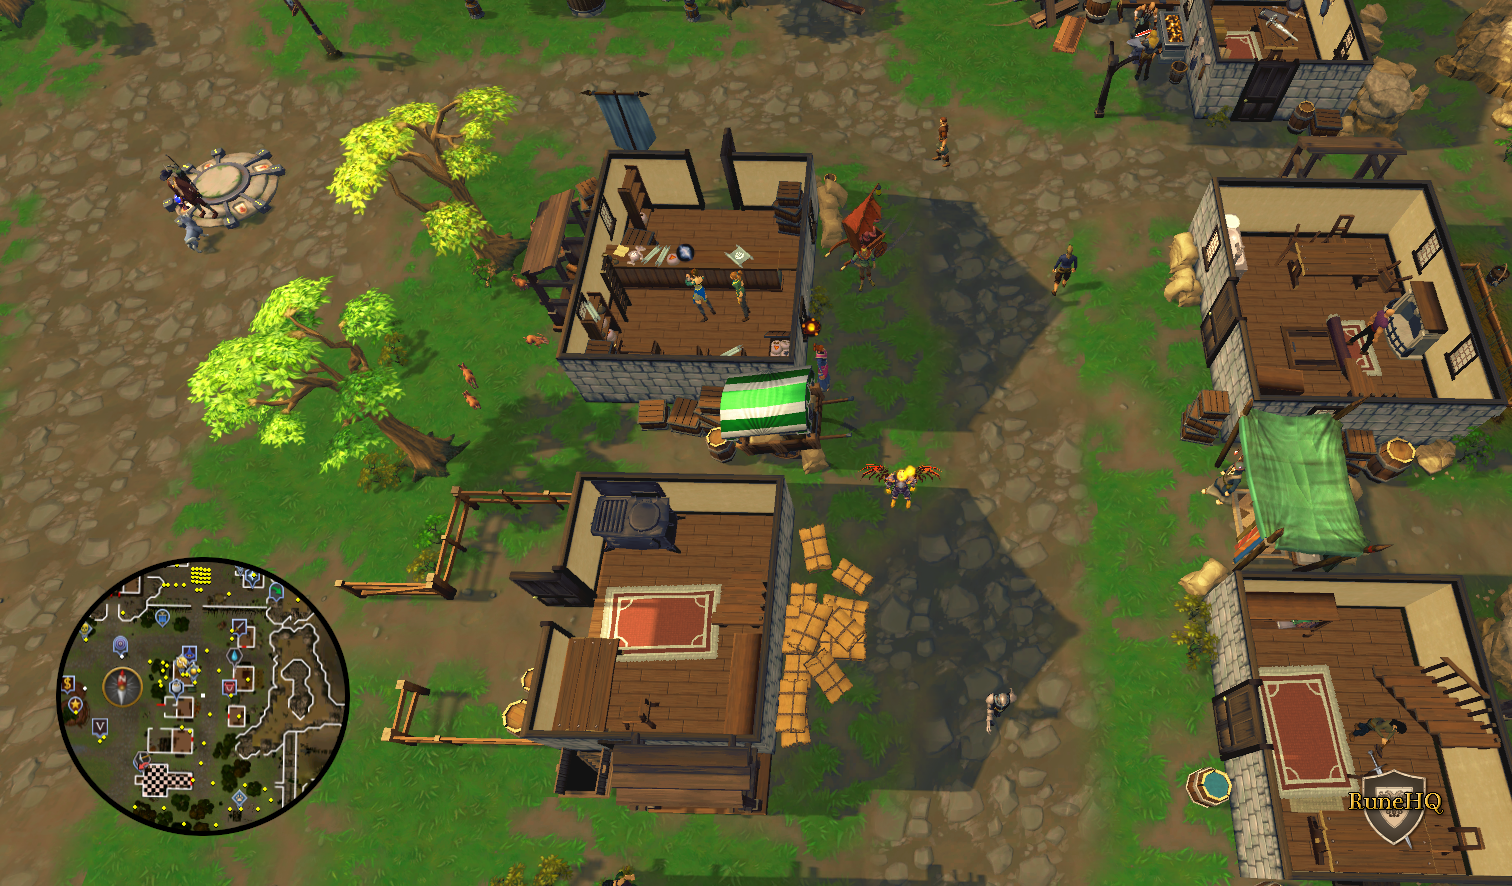 Click the above image to enlarge! |
12 Degrees |
||
| Coordinate | Location | Image |
| 12 degrees 48 minutes North 20 degrees 20 minutes East (12.48 N, 20.20 E) |
In level 7 Wilderness, at the Air Obelisk. Go through the Edgeville dungeon, past the Black Demons, and climb the ladder. Dig 3 steps East of the ladder. You will be attacked by a Zamorak wizard. This is located in the Wilderness be careful which items you take with you as they may be lost upon death. |  Click the above image to enlarge! |
13 Degrees |
||
| Coordinate | Location | Image |
| 13 degrees 46 minutes North 21 degrees 01 minutes East (13.46 N, 21.01 E) |
East of the Bronze arrow respawn in level 11 Wilderness in the upsidedown 'u' of mushrooms. You will be attacked by a Zamorak wizard. This is located in the Wilderness be careful which items you take with you as they may be lost upon death. | 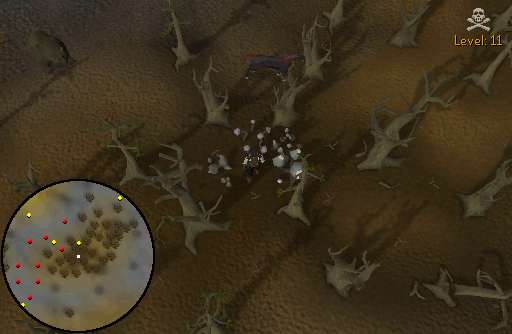 Click the above image to enlarge! |
14 Degrees |
||
| Coordinate | Location | Image |
| 14 degrees 54 minutes North 09 degrees 13 minutes East (14.54 N, 09.13 E) |
2 steps West of the swaying tree in the forest East of Rellekka. Closest teleport: Fremennik Province Lodestone then run South-East |
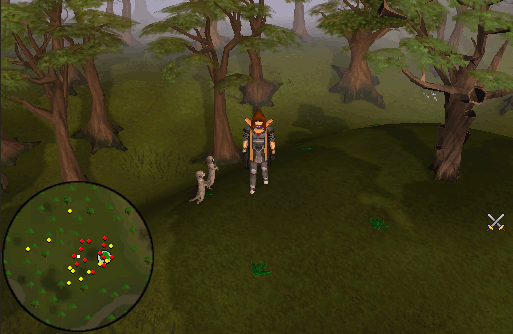
|
15 Degrees |
||
| Coordinate | Location | Image |
| 15 degrees 48 minutes North 13 degrees 52 minutes East (15.48 N, 13.52 E) |
South of the entrance to Mad Eadgar's cave on Trollheim mountain. You will be attacked by a Saradomin wizard. Closest teleport:Trollheim tablet |
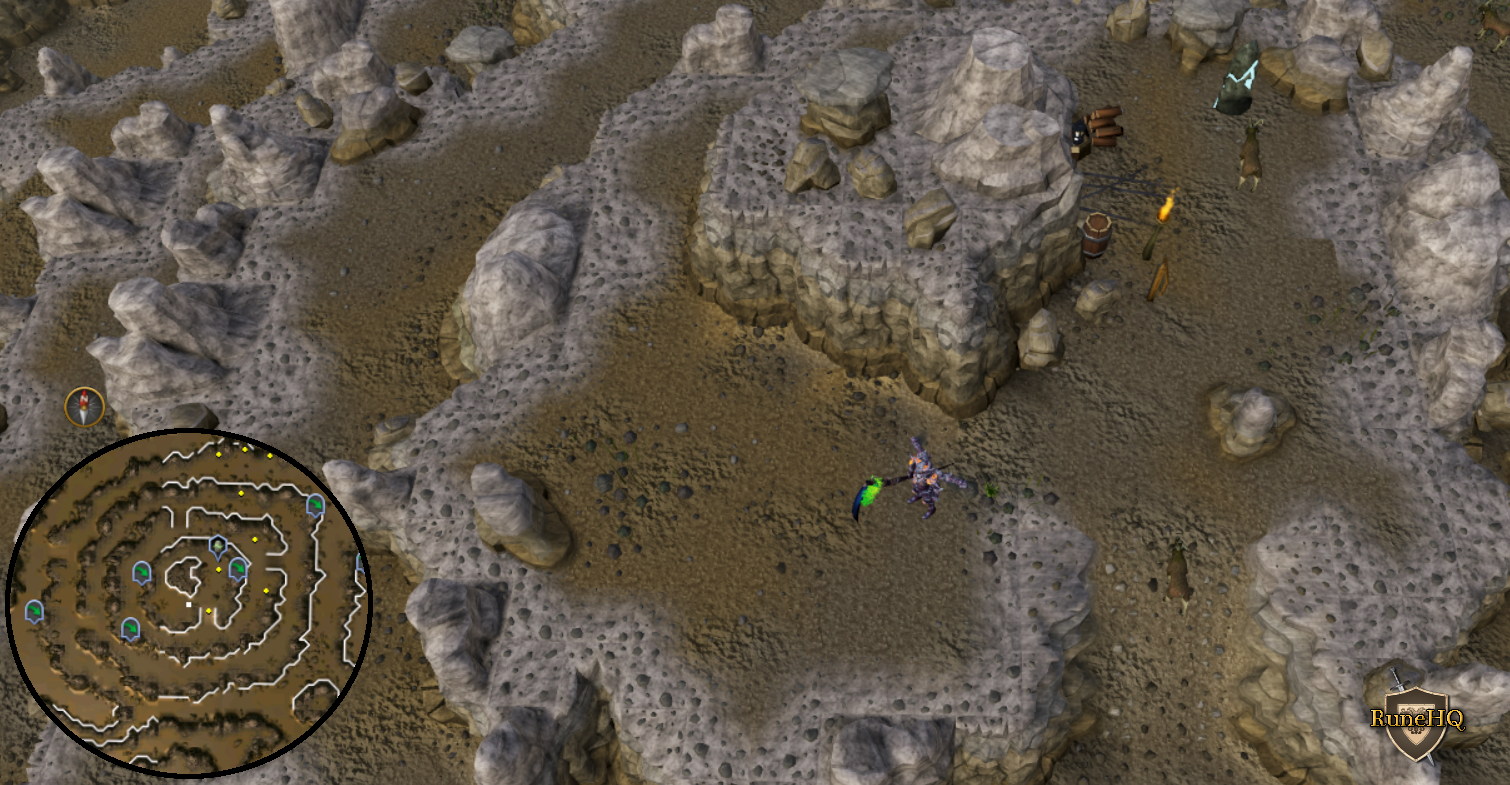 Click the above image to enlarge! |
16 Degrees |
||
| Coordinate | Location | Image |
| 16 degrees 20 minutes North 12 degrees 45 minutes East (16.20 N, 12.45 E) |
South of the entrance to the Troll Stronghold. You will be attacked by a Saradomin wizard. Closest teleport: Trollheim Teleport (Lunar Spell book) then down the ladder and out the cave entrance or Trollheim tablet. |
 Click the above image to enlarge! |
| 16 degrees 30 minutes North 16 degrees 28 minutes East (16.30 N, 16.28 E) |
Level 22 Wilderness - Inside the Ruins in Western Wilderness West of the Bandit Camp. You will be attacked by a Zamorak wizard. This is located in the Wilderness be careful which items you take with you as they may be lost upon death. | 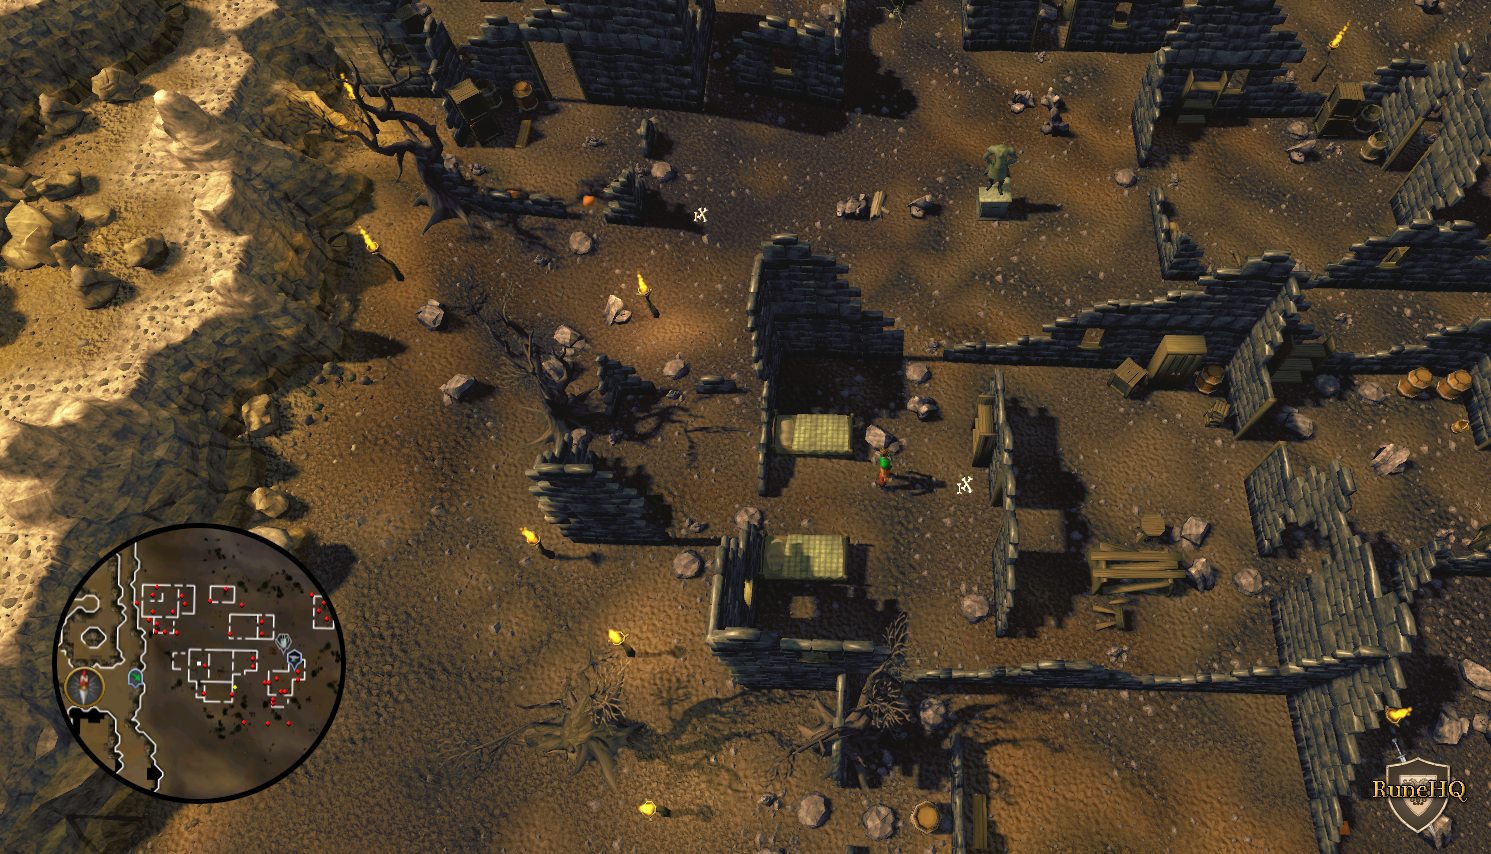 Click the above image to enlarge! |
| 16 degrees 35 minutes North 27 degrees 01 minutes East (16.35 N, 27.01 E) |
Level 22 wilderness - North-East of the Boneyard and North of the Black salamander hunting spot, near the middle of three lava pools. You will be attacked by a Zamorak wizard. This is located in the Wilderness be careful which items you take with you as they may be lost upon death. | 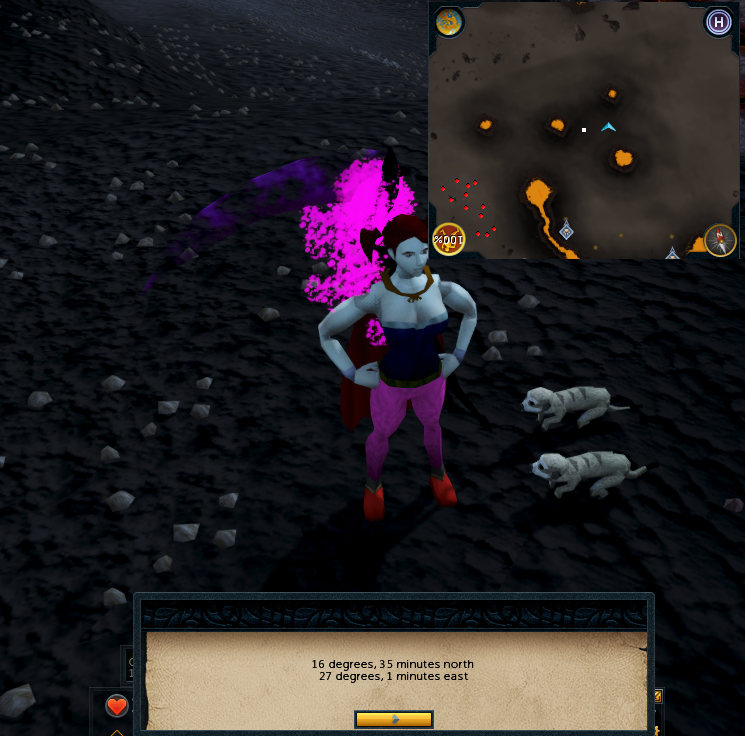 Click the above image to enlarge! |
| 16 degrees 43 minutes North 19 degrees 11 minutes East (16.43 N, 19.11 E) |
Inside the bandit camp in the wilderness. You will be attacked by a Zamorak wizard. This is located in the Wilderness be careful which items you take with you as they may be lost upon death. | 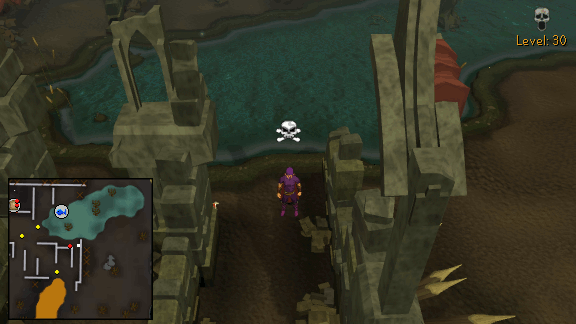 Click the above image to enlarge! |
17 Degrees |
||
| Coordinate | Location | Image |
| 17 degrees 50 minutes North 08 degrees 30 minutes East (17.50 N, 08.30 E) |
North-East of Relekka by the rock crabs. Dig on a seaweed spawn, East of the dock. Closest teleport: Fairy Ring code D-K-S or Fremennik Province lodestone |
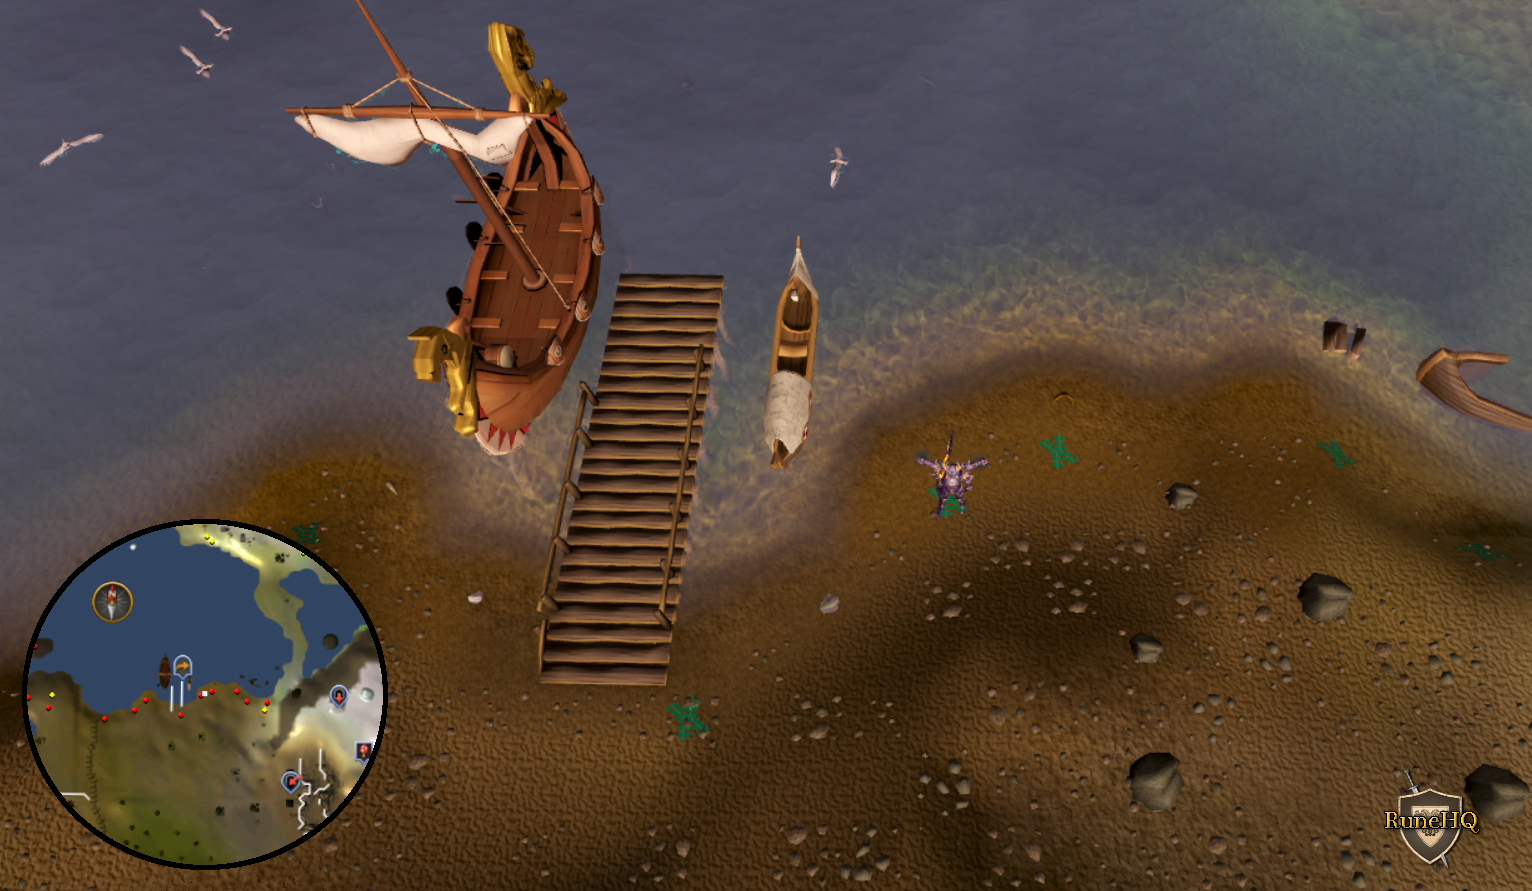 Click the above image to enlarge! |
18 Degrees |
||
| Coordinate | Location | Image |
| 18 degrees 03 minutes North 25 degrees 16 minutes East (18.03 N, 25.16 E) |
In level 28 Wilderness in the Ruins, North of the Graveyard of Shadows, between the Steel Platelegs spawn and the trapdoor. This is located in the Wilderness be careful which items you take with you as they may be lost upon death. | 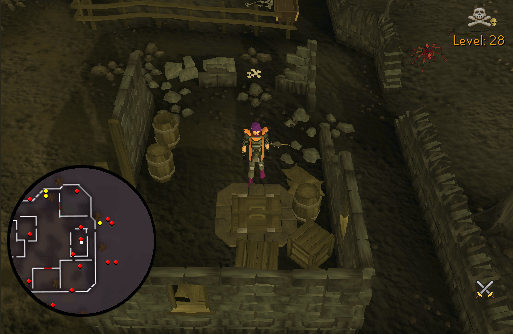 Click the above image to enlarge! |
| 18 degrees 22 minutes North 16 degrees 33 minutes East (18.22 N, 16.33 E) |
This lies in the Forgotten Cemetary lvl 29 wilderness in front of the broken gravestone of the middle row. You will be attacked by a Zamorak wizard. This is located in the Wilderness be careful which items you take with you as they may be lost upon death. |
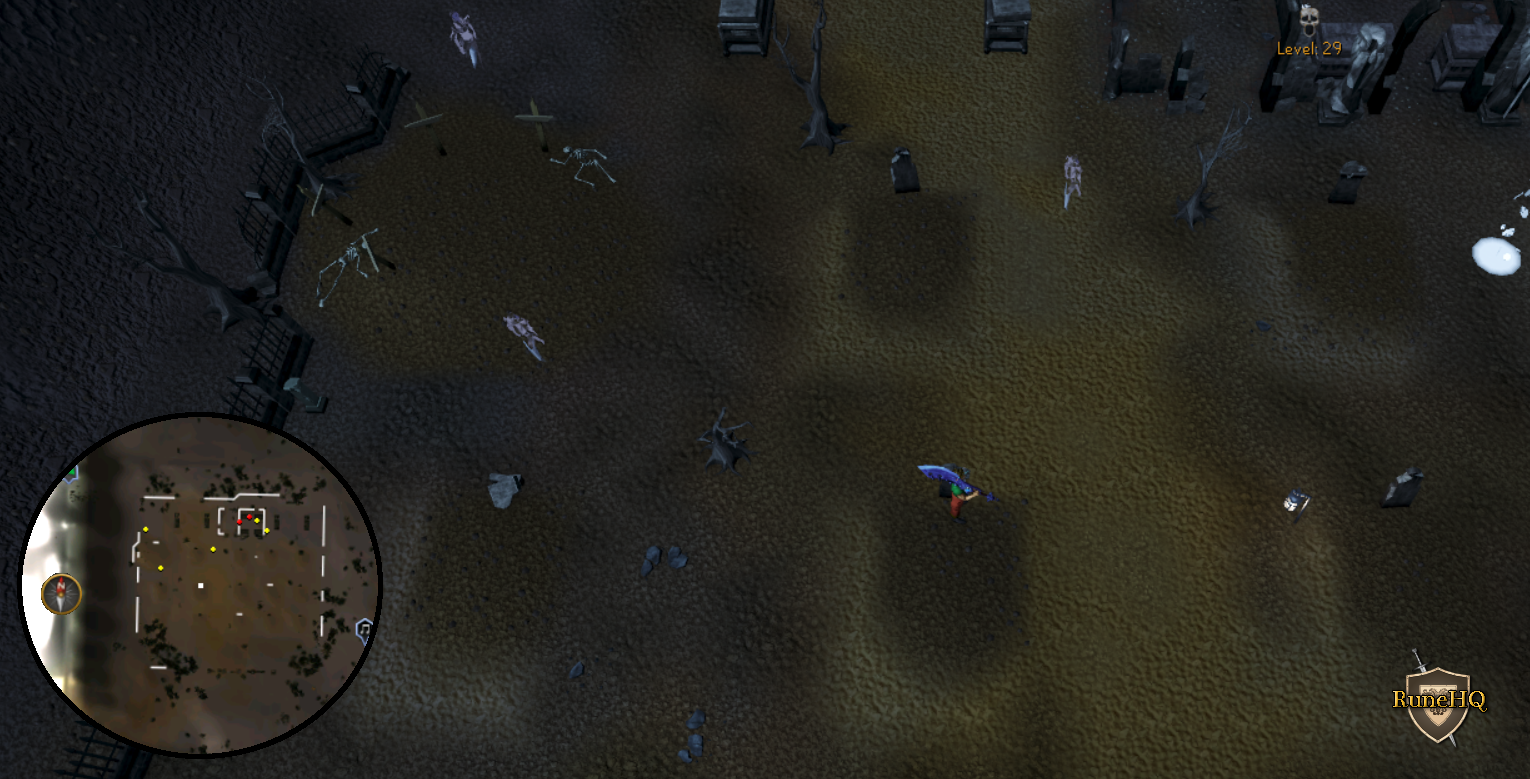 Click the above image to enlarge! |
19 Degrees |
||
| Coordinate | Location | Image |
| 19 degrees 43 minutes North 25 degrees 07 minutes East (19.43 N, 25.07 E) |
The Chaos Dwarf area in the level 36 wilderness - Go to the Big Bone respawn. From that point, go directly North until you see some chaos dwarves and rocks. You have to dig exactly in the middle of the 4 large, white rocks. This is located in the Wilderness be careful which items you take with you as they may be lost upon death. | 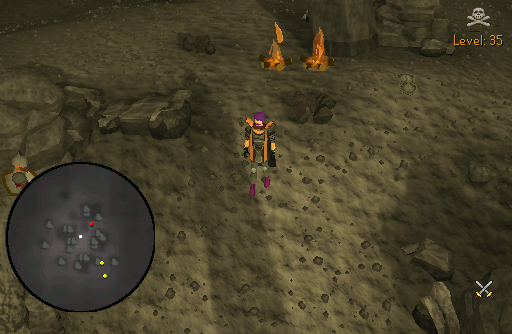 Click the above image to enlarge! |
20 Degrees |
||
| Coordinate | Location | Image |
| 20 degrees 05 minutes North 21 degrees 52 minutes East (20.05 N, 21.52 E) |
North of the pond in the area with the Moss Giants in level 36 wilderness, West of the Red Dragon island. This is located in the Wilderness be careful which items you take with you as they may be lost upon death. |  Click the above image to enlarge! |
| 20 degrees 07 minutes North 18 degrees 33 minutes East (20.07 N, 18.33 E) |
In level 36 Wilderness. Dig on top of a little hill in the North-Eastern part of hobgoblin mine. This is located in the Wilderness be careful which items you take with you as they may be lost upon death. |  Click the above image to enlarge! |
| 20 degrees 33 minutes North 15 degrees 48 minutes East (20.33 N, 15.48 E) |
Just South of the Zamorak Altar in the level 38 wilderness. Dig at the South-West corner of the building. You will be attacked by a Zamorak wizard. This is located in the Wilderness be careful which items you take with you as they may be lost upon death. |
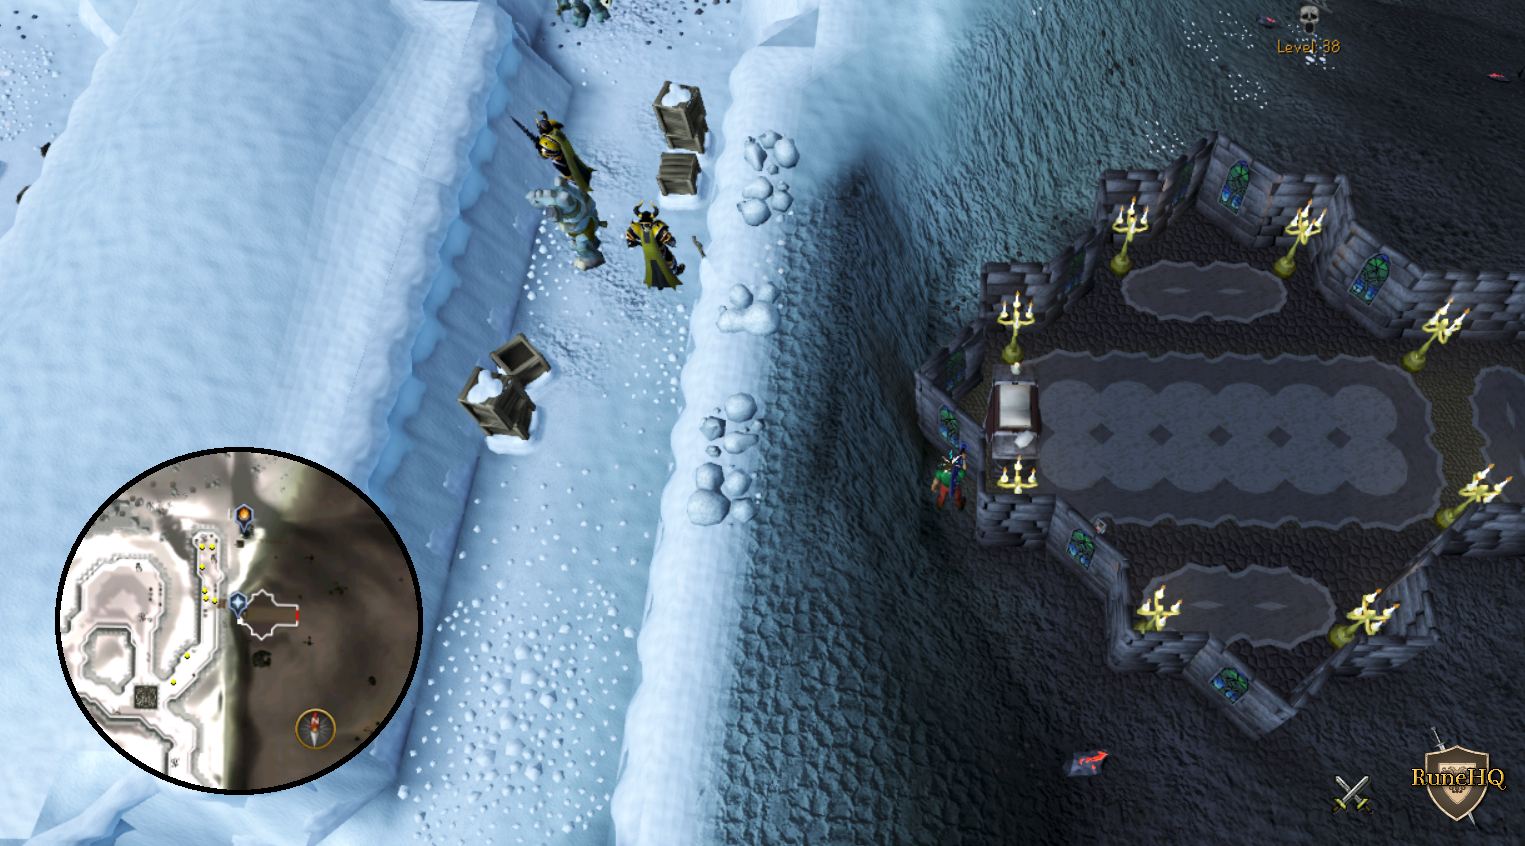 Click the above image to enlarge! |
21 Degrees |
||
| Coordinate | Location | Image |
| 21 degrees 24 minutes North 17 degrees 54 minutes East (21.24 N, 17.54 E) |
The Lesser Demon cage in the level 41 wilderness.
This is located in the Wilderness be careful which items you take with you as they may be lost upon death. |
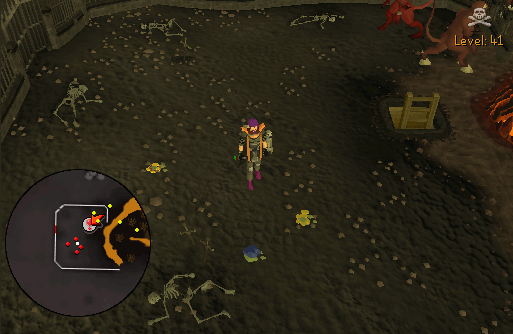 Click the above image to enlarge! |
22 Degrees |
||
| Coordinate | Location | Image |
| 22 degrees 30 minutes North 03 degrees 01 minutes East (22.30 N, 03.01 E) |
On Miscellania at the end of the path just South of the mining and smithing place. Closest teleport: Miscellania Teleport |
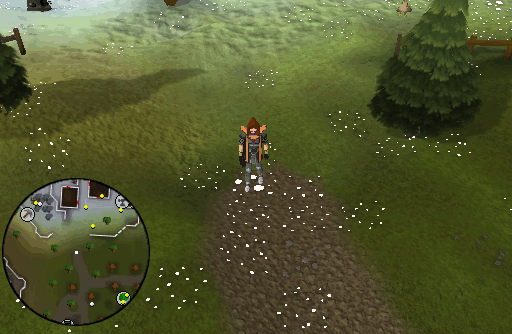 Click the above image to enlarge! |
| 22 degrees 35 minutes North 19 degrees 18 minutes East (22.35 N, 19.18 E) |
In level 46 Wilderness, North of the Lava Maze. Dig 2 steps West of the Eastern runite rock. This is located in the Wilderness be careful which items you take with you as they may be lost upon death. | 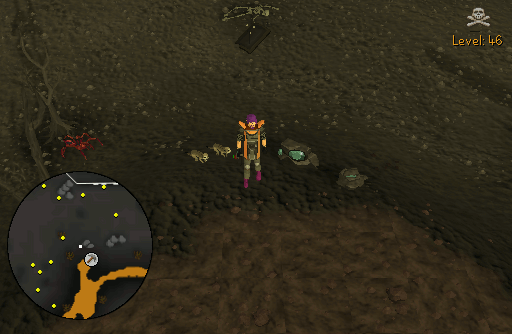 Click the above image to enlarge! |
| 22 degrees 45 minutes North 26 degrees 33 minutes East (22.45 N, 26.33 E) |
At the Greater Demon ruins in the level 47 wilderness - You have to dig on the most North-East pentagram (the red star on the ground). This is located in the Wilderness be careful which items you take with you as they may be lost upon death. | 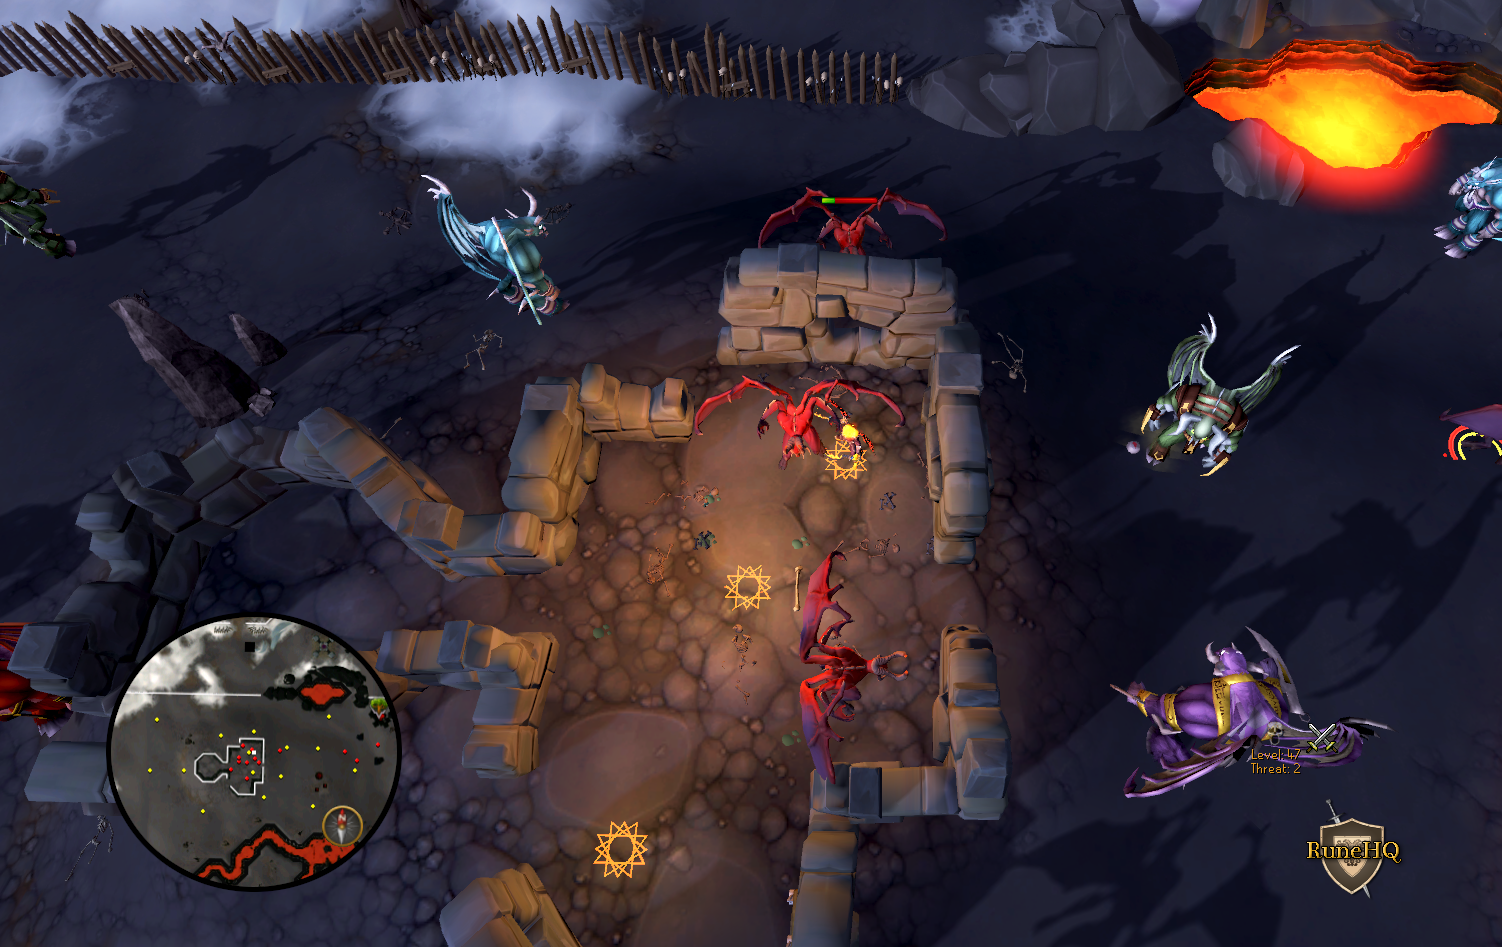 Click the above image to enlarge! |
24 Degrees |
||
| Coordinate | Location | Image |
| 24 degrees 24 minutes North 26 degrees 24 minutes East (24.24 N, 26.24 E) |
Level 53 Wilderness at the Rogues Castle. On the inside, the most North-East point. You will be attacked by a Zamorak wizard. This is located in the Wilderness be careful which items you take with you as they may be lost upon death. | 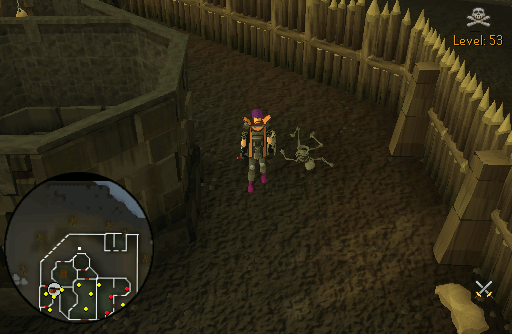 Click the above image to enlarge! |
| 24 degrees 56 minutes North 22 degrees 28 minutes East (24.56 N, 22.28 E) |
North of the Deserted Keep in level 55 Wilderness. Use the Ardougne lever to teleport to deep Wilderness, go North and slash the web. You should see some bones on the ground a little North of the web, walk 5 steps East of the bones and dig. This is located in the Wilderness be careful which items you take with you as they may be lost upon death. |  Click the above image to enlarge! |
| 24 degrees 58 minutes North 18 degrees 43 minutes East (24.58 N, 18.43 E) |
Behind the Pirates house in level 56 Wilderness one step West of the back door. You will be attacked by a Zamorak wizard. This is located in the Wilderness be careful which items you take with you as they may be lost upon death. |
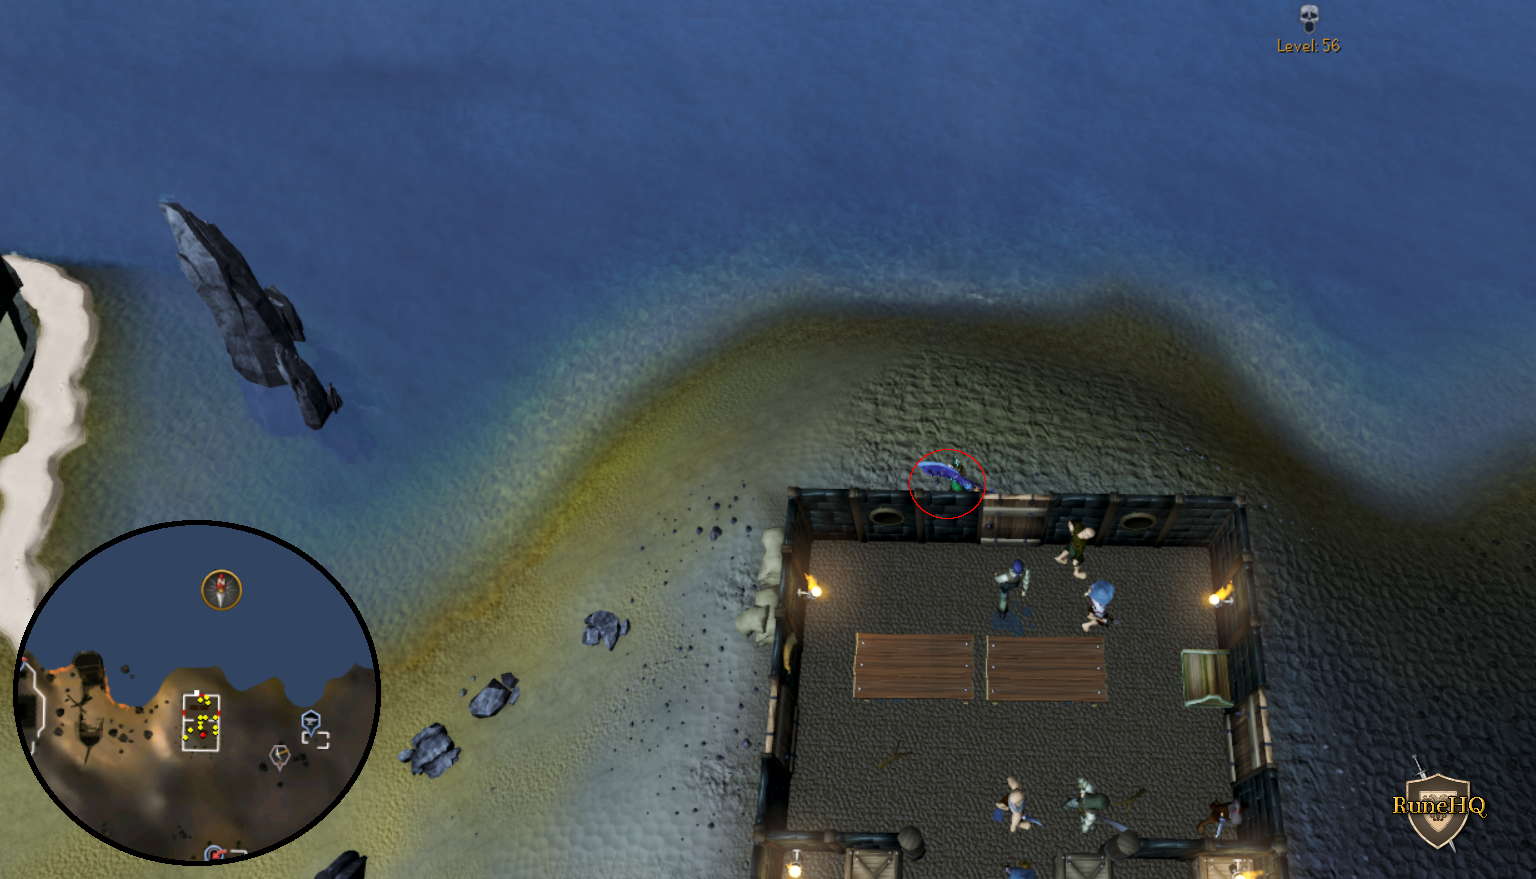 Click the above image to enlarge! |
25 Degrees |
||
| Coordinate | Location | Image |
| 25 degrees 03 minutes North 17 degrees 05 minutes East (25.03 N, 17.05 E) |
West of Agility Camp in the Wilderness - all the way North, close to agility fence. This is located in the Wilderness be careful which items you take with you as they may be lost upon death. |  Click the above image to enlarge! |
| 25 degrees 03 minutes North 23 degrees 24 minutes East (25.03 N, 23.24 E) |
One step West of the backdoor of the Axe Hut, North-East of the Mage Arena, in level 56 Wilderness. This is located in the Wilderness be careful which items you take with you as they may be lost upon death. | 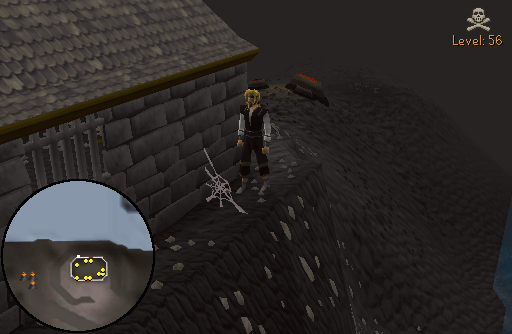 Click the above image to enlarge! |
These clues will require you to perform one or two of the many emotes at a specific location, while also equipping specific items. You can also be equipping any other items, but you must have all the items specified by the clue. When you perform the correct emote while equipping the correct items, then Uri Molotov will appear and give you the next clue or casket.
If you do not have or can not get the required items for an emote clue you can use a Costume-skipping ticket to do the emote clue without the needed items. You still have to go to the required location and do the required emote but it removes the need for the required items. The Costume-skipping ticket also let you do the opposite in the case of a clue stating that no items can be equipped. The ticket will allow you to leave all items equipped.
The table below lists the emote clues along with the specific locations and items needed for the clue.
There is also a list of some of the ways to obtain the items. If you choose not to make the required items yourself,
you can always purchase them from other players or at the Grand Exchange.
In any of the clues that tell of a Double Agent,
you will need to fight a look-alike of Uri Molotov.
The Double agent level for clues leading to the wilderness will be 77 and for clues that lead to all other areas, it will be 98.
After you fight the Double agent, you will need to perform the emote again with all required items equipped, and Uri Molotov will appear instead.
If he is not appearing double-check that the correct items are equipped, you may have unequipped items to fight him, such as a mud pie exchanged for a weapon.
| Easy Clue | |||
| Emote Clue | Location | Items | Image |
| Blow a raspberry at the monkey cage in Ardougne Zoo. Equip a studded leather body, bronze platelegs and a mud pie. | Ardougne Zoo. Closest teleport: Clocktower Teleport |
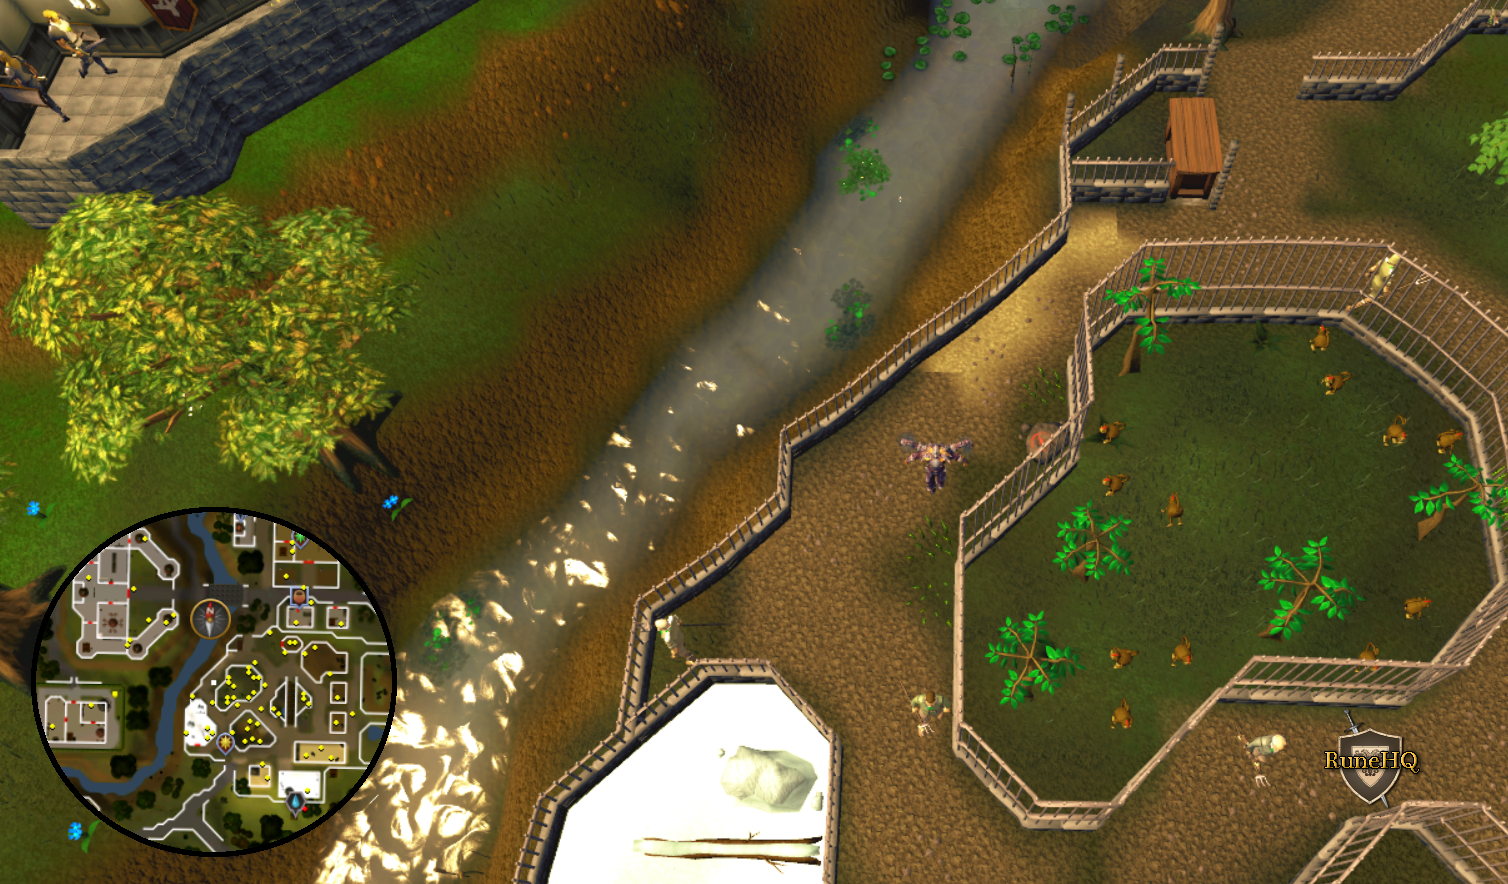
Click the above image to enlarge! |
|
| Blow raspberries outside the entrance to Keep Le Faye. Equip a studded leather coif, an iron platebody and leather gloves. | Keep Le Faye is North-East of the Legends' Guild East of the Sorcerer's Tower. Closest teleport: 'Chipped' Camelot teleport, Cape of legends, or Fairy Ring Code B-L-R |
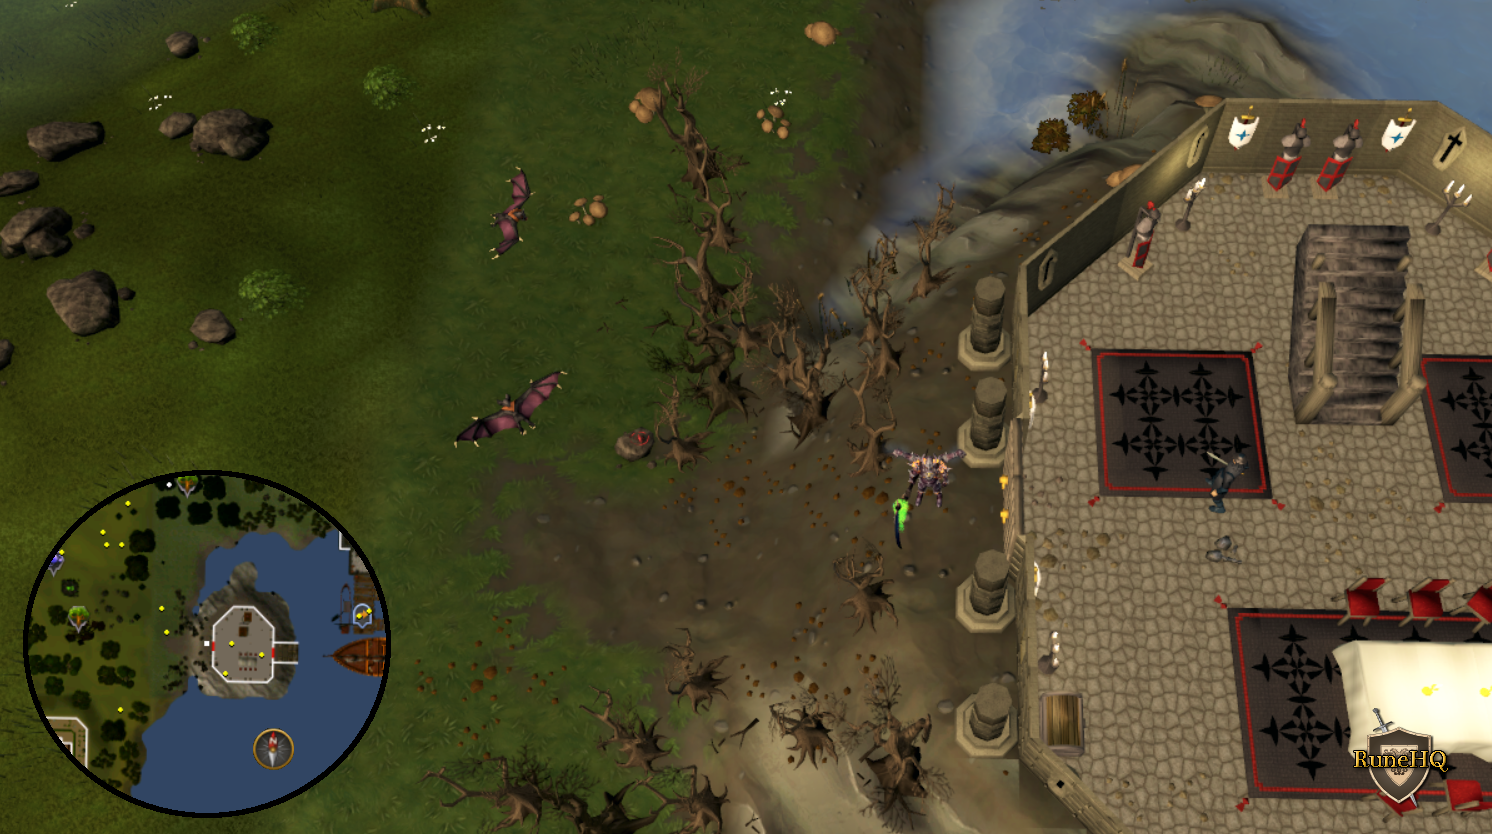 Click the above image to enlarge! |
|
| Bow or curtsy at the entrance to Het's Oasis. Equip an iron chain body, leather chaps, and a studded leather coif. | At the entrance to Het's Oasis in Al Kharid. Closest teleport: Ring of duelling (8) option 1 |
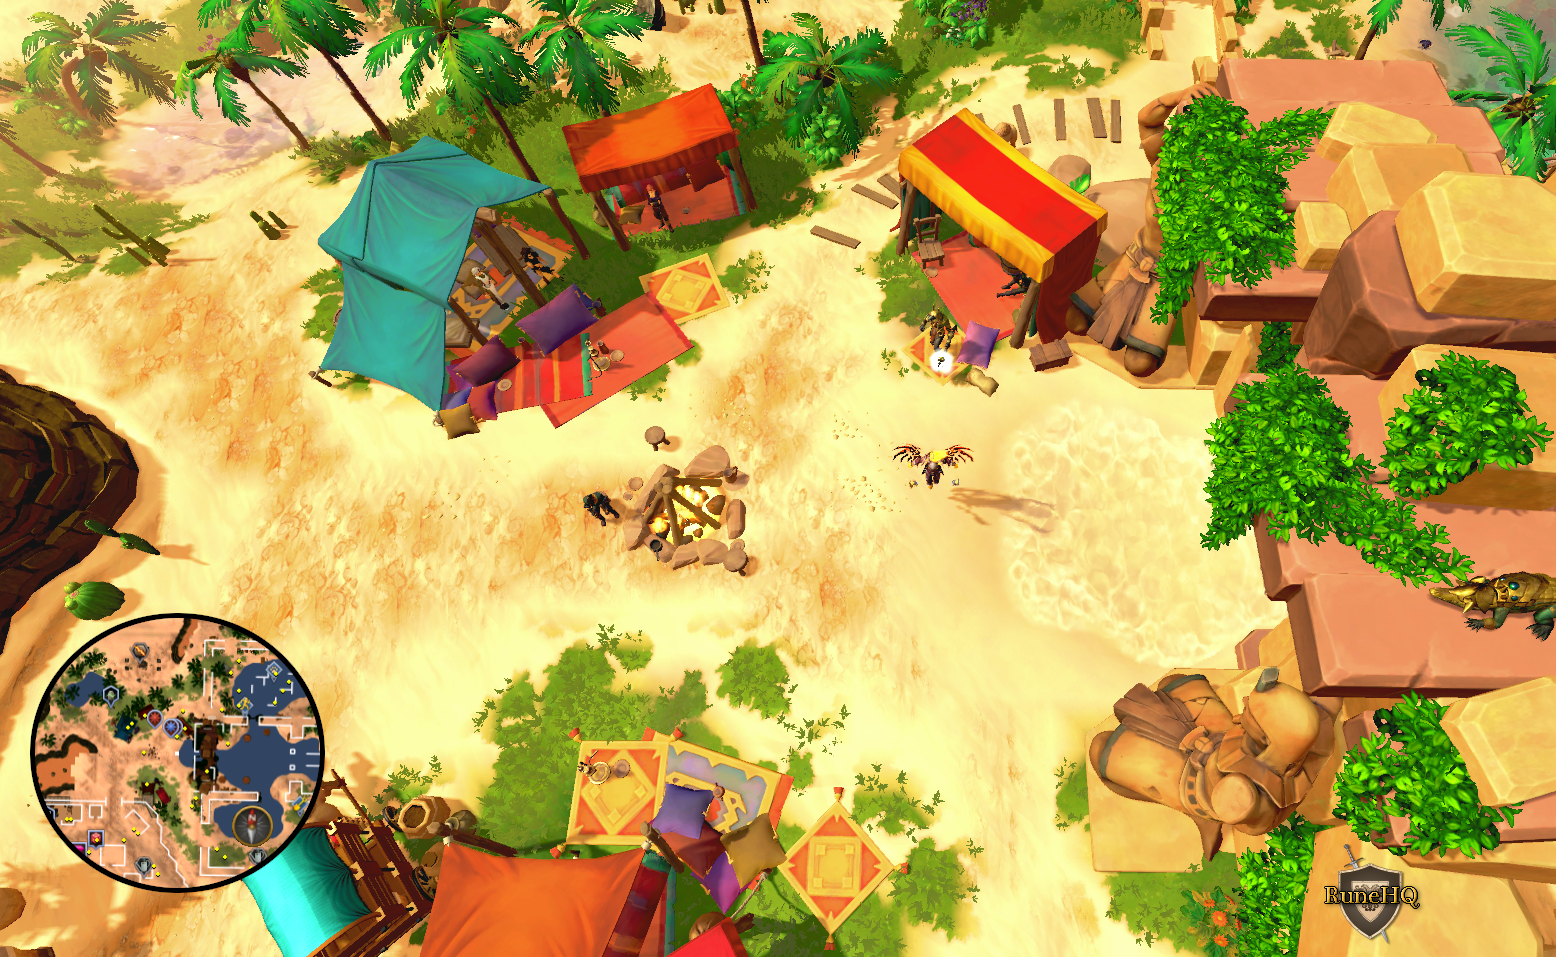 Click the above image to enlarge! |
|
| Bow or curtsy outside the entrance to the Legend's Guild. Equip iron platelegs, an emerald amulet and an oak shieldbow. | Just outside the Legend's Guild gate. Closest teleport: Cape of legends or Fairy Ring Code B-L-R |
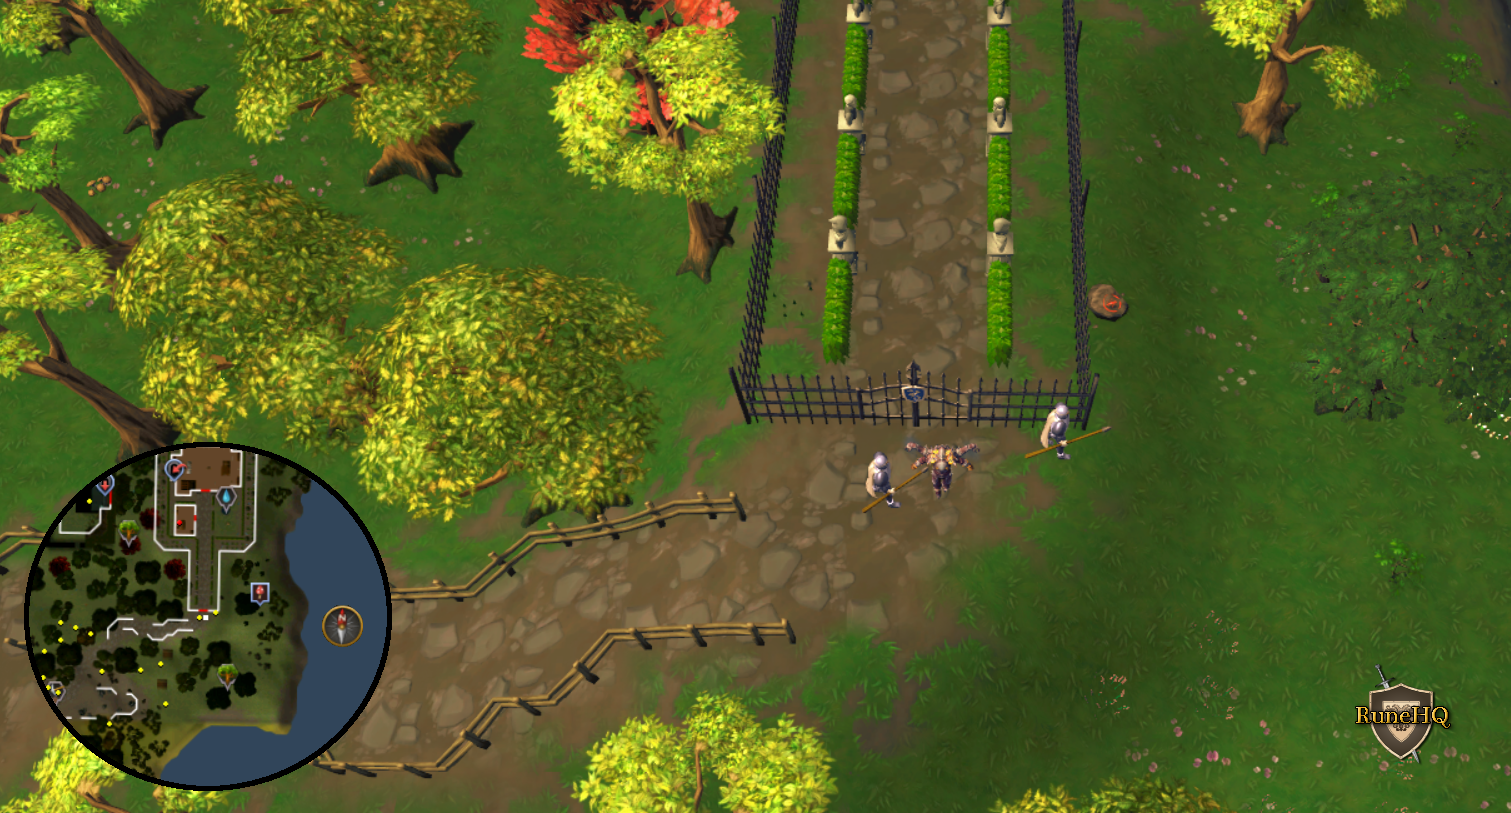
Click the above image to enlarge! |
|
| Cheer in the centre of the Burthorpe Games Room. Have nothing equipped at all when you do. | The Games Room in Burthorpe. Go downstairs and enter the game room. Closest teleport: Games necklace (8) option 1 |
None |
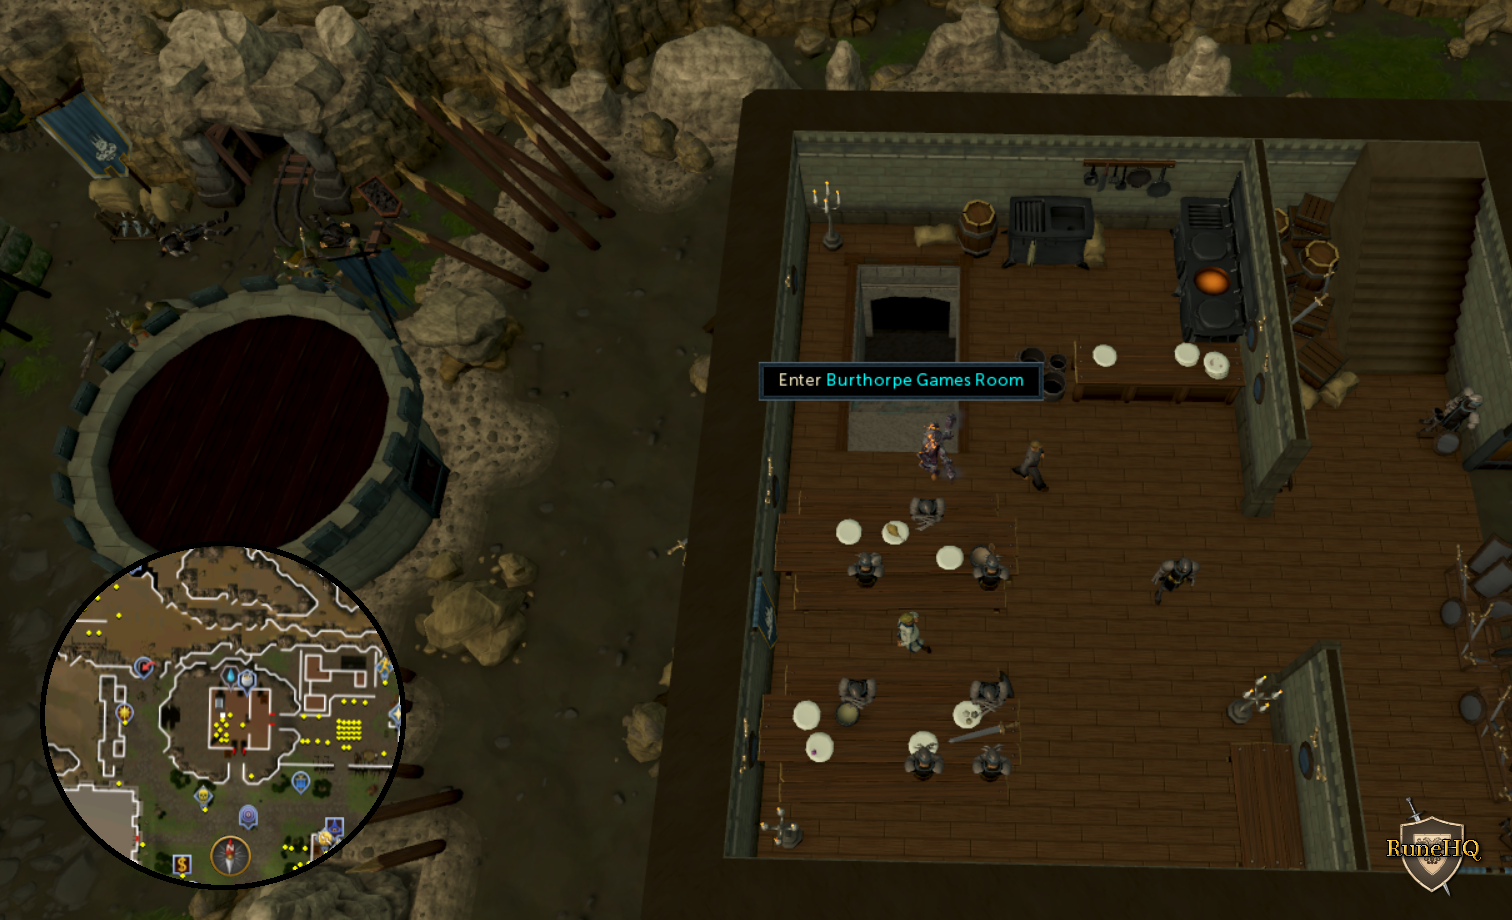
Click the above image to enlarge! |
| Cheer at the Druid's Circle. Equip an air tiara, bronze two-handed sword, and gold amulet. | Druid's Circle in Taverley. Closest teleport: Taverly lodestone or Taverley tablet |
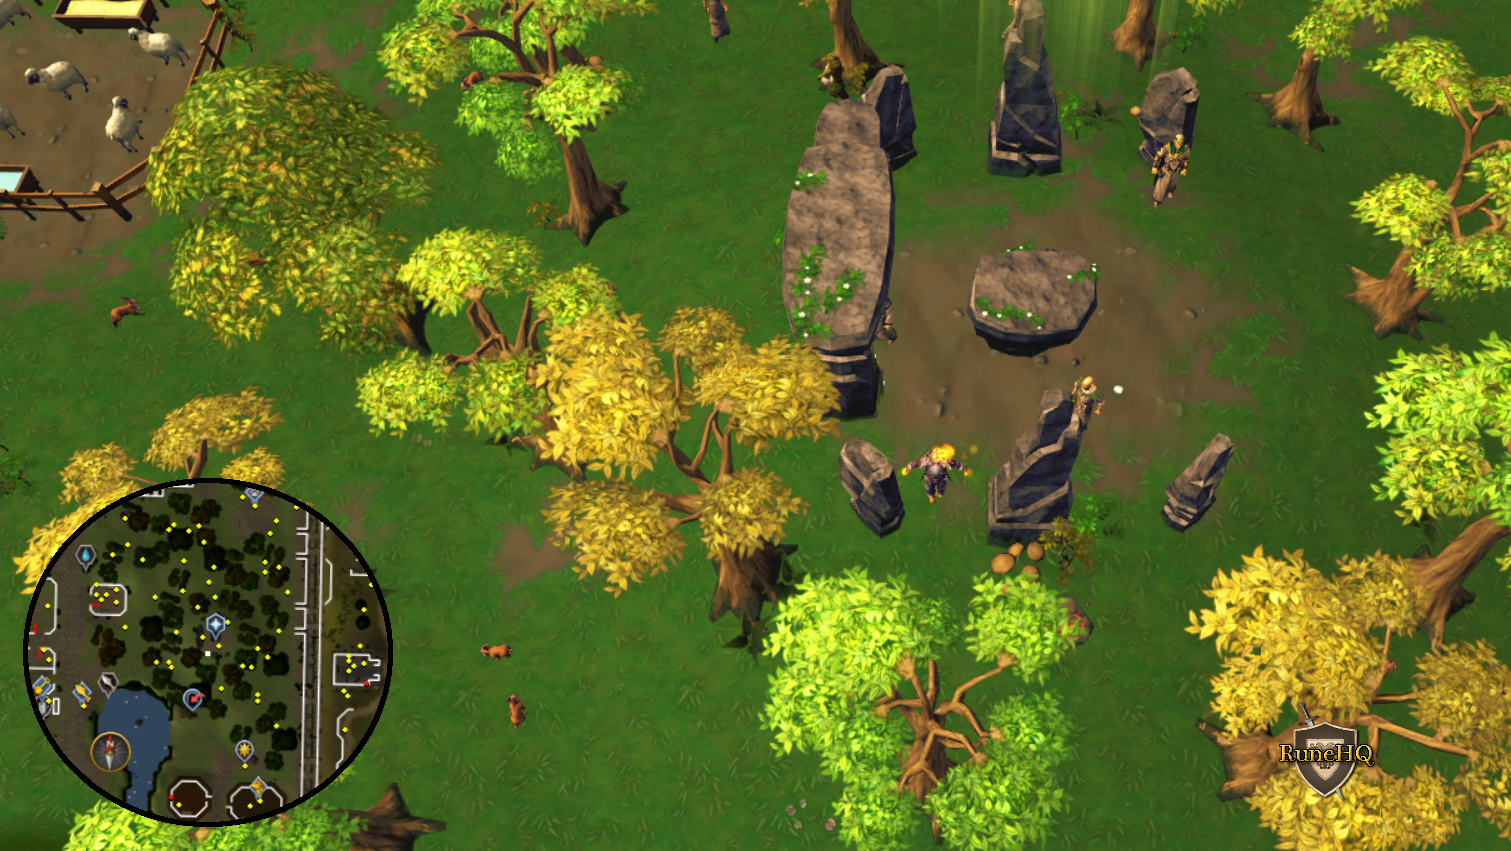
Click the above image to enlarge! |
|
| Cheer for the monks at Port Sarim. Equip a studded leather coif, steel plateskirt and a sapphire necklace. | Entrana Monks on the Port Sarim docks. Closest teleport: Captain's log or Spirit Tree teleport option 6 |
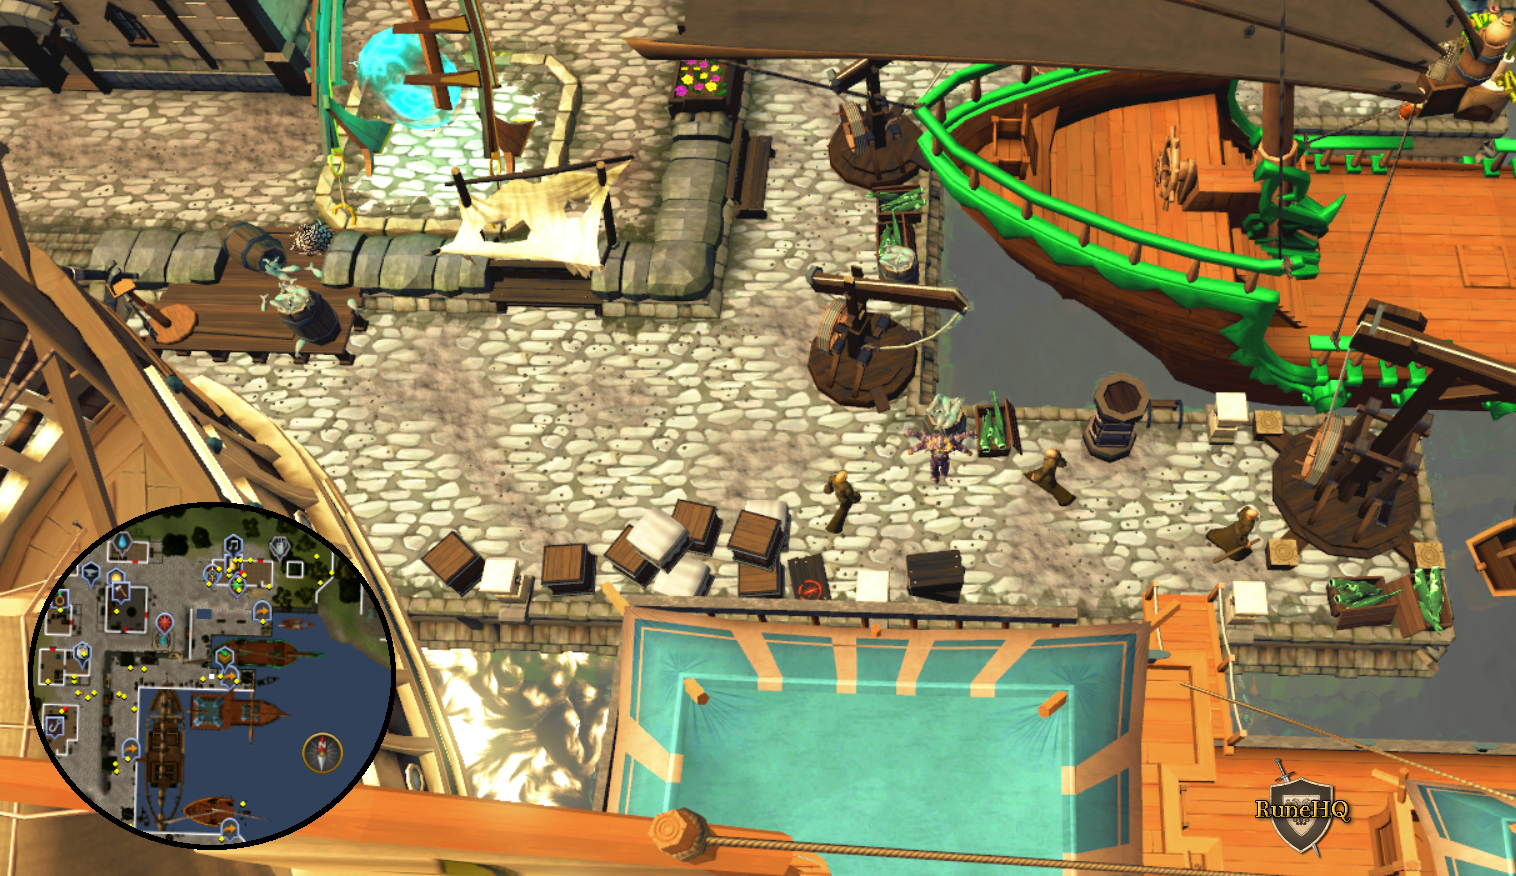
Click the above image to enlarge! |
|
| Clap in the main exam room in the Exam Centre. Equip a ruby amulet, blue flowers, and leather gloves. | Exam centre at the Digsite. East of Varrock. Closest teleport: Digsite pendant (5) option 3. |
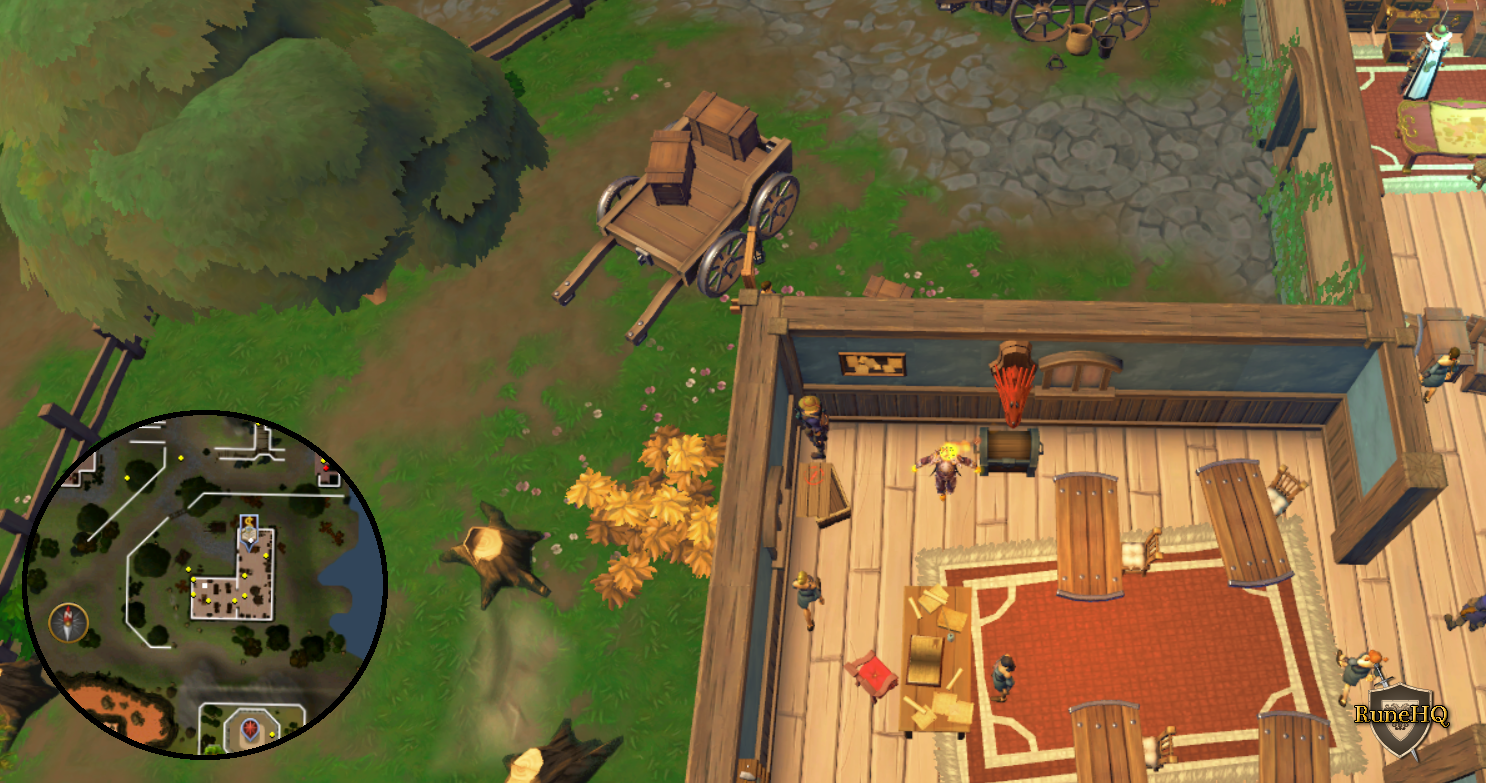
Click the above image to enlarge! |
|
| Clap on the causeway to the Wizard's Tower. Equip an iron helmet, emerald ring, and leather gloves | The bridge to the Wizard's Tower. South of Draynor Village. Closest teleport: Traveller's Necklace option 1 |
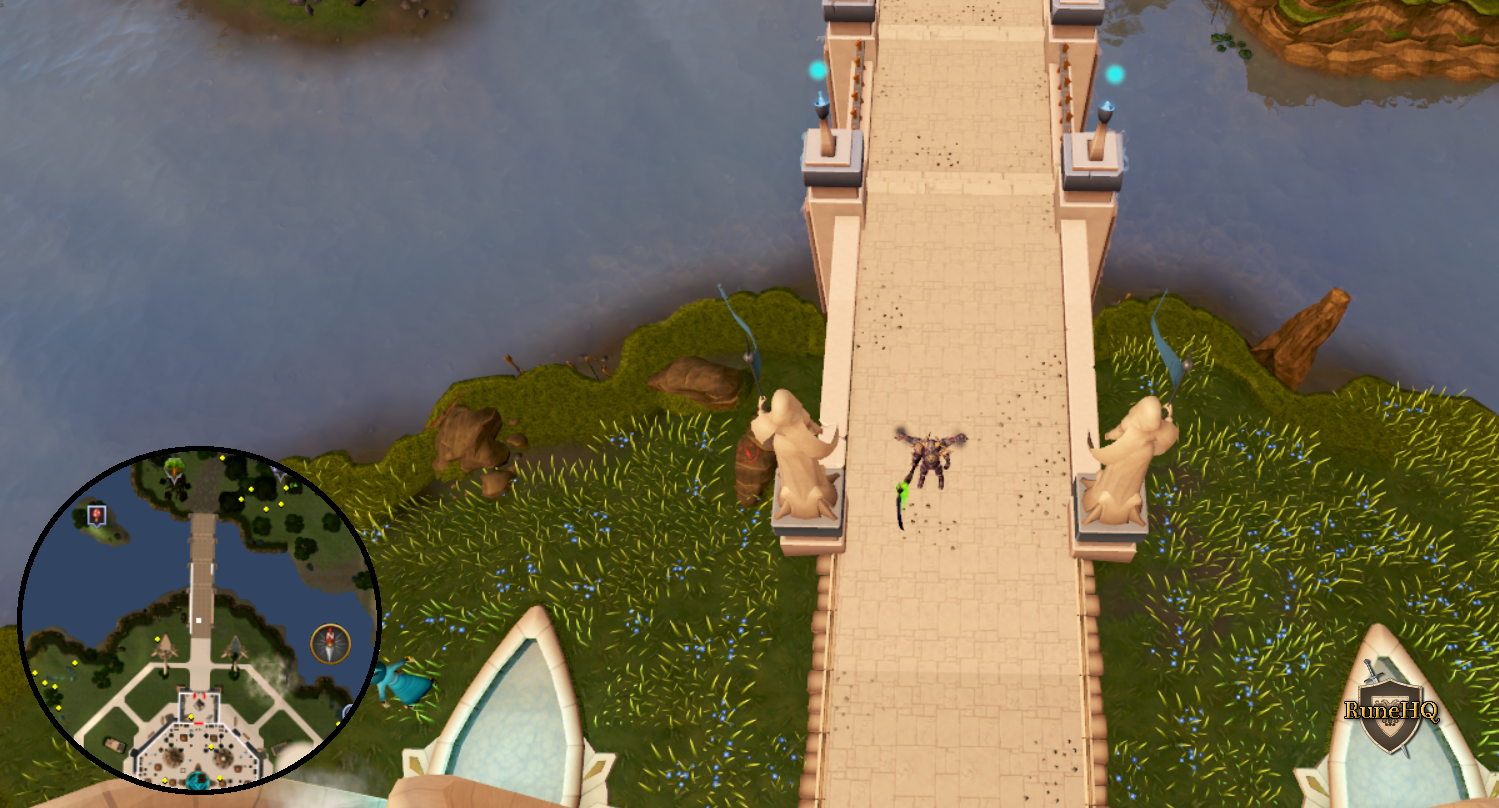 Click the above image to enlarge! |
|
| Clap on the top level of the mill, North of East Ardougne. Equip an emerald ring, wood camo top and an unenchanted tiara. |
Top level of the mill North of Ardougne. Closest teleport: Ardougne lodestone. |

Click the above image to enlarge! |
|
| Cry outside the south gates of Fort Forinthry. Equip a hard leather body, leather chaps, and a bronze hatchet. | South of Fort Forinthry, South of the Lodestone. Closest teleport: Fort Forinthry lodestone or Fort Forinthry Teleport |
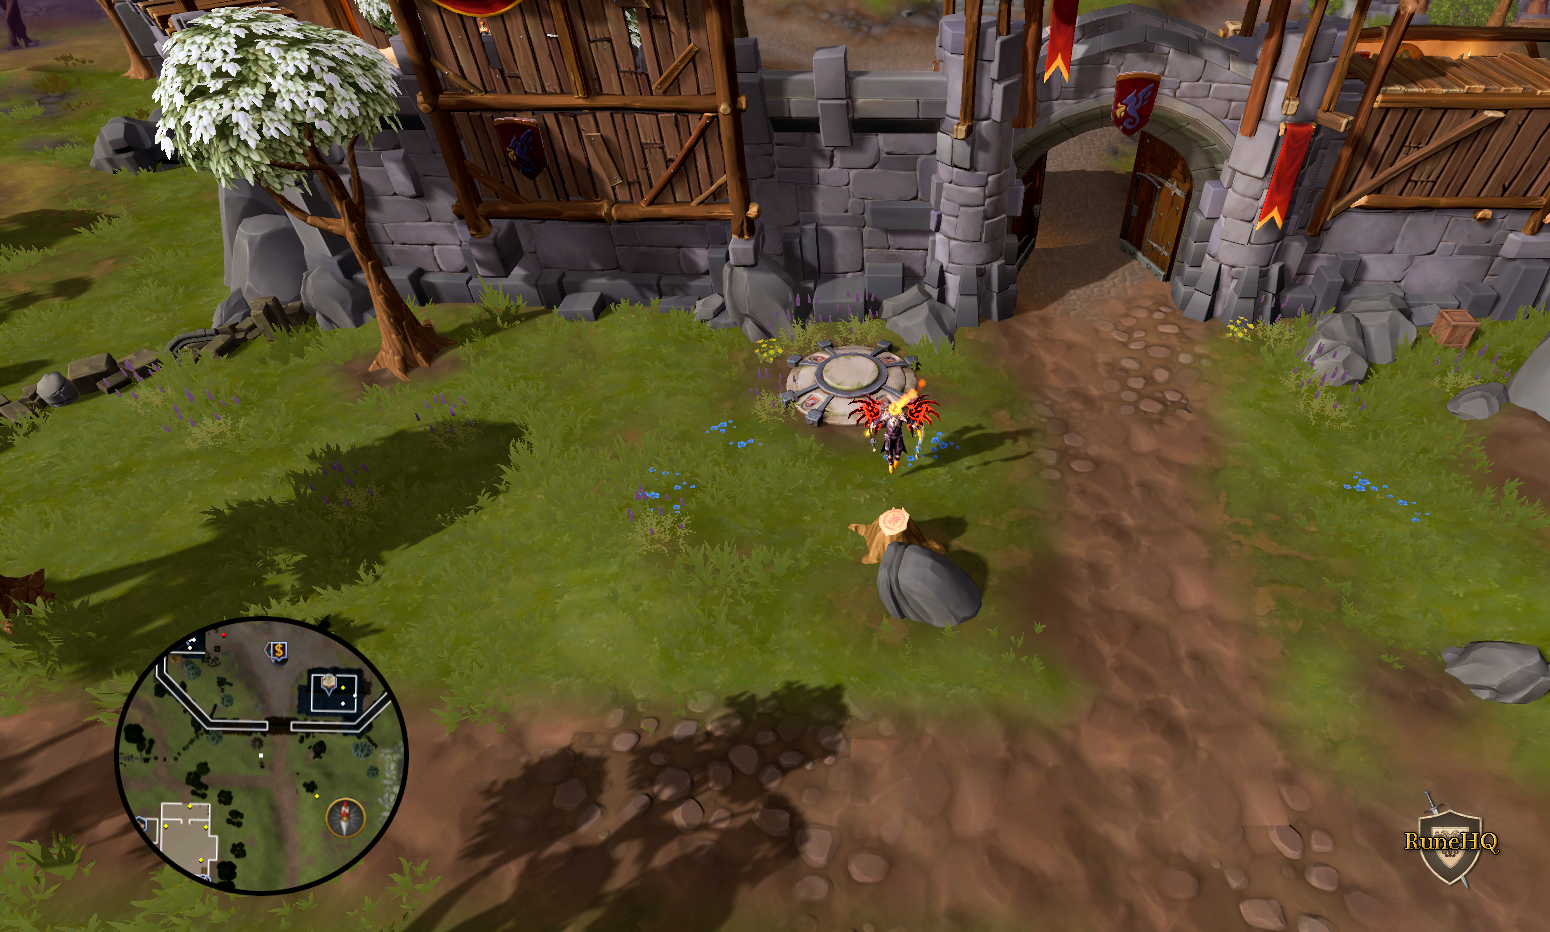
Click the above image to enlarge! |
|
| Dance a jig by the entrance to the fishing guild. Equip an emerald ring, a sapphire amulet, and a bronze chain body. | Fishing Guild. North of East Ardougne Closest teleport: Skills necklace option 1 |
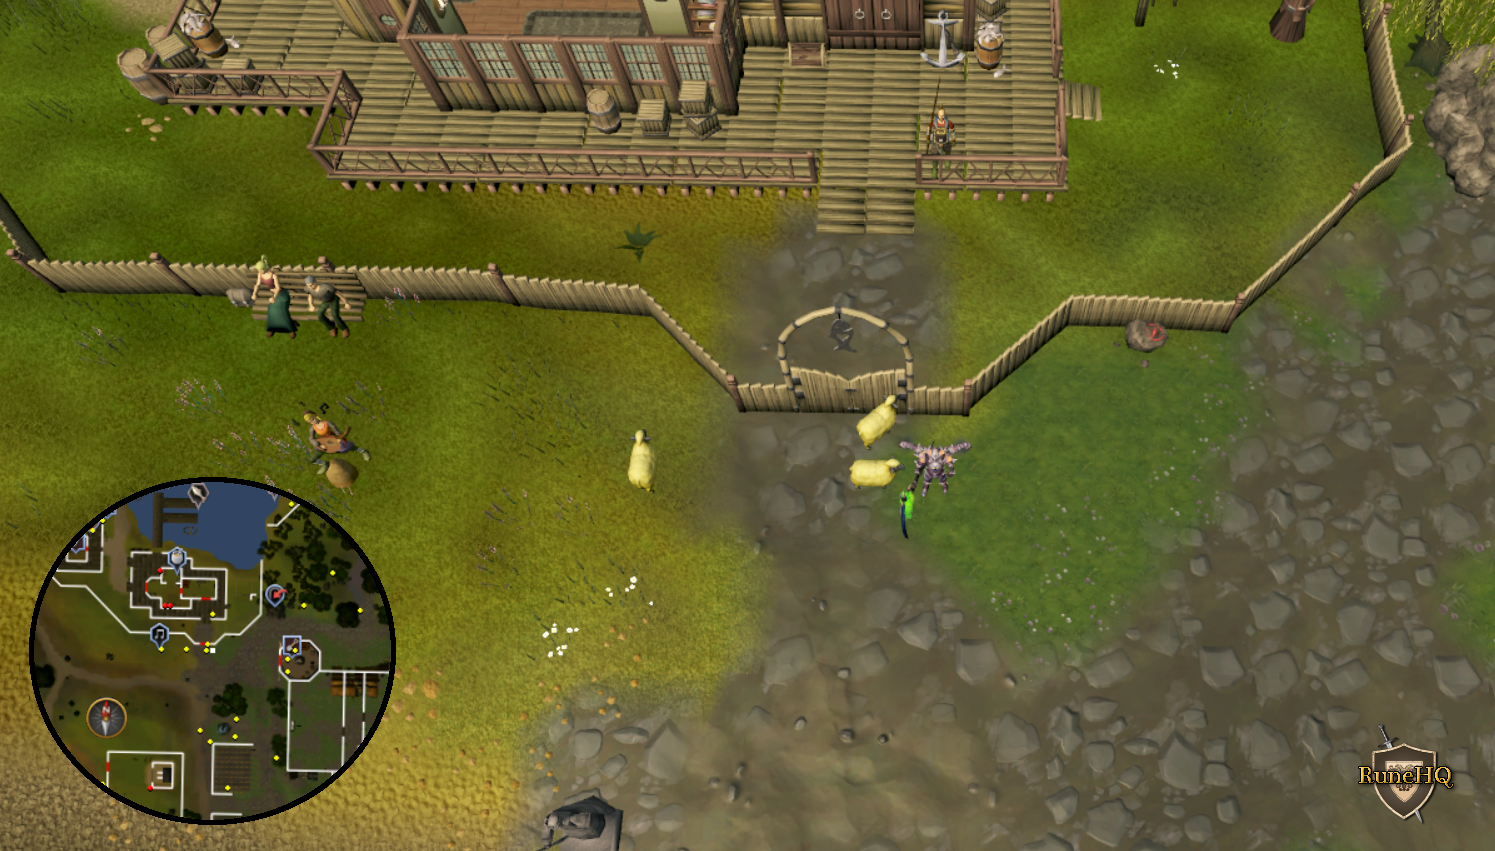 Click the above image to enlarge! |
|
| Dance at the crossroads North of Draynor. Equip an iron chain body, a sapphire ring and a shieldbow. | Crossroads North of Draynor Village. Closest teleport: Draynor lodestone |

Click the above image to enlarge! |
|
| Dance in the Party Room. Equip a steel full helmet, steel platebody, and an iron plateskirt. | Party Room in Falador. Closest teleport: Skills necklace (4) option 2 |
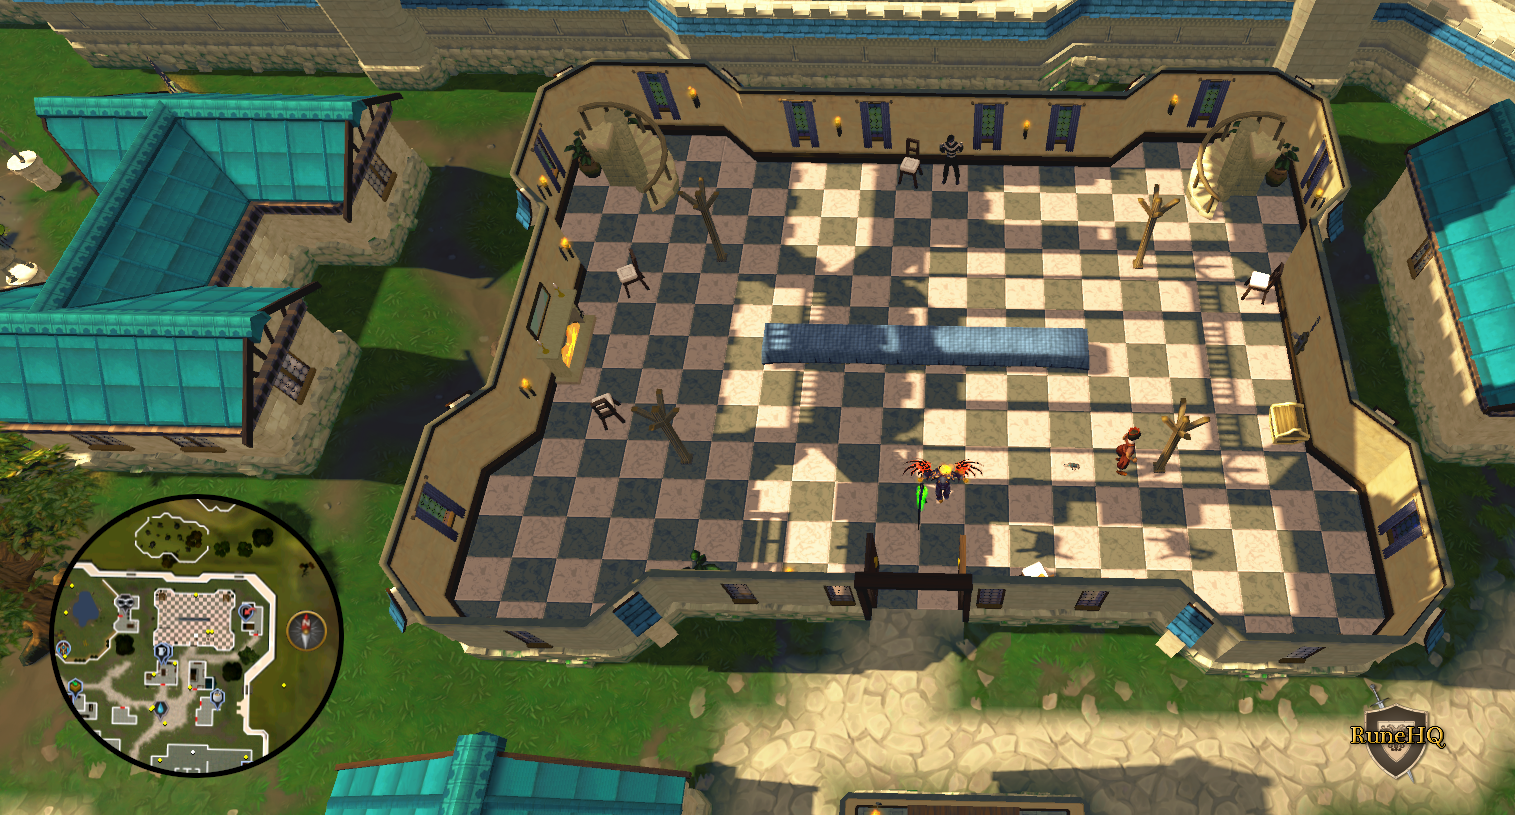
Click the above image to enlarge! |
|
| Dance in the shack in Lumbridge Swamp. Equip a bronze dagger, iron full helmet and a gold ring. | The shack in the Lumbridge Swamp. Closest teleport: Enlightened amulet option 1 |
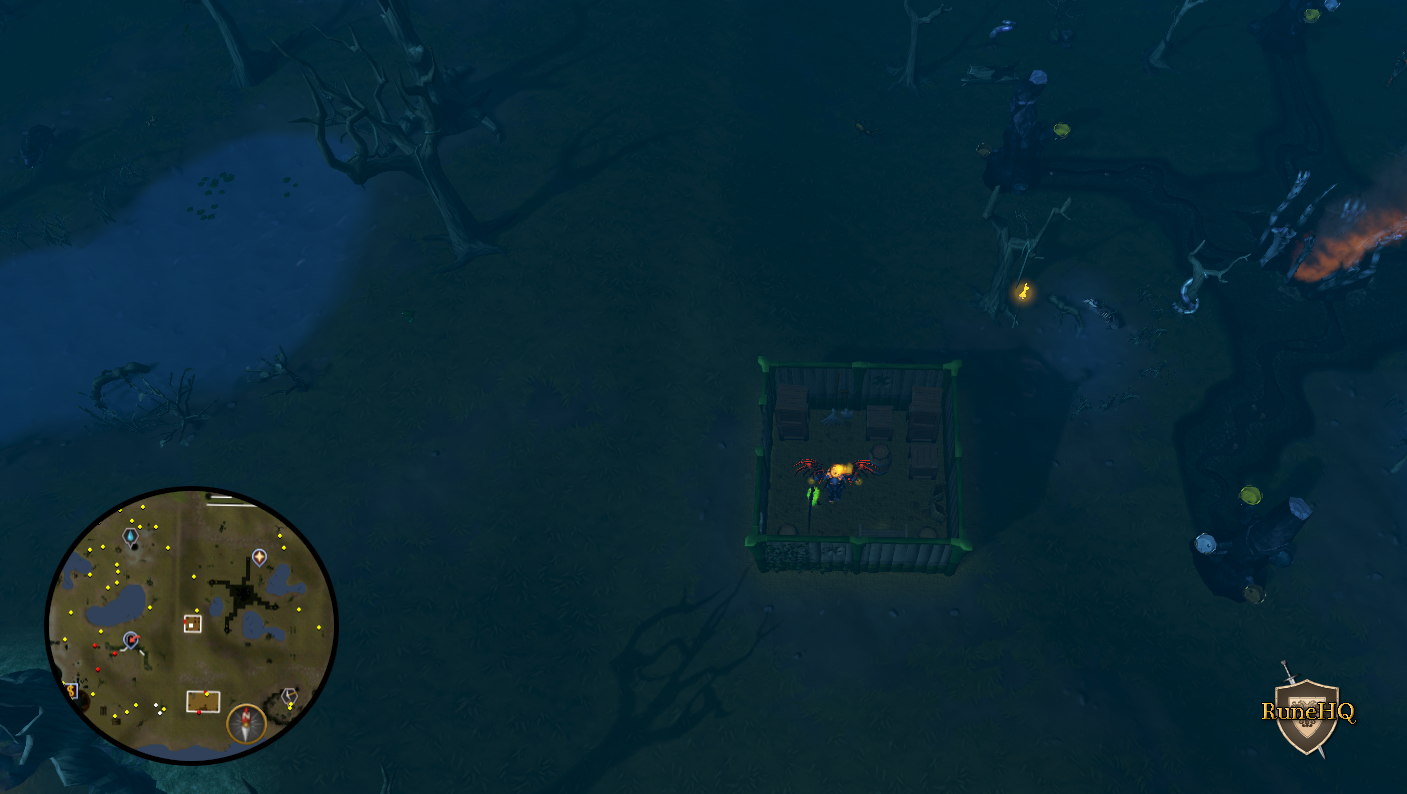
Click the above image to enlarge! |
|
| Headbang in the mine North of Al Kharid. Equip a polar camo top, leather gloves, and leather boots. | Al Kharid Mine. North of Al Kharid. Closest teleport: Dungeoneering cape (t) option 0 then option 5 |
 Click the above image to enlarge! |
|
| Jump for joy at the beehives. Equip iron boots, unholy symbol, and a steel hatchet. | Beehives South-East of Seers' Village and West of Catherby. Closest teleport: Camelot teleport then run South or Catherby lodestone then run West |
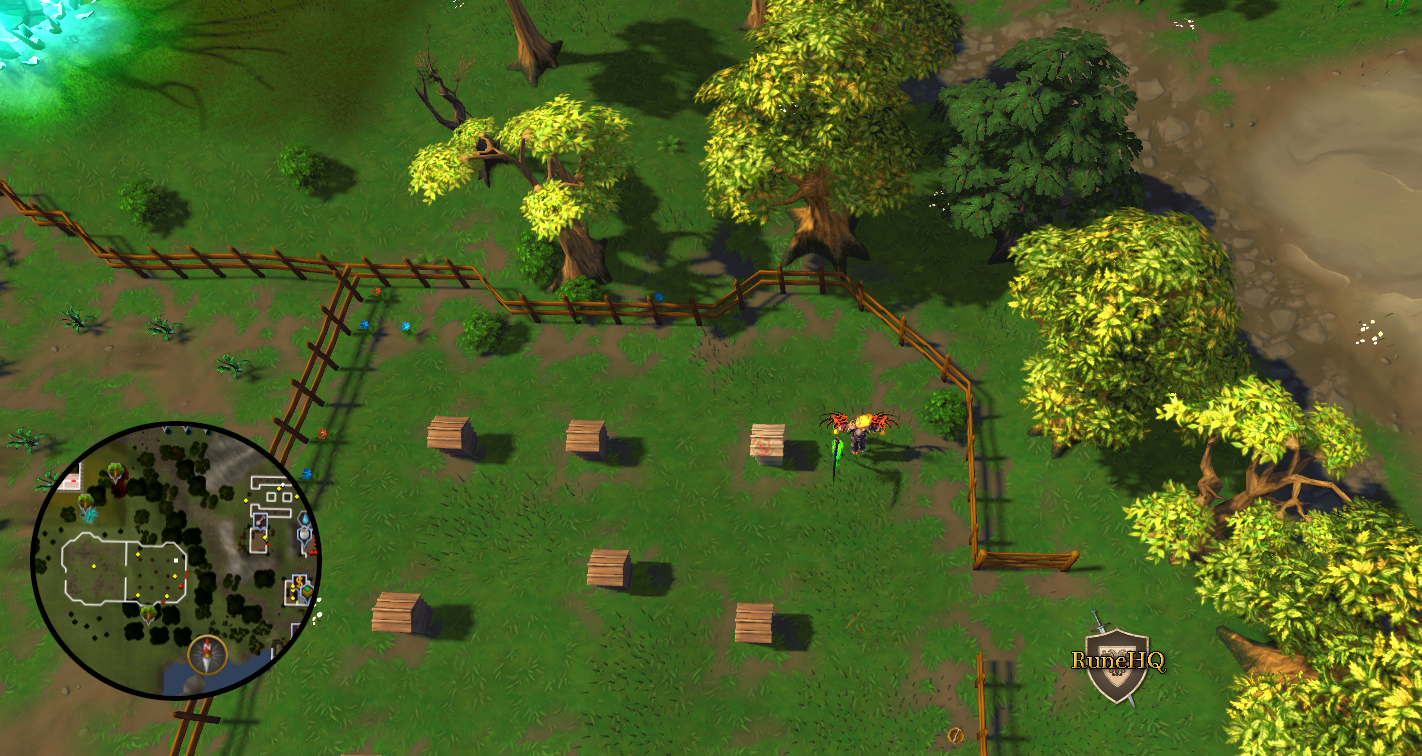
Click the above image to enlarge! |
|
| Laugh at the crossroads South of Sinclair Mansion. Equip a cowl, strength amulet and iron scimitar. | Crossroads South of Sinclair Mansion, North-East of Seers' Village. Closest teleport: Fairy Ring code C-J-R then run South-East |
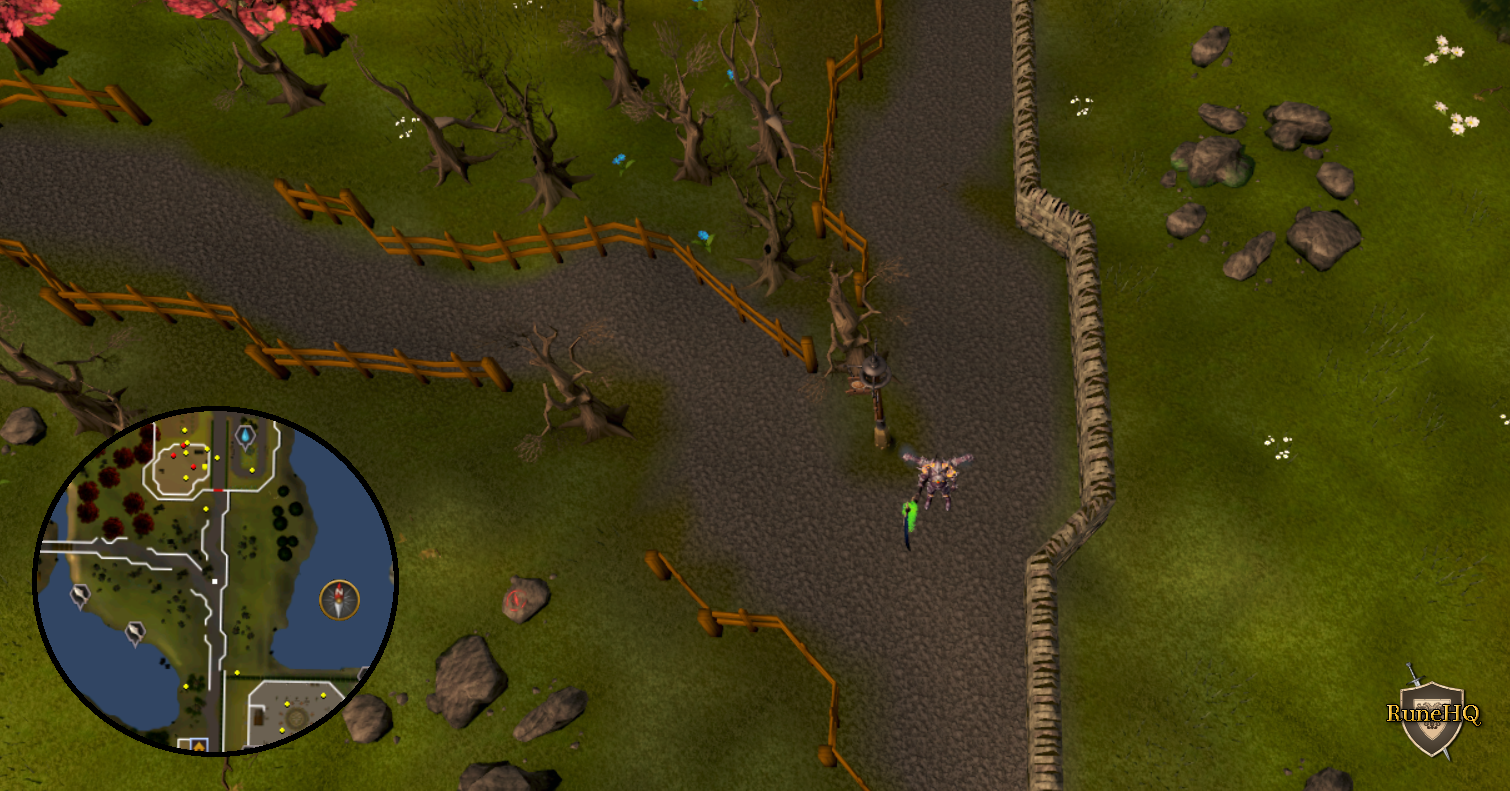 Click the above image to enlarge! |
|
| Panic in the Limestone Mine. Equip bronze platelegs, a steel pickaxe, and a steel helmet. | Limestone Mine, East of Varrock (road to Canifis). Closest teleport: Skeletal horror teleport or Fort Forinthry Teleport then run East |
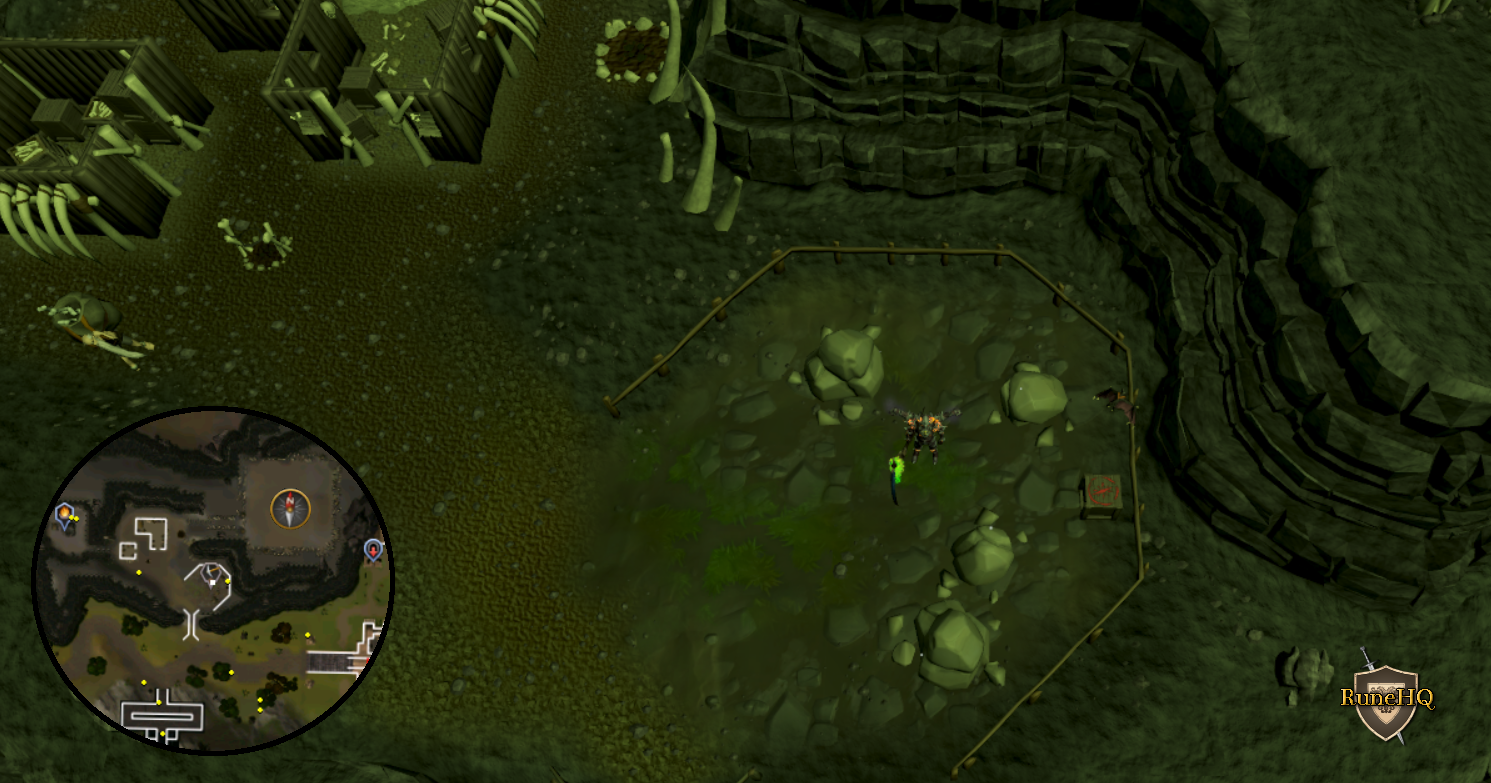 Click the above image to enlarge! |
|
| Panic on the pier where you catch the Fishing Trawler. Have nothing equipped at all when you do. | Port Khazard docks, where you start the Fishing Trawler Mini-Game. Closest teleport: Ardougne cloak 3 or 4 Watchtower Teleport |
None. |
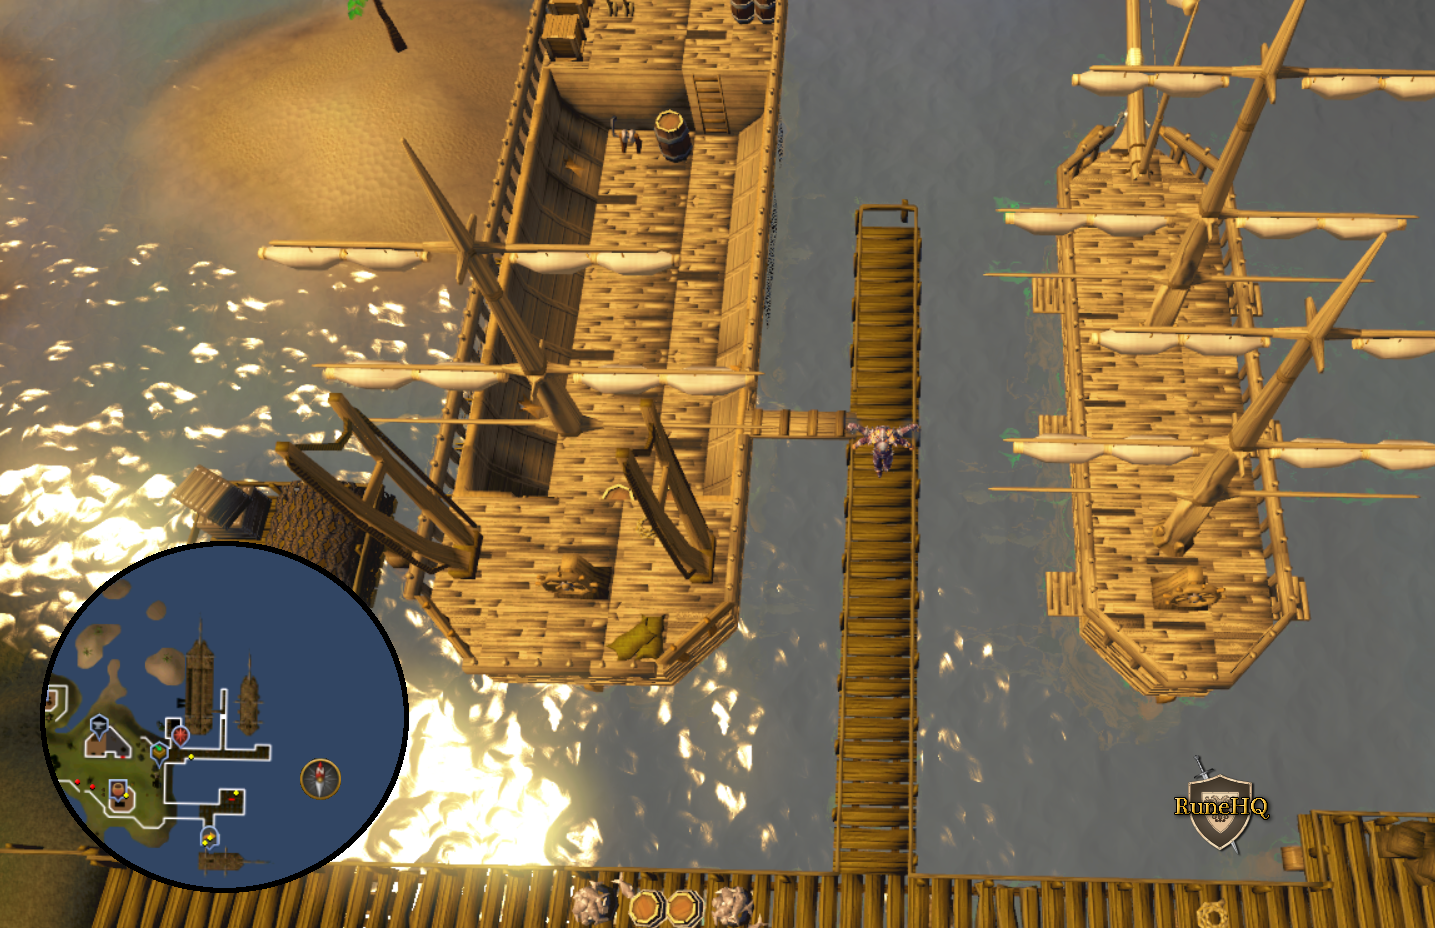
Click the above image to enlarge! |
| Shrug in the mine near Rimmington. Equip a gold necklace, a gold ring, and a bronze spear. | Mine near Rimmington. Closest teleport: Rimmington tablet |
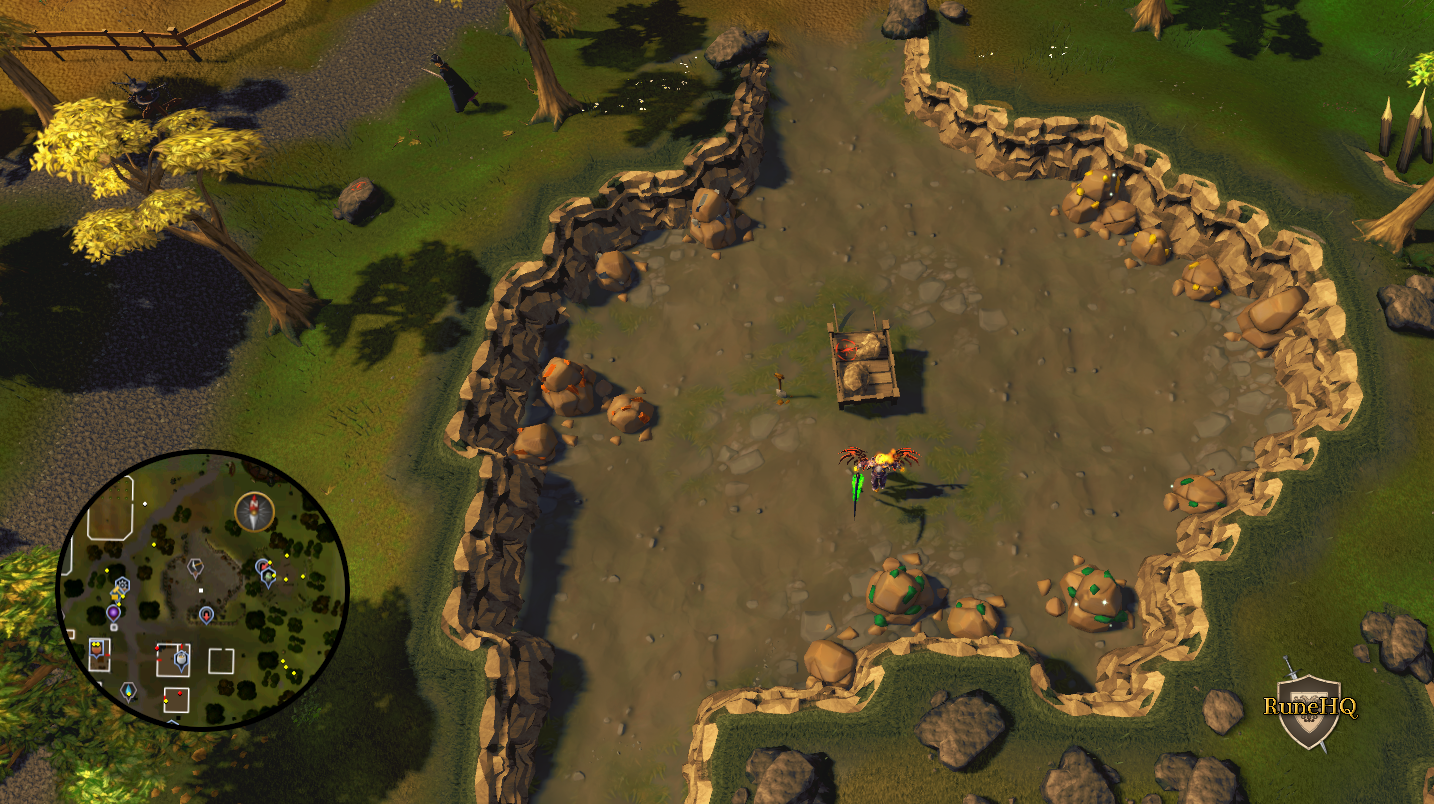
Click the above image to enlarge! |
|
| Think in the middle of wheat field by the Lumbridge mill. Equip a sapphire necklace, a polar camo legs and an oak shortbow. | The Wheat field near the mill in Lumbridge. Closest teleport: Draynor village lodestone then run East |
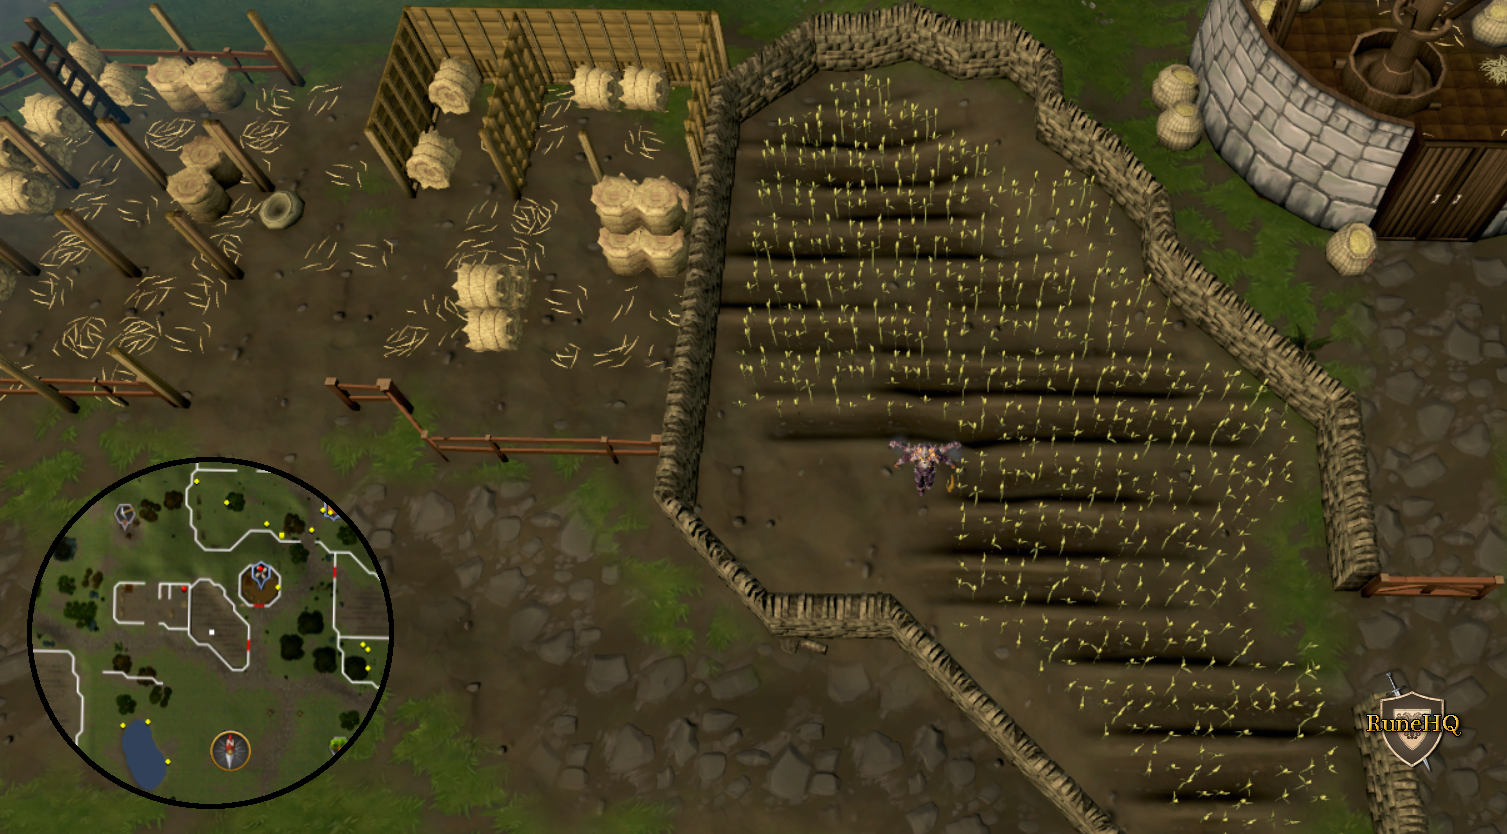
Click the above image to enlarge! |
|
| Twirl at the crossroads North of Rimmington and just South of the Clan Camp. Equip a sapphire ring, yellow flowers and leather chaps. | Crossroads near the Crafting Guild. South-West of Falador. Closest teleport: Rimmington tablet |
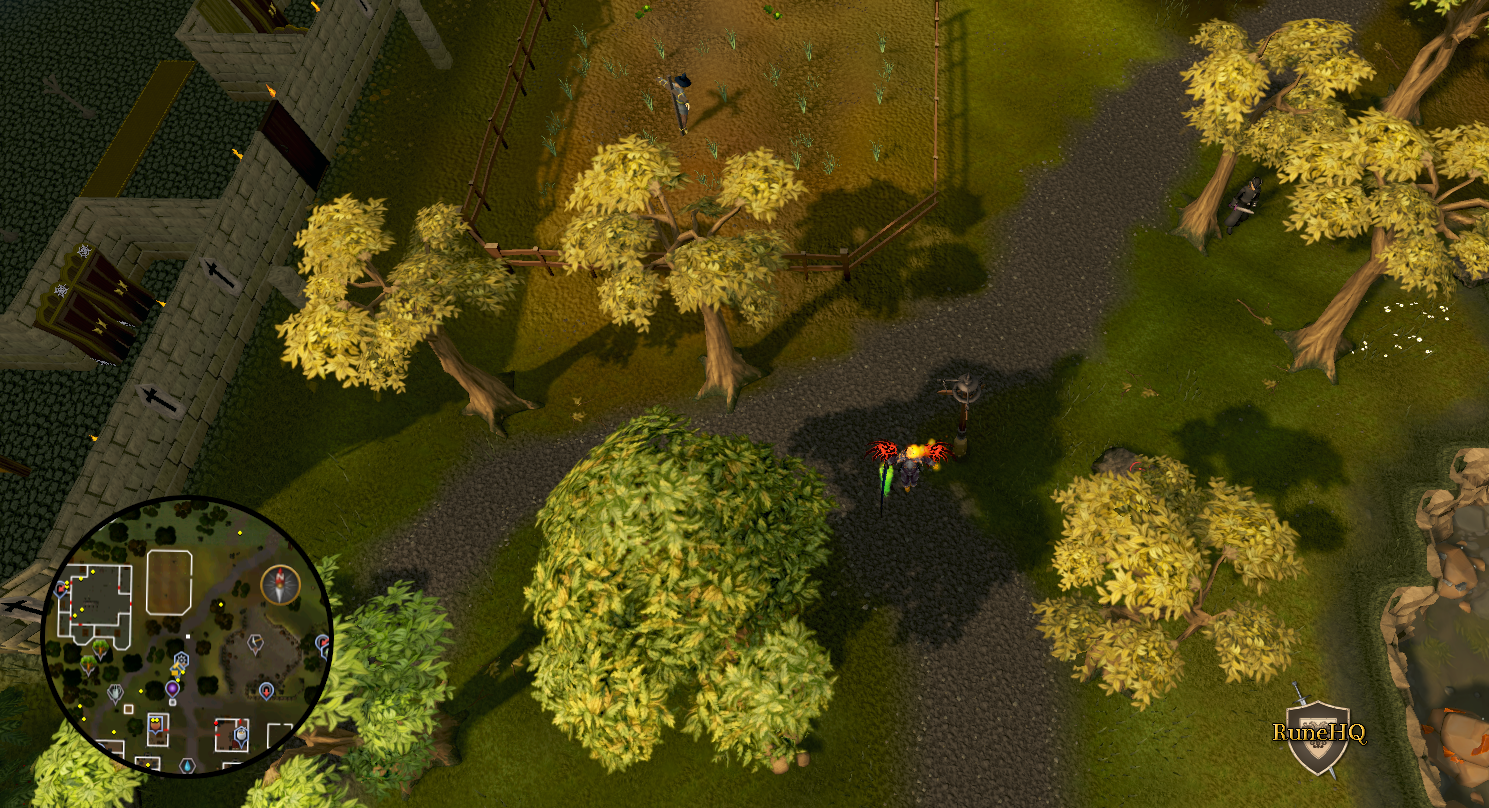
Click the above image to enlarge! |
|
| Twirl in Draynor Manor by the fountain. Equip an iron platebody, studded leather chaps and a bronze full helmet. | Fountain South-West of Draynor Manor. North of Draynor Village. Falador. Closest teleport: Draynor Village lodestone then run North-west. |

Click the above image to enlarge! |
|
| Wave on Mudskipper Point. Equip a gold ring, leather chaps and a steel mace. | Mudskipper Point, South-East of Rimmington. Closest teleport: Fairy Ring code A-I-Q |
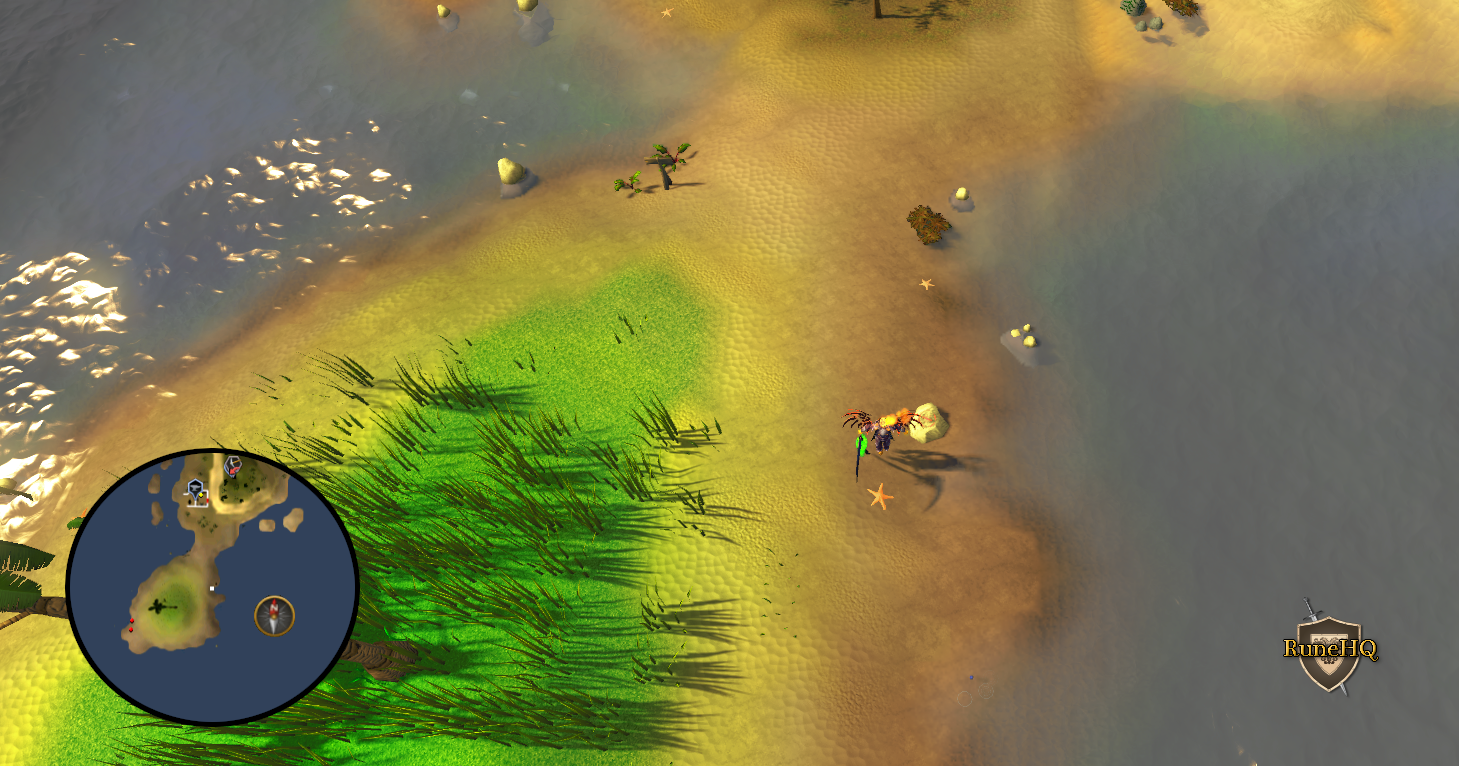
Click the above image to enlarge! |
|
| Yawn in Draynor Marketplace. Equip studded leather chaps, an iron kiteshield and a steel longsword. | Draynor marketplace. Closest teleport: Amulet of glory (4) option 3 |
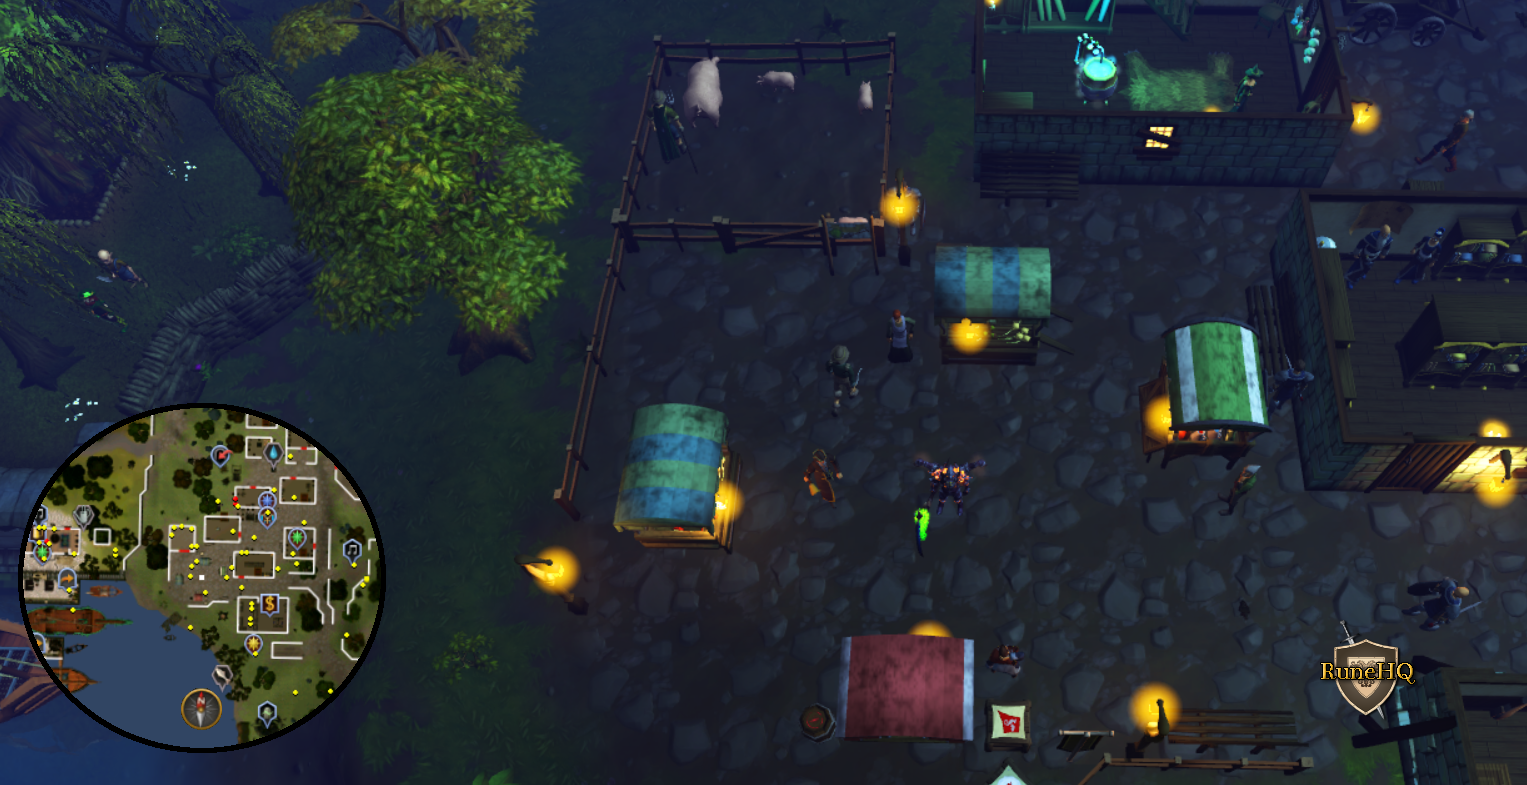 Click the above image to enlarge! |
|
| Yawn near the census in Varrock Palace library. Equip a holy symbol, leather vambraces, and an iron warhammer. | Varrock Library. Closest teleport: Varrock teleport or 'Chipped' Varrock teleport |
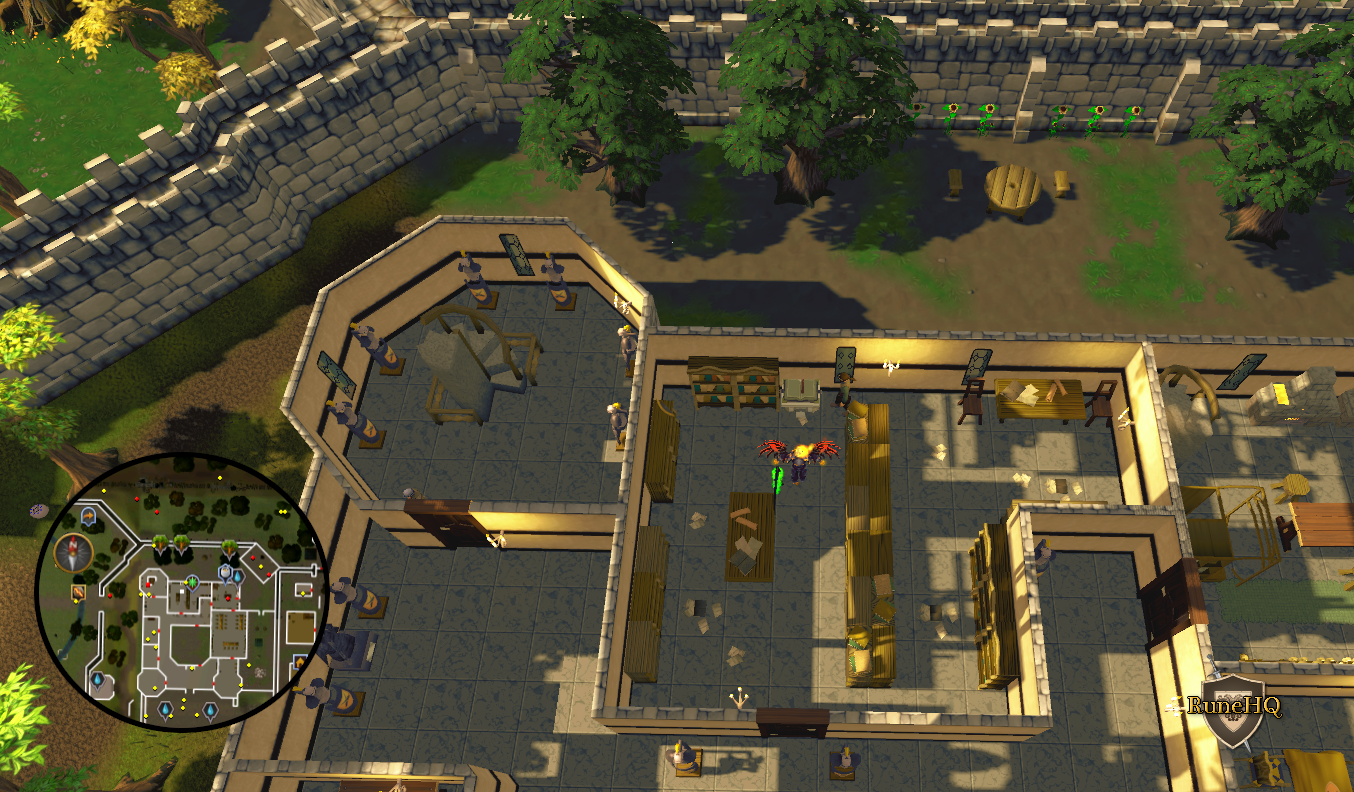
Click the above image to enlarge! |
|
| Medium Clue | |||
| Emote Clue | Location | Items | Image |
| Beckon in Tai Bwo Wannai. Clap before you talk to me. Equip green dragonhide chaps, a ring of dueling and a mithril helmet. | Tai Bwo Wannai on Karamja. Closest teleport: Tai Bwo Wannai Teleport. |
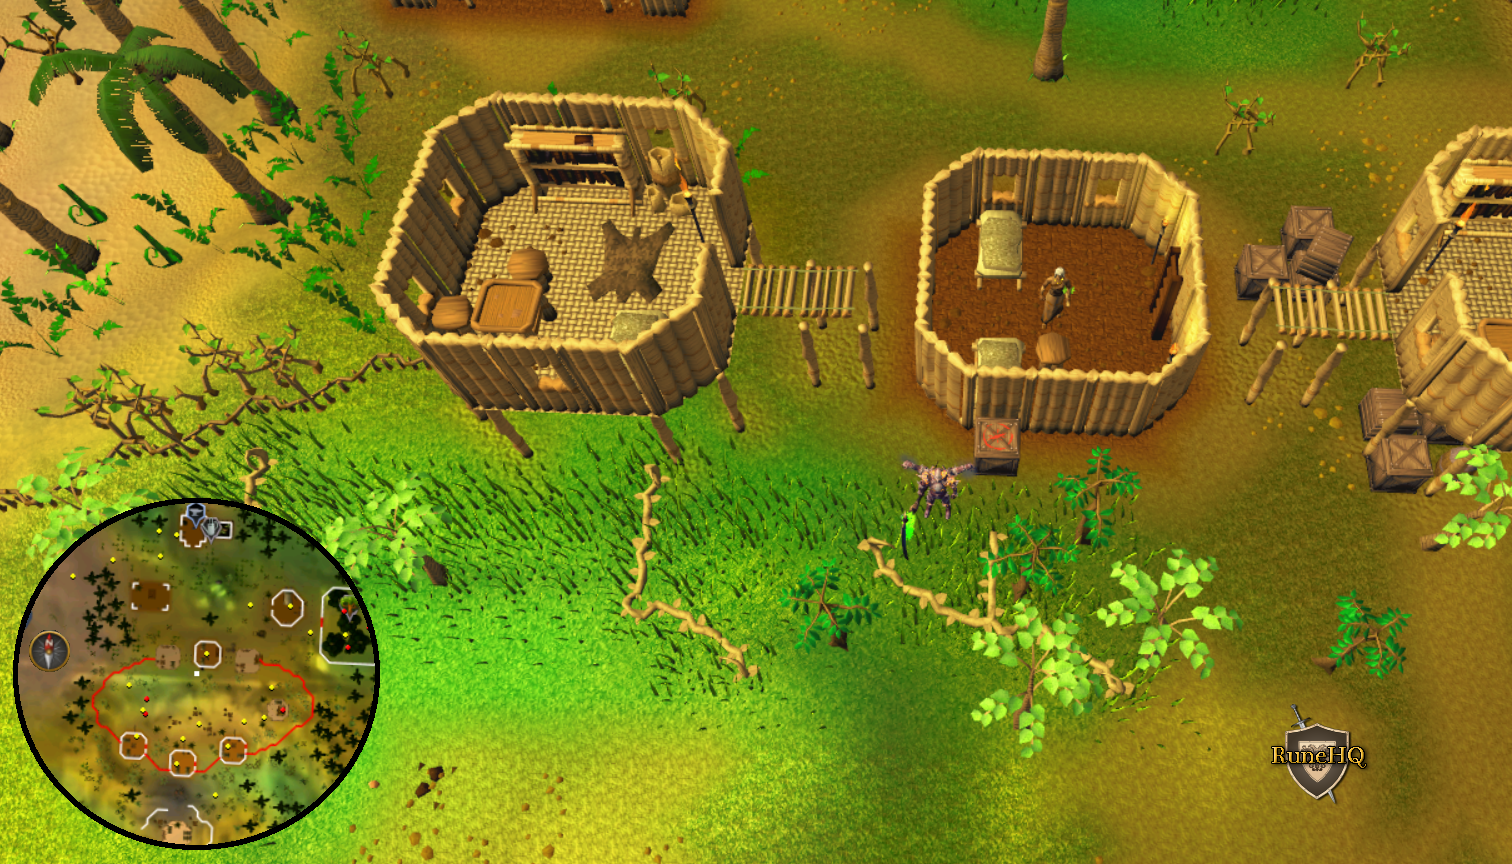 Click the above image to enlarge! |
|
| Beckon at Varrock Dig Site, near the eastern winch. Bow or curtsy before you talk to me. Equip a pointed red and black snelm, snakeskin boots and iron pickaxe. | Eastern Winch in the Digsite. East of Varrock. Closest teleport: Digsite pendant option 2 |
||
| Cheer in the Barbarian Agility Arena. Headbang before you talk to me. Equip a steel plate body, maple shortbow, and bronze boots. | Barbarian Agility Arena. Closest teleport: Games necklace option 2 |
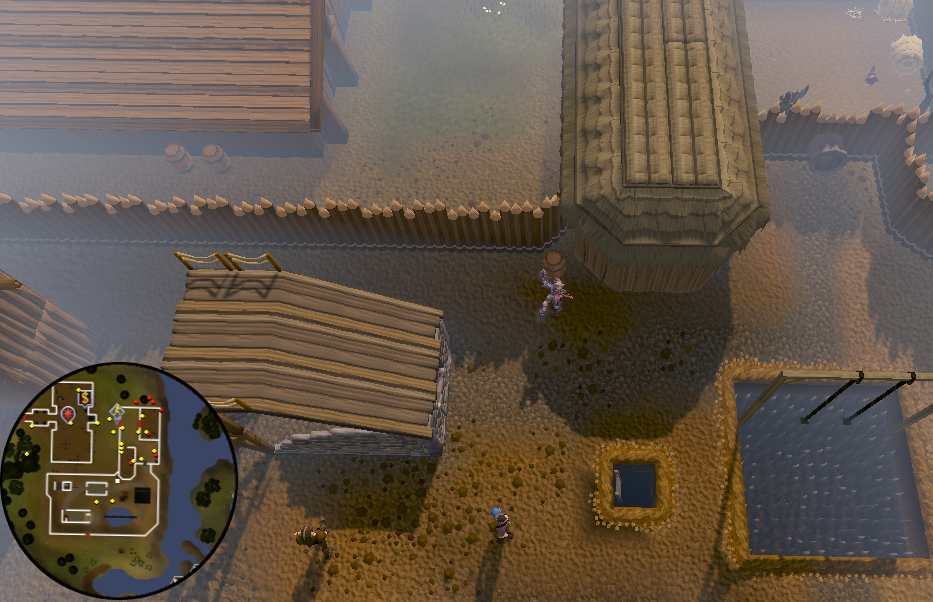 Click the above image to enlarge! |
|
| Cheer in the Ogre Pen in the Training Camp. Show you are angry before you talk to me. Equip a green dragonhide body and chaps and a steel square shield. | King Lathas' Combat Training Camp, to the North of Ardougne. (Biohazard quest required to access. Closest teleport:Traveller's Necklace option 2. |
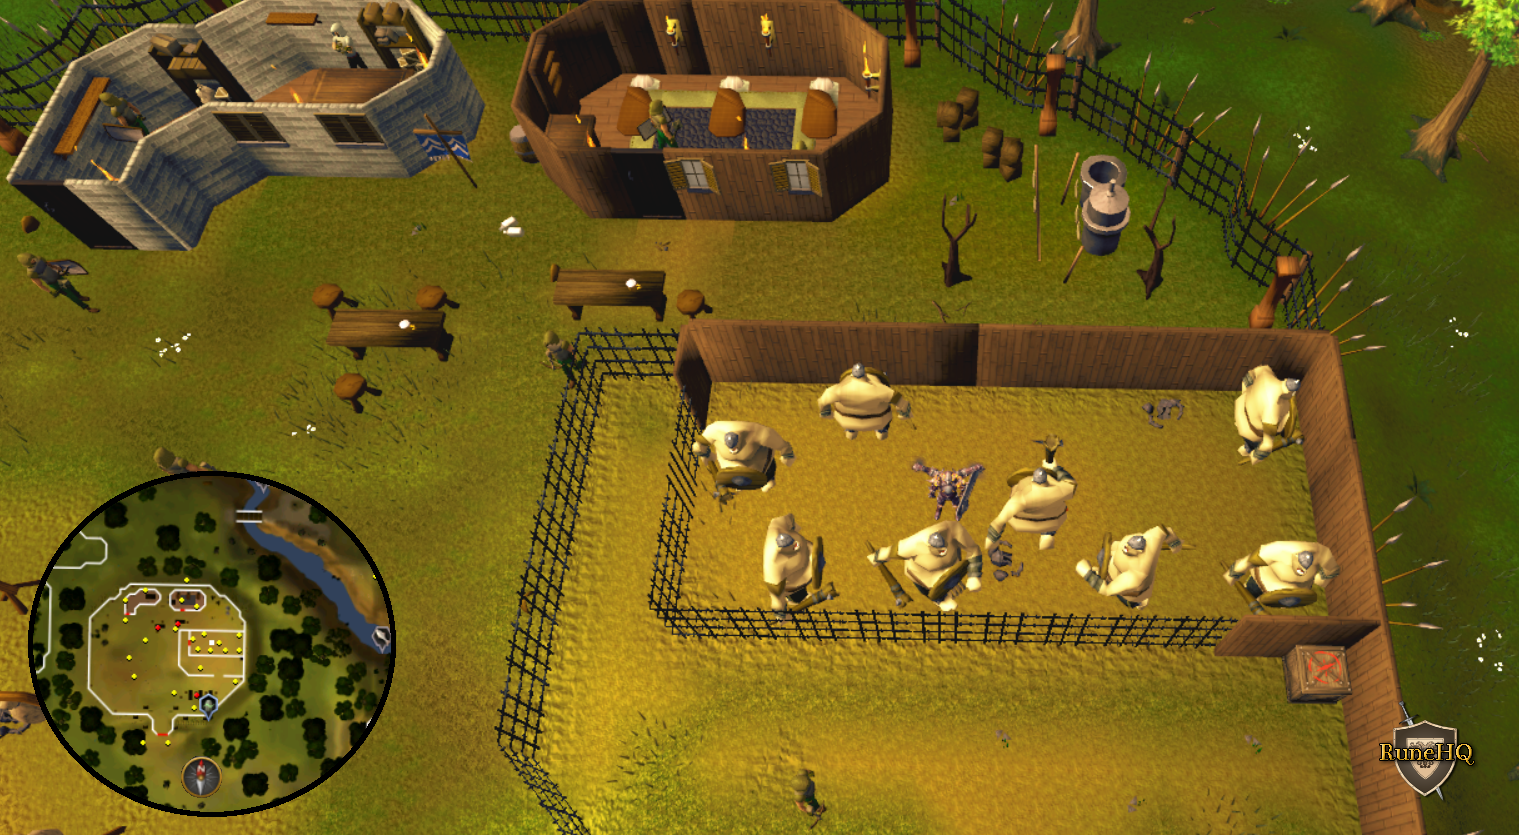 Click the above image to enlarge! |
|
| Cry in the Catherby Archery shop. Bow or curtsy before you talk to me. Equip a round red and black snelm, a hard leather body and an unblessed silver sickle. | Catherby Archery Shop. | ||
| Cry on the platform of the South-West tree in the Gnome Agility Arena. Indicate 'no' before you talk to me. Equip a steel kiteshield, ring of forging and green dragonhide chaps. | Gnome Agility Training Course in the Tree Gnome Stronghold. Closest teleport: Spirit Tree Teleport option 2. |
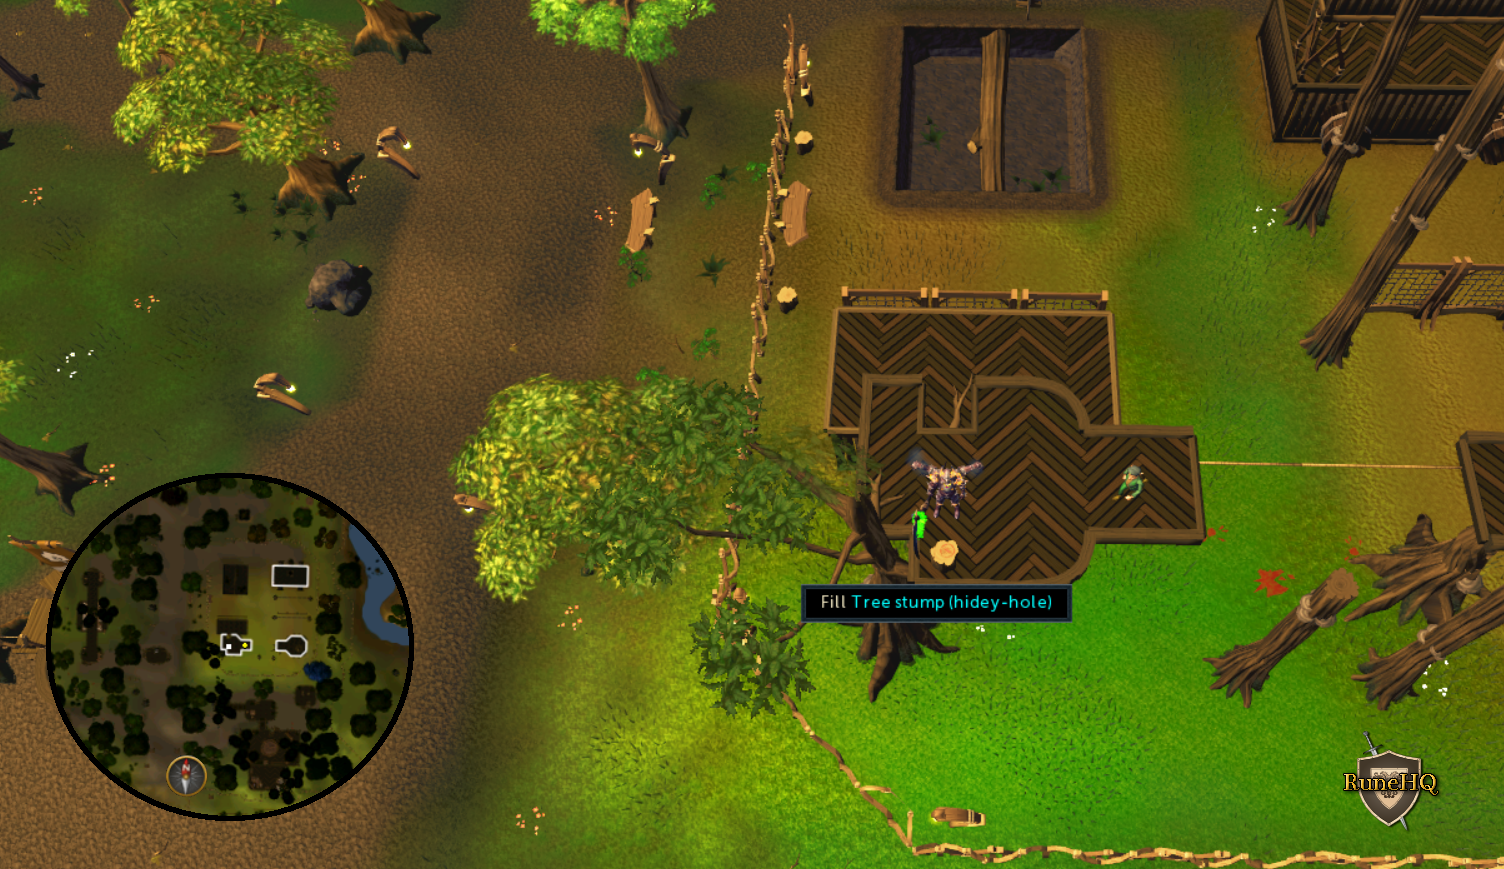 Click the above image to enlarge! |
|
| Dance a jig under Shantay's Awning. Bow before you talk to me. Equip a pointed blue snail helmet and an air staff. | Shantay's Pass under the awning. South Al Kharid. Closest teleport: Amulet of glory option 4. |
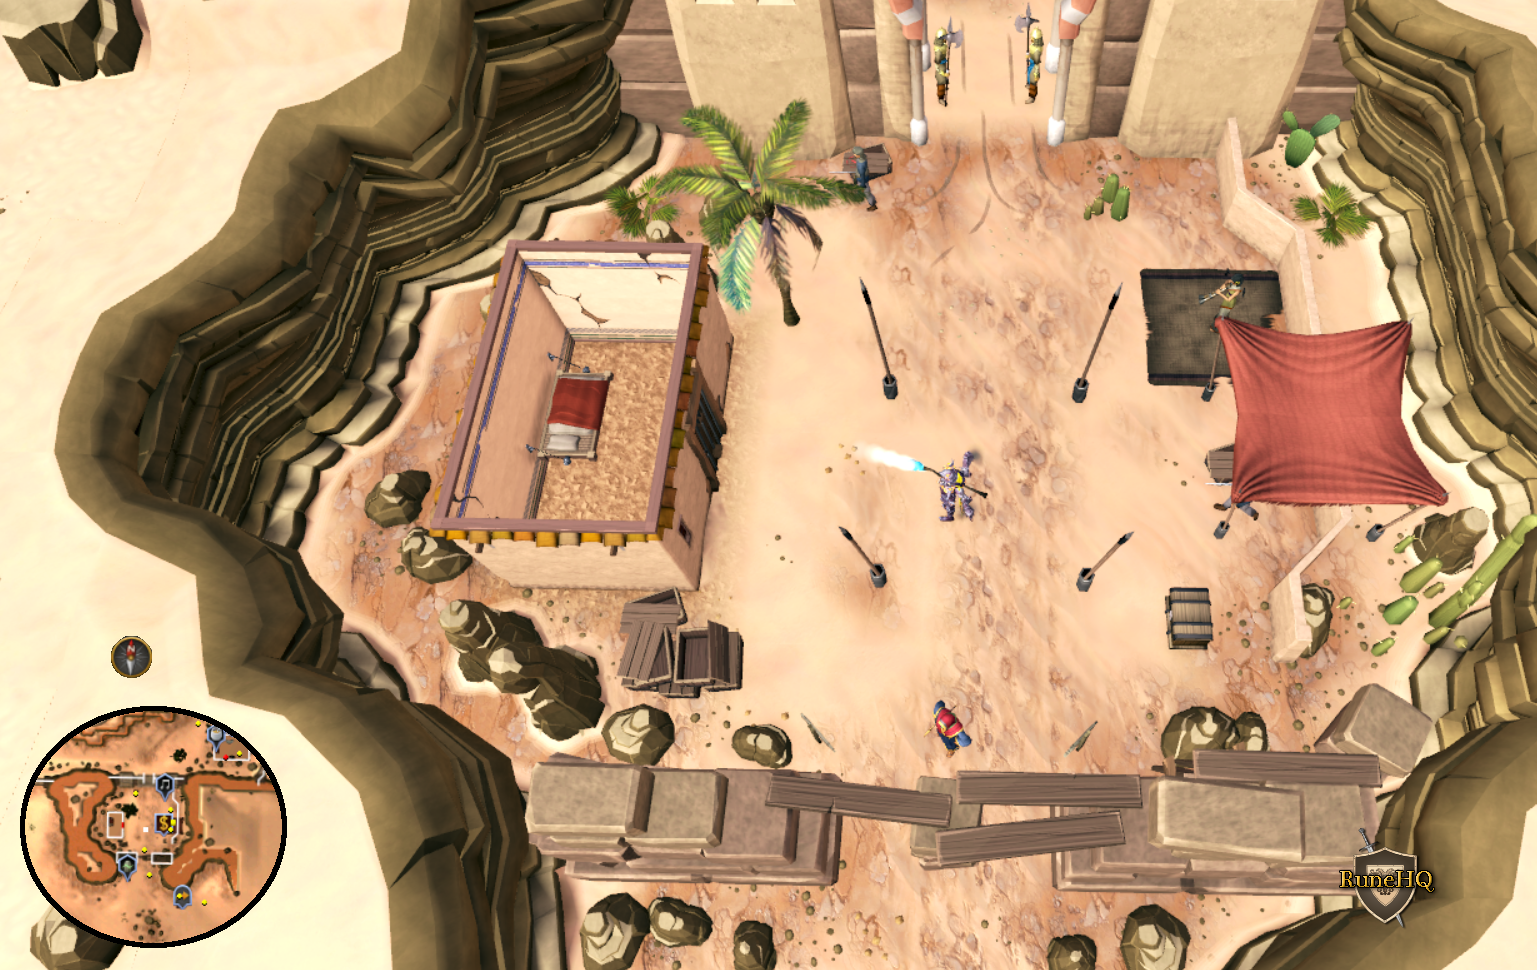 Click the above image to enlarge! |
|
| Dance in the centre of Canifis. Bow or curtsy before you talk to me. Equip a spiny helm, mithril plate legs, and an iron two-handed sword. | Canifis, in the area North of the pub/bar. Closest teleport: Kharyrll Teleport Spell or Slayer skill cape option 2. |
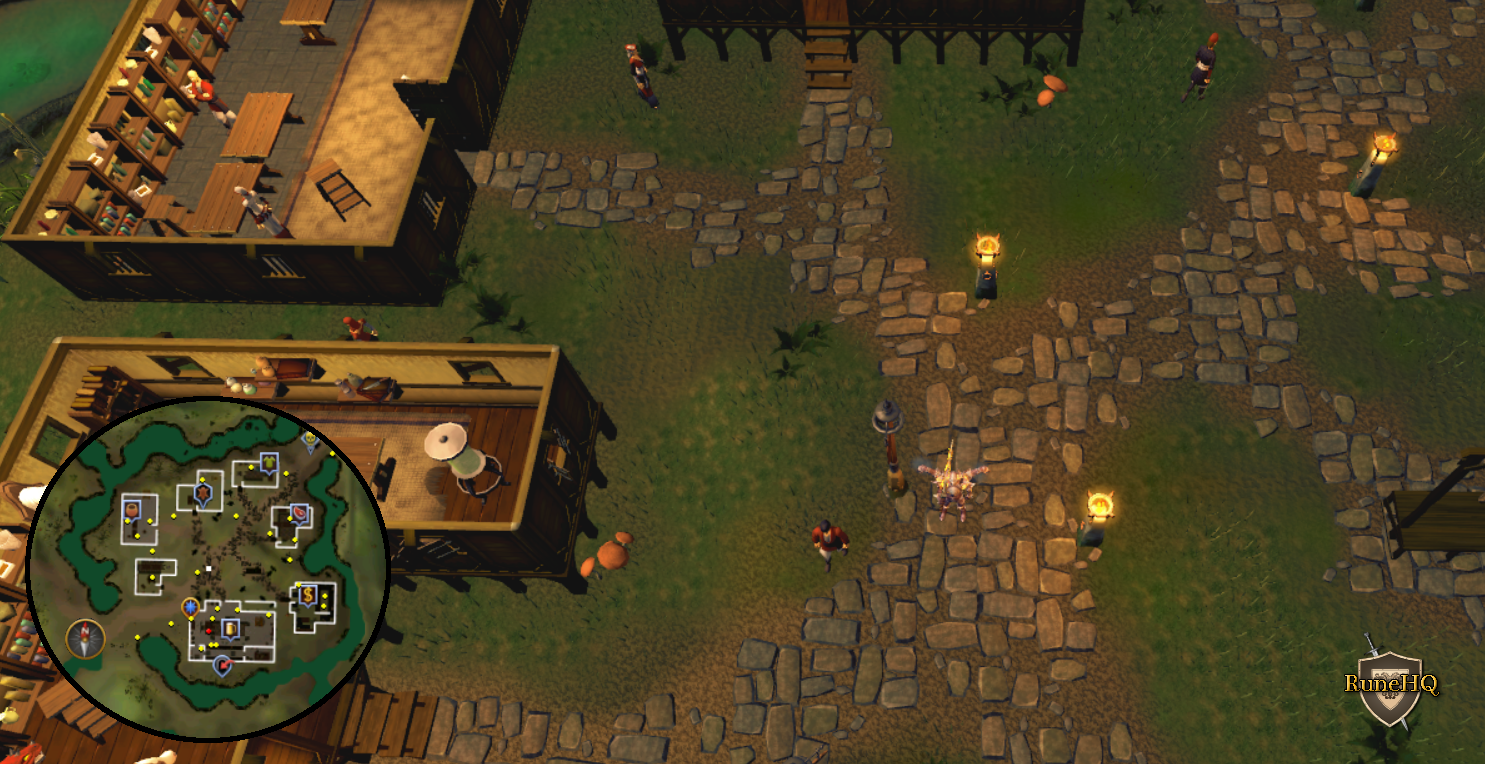 Click the above image to enlarge! |
|
| Jump for joy in Yanille bank. Dance a jig before you talk to me. Equip an iron crossbow, adamantite helmet, and snakeskin chaps. | Yanille Bank. Closest teleport: Yanille tablet. |
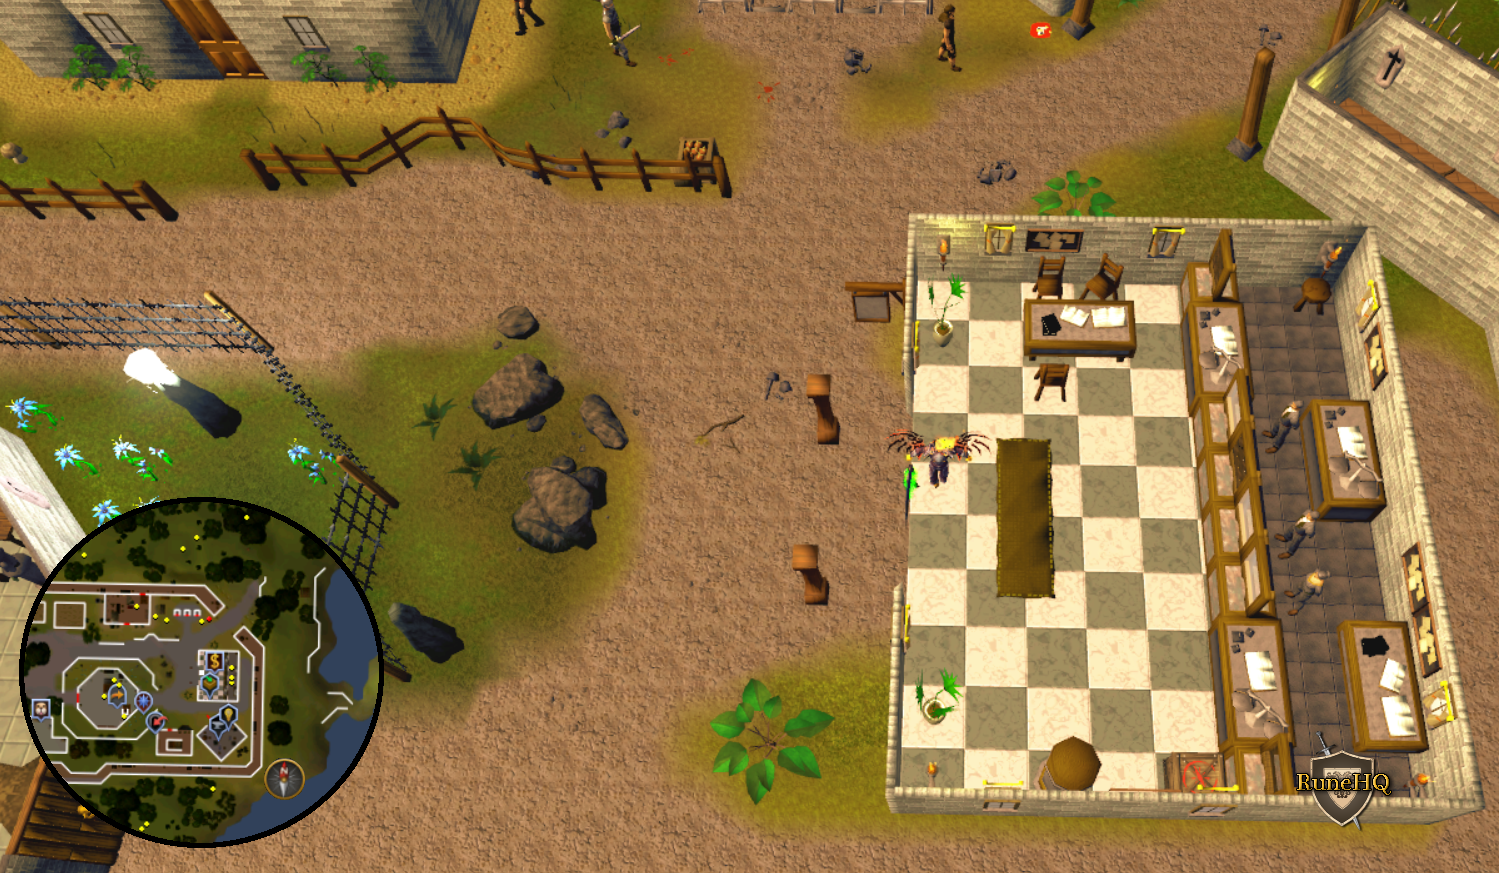
Click the above image to enlarge! |
|
| Panic by the mausoleum in Morytania. Wave before you speak to me. Equip a mithril plate skirt, a maple shieldbow, and no boots | Mausoleum in Morytania. You must have at started the Creature of Fenkenstrain Quest to gain access. | ||
| Think under the lens in the Observatory. Twirl before you talk to me. Equip a mithril chain body, green dragonhide chaps, and a ruby amulet. | Observatory, North-East of Castle Wars area. | ||
| Twirl on the bridge by the Barbarian Village. Salute before you talk to me. Equip an iron hatchet, a steel kiteshield, and a mithril full helmet. | Bridge, East of Barbarian Village. Closest teleport: Skills necklace option 4 then run South-West |
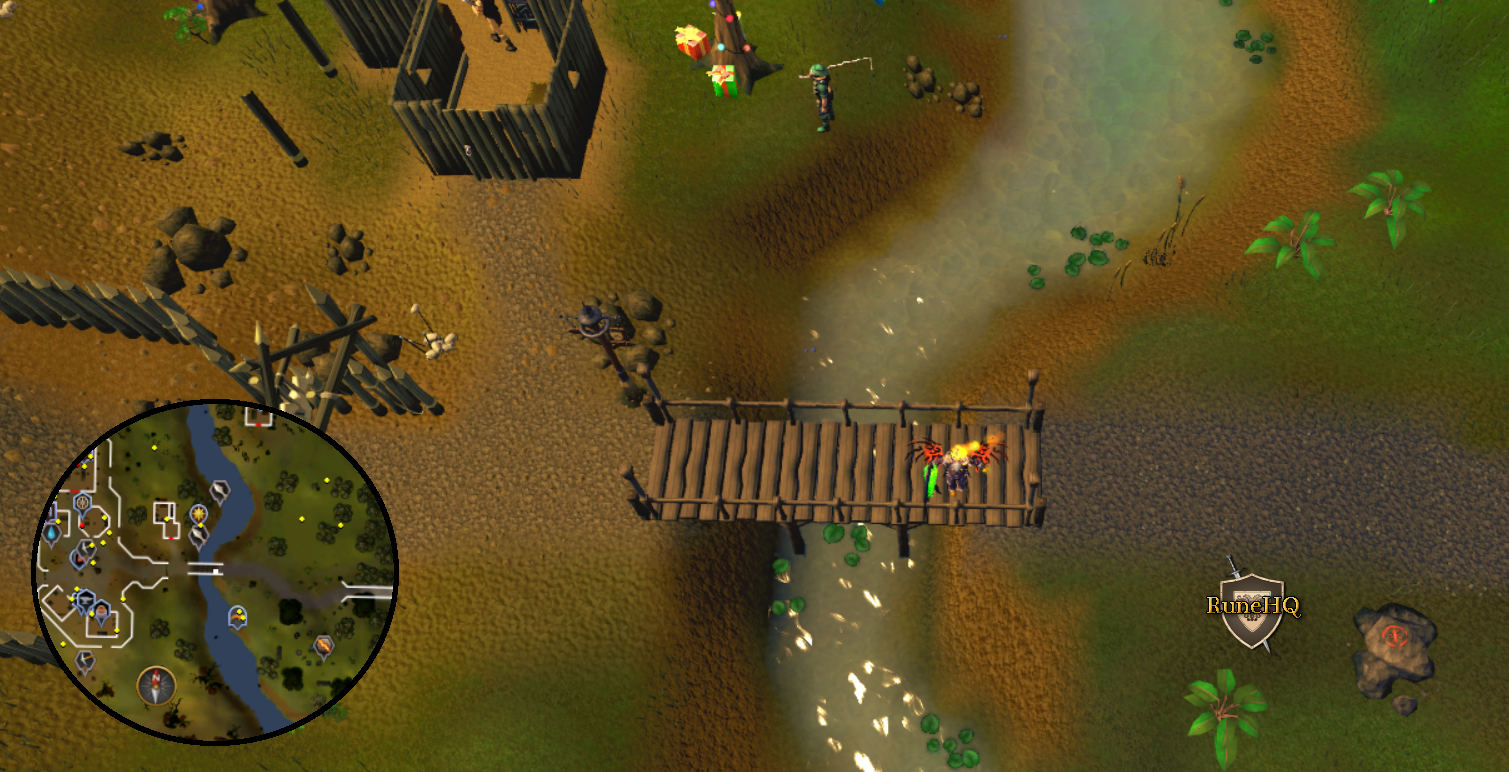
Click the above image to enlarge! |
|
| Yawn in the Castle Wars lobby. Shrug before you talk to me. Equip a ruby amulet, a mithril scimitar, and an iron square shield. | Castle Wars lobby. Closest teleport: Ring of duelling option 2 |
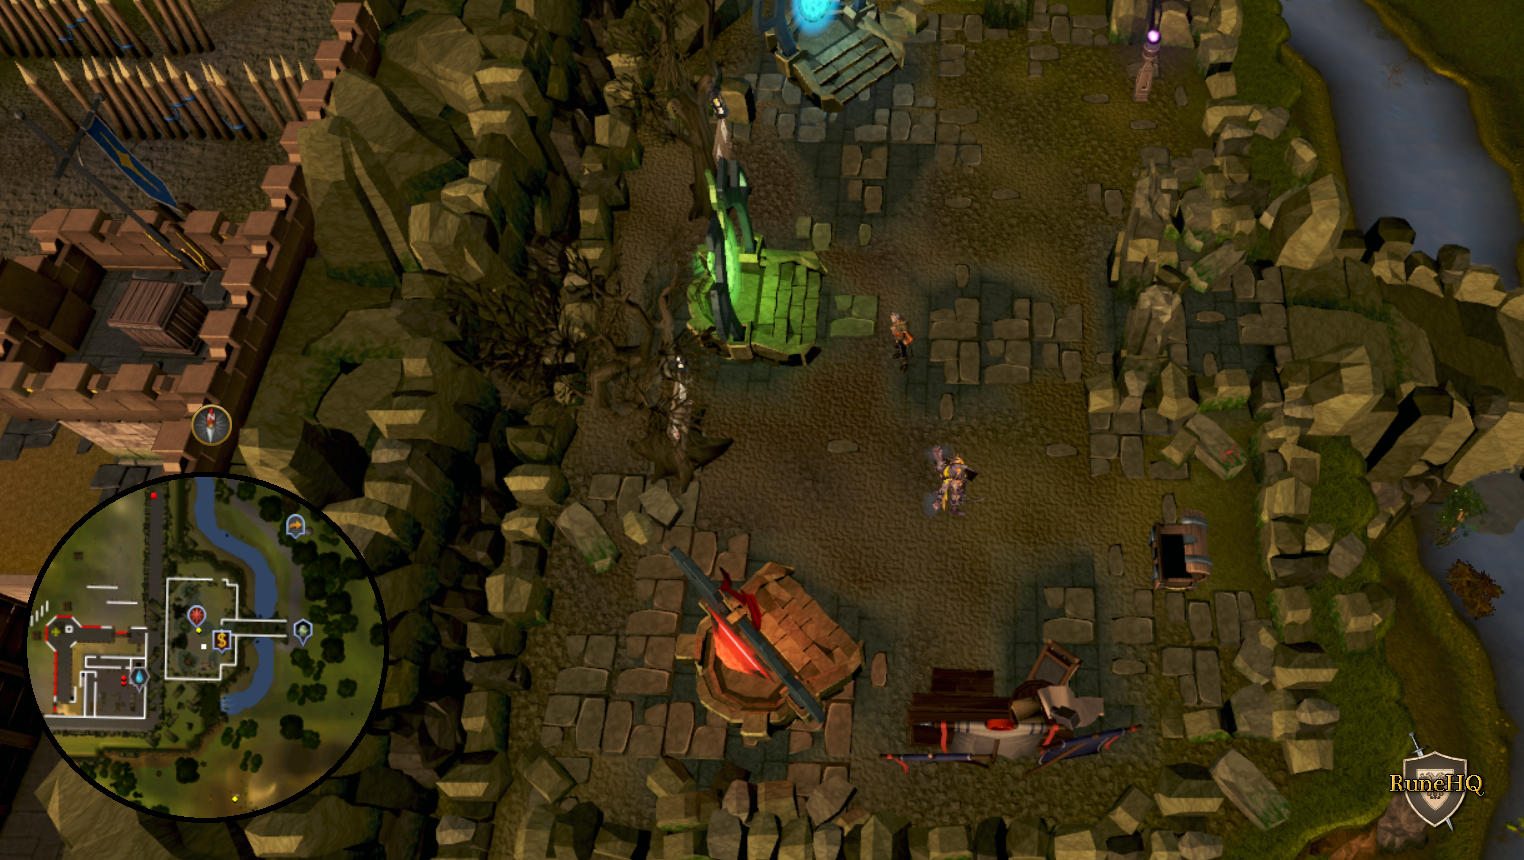 Click the above image to enlarge! |
|
| Hard Clue | |||
| Emote Clue | Location | Items | Image |
| Blow a kiss between the tables in Shilo Village bank. Beware of double agents! Equip a splitbark helm, mud pie and rune platebody. | Shilo Village bank. Closest teleport: Slayer cape option 6 |
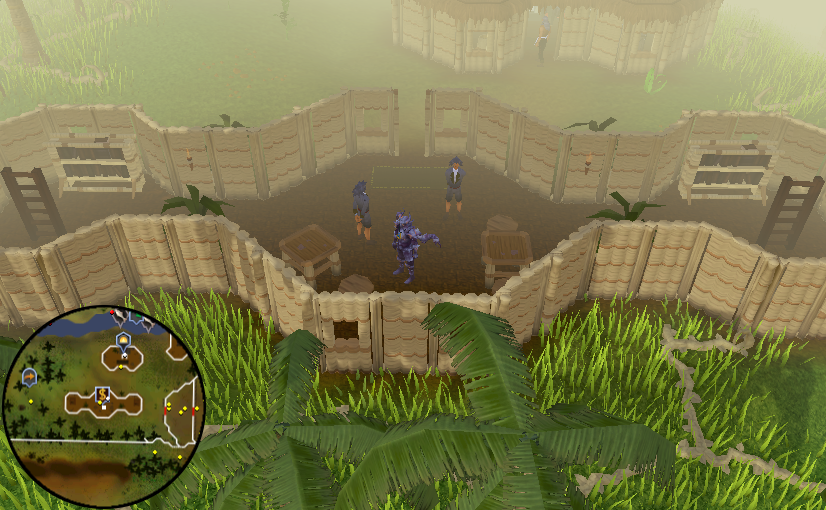 Click the above image to enlarge! |
|
| Blow a raspberry in the Fishing Guild bank. Beware of double agents! Equip an elemental shield, blue dragonhide chaps and rune warhammer. | Fishing Guild Bank. Requires 68 Fishing to enter. Closest teleport: Skills necklace option 1 |
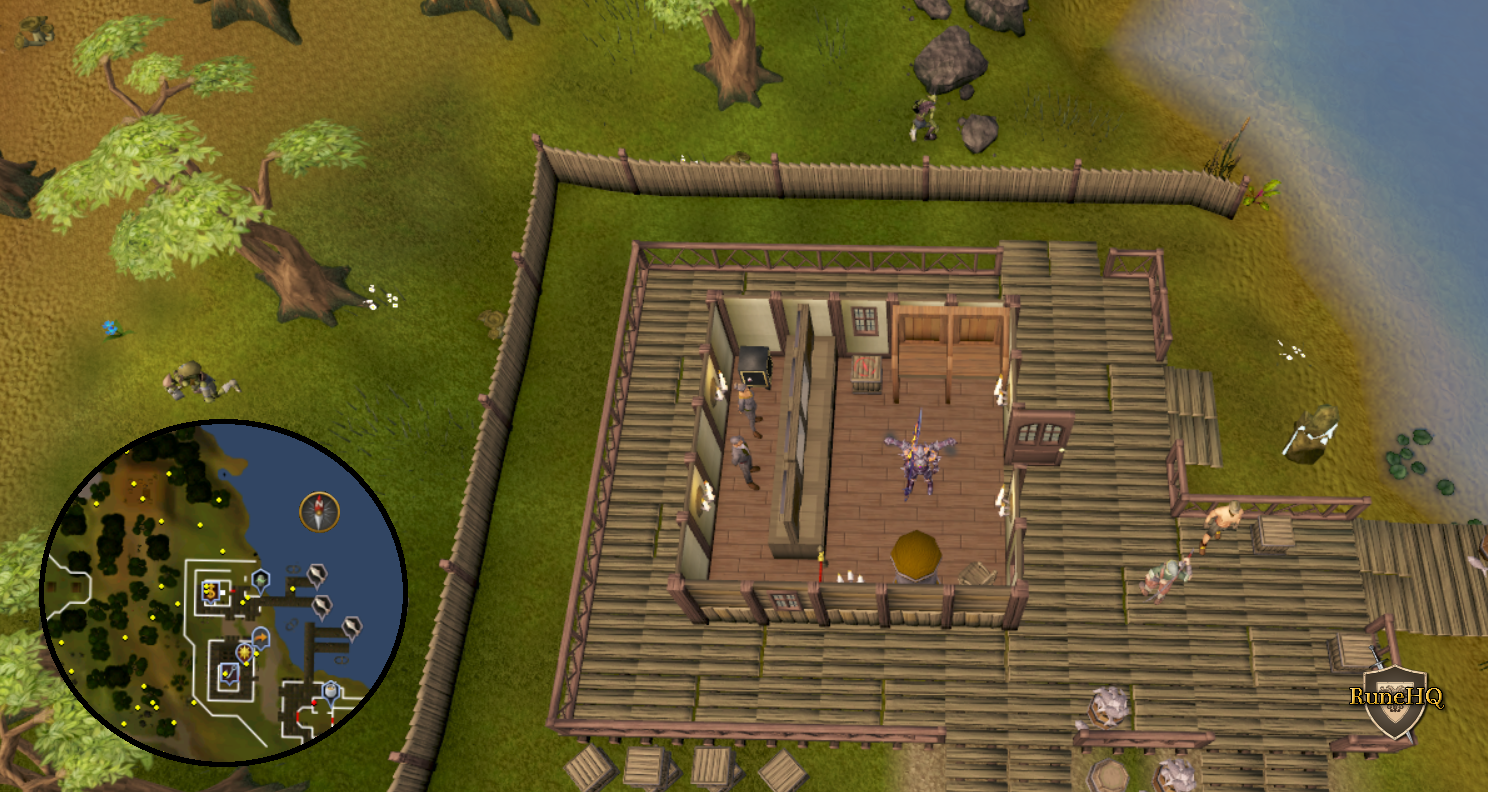 Click the above image to enlarge! |
|
| Bow or curtsy at the top of the lighthouse. Beware of double agents! Equip a blue dragonhide body, blue dragonhide vambraces, and no jewelry. | The lighthouse South-West of Rellekka. You must have started the Horror From The Deep quest to access the Lighthouse. Closest teleport: Lighthouse Teleport |
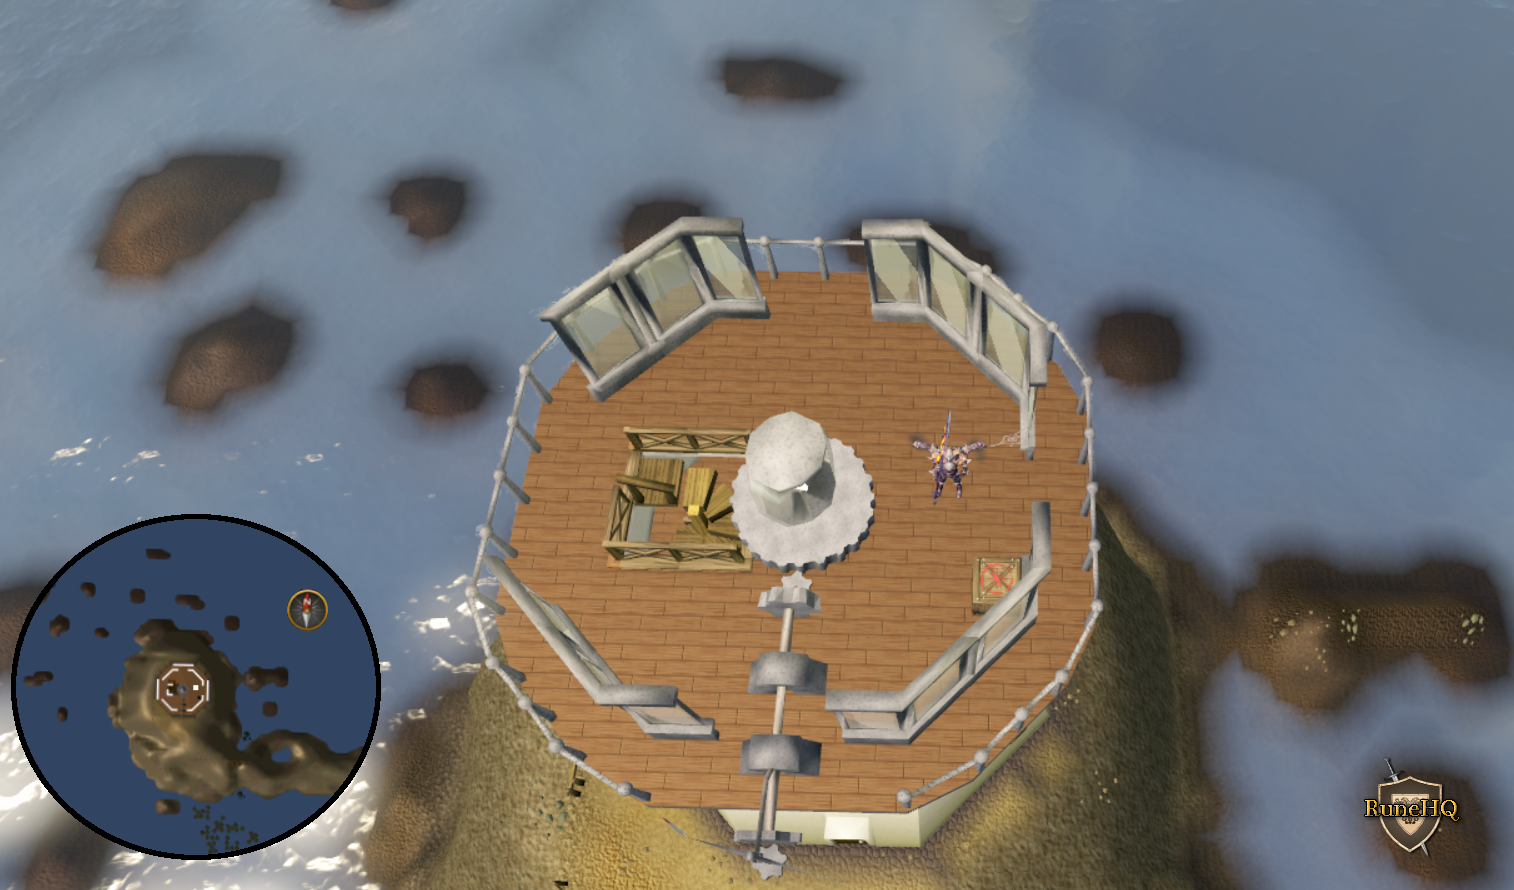 Click the above image to enlarge! |
|
| Dance at the cat-doored pyramid in Sophanem. Beware of double agents! Equip a ring of life, an uncharged amulet of glory and an adamant two-handed sword. | Klenter's pyramid in Sophanem. Closest teleport: Pharaoh's sceptre (3) option 1 |
|
 Click the above image to enlarge! |
| Laugh at Jokul's tent in the Mountain Camp. Beware of double agents! Equip a rune full helmet, blue dragonhide chaps and a fire battlestaff. | Jokul's Tent in the North-East corner of Mountain Camp. A rope is required to access the camp if you have not completed Mountain daughter. Closest teleport: Ring of slaying (8) option 3. |
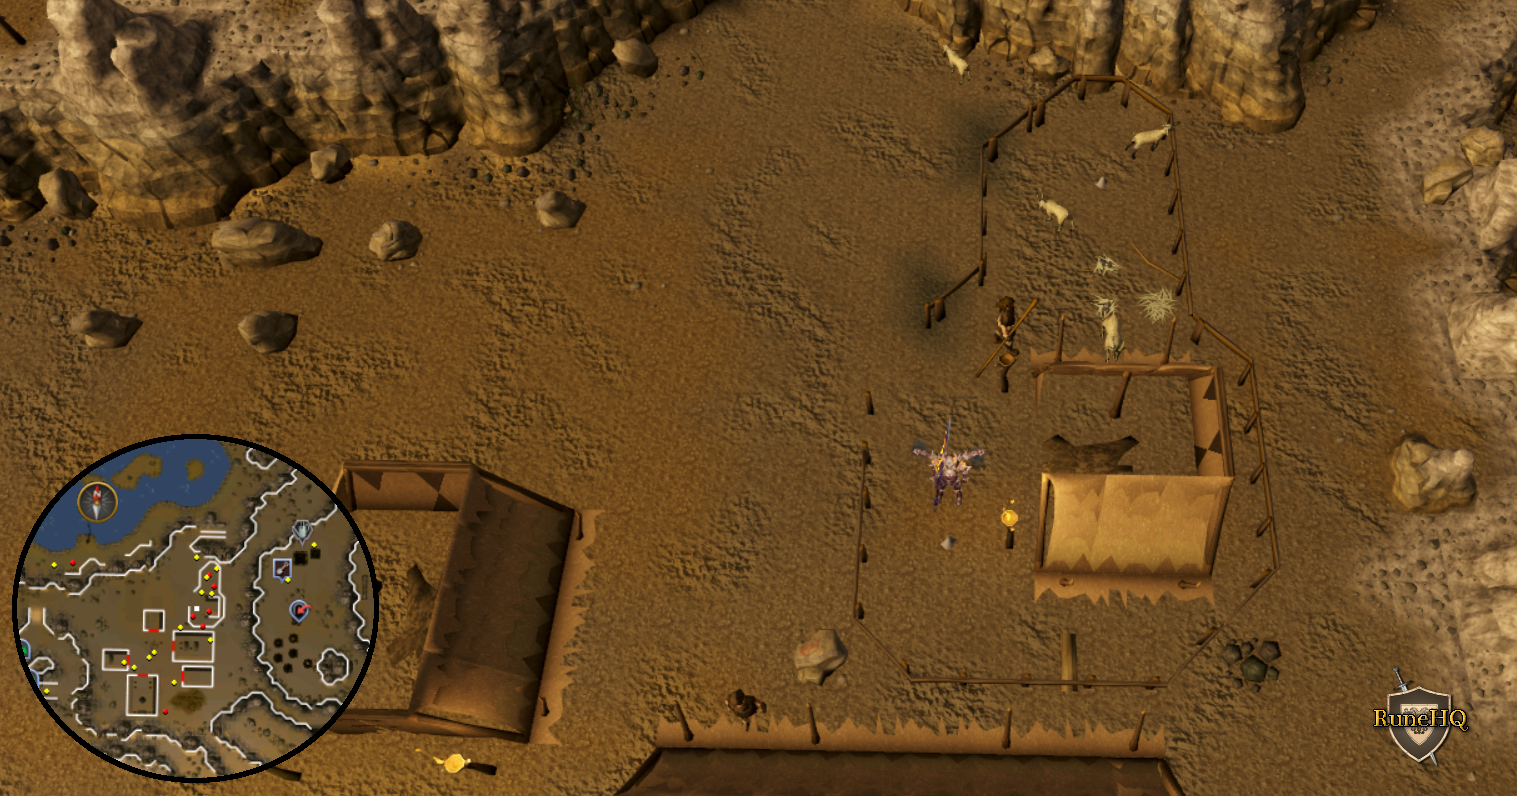 Click the above image to enlarge! |
|
| Panic in the heart of the Haunted Woods. Beware of double agents! Have no items equipped when you do. | Haunted Woods, South-East of the Fairy Ring near a couple of mushroom. Closest teleport: Fairy Ring A-L-Q |
None. |
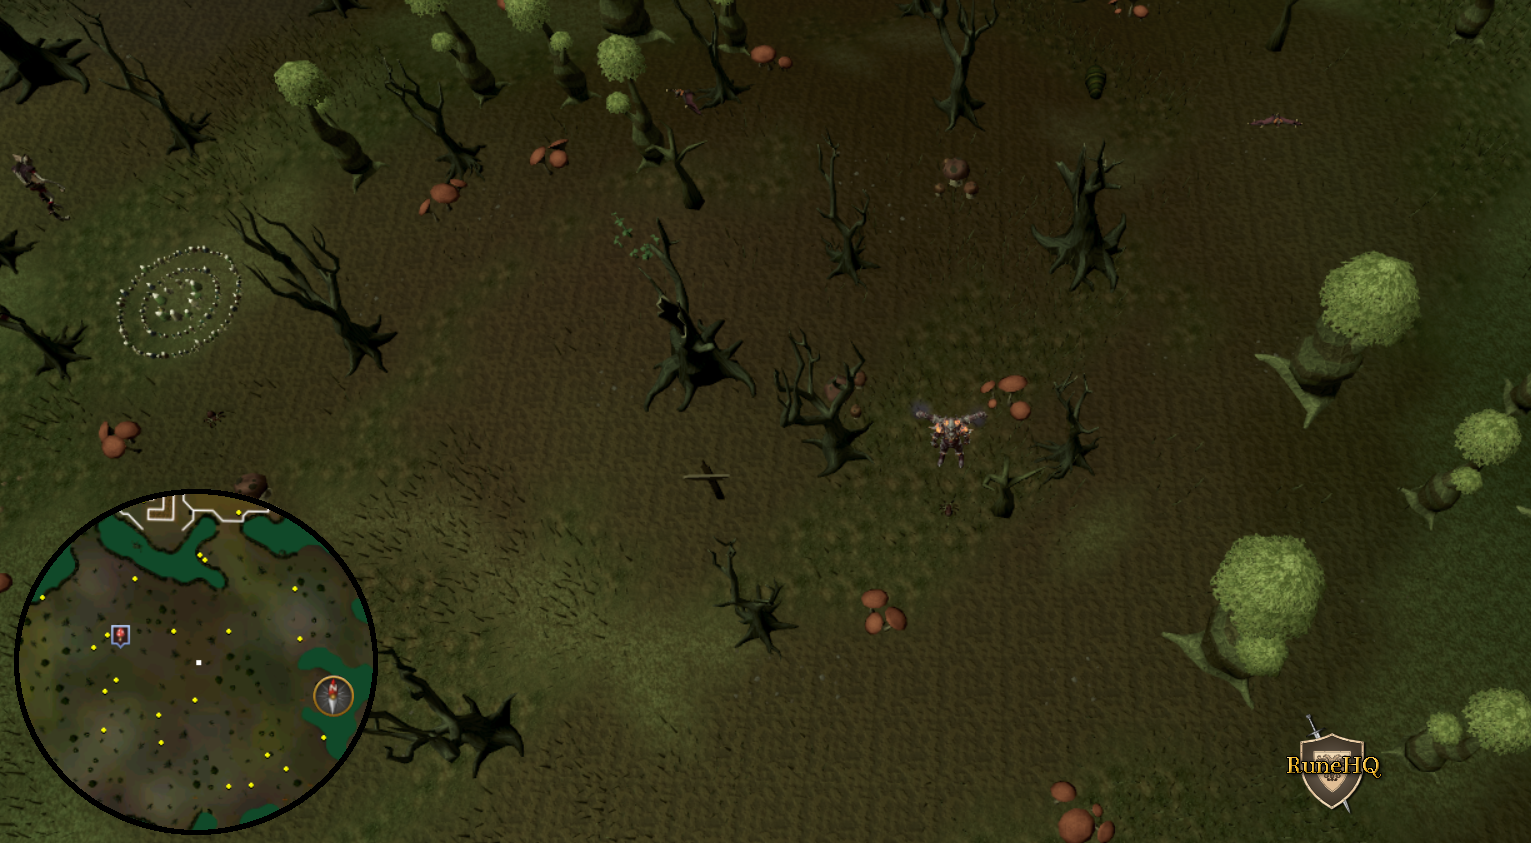 Click the above image to enlarge! |
| Panic by the pilot on White Wolf Mountain. Beware of double agents! Equip mithril platelegs, a ring of life and a rune axe. | Gnome pilot on White Wolf Mountain. Closest teleport: Gnome Glider option 2 |
 Click the above image to enlarge! |
|
| Salute in the banana plantation. Beware of double agents! Equip a diamond ring, amulet of power, and nothing on your chest and legs. | Musa Point, banana plantation South of the fishing platform on Karamja. Closest teleport: Amulet of glory (4) option 2 |
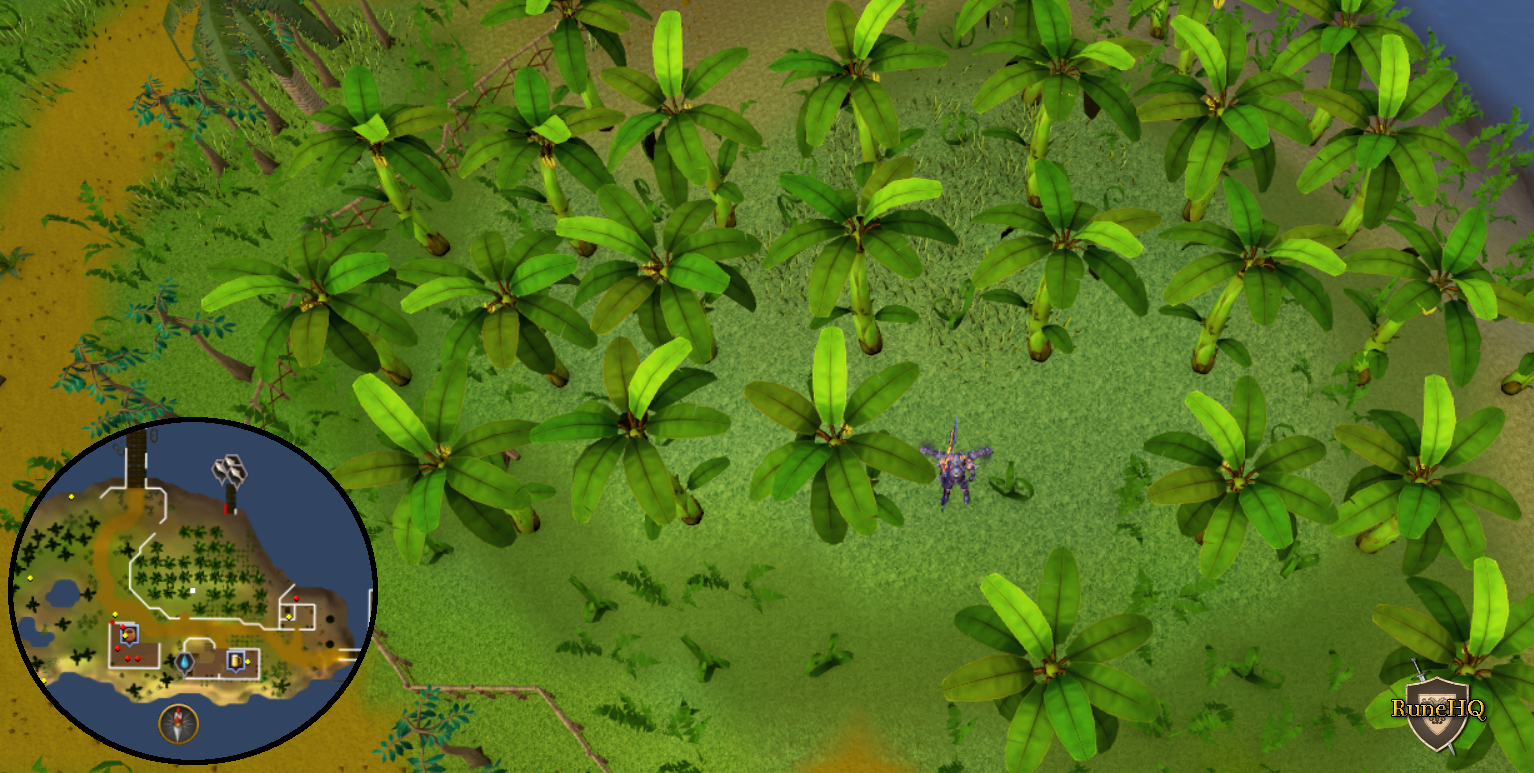 Click the above image to enlarge! |
|
| Shrug in the Zamorak temple found in the Eastern Wilderness. Beware of double agents! Equip bronze plate legs, an iron platebody, and blue dragonhide vambraces. | Chaos Temple, level 12 Wilderness. This is located in the Wilderness be careful which items you take with you as they may be lost upon death. |
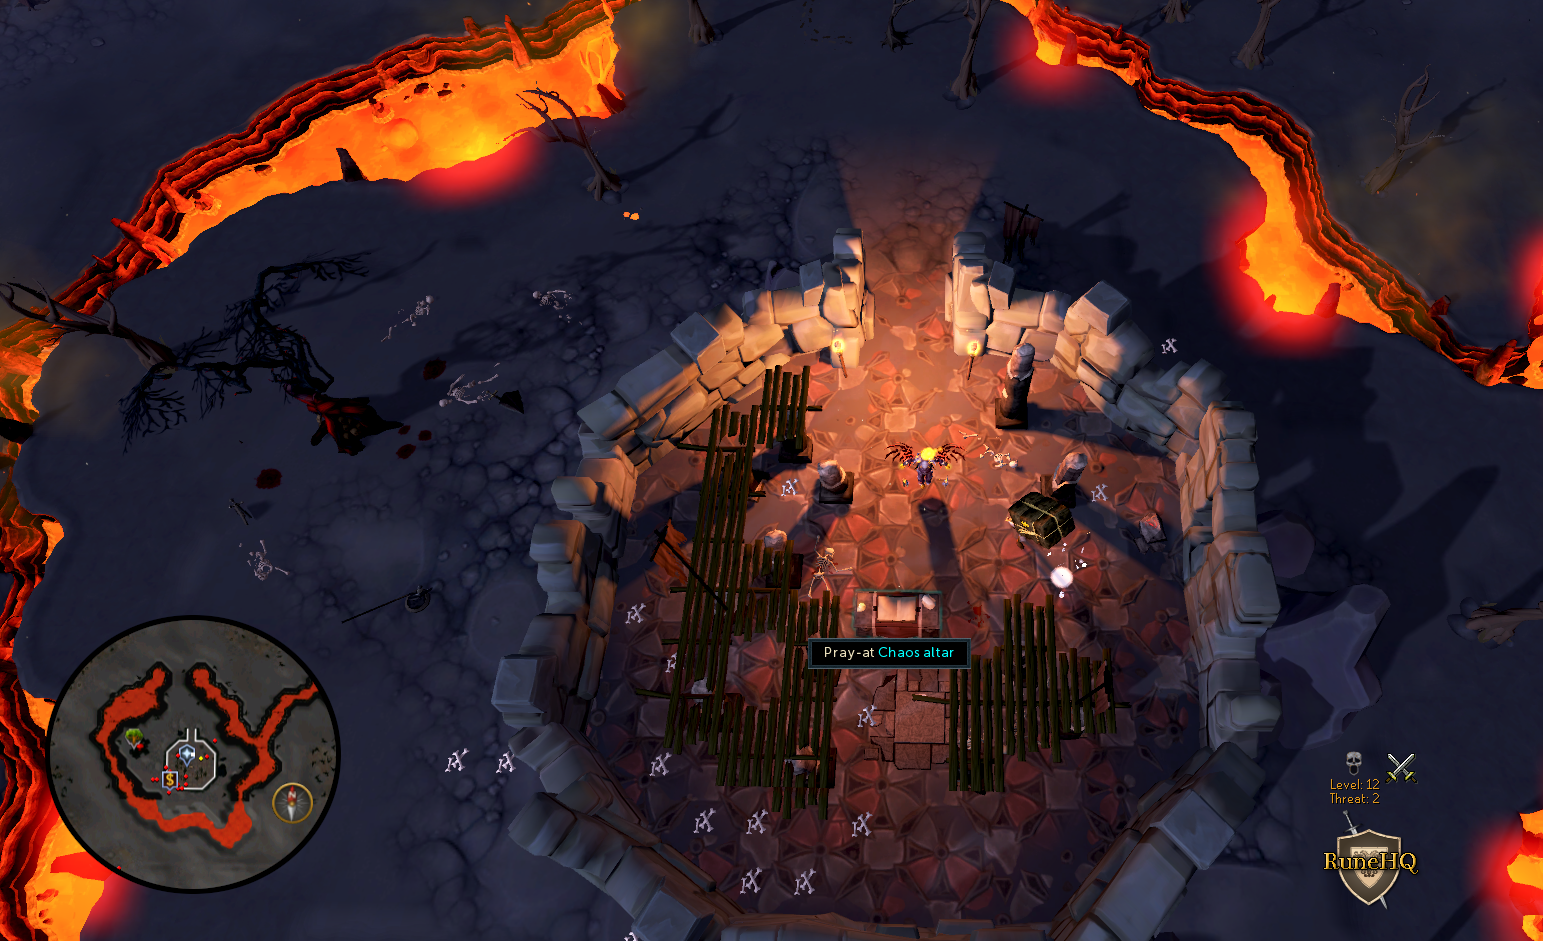 Click the above image to enlarge! |
|
| Yawn near the Wilderness Bandit camp obelisk. Beware of double agents! Equip an iron square shield, blue dragon vambraces and an iron pickaxe. | North of Wilderness Bandit camp, level 26 wilderness. This is located in the Wilderness be careful which items you take with you as they may be lost upon death. Closest teleport: Dareeyak Teleport Spell (2 Air runes, 3 Fire runes, and 2 Law runes) |
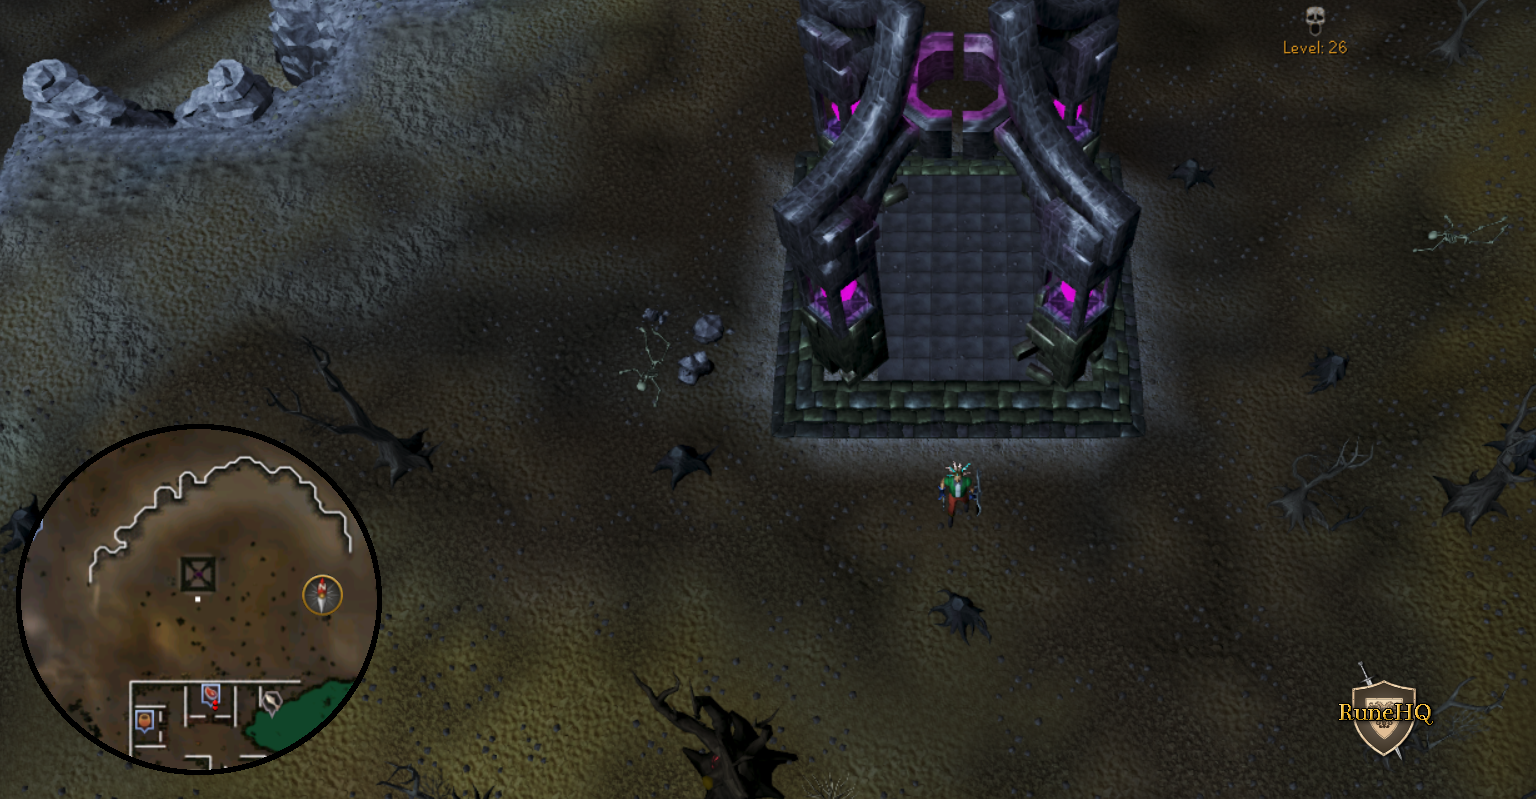 Click the above image to enlarge! |
|
| Master Clue | |||
| Emote Clue | Location | Items | Image |
| Blow a Raspberry at the celestrial dragons on Dragontooth Isle. Beware of double agents! Equip a dragon mask, a Dragon Rider amulet and a dragon defender. | In the resource dungeon on Dragontooth Isle. Quest One of a Kind required. Closest teleport: is the Dungeoneering skill cape. Use option 0 then option 3. |
|
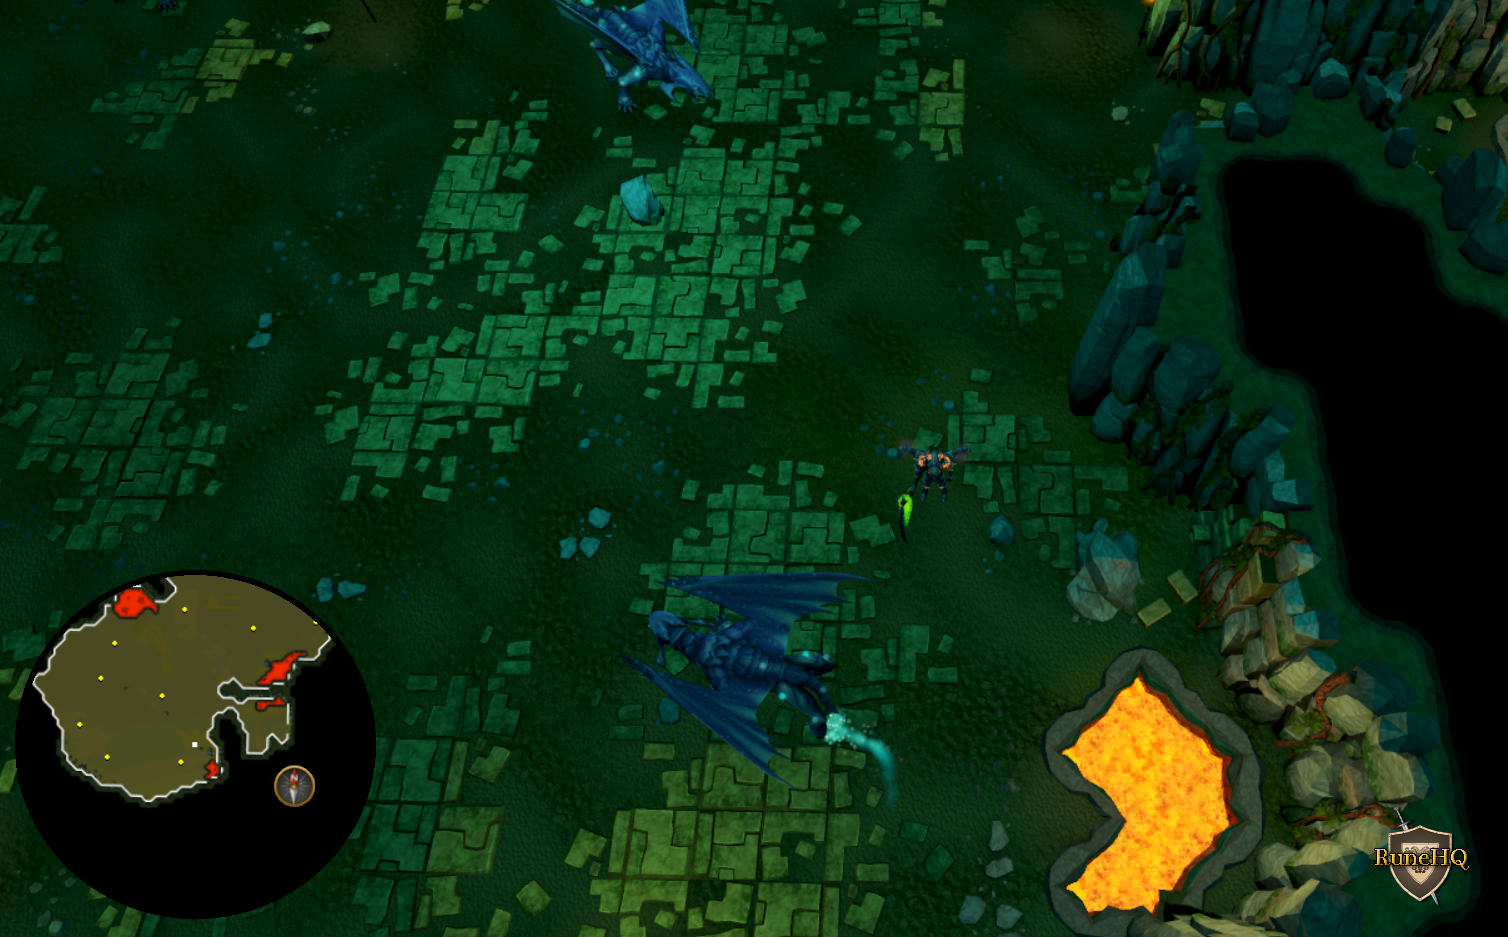 Click the above image to enlarge! |
| Bow or curtsy at the charm sprite hunter area. Beware of double agents! Equip an enhanced yaktwee stick, a Dagon-hai hat and an amulet of ranging. | The sprite hunter area is located South of Tree Gnome Stronghold. Closest teleport: Sixth-age circuit option 2 or Master Quest Cape option 0. |
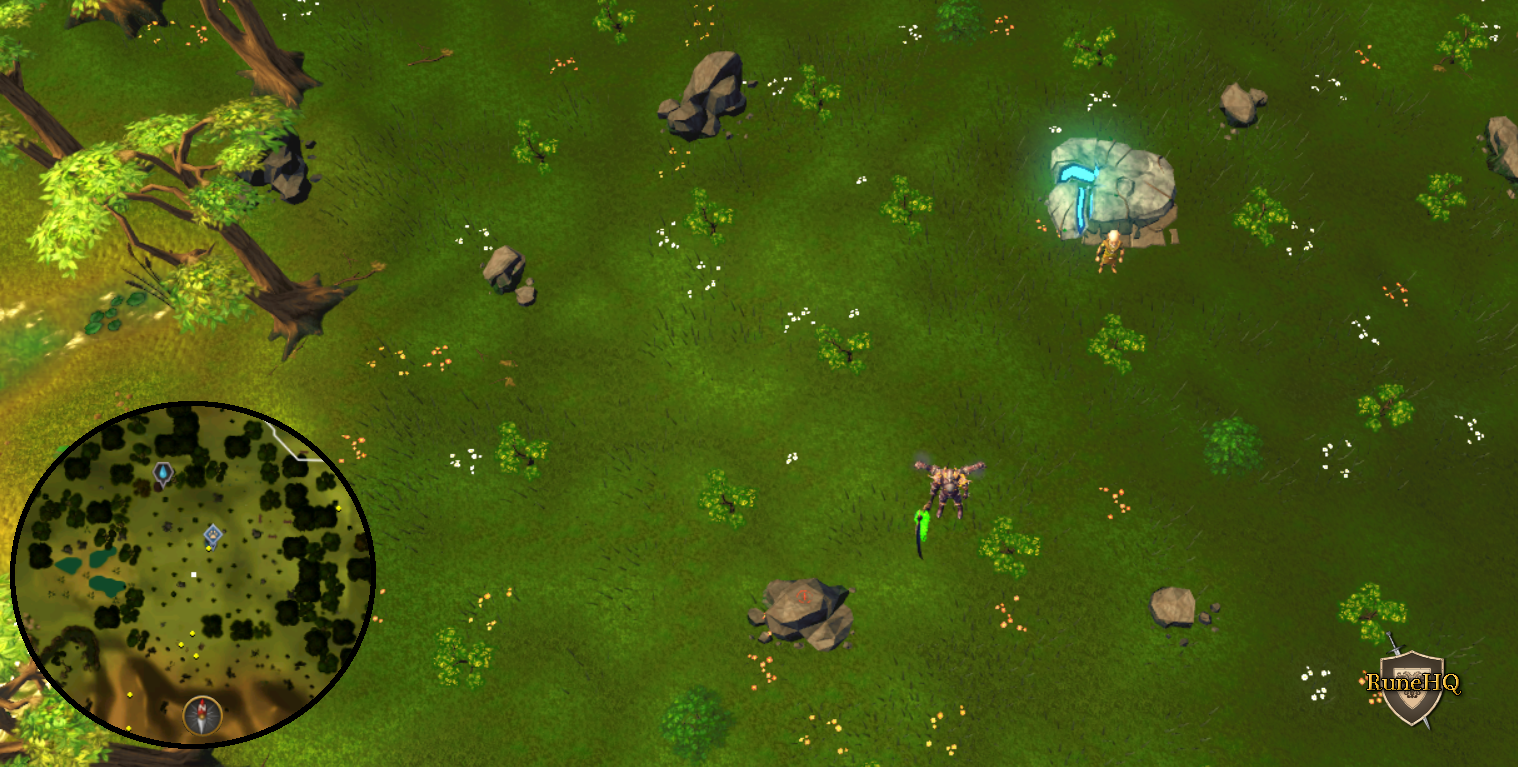 Click the above image to enlarge! |
|
| Cheer by the sulphur pit in the TzHaar City. Beware of double agents! Equip a fire cape, a Toktz-ket-xil and a spork. | In TzHaar City, South-East of TzHaar Fight Cave |
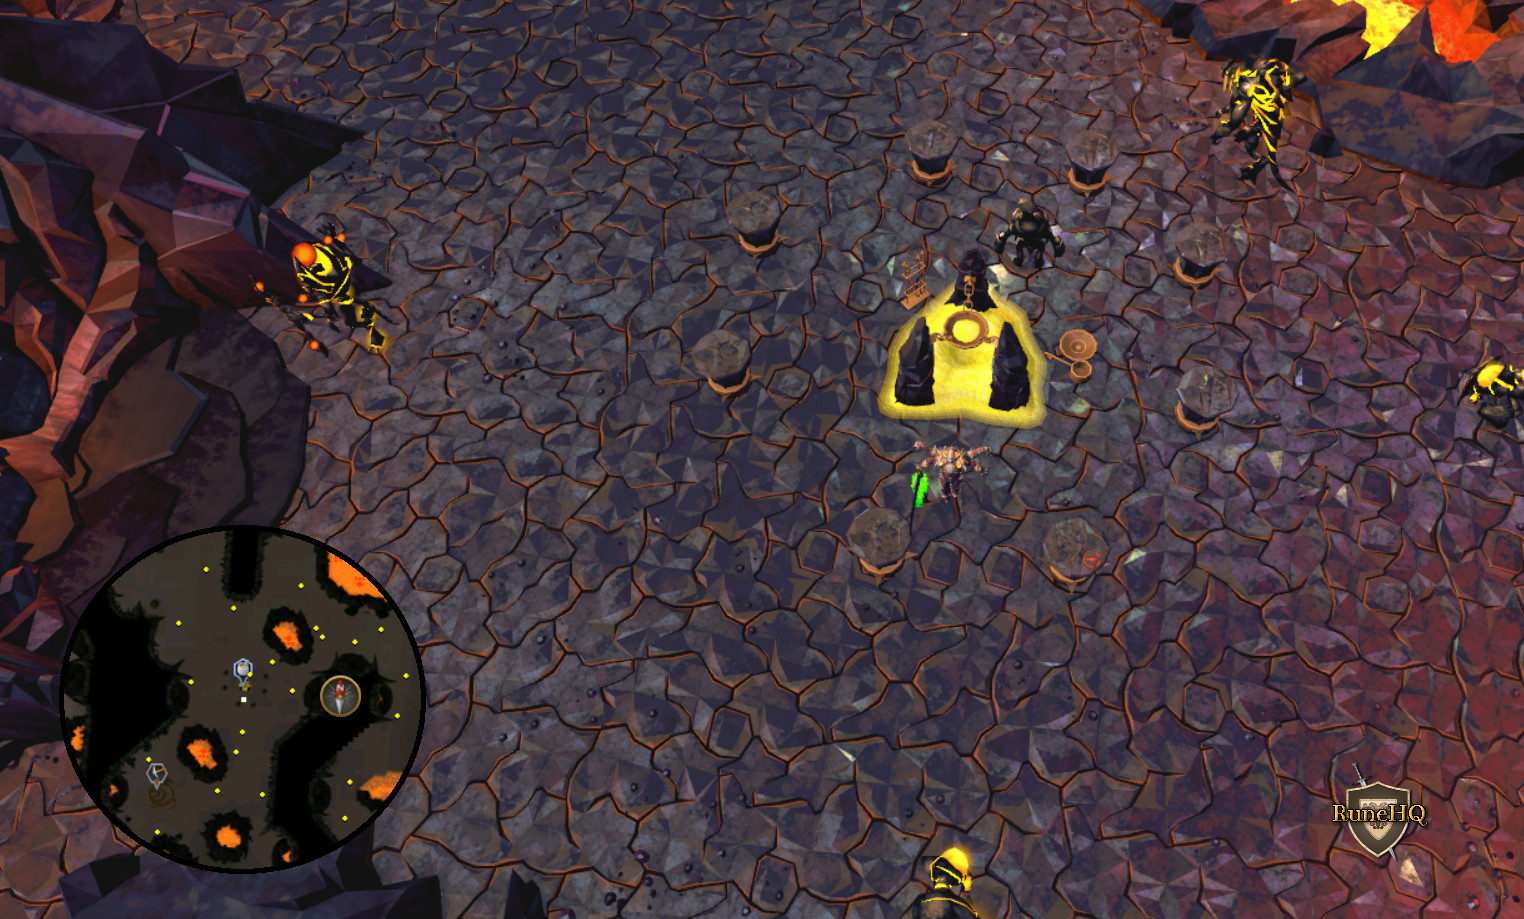 Click the above image to enlarge! |
|
| Dance on an Uncharted Isle. Beware of double agents! Equip a dark bow, some infinity boots and culinaromancer gloves 10. | On Uncharted Isles visit an uncharted isle (A player claimed island does work). Quest Impressing the Locals required. |
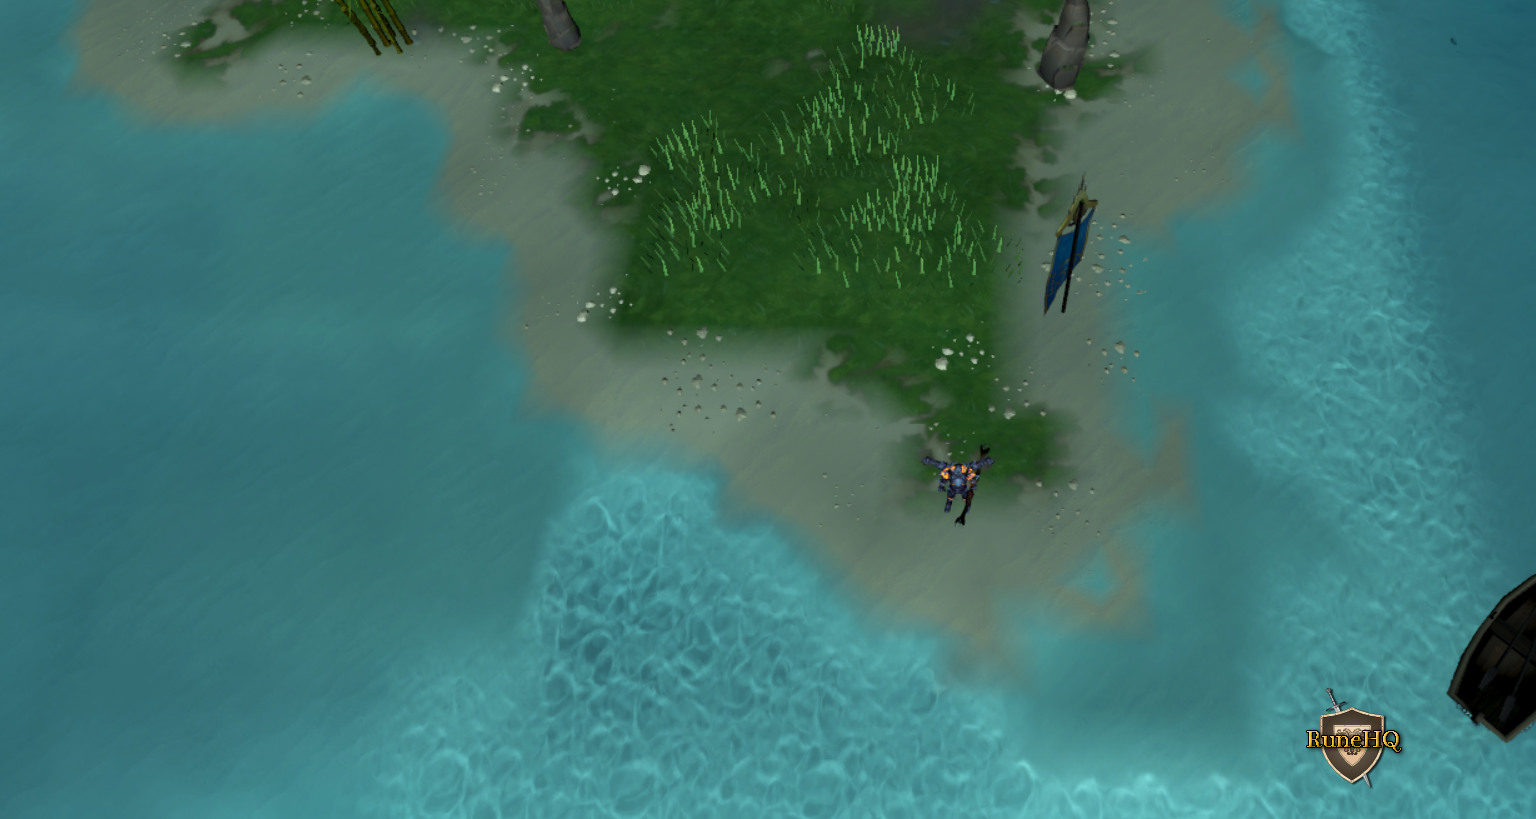 Click the above image to enlarge! |
|
| Dare to laugh in the Green Ghost inn at Port Phasmatys. Beware of double agents! Equip an Iban's staff, a ghostly cloak and a cavalier. | In Port Phasmatys. Closest teleport: Ectophial. |
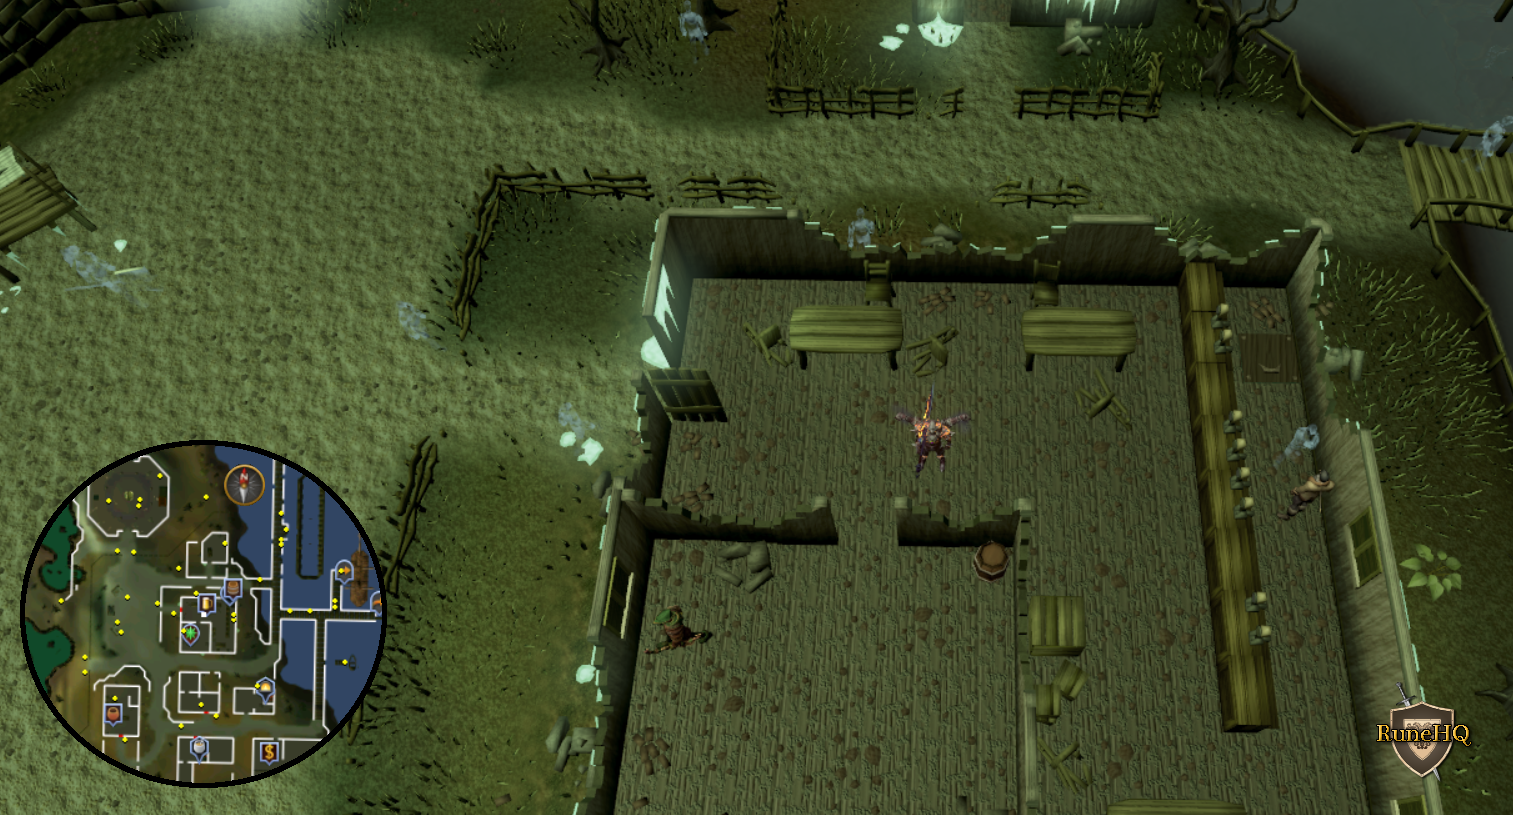 Click the above image to enlarge! |
|
| Have an idea inside the Invention Guild. Beware of double agents! Equip a lab coat top, lab coat legs and a staff of light. | Inside Invention Guild North-West of the Falador lodestone. Level 69 Invention required. Closest teleport: Falador lodestone or Games necklace option 3 |
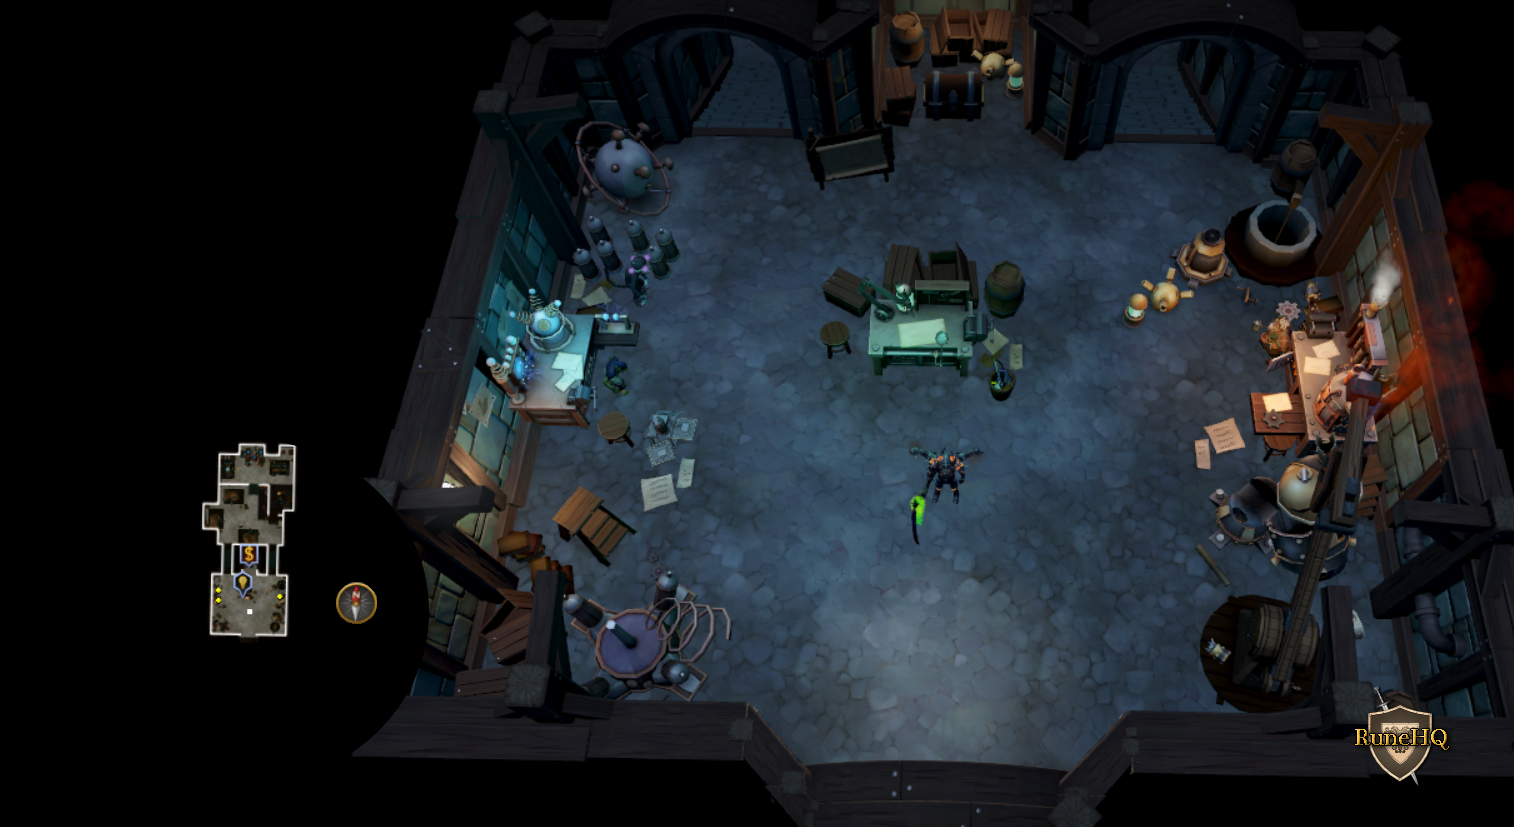 Click the above image to enlarge! |
|
| Headbang inside the Slayer Tower. Beware of double agents! Equip an imp-hide hood, a Prifddinian musician's robe top and an amulet of magic. | Inside Slayer Tower. Quest Plague's End required. Closest teleport: Ring of slaying (8) option 2 or Dungeoneering cape option 0, option 0, option 2. |
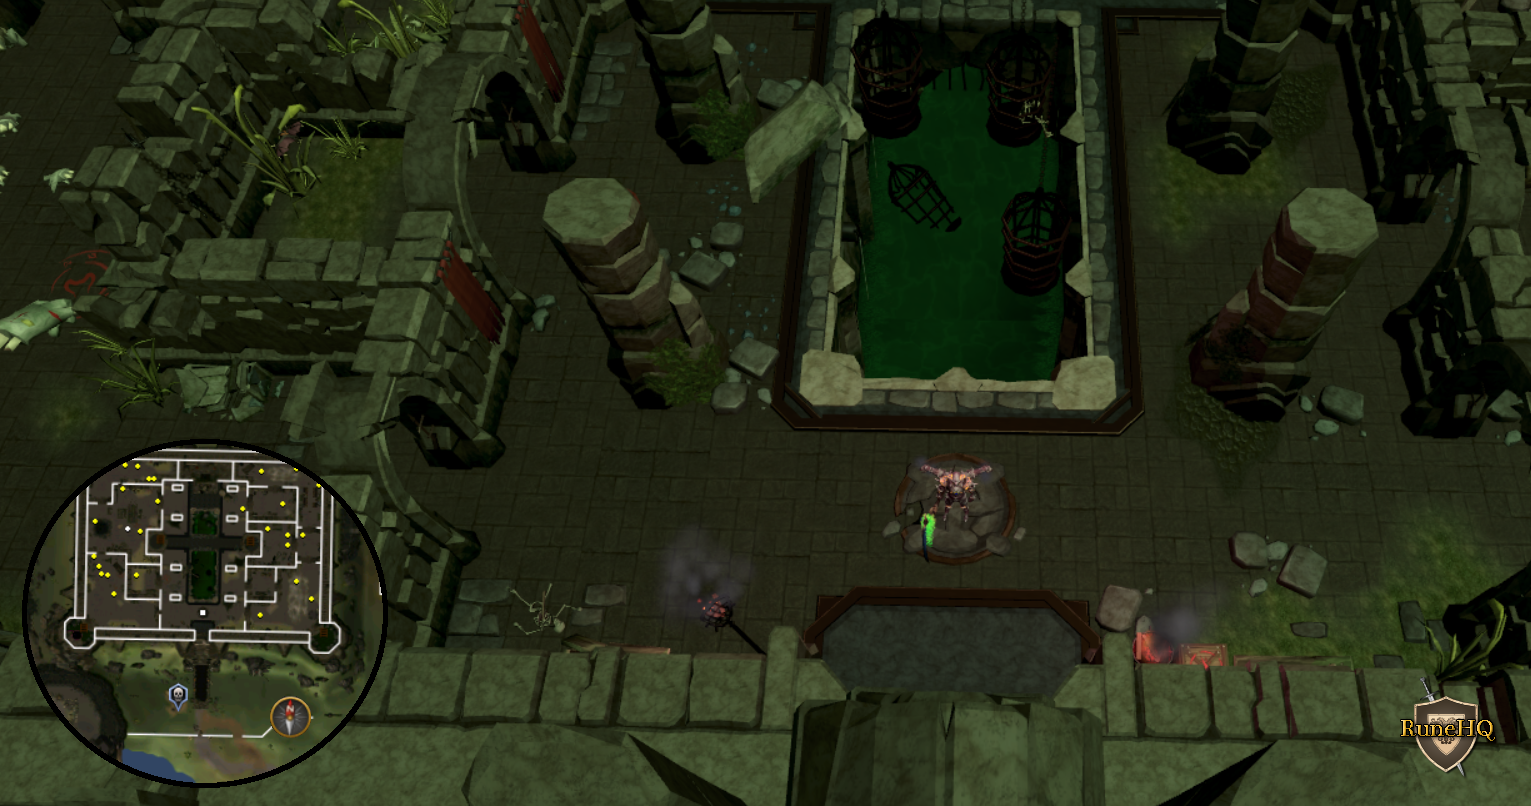 Click the above image to enlarge! |
|
| Jig in the Edgeville Monastery garden. Beware of double agents! Equip a holy cithara, Saradomin's murmur and a ring of devotion. | Inside Edgeville monastery garden. Quest One Piercing Note required. Closest teleport: Edgeville Lodestone |
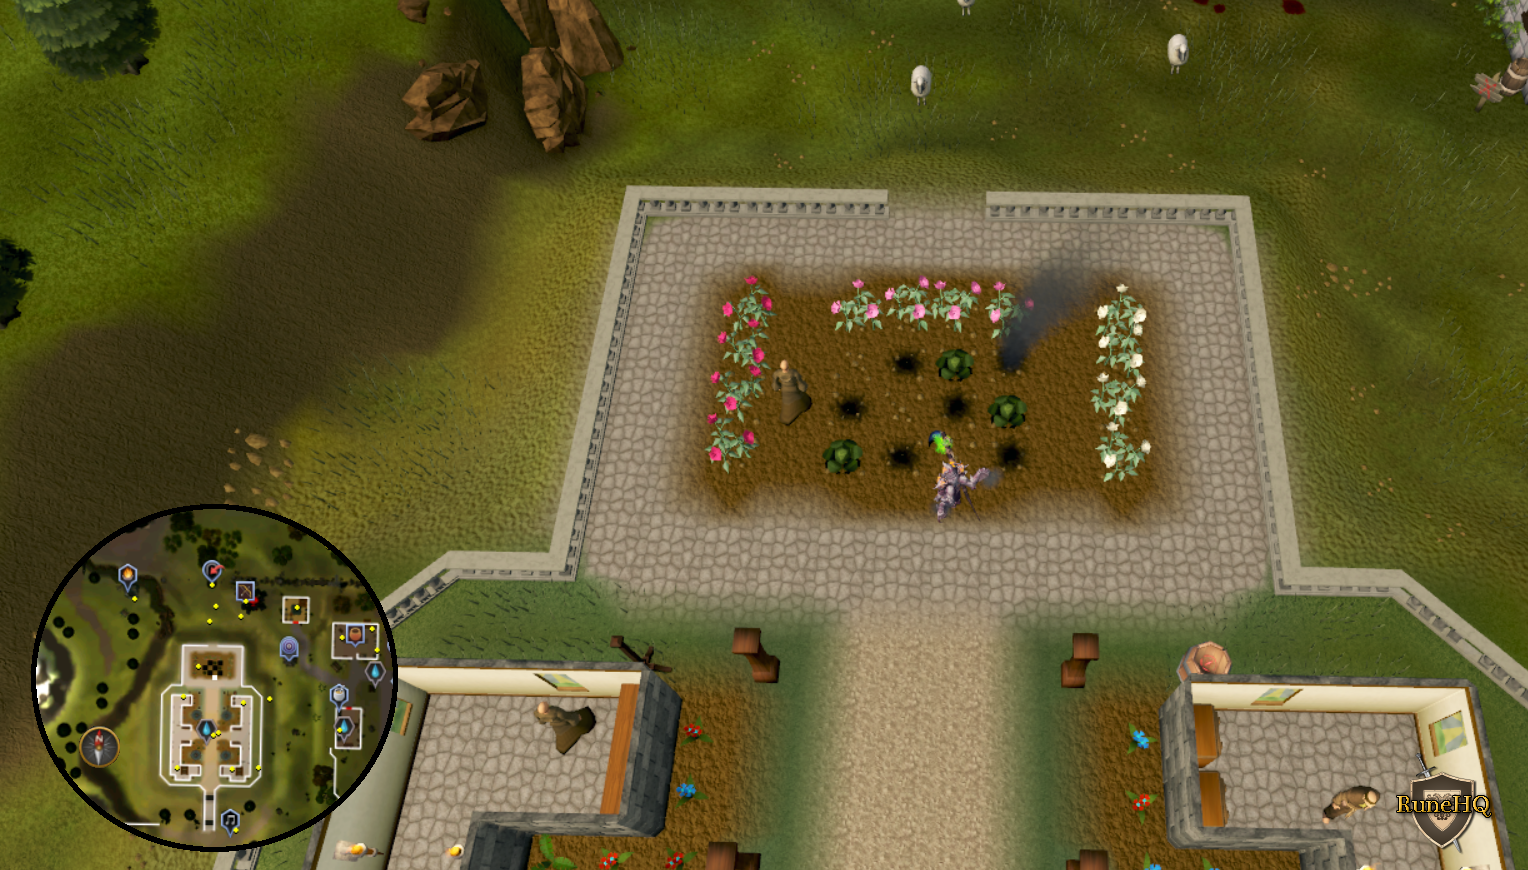 Click the above image to enlarge! |
|
| Salute in the Max Guild Garden. Beware of double agents! Have no items equipped when you do. | Inside Max Guild garden in Prifddinas. Quest Plague's End required
and either 1 skill at level 99 or have Quest point cape Closest teleport: Max Cape or Attuned crystal teleport seed option 4 |
Unequipp all items |
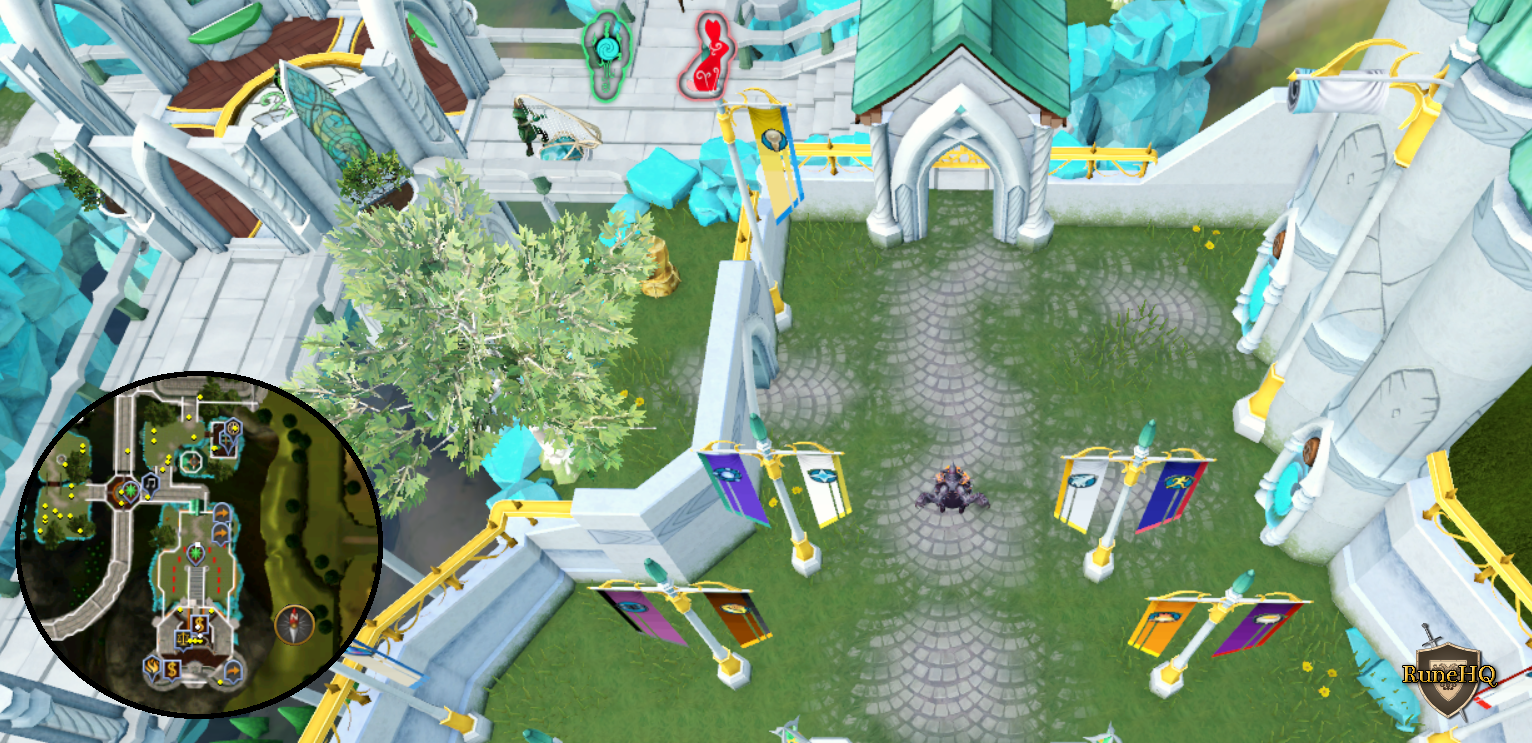 Click the above image to enlarge! |
| Shrug in the Lumbridge Fishing Supplies shop. Beware of double agents! Equip demon slayer gloves, a boater and the cape of legends. | Inside Lumbridge fishing shop in North-East Lumbridge. Quest Legends' Quest required. Closest teleport: Lumbridge Teleport Spell or Lumbridge Lodestone |
|
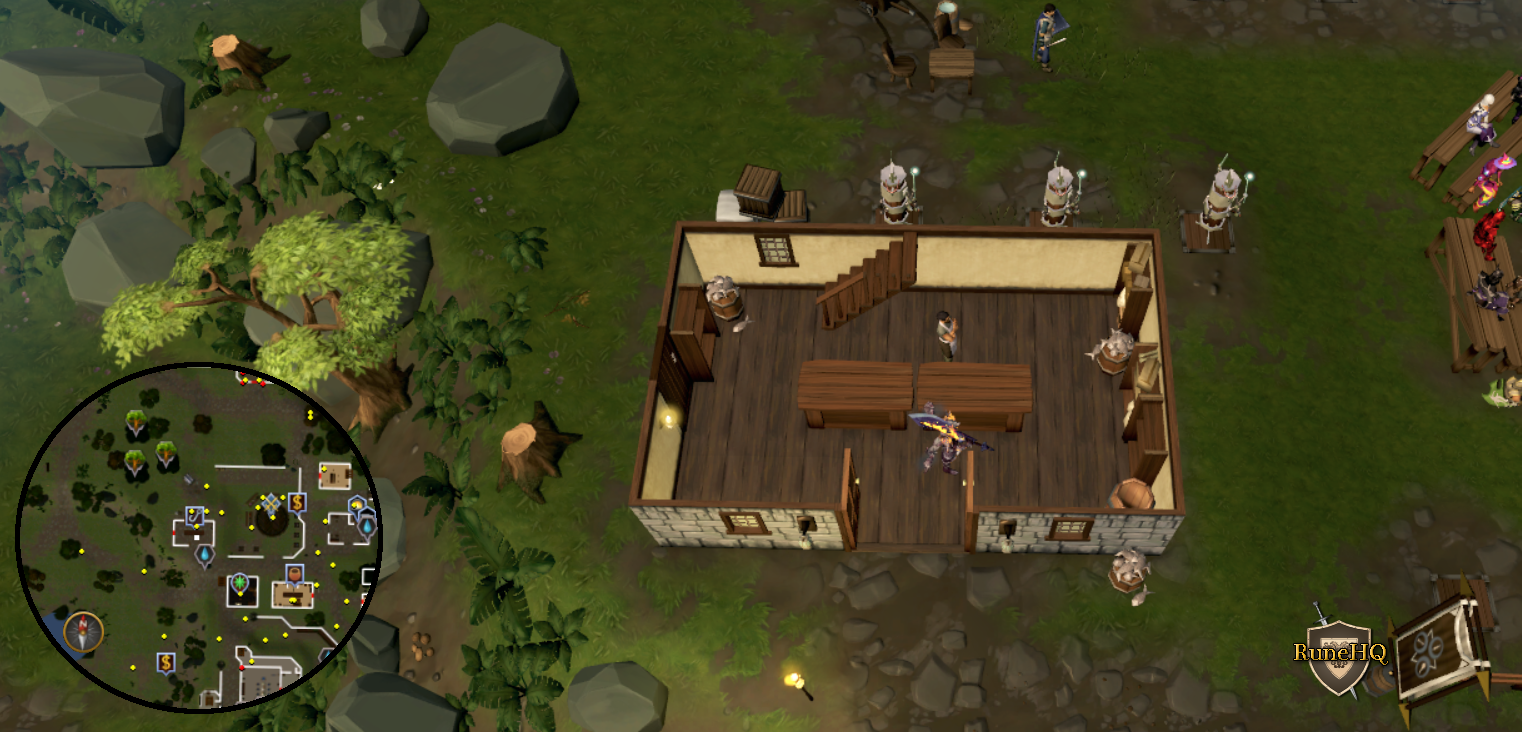 Click the above image to enlarge! |
| Think in the Hefin district of Prifddinas. Beware of double agents! Equip an ancient staff, Prifddinian worker's trousers and a berserker ring | Hefin district of Prifddinas. Quest Plague's End required. Closest teleport: Attuned crystal teleport seed option 6. |
 Click the above image to enlarge! |
|
| Wave in front of the Grand Library of Menaphos. Beware of double agents! Equip an asylum surgeon's ring and the Scabaras mask. | Inside Menaphos Grand library. Quests The Jack of Spades and Broken Home(3 challenges also required) required.Closest teleport: Imperial district teleport. |
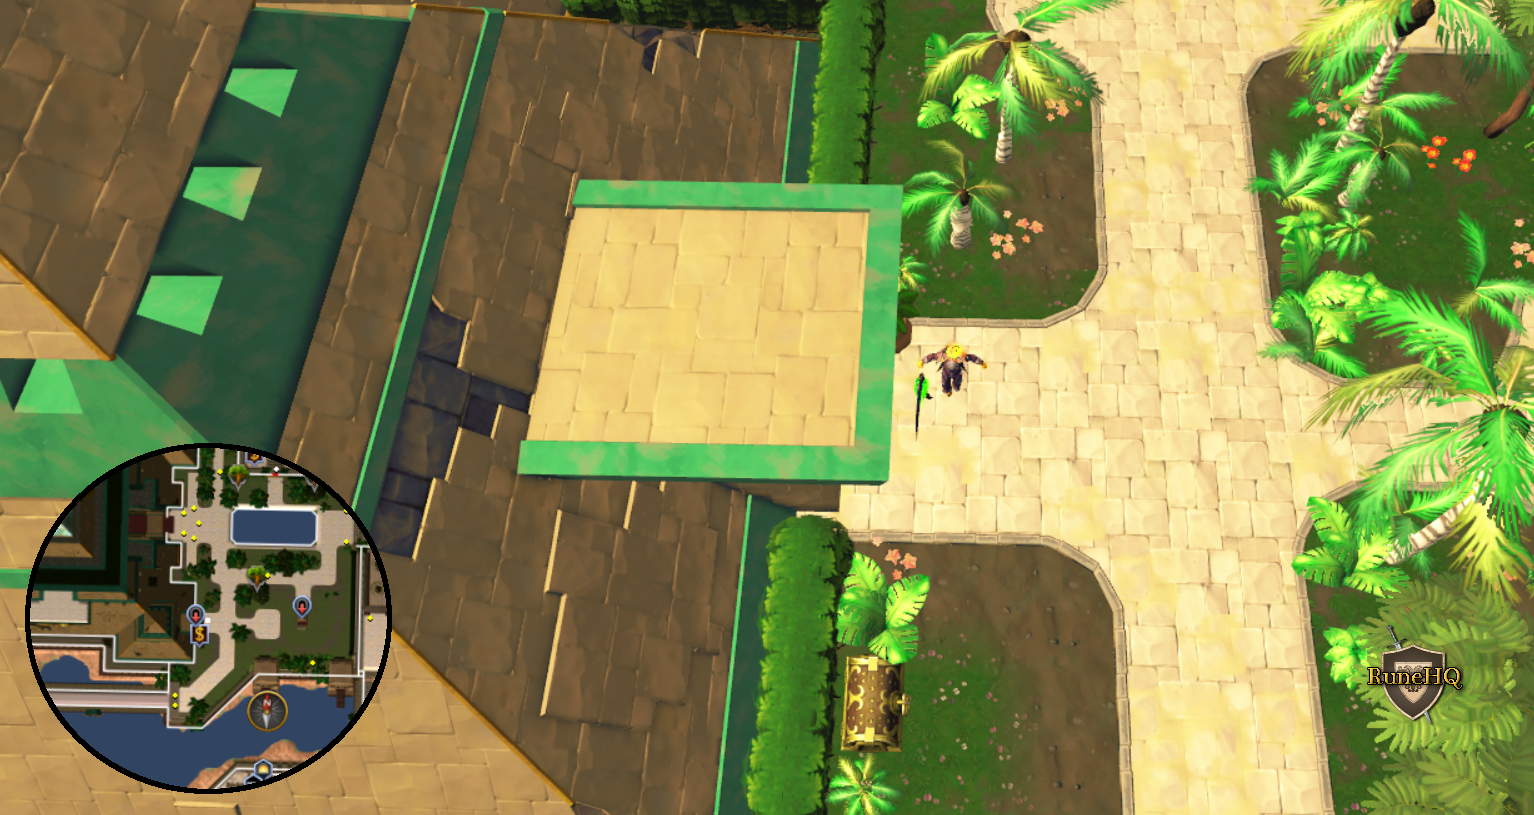 Click the above image to enlarge! |
|
| Hidey Holes | |||||
| Clue Level | Contruction Level Required | Contruction experience per Hidey Hole | Hidey Holes per clue level | Materials needed | Total materials per Hidey Hole level |
| Easy |
27 | 500 XP | 25 |
|
|
| Medium |
42 | 1,000 XP | 13 |
|
|
| Hard |
55 | 1,500 XP | 9 |
|
|
| Master |
88 | 2,500 XP | 11 |
|
|
| Easy Clue | ||||
| Location name | Where to find | Item converted | Items held | Image |
| Inside the shed in Lumbridge Swamp | Inside the shed in the center of Lumbridge Swamp. | Barrel |
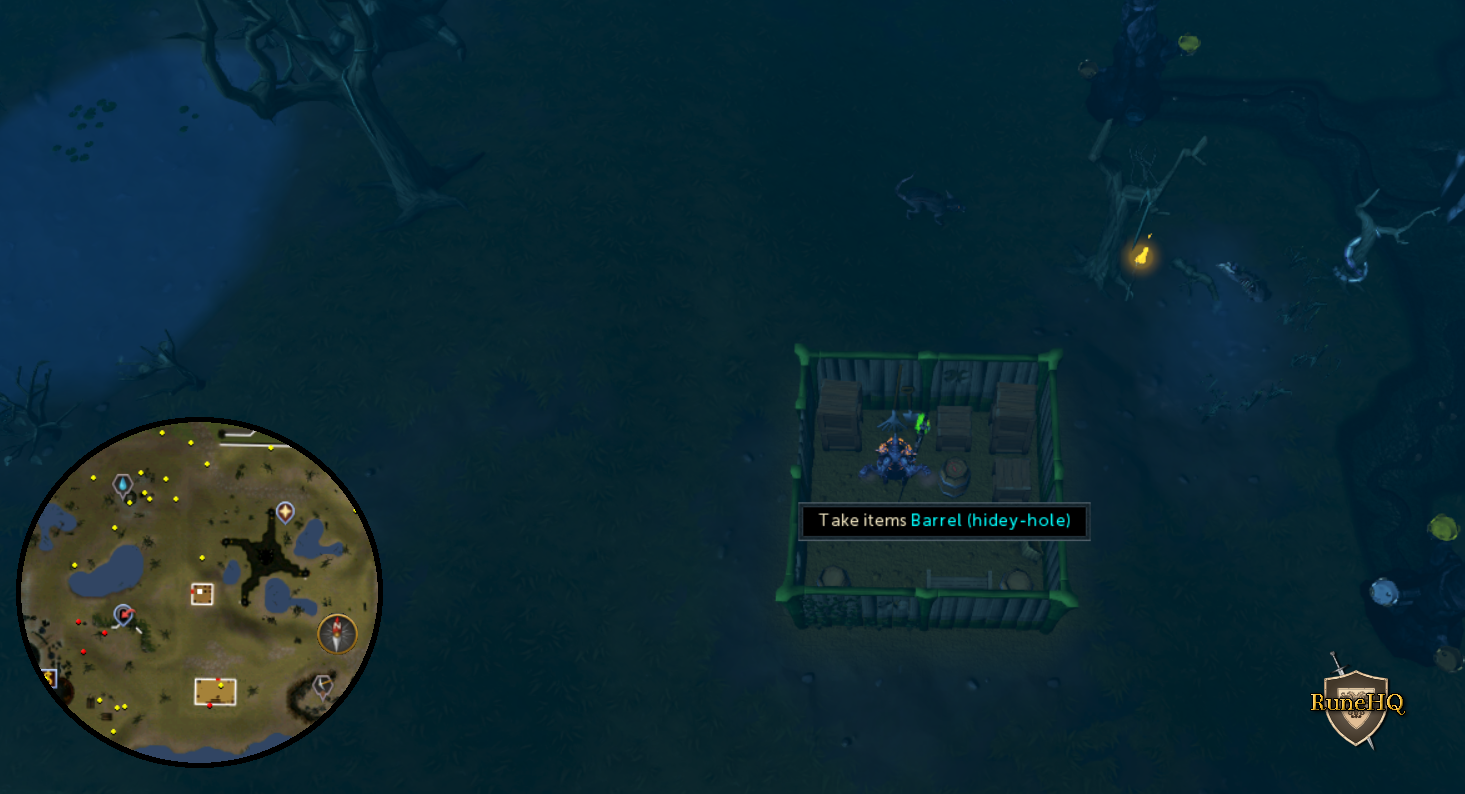 Click the above image to enlarge! |
|
| Next to the bridge on the Wizards' Tower island | West side of the bridge just North of the Wizards' Tower. | Rock |
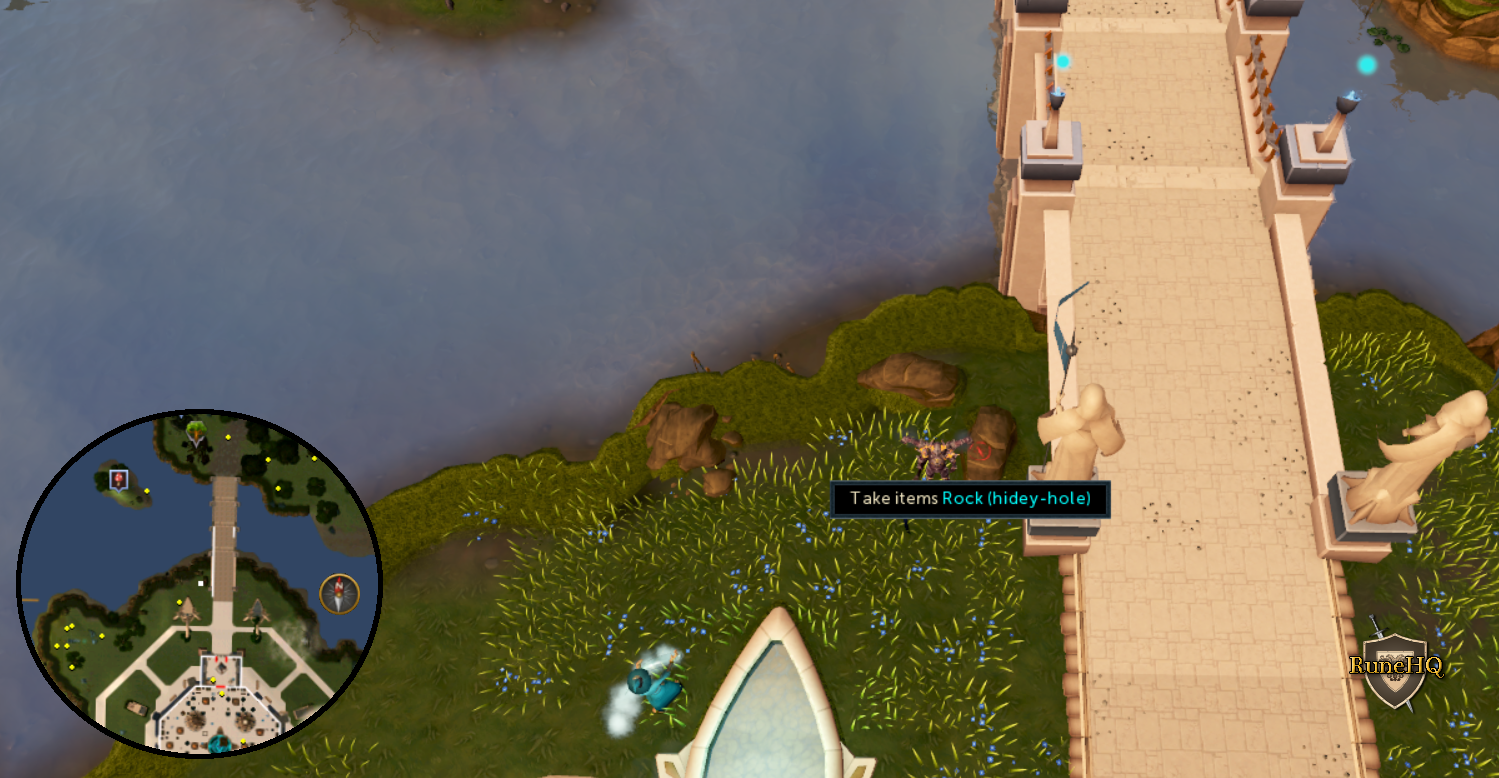 Click the above image to enlarge! |
|
| In Draynor Village market | West of Diango's cart. | Barrel |
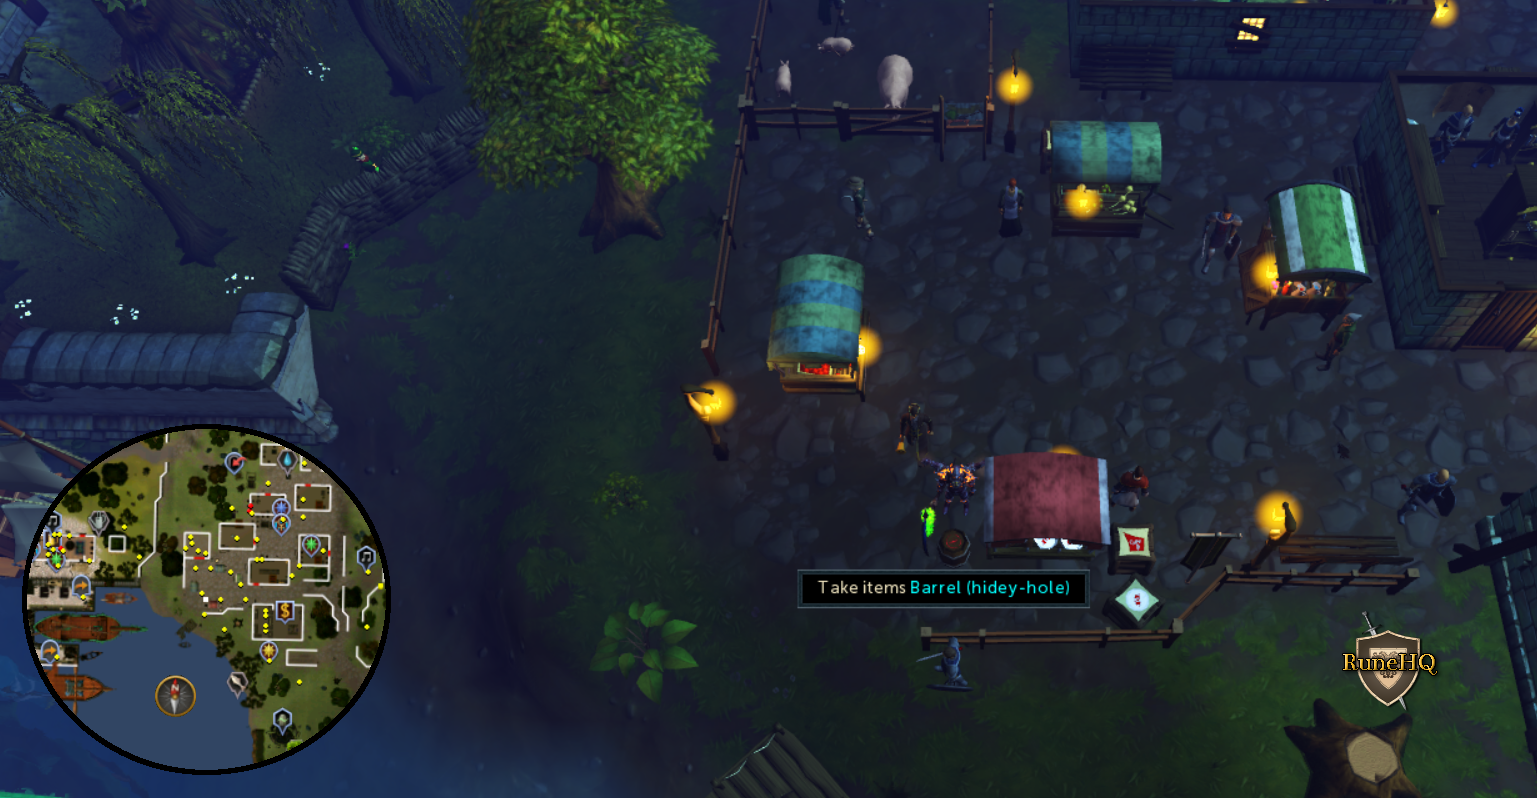 Click the above image to enlarge! |
|
| In the Silvarea limestone mine | Near the Odd Old Man. West of Varrock on the road towards Canifis. | Crate |
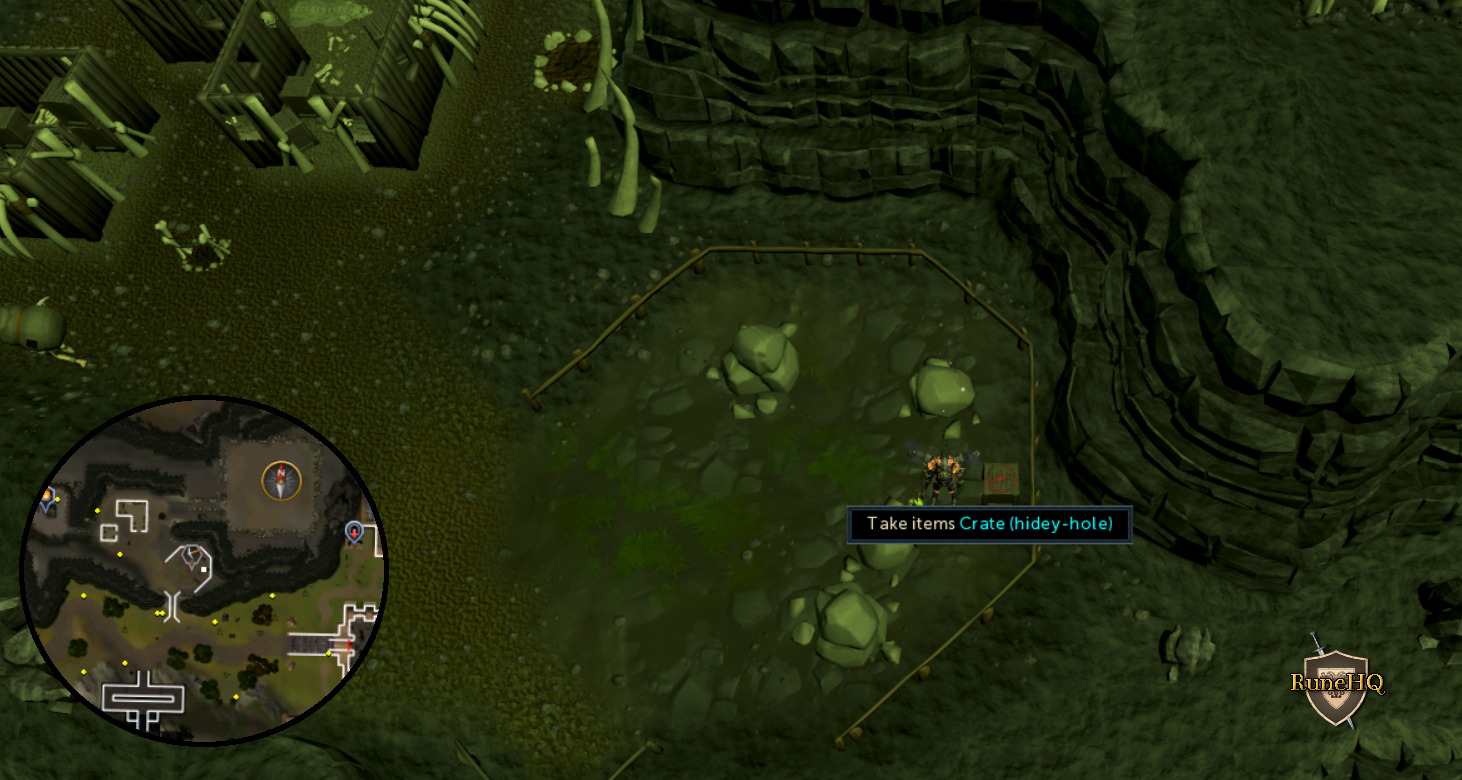 Click the above image to enlarge! |
|
| Outside the Legends' Guild gates | East of the entrance to the Legends' Guild | Rock |
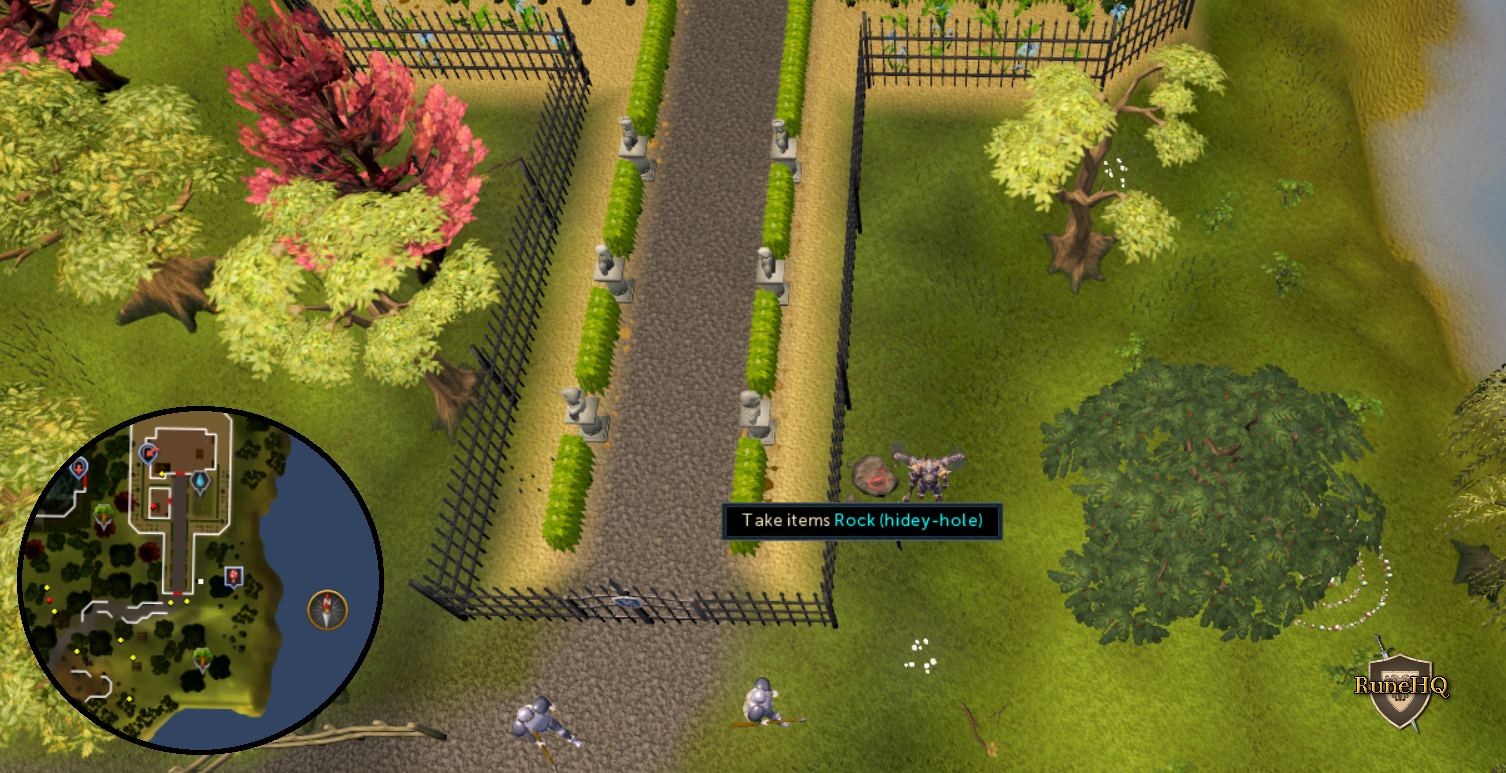 Click the above image to enlarge! |
|
| On Mudskipper Point | Mudskipper Point South of Port Sarim | Rock |

Click the above image to enlarge! |
|
| Near the Entrana Ferry in Port Sarim | On the docks by the Entrana Monks in Port Sarim. | Crate |
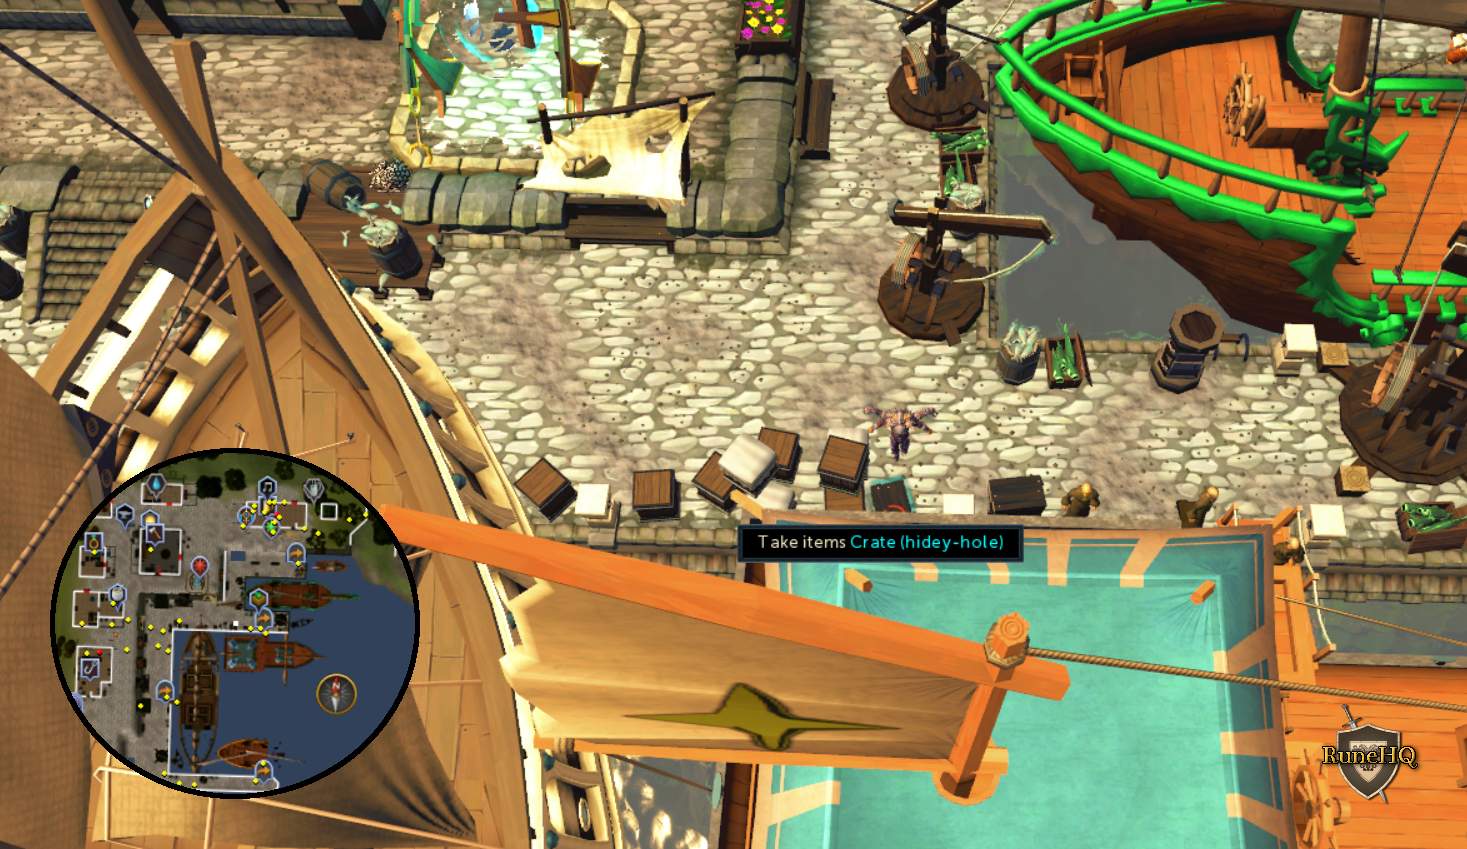
Click the above image to enlarge! |
|
| South of the Al Kharid scorpion mine | At the entrance to the Al Kharid Mine | Rocks |
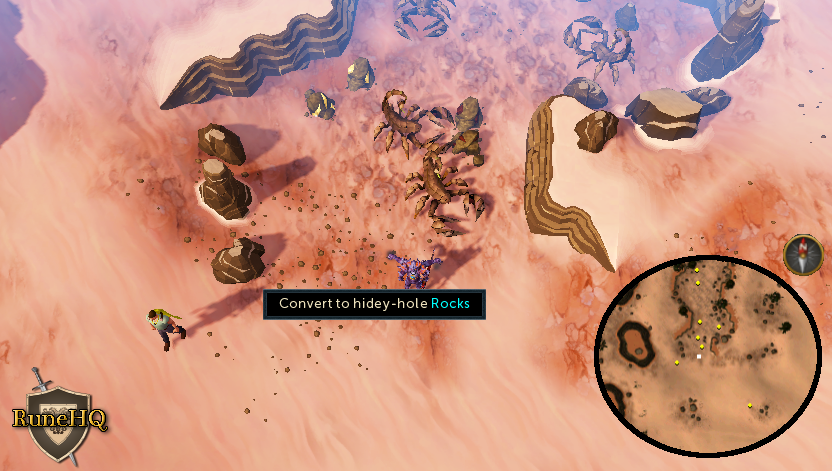 Click the above image to enlarge! |
|
| Next to the Draynor Manor fountain | South-Eastern section of Draynor Manor area | Dead tree |
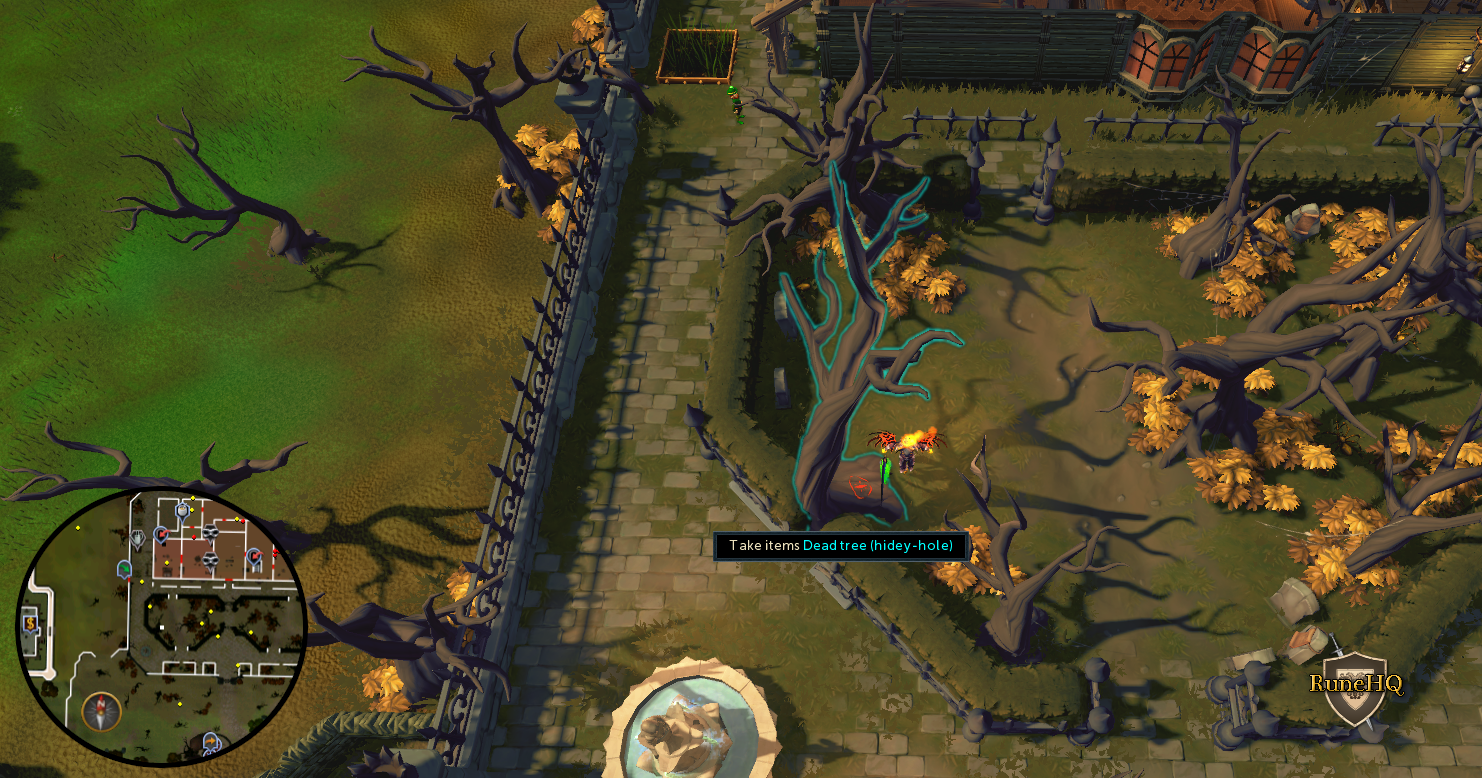
Click the above image to enlarge! |
|
| Outside the Lumbridge windmill | Just outside the doors to the Lumbridge windmill | Sack of items |
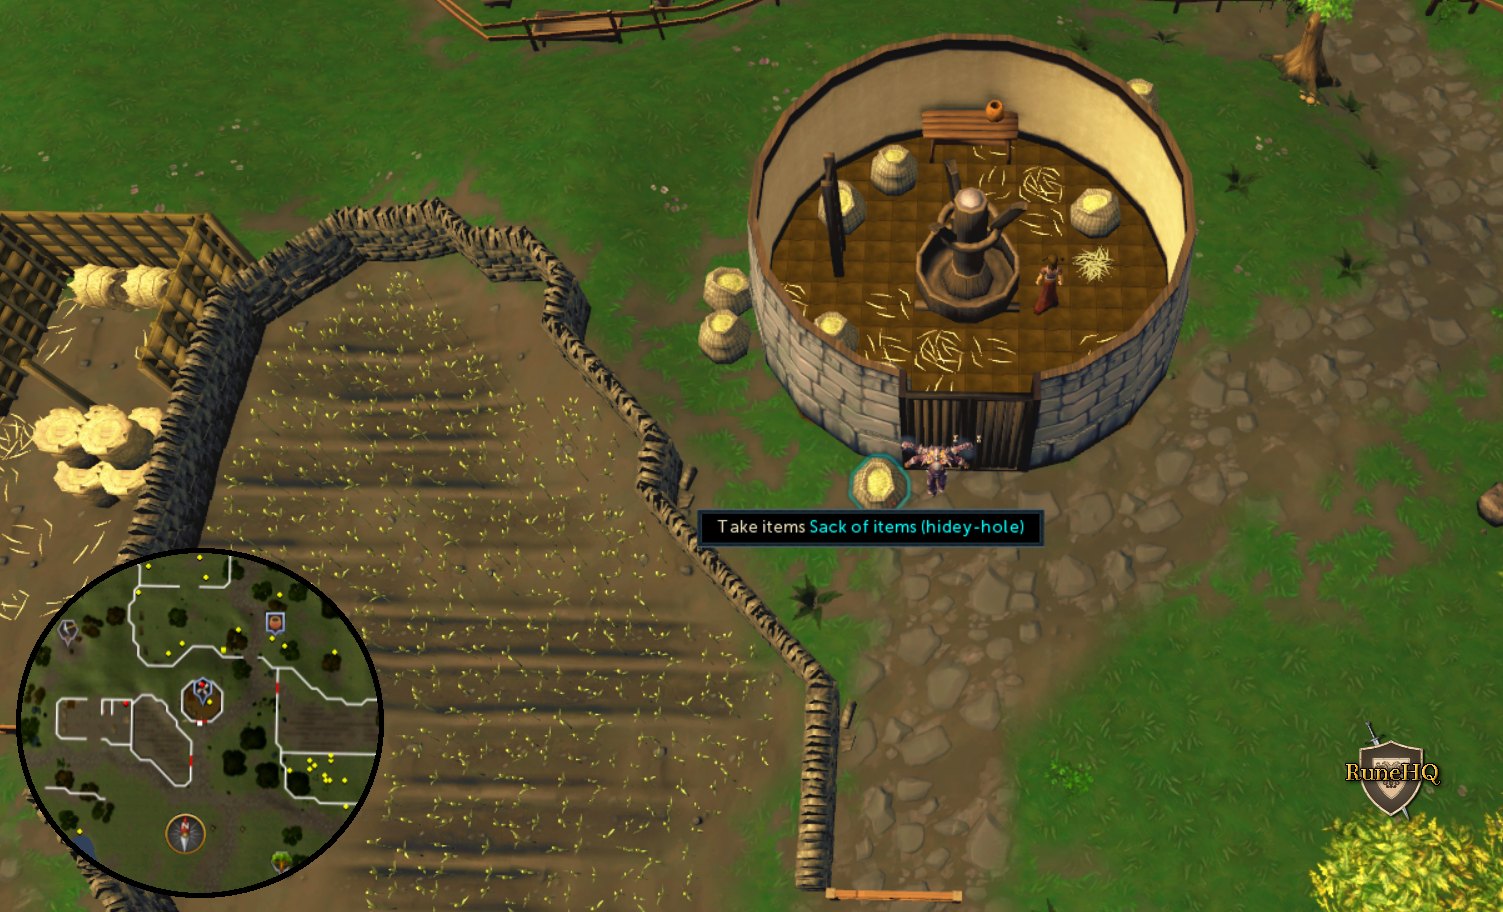
Click the above image to enlarge! |
|
| At the crossroads North of Draynor Village | Just South-East of Draynor Lodestone. Near the fence. | Rock |

Click the above image to enlarge! |
|
| In the Rimmington mine | Mine North-East of Rimmington West of Port Sarim | Cart |
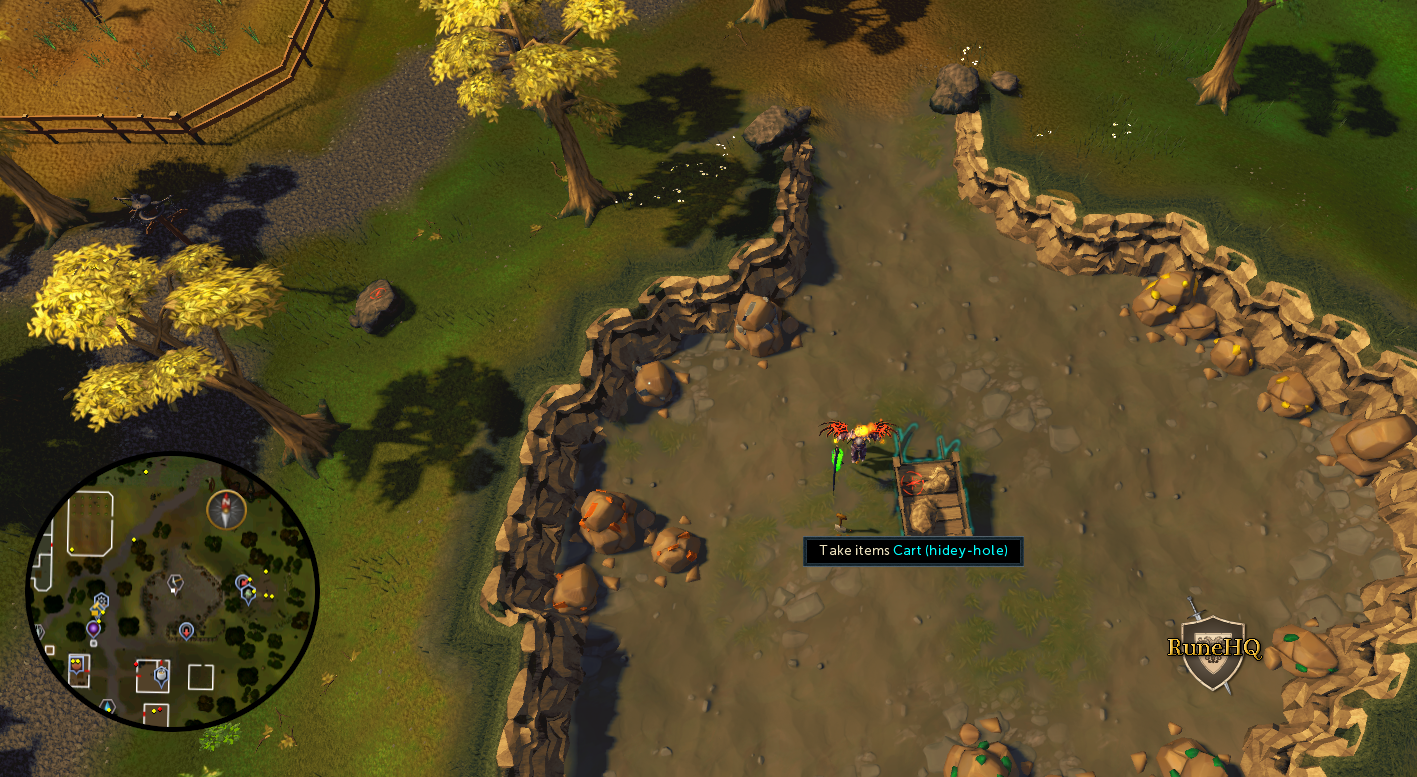
Click the above image to enlarge! |
|
| Inside the Varrock Palace Library | Northern most room of Varrock Palace located in the South-East corner of the room. Depending on the camera view the crate may be hard to see. | Crate |
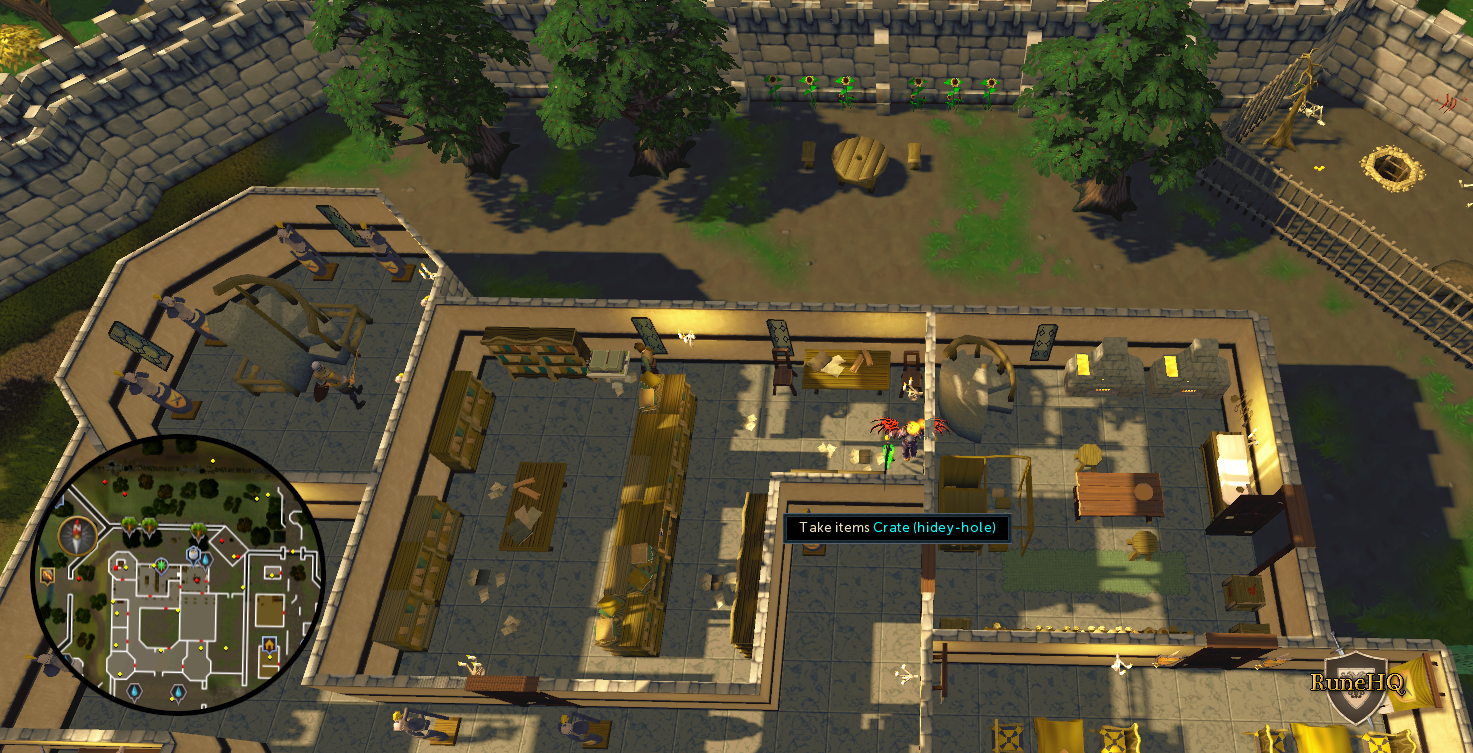
Click the above image to enlarge! | |
| Upstairs in the East Ardougne windmill | Top floor of the windmill North of the Ardougne lodestone | Crate |
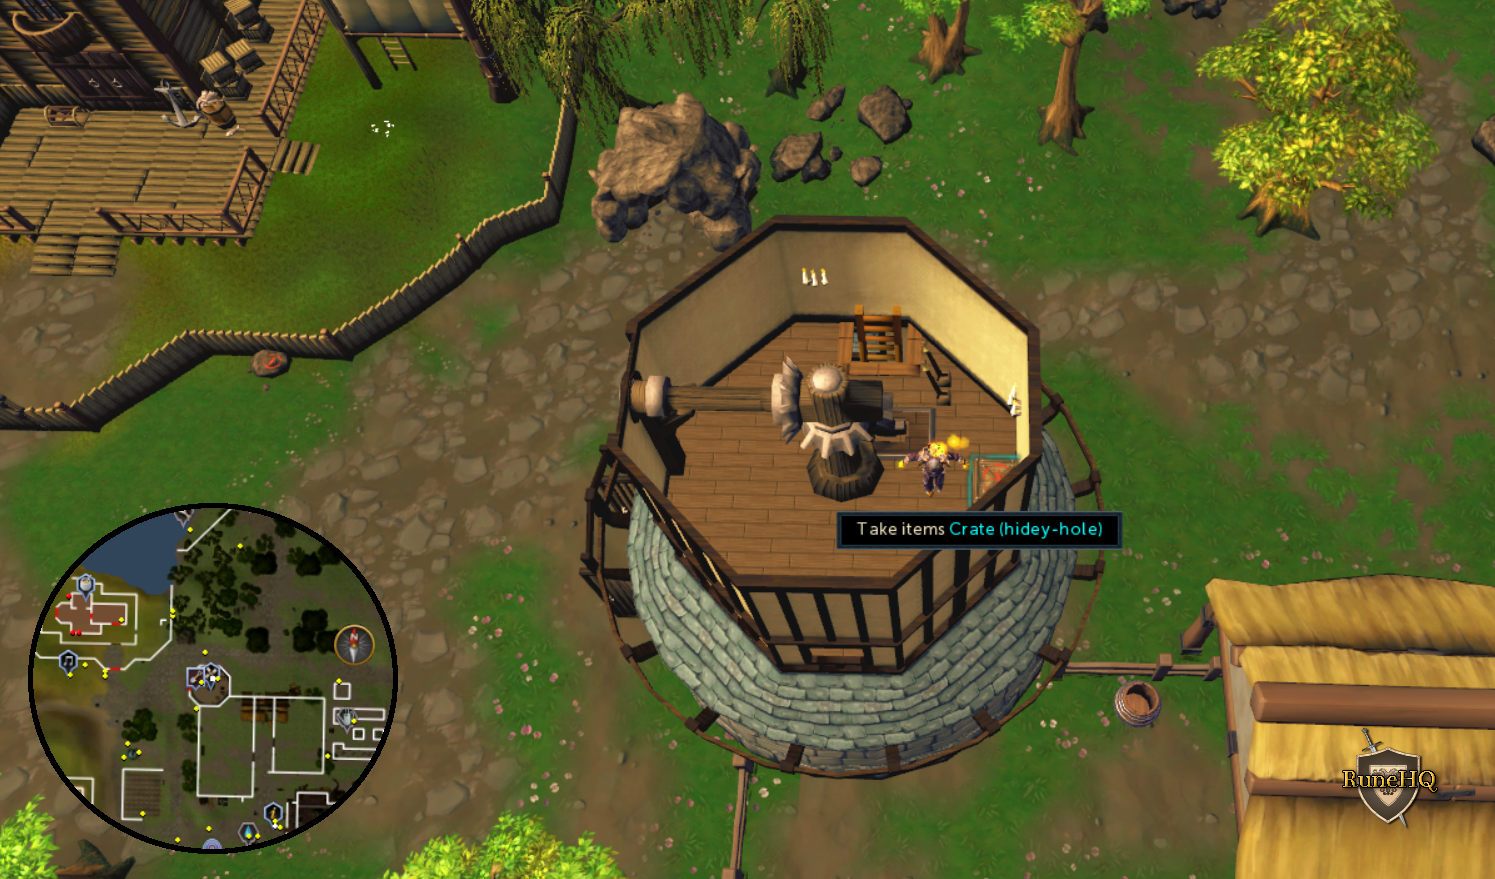
Click the above image to enlarge! |
|
| Inside the Falador Party Room | Falador Party Room Southern wall East of the Door. | Potted plant |
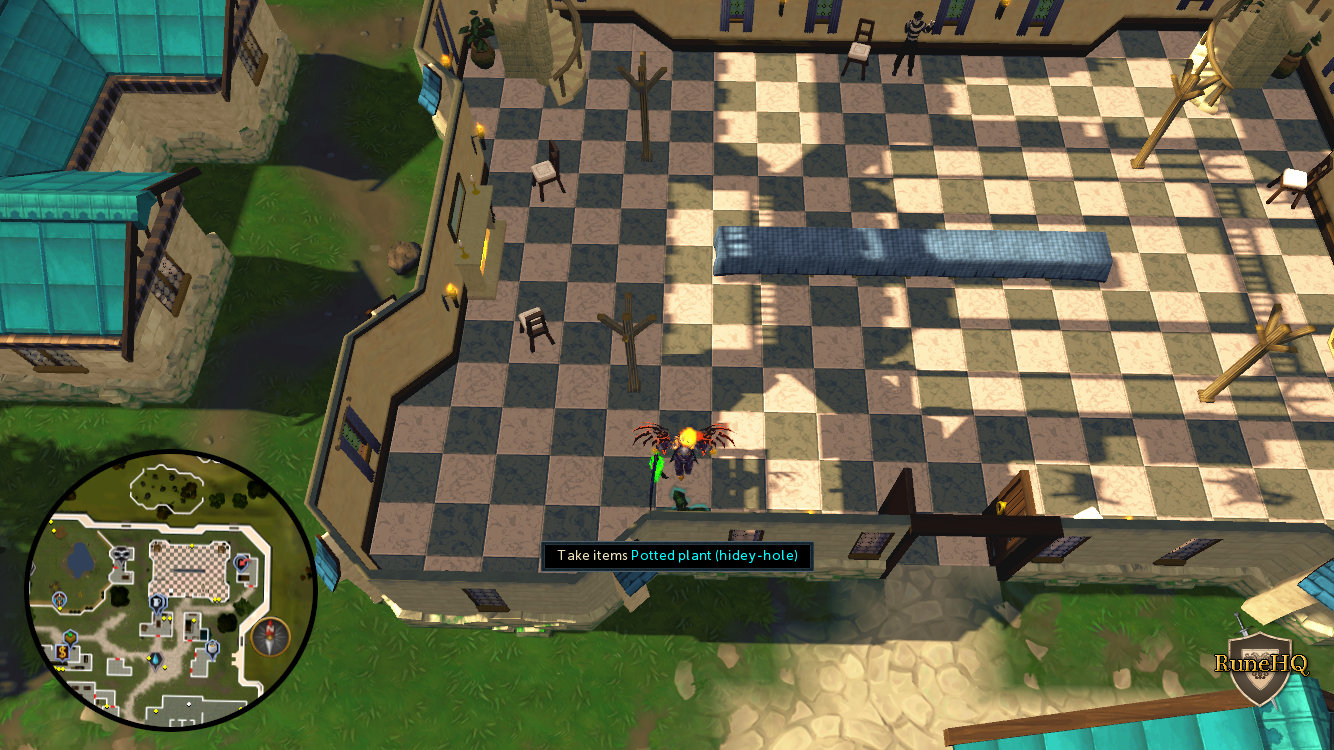
Click the above image to enlarge! |
|
| Next to the Taverley Stone Circle | Just South of the Druids and stone circle in the wooded area between Taverley and Burthorpe | Rock |
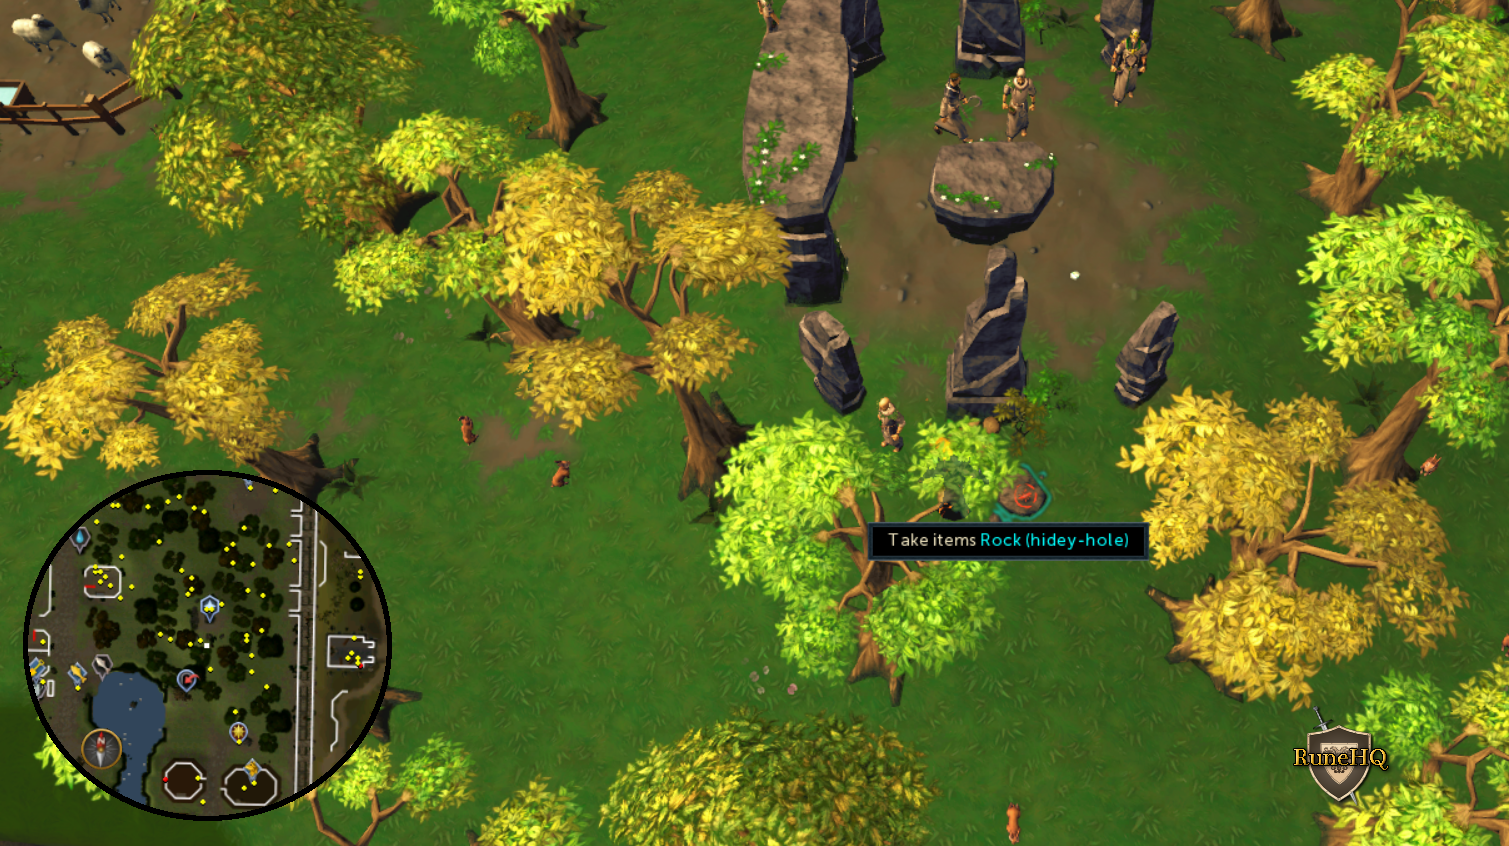
Click the above image to enlarge! |
|
| Among the Catherby beehives | East of Catherby inside the fenced area with beehives. | Beehive |
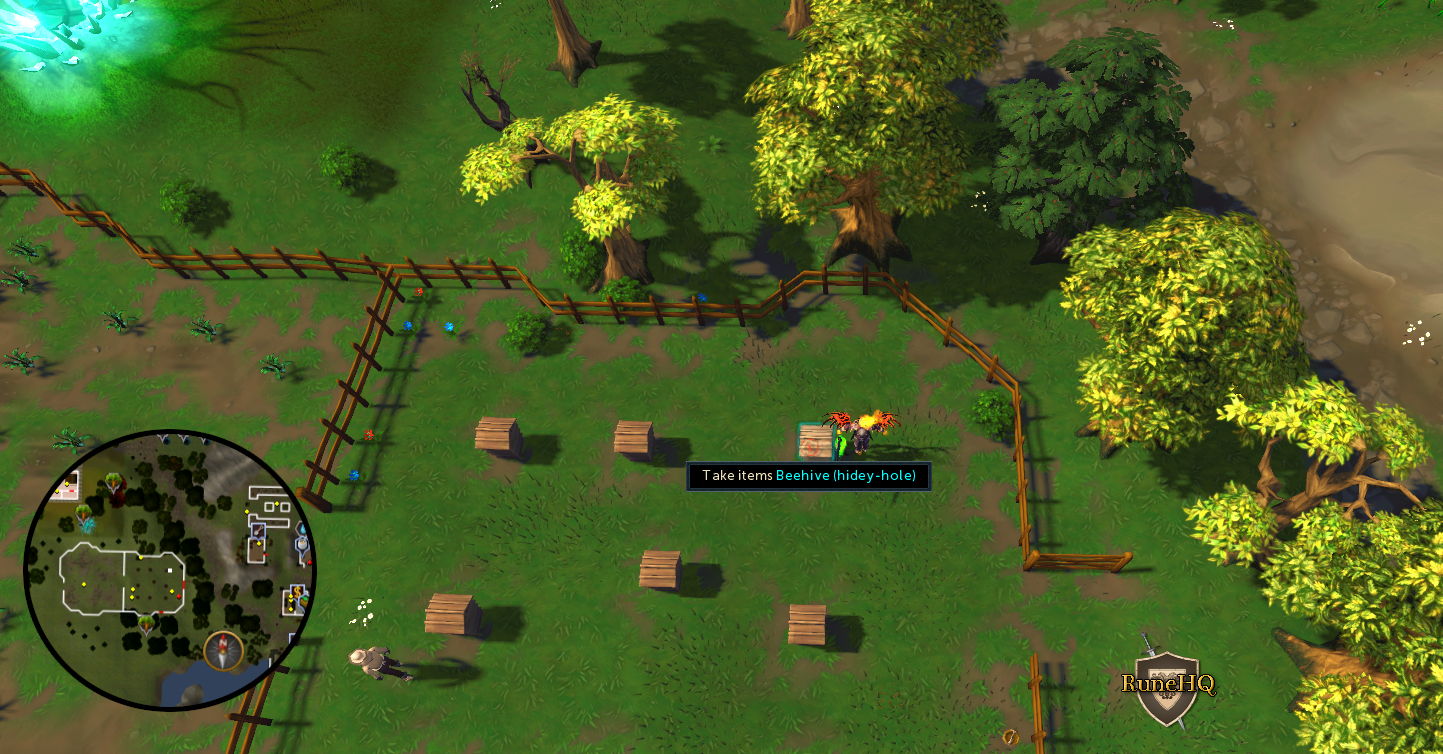
Click the above image to enlarge! |
|
| Next to the monkey cage in Ardougne Zoo | Eastern side of the zoo in Ardougne (East) | Rock |
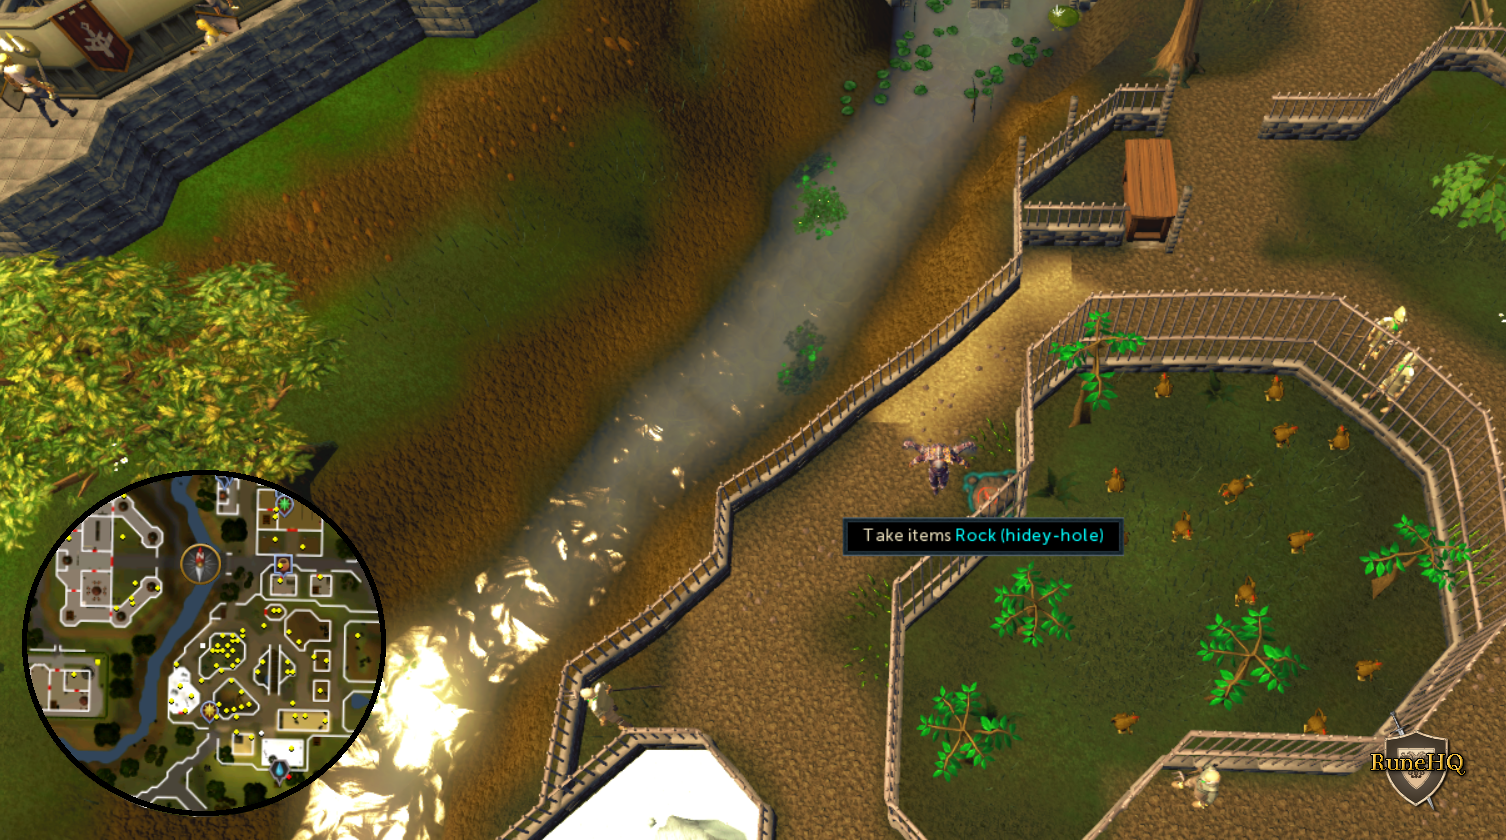
Click the above image to enlarge! |
|
| By the crossroads North of Rimmington | North of Rimmington to the East of the crossroads | Rock |
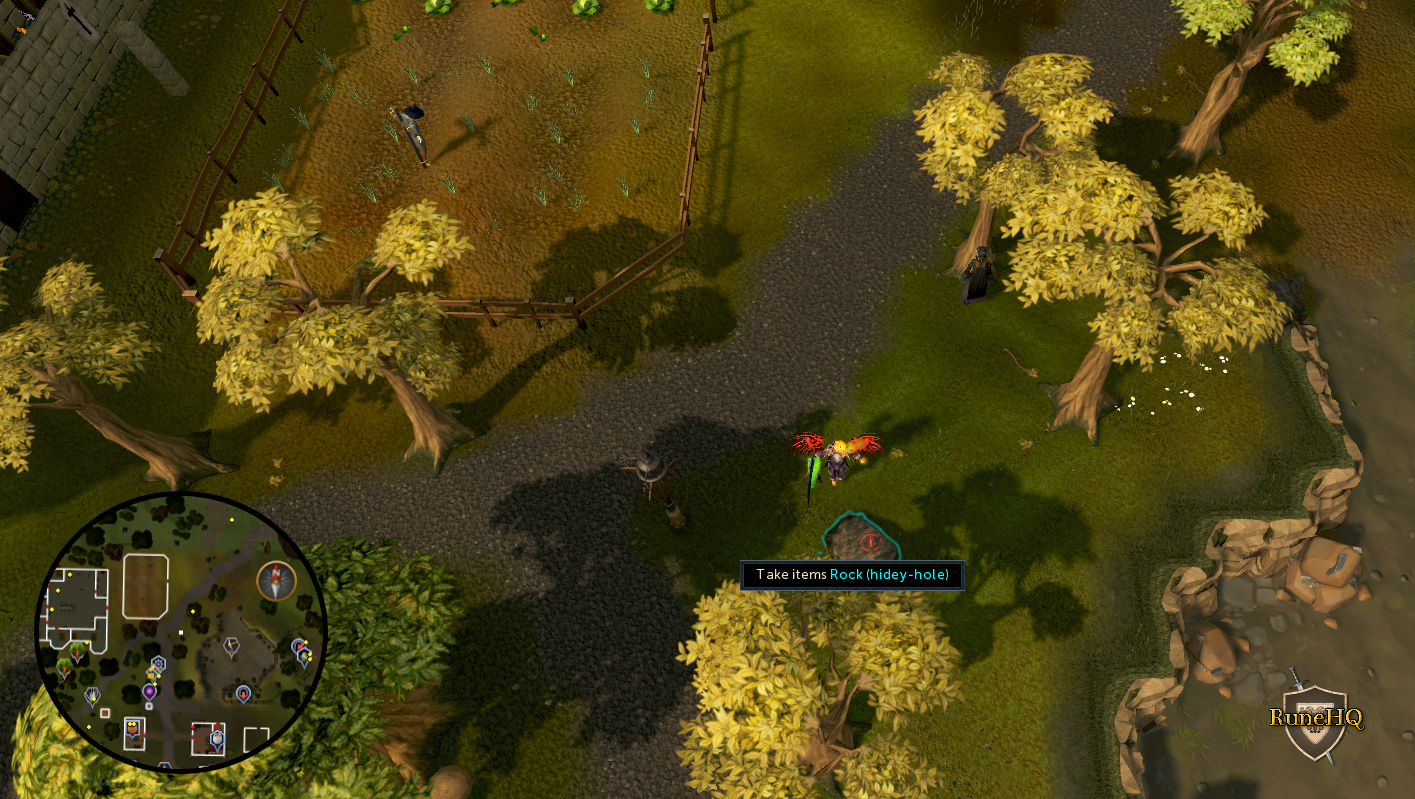
Click the above image to enlarge! |
|
| Near the entrance to the Fishing Guild | At the entrance to the Fishing Guild. North of Ardougne (East). | Rock |
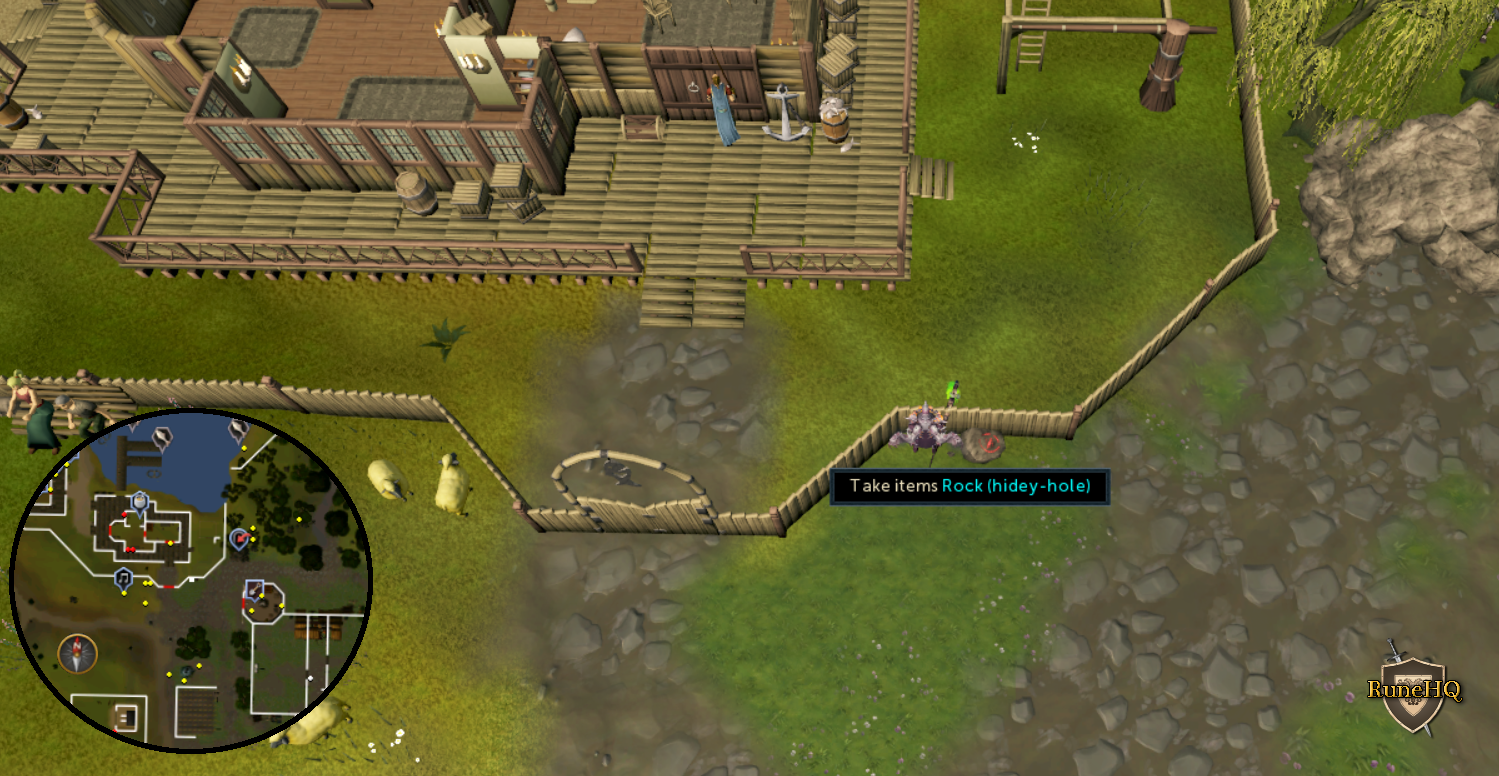 Click the above image to enlarge! |
|
| Near the entrance to Keep Le Faye | Keep Le Faye is North-East of the Legends' Guild East of the Sorcerer's Tower. | Rock |
 Click the above image to enlarge! |
|
| At the junction South of Sinclair Mansion | South of Sinclair Mansion North-East of Seers' Village | Rock |
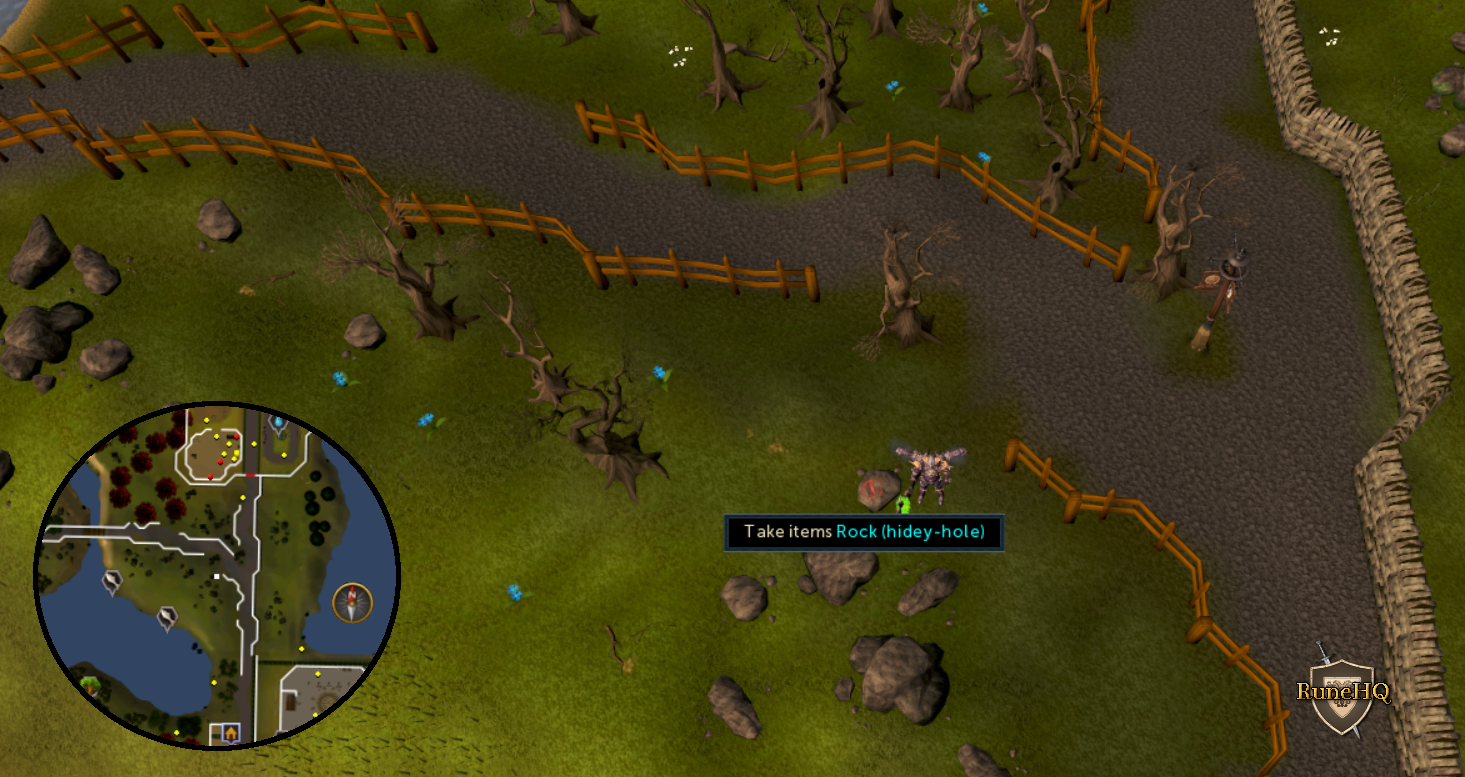 Click the above image to enlarge! |
|
| Inside the Digsite Exam Centre | Inside the Digsite Exam Centre and the Western wall. | Crate |

Click the above image to enlarge! |
|
| South of the enterance to Fort Forinthry | Directly South of the Fort Forinthry Lodestone | Tree Stump |
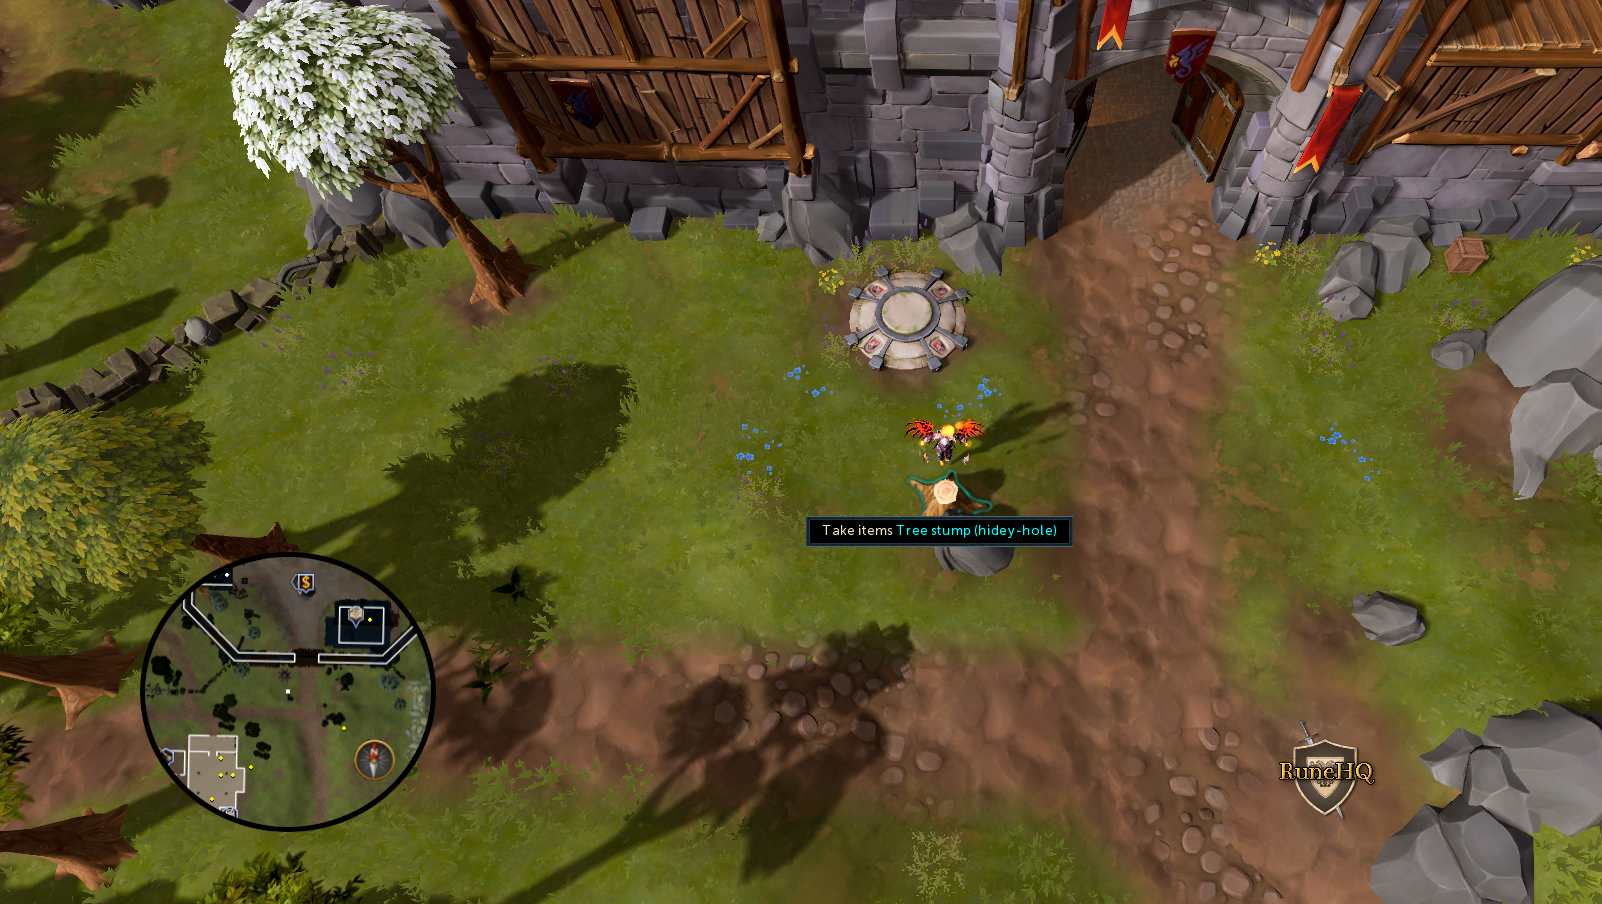
Click the above image to enlarge! |
|
| At the entrance to Het's Oasis | At the entrance to Het's Oasis right next to Icthlarin | Sack |
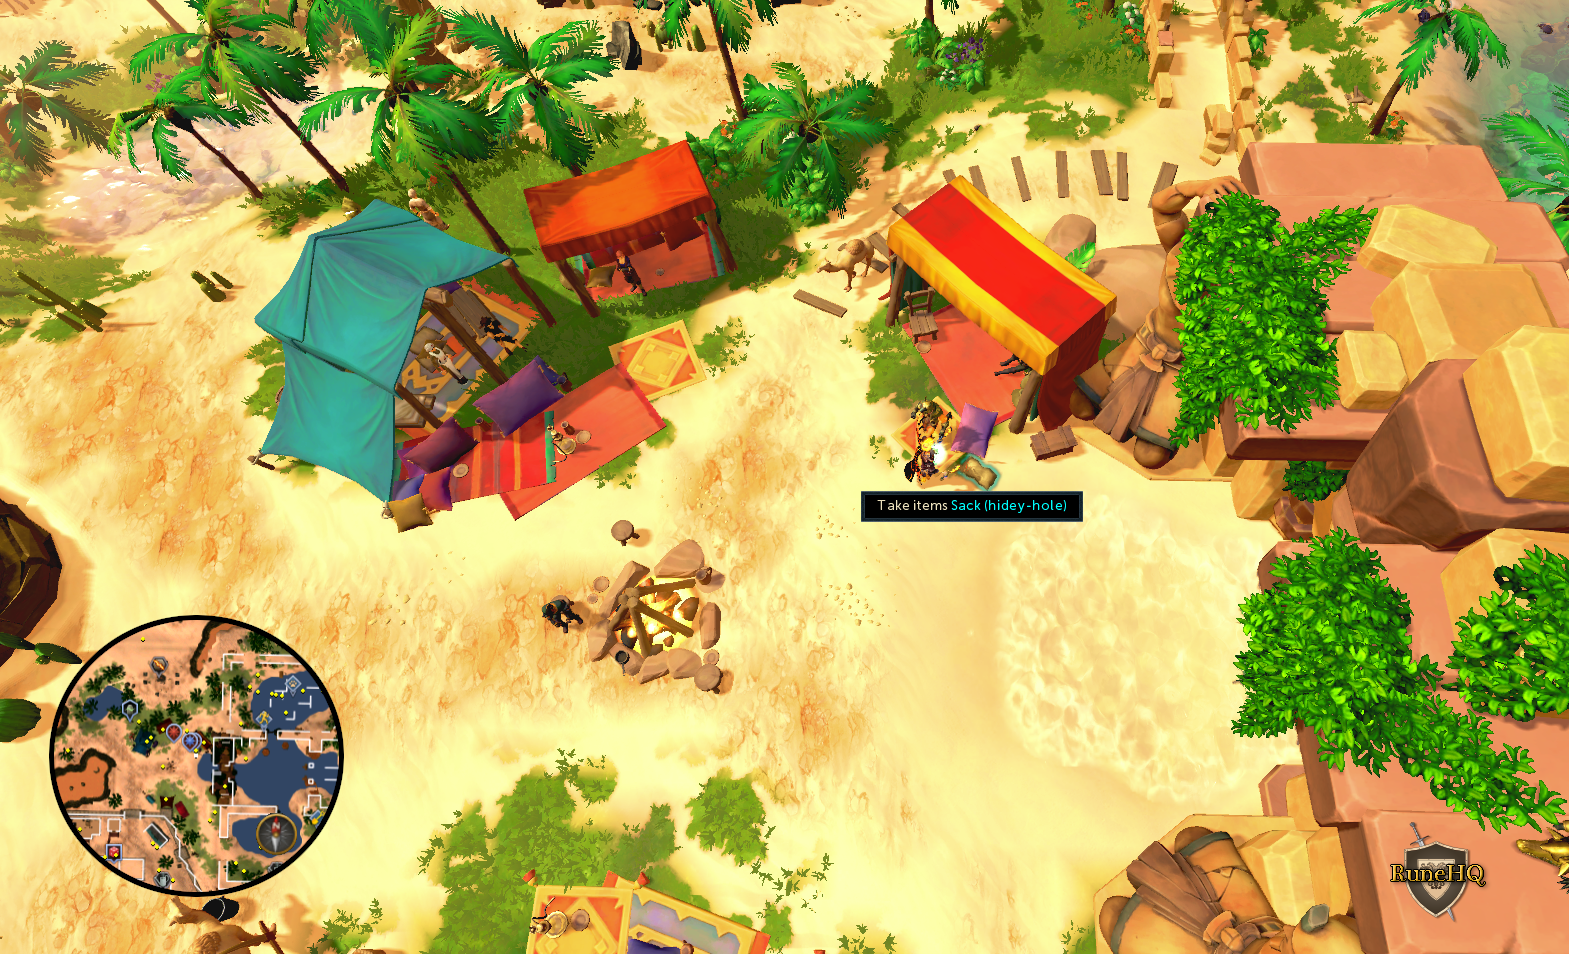
Click the above image to enlarge! |
|
| Medium Clue | ||||
| Location name | Where to find | Item converted | Items held | Image |
| Outside The Hair Of The Dog Tavern in Canifis | Center of Canifis just North of the pub/bar. | Barrel |
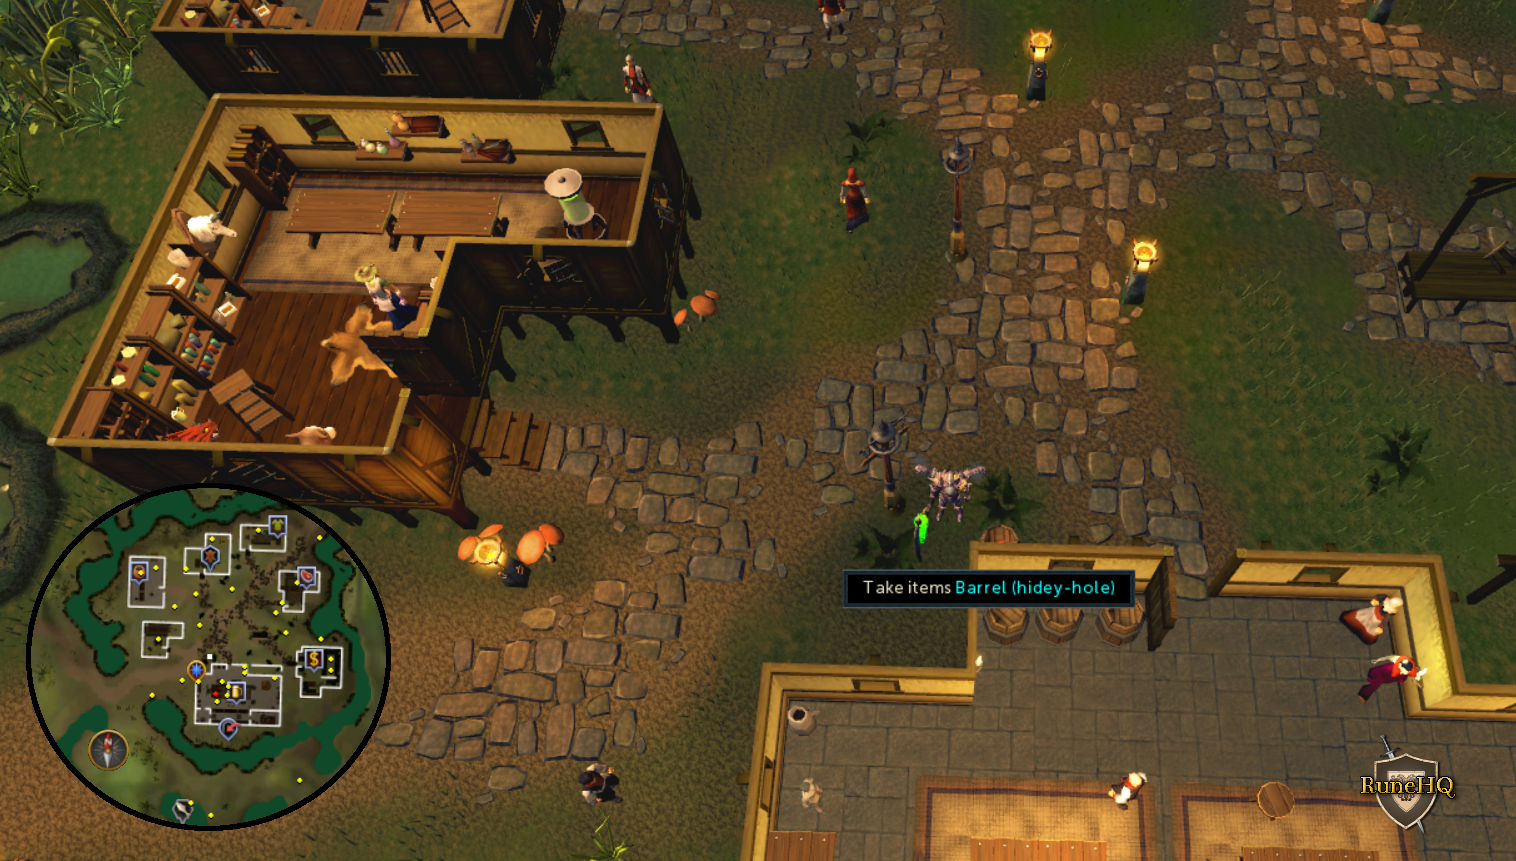 Click the above image to enlarge! |
|
| Mausoleum off the Morytania coast | ||||
| East of the Barbarian Villiage bridge | East of the Bridge on the East edge of Barbarian Villiage. | Rock |
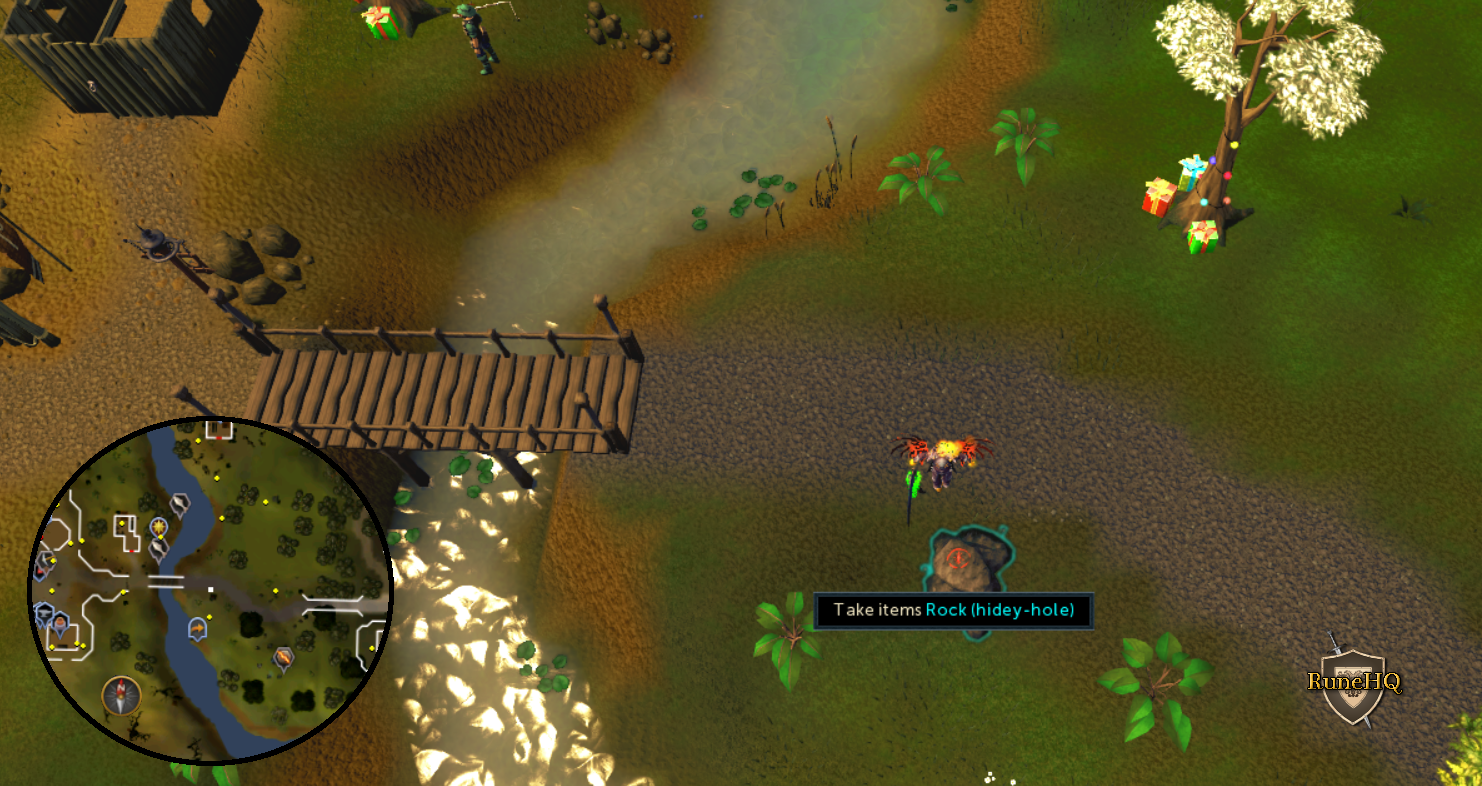
Click the above image to enlarge! |
|
| Inside the entrance of Tai Bwo Wannai village | Inside Tai Bwo Wannai | Crate |
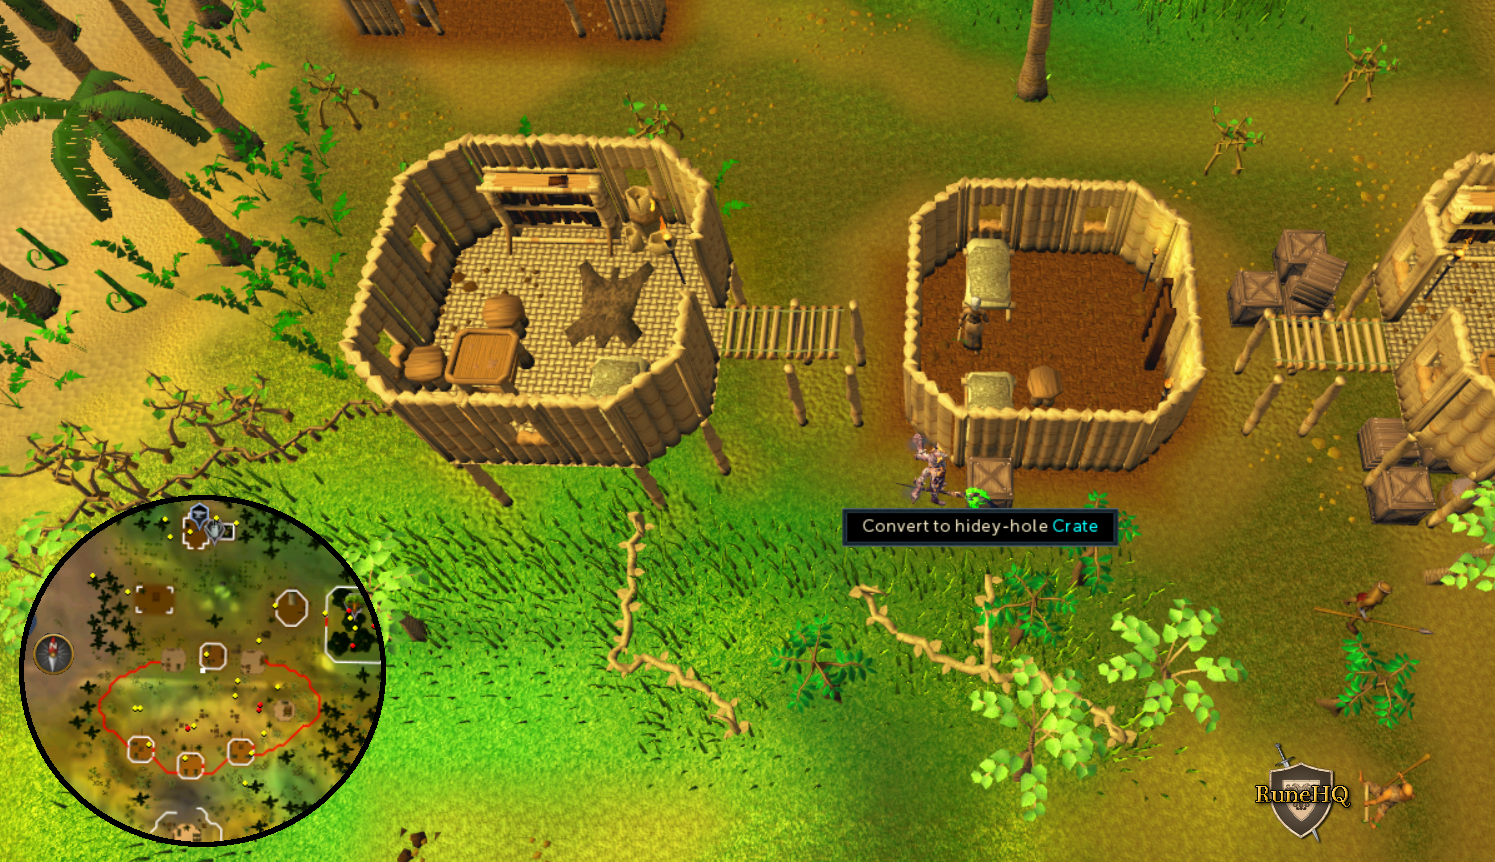 Click the above image to enlarge! |
|
| Next to the Castle Wars bank | Castle Wars lobby | Stone Blocks |
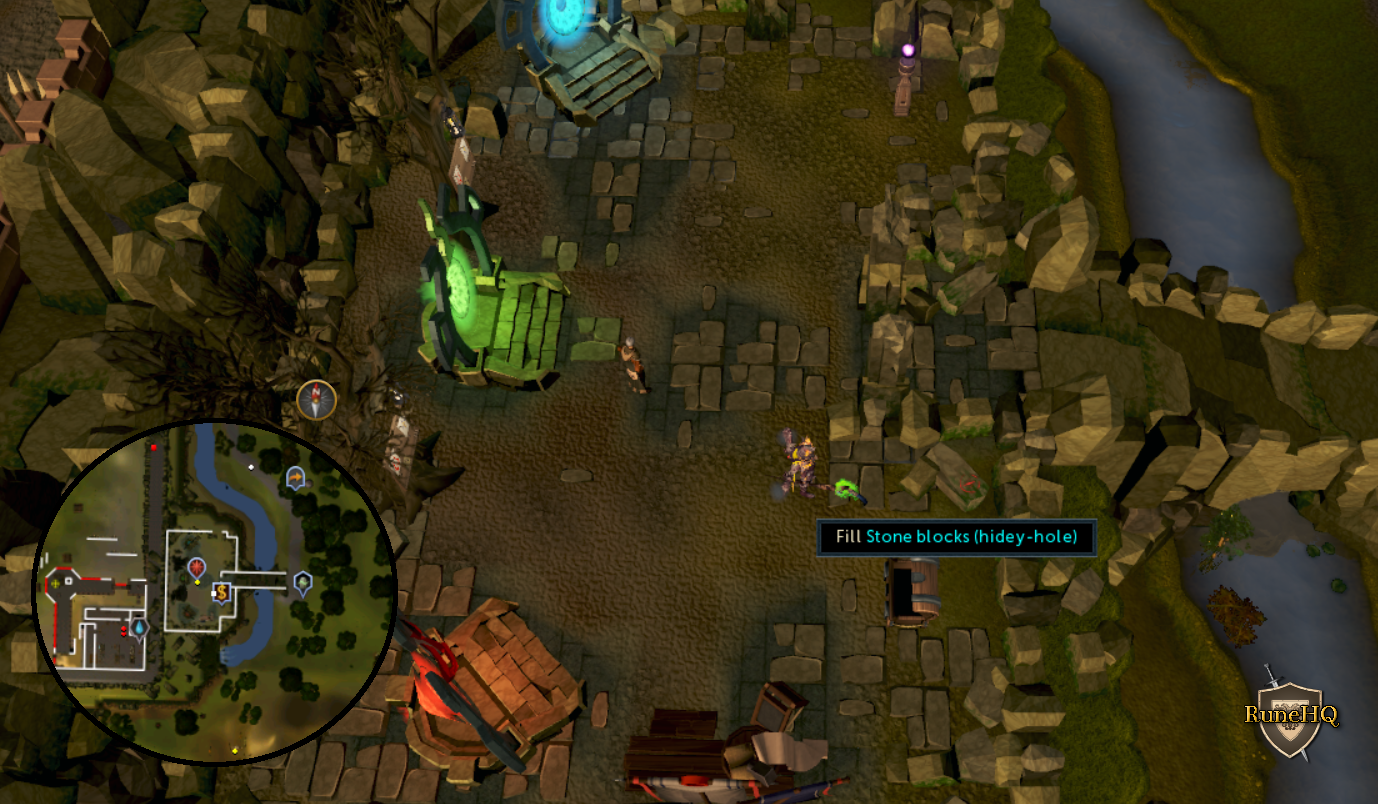 Click the above image to enlarge! |
|
| Inside the Barbarian Outpost agility training area | Barbarian Outpost | Barrel |
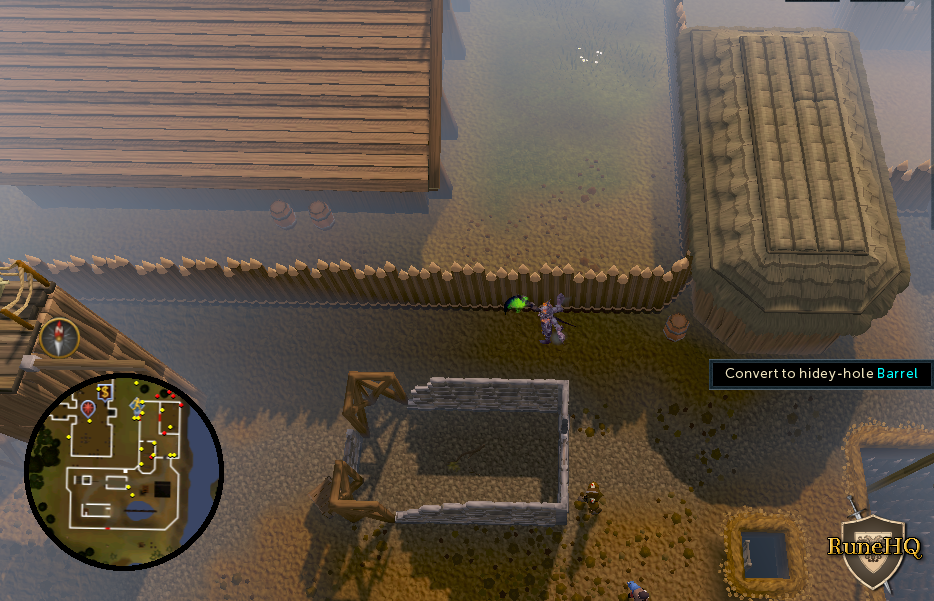 Click the above image to enlarge! |
|
| Halfway up the tree in the Gnome Stronghold agility course | Tree Gnome Stronghold agility course on the platform. | Tree Stump |
Click the above image to enlarge! |
|
| Inside the Yanille bank |
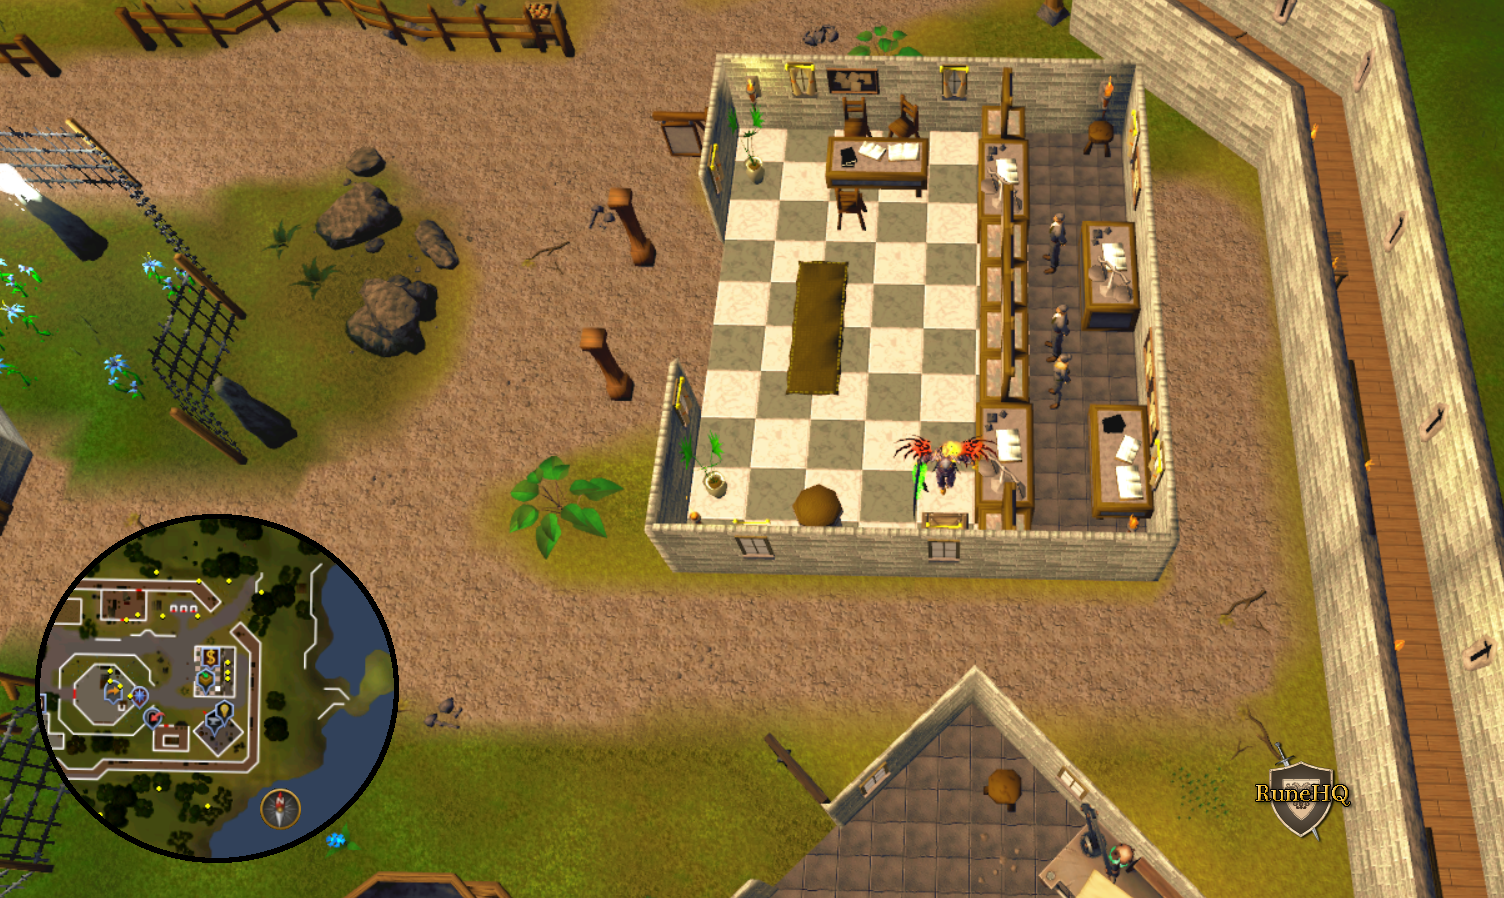
Click the above image to enlarge! |
|||
| On the top floor of the Kandarin Observatory | ||||
| By the ogres in the Combat Training Camp | In the Combat Training Camp North of Ardougne (West). Closest teleport: Traveller's Necklace option 2. |
Crate |
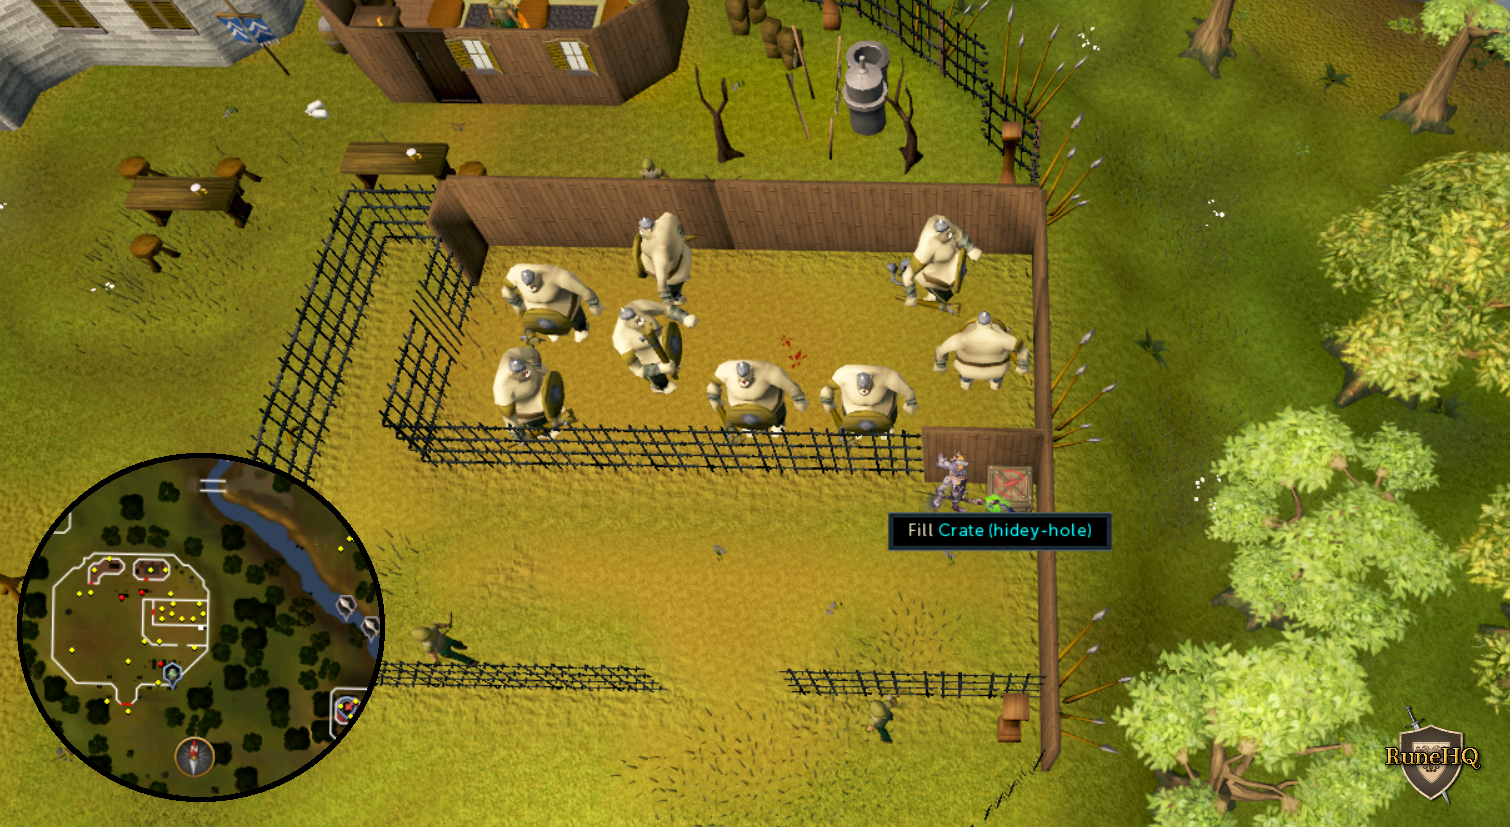 Click the above image to enlarge! |
|
| Next to the Eastern Digsite winch | East of the Eastern Digsite winch | Barrel |
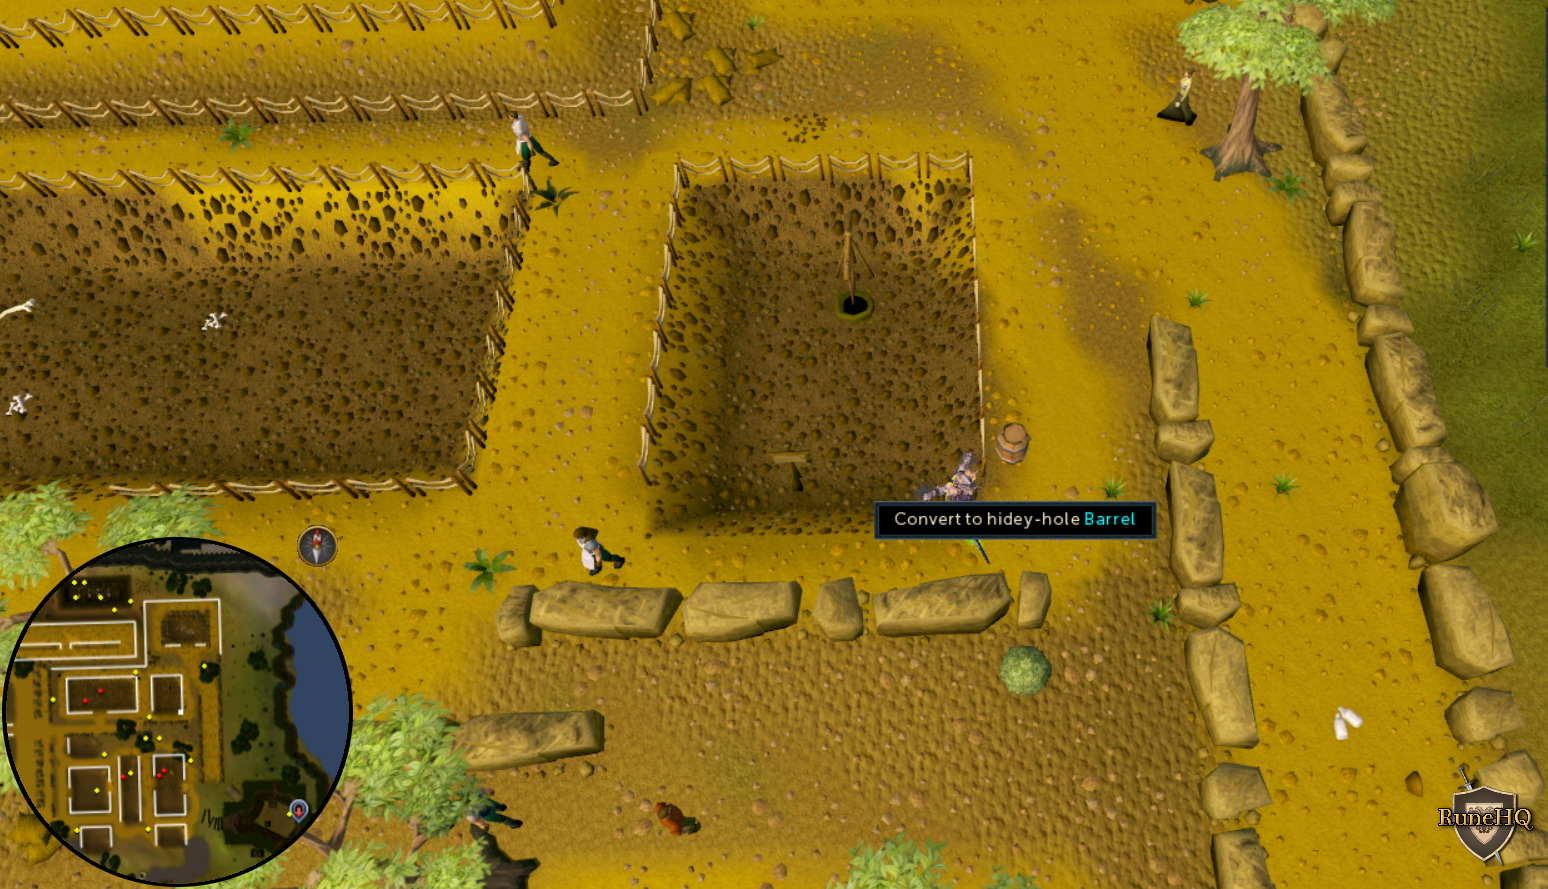 Click the above image to enlarge! |
|
| Outside Hickton's Archery Emporium in Catherby | ||||
| Near the entrance to Shantay Pass | Southern Al Kharid near Shantay | Crate |
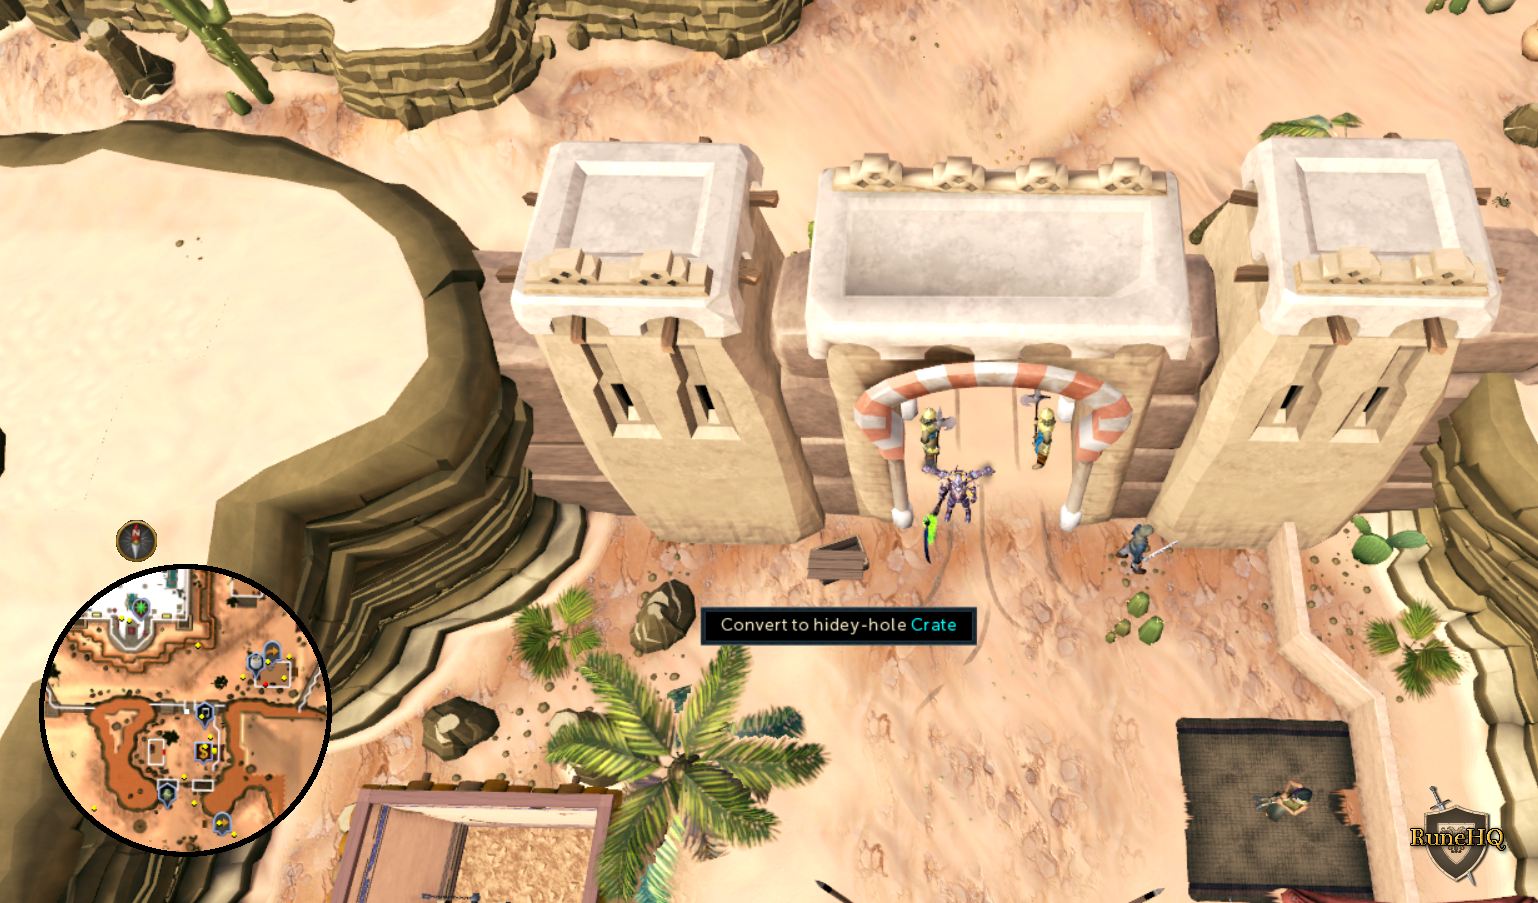 Click the above image to enlarge! |
|
| Hard Clue | ||||
| Location name | Where to find | Item converted | Items held | Image |
| Inside the Zamorak temple in the Eastern Wilderness. This is located in the Wilderness be careful which items you take with you as they may be lost upon death. | Level 12 Wilderness North of Varrock. | Rock |
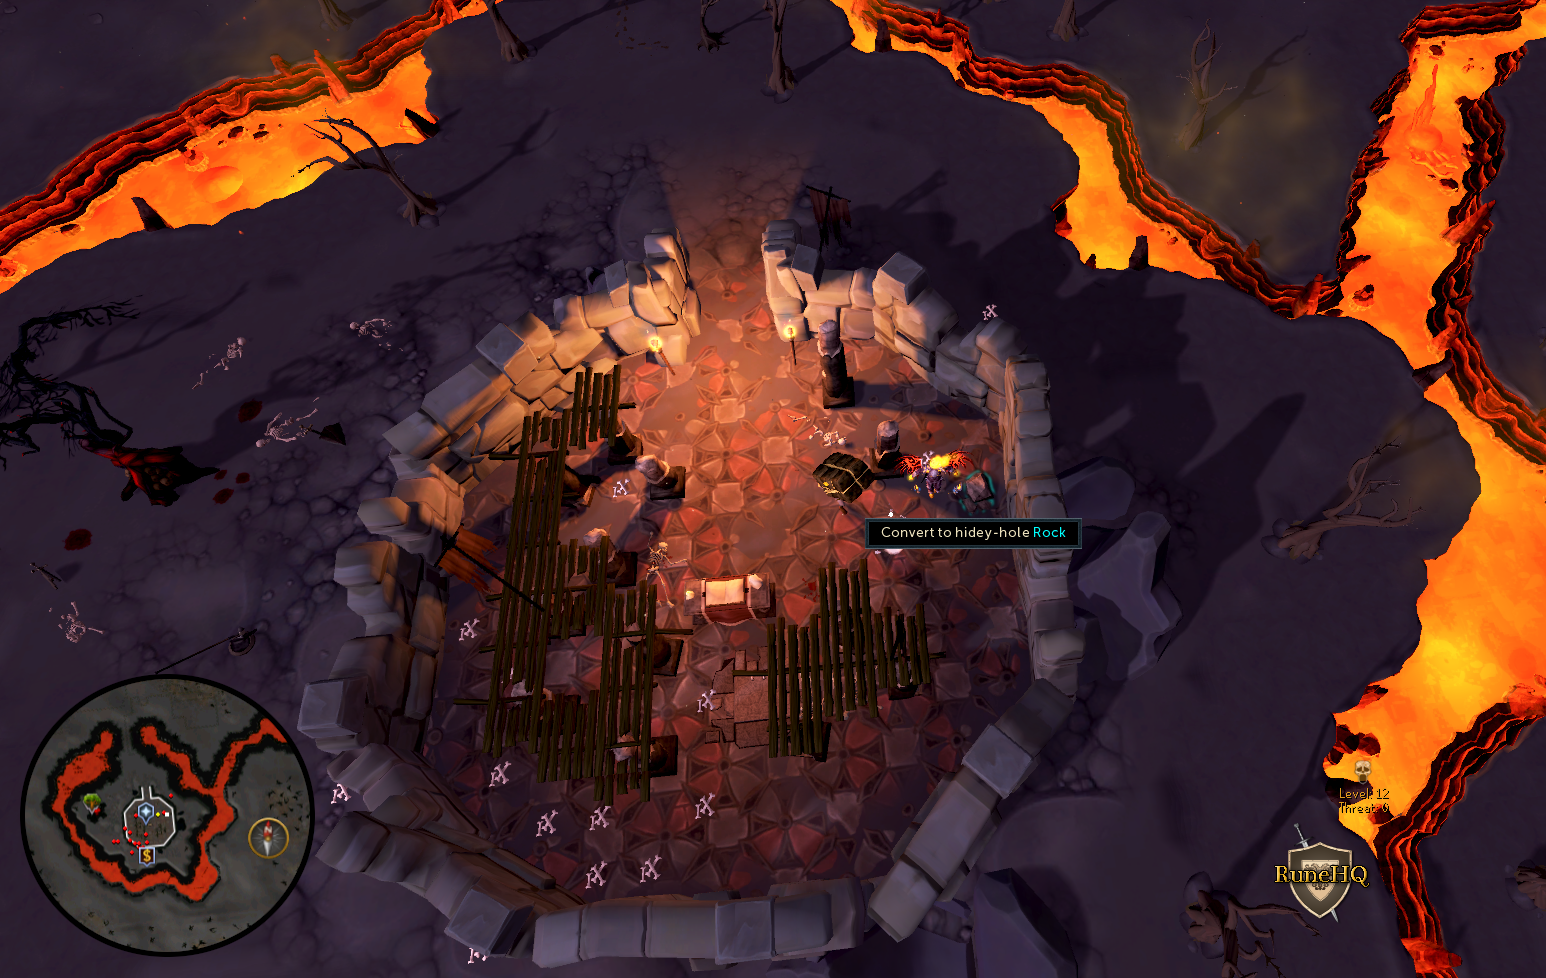 Click the above image to enlarge! |
|
| Inside the Fishing Guild bank | North wall of Fishing Guild bank | Crate |
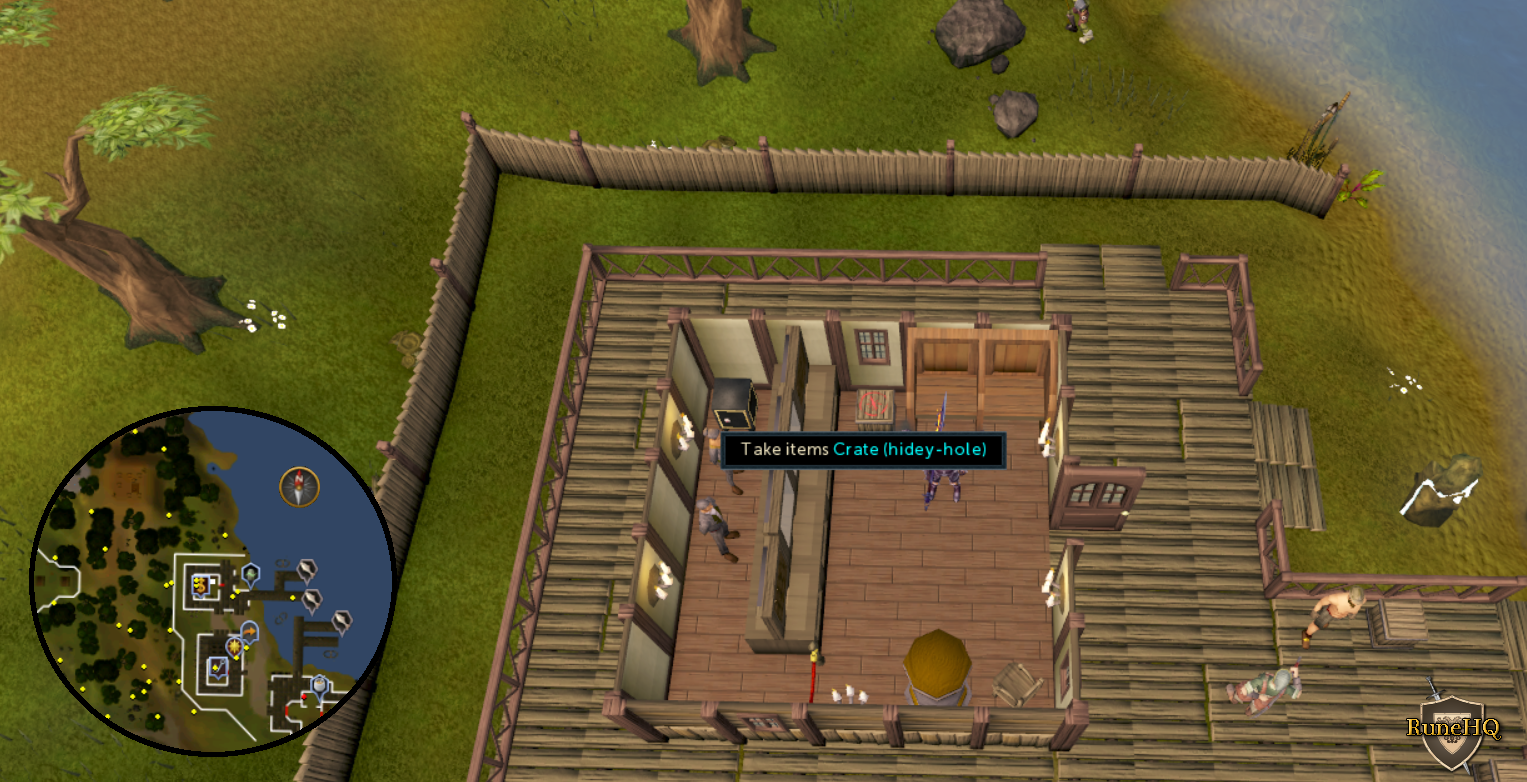 Click the above image to enlarge! |
|
| On the top floor of the Kandarin lighthouse | Top floor of the lighthouse | Crate |
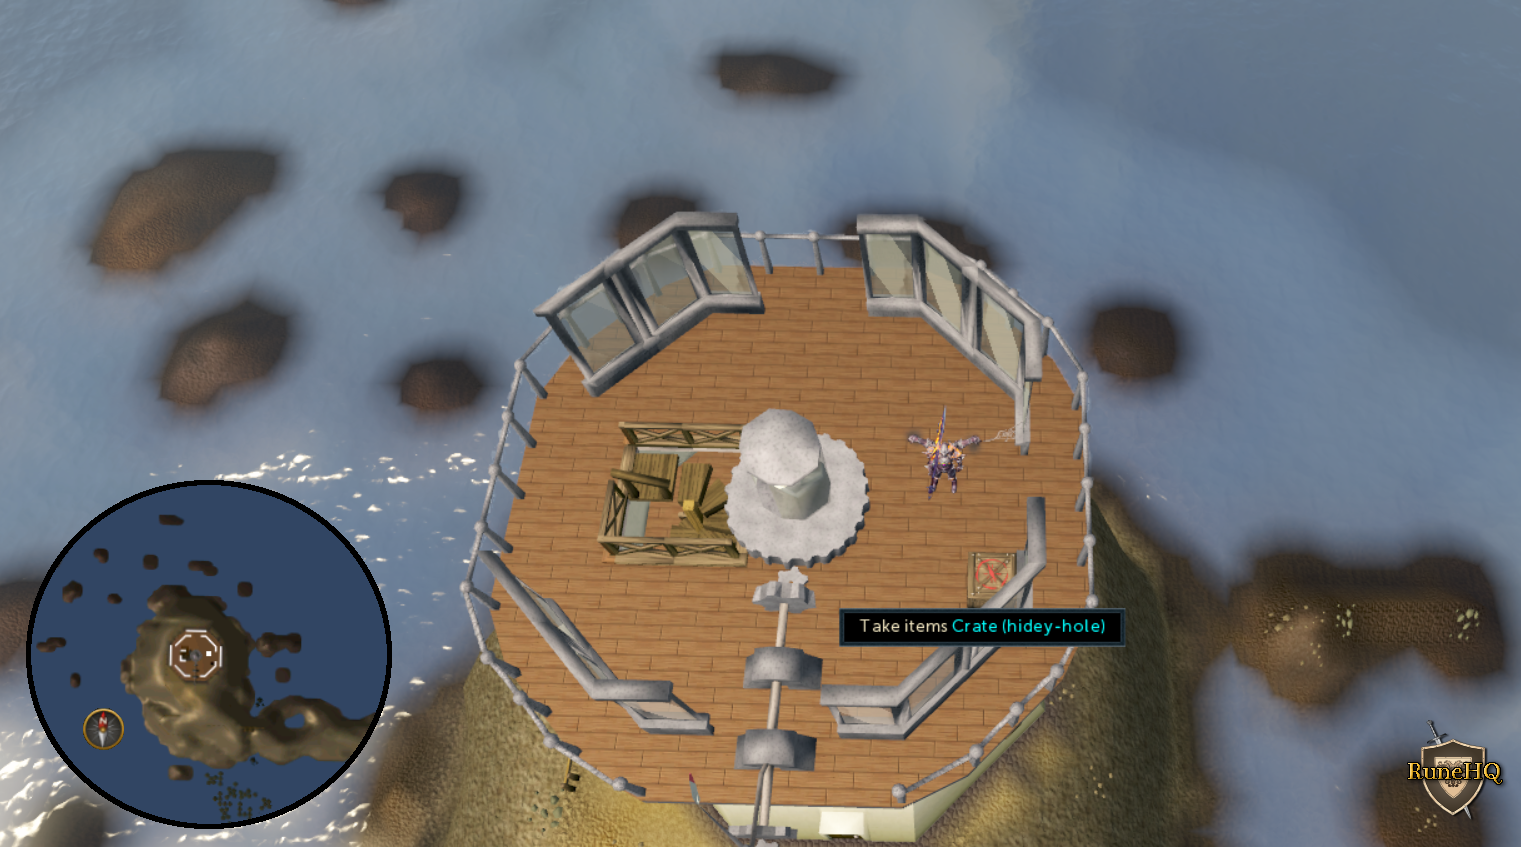 Click the above image to enlarge! |
|
| Next to Jamila's craft stall in Sophanem | East of Pyramid North of craft stall | Crate |
|
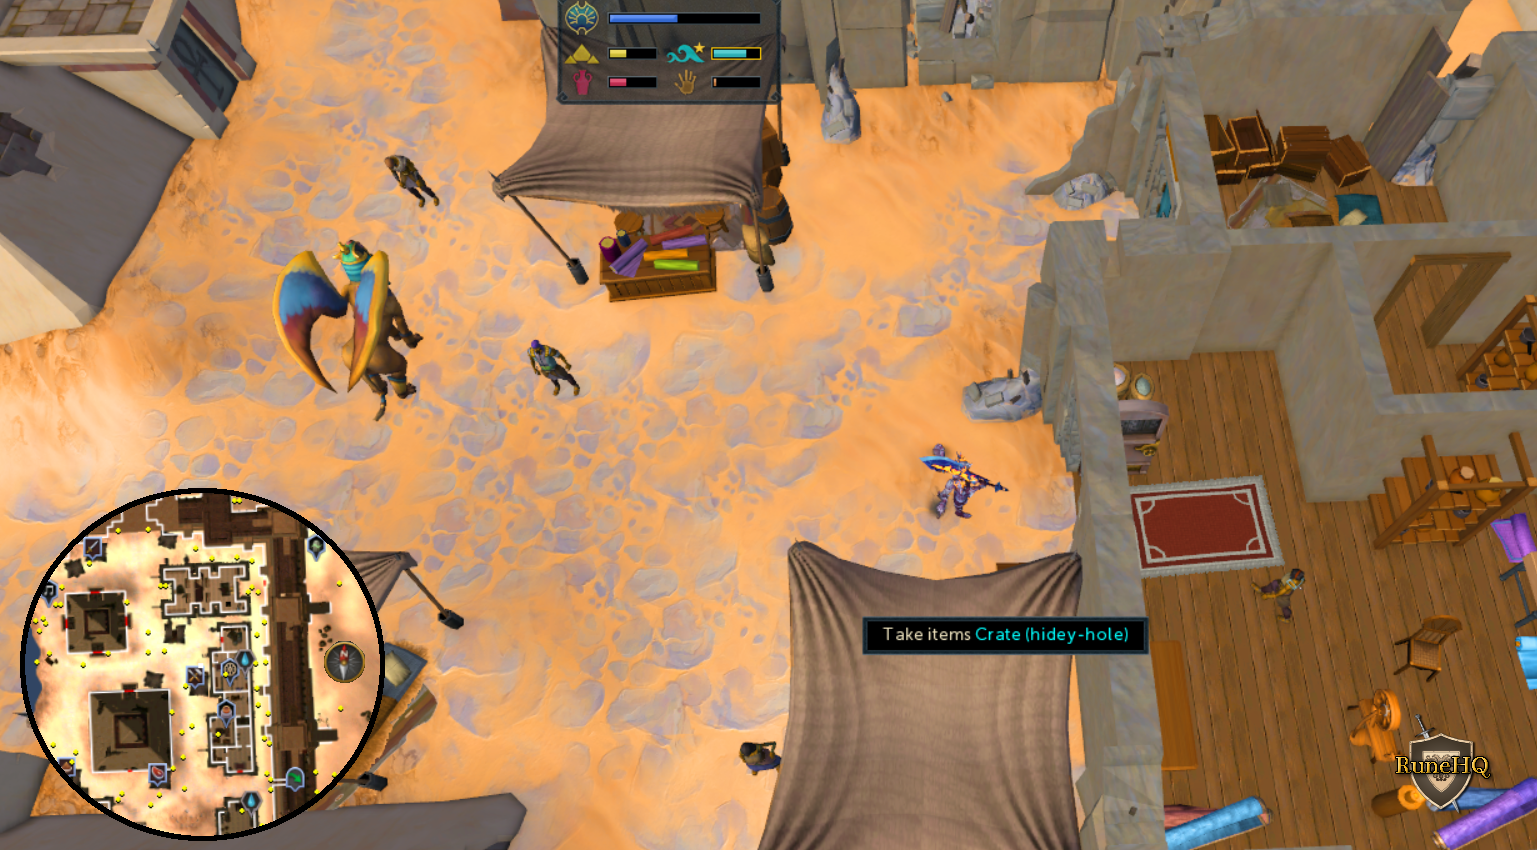 Click the above image to enlarge! |
| Near the Wilderness Bandit camp obelisk. This is located in the Wilderness be careful which items you take with you as they may be lost upon death. | North of Wilderness Bandit camp, South of the obelisk | Dead tree |
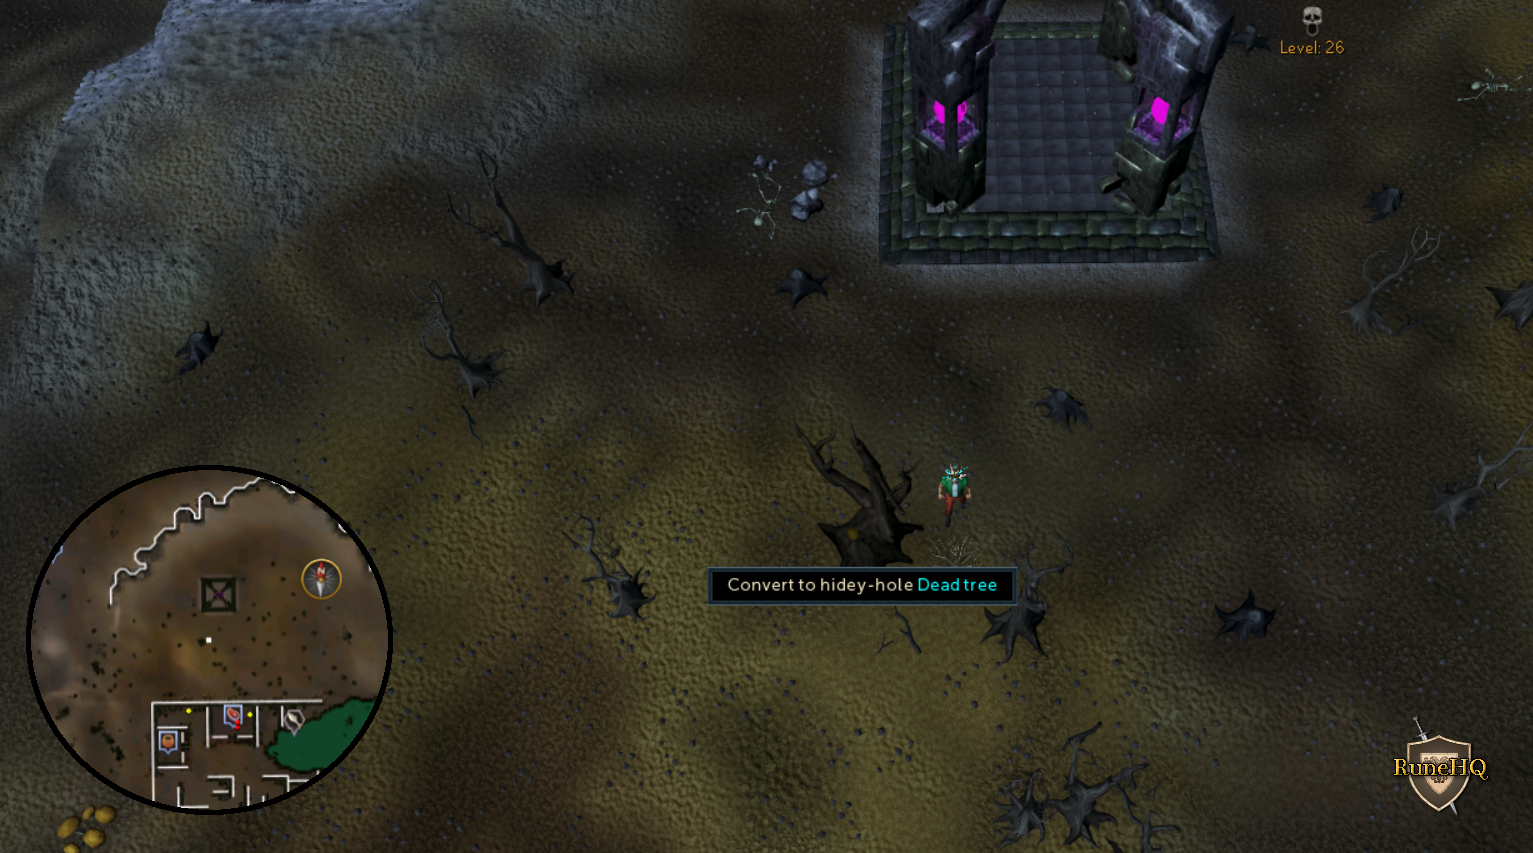 Click the above image to enlarge! |
|
| South side of the Musa Point banana plantation | Along the fence to the West when entering the Banana plantation | Log |
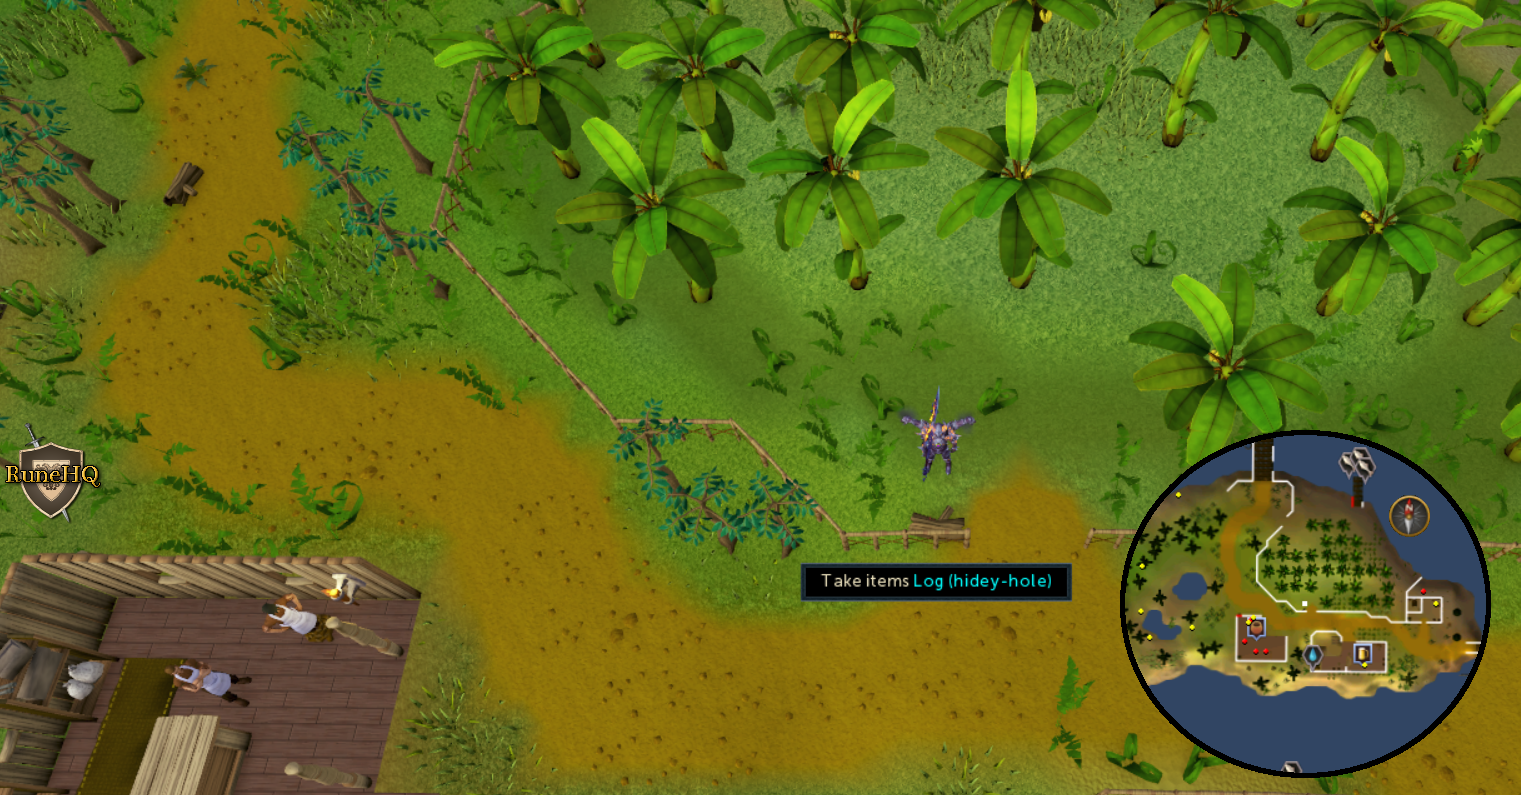 Click the above image to enlarge! |
|
| Near the Mountain Camp goat enclosure | Just South-West of Jokul's tent enclosure. | Rock |
 Click the above image to enlarge! |
|
| Near the Gnome Glider on White Wolf Mountain | White Wolf Mountain just West of the Taverley lodestone near the gnome glider. | Rock |
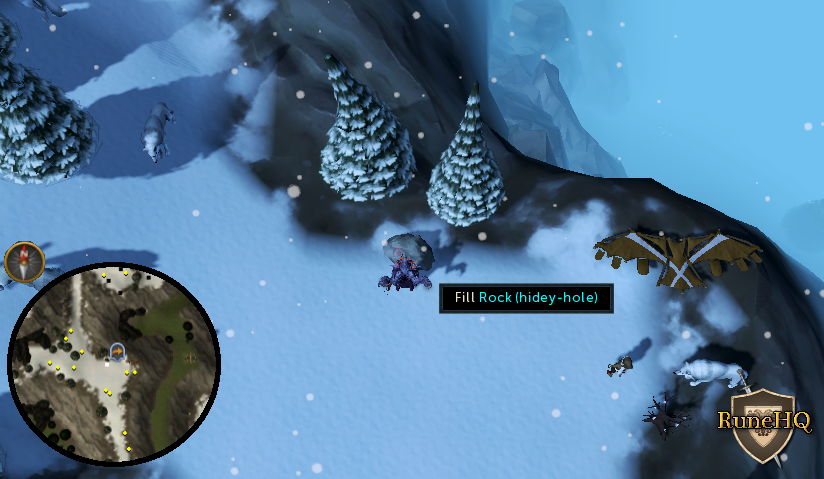 Click the above image to enlarge! |
|
| Inside the Shilo Village Bank | Eastern potted plant inside Shilo Village Bank | Potted plant |
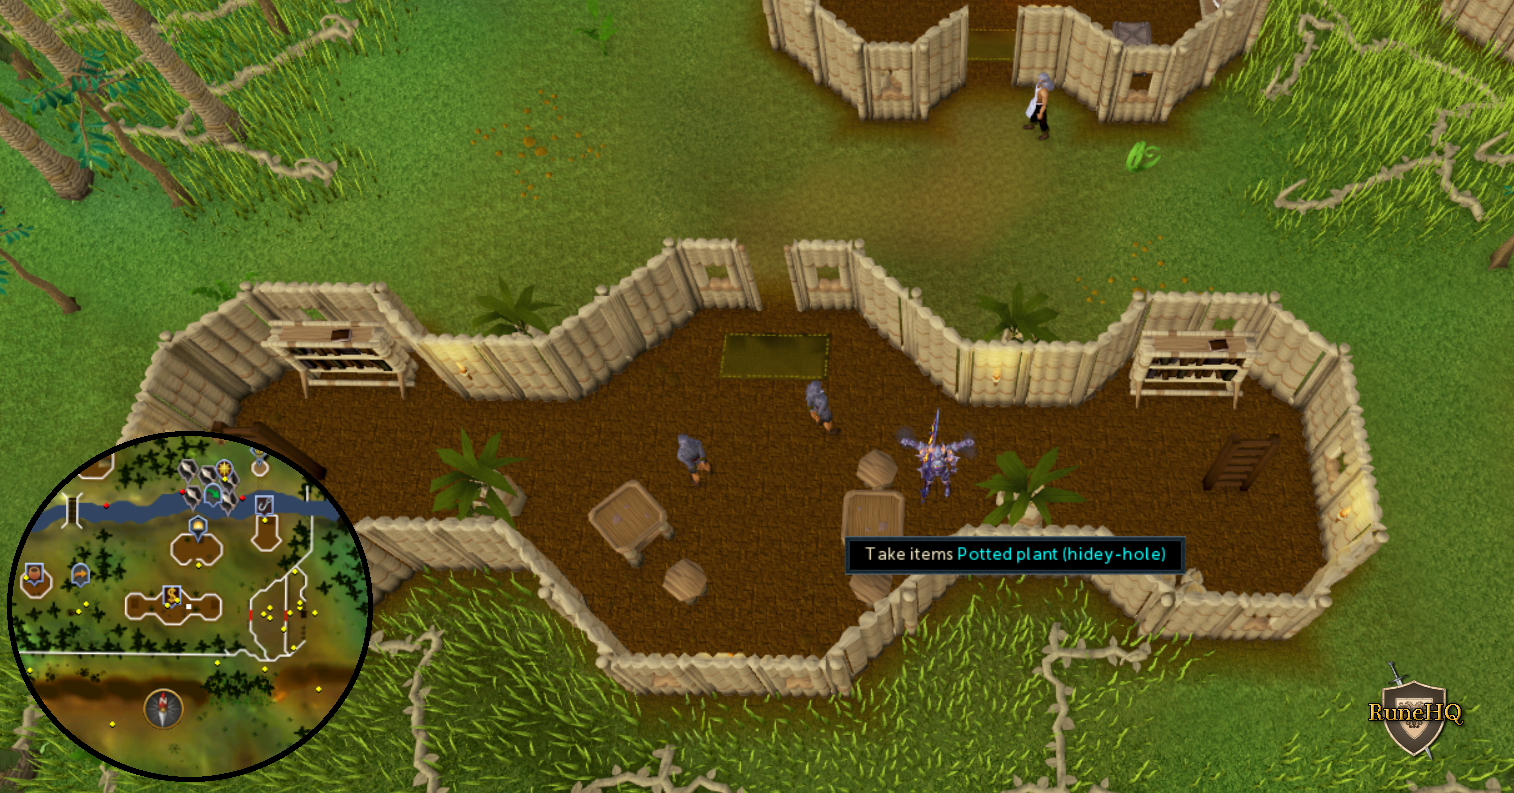 Click the above image to enlarge! |
|
| Master Clue | ||||
| Location name | Where to find | Item converted | Items held | Image |
| Next to the sulphur pit in the TzHaar City | West side of TzHaar City. Closest teleport: TokKul-Zo option 3 or Fairy Ring code B-L-P. |
Table |
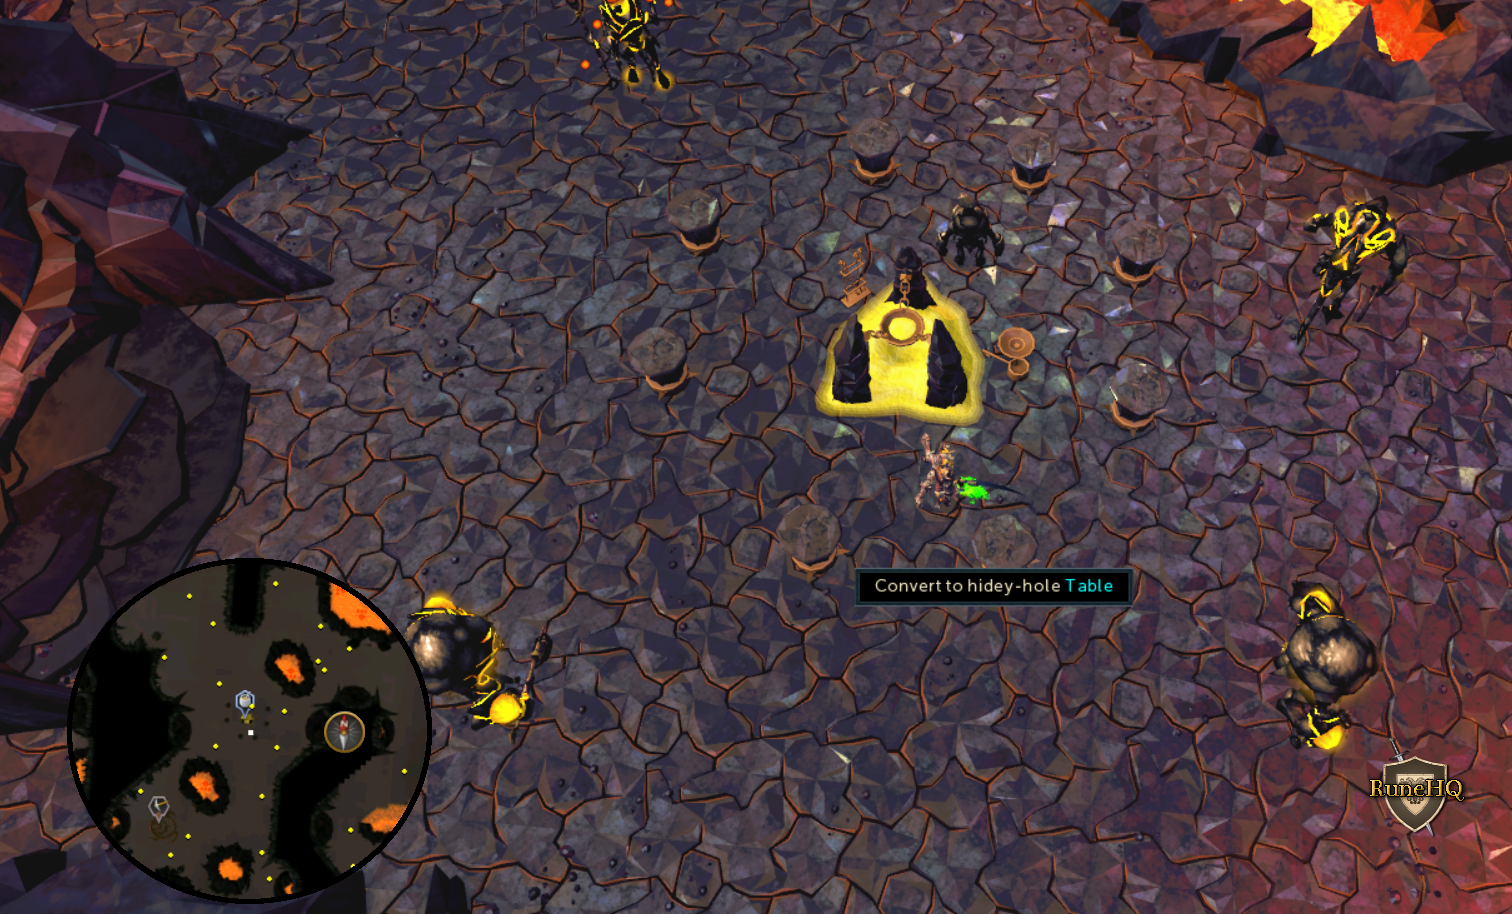 Click the above image to enlarge! |
|
| South West of the Charm Sprite cracked dolmen | South West of Yaktwee Swinmari Cianta Closest teleport: Sixth-age circuit option 2 or Master Quest Cape option 0. |
Rock |
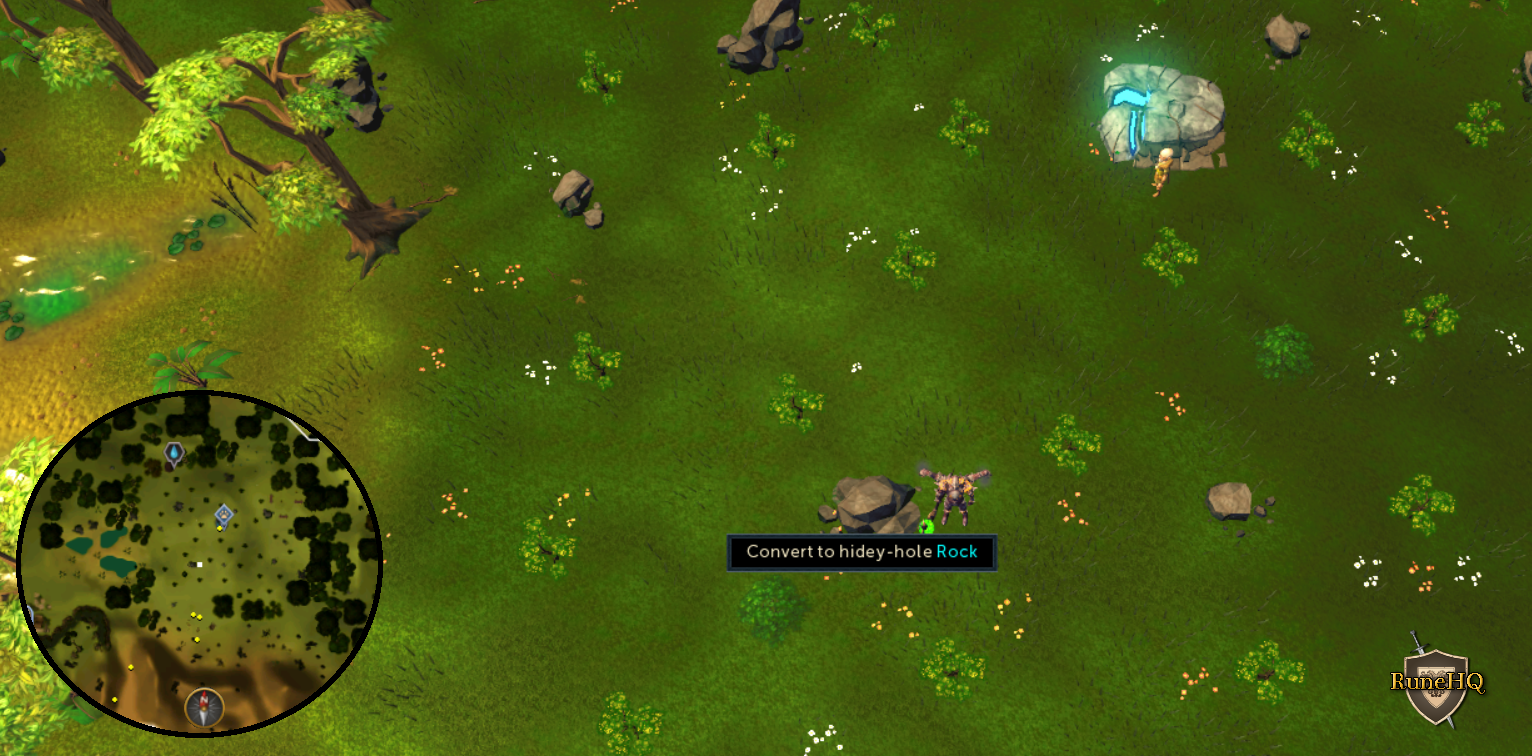 Click the above image to enlarge! |
|
| On the Northern Waiko docks | On the Docks of Waiko. | Water barrel |
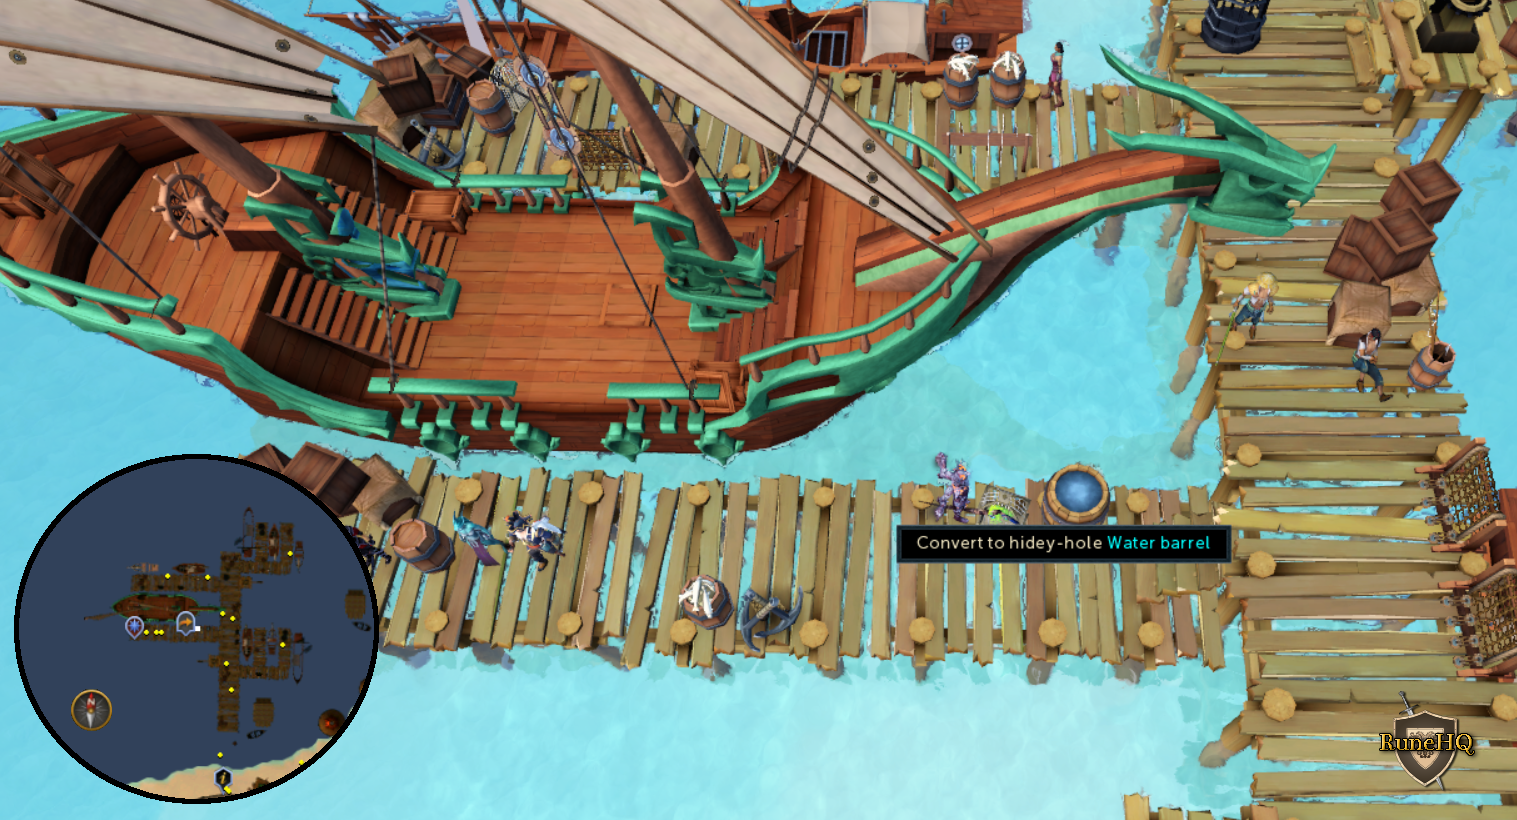 Click the above image to enlarge! |
|
| Near the entrance to the Morytania Slayer Tower | Just inside the door to the Morytania Slayer Tower to the East | Crates |
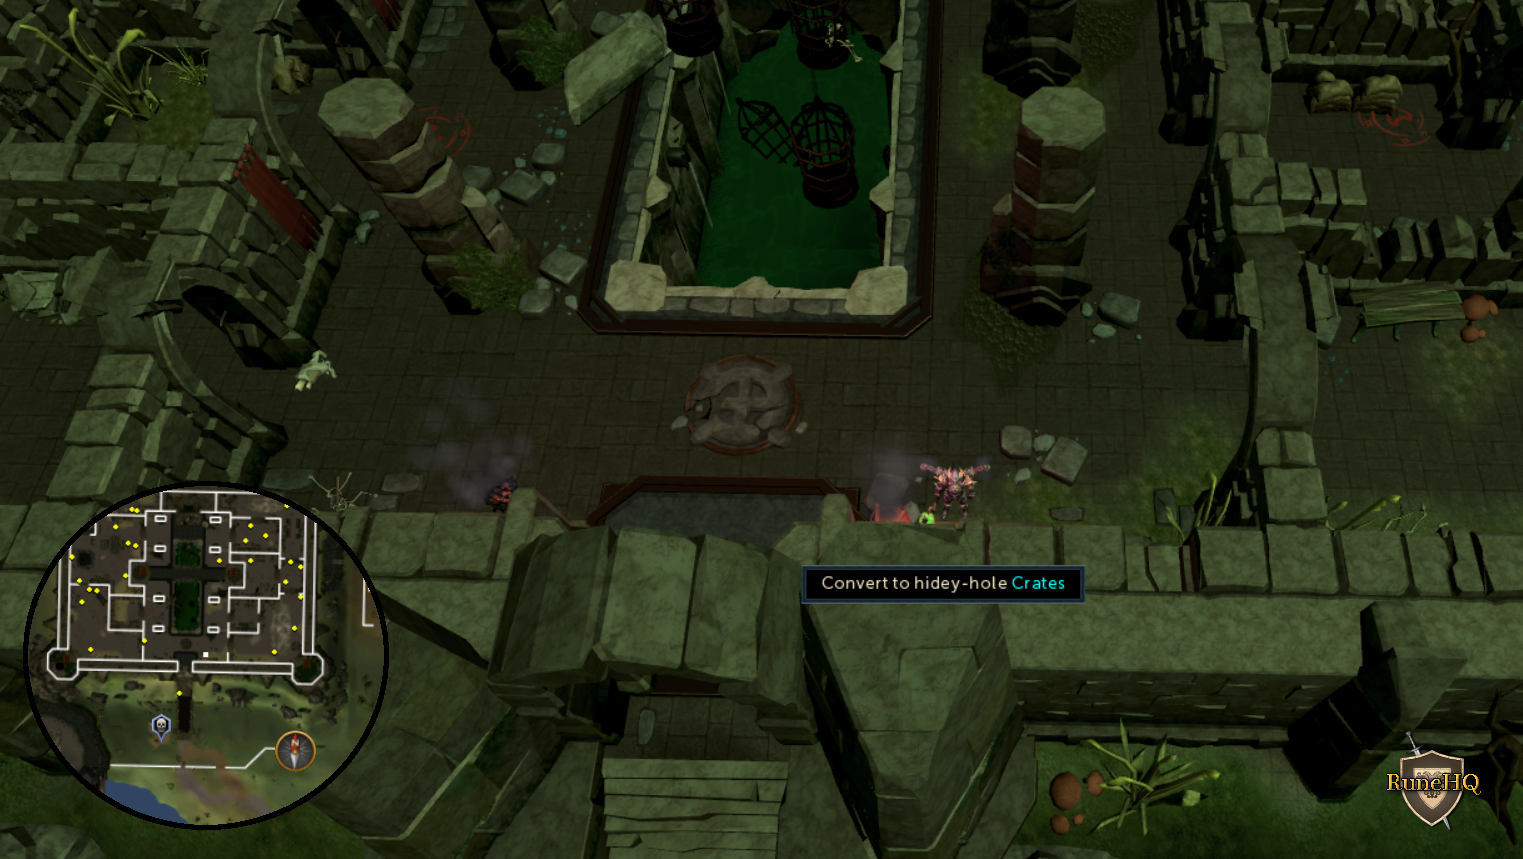 Click the above image to enlarge! |
|
| Inside the Green Ghost Inn in Port Phasmatys | Inside Green Ghost Inn | Barrel |
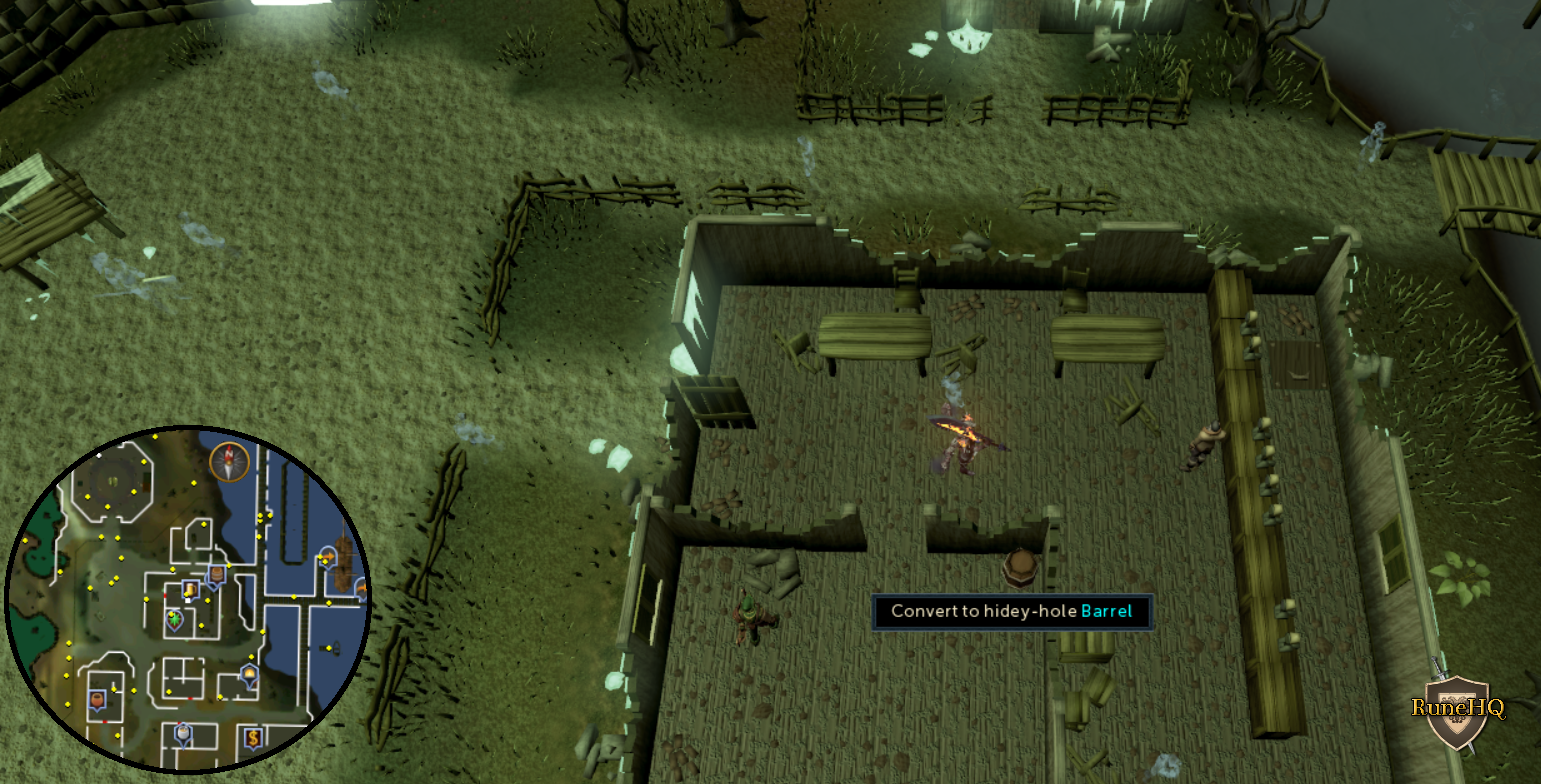 Click the above image to enlarge! |
|
| In front of the entrance to the Grand Library of Menaphos. | Just outside the door to the Grand Library in Menaphos. | Plant |
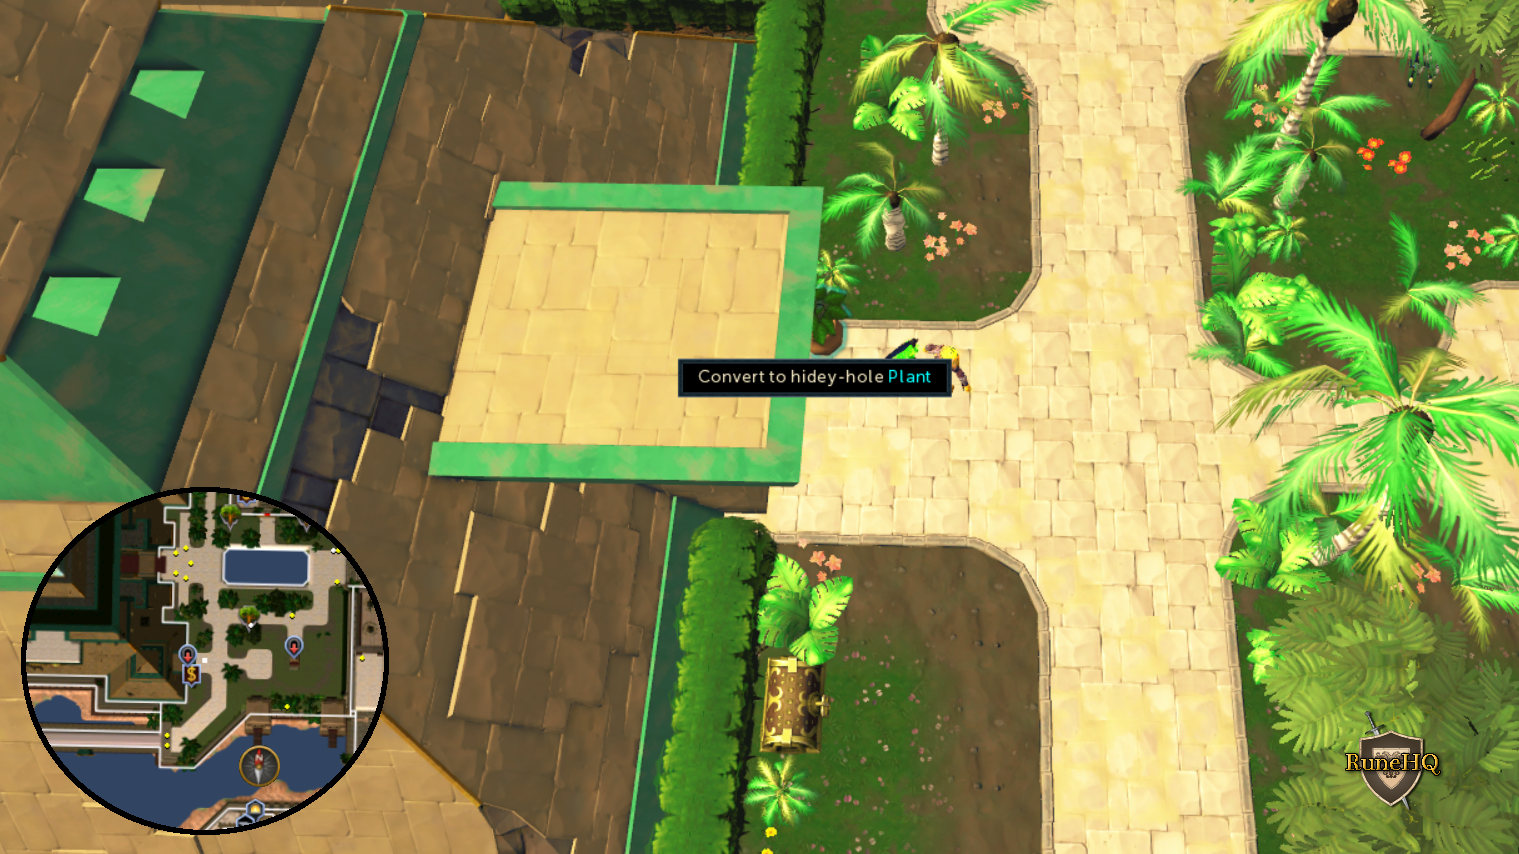 Click the above image to enlarge! |
|
| Inside the Invention Guild | North-East corner of Invention Guild main room. | Barrel |
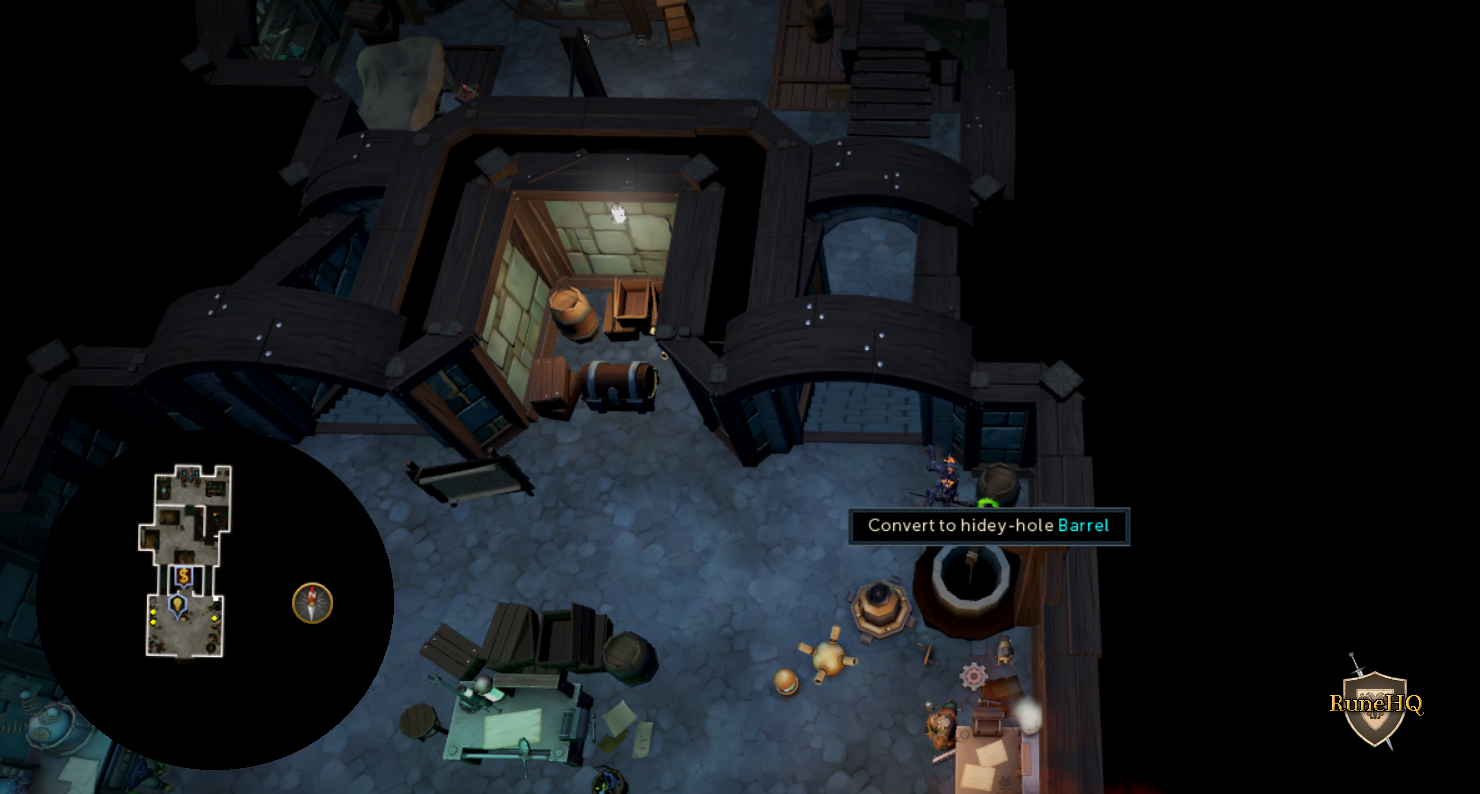 Click the above image to enlarge! |
|
| Inside the celestial dragon dungeon on Dragontooth Island | Inside the Dungeoneering resource dungeon on Dragontooth Island. Closest teleport: is the Dungeoneering skill cape. Use option 0 then option 3. |
Rock |
|
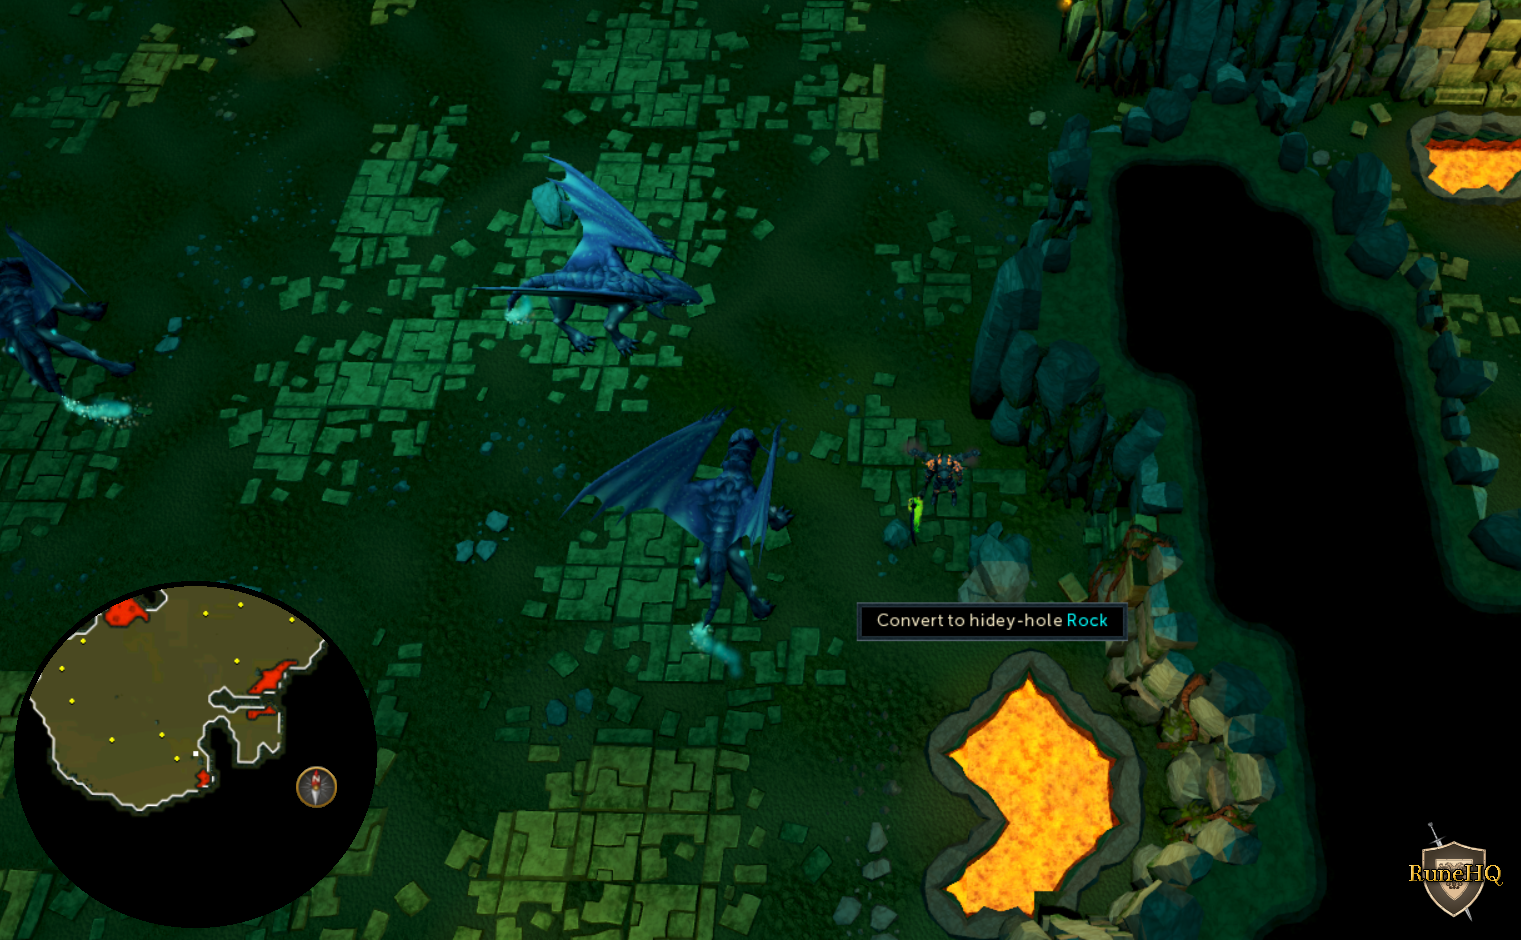 Click the above image to enlarge! |
| Inside the Lumbridge Fishing Supplies shop | South-East corner of Lumbridge fishing supplies shop | Barrel |
|
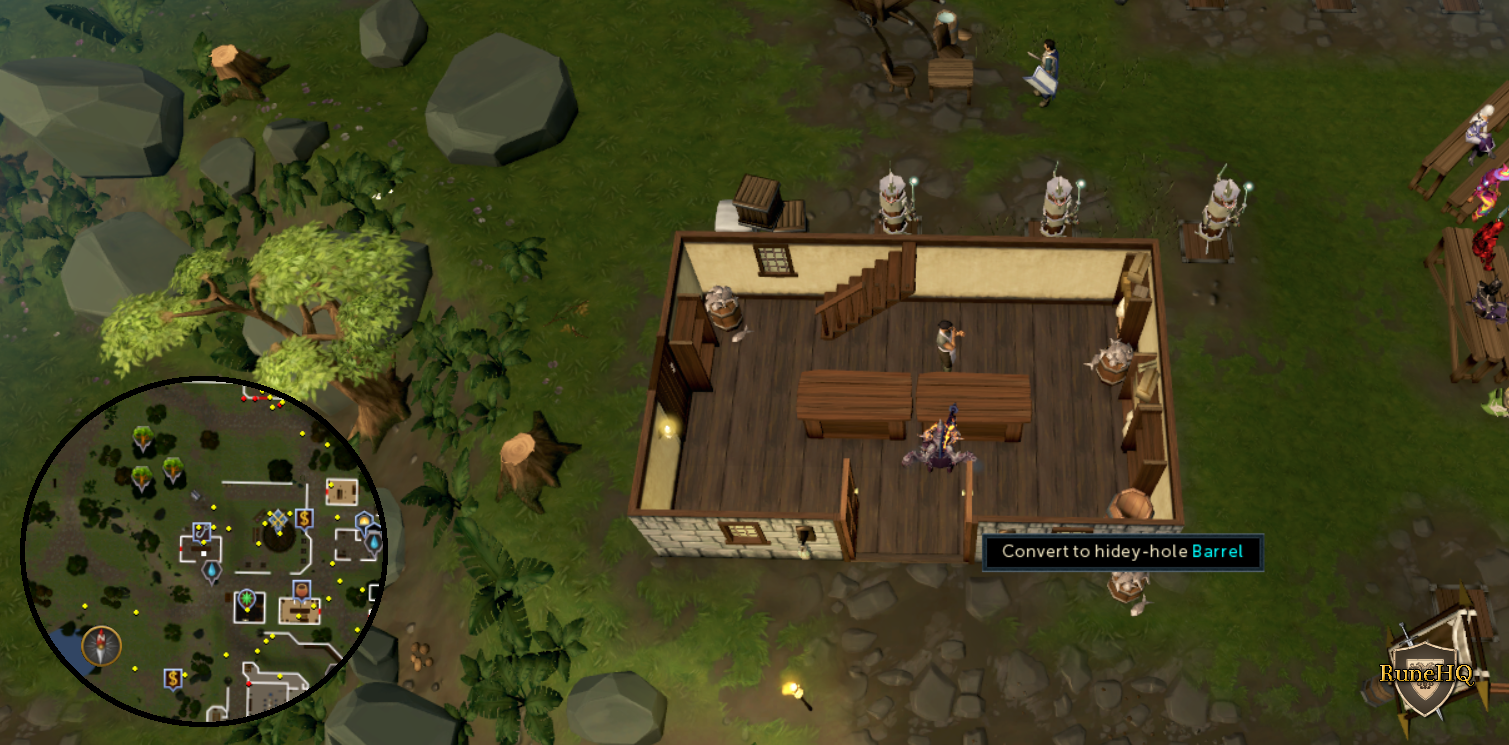 Click the above image to enlarge! |
| Next to the start of the Hefin District agility course | Located on the platform that acts as start of Hefin Agility Course | Potted Plant |
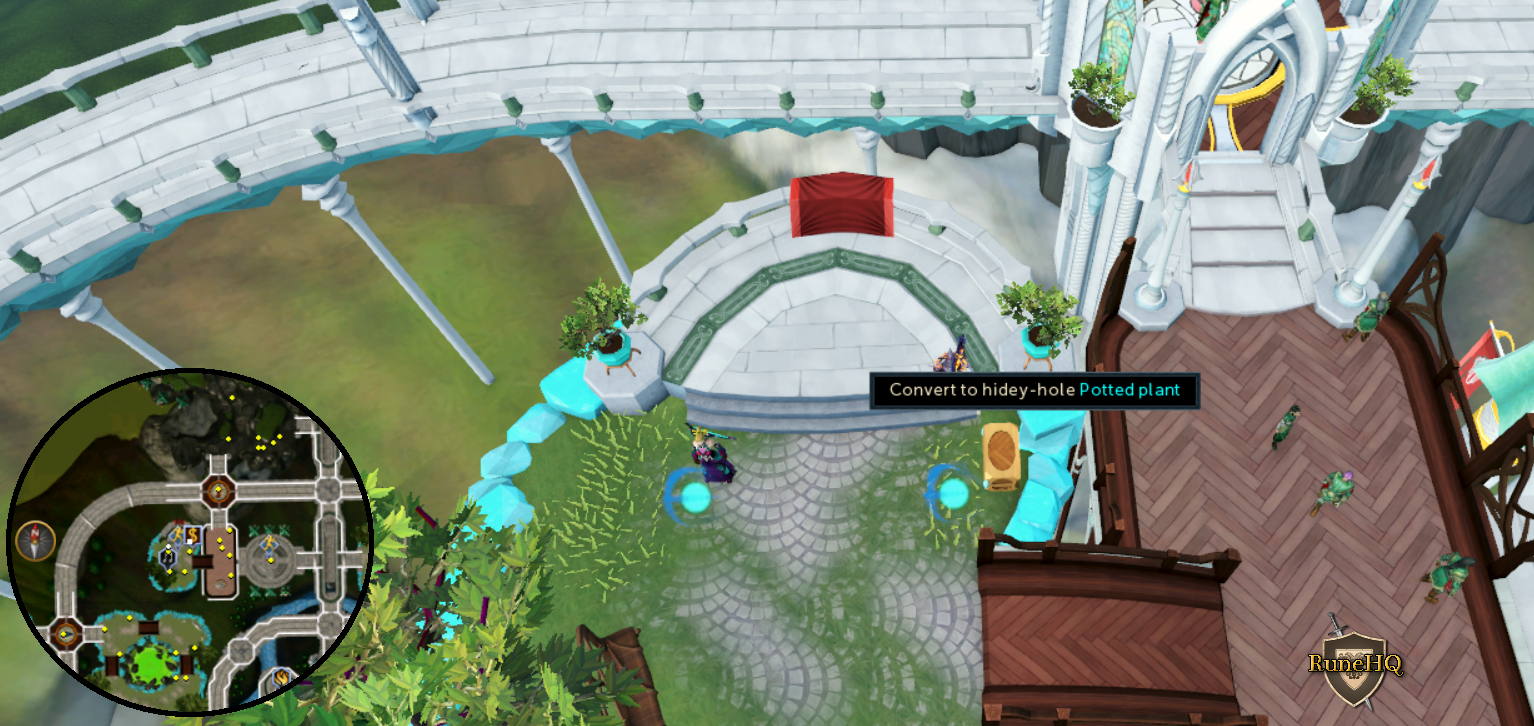 Click the above image to enlarge! |
|
| Next to the Edgeville Monastery garden | North end of the Edgeville monastery near the garden. | Barrel |
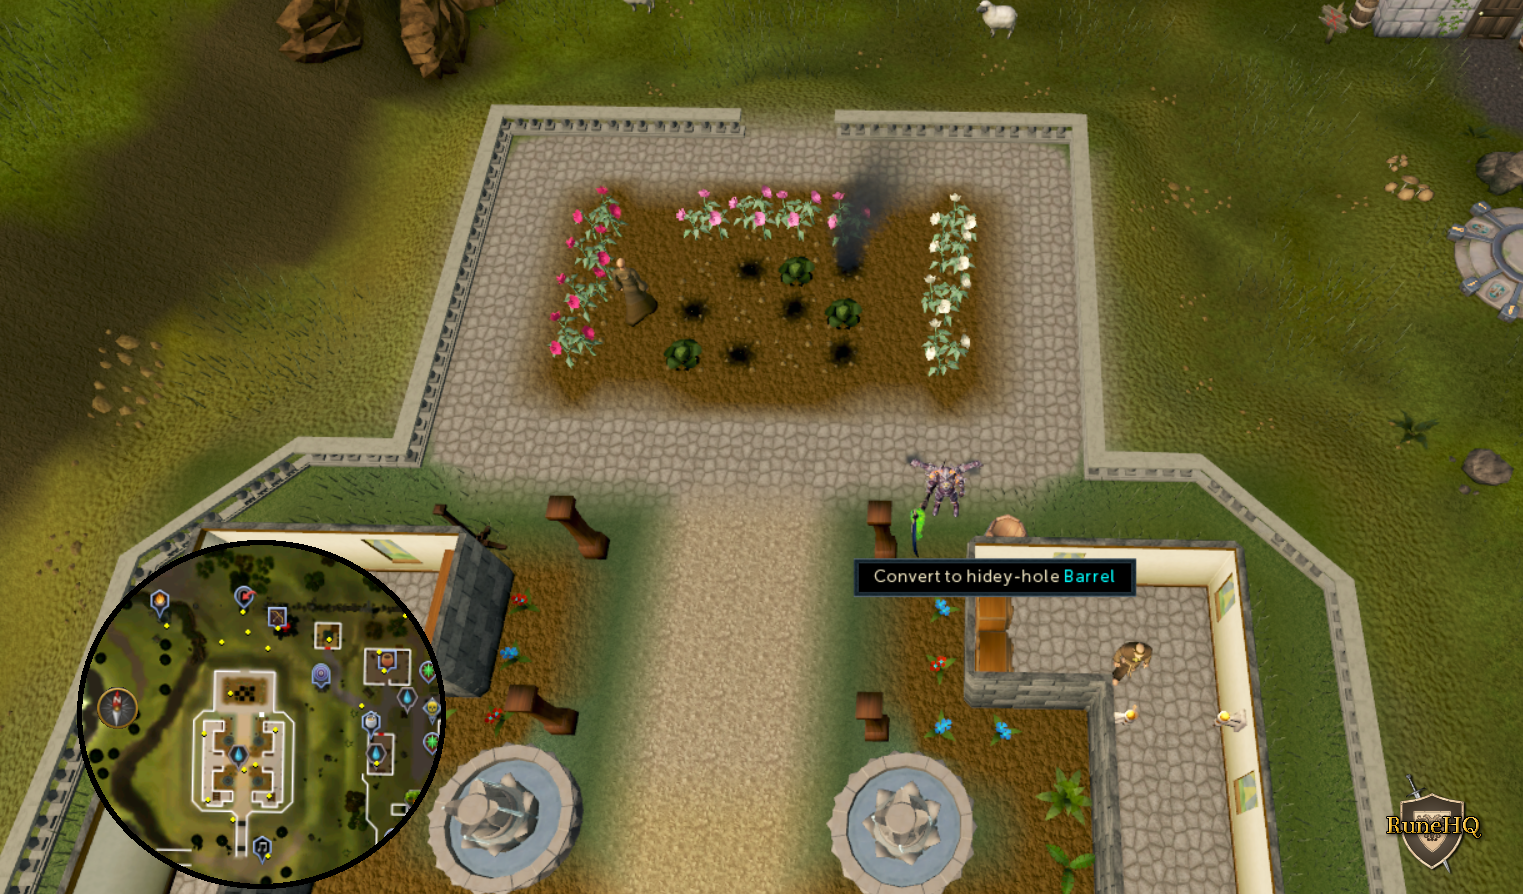 Click the above image to enlarge! |
|
Compass clues are found in elite and master treasure trails, when clicked upon they show an arrow pointing in the direction of where the casket is buried.
Simply head in the direction the compass is pointing to until the arrow turns into a cross, where you must dig.
It is advised that you teleport to various lodestones to narrow down the location.
A Guthix wizard (level 119) may appear and attack you with all three combat styles (melee, ranged and magic),
Kill him and then dig again to get the casket. If the Guthix wizard appears in the Wilderness it will be a level 110.
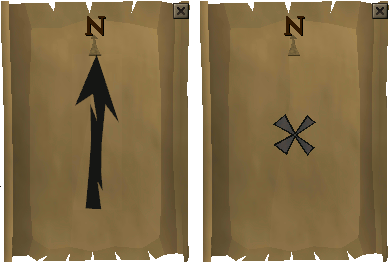
Scan clues are found in elite and master treasure trails. They give a city name or general location where the casket is buried. The general idea is to wander around the are listed to find the location of the dig spot.
There are a couple of ways the clue helps you find the exact location. First, the clue will list a number of paces on it (e.g. 13 paces) this is how far the clue will scan and show the location with a yellow arrow on your screen and minimap. So if you are 14 paces away it will not show the arrows but when you move to 13 paces away it will appear.
To help make this easier to locate after you right click the and click scan a pulse will appear around your feet.
| Slow pulse | Medium pulse | Fast pulse | |
| Speed of pulse | Around 1/second | Around 2/second | Around 4/second |
| Distance when pulse changes | Farther away than twice the range of scan location. | 1 pace past scan range up-to twice the distance of scan range. | Within the distance of the scan location. |
| Example |  |
 |
 |
If you are using a Meerkats pouch and scrolls it will increase your scan by 5 paces and using the Fetch casket scroll special move the meerkats will dig up the casket without having the chance of a wizard showing up to fight you.
Once you are standing on the spot where the arrow points right click on the clue and click dig to dig.
A Guthix wizard (level 119) may appear and attack you with all three combat styles (melee, ranged and magic), Kill him and then dig again to get the casket. If the Guthix wizard appears in the Wilderness it will be a level 110.
Scan clue Locations
| Clue location | Scan Locations |
| This scroll will work within the walls of East or West Ardougne. Orb scan range: 22 paces. |
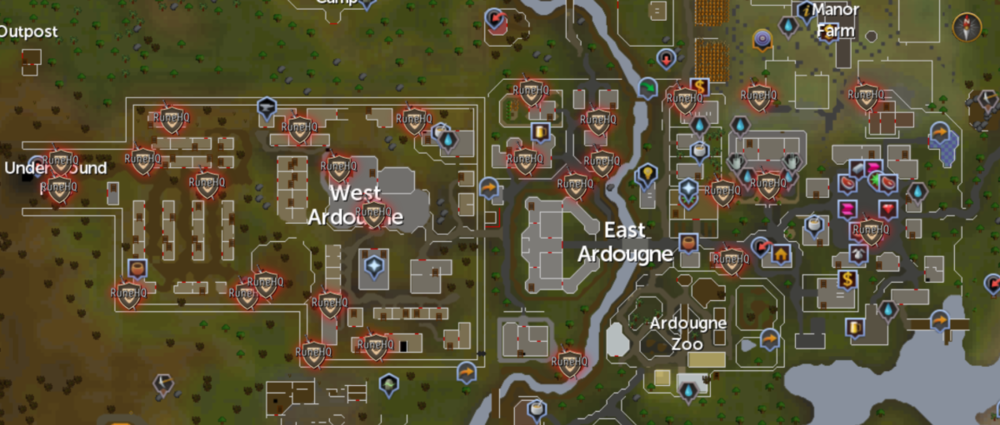 Click the above image to enlarge! |
| This scroll will work in the Brimhaven Dungeon.
Orb scan range: 14 paces. Closest teleport: Dungeoneering cape option 0 then option 6 |
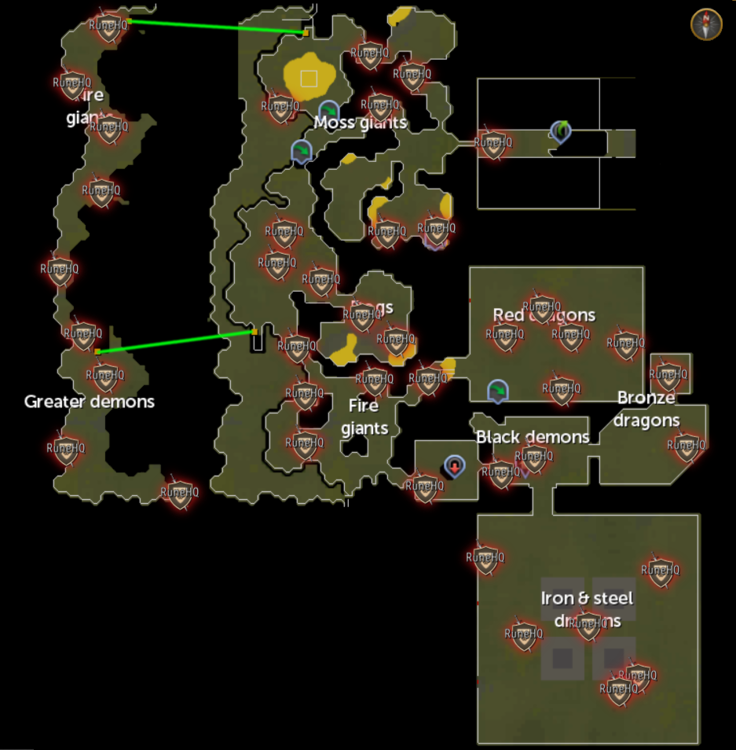 Click the above image to enlarge! |
| This scroll will work in Darkmeyer. Orb scan range: 16 paces. |
 Click the above image to enlarge! |
| This scroll will work in the cave goblin city of Dorgesh-Kaan. Orb scan range: 16 paces. |
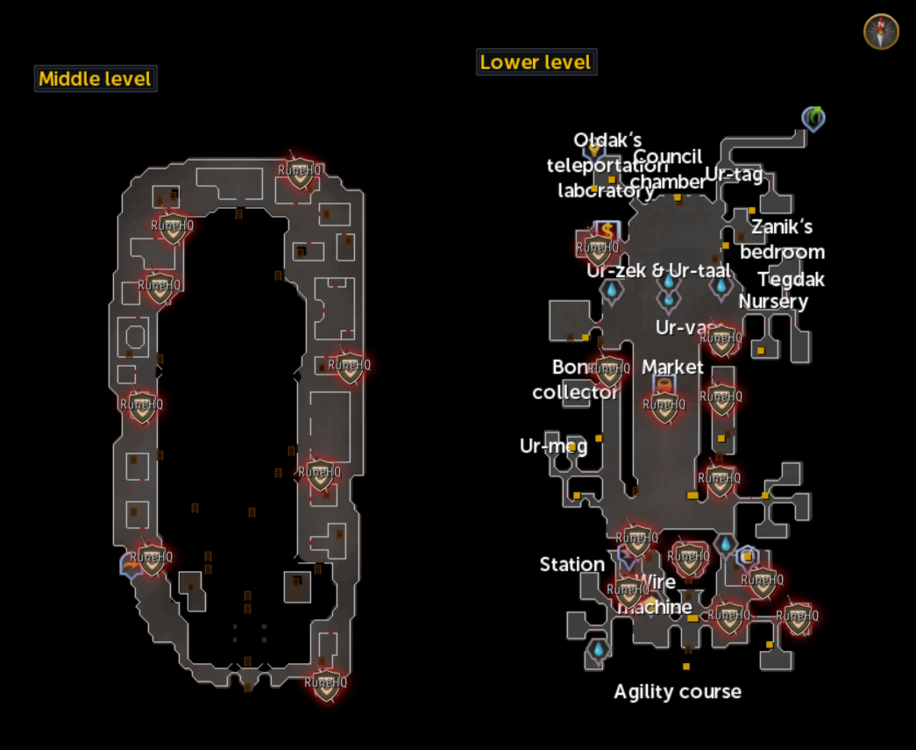 Click the above image to enlarge! |
| This scroll will work within the walls of Falador. Orb scan range: 22 paces. Closest teleport: Falador Lodestone or 'Chipped' Falador teleport |
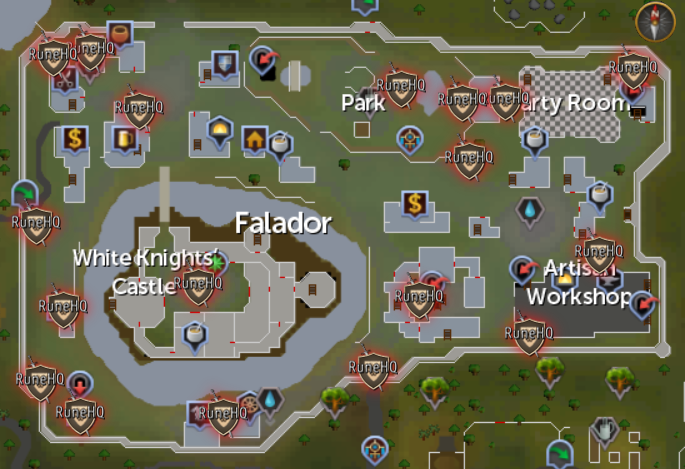 Click the above image to enlarge! |
| This scroll will work on the Fremennik Isles of Jatizso and Neitiznot. Orb scan range: 16 paces. |
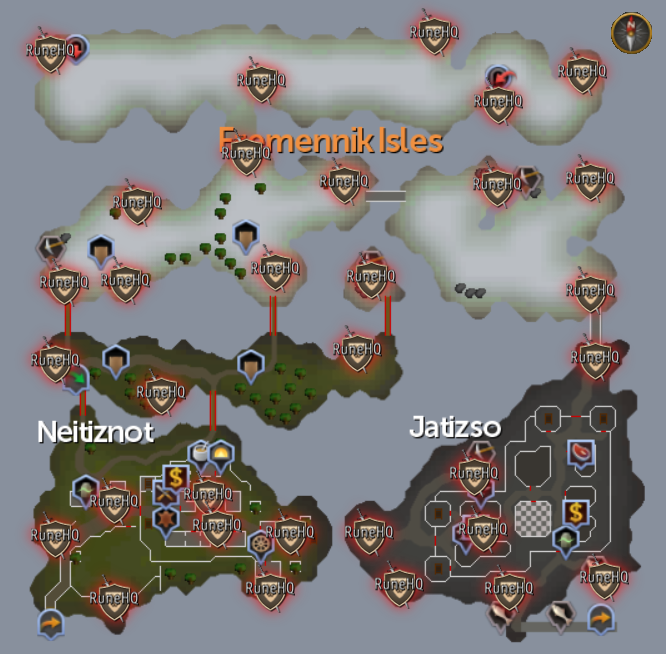 Click the above image to enlarge! |
| This scroll will work in the Fremennik Slayer Dungeons. Orb scan range: 16 paces. Closest teleport: Fairy ring code A-J-R |
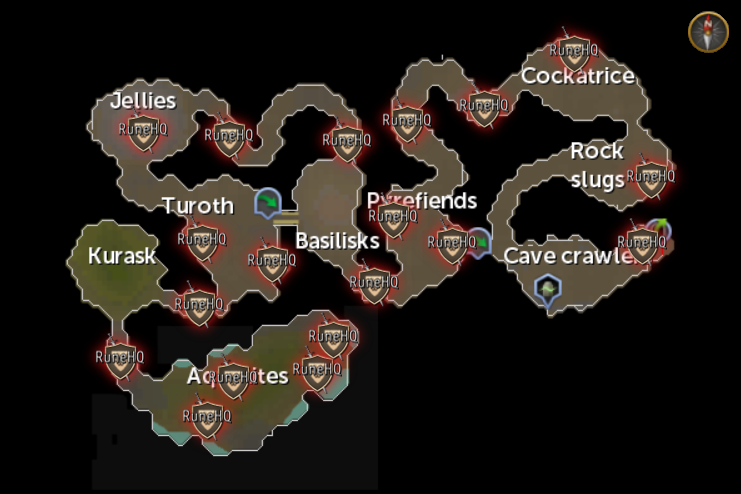 Click the above image to enlarge! |
| This scroll will work within the Haunted Woods. Orb scan range: 11 paces. |
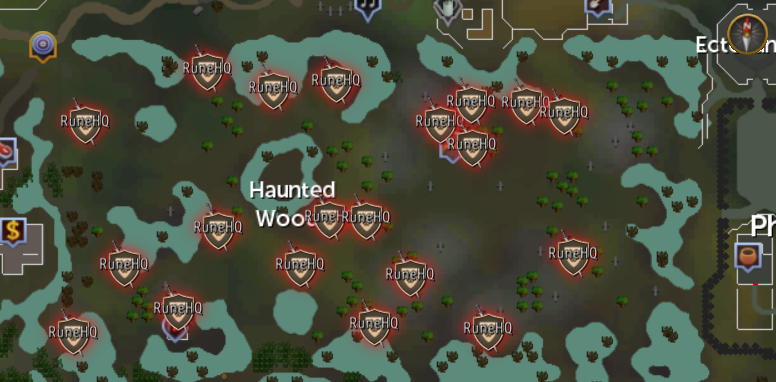 Click the above image to enlarge! |
| This scroll will work around the Heart of Gielinor. Orb scan range: 49 paces. Don't forget your Shard of Mah Closest teleport:The Heart teleport or use the Max Guild Boss portal. |
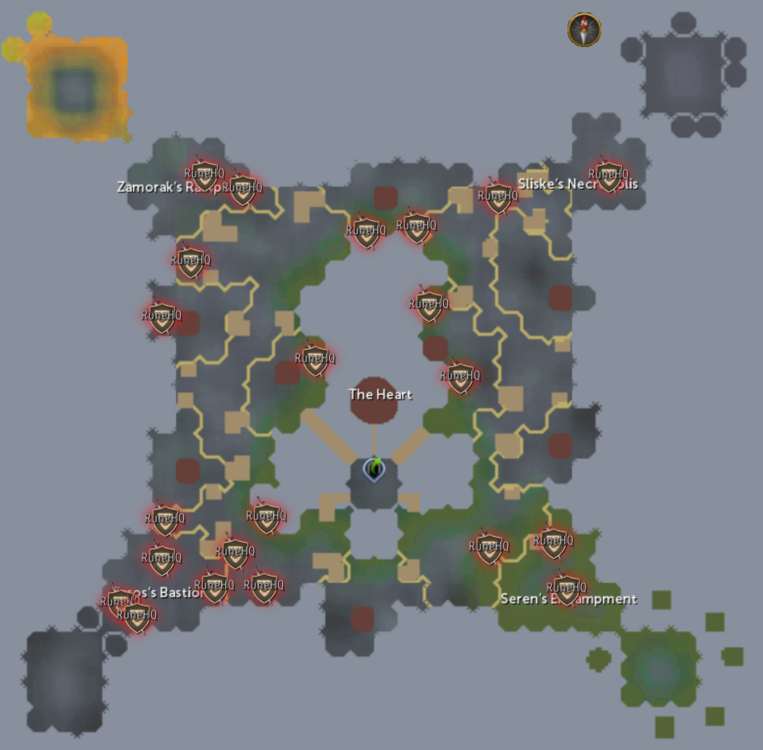 Click the above image to enlarge! |
| This scroll will work in Isafdar and Lletya. Orb scan range: 22 paces. |
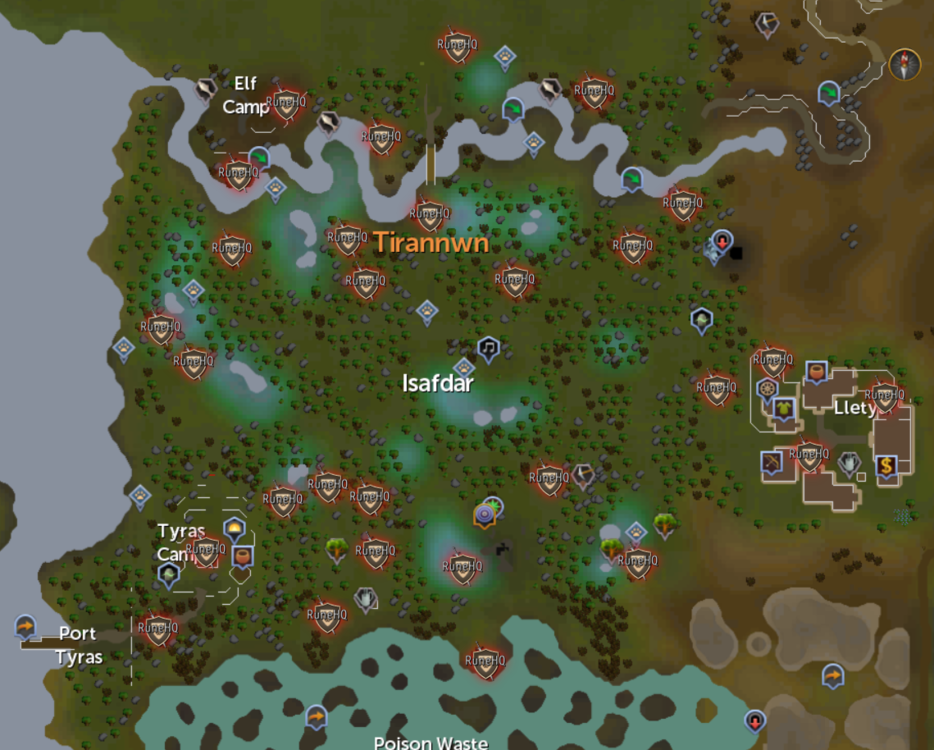 Click the above image to enlarge! |
| This scroll will work on The Islands That Once Were Turtles. Orb scan range: 27 paces. |
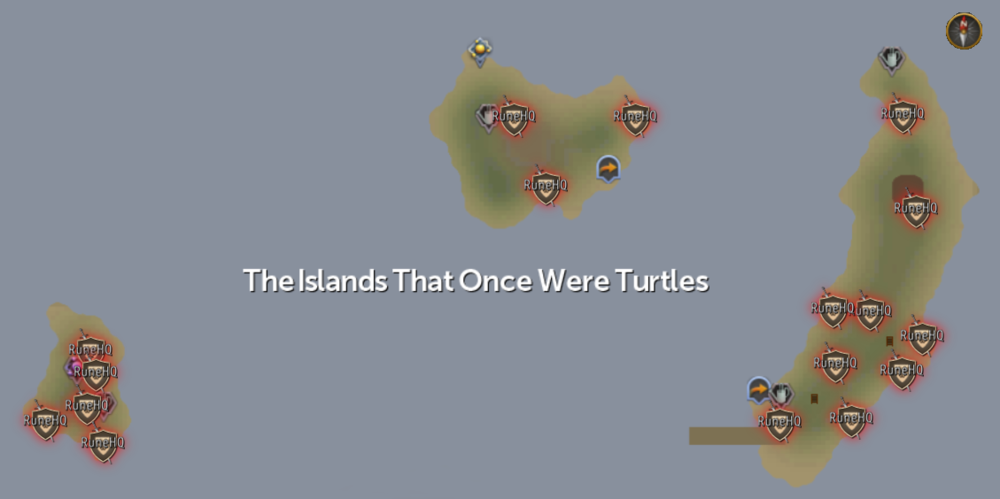 Click the above image to enlarge! |
| This scroll will work within the dwarven city of Keldagrim. Orb scan range: 11 paces. Closest teleport: Luck of the dwarves Keldagrim teleport |
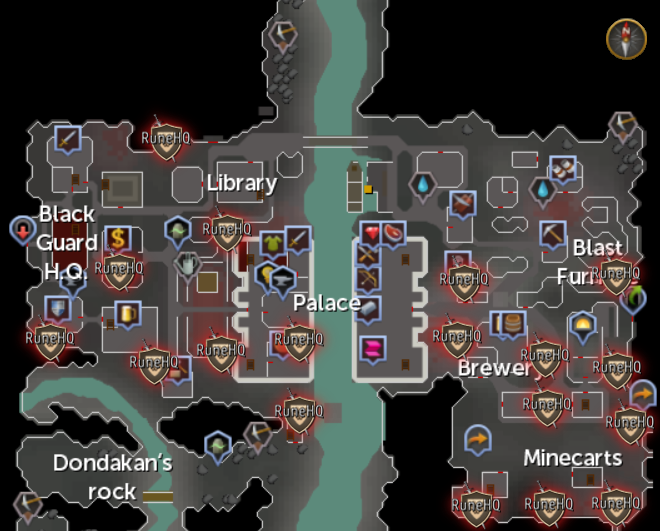 Click the above image to enlarge! |
| This scroll will work in the Kharazi Jungle. (There are no scans in or North of the Herblore habitat) Orb scan range: 14 paces. Closest teleport: Fairy Ring code C-J-S |
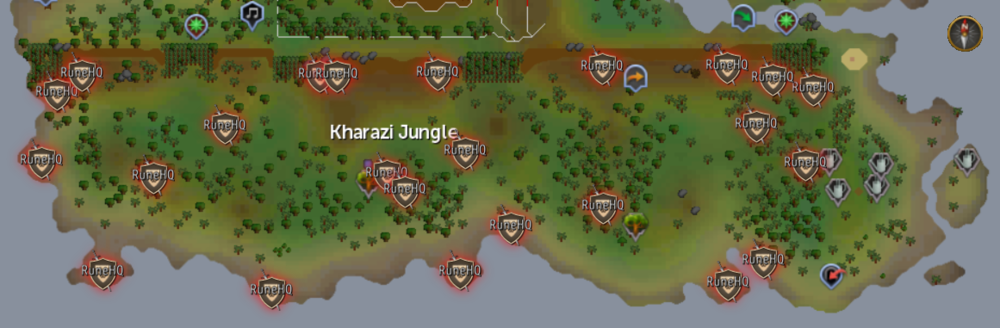 Click the above image to enlarge! |
| Kharidian Desert: all dig locations are East of the River Elid. Orb scan range: 27 paces. |
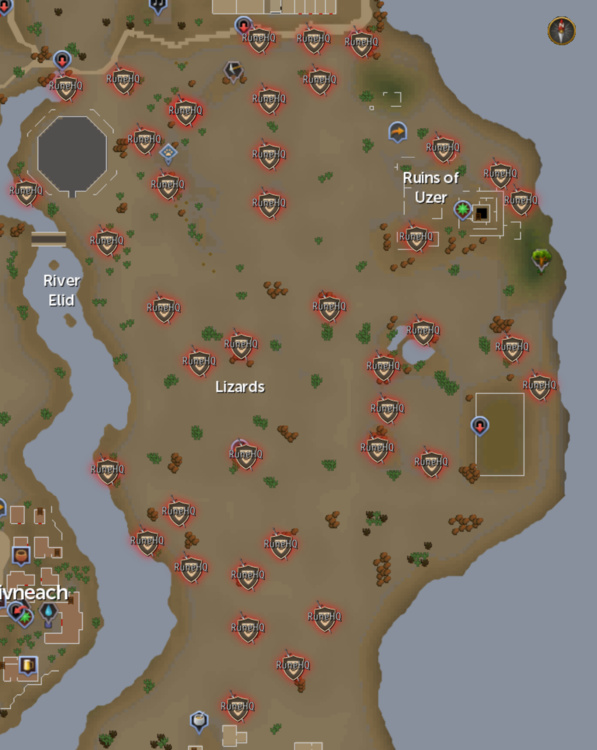 Click the above image to enlarge! |
| This scroll will work in the dark and damp caves below Lumbridge Swamp. Orb scan range: 11 paces. A light source (such as a Candle lantern) is required for the Lumbridge swamps. Additionally, a Spiny helmet or Slayer helmet is suggested to prevent damage from the Wall beast. |
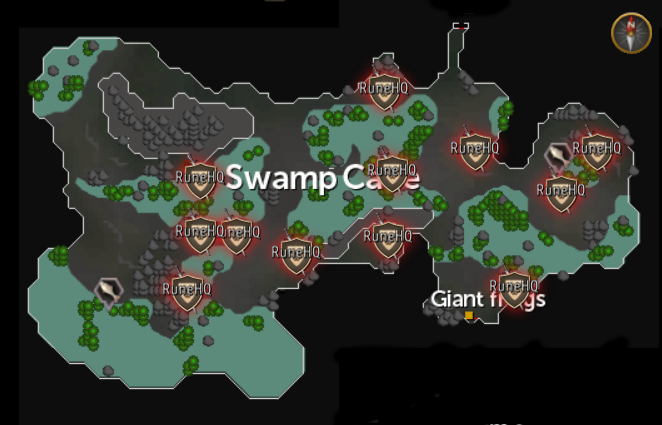 Click the above image to enlarge! |
| This scroll will work within Menaphos. Orb scan range: 30 paces. |
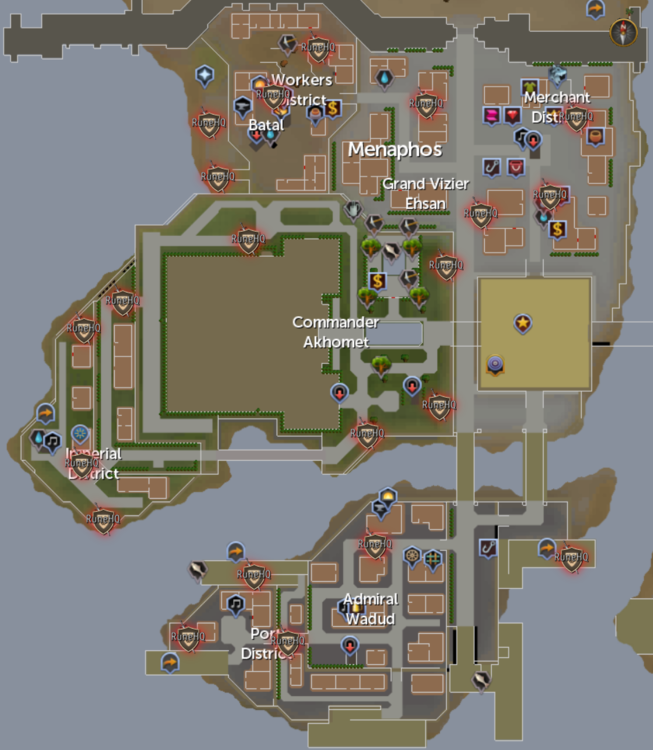 Click the above image to enlarge! |
| This scroll will work on the faraway island of Mos Le'Harmless. Orb scan range: 27 paces. |
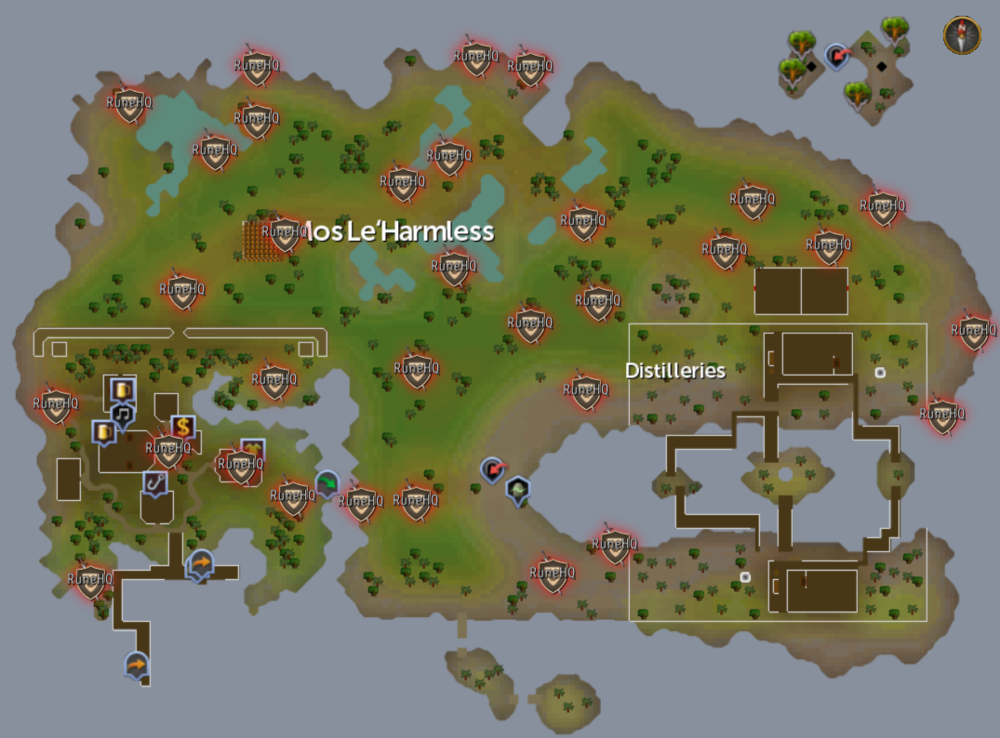 Click the above image to enlarge! |
| This scroll will work in the Piscatoris Hunter Area. Orb scan range: 14 paces. |
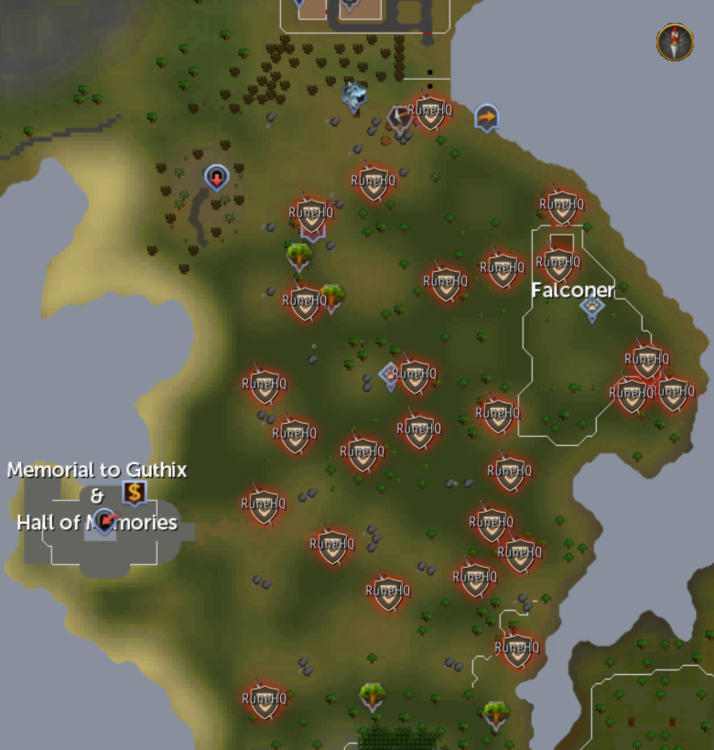 Click the above image to enlarge! |
| This scroll will work in Prifddinas. Orb scan range: 30 paces. |
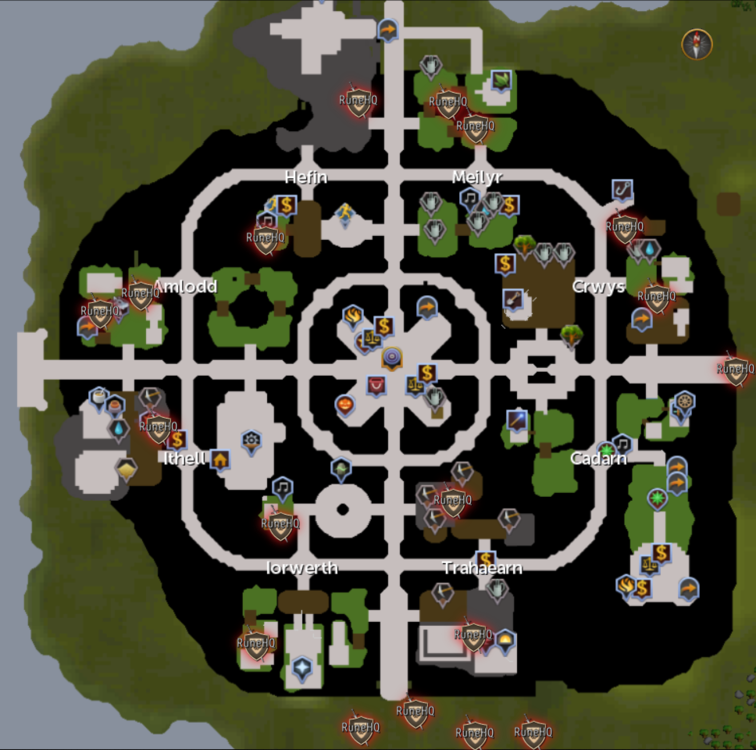 Click the above image to enlarge! |
| This scroll will work in Taverley Dungeon. Orb scan range: 22 paces. |
 Click the above image to enlarge! |
| This scroll will work within the walls of Varrock and the Grand Exchange. Orb scan range: 16 paces. |
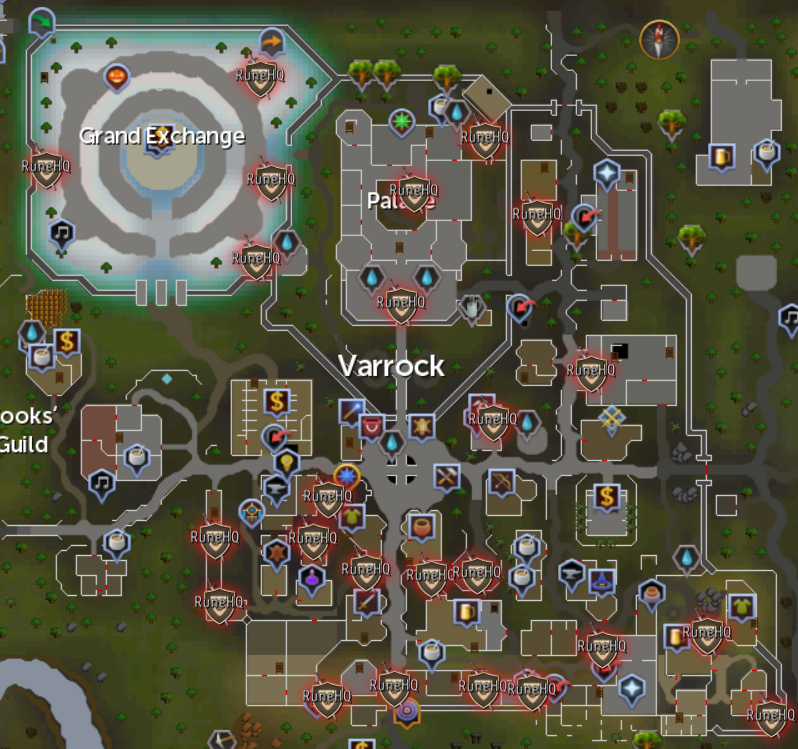 Click the above image to enlarge! |
| This scroll will work in the deepest levels of the Wilderness. Orb scan range: 25 paces. This is located in the Wilderness be careful which items you take with you as they may be lost upon death. |
 Click the above image to enlarge! |
| This scroll will work in the crater of the Wilderness volcano. Orb scan range: 11 paces. This is located in the Wilderness be careful which items you take with you as they may be lost upon death. |
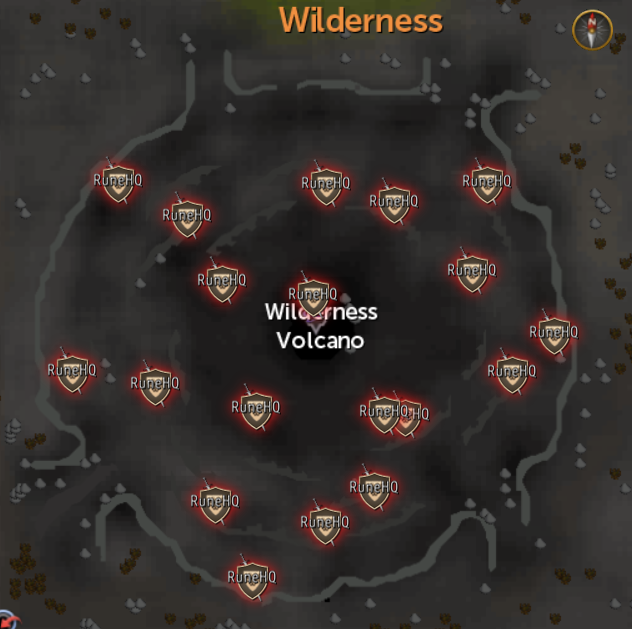 Click the above image to enlarge! |
| This scroll will work in the city of Zanaris. Orb scan range: 16 paces. Closest teleport: Any Fairy Ring can teleport to Zanaris or Slayer cape option 4 |
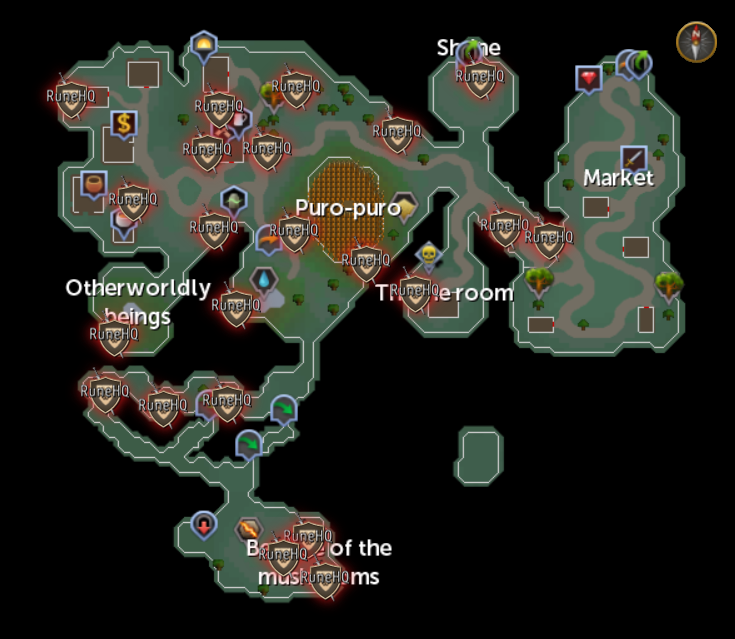 Click the above image to enlarge! |
Celtic Knot clues, only found in elite treasure trails, are fairly simple to solve. There are three tracks of runes in a knot (blue, red, and gray track)that intersect. However, there is no spot in the puzzle at which all three tracks intersect at the same time. Wherever two tracks intersect you will see a circle. There are always two runes at the spot of an intersection. if these two runes are different, the circle will be red. If the two runes are the same, the circle will be green. To solve the puzzle and unlock your scroll box, you must line up all three tracks so that the two runes at every track intersection are the same. Once all intersections have matching runes and turned green 'Unlock' to complete the puzzle.
Note You can move the tracks clockwise or anticlockwise by using the arrows. To view the runes on the underlying tracks use the 'Invert Paths' button. The puzzle can be reset by pressing the X in the top right corner or by logging out.
Pick two tracks to focus on; you will not need to pay any attention to the third track until you have completed the first step of solving the puzzle. Choose one track (f.e. red) that will stay still and one that you will be rotating (f.e. gray). Watch a certain rune on the red track, and use the arrows to move the red track in a full rotation. The rune you chose to watch should go all the way around the red track and finally stop in the spot it was in before you began rotating the track. Now, rotate the gray track once. Then, do exactly what you did before with the red track until all of the circles on the intersections of the red and gray tracks turn green. When you have found the point where all of these circles turn green, stop moving both tracks and leave them as they are. Now, move on to the blue track. Rotate the blue track around until all of the track intersections in the puzzle have turned green.
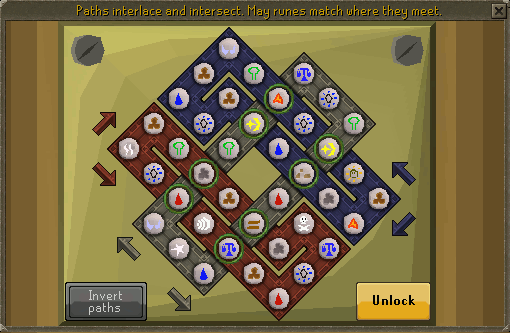
If you've ever played Sudoku, this idea will be very familiar!
To change the numbers on a tower puzzle there are 2 ways. Using the left-click option will change the value by 1 increment each click. Right-clicking will give the option to select between incrementing the value as before or to directly select any number between 1-5.
- Each row and column must contain, in this case, the numbers 1 through 5.
- Rows may not repeat a number
- Columns may not repeat a number
- Think of each hint provided as the NUMBER of towers you can view by looking to the hint on the exact opposite end of the table.
To aid you in solving this puzzle, Jagex gives us hints for each row and column
(just like Sudoku solves a portion of the puzzle). That being said,
some of you may find this type of puzzle difficult to solve.
Here are some tips and tricks to help solve this puzzle.
Below is a sample puzzle. This is similar to how the puzzle will look when you start.
The main difference is we added a coordinate system below each box in the blue section,
this allows us to specify which box is being discussed as we describe how to solve the puzzle.
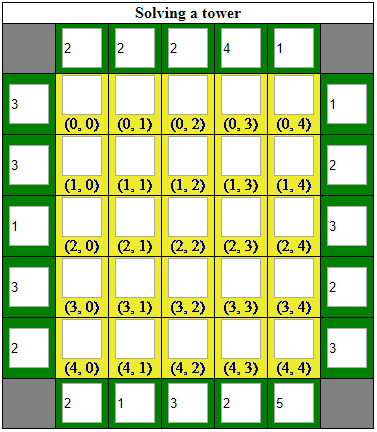
My best tip for starting to solve this puzzle is to begin by placing 5's by hints of 1.
The reasoning behind this is that if you're standing on a tower of 1 and you only want to see
one tower a maxed height will prevent all other towers from being seen. In the below image there
is a 5 placed next to each of the hints of 1.
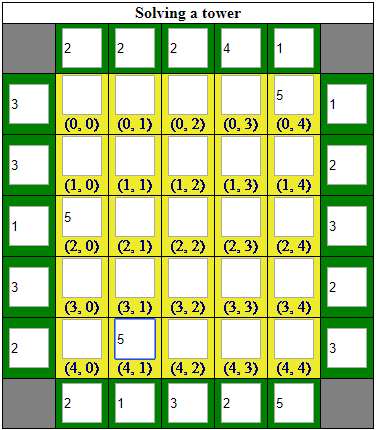
Next, we will finish entering the rest of the missing 5's and begin adding other numbers.
Just below (4,4) we can see we need 5 visible towers, this means it MUST ASCEND from bottom to top.
We will fill in all 5 numbers 1-5 with number 1 at (4,4) and number 5 at (0,4).
We will ALSO finish filling in the 5's.
We can see just above (0, 3) that we need 4 visible towers,
so we will place the 5 four paces South (into 3,3).
This leaves the remaining position for a 5 in the (1,2) position,
which is also intuitive because we only ever want to be able to see two towers
(this means we can place ANY number in (0,2) and be fine.
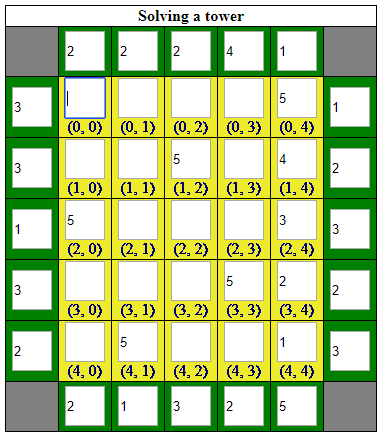
No,w look at the hints again. Make sure all of the lowest are 2's at this point. If not go back and add
a 5 next to the 1's. Now see if a "limiter" can be added as was just done with the 5's previously
to ensure we only ever see 2 towers.
Position (4,0) is a ripe candidate for limiting, since it is next to a 2 two towers will be seen
so place a 4 in that position. We now have 3 numbers filled in that row which means we can proceed with
that row and try to finish it out. The number to the right of (4,4) is 3, at this point it can see
the number 1 and number 5. We need to add 1 more tower but there are 2 towers left. If we add a 2 in (4,3)
you will be able to see towers 1, 2, 3, and 5, which would be 4 so this can't be the answer. So (4,3) must
be 3 and (4,2) must be 2. This means the (4, X) row is now complete.
Another prime position for a limiter is (3,0) we only want to see 3 positions in this row,
and we've already used our 4 for this column, so we'll place a 3 there.
The (0,1) column needs to be limited to 2 towers. We have already used a five in (4,1) and if we
put anything but a 4 in (0,1) we will see more than 2 towers so we're going to put a 4 in (0,1).
We want four visible spaces for the (0,3) column. There is a 5 in (3,3) so to get 4 visible towers
in (0,3) we have to use a 1.
For (0,0) we have already used a 3, 4, and 5 in that column and a 4, 1, and 5 in that row so it must
be a 2 since this is the only number not used in the row/column that it is in.
We need a view of three towers according to our hint right of (1,0) so we'll go with 1
there placing our remaining 2 in the (0,0) position
In (0,2) the only number not used in that row is a 3 so that is the answer for that box.
Our puzzle should now look like this:
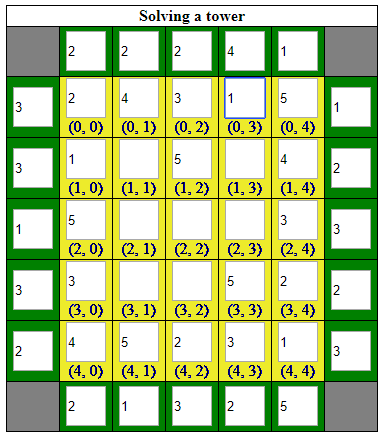
In the column of (0,3,) we need four towers from (0,3) down. Thus (1,3) should be a 2 and (2,3) should be a 4.
The row of (1,1) now is only missing one number so (1,1) must be a 3.
Our hint below (4,2) wants a limit of three towers, which means (3,2) must be a 4.
The remaining 1 must go in (2,0).
So then (2,1) is going to be a 2 and (3,1) is going to be a 1.
SOLUTION:
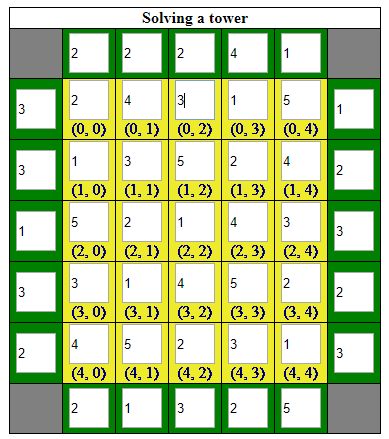
The goal of the Lockbox puzzle is to change all of the squares to the same logo. It does not matter what symbol you choose, any will work. This puzzle can be quick and easy to finish if you follow the steps below. In the below example the magic symbol was chosen as the symbol to work towards since it is the symbol that is the most different due to the blue background.
To begin with your puzzle should look something like this:
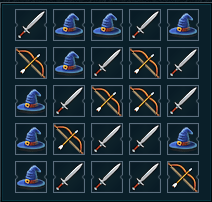
The first step is to start at the top left corner and turn each square into the magic symbol. After the first row move to the left side of the second row and continue the same process until the first 4 rows are all the magic symbols. The last row will not be all magic symbols, if it is you got really lucky. Below is a GIF of this step:
This is what it will look like after step 1:
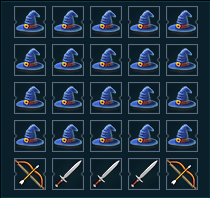
In the next step, you will need to click on the top square in each column that has a non-magic symbol in the bottom row. For this specific puzzle, each column has a non-magic symbol so you will click on each of the top squares once.
Now you do the same thing you did in step 1. Start at the top left corner and make each square a magic symbol. Again move left to right and top to bottom. It is the same process as below and again likely the bottom row will not be all magic symbols, if it is you are done. If not move on to the next step.
The below GIF will show the previous step.
This is what it will look like after step 2:
Now you will do the same thing you just did again, you will click on the top square of each column that is not a magic symbol. In this particular instance there is only 2 columns to change. Then go back through and make each square the magic symbol starting at the top. Again, if you finish the puzzle you are done, if not continue.
Here is a GIF showing that step:
This is what it will look like after step 3:
In this specific puzzle, the process has to be done a 3rd time and in the end, it is solved. Each puzzle can be a little different, so it may take multiple times of this process or just once or twice. Follow the same process until the puzzle is solved, the number of times depends on the specific puzzle.
Below is the final GIF showing how to finish the process:
A skill riddle challenge will provide you with a clue and requires action. Most actions are reasonably quick to accomplish but may have high-level requirements since these only appear during Master clues.
| Clue | Action | Location/Requirements |
| A view of the city from high above. I can hear their prayers below. | Reach the top of Hefin Agility Course | Access to Prifddinas and 77 Agility |
| Being open to Chaos can raise your defences. It may also bring you closer to death. Take a moment to bottle this feeling. | Create a Zamorak Brew | 78 Herblore required. Recipe: Vial of water, Clean torstol, and Jangerberries Torstol potion (unf) and Jangerberries |
| Catching only one shark. That don't impress me much. | Catch 2 Raw sharks at the same time | 76 Agility and 76 Fishing Best locations are Catherby or Elf Camp using the Tirannwn quiver 3 teleport. |
| Charm me and I shall unlock. But be brave in the darkness. |
Catch a charming moth | level 25 Wilderness, West of Daemonheim
This is located in the Wilderness be careful which items you take with you as they may be lost upon death. |
| Corruption seeps from this stone but there are those who work to cleanse it. Lend your voice. | Use a Cleansing crystal to cleanse the Corrupted Seren Stone. | Plague's End required.
The Corrupted Seren stone is located in the Hefin district of Prifddinas |
| Crossing the desert I met a crocodile. She gave me a dazzling smile but she had something in her teeth. | Use a deadfall trap to catch a Plover bird | 73 Hunter required.
Plover birds are located in Sophanem. There are trees nearby to chop to use with the deadfall traps. |
| Ernie once mentioned to me a secret to improve my cooking. His idea was strong but I went the extra mile. |
Create or Activate a Decorated cooking urn (must attach a rune to the urn to complete) | 81 Crafting to make. To make use a Fire rune on a Decorated cooking urn (nr). |
| Head protection is never a bad thing. Make it from rune for the best chance of survival. |
Make a Rune helm or a Rune full helm | 50 Smithing to make |
| I have all the ingredients for soup but sometimes a simple meal tastes the best. | Cook a Raw shark or a Raw rocktail | 80 Cooking required. |
| In a station of power someone requires assistance. Do a good deed to spread some happiness. | Find and help Turgall. | 80 Agility and Death to the Dorgeshuun required.
Located by the Dorgesh-Kaan agility course. |
| I once met a man returning from market. He showed me the spoils of his day. It's precious to see what people pay for. | Steal a gem from the East Ardougne gem stall | 75 Thieving required.
East Ardougne |
| I once met an ancient warrior who told me tales of his adventures, his eyes lit up as he spoke. | Burn Elder logs | Firemaking |
| Keeping all your gold together. That's a good idea. It shall be mine. | Mine at a concentrated gold rock. | 80 Mining
In the Living Rock Caverns |
| Magical energy floats unleashed. The fluid of life that flows through us all. Span the gap to capture this energy. |
Siphon Blood runes in Runespan | 77 Runecrafting Required. Runespan |
| Round and round we go, burning, burning all aglow. | Chop a Curly root and light in a fire pit. (superheat does NOT work) | 83 Woodcutting and 83 Firemaking required.
Located in the Jadinko Lair Closest teleport: Gnome Glider option 5 or Max Guild Overgrown Idols teleport. |
|
Rowdy Unruly Boisterous I am pie. |
Cook a Raw wild pie | 85 Cooking |
| Rumours of a great shark continue to spread. Catch me one and I will be fed. | Catch a Raw great white shark | 80 Fishing required |
| Stare into the flames for long enough and you may see something you didn't see. | Add Magic logs to Prifddinas or Max Guild bonfire | Prifddinas |
| Take the journey to a distant mining site. Become a blight to your foes. | Create a bane bar | Ritual of the Mahjarrat, 77 Smithing, 87 Magic, required to complete. |
| The crystals tempt most however, there are other riches to gain for the quick-fingered. | Pickpocket a Prifddinas worker in one of the Prifddinas districts | 91 Thieving (boostable) and Plague's End |
| The God of Order requires a sacrifice of strength but in return restores me. If only we could keep that feeling in his absence. | Create a Saradomin brew (3) | 81 Herblore |
| The spell struck me in the chest. Perhaps if I had worn armour today. Black looks better than red | Craft a Black dragonhide body | 84 Crafting |
| There are those who prove themselves and become a beacon of light in the darkness. Come to the crystal city and become that figure. |
Activate the curse "Light Form" inside Prifddinas | Prifddinas |
| There is a temple where there are rivers of red. Bind the magic to get ahead. | Craft a Blood rune | 77 Runecrafting and Legacy of Seergaze quest required.
Only at the Blood altar |
| Those things I once held dear continue to fade. I look upon her face and barely know who she is. But her eyes...they are still so radiant. | Harvest a Radiant memory. | 85 Divination Required.
The Radiant Divination colony is located on Dragontooth Island. This can also be completed in the Hall of Memories. |
| When I encountered this individual, she had more rings than any I had seen before. | Cut an Elder tree | 90 Woodcutting required. At any of the Elder Trees (The player grown tree in Prifddinas works.) |
| Where there is light there is also death Should you contain this you may progress. |
Craft a Death rune | 65 Runecrafting and Mourning's Ends Part II required.
Only on Death Altar |
Reward casket (medium)
Reward casket (hard)
Reward casket (elite)
Reward casket (master)
This Minigame Guide was written by The RuneHQ Community. Thanks to Fireball0236, Lilroo503, Double_D_Edd, Jakesterwars, DRAVAN, Tabion, Greg, Amoa123, Tudjay, Javezz, Jarkur, XmyselfX, Somedude772, Etghon, 1-2_punch, Jarl Ulfrich, DyingCrystal, Pyr0killer, Ratville, Unview, Rednar, Seck154, 88m, Endless Life, YouRageAtMe, Rs Two One, z Breach, TKJ222, TKoris, HeartofDixie, Wolf 1508, Noble_K, Tainted Fire, Cp93, Nova Curse, DarkPyroNinja, WhtRemx, RHQ Bob, Miauwmeph, HiddenWoody, Numerous One, Mirr0rs, Dvdveeken, Saint Blair, Su1cidal, Cryolence, Telle, Ksb Single, Rooskii, Bazzy, Hitori, Hankinator, Hi Mom N Dad, Youdle7, Alk12, Deathe, and Zing. for corrections.
This Minigame Guide was entered into the database on Fri, Jun 04, 2004, at 02:54:29 PM by Kidd and CJH, and it was last updated on Fri, Apr 05, 2024, at 01:03:43 PM by Alk12.
If anything is incorrect or missing, or if you have any new information to submit to this database, please submit it to us on our Content Submissions Forums.
If you see this guide on any other site, please report it to us so we can take legal action against anyone found stealing our content. This guide is copyrighted by RuneHQ, and its use on other sites is expressly forbidden. Do not ask if you can use our guides or images, the answer is and always will be NO!
Print this page with images - Back to the Minigame Guide Index Page - Back to Top
