

Table of Contents
- Combat Level
- Combat Basics
- Attack
- Strength
- Defence
- Constitution
- Training
- Temporary level boosts and Quest rewards
- Capes of Accomplishment
Every monster and player that has the ability to engage in combat has a combat level. This level summarizes your skill in combat. Your combat consists of:
Your combat level can be Melee, Magic, or Ranged based. The minimum combat level is 3 and the maximum level varies depending on if you are a Member or not - 138 for Members and 126 for Free-to-play players. This is calculated using the following formula:
((Highest result of Attack+Strength, or Magic x2, or Ranged x2) x 13 / 10 + Defence + Constitution + (Prayer / 2) + (Summoning / 2 )) / 4
Rather than using this formula, you can use our Combat Level Calculator to automatically calculate your level for you and how many levels are required to level up.
You may notice that the combat levels of other monsters and players will appear in a color - red, green, yellow, or something in between. Enemies 10 levels or more below you will appear very green. Likewise, if they are 10 levels or more above your combat level, their level will appear very red. If a player or monster is the exact same combat level as you, their level will appear yellow. If the enemy is less than 10 levels below you, their level will appear greenish-yellow, progressing as the level gets lower; enemies above your level will appear orange.
For every monster that you kill, you will be awarded experience split between your selected Combat skill(s) (see below) and Constitution. It is divided between the two as follows:
- Combat experience = Total experience per kill/1.33
- Constitution experience = Combat experience per kill/3
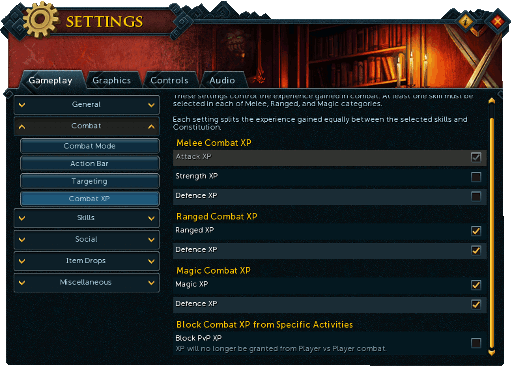
The Combat Mode interface allows you to select which combat skill(s) you wish to train while fighting. This can be opened by selecting the gear on the Right side of your main ability bar that also includes your Life points, Adrenaline, Prayer points, and Summoning points.
All Combat sections allow you to choose either a single combat skill to gain experience in or a combination of two or more skills. When selecting multiple skills, the experience will be split evenly amongst them. The skills offered for each combat style is as follows:
Constitution is automatically trained alongside all combat skills.
In order to be effective at Combat, there are several basic things you need to know about: Action Bar, Adrenaline and Abilities, as well as Combat Modes.
On an action bar there are several different bars and buttons which will affect your combat.

| Section | About |
| Action bar | This indicates which action bar you are currently using. By default there are 6 action bars, 4 of which can be on screen at once for Members and 3 for Free-to-Play. You can purchase more action bars, enabling you to have up to 10. This allows you to set up what abilities you will need for different situations, be it chosen simply by combat style or more complex by specific Boss you will encounter. It is also possible to automatically change your action bar depending on the style of weapon you are wielding. These settings can be toggled in the Action Bar section under Combat in your Gameplay Settings. |
| Health | This bar indicates how much health you currently have. The icon at the Left of the bar can be clicked to enable the "Regenerate" Ability. Right-clicking it also give a "Cure Poison" option. |
| Adrenaline | This bar indicates the amount of Adrenaline you have. Note that you will need a certain amount of Adrenaline to queue certain Abilities. For example, Threshold abilities require 50% Adrenaline. You can also click the button to the Left of the bar to toggle your auto-retaliate. 2 Swords (as seen) means that you will attack anyone who attacks you first, while a single sword indicates that you will not retaliate when attacked. |
| Prayer points | This indicates how many Prayer points you currently have. Clicking the icon to the Left will enable you to activate your Quick Prayers, while Right-clicking it will give you the option to set them up. Note that only 2 Quick Prayers can be selected and they must be Prayers, Curses will not work. |
| Summoning Points | This indicates how many Summoning points you currently have. Clicking the icon to the Left offers several options. You will need to Right-click the icon and choose "Select follower interaction" to determine what will occur when you click the icon. |
| Minimize/Maximize | This button can be clicked to minimize the amount of information you see on your action bar; minimized view only displays your Health, Adrenaline, Prayer, and Summoning bars. Right-clicking it will allow you to sheathe/unsheathe weapons. |
| Revolution Hotkeys | If you enable the Revolution Mode of combat, some of your abilities will be encircled by a yellow box. This box indicates which abilities are included in its range. You can choose as few as 1 or as many as all 14 in the Action bar. More on Combat Modes below. |
| Remaining Hotkeys | Any abilities not within the yellow box will not be triggered by Revolution. Regardless of what Combat Mode you choose to fight with, all abilities on your action bar can either be clicked to queue or the Hotkey can be typed to queue. Note that it is suggested to have the "Always-on" feature turned off in your chatbox in order to type the ability hotkeys. Having it on will cause you to type a conversation as opposed to triggering an ability. For most, typing the ability hotkey is faster, easier, and safer than clicking on it with a mouse. This could be the difference between life and death during a fight. |
| Combat Settings | Clicking this button will open specifically the Combat Settings interface. This will enabling you to make adjustments to your Combat Mode, Action bar, Targeting, and Combat XP. Note that other settings can be accessed through here as well. |
| Lock | Clicking this icon will enable you to lock your Action bars in place so that you cannot accidentally move them. Having the icon unlocked (as seen) means that you can relocate them as desired/needed. |
To succeed in combat, you will need to use abilities while fighting. To place an ability on your bar, drag and drop from a book into one of the keybinds. This can either be done with the ability books in a window, or by accessing the Powers tab, seen below.
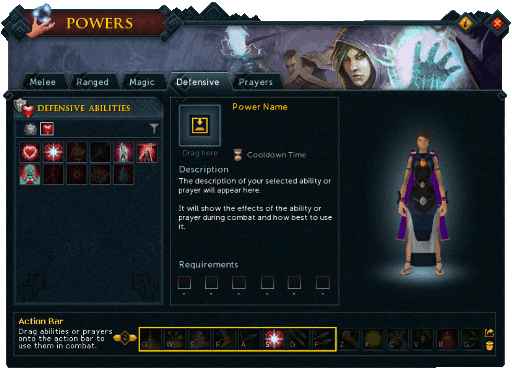
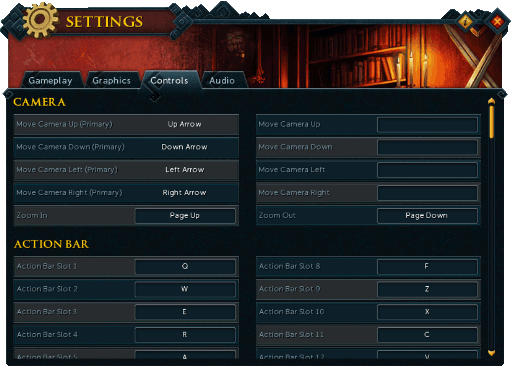
Once you've assigned an ability to the bar, you can click the icon in it or use the associated hotkey to activate that ability. Hotkeys can be customized within the Control settings.
As you activate abilities in combat, your Adrenaline bar will fill up and allow you to use stronger abilities. The abilities are divided across the three Melee skills, along with Magic, Ranged, and Constitution.
- Basic abilities require no adrenaline and add adrenaline to the bar when activated.
- Threshold abilities require 50% adrenaline. Threshold abilities are reasonably powerful and capable of dispatching most common monsters quickly, however, they will drain your adrenaline rather than add to it.
- Ultimate abilities require 100% adrenaline. These are very powerful abilities and easily capable of killing many monsters in a single hit. Ultimates will completely drain your adrenaline bar when used.
Attack, Strength, Ranged, and Magic abilities are all offensive. Whereas Defence and Constitution abilities are designed to reduce the damage you receive and restore your Life Points.
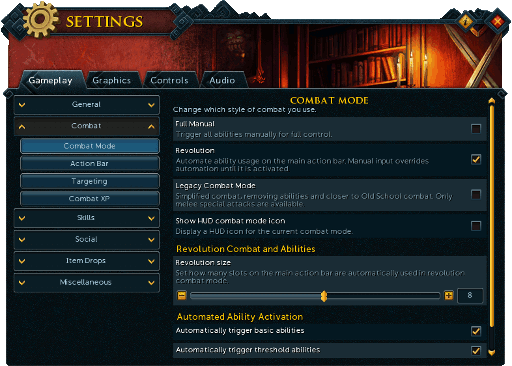
Three different Combat Modes to choose from. These can be chosen on the Combat Mode tab within your Gameplay settings. This is quickly accessed by clicking the gear on your Action Bar. Each mode enables you to participate in combat various ways.
Full Manual - This combat method requires you to actively choose what abilities you wish to trigger and when. Many PvMers prefer to use this method of combat so that nothing is triggered out of time.
Revolution - This combat method automatically activates abilities you have placed on your current/main Action bar as soon as their cooldown period is over. This means that combat requires less input from you. The amount of ability slots included and what type of abilities (Basic, Threshold, Ultimate) that can be triggered is chosen on the Combat Mode interface.
Legacy - This combat method removes Abilities and makes it closer to the Old School style of Combat. Only Melee special attacks will be available.
Attack level dictates how often you hit an enemy. In short, the higher your Attack level, the more often you hit.
Attack level also dictates what weapons a player can wield. Weapons are what you will use to attack your enemies. Certain Attack levels are required to wield the different kinds of weapons. The higher your Attack level, the stronger weapons you have the ability to wield. To see the stats of individual weapons, please use the Items Database.
Below are several generic categories of weaponry and the Attack level necessary to wield them.
| Type of Weapon | Attack Level to Use |
| Bronze | 1 |
| Iron | 10 |
| Steel | 20 |
| Black | 25 |
| White | 25 |
| Mithril | 30 |
| Adamant | 40 |
| Rune | 50 |
| Granite/Gravite | 55 |
| Dragon | 60 |
| Corrupt Dragon | 60 |
| Barrows | 70 |
| Godswords | 75 |
| Chaotic * | 80 |
| Tetsu | 85 |
| Drygore | 90 |
| Noxious | 90 |
| Zaros Godsword | 92 |
* With 80 Dungeoneering.
Depending on your Attack level, certain abilities will be available for you to use.
| Icon | Ability Name |
Ability Type |
Attack Level |
Weapon Requirement |
Cooldown | Description |
 |
Slice | Basic | 1 | None | 3 Seconds | Slice your target for 30%-120% weapon damage. This increases to 80%-146% weapon damage against stunned & bound opponents. |
 |
Slaughter | Threshold | 1 | None | 30 Seconds | Cause your target to bleed for between 100-250% weapon damage over 6 seconds. If the target moves location, they suffer 3x damage. |
 |
Overpower | Ultimate | 2 | None | 30 Seconds | Overpower your target, dealing damage up to 200-400% weapon damage. |
 |
Havoc | Basic | 5 | Dual-wield melee | 10 Seconds | Instantly attack with both weapons up to 157% weapon damage, disabling protection prayers in PVP. |
 |
Backhand | Basic | 10 | None | 15 Seconds | Smack your target with the back of your hand, stunning them for 1.2 seconds and dealing 100% weapon damage. |
 |
Forceful Backhand | Threshhold | 15 | None | 15 Seconds | Smack your target with the back of your hand, stunning them for 3.6 seconds and dealing 200% weapon damage. |
 |
Smash | Basic | 20 | Two-handed melee | 10 Seconds | Smash your target for up to 157% weapon damage, disabling protection prayers in PvP. |
 |
Barge | Basic | 30 | None | 20 Seconds | Shoulder-barge your target, breaking free of binds and dealing up to 125% weapon damage and binding your opponent in place for 6.6s.. |
 |
Mutated Barge | Basic | 30 | None | 20 Seconds | Shoulder-barge your target, breaking free of binds and dealing up to 125% weapon damage and binding your opponent in place for 6.6s. Mutated barge deals up to 10% additional damage for every 0.6 seconds since you last hit your current target, for a maximum of 225% weapon damage. If it has been at least 4.8 seconds since you last hit your current target your next melee combo attack becomes instant and deals damage-over-time instead. |
 |
Flurry | Threshhold | 37 | Dual-wield melee | 20 Seconds | Perform a flurry of blows against your surrounding targets, dealing up to 94% weapon damage per hit over 3.6 seconds. Combo attack. |
 |
Mutated Flurry | Threshhold | 37 | Dual-wield melee | 20 Seconds | Perform a flurry of blows against your surrounding targets, dealing up to 94% weapon damage per hit over 3.6 seconds. If only one target is nearby, up to 157% weapon damage per hit will be dealt instead. Additionally if an attack hits any target per swing, the cooldown of Berserk will be reduced by 1.2 seconds each swing. |
 |
Sever | Basic | 45 | None | 15 Seconds | Sever a tendon, dealing up to 188% weapon damage and reducing any damage they deal by 10% for 5 seconds. |
 |
Hurricane | Threshold | 55 | Two-handed melee | 20 Seconds | Spin on the spot, dealing 66%-219% weapon damage to all adjacent targets, hitting your main target a second time dealing 84%-161% weapon damage. |
 |
Massacre | Ultimate | 66 | Dual-wield melee | 60 Seconds | Rend your target, dealing up to 188% of both weapons' damage instantly and causing an additional 313% of weapons damage over 6 seconds. |
 |
Blood Tendrils * | Threshold | 75 | None | 45 Seconds | Blood tendrils whip at you and your opponent for 5 seconds. The first hit deals up to 180% weapon damage, with four subsequent hits each dealing up to 90% weapon damage to your target and up to 25% weapon damage to you. |
 |
Meteor Strike | Ultimate | 81 | Two-handed melee | 60 Seconds | Crash down on your target with the force of a meteor, dealing damage equal up to 250-350% weapon damage. Critical strikes generate 10% adrenaline for 30 seconds. Only usable on targets with over 50% life points remaining. |
 |
Balanced Strike ** | Ultimate | 85 | None | 120 Seconds | Strike your target, restoring balance. If you have a smaller percentage of your lifepoints than they do of their lifepoints, your target will take the difference as a percentage of their lifepoints in damage. You will be healed for half the difference as a percentage of lifepoints. Be cautious: if you have more health than your target the effects will be reversed! You will take the damage and they will be healed! |
* Requires completion of The Digsite.
** Requires completion of The World Wakes.
Strength is the skill that allows you to hit harder on enemies. The higher your strength level, the higher you will hit on enemies.
Depending on your Strength level, certain abilities will be available for you to use.
| Icon | Ability Name |
Ability Type |
Strength Level |
Weapon Requirement |
Cooldown | Description |
 |
Kick | Basic | 3 | None | 15 Seconds | Kick your target, knocking them back and stunning them for 1.2 seconds and dealing 100% weapon damage. |
 |
Stomp | Threshhold | 3 | None | 15 Seconds | Kick your target, knocking them back and stunning them for 3.6 seconds and dealing 200% weapon damage. |
 |
Punish | Basic | 8 | None | 3 Seconds | Punish your target's mistakes, dealing 94% weapon damage, or 188% weapon damage if they're stunned or bound. |
 |
Dismember | Basic | 14 | None | 15 Seconds | Dismember your target, dealing 188% weapon damage over 6 seconds. |
 |
Fury | Basic | 24 | None | 5 Seconds | Unleash your fury 3 times, strike your target for 2.4 seconds, once every 1.2 seconds. Each strike deals 75% of weapon damage and increases by 7% with each strike. Each strike will also increase your next attacks chance to critical hit by 5% per strike, up to a maximum of 15%. This critical hit bonus also affects each strike of Fury. Combo attack. |
 |
Mutated Fury | Basic | 24 | None | 5 Seconds | Unleash your fury instantly. Dealing up to 157% weapon damage and increasing the critical hit chance of your next ability by 10%. If mutated fury is a critical hit then your next ability has a 100% critical hit chance. |
 |
Quake | Threshold | 37 | Two-handed melee | 20 Seconds | Smash your weapon into the ground beneath you, dealing up to 219% weapon damage to your main target and up to 188% weapon damage to all adjacent targets. Your primary target's defence and armour are also lowered for 1 minute. |
 |
Destroy | Threshold | 37 | Dual-wield melee | 20 Seconds | Perform a destructive attack 4 times against your target for 3.6 seconds. Each attack dealing damage up to 188% weapon damage. Initially stunning the target for 3.6 seconds. Combo attack. |
 |
Berserk | Ultimate | 42 | None | 60 Seconds | Harness your adrenaline to increase melee damage dealt by 100% for 20 seconds. Also increases all damage taken by 50%. |
 |
Cleave | Basic | 48 | Two-handed melee | 10 Seconds | Cleave through your foes, dealing 188% weapon damage to all targets in a frontal cone. |
 |
Assault | Threshold | 55 | None | 30 Seconds | Assault your target 4 times for 3.6 seconds, once every 1.2 seconds, dealing damage to 219% of weapon damage each strike. Combo attack. |
 |
Decimate | Basic | 67 | Dual-wield melee | 7 Seconds | Decimate your target's defences, dealing up to 188% weapon damage, or up to 244% weapon damage if they are bearing a shield. |
 |
Pulverise | Ultimate | 81 | Two-handed melee | 60 Seconds | Pulverise your target, dealing 250-350% weapon damage and reducing their damage dealt by 25% for 30 seconds. If an NPC target is defeated with Pulverise you are also granted 50% adrenaline. |
 |
Frenzy | Ultimate | 86 | Dual-Wield melee | 60 Seconds | Perform a frenzied attack at your target's current location lasting for 3.6 seconds. Every 1.2 seconds dealing 80-180% of weapon damage. Each subsequent hit gains an additional 10% damage to both minimum and maximum hit. If your target moves they will take no damage. Combo attack. |
If you do not want to be dealt high hits, Defence is a necessity. It reduces your chance of being hit by an opponent. Defence is also required to wear the different types of armor. The higher your Defence level, the stronger the armor you will be able to wear.
Armor is a vital part of combat. It protects you from attacks and, depending on the class, it can increase your damage. Armor comes in two main classes: Tank and Power. Tank armor generally has a very high Armor rating and Life points bonus, whereas Power armor has a moderate Armor rating and Life points bonus, but makes up for this with a Damage bonus. To see the stats of individual weapons, please use the Items Database.
Below are several generic categories of armor and the Defence level necessary to wear them.
| Type of Armor | Armor Class | Defence Level to Use |
| Bronze | Tank | 1 |
| Iron | Tank | 10 |
| Steel | Tank | 20 |
| Yak-hide * | Tank | 20 |
| Black | Tank | 25 |
| Initiate | Tank | 25 |
| White | Tank | 25 |
| Mithril | Tank | 30 |
| Proselyte | Tank | 30 |
| Adamant | Tank | 40 |
| Corrupt Armor (Vesta's and Statius') |
Tank | 40 |
| Elite Black | Tank | 40 |
| Dragonstone | Tank | 50 |
| Rock-shell | Power | 50 |
| Rune | Tank | 50 |
| Granite | Tank | 55 |
| (Corrupt) Dragon | Tank | 60 |
| Obsidian ** | Tank | 60 |
| Third-age | Tank | 65 |
| Bandos | Power | 70 |
| Barrows | Tank | 70 |
| Crystal | Tank | 70 |
| Warpriest | Hybrid | 75 |
| Vesta's and Statius' | Tank | 78 |
| Attuned Crystal | Tank | 80 |
| Anima Core | Power (Sliske is Hybrid) |
80 |
| Chaotic *** | Tank | 80 |
| Torva | Power | 80 |
| Gemstone | Hybrid | 80 |
| Refined Anima Core | Power (Sliske is Hybrid) |
85 |
| (Superior) Tetsu | Tank | 85 |
| Malevolent | Power | 90 |
| (Achto) Teralith | Tank | 90 |
* With completion of The Fremennik Isles.
** With completion of The Brink of Extinction.
*** With 80 Dungeoneering.
In addition to the main body armors above, there are several shields, boots, and gloves for melee that also require specific Defence levels to use.
| Armor | Defence Level to Use | Notes | |
| Shields | |||
| Spirit shield | 40 | Requires completion of Summer's End and 55 Prayer. | |
| Dragonfire shield | 70 | Requires 90 Smithing to make. | |
| Corrupt Defender | 70 | Also requires 70 Attack to wield. | |
| Blessed spirit shield | 70 | Requires completion of Summer's End and 60 Prayer. | |
| Divine spirit shield | 75 | Requires completion of Summer's End and 75 Prayer. | |
| Ancient defender | 80 | Also requires 80 Attack to wield. | |
| Malevolent kiteshield | 90 | Degrades to broken state. | |
| Kalphite defender | 90 | Also requires 90 Attack to wield. | |
| Gloves | |||
| Pneumatic gloves | 85 | Requires completion of The World Wakes to obtain. | |
| Razorback gauntlets | 90 | Degrades to dust. | |
| Boots | |||
| Steadfast boots | 85 | Requires completion of Ritual of the Mahjarrat to obtain as a drop. | |
| Emberkeen boots | 90 | Requires completion of Ritual of the Mahjarrat and Fate of the Gods to obtain as a drop. | |
Depending on your Defence level, certain abilities will be available for you to use.
| Icon | Ability Name |
Ability Type |
Defence Level |
Weapon Requirement |
Cooldown | Description |
 |
Devotion ** | Threshold | 1 | None | 60 seconds | Protection prayers are 100% effective (75% in PvP) for 10 seconds. Killing an opponent extends the effect by 5 seconds up to a maximum of 20 seconds. |
 |
Anticipation | Basic | 3 | None | 24 Seconds | Concentrate on anticipating your foe's attacks, reducing all damage taken by 10% and providing immunity from stuns for 10 seconds. |
 |
Bash | Basic | 8 | Shield | 15 Seconds | Bash your target with your shield, dealing up to the sum of 100% weapon damage plus your shield's armour value. |
 |
Revenge | Threshold | 15 | Shield | 45 Seconds | Enact revenge upon your foes, causing any attacks you receive to increase your max hit by 10%, stacking up 100%. Lasts 20 seconds. |
 |
Provoke | Basic | 24 | None | 10 Seconds | Taunt your target, forcing them to focus their attacks on you. Player targets have their damage reduced by 50% when attacking anyone other than yourself. However, you also do 50% less damage when attacking any other player. Lasts 6 seconds. |
 |
Immortality | Ultimate | 29 | Shield | 120 Seconds | Any damage you receive is reduced by 25% for 30 seconds. If you should die during this period, you will miraculously return to life with 40% of your maximum life points. However, the Immortality effect will be consumed. |
 |
Freedom | Basic | 34 | None | 30 Seconds | Break free of any stuns or snares, and gain immunity to any further ones for 6 seconds. Also clears damage-over-time effects. |
 |
Reflect | Threshold | 37 | Shield | 30 Seconds | Raise your shield, reducing the damage you receive by 50% (25% in PvP) of incoming damage and reflecting it back at the attacker. Lasts 10 seconds. |
 |
Resonance | Basic | 48 | Shield | 30 Seconds | The next attack you receive within 6 seconds will heal you instead of harm you. Heals 50% of the incoming damage and an additional 0.5% for every shield level. Certain large Boss attacks will have their damage prevented, but will not heal. |
 |
Rejuvenate | Ultimate | 52 | Shield | 300 Seconds | Channel your adrenaline to help restore 40% of your life points and fully restore your drained stats over 10 seconds. |
 |
Debilitate | Threshold | 55 | None | 30 Seconds | Debilitate your target for up to 100% weapon damage, also reducing any damage they deal to you by 50% for 7.8 seconds. This duration increases if a shield is equipped by 0.6 seconds for every 10 shield levels. |
 |
Preparation | Basic | 67 | Shield | 20 Seconds | Prepare for the fight ahead, causing each attack you receive to reduce the remaining cooldown of Resonance by 3 seconds. Lasts 10 seconds. |
 |
Barricade | Ultimate | 81 | Shield | 60 Seconds | Summon an impenetrable barricade, which prevents all damage received for a minimum of 4 seconds, and increases based on the level of shield equipped, up to 10 seconds. |
 |
Natural Instinct * | Ultimate | 85 | None | 120 Seconds | Instantly leech your target's adrenaline. If fighting a non-player opponent that does not use adrenaline, for the next 20 seconds you will gain 200% adrenaline from your own abilities. |
* Requires completion of The World Wakes.
** Must have been purchased with fealty during The Bird and the Beast World Event or can be obtained as a drop from General Graardor and Kree'arra.
When fighting another player or monster, you will notice red or blue "splats" will appear on you and your opponent when hit. The number inside the "splat" indicates how many Life Points have been taken. Note that the splat colors can be changed within the Targeting section of your Gameplay Settings.
Your base number of Life Points is your Constitution level x 100. So for example, at level 99 you will have 9900 Life Points while wearing nothing. Some armor, such as the Ports armor, has an associated Life bonus which will increase your base Life Points when worn. Once you reach 0 Life Points, you will die, and reappear within Death's office.

Here you will be able to purchase back any items that you were wearing and holding when killed - items within a Beast of burden cannot be purchased back. You can also choose to not purchase your items and run back to the location you died to retrieve them, however, they will only stay there for so long and someone can pick them up as well.
The only exception to this is if you die in the Wilderness. If this is where you meet your demise, at most you will be able to keep 5 items while the rest go to your killer, or drop on the floor if you die to a monster. Typically 3 items will be kept, but it can be boosted with use of the "Protect item" Prayer, Portent of item protection, and/or Sign of item protection. If you are the person who initiated the attack against another player and you are killed, you will lose EVERYTHING.
When you take damage, your Life points will slowly restore themselves over time. Alternatively, you can heal yourself much faster by eating or drinking a wide variety of food and potions, as well as using spells, abilities, and resting. The amount that food heals depends on the Cooking level required to cook the food and your Constitution level. To receive the full Life Points restoration, you must have a Constitution level equal to or higher than the level required to cook the food. For example, you will need level 40 Constitution to heal the full 800 Life Points from a Lobster. Standing within range at a bank booth or Grand Exchange counter will also restore your Life Points.
Using abilities such as: Regenerate, Guthix's Blessing, and/or Ice Asylum can save you a huge amount of food. If used correctly, you can last a significantly longer time fighting the same monster, or even stay there indefinitely.
Depending on your Constitution level, certain abilities will be available for you to use.
| Icon | Ability Name |
Ability Type |
Constitution Level |
Weapon Requirement |
Cooldown | Description |
 |
Regenerate | Basic | 10 | None | 0 Seconds | Focus your remaining adrenaline to heal 2% of your maximim lifepoints, every 0.6 seconds at the cose of 10% adrenaline each time. Does not work during combat. |
 |
Sacrifice* | Basic | 10 | None | 30 Seconds | Deal up to 100% damage to your opponent, ignoring protection prayers. Heal 25% of the damage you deal, or 100% if your target dies. |
 |
Transfigure * | Ultimate | 10 | None | 180 Seconds | You are bound and interrupted for 6 seconds. When this ends, you heal 250% of any damage taken (maximum of 75% your lifepoints), and become immune to stuns and binds for 15 seconds. |
 |
Weapon Special Attack | Special Attack | 10 | None | Varies | Some of the most powerful weapons grant you unique special attacks. |
 |
Siphon | Basic | 20 | None | 60 Seconds | Siphon up to 10% adrenaline from your target if they have more adrenaline than you and protects you from further siphons for 6 seconds. |
 |
Incite | Basic | 24 | None | 0 Seconds | Dramatically increases the likelihood that your attacks will cause your target to attack you instead of your allies. Lasts until cancelled. Has no effect in PvP. |
 |
Tuska's Wrath ** | Basic | 50 | None | 120 Seconds | Deal 10000% of your Slayer level as damage to your active slayer target. If used on a non slayer target the ability will deal 110% easpon damage and will go on a 15 second cooldown. |
 |
Storm Shards | Basic | 70 | None | 30 Seconds | Stack up to 95% (32% in PvP) weapon damage on your target. Trigger all stacked damage by using the Shatter ability. Maximum of 10 stacks. |
 |
Shatter | Threshhold | 70 | None | 120 Seconds | Unleash all Storm Shard damage stacked on the target. Will only have an effect on a target with at least 1 stack of damage. |
 |
Guthix's Blessing *** | Ultimate | 85 | None | 300 Seconds | Call on Guthix's spirit, invoking a butterfly that will heal you for 8% of your life points, every 2 seconds for a maximum of 10 seconds. The butterfly may be destroyed by the enemies. |
 |
Onslaught **** | Ultimate | 90 | None | 120 Seconds | Channel a powerful attack at your opponent starting at 33%-150% weapon damage, each channel adds 33% weapon damage to the max hit and takes 25% adrenaline. If you run out of adrenaline the ability will start damaging you for 25% of damage dealt as payment, adding 1000 base damage to this past 10 hits. |
 |
Ice Asylum ***** | Ultimate | 91 | None | 300 Seconds | Summons a crystal with a total healing capacity equal to three times the caster's maximum life points. It will heal anyone standing near it for 1-7% of their maximum life points every 3.6 seconds, based on their proximity to the crystal. The crystal disappears after 22.2 seconds or after reaching its healing capacity, whichever comes first. |
* Must have been purchased with fealty during The Bird and the Beast World Event or can be obtained as a drop from General Graardor and Kree'arra.
** Obtained during the Tuska World event or purchased from Wizard Chambers after earning Reward Currency from Anima Islands.
*** Requires completion of The World Wakes.
**** Obtained via a Mazcab ability codex.
***** Requires completion of The Digsite.
Now that you know the basics of combat, where do you train these? Please note that the monsters in these guides are just meant to help you out. If you do not agree with something in this guide, feel free to do it your own way. Also, these guides are meant for training, not making money from good drops.
An alternative option to training could be to do it through Slayer, as you will be assigned monsters that should be within your ability to kill.
| Map | Monster | Location | Information |
| Skill Level 1 - 20 | |||
 |
Can be found in fields around Crafting Guild, Lumbridge. |
|
|
| Skill Level 20 - 30 | |||
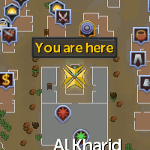 |
Al-Kharid Warriors | Al-Kharid Castle |
|
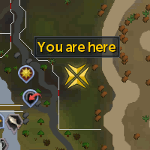
| Skill Level 30 - 40 | |||
 |
Wilderness section of the Edgeville Dungeon |
|
|
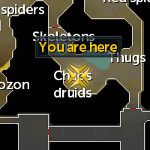
| Skill Level 40 - 60 | |||
 |
Rock Crab | Rellekka | |
| Skill Level 60 - 70 | |||
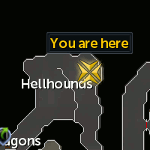 |
Hellhounds | Taverly dungeon | |
| Skill Level 70 - 80 | |||
 |
Bandits | Bandit Camp (Desert) | From level 70 attack onwards a lot more weapons open upto you, some of them have other requirements than just an attack level. Refer to the Weaponry table in the Attack section of this guide. |
| Skill Level 80+ | |||
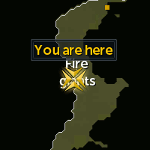 |
Fire giants | Baxtorian Falls, Brimhaven dungeon, Chaos Tunnels, Wilderness (Members), Kharidian desert dungeon. | From level 70 attack onwards a lot more weapons open upto you, some of them have other requirements than just an attack level. Refer to the Weaponry table in the Attack section of this guide. |
Free-to-Play training has a lot less options than Pay-to-Play, but this guide should help you get started, as well as give you the knowledge you need to find your own training locations.
| Map | Monster | Location | Information |
| Skill Level 1 - 20 | |||
|
Can be found in fields around Crafting Guild, Lumbridge. |
|
|
| Skill Level 20 - 30 | |||
|
Al-Kharid Warriors | Al-Kharid Castle |
|
| Skill Level 30 - 40 | |||
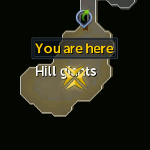 |
Hill giant | Edgeville Dungeon and the Wilderness |
|
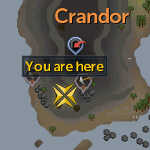
| Skill Level 40 - 50 | |||
 |
King scorpion | Crandor |
|
| Skill Level 50 - 70 | |||
 |
Moss giant | Crandor |
|
| Skill Level 70+ | |||
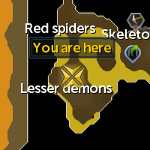 |
You can find both of these in the Musa Point Volcanoe Dungeon |
|
|
Temporary level boosts and Quest rewards
For more information on how to boost your level, see the Temporary Stat Leveling Techniques special report.
For XP rewards from quests, see the Quest Experience Guide special report.
Each combat skill has a Skillcape and a Master Skillcape that can be obtained at the appropriate levels. Below lists where you can obtain each of them.
Attack

Once you have achieved level 99, you may visit Ajjat to purchase an Attack cape for 99,000 Coins.
Once you have achieved level 120, Ajjat will sell you the Attack master cape for 120,000 Coins.
Constitution

Once you have achieved level 99, you may visit Surgeon General Tafani to purchase a Constitution cape for 99,000 Coins.
Once you have achieved level 120, Surgeon General Tafani will sell you the Constitution master cape for 120,000 Coins.
Defence

Once you have achieved level 99, you may visit Harlan to purchase a Defence cape for 99,000 Coins.
Once you have achieved level 120, Harlan will sell you the Defence master cape for 120,000 Coins.
Strength

Once you have achieved level 99, you may visit Sloane (or Yadech Strogarm after While Guthix Sleeps) to purchase a Strength cape for 99,000 Coins.
Once you have achieved level 120, Sloane (or Yadech Strogarm after While Guthix Sleeps) will sell you the Strength master cape for 120,000 Coins.
Discount
Note that as of December 2018, another one of Mod Daze's Easter Eggs have been found. This enables you to purchase a Skillcape for half price (only from the master, not Elen) if you are wearing a Ring of Charos (a). Be aware that "Half price" is 92,000 Coins as the experience at level 92 is approximately half way to level 99.
This Skill Guide was written by ChathMurrpau and Sirius XM. Thanks to Previous Guide writers: DownStrike, mpm13, and Ged, as well as Hampster_Hat, Fireball0236, Nuke-Marine, DRAVAN, DownStrike, Maesenko, baldrix_2, Plank, Sccerluk9, Alk12, TMan1790, sethyboy0, Chaosblade77, SKeTchiY, Yeldarb12, Darkblitz, Killmouski, chinese whiz, Skeletonmat, Kevinownz, Sheep01, Jakesterwars, Mizar234, Greg, thepieman9, Rokern, diamondi3ack, Ralkal, Scott, Javezz, Varunky, FireHazard772, Amoa123, Wacko938, Sumurai, kemosobby1, and AS Bob for corrections.
This Skill Guide was entered into the database on Sun, Jul 31, 2005, at 01:10:11 PM by Fireball0236, and it was last updated on Fri, Dec 14, 2018, at 05:23:08 PM by Chath.
If anything is incorrect or missing, or if you have any new information to submit to this database, please submit it to us on our Content Submissions Forums.
If you see this guide on any other site, please report it to us so we can take legal action against anyone found stealing our content. This guide is copyrighted by RuneHQ, and its use on other sites is expressly forbidden. Do not ask if you can use our guides or images, the answer is and always will be NO!
Print this page with images - Back to the Skill Guide Index Page - Back to Top
