

Hand in the Sand
King's Ransom
Legends' Quest
Dream Mentor
Recipe for Disaster
Summer's End
Swan Song
Defender of Varrock
Tears of Guthix
Zogre Flesh Eaters
Path of Glouphrie, The
55 Hunter
60 Thieving
40 Defence
65 Farming
65 Herblore
75 Magic
Be eligible for entry to the Warriors' Guild
Have defeated Bork in the Chaos Tunnels
270 Quest Points
Note: If you have completed the Death of Chivalry quest, you can use the Black Knight captain's armor instead of iron chainbody and bronze med helm.
Note: As you'll acquire plenty of items during the quest, it is suggested to always keep at least 7-10 slots free in your inventory.
-
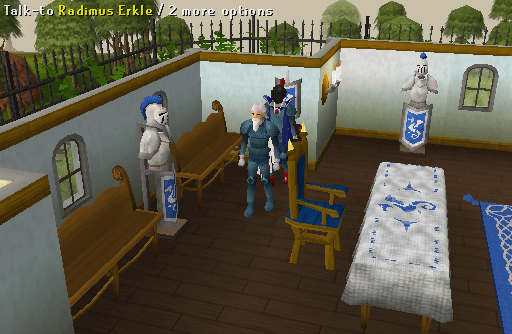
Talk to Radimus Erkle in the Legends' Guild. He will tell you of a new group of Guthix followers led by Ivy Sophista in Taverley who wishes to travel to Karamja. He will give you the password to talk to her. It is "Our friend in common places great faith in totems."
-
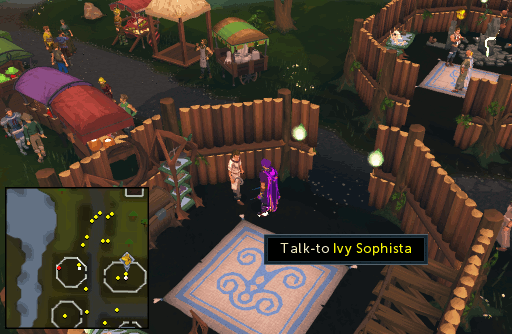
Meet Ivy in the house opposite the Summoning obelisk in Taverley. Tell her the password and she will tell you to meet Thaerisk Cemphier upstairs, also warning you to watch out for Lucien's spies.
-
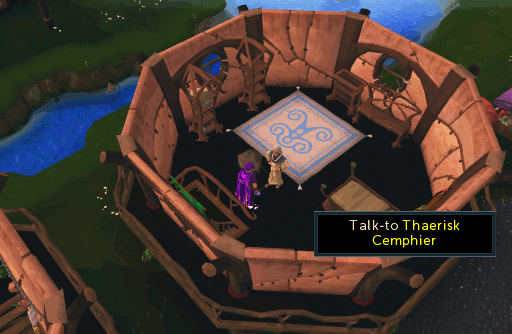
Go upstairs and talk to Thaerisk. He will tell you that the trip to Karamja is just a cover story and in reality he has founded a group named Crux Eqal. As he explains that Lucien has been gathering power and killing off his agents, you will be attacked by two Assassins (level 42). After killing the Assassins, talk to Thaerisk again and he will tell you about Lucien's growing power. You will need to ask him "What efforts are you making against Lucien?", "What are our options?", and "What do you need me to do?". He will then task you with finding out background information on Movario. Thaerisk will suggest talking to Reldo in the Varrock library.
-
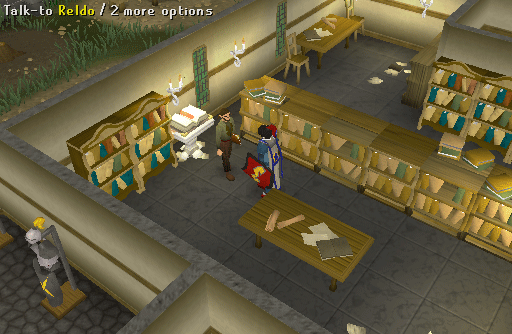
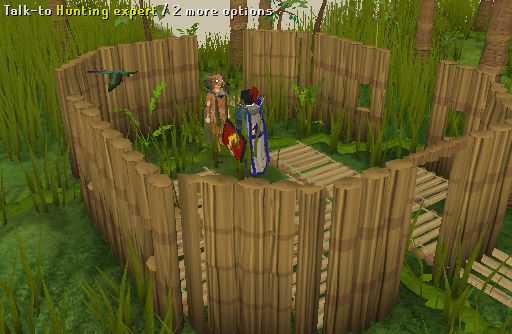
Go to the Varrock library and talk to Reldo in the palace. He will tell you that Movario has a Khazard accent, studies old texts, and is a master of making traps. He will advise you to speak with the Hunting expert in order to track Movario effectively.
-
You will now need your logs and Mort myre fungus so head to a bank and grab these, then head to the Hunting Expert found in the jungle south of Yanille. She is located in a small round hut halfway between Oo'glog and the Feldip Hills, the quickest way here is the Oo'glog lodestone then run north west. The expert will tell you to catch a wild broav, which requires a special pit trap west of the hut with Mort myre fungus as bait. (If you forgot to go to the bank, the Hunting Expert will provide you with the bait and there are plenty of trees around that you can cut for logs.)
-
Use your logs and fungus on the trap to set it. In a moment the broav will be caught. Take the Unconscious broav back to the Hunting Expert to have it trained to follow you.
-
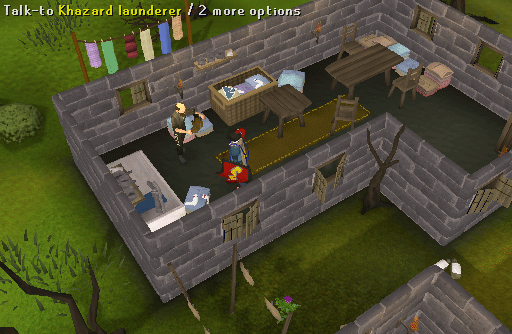
Now head to the Khazard launderer, who is located west of the Fight Arena and east of Tree Gnome Village. He will say that times are rough and that Movario is a client of his. You can either use 5000 coins on him or charm him while wearing a Ring of charos(a) to receive a shirt that Movario has worn.
-
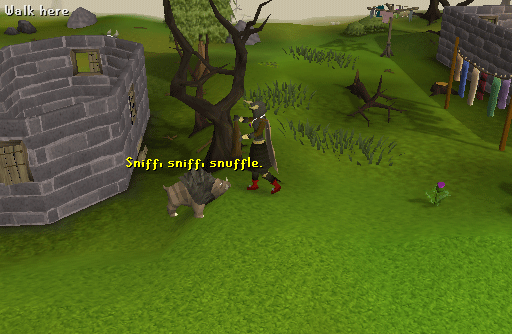
Drop the Broav and use the clothes on it. The Broav will begin to track Movario's scent and will lead you to the Khazard battlefield, more specifically to the tower in the middle of the Khazard warriors' encampment.
Note: When the broav loses the scent it will begin to turn in circles. Use the dirty laundry on him again to get him to head off in the right direction. If the broav gets stuck just move into a clear area nearby and whistle for him.
-
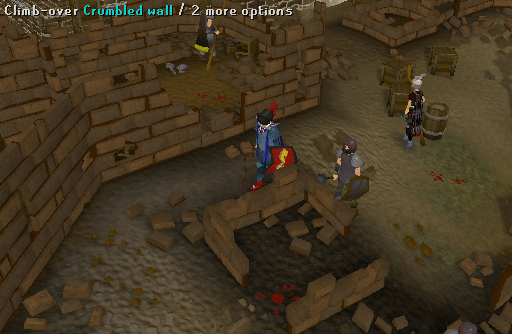
Climb over the crumbled wall of the tower and go into the central room.
-
Using the clothes on the Broav again will reveal a trapdoor under the broken table. Underground is a multi-combat base for level 77 Elite Khazard Guards, so before you enter the trapdoor go stock up on some food (These are non-aggressive, however being prepared is advisable), antipoison, a weapon and some armor, and earth, fire, water, air, and mind runes. Once you are ready, enter the trapdoor.

-
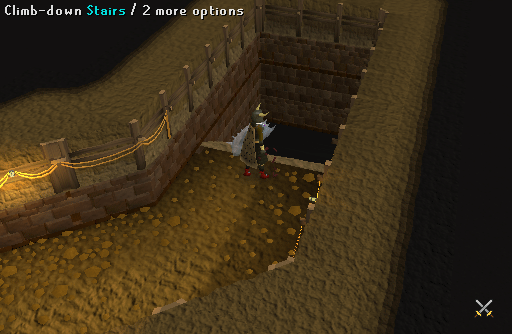
Head to the northern part of the underground base and climb down the stairs.
-
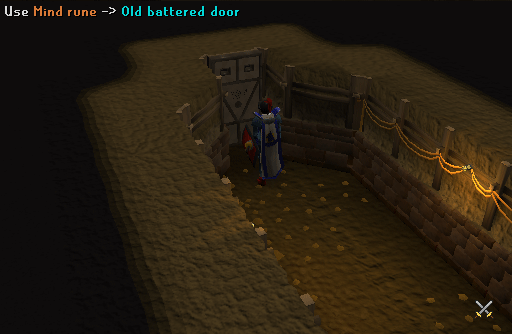
You will find yourself in a small corridor. Due to a magical energy in the corridor, you cannot teleport out at any time, so if you get into trouble, run up the stairs again before trying to teleport out. At the end, a door is locked by a strong magical lock. Use the 'Search Door' option to see a closeup of the door. Look carefully at the word "PROHIBITED" in the writing in the middle. One of the letters of this writing will actually be a symbol for one of the types of runes you are carrying. The symbols are as follows:
- D - Water
- E - Air or Fire
- H - Earth
- O - Mind
Note: If you use the wrong rune, the door will shoot a magical bolt at you which will hit for damage (the color of the attack shows which rune you should have used, but since you used the incorrect one, the type of rune needed for the door will have changed anyway on your next attempt). If you use the incorrect rune, or try to open the door without disarming the trap first, you will trigger a cloud of poisonous gas and three Elite Khazard Guards will descend the stairs to attack you. After putting in correct rune, then click search door again. it will give option to disarm trap choose that this will then allow for the door to be opened. Don't click open door.
-
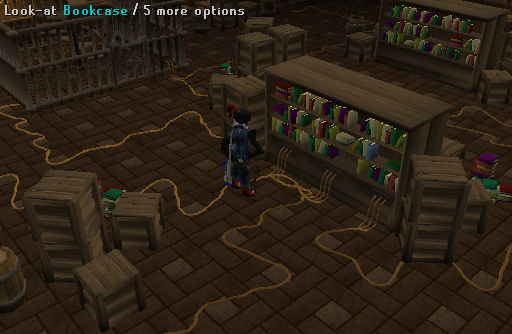
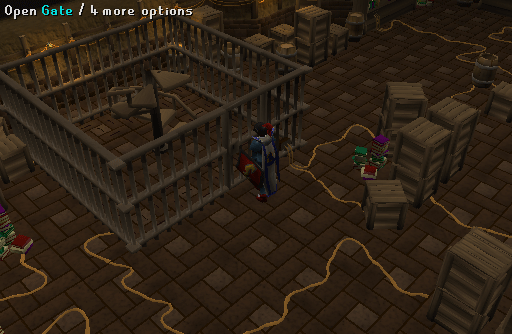
Go through the door into the library. Electricity will run between bookcases. The two in the center of the room are the main hubs of electricity and when searched activate the wires to a different bookcase. You can tell which bookcase will be activated by looking at the wires connecting them - if they appear to be vibrating slightly then they lead to the bookcase you need to search. Search an active bookcase, switch the electricity to another using the center bookcase, and repeat until all outside bookcases have been searched. The blue electricity on the gate will then disappear and you will be able to enter. Attempting to open the cage door without unlocking it correctly will result in being hit for damage, nearly 10% of your Life points.
-
After opening the gate, search the staircase and disable the trap before going up.
-
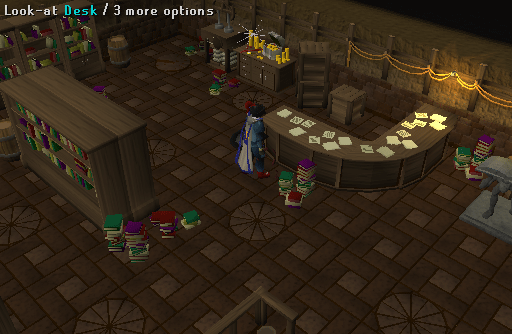
Do not attempt to grab the treasure, it is a fake. Instead, search the desk and you will acquire the first set of Movario's notes.
-
Pick up the waste-paper basket from the floor and then search it to get a Ruby key. Search the northern-most bookcase on the western wall, then use the Ruby key on it to find a secret staircase. Head upstairs.

-
Search the bed to find the bed chest. Search the bed chest and disarm the trap, then use the Ruby key to open it. Search the bed chest to find a Strange key loop, a Strange key teeth, and the second set of Movario's notes.

-
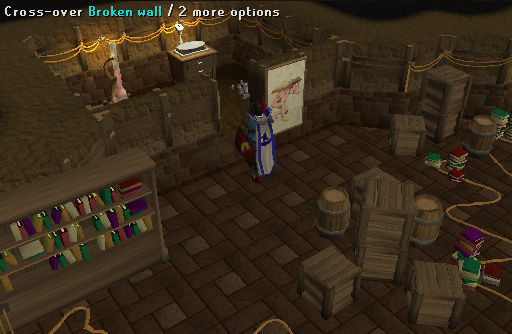
Once you have the notes and the key parts, you will need to escape via a door on the second floor. To unlock it requires solving a weight puzzle. Return to the first floor and search the painting to the east. Flip the catch and cross over the broken wall into the room.
-
Inside the room is a thermometer which will give you a specific number, this number is how much you weighed when you first entered the area. Take the number and calculate the difference between it and your current weight to determine the amount of weight you need to place onto the statue upstairs. Example: If the thermometer reads 57 "tickits" and you weigh 50kg, then you will need to take 7kg of weight and keep it in your inventory. If you now weigh more than you did when you entered then you will need to calculate how much excess weight you have, then pick up that amount in weights then head up to the second floor, and place the correct number on the statue. Example: If the thermometer reads 34"tickits" and you weight 39kg you will then need to take 5kg and put it on the statue up stairs. Make sure you have both sets of notes before you leave through the door.
-
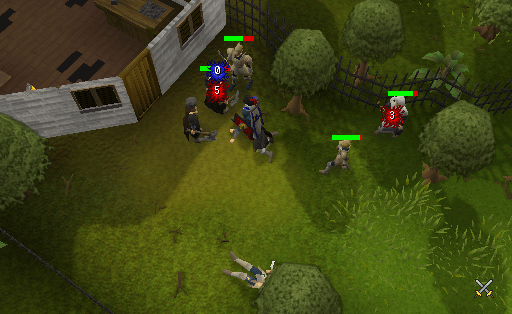
Take the notes back to Thaerisk in Taverley, and he will read them. He will then tell you that your next task is to contact the Guardians of Armadyl north of McGrubor's Wood. The camp is at the north side of McGrubor's wood. If you are able, use the Lodestone then travel west to the area. When you arrive you will find a battle underway. Kill the Mercenary mage (level 70) and two Mercenary axemen (level 91) assassins. The mage will teleport before you can finish him off. Speak to the wounded guardian and he will tell you to find Idria in the Forester's Arms, the pub in Seers' Village.
-
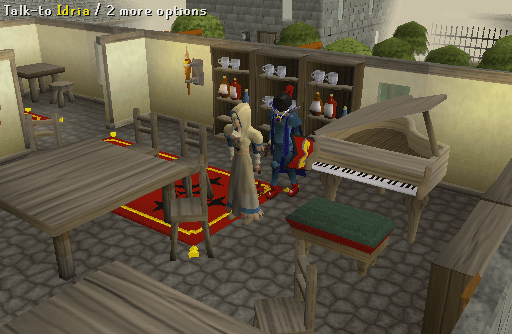
Head to the second floor of the pub to find Idria. She will make sure you are trustworthy before asking you to kidnap a spy of Lucien's. You will volunteer to talk to the Temple Knights about the situation.
-
Teleport to Falador and talk to Sir Tiffy Cashien in the park. He will tell you to find Akrisae in the White Knights' Castle, on the ground floor to the east. After talking to Akrisae, Thaerisk and Idria, you will be given a Teleorb. You will now need to plant the Teleorb on Lucien's spy.
-
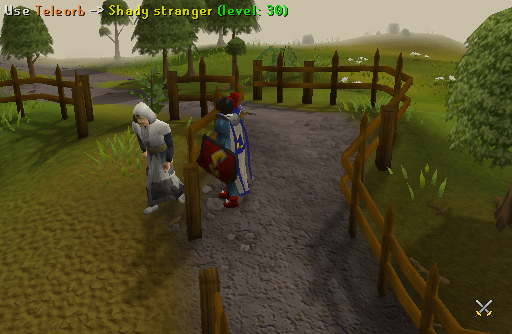
Talk to Akrisae, and he will teleport you to Draynor Village. Use the Teleorb on the Shady stranger in the white robes, then return to Falador. Talk to either Akrisae or Idria. Idria will then teleport Lucien's spy into the cell in the White Knights Castle. A druid will enter the cage with his bodyguard, but when the druid attempts to give the Spy 'a lovely juice', the spy will attack and the truth serum jar will drop and break. Speak to Thaerisk, and he will task you with making more truth serum. To make more you will need an Enriched snapdragon seed, which is made by taking a Snapdragon seed (he will sell you one for 25% off the current Grand Exchange price) to Betty in Port Sarim. You can teleport there using the Lodestone Network or the druids will offer to teleport you. Before going to see Betty you will need to go to a bank and get out a Lantern lens.
-
Betty will tell you that you need a Rose-tinted lens to enrich the seed with sunlight. Buy some Pink dye from her for 20 coins, then take a Lantern lens and use the dye on it to get the Rose-tinted lens. Give Betty your Snapdragon seed, and she will place it on the counter. She will also give you a jar of regular Truth serum.

-
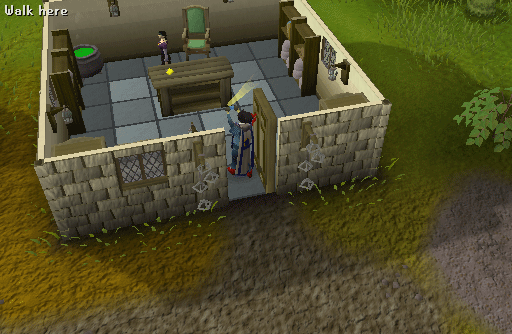
Stand in the doorway of her shop and open the door, then use the Rose-tinted lens on the table while still standing in the doorway. You will use the sunlight to enrich the seed. Search the counter and return to the White Knight Castle.
-
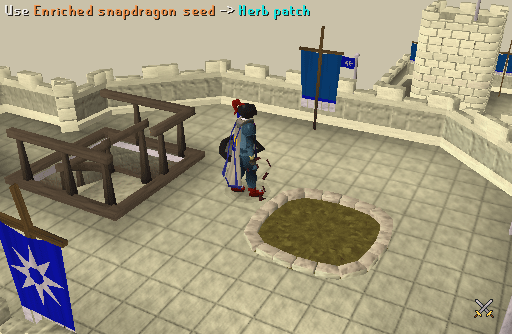
Talk to Thaerisk, and he will tell you to plant the seed on the top of the castle. Head to the west part of the castle and go up the winding staircases until you find the patch on the top floor. Plant the seed.
-
Head back to Idria, and you will be tasked to get a small team together to capture Lucien. Simply speak to the four people that are needed in order to enlist their help. You can either talk to them in person or by using the Contact NPC lunar magic spell (requires level 67 Magic). You will be required to use Lunar Magicks later anyway so you might as well switch spell books now. The four people you need to enlist are:
- Duradel - In Shilo Village on the second floor of the fishing shop
- Mazchna - North East of Canifis, by the lodestone.
- Hazelmere - On the second floor of his house on the peninsula East of Yanille
- Turael - just West of the Burthorpe lodestone
Note: You can contact all but Hazelmere via the Contact NPC lunar magic spell. Before you proceed with next stemp, visit a bank to withdraw the Charcoal and Papyrus as you will need them shortly.
-
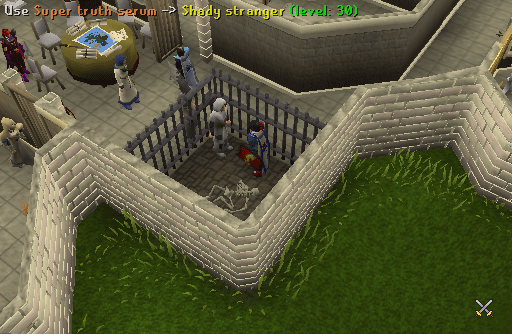
Once everyone has been enlisted, head back to the White Knight Castle and check on your Enriched snapdragon seed. It will have grown and you can now harvest it. Combine the Truth serum and the Enriched snapdragon to make a Super truth potion. Take this back to the Shady stranger and enter his cage. Use the serum on the Shady stranger and make him gulp it down. The spy will then describe a person known as Dark Squall. You will then make a Sketch of this person using the Charcoal and Papyrus in your inventory.
-
Give this sketch to Idria, and she will thank you. She will then ask you to recruit more members for your group. They are as follows:
- Sloane - Upstairs at the Warriors' Guild
- Ghommal - Outside the Warriors' Guild
- Harrallak Menarous - Just inside the main entrance to the Warriors' Guild
- Cyrisus - Can only be contacted using the NPC contact spell (Lunar spell book)
-
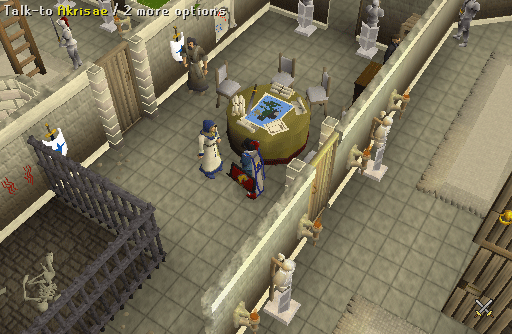
Return to the White Knight Castle and talk to Akrisae to receive your next assignment - to find the Dark Squall. He was last seen in the Black Knights' Fortress near the monastery. Make sure you have an Iron chainbody, Bronze med helm, runes for any charge orb spell, an Unpowered orb, food, armor, and attack methods before continuing. You will also need to convert back to the normal spell book.
Note: If you have completed the Death of Chivalry quest you can use the Black Knight captain's armor instead of the Iron chainbody and Bronze med helm.
-
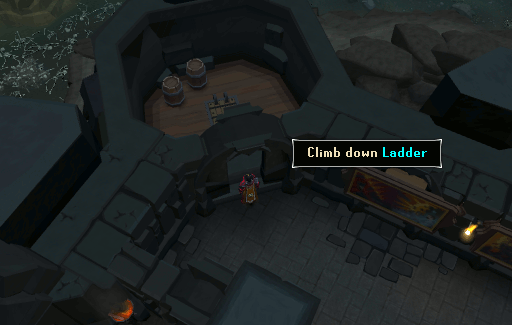
Head over to the Black Knights' Fortress, the easiest way to get there is taking the Edgeville lodestone then running up to the eastern side of Ice Mountain. Equip the Iron chainbody and Bronze med helm, then enter the fortress and climb down the ladder in the southwest corner.
-
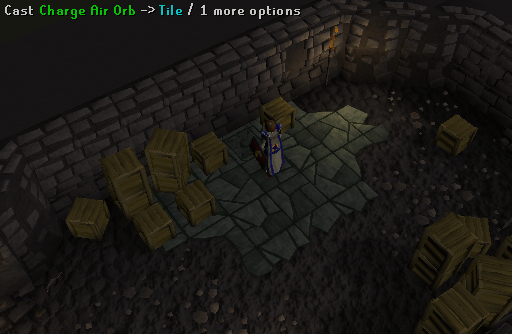
Once downstairs you will see a tile with an orb symbol on it. Search the tile first, then cast your charge orb spell on the tile with the Unpowered orb in your inventory to unlock the trapdoor.
-
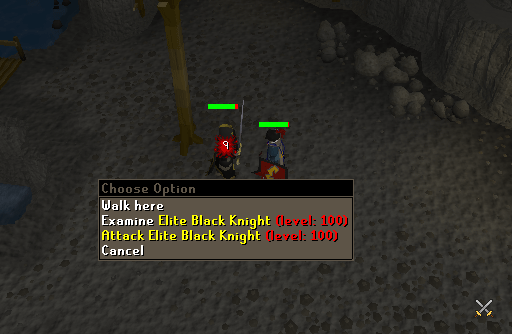
Climb down the trapdoor to enter the underground base of the Black Knights. There are many enemies down here from all sides of the combat triangle. Head down the stairs and run to the east until you reach the eastern bridge. There is a level 100 Elite Black Knight spawn here away from the other enemies. He will use prayer to avoid damage, but if you can switch between two different attack styles you can kill him quickly. You need to kill the knight 3 times to receive 3 pieces of elite black armor. If you do not switch attack styles, the Elite Black Knight will run out of prayer after about a minute or so.
-
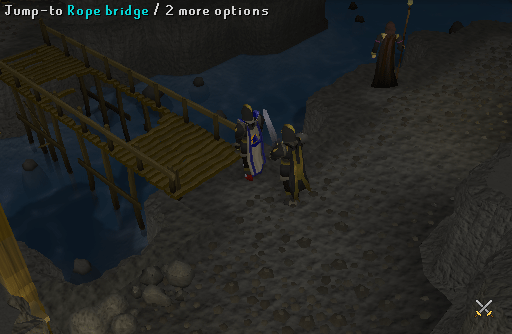
Once you have the armor, equip it and you will no longer be attacked. This will also allow access to the rest of the base. Head to the western bridge and jump across it.
-
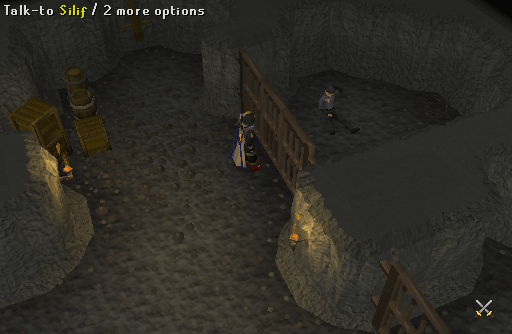
Follow the tunnels northeast and climb up the wall you encounter. Keep going through the tunnels until you reach a 4 way intersection with 3 doors and a tunnel that leads to the jail cells. Head towards to the cells where you will find Silif in one of the cells. He will tell you that he is hungry and needs a Restore potion to help him heal. Return to the intersection and go through the northern door.
-
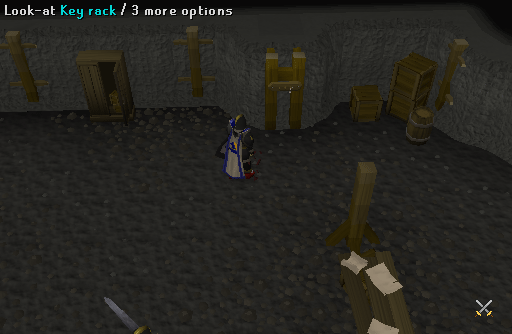
Once inside the room search the desks. You will get a Lobster, a Restore potion, and a Strange teleorb. There is also a wardrobe on each wall. Search them both to get another set of Elite black armor and a set of Dagon'Hai mage armor. (If you have another set of Dagon'Hai mage armor, drop it before searching). Make sure to also grab the key on the key rack just east of the wardrobe with the knight armor.
-
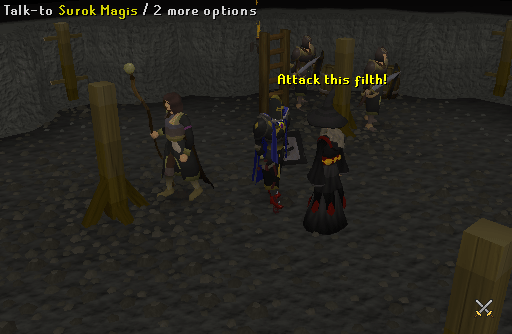
Go back to Silif in the cells and use the key on the door to enter. Give the food and the potion to Silif and he will recover. Give him the second set of elite black armor and let him follow you through the northern door. Once inside, walk over to the map on the southern wall and talk to Silif to have him study it. He will give you a Teleorb and will tell you to go plant it on Dark Squall. Move deeper east into the room to find Dark Squall nearby the ladder. When you plant the teleorb on him, he will discover you and transform into Surok. Do not fight the guards, instead teleport back to Falador.
Note: If you have a familiar, Silif will not follow you until you dismiss the familiar.
-
Head back to the White Knight Castle and talk to Akrisae. He will tell you to get into the cell so he can swap you with Surok. This way, you can infiltrate the base. Make sure that you are wearing the Dagon'hai clothes whilst having a Death rune, a Law rune, and the Strange teleorb in your inventory. Enter the nearby jail cell, Akrisae will teleport Surok to the cell and teleport you to where Surok was inside the caves.
Note: Before you enter the cell, bank all unnecessary and valuable items because there will be a brief encounter in the Wilderness wherein it is possible to lose all items.
-
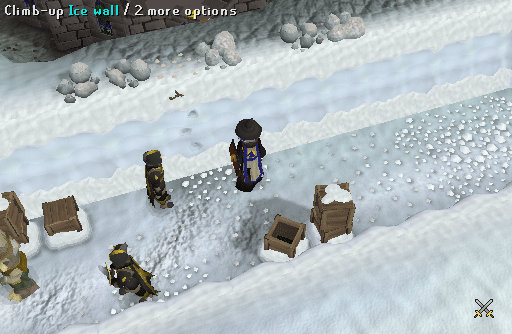
Head up the ladder to the east of the room you appear in and activate the Strange teleorb in the center of the stone circle while holding a Death rune and a Law rune in your inventory. You will appear in an ice area filled with knights and undead creatures. Head northeast and climb the ice wall. Jump to the ledge then walk to the balcony to trigger a tragic cut scene. After the knights attack you, jump back to the snow ledge and teleport to Falador. Go back to the White Knight Castle and talk to Idria. She will now tell you to pretend to be Surok and find out more about Movario. He was last seen in the Lumbridge swamp.
-
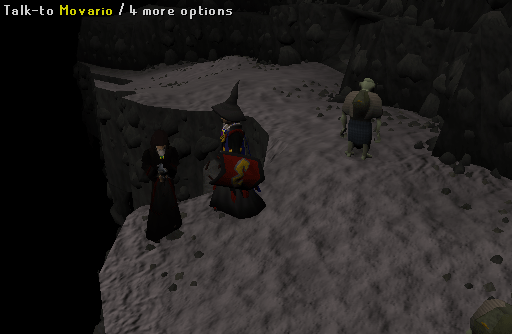
Wearing your Dagon'Hai robes and with a Sapphire lantern in your inventory, head to the Tears of Guthix minigame in the Lumbridge Swamp Dungeon. (Games necklace will also work as an alternate way of travel). When you arrive at the chasm near the minigame you will encounter Movario. Talk to him and convince him that you are Surok. He will use a special blue light spell to get a light creature to take you to the bottom. Use your lantern on a light creature to get it to fly over to you, then Movario will cast the spell.
-
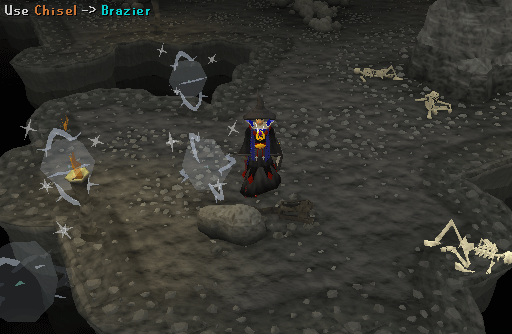
At the bottom of the chasm you will find several skeletons. Search them for a Chisel, Hammer, Spade, Silver sickle(b), and Druid pouches. Use the spade to lift the rocks that can be searched near the skeleton to find a overturned brazier. Use the chisel on this brazier to find a fire orb. There is another overturned brazier to the west which can be dug out, and by using a chisel, you can find an earth orb. The air and water orbs are in braziers still standing upright to the south.
-
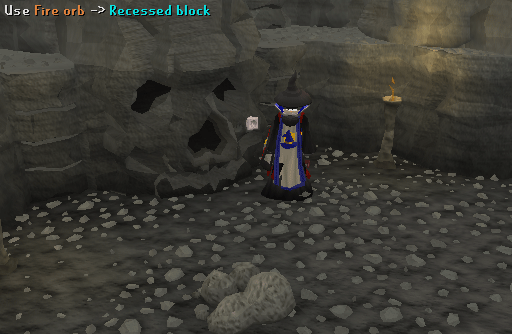
Take the orbs south to find 3 skulls carved into the rock face and a fourth skull above them. In each of the skulls is a small white recessed block. By examining them you can see which type of orb each skull needs. If you find an air symbol, put the air orb into recessed block to get the air key. Do this with the three symbols on the bottom and then climb up to do the top skull. Repeat the above procedure to obtain the water key. You will now have 4 elemental keys.
-
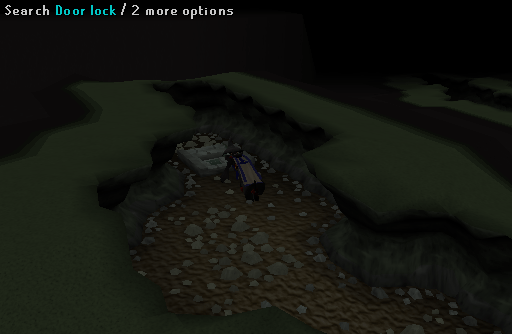
Remove any weapons or shield you have on and enter one of the bottom skulls. Climb through the passage until you reach the end. Examine the door lock to find which key needs to be entered into which lock. Use the correct key with the door lock, then crawl back out.
-
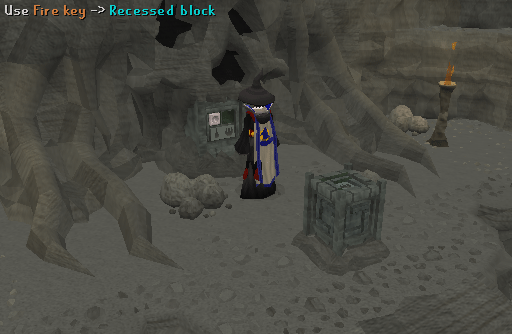
Repeat this with each of the bottom three skulls, then use the remaining fire key on the top skull to unlock the nearby square cube. Search the cube and then enter the top skull.
-
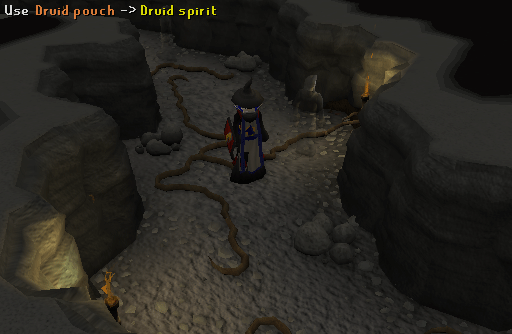
Follow the path along to find a Guthixian temple. Along each of the 8 paths are druid spirits that you will need to set free. Equip your sickle and cast bloom while standing over a vine to grow flowers to fill your druid pouch, then use the pouch on the spirits. They will reward you by dropping two ingredients that you will need to make various potions. Once you have the ingredients for a specific potion, combine them on the altar corresponding to their type of potion (examine each altar to find out what type of potion it needs). The type of potion for each altar is random for everyone. You can use either the ingredients for a normal potion or the super potion variant.
- Agility - Clean toadflax and Toad's legs
- Attack: - Clean guam and Eye of newt
- Balance - Clean harralander, Garlic, Silver dust, Red Spider's Eggs
- Combat - Clean harralander and Goat horn dust
- Defence - Clean cadantine and White berries
- Energy - Clean harralander and Chocolate dust, or Clean avantoe and Mort myre fungus
- Fishing - Clean avantoe and Snape grass
- Hunter - Clean avantoe and Kebbit teeth dust
- Magic - Clean lantadyme and Potato cactus
- Prayer - Clean ranarr and Snape grass
- Range - Clean dwarf weed and Wine of Zamorak
- Restoration - Clean snapdragon and Red spiders' eggs
- Strength - Clean tarromin and Limpwurt root, or Clean kwuarm and Limpwurt root
-
Everytime you use the correct ingredients use will receive a Dolmen. These can be used on the table in the main part of the temple to unlock one part of the door seal. Once all 8 have been done, the dolmens will rise up and unlock the door.
WARNING: Several extremely strong monsters that hit with all 3 sides of the combat triangle lie ahead. Two are level 119, and one is level 117. Bank any valuables you may have. It is advised to bring food and armor/weapons for melee and range attacks before proceeding.

-
Walk into the chamber to find the Stone of Jas sitting in the center of a room. As you search it you will be confronted by a level 117 Balance Elemental. The Balance Elemental can attack with all 3 sides of the combat triangle, and the attacks can hit with very little to no warning between attack changes. It is recommended to attack with melee and range if fighting him normally. It is fairly simple to predict what style of combat he going to use. When he takes out a fire bow, he will use range and you should have enough time to switch your prayer to protect range. If he throws anything at you, it is considered a magical attack and you should put on protect from magic. If he punches you, it is a melee attack and once again you should have enough time to protect from melee. However, there is a safe spot if you lure him over to the Stone of Jas, where you can range him without being attacked with melee.
Note: The Balance Elemental will drain some of your combat stats, thus you should bring Super restore potions. On another note you can also use Verac's and hit through the prayer, but it is recommended by others to use the range method as above.
-
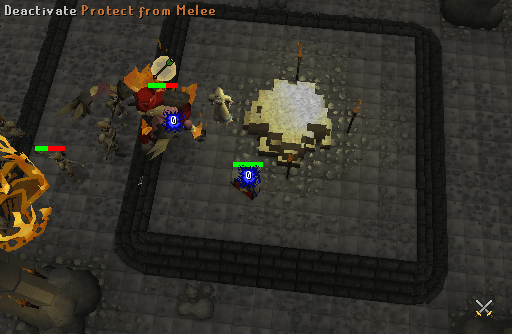
When the elemental is defeated, search the stone again to see a cutscene depicting the first time the stone was found by a human. You will then come to the revelation that the dragonkin are growing in power again. You will then be confronted by Movario and Darve who will tell you that they are claiming the find as their own. After going through all of the chat options in order, they will say that while you are far stronger than them, you have no chance to defeat Lucien. Lucien at this point will turn up and tell you how much he needs the stone. After going through all of the chat options, you decide that you have talked enough, and Lucien will summon two level 119 Tormented Demons to destroy you.
-
The Guardians of Armadyl will appear and help you defend yourself. Your combat stats, except for prayer, will have been boosted dramatically up to 255 by the Stone of Jas, so expect to hit very hard. The Tormented Demons can use prayer which you cannot hit through and does not run out so hit it with melee until it swaps to melee protect then change to your range attack to do more damage.
-
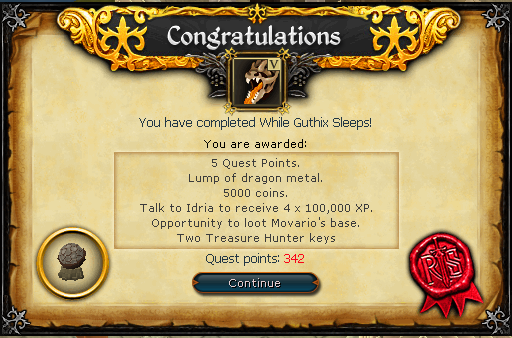
Once they are defeated, talk to Idria, and she will thank you and offer to teleport you to Falador to discuss what happened. Speak to Idria back at Falador, and she and Akrisae will thank you for all your efforts, giving you a very well earned and spectacular reward in the process. After you have gained your newfound experience, you will see a cut scene of what is to come in future quests.
Note: Temporarily, you will also receive a level 5 Summoning boost. However, you will not be able to infuse higher leveled pouches or summoning higher leveled familiars.
Congratulations! Quest complete!
Movario's Base:
To loot Movario's base, open the gate to Movario's base. If you fail to open the gate you will be thrown in jail. Teleport out of the jail and head back to the back. Once inside of the base, go up the spiral stair and enter the small rift to the South. You will find 4 pallets, contain 100 fire runes, 100 death runes, 100 coal (unnoted), and 100 magic logs (unnoted). This means that several trips are required in order to collect the loot. The pile of "loot" on first floor is a fake, and you cannot loot it. In order to leave the base safely, you must solve the weight puzzle again. To do so, work out what your weight will be when you are carrying the coal or magic logs you want to remove from the base. Once inside the base, subtract the weight you will be when carrying the coal or magic logs from the number on the thermometer. Place the appropriate weights on the statue to equal the weight calculated and exit the room. However, you can also leave the base by taking some damage without having to solve the puzzle.
Dragon Platebody:
If you obtain the other two dragon metal fragments, and have 92 Smithing (or a friend who is willing to assist you), you can make a Dragon platebody. First buy a Fusion hammer from the dwarves at the Blast Furnace for 1 million coins, then use the teeth and loop half of the strange key you received on a Mithril dragon to create a Dragonkin key. Enter the mithril door on the second floor of the cavern and cast a fire wave spell on each of the three dragon heads. This will light the forge, in the southwest corner of the first floor. You will now be free to assemble the Dragon platebody.
This Quest Guide was written by Greendonkey. Thanks to Clamball, diamondi3ack, Eragon7985, Sire TRM, Skeletonmat, Terr002, diana de witt, Hilwin1, Joe3750, Pinkytoes, Amoa, Darkpassion8, Kingcluth, BlueFox, Tinychris1, awp5379, Myxscape2, Eragon7985, 2Nikon, Im4eversmart, Sumurai8, Mergatroyd2, Ralkal, uknowme60, Bunny_Man, Jaapie23, Mongols1, jinks114, Xcm2, Graystar, This_Dying_Soul, busted29, lanka, Javezz, Ricklionhart, TheExplosiveFrog, LadyGrey1, Smexy Sarah, Wire Tap Out, Aty, Jarkur, XPro HunterX, and ChathMurrpau for corrections.
This Quest Guide was entered into the database on Fri, Nov 28, 2008, at 01:29:04 PM by Im4eversmart, and it was last updated on Sun, Mar 17, 2024, at 03:53:18 AM by KsbSingle.
If anything is incorrect or missing, or if you have any new information to submit to this database, please submit it to us on our Content Submissions Forums.
If you see this guide on any other site, please report it to us so we can take legal action against anyone found stealing our content. This guide is copyrighted by RuneHQ, and its use on other sites is expressly forbidden. Do not ask if you can use our guides or images, the answer is and always will be NO!
Print this page with images - Back to the Quest Guide Index Page - Back to Top
