

-
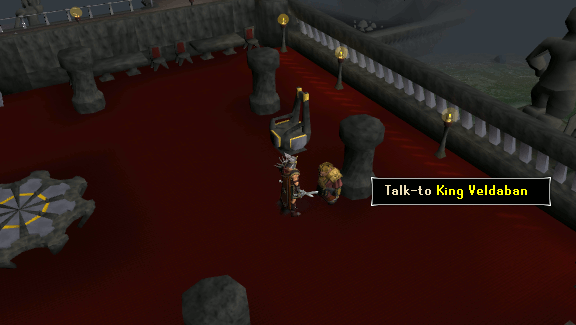
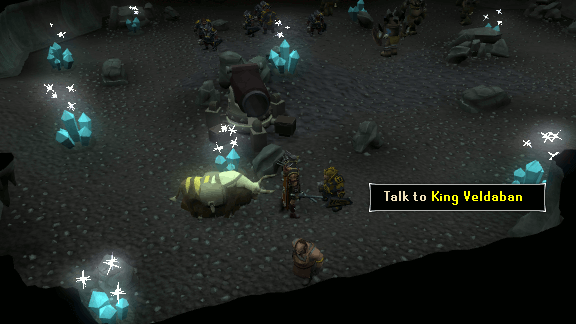
Speak to King Veldaban in the Keldagrim palace throne room and ask him, "So you're king - what now?" and he'll tell you about the problems he faces as King. Ask him what he's going to do and he'll tell you he needs to deal with the Red Axe before he can focus on anything else and ask you to help him launch an attack on their base. Agree and you'll start the quest. Veldaban will now tell you he has three things he needs you to do and give you a Royal dwarven seal:
- Investigate a group of imprisoned suspected spies.
- Kill chaos dwarves in taverley dungeon.
- Ask the Watchtower Wizard for help in protecting him against the Ogre shaman's memory-altering magic.
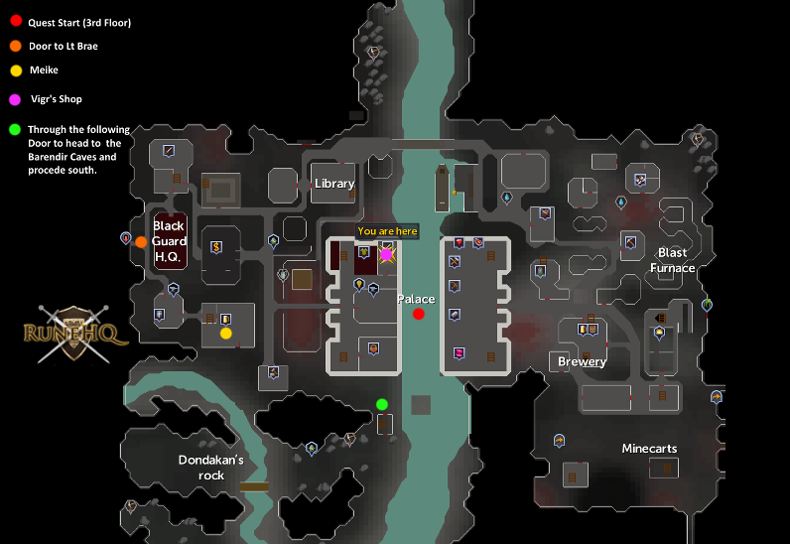
Shown below is the location of the following area's you'll need to visit within Keldagrim whilst on this quest.
-
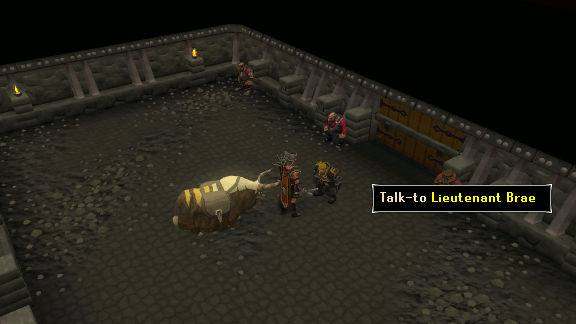
Make your way to the Records chamber on the west side of the city (marked by the dungeon symbol on the west wall) and talk to Lieutenant Brae. Tell her that Veldaban isn't coming and he sent you instead and you'll show her the Royal seal. She'll now tell you to investigate the suspects and make your judgements.
-
First concentrate on Brendt and Grundt. Go through their options, alternating between the two dwarves and choosing the new option as they share information. Eventually you'll find that they have contradicting stories about their trip to Jatizso and Lieutenant Brae will ask you to judge who is telling the truth. You'll be given three options for both dwarves. Choose whichever option you wish.
-
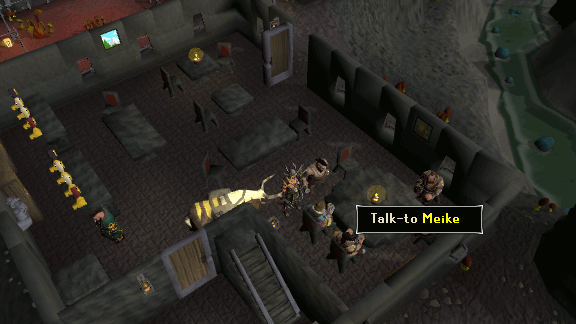
Now speak to Klass and choose "I think the Red axe told you to say this" and he'll tell you to speak to Meike in the King's Axe Inn. Leave the room and head to the Inn which is just southeast and talk to Meike at the table. Go through the options and she'll say that she doesn't think he'd ever work for the Red Axe. Return to Klass and tell him that Meike vouched for him and make your judgement.
-
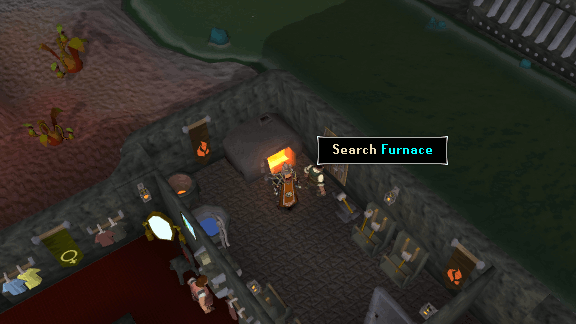
Now try to talk to Vigr and he'll demand that you find physical evidence of his treachery. Ask Lieutenant Brae about the suspects and she'll tell you that Vigr owns a warhammer shop in the palace marketplace. Head to the northeast corner of the west side of the palace and search the furnace in his shop to find a Bundle of letters. Read them to find that they're a communication between Vigr and the Red Axe spymaster. Return to Vigr and tell him you found the letters and choose your judgement.
-
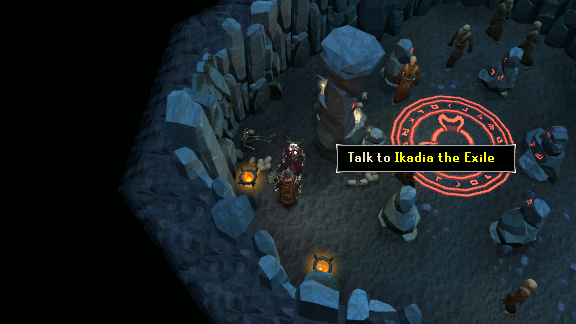
Next, head to Taverley dungeon and once inside, make your way to the Chaos dwarves and kill a couple of them until Ikadia the Exile appears and tells you to come and speak with her. Go to the northeast corner of the dungeon and speak to her. She'll now make you fight her before she will share any information. Once you've won the fight, she'll tell you about the origins of the Chaos dwarves.
-
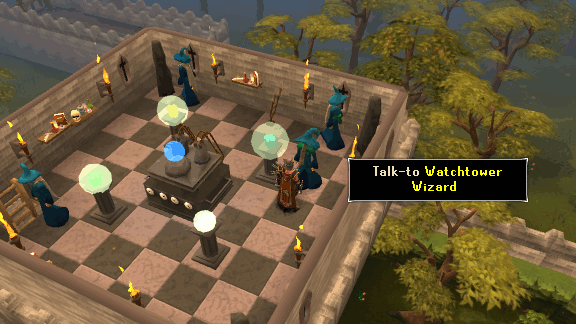
Now head to the top of the Watchtower outside Yanille and speak to the Watchtower Wizard. Tell him King Veldaban sent you and you'll inform him of the Ogre shaman and his powers. The wizard will now tell you he could make an anti-memory-magic wand, but you'll need to calibrate it first. He'll then ask if you think you have any erased memories and say that you do. You'll now enter your memory.
-
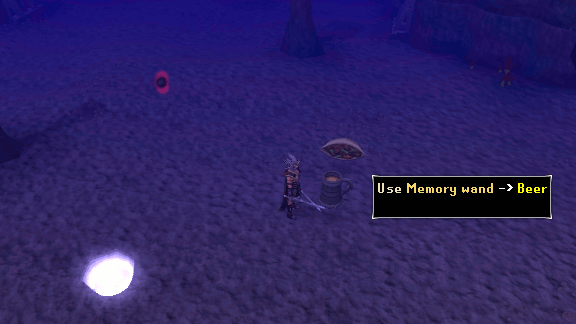
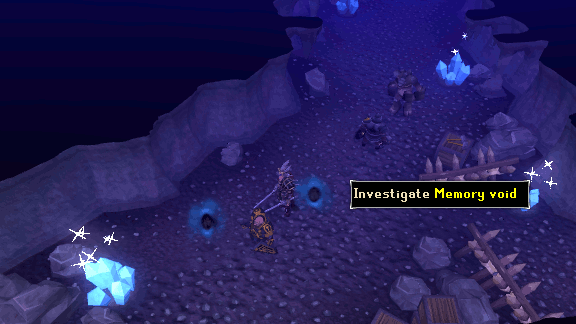
Use the Memory wand on the floating beers and kebabs nearby and they'll turn into a memory void and release four memory fragments that you must catch (Grimsson, Chaos dwarf, Gnome emissary, and Hreidmar). Investigate the voids and use the fragments on the following:
- What's a gnome doing here - Gnome fragment
- Walking stick, spiky hair, twirly moustache - Hreidmar fragment
- It's not natural for a dwarf to look like that - Chaos dwarf fragment
- I wonder where he got the scar - Grimsson fragment
-
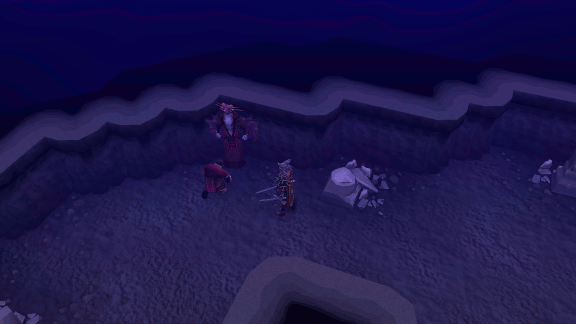
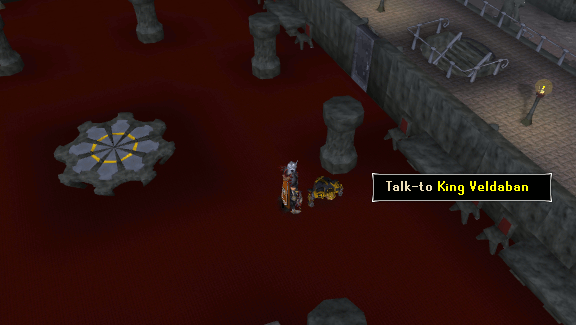
Return to King Veldaban and let him know how your tasks went and he'll tell you to meet him at the Barendir caves ready for the attack. Travel from the dock to the Keldagrim mines via the Dwarven boatman and head southeast until you find the tunnel entrance. Follow the tunnel north and enter the cave to find Veldaban and his army.
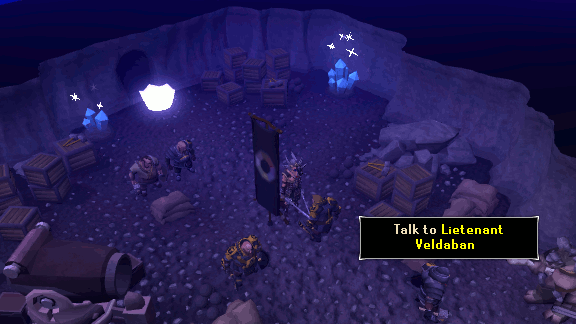
Speak to him and he'll inform you that they're about to break through the wall into the Red axe hideout. Talk to the Black Guard Quartermaster if you need anything from your bank (make sure to stock up on food).
Note: You are not permitted to use familiars from now on and if you die, your grave will appear in the tunnel before the cave.
-
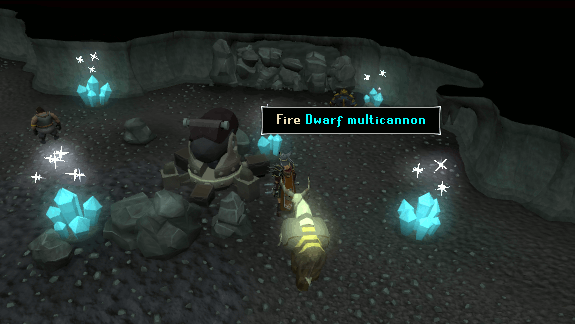
Now talk to Nulodion and he'll tell you that he expects the Red Axe to have cannon defences and will give you five explosive gears to sabotage their cannons. When you're ready, fire the cannon to destroy the wall and a cutscene will follow showing the dwarf soldiers being overwhelmed by the cannons.
-
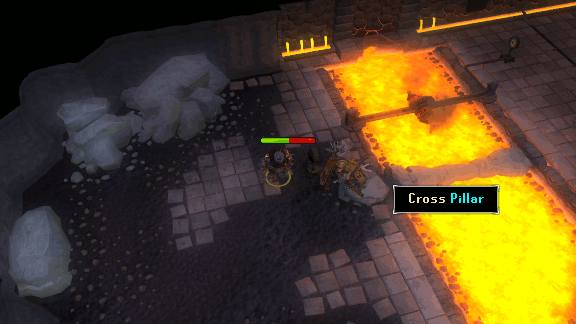
You must now make your way to the control tower while avoiding the cannon attacks (they are capable of hitting up to 3,000 rapidly if don't keep moving!) As soon as you can move, turn on Protect from/Deflect ranged and run northwest next to the the stone pillar at the edge of the lava. The cannonfire will destroy the pillar in two hits and it will collapse across the lava allowing you to cross.
Head east and sabotage the cannons along the way. When you reach the other end, stand behind the pillar there and wait for it to collapse, then cross it. Now run west, sabotaging the remaining cannons until you reach the control tower and Colonel Grimsson will flee.
Pull the lever to raise the bridges and use the mine cart to move deeper into the base. A cutscene will follow showing Grimsson informing Hreidmar of what's happened and Hreidmar telling an ogre shaman named Grunsh to alter the King's memories.
-
After the conversation, they will notice you've been watching and Grunsh will fire his memory-altering spell at you, but luckily your Memory wand will protect you. However, you will now find yourself in the memories of the others and you must fix them. Use the wand on the Zamorakian chaplain, Chaos dwarf and Red Axe standard to turn them into memory voids and catch the Conscript, Standard and Chaplain fragments that are released, then investigate the voids. Use the fragments like so:
- He doesn't want to be here - Conscript
- Eight coloured segments on a flag - Standard
- Guthix won't help us now - Chaplain
-
Next, you'll find yourself next to Colonel Grimsson who is fighting two trolls. Use the Memory wand on Small troll and Dwarf Bone to turn them into voids and catch the Dwarf and Troll fragments that escape and use the Troll on the 'Broken rocks' void and Dwarf on the 'He doesn't want to be here' void.
-
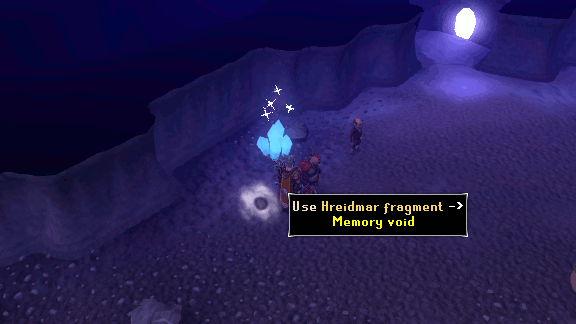
You'll now witness a meeting between Hriedmar and Zamorak in which Hreidmar informs Zamorak that his ancestor was the secret son of the first King and that makes him the rightful present King. After, use the Memory wand on Zamorak to turn him into a void and catch the Statue fragments. Use them on the void to find that Hreidmar was really talking to a statue.
-
Next you'll have to deal with Grunsh's memories. Use the Memory wand on the three dwarves and they'll turn into voids. Grunsh will fire spells at the escaped fragments that turns them into Dangerous fragments. The aim here is to catch them all before he can hit them with his spell. If you catch a Dangerous fragment, you'll reset the voids and have to catch all of the fragments again. However, don't worry if he does manage to change some into dangerous as they'll switch back to normal after a short time, allowing you to catch them before Grunsh can change them again.
When you've managed to catch them all, use them on the voids (they're the same descriptions and combinations as when you first used the wand) and a scene will play which reveals the shaman was kidnapped from Gu'tanoth and had his memories replaced to make him believe Hreidmar rescued him. Choose to kill the ogre or let him go and enter the doorway to the east.
-
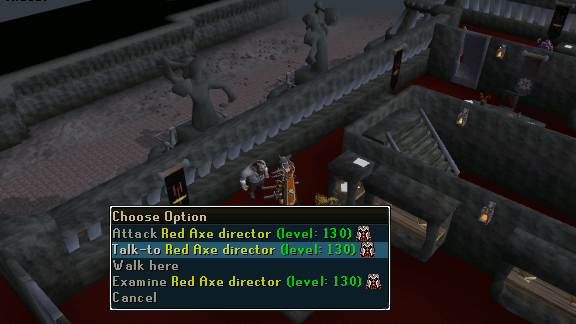
You'll now be at a copy of Keldagrim's palace. Head into the palace and go upstairs into the consortium and attempt to open the door to the throne room stairs to find it is locked and guarded. Talk to the Red Axe director in the room next door and tell him your friend wishes to join and the director will tell you he will make him a member if he's the only director left. Kill all of the other directors spread throughout the floor (7 in total) and return to the one left alive and he'll make Veldaban a member of the Red Axe. You can now climb the stairs to the throne room.
-
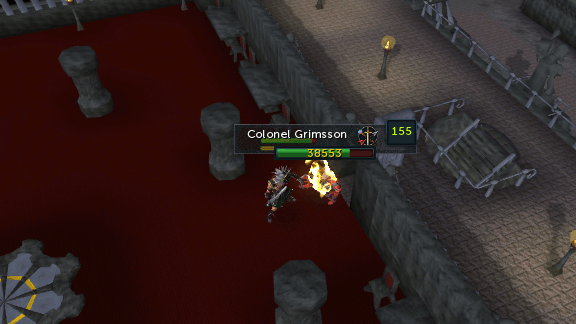
Confront Hreidmar and ask him what his plan is and he'll reveal that he has given up on trying to take the crown and instead made his own version of Keldagrim and populated it with Chaos dwarves who will be loyal to him. Colonel Grimsson and Veldaban will fight each other. Help Veldaban kill him (watch out for when his adrenaline bar is full as he will use Provoke and deal high damage if you don't move out of the way) and a cutscene will follow in which Hreidmar uses a Dragon battlestaff to turn himself, Grimsson's body and Veldaban into Chaos dwarves. Hriedmar and Grimsson will then attack you.
-
The easiest way to start this fight is by running through the building towards the end. Open the back door, and hide around the corner to lure Grimsson out of the building. Close the door behind him. Once done, you can kill Grimsson without having to worry about Hreidmar. Make sure to run when he uses his ultimate as it can kill you in a matter of seconds if you stand still.
Grimsson: Grimsson attacks with melee and with ranged. When his adrenaline bar is at 50 he does a special ability (a type of chaos explosion in himself?).When his adrenaline bar reaches 100 he changes his stance to a shoulder barrage stance. If the player misses that, a provoke symbol appears over his head while he does his special move. As listed, the player should run until Grimsson stops moving. The easiest way is by clicking far away on the minimap and changing the destination on the minimap before your character reaches it.
When Grimsson is dead, open the door and attack Hreidmar.
Hreidmar: Hreidmar seems to only attack with magic). When his adrenaline bar reaches 50 he spawns two minions. This can be one of the following:
- A melee chaos dwarf with 5k hp and a cannoneer with 10k hp
- Two cannoneers with 10k hp
- A red flashing melee chaos dwarf and a cannoneer. This flashing chaos dwarf will explode after 10-ish seconds dealing 2-3k damage in an area around him.
When his adrenaline bar reaches 100%, he charges up a special attack that heals 12k on him (and an unknown amount on minions). This can be interrupted with a treshold or ultimate ability that is cast -after- the message appears. Hreidmar can also switch with one of his minions.
Strategy: Fight Hreidmar relatively close to this stairway. When Hreidmar summons his minions, go down the stairway. You can use regenerate (quick-access via heart on the action bar) to recover some health down there if you so wish. When you go up the stares, the 2 spawned minions will be aggressive, but Hreidmar isn't. Use this to your advantage by killing both minions. A previously flashing melee dwarf will have turned into a normal melee dwarf by doing this too. Use this to your advantage to kill off both minions. Killing any melee dwarf will be relatively easy using magic. Killing the cannonneer (ranged) is somewhat more difficult. Using Sunshine (ultimate) in a 2 square radius of the cannonneer greatly helps with dealing with him though. When both minions are dead, continue with attacking Hreidmar until he uses his ultimate. Killing his minions negates any swapping Hreidmar wants to do and prevents a lot of cumulative damage that happens when too many minions stack up. Use asphyxiate (which stuns the enemy) to cancel Hreidmar's ultimate and continue attacking him until he spawns his minions. This will make the fight manageable, even if the player's dps isn't very high. I only needed to use half or so of my food - and if I would have used regenerate more efficiently, I even might be able to use even less food.
Note: If you manage to kill one of the two bosses in this fight die or leave the area, the boss you killed will not respawn when you return to the area.
Tip: Ice Blitz/Barrage works well for this fight as the freezing effect will greatly reduce the amount of damage Grimsson and Hreidmar can deal. Alternatively, a Royal/Chaotic crossbow is also capable of killing them both fairly quickly as long as you can keep up with healing.
-
Talk to King Veldaben and then a final cutscene will follow in which the directors of the consortium offer to take over power from Veldaban. You can either encourage him to let them or tell him to refuse.
Congratulations! Quest Complete!
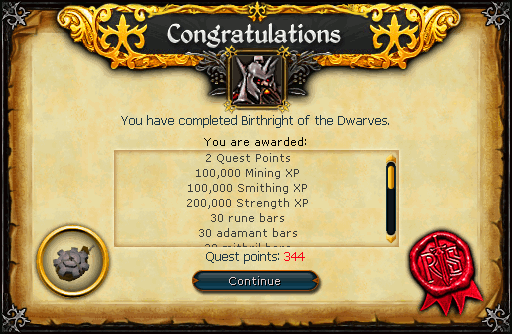
Additional Reward:
After you have completed the quest, you can enter tunnel north of Keldagrim library and mine the rubble at the end to receive up to 250,000 extra Mining experience in chunks of 20k and 33k. The requirements to mine the rubble are between 83 and 95 Mining. Once you've mined them all, you will also receive a book entitled Azdaran document.
This Quest Guide was written by Javezz. Thanks to Mr Tudjay, Lanka, Jarkur, Toeby, Tastysoul693, and Rooskii for corrections.
This Quest Guide was entered into the database on Wed, Oct 02, 2013, at 08:07:55 PM by Javezz, and it was last updated on Wed, Dec 20, 2017, at 05:51:51 AM by DRAVAN.
If anything is incorrect or missing, or if you have any new information to submit to this database, please submit it to us on our Content Submissions Forums.
If you see this guide on any other site, please report it to us so we can take legal action against anyone found stealing our content. This guide is copyrighted by RuneHQ, and its use on other sites is expressly forbidden. Do not ask if you can use our guides or images, the answer is and always will be NO!
Print this page with images - Back to the Quest Guide Index Page - Back to Top
