

Description:
Players are able to enter the tunnels by climbing down any one of five different rifts and players should have caution because of player killers, especially at the rift closest to Bork. The Chaos Tunnels are very dangerous and players should be well-prepared before venturing into the dungeon. The tunnels are a wonderful spot for training Summoning with monsters dropping a large amount of charms.
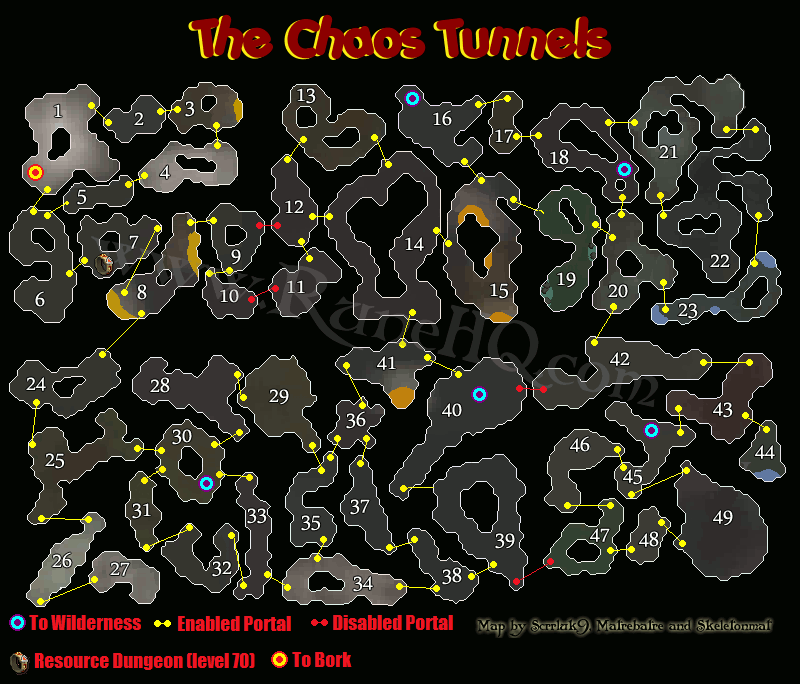
The tunnels are made up of a vast number of tunnels, each containing at least one type of monster. You can go to the various chambers by using portals that are in each room. Usually a portal goes to the next chamber. However, the portals are "stained with dark magic" by Surok Magis and do not always work correctly.
Dwarf multicannons cannot be used inside the tunnels. Trying to access the area with cannon parts in your inventory results into chatbox message "The cannon is too heavy to take it down there - you'll have to leave it behind."
Players with level 70 Dungeoneering can enter the Chaos Tunnels resource dungeon from the Black demon cave in the Chaos Tunnels.
Gear and Equipment:
- The best Dragonhide armour available in order to protect against magic attacks by Zamorak Mages and Infernal Mages.
- Prayer armour as higher level players will rarely be hurt by the weak monsters that occupy each room.
- Antipoison for the Poison Spiders you may encounter while passing their chamber or if they get misdirected there.
- Anti- dragon or Dragonfire shield to protect yourself from the Green and Bronze dragons.
- A Face mask, Masked earmuffs, or Slayer helmet is always required to slay Dust devils, because they drain all stats RAPIDLY. Dust devils are not aggressive so these items are not required if only passing through their chamber.
- Teleport spells, items, or lodestones.
Monsters:
| Room | Monster | Level |
| 1 | Dagannoth | 78, 79 |
| 2 | Nechryael | 96 |
| 3 | Fire elemental | 44 |
| Bronze dragon | 86 | |
| 4 | Waterfiend | 107 |
| 5 | Turoth | 64, 66, 68, 69 |
| 6 | Earth warrior | 78 |
| Bronze dragon | 86 | |
| 7 | Black demon | 138 |
| 8 | Dust devil | 85 |
| 9 | Infernal mage | 72 |
| Zamorak warrior | 61, 65 | |
| 10 | Giant crypt rat | 77 |
| 11 | Fire giant | 85 |
| 12 | Giant rock crab | 95 |
| 13 | Ice giant | 51 |
| 14 | Zamorak ranger | 64 |
| Zamorak mage | 68 | |
| Zamorak warrior | 61, 65 | |
| 15 | Fire giant | 85 |
| 16 | Moss giant | 51, 61 |
| 17 | Deadly red spider | 95 |
| 18 | Cave bug | 12 |
| 19 | Poison spider | 63 |
| Jelly | 68 | |
| Giant crypt spider | 84 | |
| 20 | Shadow hound | 67 |
| Big wolf | 43 | |
| 21 | Animated spade | 72 |
| Green dragon | 63 | |
| Baby black dragon | 70 | |
| 22 | Shadow hound | 67 |
| Dire wolf | 46 | |
| 23 | Shadow hound | 67 |
| Big wolf | 43 | |
| 24 | Monk of Zamorak | 54 |
| 25 | Mummy | 77 |
| 26 | Ice troll | 89 |
| 27 | Ice troll | 89 |
| 28 | Zombie | 56 |
| Skeleton | 77 | |
| 29 | Moss giant | 51, 61 |
| 30 | Gargoyle | 93 |
| 31 | Mummy | 77 |
| 32 | Animated spade | 72 |
| Possessed pickaxe | 56 | |
| 33 | Zombie | 56 |
| Skeleton | 77 | |
| 34 | Ice giant | 51 |
| Ice warrior | 54 | |
| 35 | Zamorak mage | 68 |
| Zamorak warrior | 61, 65 | |
| Dagon'hai Monk | 77 | |
| 36 | Zamorak warrior | 61, 65 |
| 37 | Zamorak mage | 68 |
| 38 | Infernal mage | 72 |
| 39 | Zamorak mage | 68 |
| Zamorak warrior | 61, 65 | |
| 40 | Giant rock crab | 95 |
| 41 | Fire giant | 85 |
| 42 | Giant crypt rat | 77 |
| 43 | Giant ant worker | 49 |
| Giant ant soldier | 70 | |
| 44 | Giant ant worker | 49 |
| Giant ant soldier | 70 | |
| 45 | Shadow spider | 46 |
| Crypt spider | 63 | |
| 46 | Shadow spider | 46 |
| Poison spider | 63 | |
| 47 | Poison spider | 63 |
| Jelly | 68 | |
| 48 | Bloodworm | 63 |
| Leech | 58 | |
| 49 | Green dragon | 63 |
| Baby black dragon | 70 |
This Map was written by Sccrluk9, Matrebatre, and Skeletonmat. Thanks to Jakesterwars, DarkBlitz, Fireball0236, Realruth, Maonzhi, Alfawarlord, Coolnorm8300, DRAVAN, thehi, Javezz, Jarkur, and Regalone for corrections.
This Map was entered into the database on Wed, Jul 30, 2008, at 12:10:04 PM by Alfawarlord, and it was last updated on Wed, Apr 27, 2016, at 01:04:01 AM by Dark.
If anything is incorrect or missing, or if you have any new information to submit to this database, please submit it to us on our Content Submissions Forums.
If you see this guide on any other site, please report it to us so we can take legal action against anyone found stealing our content. This guide is copyrighted by RuneHQ, and its use on other sites is expressly forbidden. Do not ask if you can use our guides or images, the answer is and always will be NO!
Print this page with images - Back to the Map Index Page - Back to Top
