Table of Contents
The Tutorial
If you have yet to visit the island of Anachronia, you will need to start by taking the Stormbringer to the island and going through the cutscene/tutorial-esque sequence. Once you have done this, you will arrive at the ruins of what might have been an ancient town, and will decide to make a base of operations.
Talk to Giles to begin the base camp tutorial. He will decide that it will be the location of the base camp, as it is "strong, defendable, and gives us some high ground". He will ask you to help him out. They will need several buildings to have everything necessary for survival and discovery, and (apparently) Giles is the man with the plan.
Accept his request to establish the base camp and he will begin going over what buildings will be needed.
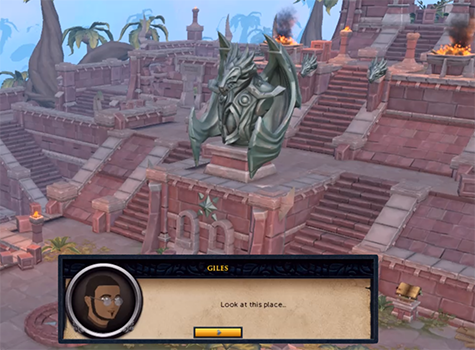
The base will need a Town Hall, which will be placed in the temple atop the ruins. From there, the base camp needs to expanded outward, using only the materials the island can provide. The resources of the region are Wood, Vines, Leaves, Stone, Hides, and Clay. These resources are gathered by a number of workers that King Roald provided to the exploration party, who will begin their standard gathering cycle after the tutorial.
For now, your next objective is to assign at least one worker to gather Wood, Vines, and Stone, the building materials needed to make the Town Hall. Once Giles has given you this objective, the Base Camp Management interface will open. However, like banks, metal banks, and trading, it is guarded by your PIN if you have one.
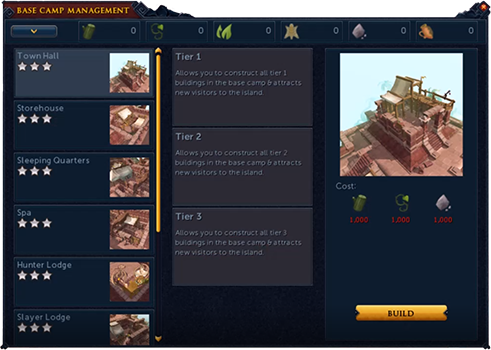
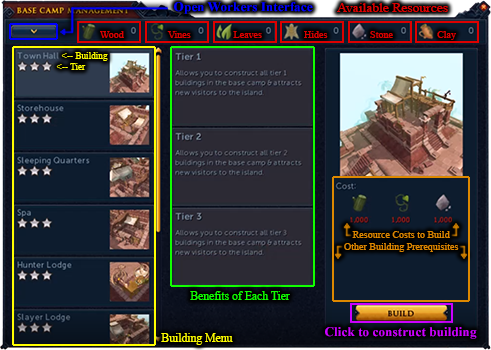
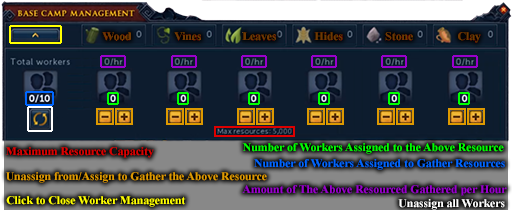
At this point, the flashing icons are going to light your way the way all cringy tutorials do. While this guide itself will walk you through the ins and outs of the interface, a set of diagrams for quick reference will be placed at the bottom of the guide.
The downward arrow in the upper left of the interface is your first stop. By clicking it, you expand the worker management section. Using this section of the interface allows you to assign your workers to gather the 6 resources of the island in whatever amounts you please. Until you upgrade the Sleeping Quarters, you will only have a total of 10 workers. The number of workers who are active is noted on the left side of the worker management section. If the number is 10/10, all ten workers you have are actively gathering resources. If you have 8/15 listed, then you have a total of 15 workers, but only 8 of them are gathering resources, and the other 7 are idle (hopefully enjoying some paid time off, but who knows).

Assign workers to resources by clicking the + symbol below the resources you want them to gather. The tutorial will have you assign at least one worker to wood, vines, and stone before moving on. Until there are enough resources, you are unable to build anything. In the span of an hour they will collect 60 units of their respective resource, but every 10 minutes the workers will deliver resources back to the base camp, during which time they will have collected 6 units. Note that workers continue to gather resources even when you are logged out or not on the island!
At this point, you can close the interface. Doing so will continue your conversation with Giles, who will tell you that you have to wait for enough resources, but he can tell you a story to pass the time. The game will fade to black and then fade back in, sparing you what is likely a boring story.

Continuing the dialogue, you will ask if the workers have returned, and Giles will say that they have brought everything you need to build the town hall. At the end of the dialogue, your Base Management Interface will open again.
Most buildings for the base camp have three tiers. The building is selected in the left column and the stars colored yellow indicate what tier of that building you have built. The specifics of the benefits for each tier are laid out in the middle column. Lastly, an image, list of requirements, and build button are in the right column.
With the town hall selected in the left column, hit the build button on the bottom right of the interface. Those who get dizzy easily should look away at this time for 15 seconds, as the game will zoom out into a cutscene where the camera circles around the fully constructed town hall.
After this cutscene ends, dialogue with Giles will open up again, and following it will eventually lead to you opening some compacted resources, adding 250 wood and 250 stone to the base camp's resources. Finally, Giles will tell you to go to your calling and adventure around the island, letting you know that he will be in the town hall should you need him.

Congratulations! Tutorial Complete!
Quick Reference
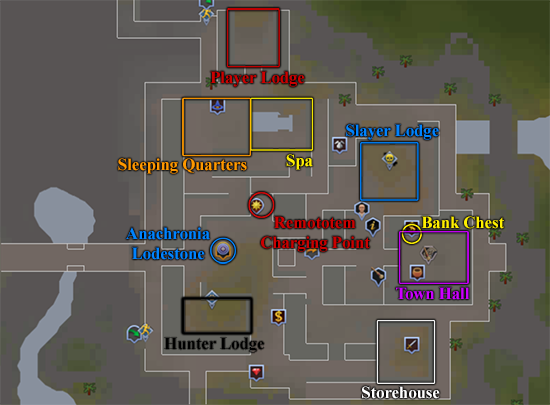
Efficient Progress
Now that the tutorial is out of the way, the benefits of the buildings in the base camp are yours to acquire. The fastest way to obtain every building involves you focusing on constructing tiers of sleeping quarters, storehouses, and town halls.
Having the sleeping quarters upgraded is the whole point of this building order, as it provides you with more workers, and as a result, faster resources. However, it requires both the storehouse and town hall of the same tier, and even if it didn't, the storehouse would be necessary in order to build most tier 2 and tier 3 buildings because your resource cap would otherwise prevent you from having enough to build them.
If you manage your workers infrequently, you should assign them to Wood, Vines, Leaves, Hides, and Stone. Clay is not used in the construction of these three buildings, and as such can be ignored. If you manage your workers often, always have them assigned to the resources needed for the building next on your list. With some minor options depending on your involvement with island, the fastest building method for the base camp is detailed below.
| Order | Building | Resources | ||||
 Wood Wood |
 Vines Vines |
 Leaves Leaves |
 Hides Hides |
 Stone Stone |
||
| 1 | Tier 1 Town Hall* | 1,000* | 1,000* | None | None | 1,000* |
| 2 | Tier 1 Storehouse** | None | 3,000 | None | 3,000 | 3,000 |
| 3 | Tier 1 Sleeping Quarters | 10,000 | None | 10,000 | None | 10,000 |
| 4 | Tier 2 Town Hall | 20,000 | 20,000 | None | None | 20,000 |
| 5 | Tier 2 Storehouse | None | 22,000 | None | 22,000 | 22,000 |
| 6 | Tier 2 Sleeping Quarters | 65,000 | None | 65,000 | None | 65,000 |
| 7 | Tier 3 Town Hall | 70,000 | 70,000 | None | None | 70,000 |
| 8 | Tier 3 Storehouse | None | 75,000 | None | 75,000 | 75,000 |
| 9 | Tier 3 Sleeping Quarters | 130,000 | None | 130,000 | None | 130,000 |
| Total Resources (Ignoring Tutorial) | 295,000 | 190,000 | 205,000 | 100,000 | 395,000 | |
*The Tier 1 Town Hall and the resources to build it are provided to players during the tutorial
**If you have any intention of spending time on Anachronia other than to keep track of your base camp's resources, building the lodestone and bank chest before the storehouse is a good idea
After these buildings are completed, there's only 1 building worth considering to speed up the development process- the Tier 1 Player Lodge. The odds of finding compacted resources on the island are fairly slim, and this building will increase the chances of finding them.
However, the odds are still pretty small even with this building, so choosing to build it before you finish the Tier 3 Sleeping Quarters is counter-productive. If you are spending lots of time on the island and are hoping to speed up your base camp's construction, choosing to build the Player Lodge next is a good course of action.
Outside this decision, the buildings remaining to be built and upgraded have no impact on the speed at which the base camp is constructed.
Compacted Resources
While doing other things around the island, it is possible to obtain compacted resources. Each type of compacted resource corresponds directly to one of the resources used in building the base camp and can be obtained from different methods based on which resource it is. The amount of the resource you gain by sending them back to your camp is based on your Town Hall's tier: 100 at tier 1, 200 at tier 2, and 400 at tier 3. The below table lists the possible ways to obtain each type of compacted resource.
| Resource | How to Obtain |
 Compacted wood Compacted wood |
Woodcutting at Overgrown Idols on Anachronia |
 Compacted vines Compacted vines |
Running through the Agility Course on Anachronia |
 Compacted leaves Compacted leaves |
Woodcutting at Overgrown Idols or running through the Agility Course on Anachronia |
 Compacted hides Compacted hides |
Taking part in Big Game Hunter encounters (most common), Hunting butterflies (less common), or killing Slayer monsters on the island (least common) |
 Compacted stone Compacted stone |
Mining at any of the Anachronia locations |
 Compacted clay Compacted clay |
Mining at any of the Anachronia locations |
Base Camp Building Details
| Town Hall | |||
| Tier | Prerequisites | Resources | Benefits |
| 1 | Reach the appropriate part of the tutorial | 1,000  Wood Wood1,000  Vines Vines1,000  Stone Stone |
|
| 2 |
|
20,000  Wood Wood20,000  Vines Vines20,000  Stone Stone |
|
| 3 |
|
70,000  Wood Wood70,000  Vines Vines70,000  Stone Stone |
|
| Storehouse | |||
| Tier | Prerequisites | Resources | Benefits |
| 1 | Tier 1 Town Hall |
3,000  Vines Vines3,000  Hides Hides3,000  Stone Stone |
Increases your resource cap from 5,000 to 25,000 |
| 2 | Tier 2 Town Hall |
22,000  Vines Vines22,000  Hides Hides22,000  Stone Stone |
Increases your resource cap from 25,000 to 80,000 |
| 3 | Tier 3 Town Hall |
75,000  Vines Vines75,000  Hides Hides75,000  Stone Stone |
Increases your resource cap from 80,000 to 150,000 |
| Sleeping Quarters | |||
| Tier | Prerequisites | Resources | Benefits |
| 1 |
|
10,000  Wood Wood10,000  Leaves Leaves10,000  Hides Hides |
Increases your number of workers from 10 to 15 |
| 2 |
|
65,000  Wood Wood65,000  Leaves Leaves65,000  Hides Hides |
Increases your number of workers from 15 to 30 |
| 3 |
|
130,000  Wood Wood130,000  Leaves Leaves130,000  Hides Hides |
Increases your number of workers from 30 to 60 |
| Spa | |||
| Tier | Prerequisites | Resources | Benefits |
| 1 |
|
7,500  Wood Wood7,500  Leaves Leaves7,500  Clay Clay |
|
| 2 |
|
60,000  Wood Wood60,000  Leaves Leaves60,000  Clay Clay |
Increases Agility experience gained on the island by 7% |
| 3 |
|
120,000  Wood Wood120,000  Leaves Leaves120,000  Clay ClayEssential oils |
|
| Hunter Lodge | |||
| Tier | Prerequisites | Resources | Benefits |
| 1 |
|
7,500  Wood Wood7,500  Leaves Leaves7,500  Hides Hides |
10% chance of gathering an additional resource from Woodcutting in Big Game Hunter encounters |
| 2 |
|
60,000  Wood Wood60,000  Leaves Leaves60,000  Hides Hides |
Big Game Hunter creatures take an additional 2.4 seconds to catch you |
| 3 |
|
120,000  Wood Wood120,000  Leaves Leaves120,000  Hides HidesReinforced dinosaur pelt |
One type of frog is removed at the start of each Big Game Hunter encounter |
| Slayer Lodge | |||
| Tier | Prerequisites | Resources | Benefits |
| 1 |
|
7,500  Vines Vines7,500  Stone Stone7,500  Clay Clay |
+1% damage boost while on the island |
| 2 |
|
60,000  Vines Vines60,000  Stone Stone60,000  Clay Clay |
+3% damage boost while on the island |
| 3 |
|
120,000  Vines Vines120,000  Stone Stone120,000  Clay ClayDinosaur tooth |
|
| Player Lodge | |||
| Tier | Prerequisites | Resources | Benefits |
| 1 |
|
12,000  Vines Vines12,000  Hides Hides12,000  Clay Clay |
Increased chance of finding building resources on the island |
| 2 |
|
75,000  Vines Vines75,000  Hides Hides75,000  Clay Clay |
|
| 3 |
|
150,000  Vines Vines150,000  Hides Hides150,000  Clay ClayDinosaur rib bone |
A stand for a skillcape, which provides the passive benefits of the skillcape placed upon it, regardless of where in Gielinor you are |
| Other Base Camp Projects | |||
| Project | Prerequisites | Resources | Benefits |
| Bank Chest | Tier 1 Town Hall | 500  Wood Wood500  Stone Stone |
It's a Bank Chest. Resupply locally! |
| Anachronia Lodestone | Tier 1 Town Hall | 150  Stone Stone150  Clay Clay |
You will be able to use your Home Teleport spell to teleport to the island |
| Remototem Charging Point |
|
Remototem 150,000  Wood Wood150,000  Vines Vines150,000  Stone Stone |
Allows you to charge all of your Anachronia totems at once from the base camp |
There are also 2 structures that players can build that are built outside the base camp (and a number of dinosaur pens at the Ranch Out of Time, see that guide for details). While the structures can be built in multiple locations, building them once will build them in every location. The structures are detailed below. The first is a bait box that can be used to store all of your bait for Big Game Hunter. While the locations for Big Game Hunter are outside the base camp, there is a box to the south of the lower town hall stairs.
| Bait Box | |||
| Tier | Prerequisites | Resources | Benefits |
| 1 | Tier 1 Town Hall | 500  Wood Wood500  Hides Hides |
Unlocks access to a bait box that has a capacity of 5 of each type of bait for Big Game Hunter |
| 2 | Tier 1 Town Hall | 5,000  Wood Wood5,000  Hides Hides |
Increases the storage capacity of your bait box to 15 of each type of bait for Big Game Hunter |
| 3 |
|
100,000  Wood Wood100,000  Hides Hides |
Increases the storage capacity of your bait box to 50 of each type of bait for Big Game Hunter |
| Bank Deposit Box | |||
| Prerequisites | Resources | Benefits | Locations |
|
30,000  Wood Wood30,000  Stone Stone |
Save yourself long treks to and from the bank! | 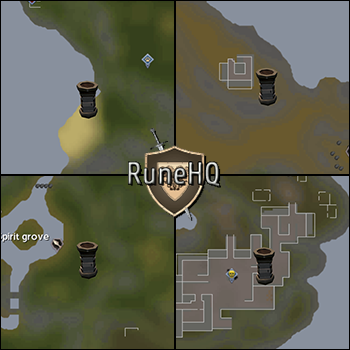 |
*While the bank deposit boxes don't require more than the tier 1 town hall, a player cannot build it without a tier 2 storehouse in order to have enough resources to build it.
This Special Report was written by 3ter 1. Thanks to Hope, Fuzzyjoe162, and ChathMurrpau for corrections.
This Special Report was entered into the database on Sun, Jul 28, 2019, at 04:40:23 PM by Chath, and it was last updated on Mon, Mar 29, 2021, at 06:20:28 PM by 3ter1.
If anything is incorrect or missing, or if you have any new information to submit to this database, please submit it to us on our Content Submissions Forums.
If you see this guide on any other site, please report it to us so we can take legal action against anyone found stealing our content. This guide is copyrighted by RuneHQ, and its use on other sites is expressly forbidden. Do not ask if you can use our guides or images, the answer is and always will be NO!
Print this page with images - Back to the Special Report Index Page - Back to Top
