

Table of Contents
In order to begin safecracking, head to the Thieves' Guild in Lumbridge. In the North East corner of the main room, you will find the Safe-cracking trainer. Talk to him and he will give some basic information as well as the tools needed to begin safecracking. These tools are a Stethoscope and a Small loot bag. Note that neither of these tools are actually needed, but without them, cracking a safe is much slower and you will gain no loot when you break in. For the higher level safes, you are able to use skill boosting items to steal from them.
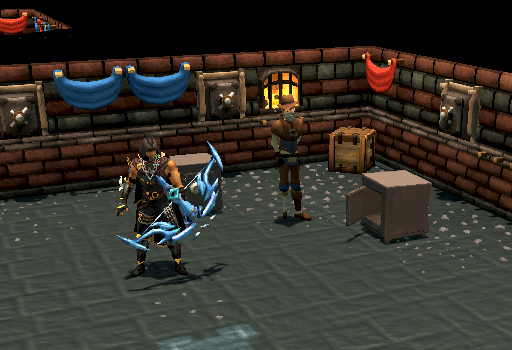
This training method involves attempting to open the safe by turning the dial (performed automatically) and bypassing a set of dial locks. The higher level safes have more locks and, therefore, take longer to open. A small amount of experience is given throughout the cracking process, with a larger amount given when you complete one of the dial locks, and an even larger amount when you break open the safe.
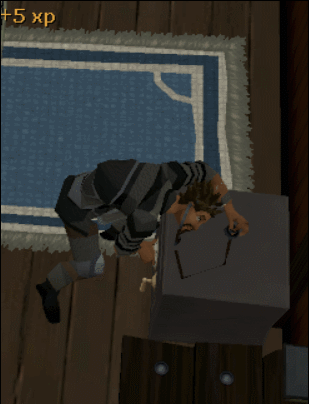
In order to quickly open a safe at the fastest possible speed, players should watch the safe that they are opening and wait for it to flash blue as seen in the gif below - note that it will also make a distinctive noise if you have your sound effects on. When it does this, click the safe again and it will instantly complete a lock. Once the safe is open, an amount of loot is placed in the players loot bag and you can also randomly be awarded a special item that gives extra rewards when redeemed. Most safes take 5 minutes of in-game time to reset and allow you to crack them again, however, the safes unlocked at level 90+ take approximately 10 minutes to reset instead.
Once you have filled your loot bag or simply wish to turn in your items, return to the Thieves' Guild and talk to Chief Thief Robin. He will fence the items collected in your loot bag then reward you with experience, coins, and Pilfer points - a separate reward currency purely gained from safecracking. Any special items can be turned in to Darren Lightfinger for either 10 Pilfer points or 37,500 coins each. See the rewards section to learn what these special items are.
Around Gielinor, there are 5 different major areas where Safecracking can be done. Each area has a minimum Thieving level required to crack the safes - some locations, or specific safes, require a little something extra. The Sections below will detail any requirements, experience gained, and the locations of the safes. Unlocking all of the safes will complete the "The world is a safe place" achievement.
Note that if you have issues locating a safe, you can use your minimap to look for the Thieving mask icon. Be aware that it will only be seen if you are on the correct floor.
![]()
Areas where you can safecrack include:
- Misthalin - Varrock, Lumbridge, and Draynor Village + Manor
- Kharidian Desert - Al Kharid, Nardah, Pollnivneach, and Menaphos
- Asgarnia - Port Sarim, Falador, Burthorpe, and Wilderness
- Kandarin - Yanille, East Ardougne, and Camelot
- Other - Zemouregal's fort, Zanaris, and Rogues' Castle
- 62 Thieving
- 3 dial locks per safe
- 405 experience for the first 2 dial locks opened and 1,600 experience for fully opening the safe
- Safes will reset after about 5 minutes
- Opening all 11 safes will complete the "Pilferin' in Misthalin" achievement
-
Recommended items:
-
Teleport runes or tablets to Varrock's market square (the Grand Exchange destination is slightly further).
If you need/want to set the market square as teleport destination, talk to either: Rat Burgiss, Reldo, or Vannaka. - Teleport runes or tablets to Lumbridge
- Amulet of glory (4) for getting to Edgeville
- Wicked hood for getting to the Wizards' Tower
-
Teleport runes or tablets to Varrock's market square (the Grand Exchange destination is slightly further).
| Location | How to get there | Notes | Image |
| General Store - Edgeville | Edgeville lodestone or Amulet of glory to Edgeville. | Second floor, in the South East corner of the room. | 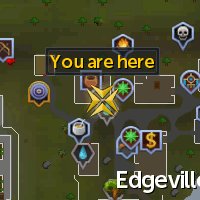 |
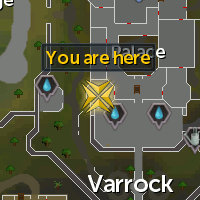
| Varrock Palace | Varrock teleport to the market square. Alternative: Varrock teleport to the Grand Exhchange or the Varrock lodestone. |
You will need at least 65 Thieving for these safes. Third floor, in the Treasury. Climb the main stairs when you enter the palace, then the ladder in the room to the East, exit this room and walk West to the Treasury vault. Use a Lockpick or Hair clip to open the door. Inside you will find 3 safes along the South and West walls. |
 |
| Wise Old Man's House - Draynor Village | Amulet of glory to Draynor Village. | At the top of the stairs just to the East of the entrance. | 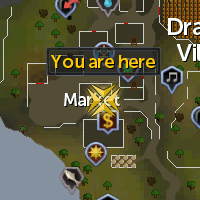 |
| Draynor Manor | From the location above: run North following the path, until you reach Draynor Manor. Directly: Draynor Village lodestone and run North. |
Ground floor, in the room to the West of the entrance. Inside you will find 2 safes along the East wall. | 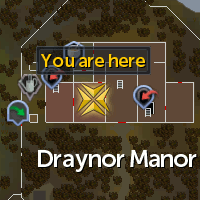 |
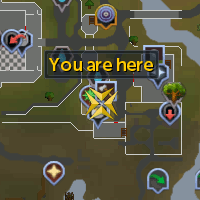
| Wizards' Tower | Wicked hood teleport (and descend one floor). | Third floor, in the North East and South West rooms. This floor is quickly identified by the statues surrounding the beam. |
 |
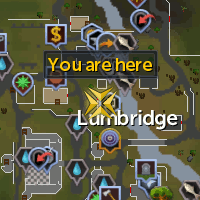
| Bob's House - Lumbridge | Lumbridge teleport or lodestone. | Second floor, along the East wall. You will likely find a Woman up here, but she doesn't seem to mind you stealing from him. |
 |
| Roddeck's House - Lumbridge | From the location above: run North to the house directly South of the furnace. Directly: Lumbridge teleport or lodestone. |
Second floor, just inside the South room. There is a Woman on this floor, but she doesn't pay you any notice. |
 |
Map of the area
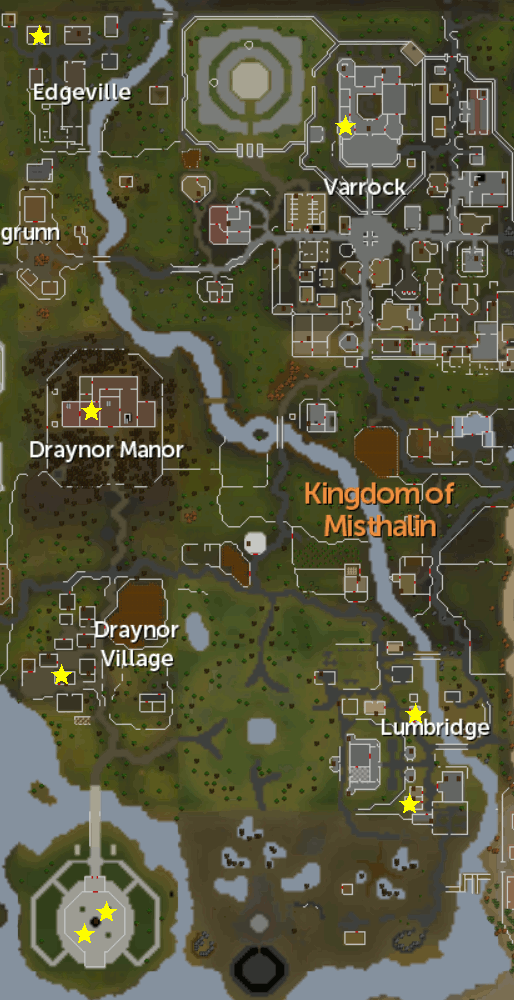
Click the above image to enlarge!
- 69 Thieving
- 4 dial locks per safe
- 580 experience for the first 3 dial locks opened and 2,875 experience for fully opening the safe
- Safes will reset after about 5 minutes
- Opening all 10 safes will complete the "Pilferin' in Kharidian Desert" achievement
-
Recommended items:
- Desert amulet 2 (or above) to get to Nardah
- Ring of slaying (8), Pollnivneach tablet, or Teleport to house runes/tablets (if your house is in Pollnivneach) to get to Pollnivneach
- Merchant district teleport
- Imperial district teleport (or Fairy Ring code C-K-Q in combination with a Ring of slaying (8) or Amulet of glory to access the rings quickly)
-
Port district teleport (or either a Menaphos tablet or Teleport to house tablet/teleport if your house is in Menaphos' Port District).
Note: having atleast one of the Menaphos district teleports is recommended for the quickest possible round trip. An alternative is to use an Amulet of Glory (4) and Magic carpets to get to Nardah, Pollnivneach, and Menaphos, relatively quickly also. Within Menaphos you can then use Shifting tombs to reach the other districts (requires completion of The Jack of Spades), this is not much slower than directly teleporting there with the appropriate district teleports.
| Location | How to get there | Notes | Image |
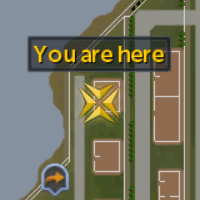
| Lodestone - Al Kharid | Al Kharid lodestone. | Ground floor, along the Southern wall in the room directly North of the lodestone. |  |
| Zeke's Superior Scimitars - Al Kharid | From the location above: run to the house directly to the West. Directly: Al Kharid lodestone. |
Second floor, in the North East corner of the room. Zeke's shop is West of the Lodestone. You will need to climb the stairs on the West side of the building to access the second floor. There is also a Body rune on the floor you can pick up. |
 |
| Ali the Mayor's House - Pollnivneach | Ring of slaying to Desert Slayer Dungeon (this will teleport you close to Sumona), Teleport to house (if in Pollnivneach), or use a Pollnivneach tablet. Alternative: Amulet of glory to Al Kharid, then travel with Rug merchant (Shantay) to South Pollnivneach. |
Ground floor, in the North West alcove. There are 2 safes in this location. |
 |
| Awusah the Mayor's House - Nardah | Desert amulet 2 (or above) to Nardah. Alternative: Rug merchant (South Pollnivneach) to Nardah. |
Second floor, along the Southern wall. |  |
| General Store - Merchant District | Merchant district teleport, Menaphos lodestone, or use the Shifting Tombs from any of the other districts. Alternative: Rug merchant (Nardah) to Menaphos. Or you can teleport to any of the other Menaphos districts directly from Nardah first, depending on the teleports you have available. |
Ground floor, along the Northern wall of the room South of the General store. | 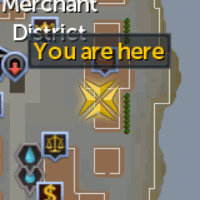 |
| Market - Merchant District | From the above location: run in West direction. Directly: Merchant district teleport, Menaphos lodestone, or use the Shifting Tombs from any of the other districts. |
Ground floor, in the building West of the Market and North of the deposit box/bank chest(if unlocked). |  |
| Shifting Tombs - Port District | From the above location: run East and enter the Shifting Tombs, take the Southen exit to the Port District. Directly: Port district teleport, Menaphos tablet, or a Teleport to house if it is in Menaphos. |
Ground floor, in the Western most room facing the dock near the entrance to the Shifting Tombs. | 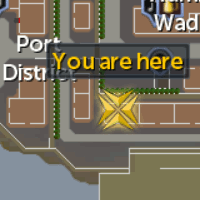 |
| Imperial District | From the above location: enter the Shifting Tombs again and take the West exit to the Imperial District. Directly: Imperial district teleport, or Ring of slaying to Fremennik Slayer Dungeon (or Amulet of glory to Edgeville) to access the Fairy Ring transportation system; then use code C-K-Q. |
Ground floor, in the South Eastern most house tucked into the South Eastern corner. |  |
| Qat's House - Imperial District | From the above location: run in North West direction. Directly: Imperial district teleport, Fairy Ring code C-K-Q, or use the Shifting Tombs from any of the other districts. |
Tier 5 Imperial Reputation is necessary to access this safe. Ground floor, along the South wall in the house where Qat is found. |
 |
Map of the area
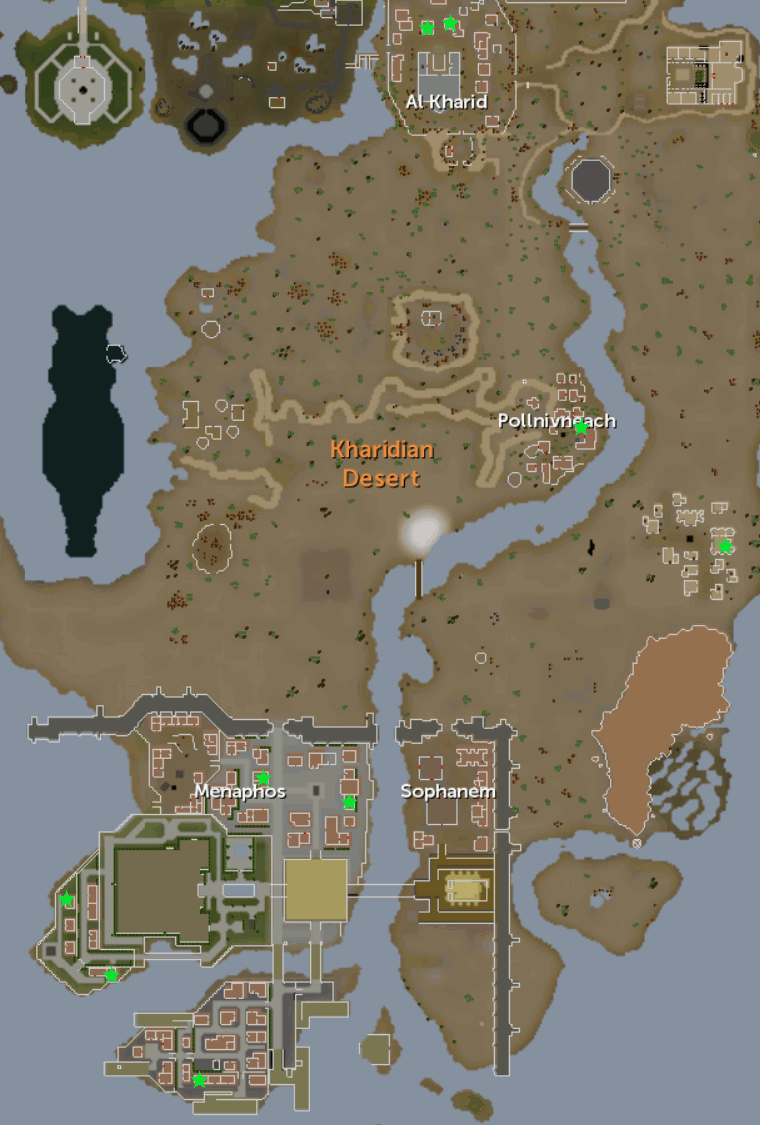
Click the above image to enlarge!
- 76 Thieving
- 4 dial locks per safe
- 780 experience for the first 3 dial locks opened and 3,875 experience for fully opening the safe
- Safes will reset after about 5 minutes
- Opening all 10 safes will complete the "Pilferin' in Asgarnia" achievement
-
Recommended items:
- Amulet of glory (4) to get to Edgeville
- Games necklace (8) or Combat bracelet (4) to get to Burthorpe
- Falador teleport runes or tablets
-
Explorer's ring 3 (or 4, requires completion of the Medium and Hard Lumbridge tasks respectively) or Captain's log (requires completion of the Player-Owned Ports tutorial, and thus atleast one level 90 of the appropriate skills) for getting to Port Sarim.
Alternative: Clan vexillum teleport to the Clan Camp North West of Port Sarim, or Teleport to house runes/tablet if your player-owned-house happens to be in Rimmington, which is just West of Port Sarim. These alternative methods would only be slightly faster than running from Falador's mining guild safe location, or using the Port Sarim lodestone, however.
| Location | How to get there | Notes | Image |
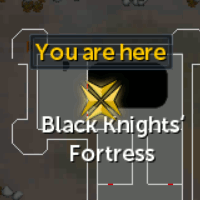
| Black Knights' Fortress | Edgeville lodestone or Amulet of glory (4) to Edgeville. | Skull of Remembrance or gear to sneak into the fort is necessary. See the "Items Needed" section of Sliske's Endgame for a list of disguises that will work. Third floor of the Fortress, in the North Western corner. Enter the fort and climb the staircase in the North West corner. On the second floor, go the the South East corner and climb the stairs. Two safes can be found in the North Western Treasure room. |
 |
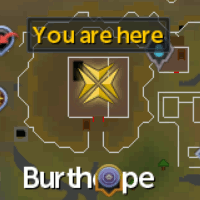
| Burthorpe Castle | Games necklace (8) to Troll Invasion, Combat bracelet (4) to Warriors' Guild, or Burthorpe lodestone. | Roof of the castle, located in the Equipment room. Accessed rapidly by climbing the ladder to the West of the entrance door. |
 |
| Falador Park | Falador teleport or lodestone. | Ground floor, in the building on the East side of the Park. You will need to be in the Park to access the building. |
 |
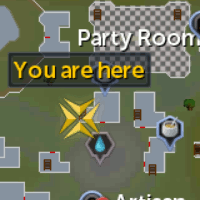
| Party Room | From the above location: exit the park and run in East direction, past the bank and then slightly North of the fountain. Directly: Falador teleport or lodestone. |
Second floor, in the house South of the Party Room. This is the building that is accessed during the Treasure Trail clue "Search through chests found in the upstairs of houses in eastern Falador." |
 |
| Falador Fountain | From the above location: run slightly South East. Directly: Falador teleport or lodestone. |
Thrid floor, in the house East of the Fountain. | 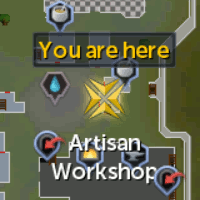 |
| Mining Guild | From the above location: run slightly South West, directly West of the Artisan's Workshop. Directly: Falador teleport or lodestone. |
Second floor, in the Southern building around the entrance to the Mining area. You will need to enter the door to the West, then pass through 2 more doors (South then East) to access the stairs that lead to the area. |
 |
| Grum's Gold Exchange - Port Sarim | Explorer's ring 3 (or 4) to the Cabbage field North of Port Sarim, Captain's log to inside Player-Owned Ports, or Teleport to house spell/tablet if your house is in Rimmington.
Alternative: Port Sarim lodestone, or from the location above: exit Falador through the Southern gate, continue running South until you are in Port Sarim. |
Second floor, in the South East corner. | 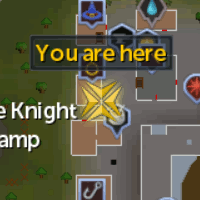 |
| Brian's Battleaxe Bazaar - Port Sarim | From the location above: run to the house directly East. Directly: Explorer's ring 3 (or 4) to the Cabbage field North of Port Sarim, Teleport to house spell/tablet if your house is in Rimmington, or the Port Sarim lodestone. |
Second floor, along the Southern wall. |  |
Map of the area
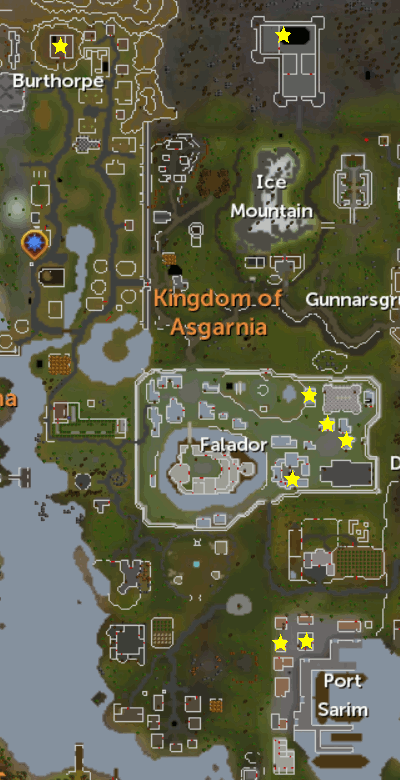
Click the above image to enlarge!
- 83 Thieving
- 5 dial locks per safe
- 805 experience for the first 4 dial locks opened and 4,800 experience for fully opening the safe
- Safes will reset after about 5 minutes
- Opening all 9 safes will complete the "Pilferin' in Kandarin" achievement
-
Recommended items:
- Camelot teleport runes or tablets
-
Ardougne teleport runes or tablets (requires completion of Plague City)
Alternative: Ardougne cloak 2 (or 3) for one teleport to the farm North of Ardougne, or Ardougne cloak 4 for unlimited teleports. -
Watchtower teleport runes or tablets (requires completion of Watchtower), but only if you have it toggled to teleport you to within Yanille (must have completed the Hard Ardougne Tasks, speak to Aleck if you want/need to toggle it). The regular Watchtower teleport is slower than using the Yanille lodestone.
Alternative: Teleport to house runes or tablets if your Player-owned-house happens to be in Yanille.
| Location | How to get there | Notes | Image |
| Camelot | Camelot teleport. Alternative: Seers' Village lodestone. |
Ground floor, West hallway on either side of the corrirdor. There are 2 safes in this location. | 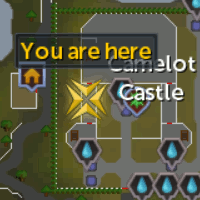 |
| East Ardougne Market - North | Ardougne teleport or lodestone. Alternative: Ardougne cloak. |
Second floor, along the South wall in the second room. This is the same location as the Treasure Trail clue "Search the drawers on the first floor of a building overlooking the Ardougne's Market." |
 |
| East Ardougne Market - West | From the location above: enter the house directly to the South West. Directly: Ardougne teleport or lodestone. |
Second floor, inside the second room just North of the door. |  |
| Ardougne Castle | From the location above: exit the house and follow the path to the West, across the river into the castle. Directly: Ardougne teleport or lodestone. |
Second floor, one is in the Southern most room and a second is in the Northern most. Both are along the Western wall. | 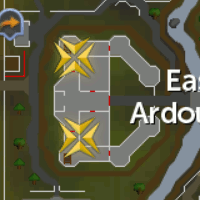 |
| Jimmy Dazzler's House - East Ardougne | From the location above: exit the castle in East direction, outside its walls run North West to the house directly West of the pub (i.e. the first house North of the house with the Lever to the Wilderness). Directly: Ardougne teleport or lodestone. |
Second floor, along the Eastern wall. | 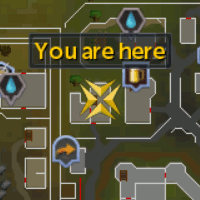 |
| Yanille Wall | Watchtower teleport (only if toggled to teleport to Yanille), otherwise a Teleport to house (if your house is in Yanille) or the Yanille lodestone. | Ground floor, just inside the Southern wall alonge the Western side. |  |
| Dragon Inn - Yanille | From the location above: exit the wall and run in South East direction to the Dragon Inn. Directly: Watchtower teleport (only if toggled to teleport to Yanille), otherwise Teleport to house (if your house is in Yanille) or the Yanille lodestone. |
Second floor, along the Southern wall. |  |
Map of the area
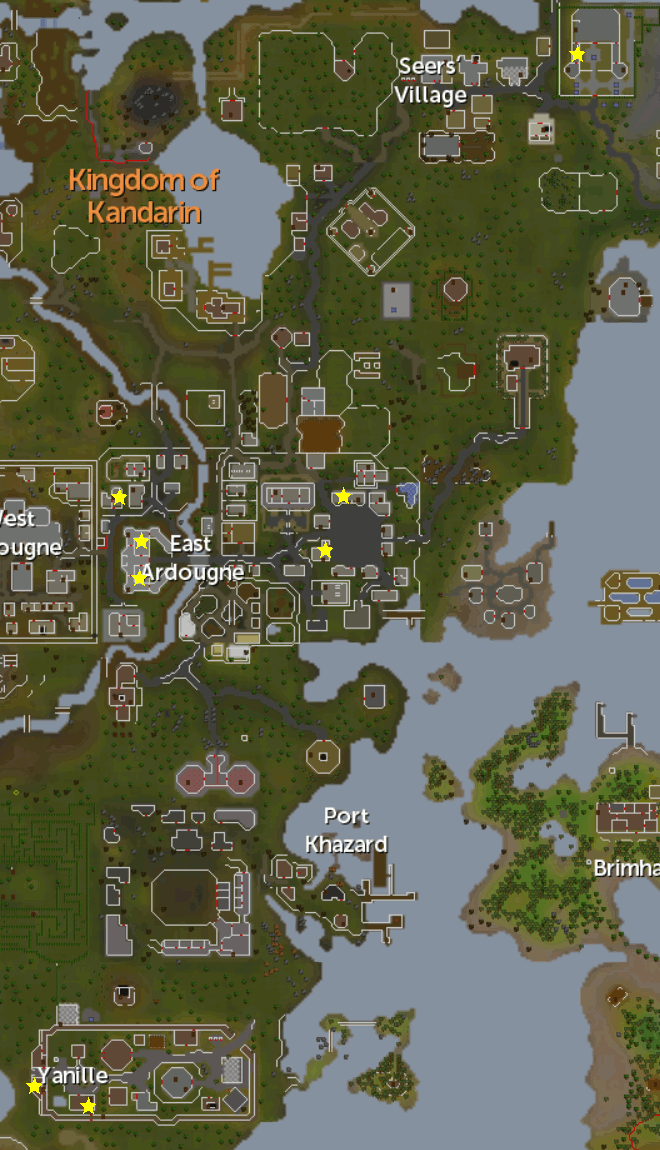
Click the above image to enlarge!
- 90 Thieving
- 4+ dial locks per safe
- Experience varies depending on specific area, see table
- Safes will reset after about 10 minutes
- Opening all 9 safes will complete the "Pilferin' the hidden ones" achievement
| Level | Dial Experience | Opening Experience | Notes | Image |
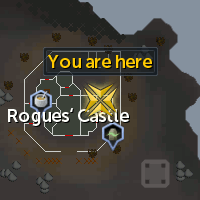
| Rogues' Castle - Wilderness | ||||
| 90 | 2,130 X 3 = 6,390 | 10,625 | Second floor, in the Eastern tower room. You will need to enter the castle via one of the side doors. Climb the staies in the North West corner then enter the room with the Mysterious ghost. You will find 3 safes here. This is in level 50 Wilderness! DO NOT bring anything you don't want to risk losing! |
 |
| Zanaris | ||||
| 90 | 1,055 X 4 = 4,220 | 6,300 | Completion of Lost City is required to access this area. Ground floor, South Western building in the Market just South of the door. |
 |
| 94 | 1,055 X 4 = 4,220 | 6,300 | Completion of Lost City is required to access this area. Ground floor, Northern most building in the Market just North of the door. There may be a Fairy in this room, but it will not care that you are stealing. |
 |
| Zemouregal's fort* | ||||
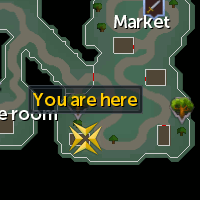
| 90 | 838 X 5 = 4,190 | 5,833 | Ground floor in the room East of the entrance, see map for exact safe location. | 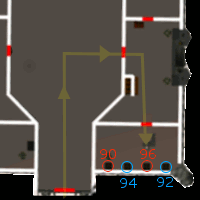 |
| 92 | 865 X 5 = 4,325 | 6,020 | ||
| 94 | 893.5 X 5 = 4,467.5 | 6,218 | ||
| 96 | 921.5 X 5 = 4,622.5 | 6,417 | ||
* Quickly accessed via Fairy Ring code D-K-Q (Glacor cave), once outside you will need to run West to find the fort. Completion of at least The Curse of Arrav is necessary. Completion up to or beyond Dishonour among Thieves and Ritual of the Mahjarrat is highly suggested for ease of travel.
As you may recall, Pilfer points are earned from Chief Thief Robin fencing the items in your loot bag and by giving Darren Lightfinger any special items found while safecracking. Remember that these items are worth 10 Pilfer points OR 37,500 coins each. Special items include:
- Antique painting
- Collectors coin
- Shiny amulet
- Shiny bracelet
- Shiny gem
- Shiny necklace
- Shiny ring
- Shiny tiara
Note that it is possible, though rare, to obtain a medium, hard, elite, or master Sealed clue srcoll as a special item as well.
When you have completed an interaction with Chief Thief Robin, and if you choose to obtain Pilfer points from Darren Lightfinger, you will be told your total number of Pilfer points.
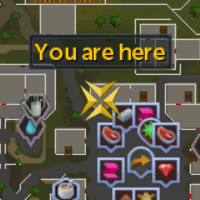
Now that you have Pilfer points, what do you do with them? You can purchase several upgrades for your safecracking tools, as well as other consumable items to assist with other Thieving training methods from Dodgy Derek. He is located in the room South of the bank in the Thieves' Guild. These upgrades and consumables include:
| Upgrade | Pilfer Points | Function |
| Upgrades | ||
| Medium Loot Bag | 500 | Upgrades the amount of loot the bag can carry. |
| Large Loot Bag | 2,000 | Upgrades the amount of loot the bag can carry. |
| Huge Loot Bag | 5,000 | Upgrades the amount of loot the bag can carry. |
| Master Thief's Lockpick | 2,500 | A lock pick that doesn't break and can be added to the tool belt. |
| Master Thief's Stethoscope | 2,500 | A stethoscope that can be added to the tool belt. |
| Consumables | ||
| Shock Absorber | 10 | Stops a player getting stunned once when pickpocketed. |
| Elf Thieving Reset Token | 200 | Resets the lockout period from Thieving from an elf clan in Prifddinas. |
| Thieves' Guild Teleport | 10 | Provides a teleport directly to the Thieves' Guild. |
Now that you know what is out there, get cracking!
This Special Report was written by Owain121 and ChathMurrpau. Thanks to KSB Single, Alk12, and Robbie for corrections.
This Special Report was entered into the database on Sun, Jul 29, 2018, at 12:03:23 AM by ChathMurrpau, and it was last updated on Wed, Aug 17, 2022, at 03:54:49 PM by Robbie.
If anything is incorrect or missing, or if you have any new information to submit to this database, please submit it to us on our Content Submissions Forums.
If you see this guide on any other site, please report it to us so we can take legal action against anyone found stealing our content. This guide is copyrighted by RuneHQ, and its use on other sites is expressly forbidden. Do not ask if you can use our guides or images, the answer is and always will be NO!
Print this page with images - Back to the Special Report Index Page - Back to Top
