

* Although we have provided a complete list of these items in the latter part of the guide, but we highly recommend players to bring a talisman over these instead.
-
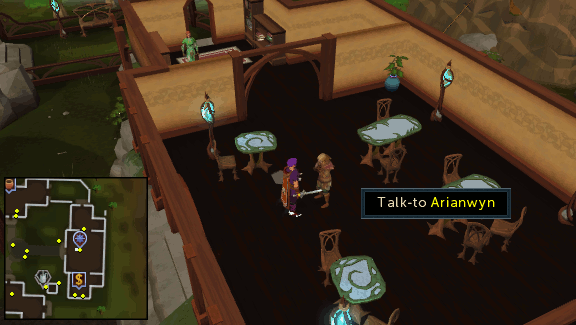
Talk to Arianwyn in the large building on the east side of the village, and agree to help out stopping the evil plans of mourners who want to take over the Temple of Light. He'll ask you to visit the mourner base to see whether the key required to access the adjacent tunnels is ready yet.
-
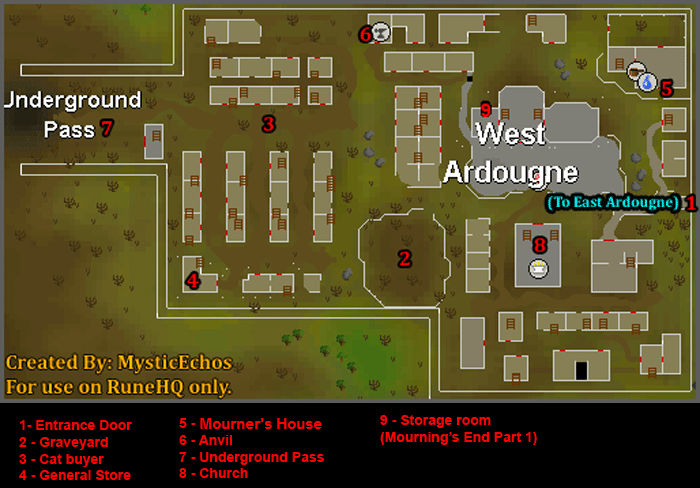
Put on nothing but your full mourner outfit, then head over to the house north-east (house number 5 in the picture below) of West Ardougne.
-
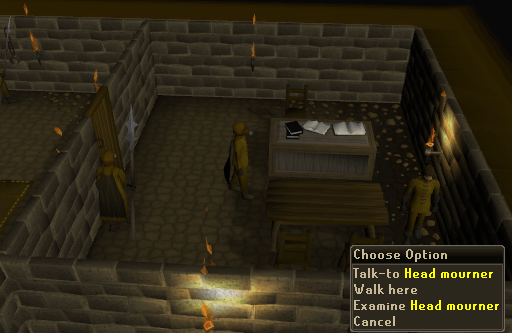
Enter the trapdoor (located in the west room of the house), and talk to the Head Mourner. He will ask you to look for a lost digging team and will give you a "New key" (If you lose this key, search the head mourner's desk for a new copy).
-
Use the key to access the digging area and follow the path southwest. You will pass Level 105 Dark beasts which may attack you, but you can't hit them unless you have the correct Slayer Level. Protect from melee is strongly recommended.
- You will eventually reach an area filled with dead slaves, at which point you are prompted to go and speak to Arianwyn.
-
Arianwyn tells you to go and find a sample of Darkened crystal from the temple. So, head to the bank and grab your chisel since you'll need it to get the sample.
-
Head back to where you found the dead slaves in Step 4. Continue heading west and go up the first stairs you see. From here, you should head south two pillars, and climb up the ladder. Go north and take the second opening on the left. You should see some stairs to the north, go down these, then go up the stairs directly to the north. Run as far east as you can, then to the south you will see the black crystal, use your chisel on it to get a sample, then head back to Arianwyn.

-
After you talk to Arianwyn about the black crystal, he will summon Eluned to have her replace it with a new one. Use the black crystal on Eluned; she will take a few moments to create a copy of it. Talk to her again and she'll give you the new white crystal. Once you have it, talk to Arianwyn now who will ask you to take it to the old altar at the end of the temple to put it back in the black crystal so the safeguards can be restored.

-
Near the entrance to the temple, search the dead slaves and slave guards until you get a colored wheel and Edern's journal. The first crystal is yellow so you need to get the beam to glow yellow in the blue door, since yellow is opposite of blue on the color wheel.
-
Go upstairs into the temple. Head east all the way till you come across a "Crystal Collector" (looks like a lever) that contains items. The collector has two options: Pull Crystal Collector and Collect Crystal Collector. Pull the collector, then select the third option to collect all items that it contains. You should have 4 hand mirrors and a yellow crystal in your inventory upon collection.
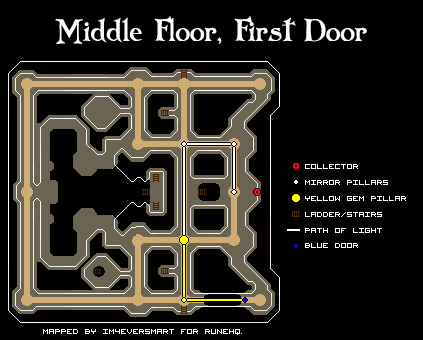
First Door (Blue)
- Insert a mirror into the pillar near the collector, then search it and rotate the mirror, making the light go north.
- Go to the next pillar to the north and insert a mirror, making the light go west.
- Head to the next pillar to the west and insert a mirror, making the light go south.
- Go south to the next pillar and insert the yellow crystal.
- Head south again and insert a mirror in the next pillar, making the light go east to the blue door.
- Climb on the wall support to get across the gap and enter the blue door. Search the chest for two more mirrors and a cyan crystal.
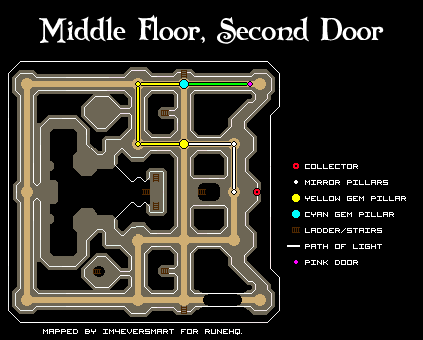
Second Door (Magenta)
- Go back to the collector, collect the items from it, and pull the lever to reset it.
- Insert a mirror near the collector like before and make it go north.
- Go north a pillar and insert a mirror, making the light go west.
- Head west to the next pillar and put in the yellow crystal or blue crystal.
- Move west again one pillar and put in a mirror, making the light go north.
- Go north to the next pillar and insert a mirror so the light goes east.
- Head east a pillar and insert the other crystal.
-
Go east through the pink door and open the chest to get more mirrors.
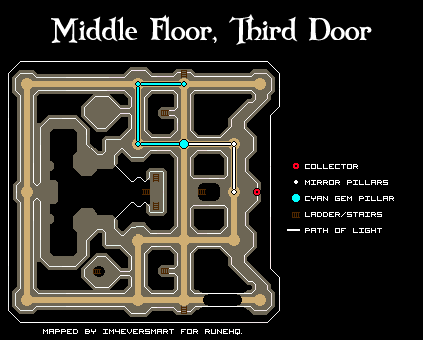
Third Door (Cyan)
- This is where it starts getting tricky, involving more than one floor. Start on the middle floor next to the collector, and insert a mirror to make the light go north.
- Go north a pillar and insert a mirror to make the light go west.
- Head west to the next pillar and insert the cyan crystal.
- Move west again one pillar and insert a mirror, making the light go north.
- Head north one pillar and insert a mirror to make the light go east.
- Next go east one pillar and insert a mirror to make the light go up. The short side of the mirror should be west and the wide side of the mirror should get east.
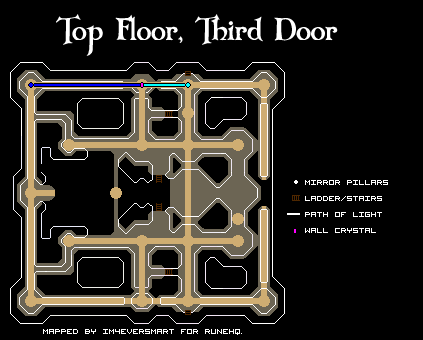
- After this pillar, go up the ladder right next to it and insert a mirror, making the light go west. The light will pass through a wall that will change it from cyan to blue for you.
- Now head back down the ladder and go as far south as you can to another ladder in the wall just like the previous one.
- Once up, go north a little until you get to the double stairs in the center. Use them to reach the north side and then head west then north to get to the other side of the blue light.
- Put in a mirror to make the light go down, with the wide side of the mirror to the east and the short side of the mirror to the west.
-
Finally, go back to the east stairs near the collector and go to the bottom floor. Go to the northwest corner and go through the yellow door. Once through, rotate the mirror towards the other yellow door, go through it, then follow the corridor around to the east and search the chest. After searching the chest, return to the collector. Note: You must get a fractured crystal from the chest
Important Note: Do NOT reset the system / pull the lever. Simply continue on with next steps (Fourth Door), otherwise you will lose your progress so far.

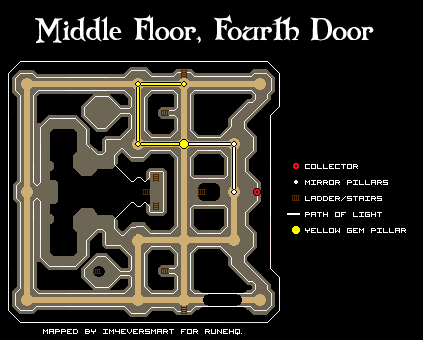
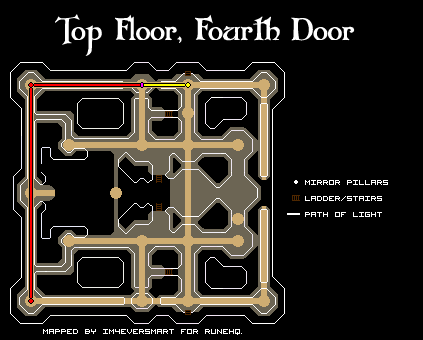
Fourth Door (Yellow)
- Start by leaving everything the same as the third door, do NOT pull the lever.
- Go to the middle floor and replace the cyan crystal with the yellow one.
- Head to the south ladder on this floor and go up it, then go north and use the double stairs to get to the northwest corner of the top floor.
- This time rotate the mirror so the red light goes south.
- Follow the red light south to the southwest corner and insert a mirror to make the light go down. The wide side of the mirror should be to the north and the short side of the mirror to the south.
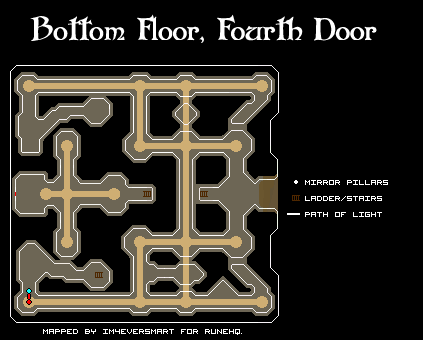
- Now run back to the double stairs, then return to the ladder on the south wall through which you came up. Once you're down, head west of the ladder to the room shaped like an octagon with a hole in the floor with a rock beside it. Climb over the low wall to enter this room, and use your rope on the rocks to climb down to the bottom level.
-
Walk over to the cyan door and open the chest to get the blue crystal.
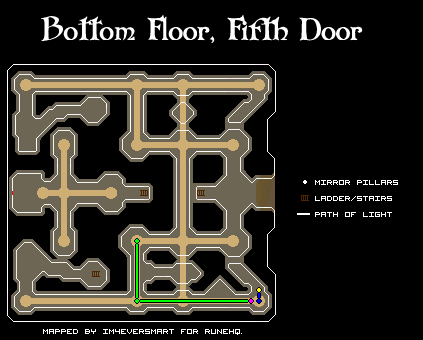
Fifth Door
- Go back to the collector and pull the lever. Now repeat what you did to get to the Blue Door. Once there, use the blue crystal with the pillar there.
- Now leave there and retrace you steps back to the collector. As you go, manually take every mirror and crystal you have used so far (except the blue crystal). Do NOT pull the lever or you will have to start this door again.
- Now insert a mirror in the pillar next to the collector so the light goes north.
- Go north a pillar, insert a mirror, and make the light go west.
- Head west one pillar and insert a mirror to make the beam go up. The wide side of the mirror should be to the west and the short side of the mirror to the east.
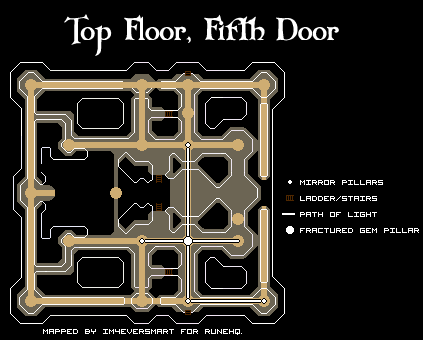
- Head to the ladder to the south and go up them to the top floor. Once there, go North one pillar and insert the fractured gem. Remember that the smooth side is facing to the north.
- Now head west one pillar and insert a mirror, with the wide side of the mirror to the east and the short side of the mirror to the west.
- Go a few steps northeast and use the double stairs. Once across, go north then east to the pillar with light coming straight up from it. Insert a mirror and make the light go south.
- Retrace your steps back to where you put in the fractured crystal and then head south one pillar. Insert a mirror so that the light is reflected east.
- Follow that light east to the next pillar and insert another mirror, making the light go down. The wide side of the mirror should be west and the short side of the mirror to the east.
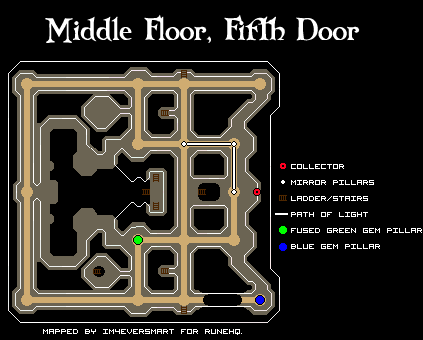
- Now go down the stairs to the middle floor, then down the stairs near the collector to get to the bottom floor.
- Once there, go south a pillar, then west two pillars to where the green light is coming down. Insert a mirror here and make the light go south. The wide side of the mirror should be to the north and the short side of the mirror should be to the south.
- Go south one pillar and insert a mirror, making the light go east.
- Follow the light east, go through the pink door, and insert the last mirror into the pillar, making the blue light go north.
-
Go through the yellow door and open the chest to get some more mirrors and another fractured crystal.
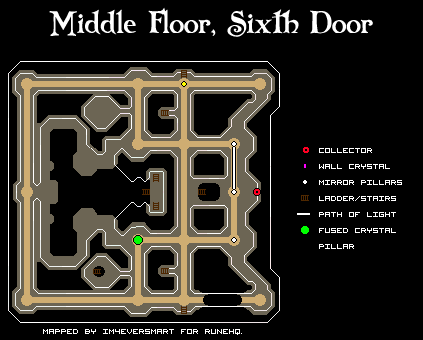
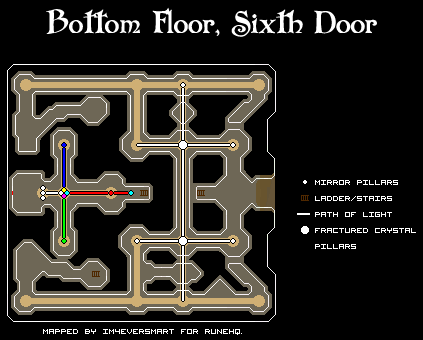
Sixth Door
- For the final door, go to the collector and pull the lever. Get all the crystals and mirrors and then insert a mirror in the pillar to make the light go north.
- Now go north a pillar and insert a mirror to make the light go down. The mirror should have the wide side to the south and the short side to the north.
- Go back to the collector and go downstairs. Head north a pillar and insert a mirror to make the light go west.
- Go west one pillar and insert the newest fractured crystal. It's the one that is split vertically, not horizontally, with the smooth side to the east. You can check to see if you put in the right one by seeing if there are four beams coming out of the pillar.
- From this pillar, go west a pillar, north a pillar, and then east a pillar and insert a mirror. Make the light go up by having the wide side of the mirror to the North/South and the short side of the mirror to the South/North.
- Go back to the collector stairs and return to the middle floor. Head all the way north to the pillar next to the ladder and insert the yellow crystal.
- Now go up the ladder and insert a mirror in the pillar right next to you, making the light go west. The beam will go through the pink crystal and make the light turn red.
- Go back to the ladder you came up by and go down it to the middle floor. Run all the way to the other side and go up the ladder on the south wall to return to the top floor. Now go north and take the double stairs across. From there, go west and then north to where the red light is hitting the pillar.
- At the pillar, insert a mirror and make the light go south.
- Follow the red light south until you reach the next pillar, then insert a mirror and make the light go east. A built-in mirror will then reflect it down for you from there.
- Now head back to the pillar where you split the light at by taking the double stairs, the south ladder, and then the collector stairs. From the fractured crystal pillar, go south until you reach another pillar.
- Insert the remaining fractured crystal, it should make the light go east and west.
- Go west one pillar and insert a mirror, making the light go up. The wide side of the mirror should be to the west and the short side should be to the east.
- Head back east two pillars and insert another mirror, making the light go up. The wide side of the mirror should be to the east and the short side should be to the west.
- Go back to the collector stairs and return to the middle floor, then go south to the ladder and go to the top floor.
- From the south ladder, go north a pillar and then west a pillar and insert a mirror, making the green light go west. Built-in mirrors will again make the light go down for you.
- Head back east two pillars and insert a mirror, making the light go west.
- Go west a pillar, insert a mirror, and make the light go north.
- Cross over to the north side using the double stairs and then insert a mirror in the east pillar, making the light go west.
- Move west one pillar and insert the blue crystal. The blue light will be reflected down by a built-in mirror once more.
- Return to the double stairs but instead of crossing them, take the west one down to a cyan door.
-
The red beam should enable you to go through. Enter it and then rotate the mirror in the pillar to make the red beam go west. The door to the altar located west of the pillar will now be open.
IMPORTANT NOTE: Whenever you want to leave, make sure you re-direct the red beam from west to east (180 degrees)! All you need to do is rotate the last mirror back so the light hits the cyan door! If you forget to do this, you can get to the death altar by using the underground pass or your wicked hood!

-
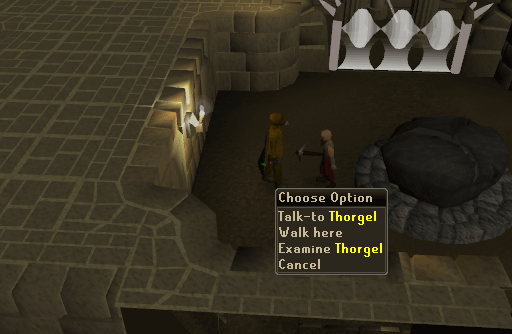
Enter the door and you will talk to the dwarf named Thorgel. He will give you a list of 50 items you must get for him in exchange for a Death talisman.
Note: Players are not required to give him the 50 items if they already have a Death talisman of their own! Please skip to Step 3 if you brought a talisman with you.
Note: You can also get to the death altar through a shortcut in the Underground Pass. A quick way to get to the Underground Pass shortcut is to teleport to Lletya with a teleport crystal, then go through the cave to the Underground Pass which you come out of to start Regicide. After this go down the well once, then through a big door to get to the place with the Iban Desciples. Fail to jump a gap then you'll be at some soulesses. Go south to get to the place with the dwarves and buildings, and behind the buildings will be a staircase within the wall.
- A random Ticket (Agility or Archery ticket)
- A random Key (Door, Jailer's, or Dusty key. Door is the one from the Witch's house quest, Jailer's can be obtained by killing the jailer in Taverly dungeon, and Dusty key cam be obtained by using a Jailer's key with the cell next to it, then talking to the guy inside.)
- A random Book (Crumbling tome, Pfriddnas' history, or Battered book. The Tome is near the barrows, the history is in a bookcase in Lletya, and the battered book is the book from the Elemental workshop quest, which has been replaced with the slashed book. Though the list still says battered book, a slashed book is accepted in it's place.)
- Rope
- Spade
- Iron pickaxe
- Iron axe (hatchet)
- Knife
- Plank (Barbarian Outpost)
- Pie Dish
- Potatos (10) (Must be a sack of 10 potatos)
- Pot of flour
- Bucket of milk
- Ball of wool
- Oak logs
- Chisel
- Shears
- Needle
- Thread
- Cooked meat
- Iron nails
- Unicorn horn dust
- Bronze bar
- White berries
- Hammer
- Potato cactus (Kalphite lair)
- Skull (Wild by Black Knight's fortress)
- Baby dragon bones
- Facemask (Any slayer master)
- Pure essence
- Lobster pot
- Fishing rod
- Tinderbox
- Lock pick
- Bronze med helm
- White apron (Varrock clothes store)
- Jug of wine
- Kebab
- Leather Boots
- Swamp paste
- Redberries
- Cheese
- Vial of water
- Flax
- Gold ring
- Egg
- Leather gloves
- Cake tin
- Necklace mould
- Rotten Tomato (Duel arena)
-
Talk to Thorgel to give him everything he needs and he will give you a Death talisman. (It will take a few trips to bring all the stuff. Remember to rotate the mirror each time to send the red light at the door before you teleport/leave.)
-
Use the Death talisman on the ruins near Thorgel. Once you're in the "Death realm" use you newly made crystal with the death altar.
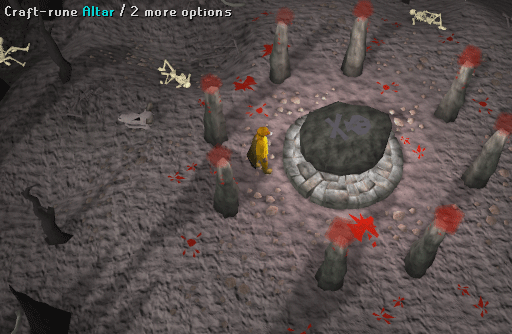
-
Finally, go back up to the top floor and use the newly made crystal with the dark crystal. It will turn white. Teleport or walk back to Lletya and talk to Arianwyn.
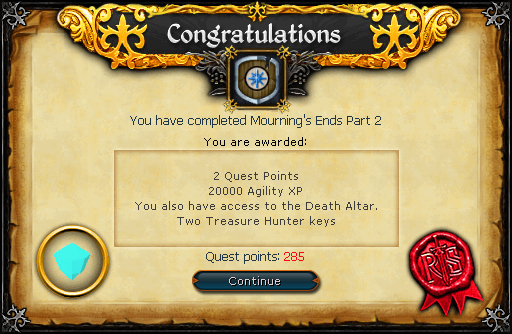
Congratulations! Quest complete!
This Quest Guide was written by Digipoke and Im4eversmart. Thanks to Lord_Scerendo, Piro_Omar, Cheezy Power, Alex201285, Brenden, DRAVAN, UrInDenile, Snake712, iii zero iii, t virus, aloavia, lord_zedex, Killmouski, jtfa0007, Digipoke, Zamorakgiant, nickstud, SaxRox, Master Gamer, paulus, skatey, Fireball0236, tino pham, Kazan Tony, Islam2001, Clamball, Seethru, verelstje, Zantetsuken, Double_D_Edd, Alk12, ice_king_xxx, thegunner78, Flammo9, Sumurai8, Roman S9, Zombie Woof, Red Rian, RepairedMind, Handofgod, nOCTIVAGANT, Prowling Hag, Zanvo, Best Newb, Sirius XM, CND Forces, Noble K, PoofyMcChubb, and Nofu for corrections.
This Quest Guide was entered into the database on Tue, Oct 25, 2005, at 04:10:14 PM by Im4eversmart, and it was last updated on Sun, Jun 04, 2017, at 05:20:21 AM by Numerous One.
If anything is incorrect or missing, or if you have any new information to submit to this database, please submit it to us on our Content Submissions Forums.
If you see this guide on any other site, please report it to us so we can take legal action against anyone found stealing our content. This guide is copyrighted by RuneHQ, and its use on other sites is expressly forbidden. Do not ask if you can use our guides or images, the answer is and always will be NO!
Print this page with images - Back to the Quest Guide Index Page - Back to Top
