

Missing My Mummy
Dealing with Scabaras
Shadow of the Storm
Smoking Kills
Desert Treasure
Animal Magnetism
Level 50 Ranged
Level 64 Construction
Level 68 Crafting
Level 70 Magic
Level 70 Thieving
-
Talk to Leela north of the Draynor Village jail and she will ask you if you would like to join her to pay homage to Senliten. Agree to go with her, and you will automatically be taken to Senliten in the Uzer Mastaba pyramid.
Note: You may first need to complete Stolen Hearts and Diamond in the Rough if Leela is not there.
-
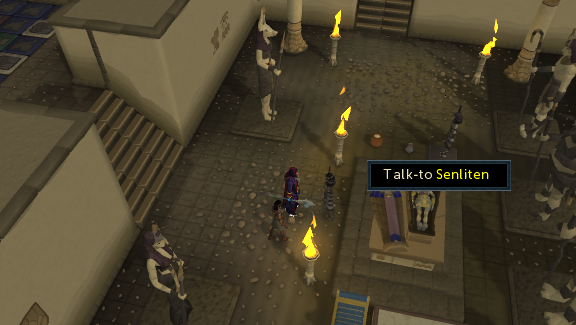
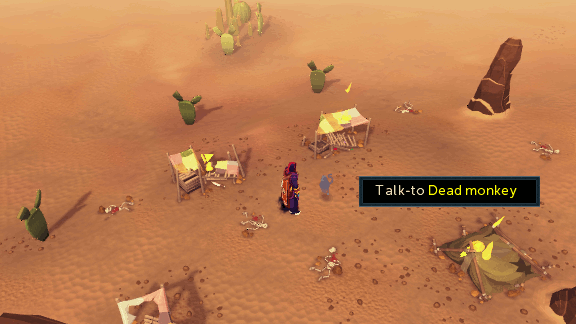
Talk to Senliten and go through all the options. She'll tell you a story about the monkeys in the desert. After that, she'll instruct you to talk to Jex and the Sphinx in Sophanem about the minor deity, Apmeken.
-
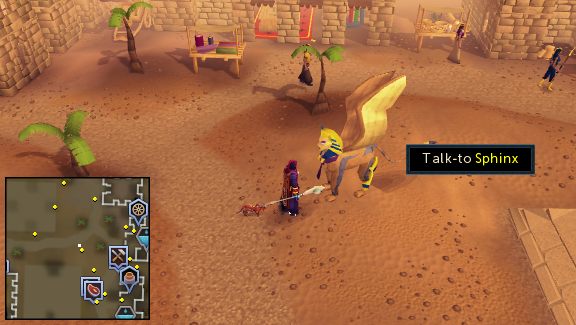
Go to Sophanem and talk to both Jex and the Sphinx about the minor god, Apmeken. For the Sphinx, you'll need to have your cat out. Once you've talked to both about all the Apmeken options, your character will say he/she knows enough about Apmeken and understands the importance of monkeys in the desert. Return to Senliten. She'll ask you to bring the monkeys back to the desert as free creatures.

- TIP: A ninja monkey greegree is preferred for the next two steps, as you'd have the ability to run faster than you would as a gorilla.
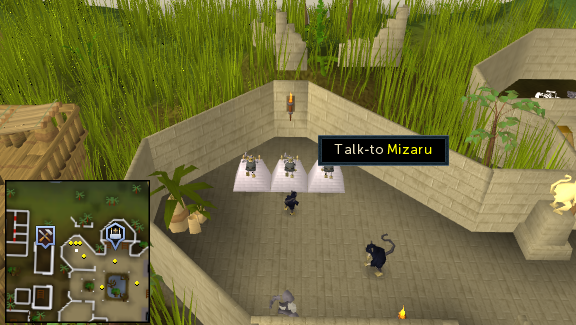
Make sure you have a fairly empty inventory (about 20 free spaces), but also make sure you have a greegree (preferably ninja), M'speak amulet and a way of getting to Ape Atoll. Go to Ape Atoll and enter the temple. You'll enter a specific Quest Area - if the guard monkeys are un-attackable, you're in the right place. Talk to the three Wise monkeys. After a long chat (it's funny, try to read all of it), admit to being human. They want to see your human form as proof, but there's one problem: A monkey guard is watching you. You'll have to distract him.
-
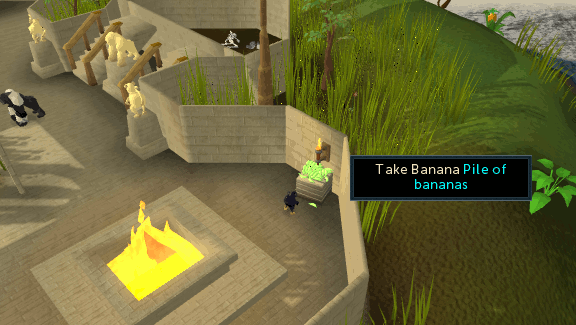
Go to the crate in the northeastern corner of the temple and take around 15 Green bananas from the crate. Go to the monkey guard and create a trail of green bananas to the green banana crate, while avoiding the gorilla guards (as they will eat your bananas). You'll have to go all around the building (do not leave the building!) in order to lead the monkey to the crate.
Make sure the bananas are only about 3 squares away from each other and be quick. This will take around 15 bananas. You can try starting the trail at the halfway point, leading back to the guard and he will smell the banana placed near him. Then as he eats the bananas, complete the trail from the halfway point to the crate. This puts less pressure on your speed; but, beware, since after a while (around 10 seconds) the bananas will go moldy and be inedible. Once the monkey has been led to the crate, he'll leave the Wise monkeys alone.
-
Return to the Wise monkeys and talk to them. After talking, unequip your greegree and talk to them again. Once done, equip your greegree and continue the conversation. They'll ask you some questions about Apmeken to prove you really know the god. The answer to the first question is 'The baboon head,' the answer to the second question is 'On the monkey's shoulders.' The monkeys will now ask you to talk to Awowogei and convince him to start a colony in the desert.
-
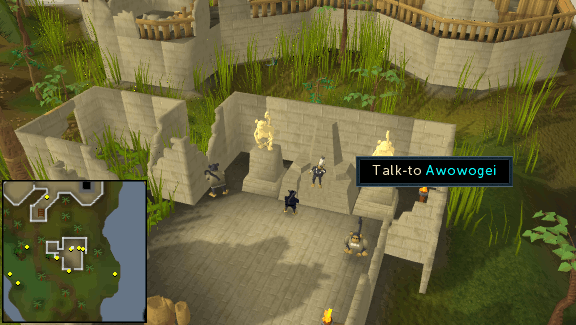
Go to Awowogei, who is south of the monkey temple. Talk to the guard to get in and then talk to Awowogei about starting a colony in the desert. When he asks what goods they could trade, talk about Choc-ice. Awowogei will then tell you to bring him some Choc-ice in the shape of a monkey head.
-
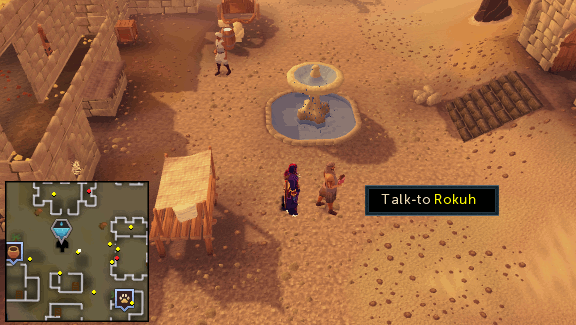
If you haven't already, take this opportunity to activate Ancient Magicks in the pyramid (enter through the tunnel south of the pyramid!) to the south-west of Pollnivneach. Make sure you have at least 10,000 coins, a M'amulet mould, tons of runes to cast an Ice Burst or higher ice spells, food, antipoison, and your monkey greegree and amulet. Head to Nardah and talk to Rokuh, the choc ice seller. Talk to him about getting special Choc-ice. He'll sell you one for 1,000 coins. He needs a monkey-head shaped mould, so give him the M'amulet mould. There seems to be one problem though: the cooling magic doesn't seem to work in this shape. Therefore, you must not use any magical teleports and you must find a way to keep it frozen.
- TIP: The higher the level of your ice spell, the longer the Chimp ice will last. So, be sure to choose the highest ice level spell you can cast!
Buy a Chimp Choc-ice, then run to the magic carpet merchant. If "Your chimp ice is beginning to melt." is displayed, cast your ice spell on it. You'll now have to reach Ape Atoll without using magic of any kind. You can, however, use magic carpets and boats. Gliders are out of order (except for the one to bring you to Ape Atoll), because of the Karamjan volcanic ash. Here's one tip: If you're out of run energy or need to pause, talking to an NPC will stop your ice from melting.
-
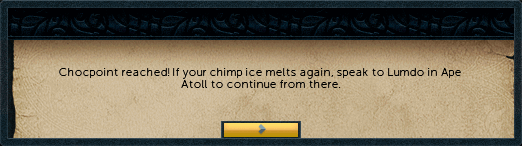
TIP: Try to get to Ape Atoll with any of the following methods. If your Chimp ice melts on Ape Atoll, simply talk to Lumdo to receive a new one! (See picture below.)
There are three methods you can follow:
Method 1: You can bring a rope to the Eagles' cave far north of Nardah and take the desert Eagle to Eagles' Peak, then run to Gnome Stronghold.
Method 2: You can also take a carpet to Pollnivneach, then the carpet to Shantay Pass. Run to Port Sarim, take the boat to Brimhaven, take the boat to East Ardougne, then run to the Gnome Stronghold.
Method 3: You can take the carpet to Pollnivneach, then the carpet to Shantay Pass. Run north through Al Kharid. Continue north along the east side of Varrock (to recover run energy, rest at either of the two Musicians). Take the Hot Air Balloon to the Gnome Stronghold (requires 1 Magic log). Using this method requires unlocking the Hot Air Balloon Network.
Once you have arrived at the Gnome Stronghold you can take the special glider to Crash Island, take the boat to Ape Atoll (this is a "chocpoint" where you can talk to Lumdo, if your chimp ice melts! See picture below!), and then run to Awowogei.
Beware: You cannot practice magic as a monkey, and if you show your human form near the monkeys at the gate, you will be shot. However, being shot puts you in jail, but doesn't melt your ice, so you could consider doing this if you have problems with the gate. Therefore, make sure you use your ice spell on the Chimp ice before going through the gate and after going through the gate (and away from archers). After that, walk along the north shore toward the temple, stand in the high grass, and use your ice spell on it once more. Equip your greegree and run southeast of the temple. Cast your ice spell on it, then talk to Awowogei.
-
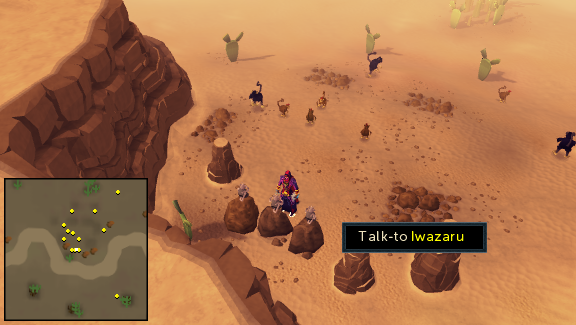
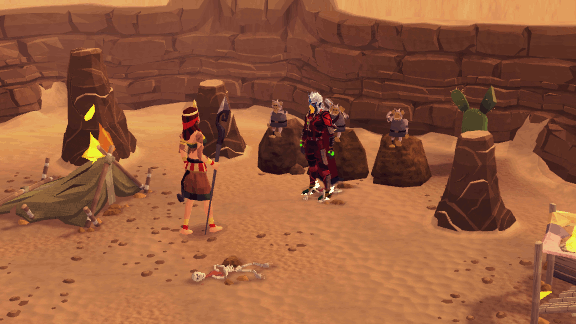
Awowogei will give you a barrel of monkeys. Talk to the three Wise monkeys, let them hop in the barrel, then go to the Bandit Camp. There is a huge mountain to the east of Bandit Camp, so go north around the mountain and stand between the second and third 'camel hump' of the mountain (see minimap on the image below). Talk to the barrel of monkeys to confirm your position, then open the barrel. Talk to the three Wise monkeys and they'll start complaining about the lack of magical carpets. Head to Ali Morrisane to talk about Magic Carpets.
Note: The easiest way to reach the Bandit Camp is via the Bandit Camp lodestone home teleport and the easiest way to reach Ali Morrisane is via the Al Kharid lodestone home teleport.
-
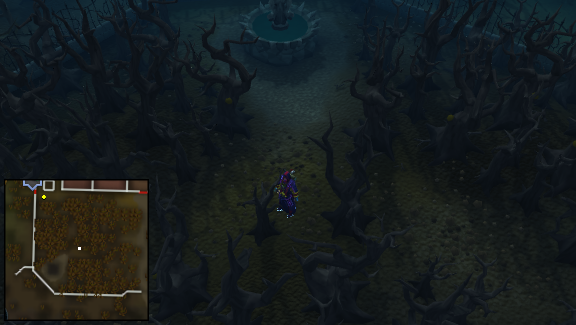
Talk to Ali Morrisane. He'll tell you he won't make another carpet network, so use your Ring of Charos (a) to persuade him. He'll talk about lost metal crates and will ask you to go to Ava in Draynor Manor to get him a metal crate detector. Make sure you have Ava's accumulator and a Spade, then talk to Ava. She'll make 'Ava's alerter' for you, then hide a crate in the grounds so you can test it. Equip it and scan the grounds. The more Bwuk!'s appear, the closer you are. The crate is north-east of the fountain (see image). Keep doing this until "Bwuk! Bwuk! Bwuk! Bwuk!" appears, then dig the ground and return to Ava to let her know it worked.
Note: When you get 'Bwuk! Bwuk! Bwuk!' it means that the crate is in one of the squares around you.
-
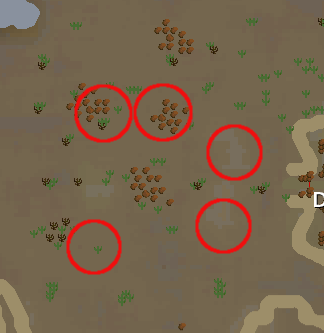
Return to the three Wise monkeys and scan the grounds for metal crates. There are five scattered around the desert north of the monkeys, west of the Desert Mining Camp and the exact locations vary between players, hwoever they are found roughly within the circled areas in the image below. Two of them will contain gems (keep them!) and the last one contains the rugs you need for the monkeys. While digging for crates, a level 72 Scarab may spawn from the ground appear. You'll need to kill it and then dig in the same spot again to obtain a metal crate. Acquire the rugs, then return to the monkeys.
-
TIP: To avoid multiple trips to the bank, get a Beast of Burden such as a Spirit terrorbird (52 summoning), War Tortoise (67 summoning), or higher to store the items listed below for you.
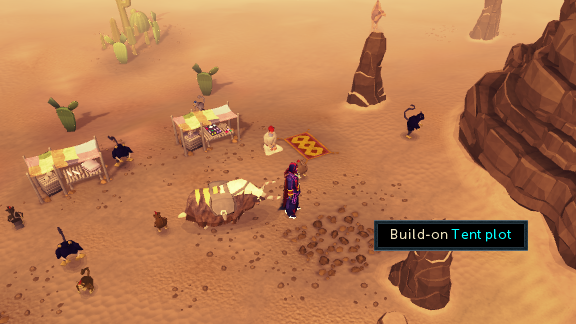
The Wise monkeys will complain about the fact that they have nothing interesting, so bring your spade and gather 6 teak planks, 10 bolts of cloth, a hammer, a saw, 3 cords of rope, 4 knives, 3 full waterskins, 2 baskets of bananas/10 bananas, a full desert outfit, and an uncut gem set (which was given by the metal crates). Construct three filled stalls and a tent, then talk to the monkeys twice. They'll ask you to gather 6 monkey knives from some fierce monkeys of Ape Atoll.
-
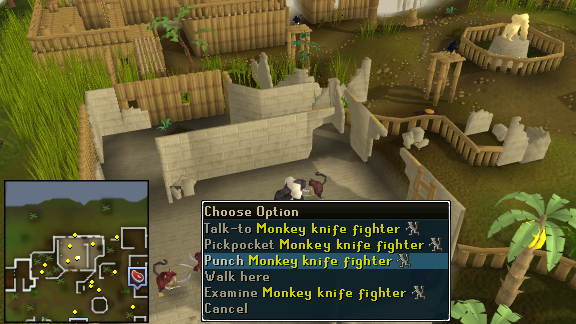
Go to Ape Atoll, with your Gorilla greegree and some food. Go to the building west of the jail, morph into a gorilla and punch a monkey knife fighter. Pickpocket him once or twice before he wakes up. Keep doing this until you have 6 knives, then return to the three Wise monkeys. Talk to them and they will tell you you're done.
-
Return to Senliten. After a short cutscene, tell her about the monkeys and she will tell you to return to the camp, as something is not right. Return to the desert monkey camp and see the chaos that was caused. Search a nearby monkey corpse and a ghost will appear. Attempt to speak to the ghost and you'll find you can't understand it. Use your ghostspeak amulet on your M'speak amulet and you will create a Cramulet. Equip it, then talk to the monkey ghost and he'll tell you what happened. The Wise monkeys have been captured, and the first one is in the Pollnivneach well, guarded by a boss.
- TIP: Be sure to bring lots of food for each of the three boss sisters you'll be fighting. You can head to a bank after killing a boss, so you have lots of chances to prepare for battle. The fights will be much easier to win if you have high-healing food such as sharks or rocktails.
Make sure you have good armor and a weapon (ranged works well for all three fights), Masked earmuffs or a Slayer helmet and plenty of food. Once you're ready, climb down the well in the middle of Pollnivneach and run north until you see a huge barrier. Pass it and you'll encounter the the first boss sister, Leeuni. Leeuni has 50,000 Life points, and has a very strong magic/ranged attack which is only partially blocked by prayer, so it's best to protect magic and stay in melee distance. Sometimes she will teleport away. If she does, run to her, as she will use her powerful magic attacks on you when you're away from her. She also occasionally unequips your headgear, making you take damage from the smoke. Equip your headgear as soon as possible. Once done, enjoy the cutscene, and talk to the monkey ghost about the second location.
- TIP: The second boss sister, Ayuni, is located in the cave north of the Kalphite Queen. While you won't have to fight the Kalphite Queen, there is a possibility that you will take some damage from her, be sure to stock up on plenty of food before fighting Ayuni!
Note: Ayuni has the same amount of Life points as Leeuni.
Bring two ropes (if you have not already entered the lair), ranged gear, 1-2 anti-poison potions, the Cramulet, and food. Don't bother taking prayer restore potions with you; they're a waste as Ayuni will drain your prayer level to zero. Ayuni is in the cave beyond the Kalphite Queen. She is not much of a challenge, as only her melee attack is strong and she walks very slowly. Just stay away from her, keep ranging her and keep an eye out for both her teleporting and your health. After the fight, talk to the Wise monkey and use the "Return to colony" option.
- TIP: Using the pillars to take cover from Eruni's attacks while fighting the lesser demons is extremely helpful. Assuming you have a fairly high combat level, you will be able to save lots of food with this tactic. Eruni only has 30,000 Life points due to how hard this boss may be.
Talk to the ghost monkey again, then prepare for the final battle. Bring melee/ranged gear, food, and some prayer potions (and eventually a familiar with food, if you want to be sure), then head to the Ruins of Uzer. Go down the temple (the one near the magic carpet), run north and go through the portal and you'll face Eruni, the third boss sister. She'll use rapid magic attacks, so keep protect from magic on. She'll respectively summon one (at the start of the battle), two (when she is at 75% health), three (when she is at 50% health) and four lesser demons (when she is at 25% health), which you have to defeat before being able to hurt her. You can hide behind a pillar and range the lesser demons (or lure them with range and attack with melee) to avoid the magic attacks from Eruni. This fight shouldn’t be hard, it just takes long. Once the fight is over, talk to the Wise monkey and return to the colony.
-
At the colony you'll see a cutscene in which Apmeken will appear to reveal that you have restored her senses and she can resume her duties as a Godess. Afterwards, return to Senliten and inform her of what has happened to collect your reward.
Congratulations! Quest Complete!
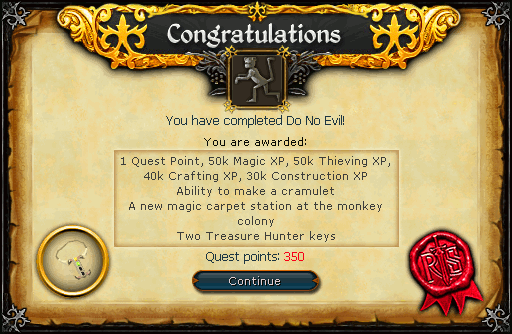
Cramulet, free elite clue scroll and free Agility XP:
Upon completion of the quest, you may add the Catspeak amulet and the Camulet to the Cramulet. Your Catspeak amulet will lose its enchantment if it is enchanted.
Upon completion of the quest you can use Ava's alerter and a spade to find a free elite clue scroll. There are 4 possible locations, with only one of them yielding the clue. Just like during the quest, you must dig when you see 4 Bwuks. Be sure to not wear any metal armor, because it will effect the Alerter.
- In Isafdar, at the coordinates 01 degrees 31 minutes north, 05 degrees 05 minutes west
- On Lunar Isle, at the coordinates 21 degrees 50 minutes north, 11 degrees 07 minutes west
- In the Iceberg region, at the coordinates 26 degrees 16 minutes north, 06 degrees 20 minutes east
- In Meiyerditch, at the coordinates 03 degrees 41 minutes north, 37 degrees 31 minutes east
If you return to the desert monkey camp after completing the quest, along the south east wall is an 'Exit'. This said exit can be accessed with 80 Agility and also contains a tomb, entering the exit gives 20k Agility xp, Apmeken mask and Ankh.
This Quest Guide was written by Terr002. Thanks to Norway007, Slasher200007, Mimz , MandyDarlin, Tormeh, Heavens Vibe, Andross2000, Phace, karisma, Double_D_Edd, Mikey Jh, Mr Tudjay, Ayri Wynn, Javezz, RisingSoul, Gu Jade, and Dusseldier for corrections.
This Quest Guide was entered into the database on Fri, Dec 03, 2010, at 05:14:47 AM by Double_D_Edd, and it was last updated on Thu, May 26, 2016, at 04:48:05 PM by Dark.
If anything is incorrect or missing, or if you have any new information to submit to this database, please submit it to us on our Content Submissions Forums.
If you see this guide on any other site, please report it to us so we can take legal action against anyone found stealing our content. This guide is copyrighted by RuneHQ, and its use on other sites is expressly forbidden. Do not ask if you can use our guides or images, the answer is and always will be NO!
Print this page with images - Back to the Quest Guide Index Page - Back to Top
