

Must be a member of the Champions' Guild (33 Quest Points).
-
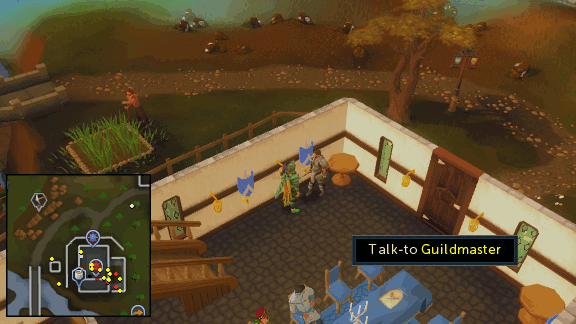
Talk to the Guildmaster in the Champions' Guild and ask him if you can have a quest. He'll tell you that he has a quest which will earn you the right to to wear a Rune platebody and send you to Oziach in Edgeville for details on what exactly you'll have to do.
Note: The fastest way to reach the Champions' Guild is via the Varrock lodestone home teleport and running southwest.
-
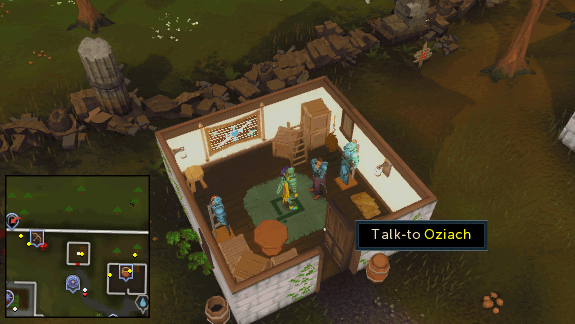
Make your way to Oziach's hut found just north of the Edgeville lodestone and talk to Oziach inside. Ask if he'll sell you a rune platebody and he'll ask how you know he has some. Tell him that the Guildmaster told you and he'll tell you that only heroes may wear it, then ask him about the quest and he'll tell you that he'll let you wear the platebody if you slay the dragon of Crandor. Say that sounds like fun and ask how to kill the dragon, after which he'll send you back to the Guildmaster for more information.
-
Head back to the Guildmaster and tell him you've talked to Oziach and he's given you a quest to defeat the dragon of Crandor. The Guildmaster will now tell you a story about Crandor and how the dragon, Elvarg was disturbed by one of the island's inhabitants, after which she destroyed their community. He'll then tell you that to get to the island you'll need a ship, a map and some form of protection from the dragon's breath.
Ask him how to find a route to Crandor and he'll tell you that the only map was split into three parts which were in possession of three mages from Crandor called Melzar, Thalzar and Lozar. Go on to ask him where to find each piece and after doing so he'll give you a Maze key.
Now ask him about where to find a ship and he'll tell you to try looking in Port Sarim, but you'll also need a captain and he doesn't know where you can find one of those.
Finally ask him about protection from dragon's breath and he'll direct you to Duke Horacio in Lumbridge who possesses a special shield enchanted against dragon breath.
-
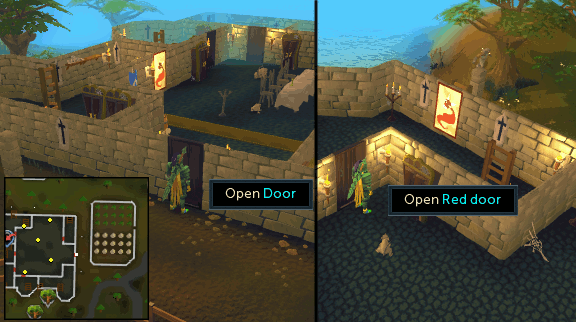
Starting with Melzar's map part, make sure you have food, armor and a weapon and make your way to Melzar's Maze found northwest of Rimmington. Go through the door and kill the Zombie rats in this room until one drops a Red key. Once you've got the key, go through the northwest Red door and climb up the ladder.
Note: The fastest way to reach Melzar's Maze is via the Port Sarim lodestone home teleport and running northwest.
-
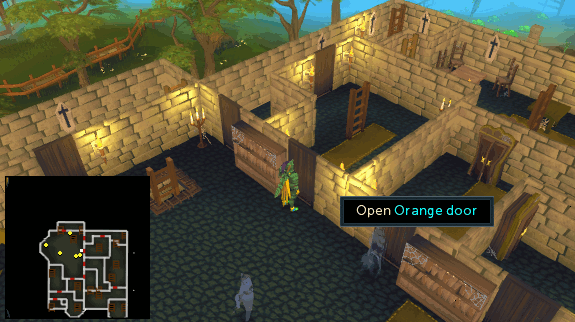
On this floor you'll need to kill Ghosts until one drops an Orange key. Once you've got the key, go through the second from north Orange door and climb up the ladder.
-
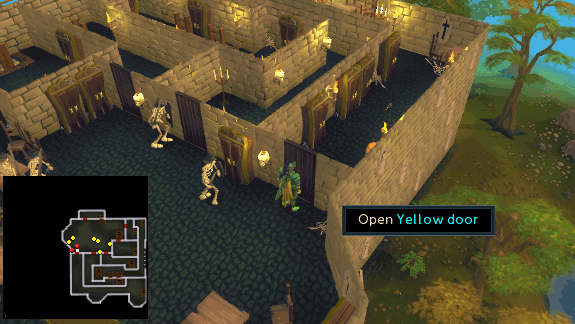
On this next floor you'll need to kill Skeletons until one drops a Yellow key. Once you've got the key, go through the Yellow door to the southwest and climb down the ladder at the end of the corridor, then climb down another ladder on the lower floor and then a final ladder down on the fist floor into the basement.
-
You'll now find yourself in a room with two Zombies. Kill both and one will drop a Blue key. Use this to open the Blue door in the northwest corner of the room and you'll find yourself in another room with Melzar the Mad.

-
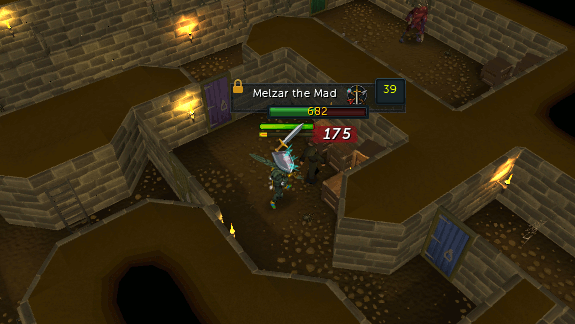
Kill Melzar the Mad and he will drop a Magenta key. Use this to go through the Magenta door to the north.
-
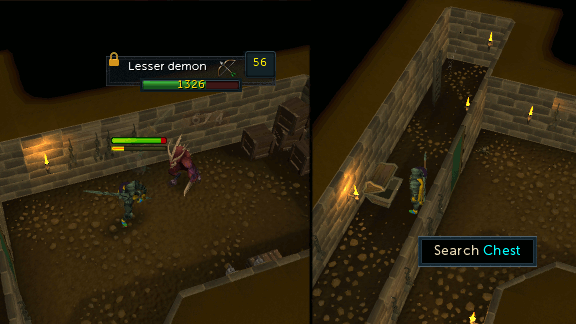
Finally you'll have to kill a Lesser demon to obtain and a Green key. Once done, open the Green door to the north and open and search the chest to obtain Melzar's Map part.
-
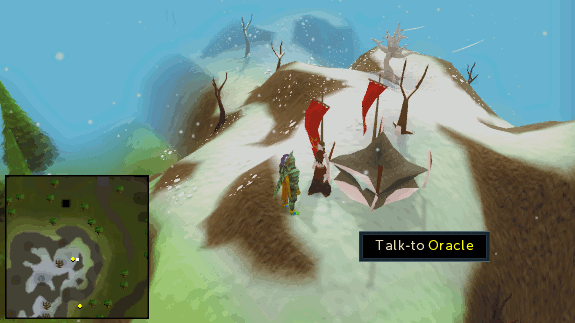
Now for Thalzar's map part. Make sure you have a Wizard's mind bomb, piece of Silk, Lobster pot OR Crayfish cage, and an Unfired bowl, then make your way to the northern side of the peak of Ice Mountain, found west of Edgeville, and talk to the Oracle. Ask her about the map piece and she'll answer in a riddle which basically means that the map part can be found in a room inside the Dwarven Mines beneath the mountain and you'll need the items listed above to gain access.
Note: The fastest way to reach Ice Mountain is via the Edgeville lodestone home teleport and running southwest.
-
Follow the red line on the image below from the Oracle to the dwarven camp on the south side of the mountain. Climb down the ladder here to enter the Dwarven Mines and continue to follow the red line until you find a Magic door.
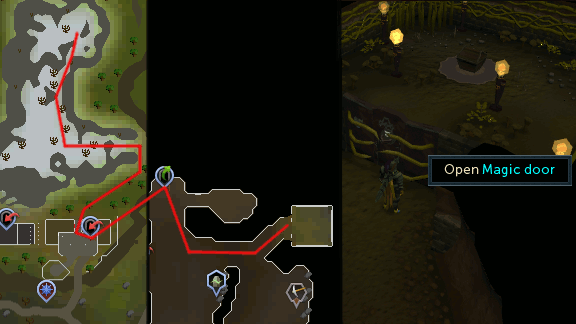
-
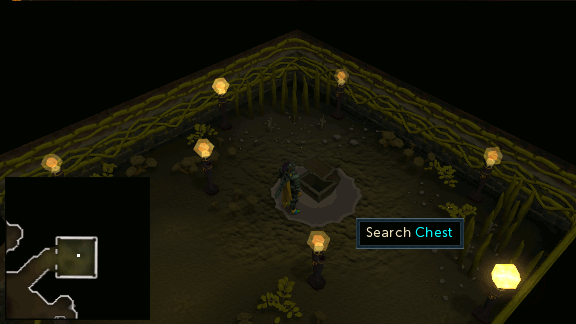
Use the Wizard's mind bomb, Silk, Lobster pot OR Crayfish cage, and Unfired bowl on the door and you'll pass through it into a secret room. Attempt to open the chest and you'll have to read a warning from Thalzar who urges you to leave the map part where it is, but you'll ignore this and can search the chest to find Thalzar's Map part.
-
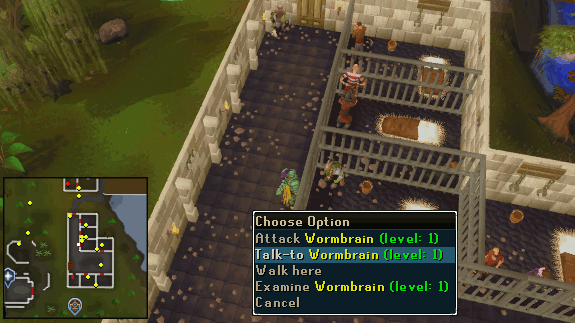
Now for Lozar's map part. Make sure you have either 10,000gp, or a Ranged/Mage weapon and Telekenetic grab runes (requires level 33 Magic), then make your way to the Port Sarim jail found south of Wydin's Food Shop. If you want to pay 10,000gp for the map part, talk to Wormbrain in one of the cells and offer to pay him. Do so and he'll give you Lozar's Map part. Alternatively, you can just kill him using Ranged or Mage and cast Telekenetic grab on the map part he drops to obtain it. Now use all three Map parts on each other to make the Crandor map.
Note: The fastest way to reach the jail is via the Port Sarim lodestone home teleport and running south.
-
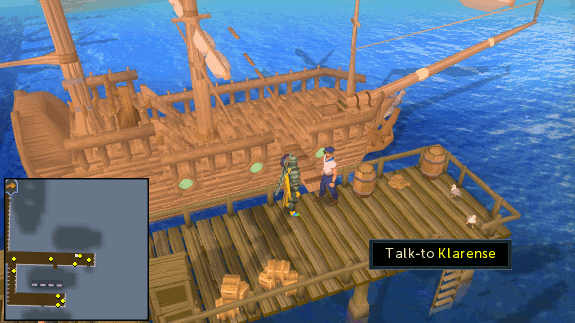
Now it's time to find yourself a ship. Make sure you have 90 Steel nails, 3 Planks and 2,000gp, then head back to Port Sarim and look for a sailor called Klarense at the end of the dock east of the Food Shop. Talk to him and he'll tell you that the ship next to him is for sale, but isn't quite seaworthy and needs some work. Say you'll buy her and pay him 2,000gp. You're now the proud owner of the Lady Lumbridge!
-
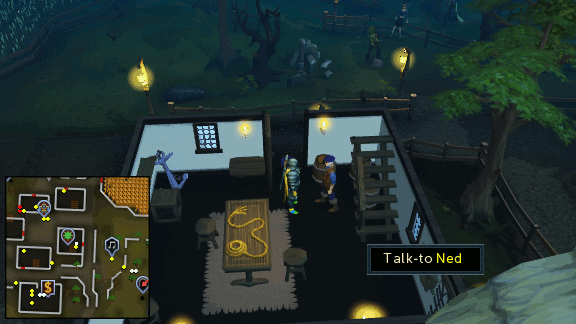
Cross the gangplank to board the ship and repair the holes on the deck. After which you will need to find a captain, head to Draynor Village with the Crandor map and talk to Ned in his house northeast of the bank. Ask him if he could take you to Crandor and after a short conversation, you'll give him the map and he'll tell you to meet him on board the Lady Lumbridge when you're ready.
Note: The fastest way to reach Ned is via the Draynor Village lodestone home teleport and running south.
-
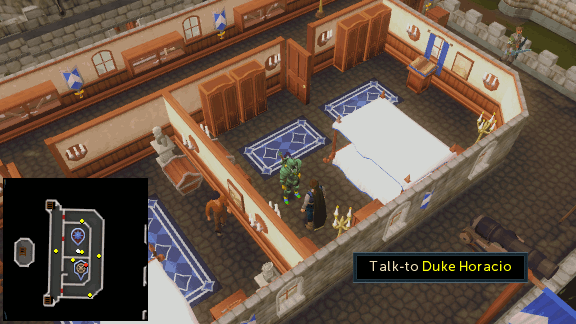
Lastly you'll need to obtain protection from dragon's breath. Make your way to the middle floor of Lumbridge Castle and talk to Duke Horacio. Ask him about the shield and tell him you're going to use it to slay Elvarg and after telling you a story about the dragon and confirming that you're sure you want to kill her, he'll give you an Anti-dragon shield. Doing this will also complete the "Always Be Prepared" Medium Lumbridge Task.
-
Now it's time to prepare to fight Elvarg. If using Melee, then Rune armor with a Rune chainbody and Rune battleaxe or Rune warhammer is recommended for the best Armour and Damage bonuses. Adamant also works, but will obviously be less effective.
If using Magic, then Mystic robe bottom with a Batwing torso and Bat wand is highly recommended. Members can use Splitbark as an alternative.
Ranged is not recommended as the armor does not provide much protection against Elvarg's attacks, but if you choose to use it then Blue d'hide with a Green d'hide body and Rune or Adamant javelins are recommended. Crossbows can be used as an alternative if you are a Member.
Free-to-play players should use Swordfish as food and may also want to bring Stat-boosting potions with them e.g. Attack potion.
Members can use Monkfish or better as food and may also want to bring super stat-boosting potions with them e.g. Super attack and an Antifire potion to completely block Elvarg's dragonfire attack. If you can use Protect From Melee, then it is recommended to do so during the fight and bring 2-3 Prayer potions as Elvarg's dragonfire drains your Prayer Points.
DO NOT FORGET your Anti-dragon shield as Elvarg's dragon breath damage will be limited to 400 with the shield, but can hit up to 1,200 without it.
If you haven't done so already, then it is also recommended to buy the Ornate gravestone from Father Aereck in Lumbridge for 5,000gp so that you have 8 minutes to get back to Elvarg's Lair if you die.
-
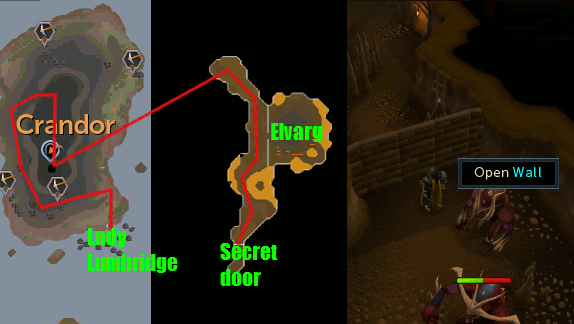
Return to the Lady Lumbridge and talk to Ned on board. Confirm that you're ready to set sail and you'll see a cutscene in which your ship is attacked by Elvarg and you're forced to crash into the shore of Crandor. Follow the red line on the image below from the Lady Lumbridge to the top of the volcano and climb down the ladder.
You'll see another cutscene showing Elvarg's Lair and once done, ignore the skeletons that attack you and run south past the lair and the Lesser demons until you come to a wall which can be opened. Do so and you'll unlock a secret door which can be used to get back to the lair via the Karamja volcano at Musa Point if you die.
-
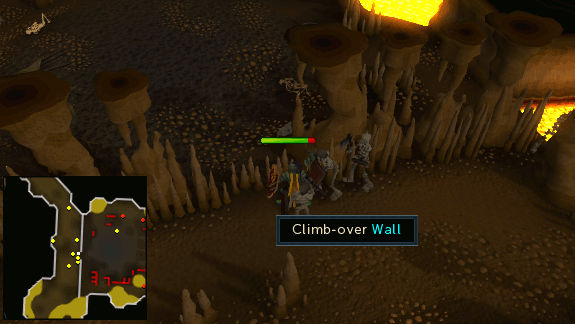
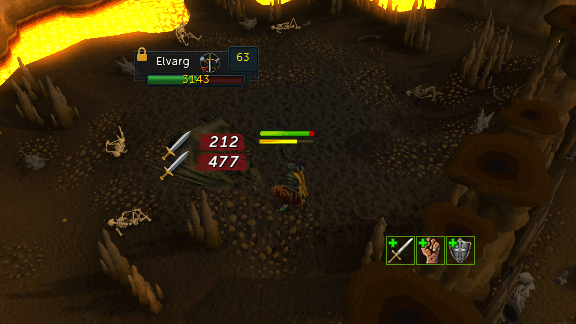
Head back to the lair and prepare to fight Elvarg. Make sure your Anti-dragon shield is equipped and drink any potions if you've brought them, then climb over the wall and attack the dragon.
If using Magic or Ranged, make sure you stand within Melee range of Elvarg otherwise she will only use her dragonfire attack and constantly hit 300+, whereas her Melee attack hits a maximum of 200 and will sometimes miss.
-
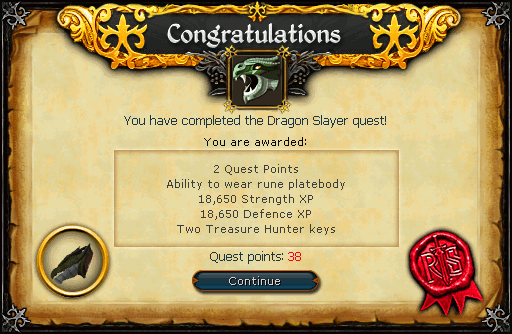
Once you've defeated the dragon, you'll cut off Elvarg's head as a trophy which you should now take to show Oziach in Edgeville. Do so and he'll proclaim you a hero and offer to sell you rune platebodies.
Congratulations! Quest Complete!
This Quest Guide was written by Javezz. Thanks to Catherine, Ghouliesa, and Brenden,Weezy, Fritters, firespyrit, evomasta, stormer, DRAVAN, Axelman, Nitr021, gingerboy20, Perfect Idol, lorddan01, Kang227, TheRulnig, pokemama, Psycho944, Shinraz, gkef, havfunonline, rc pure, Tenseiken, kober18, Perfectbody7, themrb, de3plus, Minas_Kai, minikiltman, ossie000, thor__13, beaverboy40, Dell8400p4, Chaosblade77, Skeletonmat, Alfawarlord, Hammeh, Poofy, Cedros Man, andro girl, Mutiny, Stormys_Amazon, Hilwin1, Realruth, stpbutcool, Kittyhawk, Killamonga, Crablogger, Dark Weed121, Yonyonson1, Wahz, Arthenwel, cloud elran, nunya, Ksb Single, and Jarkur for corrections.
This Quest Guide was entered into the database on Fri, Feb 06, 2004, at 09:11:17 PM by Chownuggs and CJH, and it was last updated on Mon, Aug 22, 2022, at 03:49:48 PM by 3ter1.
If anything is incorrect or missing, or if you have any new information to submit to this database, please submit it to us on our Content Submissions Forums.
If you see this guide on any other site, please report it to us so we can take legal action against anyone found stealing our content. This guide is copyrighted by RuneHQ, and its use on other sites is expressly forbidden. Do not ask if you can use our guides or images, the answer is and always will be NO!
Print this page with images - Back to the Quest Guide Index Page - Back to Top
