

Table of Contents
Introduction
Puzzles
Strategy 1 - Ancient Magic Freezing
Strategy 2 - Magic Dart and Prayer
Equipment Sets
- - Ahrim the Blighted
- - Dharok the Wretched
- - Guthan the Infested
- - Torag the Corrupted
- - Verac the Defiled
- - Karil the Tainted
Required Quests: Must finish Priest in Peril and begun/finished Nature Spirit. Highly recommended quests are In Search of the Myreque (shortcut to the area) and either In Aid of the Myreque, Ghosts Ahoy, or Desert Treasure (for nearby banking in Burgh De Rott or Canifis).
Required Items: Spade
The Barrows is a fairly large area located in southeastern Morytania, just east of the city of Mort'ton. For those who do not know where Mort'ton is, it is a city south of Canifis, beyond Mort Myre.
It is inhabited by the spirits of six brothers who died long ago in battle. The warriors' souls, however, have been tainted, but that is no concern of yours; you most likely just want their armor and weapons. The six brothers include one mage, Ahrim, one archer, Karil, and four warriors: Verac (the flail user), Guthan (the spear user), Dharok (the great axe user), and Torag (the dual-hammer user). Ahrim and Karil are both able to max hit around 20, and the warriors can normally hit in the 20's, but Dharok is the biggest threat of the six brothers. Dharok has a special effect; he hits higher the lower his hit points get, and he can hit up in the 60s when very low on hit points.
Each of the brothers has their own special effect if they are able to hit you. Verac's special effect is that he can hit through any kind of armor, INCLUDING PRAYER, so he can hit very often. However, prayer can still be effective against Verac as not all hits will pierce armor and prayer. Torag is able to drain your energy by 20% randomly. Karil lowers your agility by 20%. Ahrim lowers your strength very often and can also use spells to lower your attack and defense. Guthan is able to heal the amount of damage inflicted on you when his special effect is activated (this can even heal him if you are praying mind you). All of the NPCs except for Verac and Dharok can hit their special effects through your prayer.
There are many different strategies in order to kill these ghosts, and it is not really necessary (although it's definitely recommended) that you kill all six brothers. The following guide will lead you through the two most common strategies used amongst the people who barrow often.
Combat levels of the six brothers:
- Ahrim the Blighted (Level-98)
- Dharok the Wretched (Level-115)
- Guthan the Infested (Level-115)
- Karil the Tainted (Level-98)
- Torag the Corrupted (Level-115)
- Verac the Defiled (Level-115)
One of the most important things that you should know before going to the Barrows is that everyone has their own strategy, and there is no perfect way to go about getting items; it's totally and completely random, with an average chance of about 10% for an item at all. However, you will always receive coins and some missile runes from the chest, so it isn't a complete waste if you don't get barrows equipment.
Before I lead you into the strategies you might want to know what exactly that you are doing. When entering the barrows graveyard there are a total of six mounds, one for each of the brothers. To enter one of their tombs simply dig with your spade while standing on top of one of the hills. This will take you into a small room; within is a crypt and a staircase. The staircase will take you back to where you came from, and clicking on the crypt will do one of two things. The first thing it might do is awaken the spirit living in the crypt, one of the six brothers. This map gives information on which of the crypts belongs to which brother:
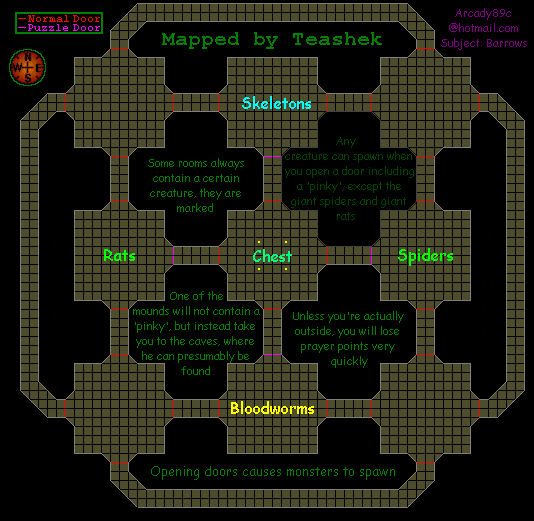
(Map made by Teashek, and edited by Sir karamu, original map by Coolgeekz)
The second thing that might happen when searching the crypt is that you'll find a tunnel. Every time that you go to the barrows, you will have a certain ghost that won't be in his crypt. He will instead be inside of the tunnel that you would enter if you decided to go in. The brother can randomly be spawned by opening a door down in the crypt, or by opening the barrows treasure chest. Therefore, you will find a total of five brothers in their crypts, and one brother inside of the tunnel. If you continue reading this guide, you will find two different strategies on killing the Barrows Brothers, but for the moment I will continue on.
Once you have killed the desired amount of brothers from their crypts (Although you don't have to, it is very strongly advised that you kill all five of them), you may descend into your tunnel. The main outlook of the tunnel is a 3x3 grid with doors connecting every adjacent room with small hallways and all adjacent edge room with long hallways. It should also be noted that there are many monsters in the tunnel which can hit up to 9-10 damage, and should be avoided if possible; they do not help you receive barrows equipment. The tunnel is always the same layout, but the doors are locked differently for different people.
When entering the tunnel, you will be in a room with a ladder and four doors, one on each side of the room. You will only be able to open one of them, so open it and follow the hallway to the next room. If you go through a door with a small hallway into another room then you are now in one of the outer middle rooms. You want to get into the center room, which contains the ever infamous Barrows Treasure Chest. The only way into the Treasure Room is to go through one of the four doors from the outer middle rooms. The door is completely random and can be in any four of the outer middle rooms. Check all of the doors from the outer middle rooms into the center room until you find the one that can be opened.
If you are stuck and cannot find your way into the center room try standing next to one of the four doors and angle your camera so that you can see the middle room, you will be able to see the other three doors as well, which will help you find which one has the "Open" option. Once you have found the door you will have to answer one of the four questions correctly:
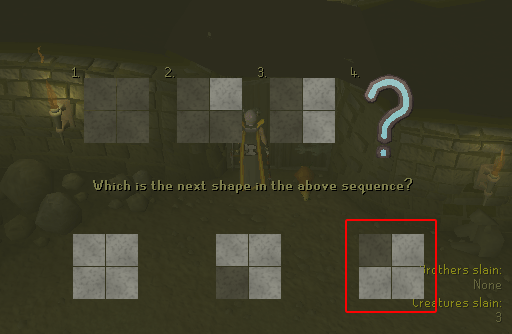
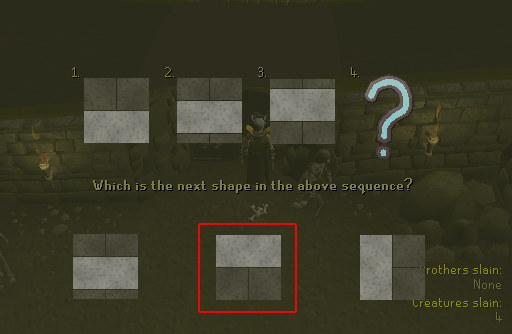
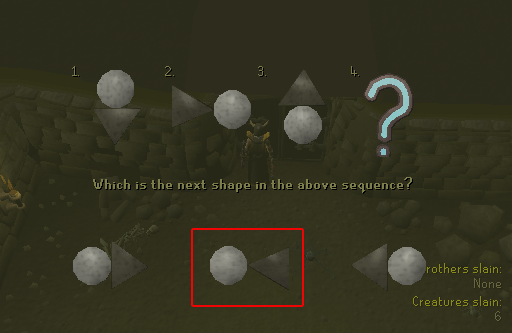
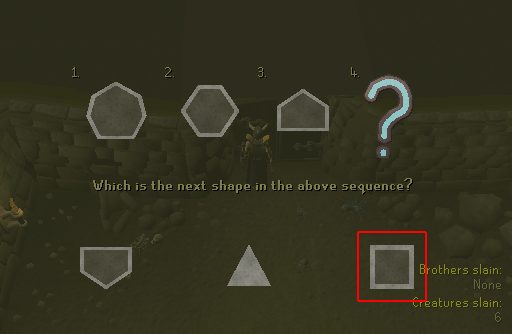
Note: the answers aren't always in the exact same order... so pay attention to which one is which!
Once you have answered the puzzle correctly, the door will be able to open. If you answer the puzzle incorrectly then the puzzle door will be changed to a different door and you must find it again. Once you have gotten into the center room you will see a closed chest. If you haven't already run into and killed the sixth Barrows Brother, he will appear once you open the chest. Kill him, and you are ready to search the chest. Once you have searched the chest, the cave will start collapsing and hitting random hits on you until you get out of the cave. It's your choice here whether you teleport out and bank or find your ladder again to go straight back to fight the brothers.
I must warn you that you ARE NOT assured anything out of the chest no matter how many times you go. If you notice in the bottom right corner of your screen you will see a kill counter. This appears whenever you are in the tunnel or in one of the brothers' crypts. The kill count rises when you either kill one of the brothers or one of the creatures inside of the tunnel. The kill count in no way affects the chance of you getting a barrows item. To maximize your possible reward for each chest you open, you must kill all 6 Barrows brothers and kill 5 Skeletons or 5 Giant Crypt spider. All the barrows brothers and whichever 5 you choose to kill will equal out to the max possible reward. For those players who have completed Morytania Hard Diary, they may claim 50% more runes at the chest.
Note: when you teleport out, your Killcount will not be reset and will remain there. The Killcount will only reset once you have opened the chest.
Once you have left the tunnel, everything in the barrows will reset, including your kill count and the barrows brothers themselves (this also means that you might meet a different brother in the tomb). Now it's on to the strategies that you might want to use while visiting the barrows.
Strategy #1: The Ancient Magic Freezing Approach
Recommended Items: Magic armor and ranging armor, Mithril-Rune Arrows, Runes to cast Ice Burst or other Ice attack, Lobsters+ for food purposes, 2-10 prayer potions (depending on how many trips you plan per bank run), Super Stat Restore Potion, Magic short bow, Ancient or Water staff, and Teleport Runes or an Ectophial.
This strategy is all about timing, and uses many less prayer potions than most methods to date. In this method, you are able to attack the opponents from a distance, and run off into cover before the barrows brother is able to fight back. This method is much more dangerous than many other methods as well, so be cautious when using it.
To start, make sure that you have at least 10 points of prayer and head over to the tomb of Dharok. It is advised that you start out with magic armor and your staff handy, ready to cast your ice attack on the spot. Turn on Protect From Melee and search the crypt, and cast your ice spell on Dharok as soon as he appears. Take a few steps back from him and run on the opposite side of his coffin. When he becomes unfrozen wait for a second (it is now safe to turn off your prayer). After about 10 seconds quickly run to an end of your side of the coffin, but make sure that your magic menu is open. When Dharok gets to the end of his side of the coffin quickly cast your ice spell on him. When he becomes frozen you have EXACTLY enough time for three more attacks before he is able to move if you're using Ice Burst. You should have time for 6 more attacks if using Ice Barrage. Now, once you have begun casting your fourth spell quickly run back to the opposite side of the coffin as Dharok is on, making sure to keep out of his reach if you're too slow. Repeat this process until he is out of health, but don't be fooled by him if he has 2 or 3 health points left, because he'll make you regret it with very high damage and accuracy.
The other 3 meleeing brothers aren't as strong as Dharok and will not need any prayer when you first open their crypts; just continue to use the same method as you did on Dharok. Once you have killed all four of the meleeing brothers it is time to use your prayer or super restore potions and head over to Karil's crypt. Choose between Maging and Ranging (maging works slightly better but uses up runes), and go on in. Turn on protect from range and kill him. Next go to Ahrim's crypt and use your magic short bow to kill him; he dies very quickly, although it is advised that you use prayer on him as well. Now it is time to head into the tunnel. On the brother in the tunnel, you'll be almost forced to pray against them no matter which one it is, especially if it is Dharok, so just kill them and reap your rewards.
Strategy #2: The Prayer and Magic Dart Approach
Recommended Items: Magic armor and ranging armor, Mithril-Rune Arrows, Runes to cast Magic Dart, Lobsters+ for food purposes, 5-15 prayer potions (depending on how many trips you plan per bank run), Super Stat Restore Potion, Magic short bow, Slayer staff, Ectophial.
This strategy is the more commonly used one, because it has a much lower chance of death while barrowing. However, this approach does use MANY more prayer potions than the first choice, although it doesn't use nearly as many runes. This approach is also much simpler than the first one; simply use prayer potions to keep up your prayer while you use magic dart on the barrows brothers until they die. You'll still use the same method on Ahrim and Karil, but the melee brothers are much less of a hassle with this approach. The tunnel will also use the same method, simply pray on the last brother and reap your rewards! You might want to bring noted food and potions, so that you only have to go to the Mort'ton general store for supplies, but beware, if you die, it will be much more costly.
However, if you have finished the quests "In Search of the Myreque" and "In Aid of the Myreque," you will have access to a bank in Burgh De Rott, just South of Mort'ton.
I hope this guide has assisted you in your ambitions to receive barrows equipment.
The following data regarding Equipment Sets was taken from the Official Runescape Forums, used with permission.
-
Ahrim the Blighted's Set (Magic)
- Ahrim's hood
- Ahrim's robetop
- Ahrim's robeskirt
- Ahrim's staff
-
Dharok the Wretched's Set (Melee)
- Dharok's helm
- Dharok's platebody
- Dharok's platelegs
- Dharok's greataxe
-
Guthan the Infested's Set (Melee)
- Guthan's helm
- Guthan's platebody
- Guthan's chainskirt
- Guthan's warspear
-
Torag the Corrupted's Set (Melee)
- Torag's helm
- Torag's platebody
- Torag's platelegs
- Torag's hammers
-
Verac the Defiled's Set (Melee)
- Verac's helm
- Verac's brassard
- Verac's plateskirt
- Verac's flail
-
Karil the Tainted's Set (Ranged)
- Karil's coif (censor)
- Karil's leathertop
- Karil's leatherskirt
- Karil's crossbow
Notes:
- All the weapons are two handed - you cannot use shields.
- Bolt racks can only be used once, like runes.


Set effect:
When you attack with any spell, you have a chance to reduce the opponent's strength.


Set effect:
As your HP gets lower, your strength increases. It stops when you get to 10% of your health, which gives double strength.


Set effect:
When you attack, you have a chance to drain the damage you inflicted onto your opponent into your own hitpoints.


Set effect:
While wearing the complete set, it will drain your opponent's energy at 20% a drain. However, it will not add it to your own energy.


Set effect:
When you attack, you have a chance to ignore the opponent's armor and attack as if they were not wearing anything (much more accurately). This attack does ignore prayers.


Set effect:
While wearing the complete set, it will lower your opponent's agility by 20%.
This Old School Minigame Guide was written by Unknown. Thanks to kaenen4 for corrections.
This Old School Minigame Guide was entered into the database on Thu, May 12, 2005, at 06:30:38 PM by dravan, and it was last updated on Fri, Jun 17, 2016, at 08:37:16 PM by Dark.
If anything is incorrect or missing, or if you have any new information to submit to this database, please submit it to us on our Content Submissions Forums.
If you see this guide on any other site, please report it to us so we can take legal action against anyone found stealing our content. This guide is copyrighted by RuneHQ, and its use on other sites is expressly forbidden. Do not ask if you can use our guides or images, the answer is and always will be NO!
Print this page with images - Back to the Old School Minigame Guide Index Page - Back to Top
