

Table of Contents
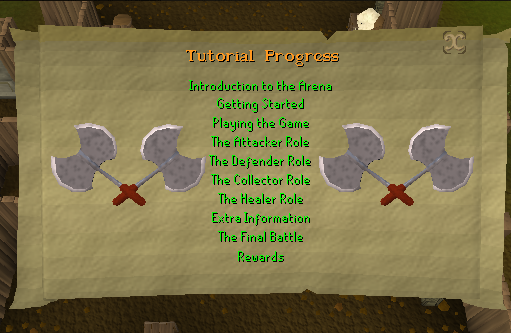
Before venturing in the depths of the Barbarian Outpost, you'll be required to go through a long tutorial which will introduce you to the basics of the activity such as the different roles you can play with and their purpose. Here is what you will be learning:
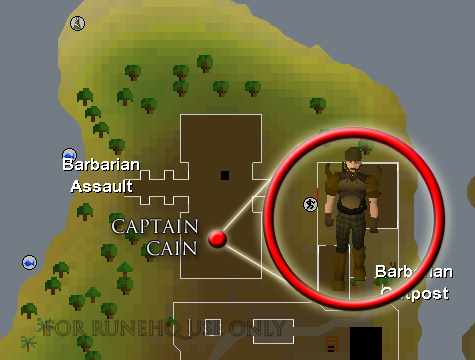
 To start the tutorial, speak to Captain Cain, found in the lobby:
Once the tutorial is complete, you will be offered a Queen tutorial book which contains the steps to make an Omega egg. This is the weapon that you will need in order to defeat the queen, which will be explained later on in this guide as well.
Did you notice that ladder next to Captain Cain? Sure you did, but now, you can use it to access the wave rooms lobby! But first, you need to stop by the bank deposit box, which is just in front of the ladder. Items such as any cape, arrows, runes, and food are to be banked as you won't be needing them, even if you're geared as a wizard or an archer. Unneeded items banked, you're now ready to go downstairs! Do so, and you will find yourself in the wave lobby room.
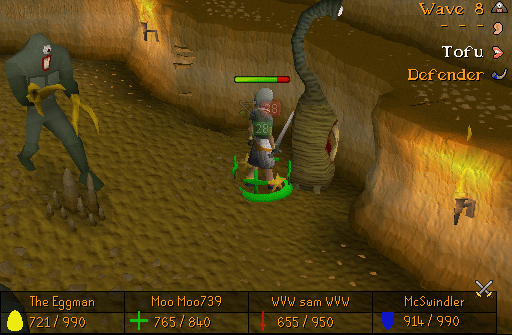
A full game of Barbarian assault constitutes of 10 waves of increasing difficulty with a small variety of penance monsters that are to be defeated to get to the next wave, so, each wave has its own waiting room here. Note that you may leave the waiting rooms as you wish without losing your current wave process. If you wish to restart your wave progress, talk to Captain Cain again and ask him to reset your progress, you won't be losing anything though, as you will be given a wave room ticket, according to your current progress. That way, if you want to team with friends but have unmatching waves, you can reset your progress then continue with that game later, handy!
As you can see in the following area map.
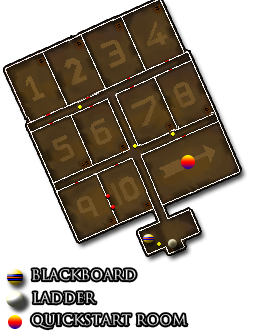
There is no way to get lost here, as every room has the wave number writing on the floor so you can easily locate them, from 1 to 10. But as you might have seen there is also an eleventh room with an arrow marked on it. This is the Quickstart room, to which anyone can enter (Note: Entering this room will reset any process you might have) to have a "test drive" of the activity, you could count it as wave 0. Something special about this room is that teams will be automatically picked inside this room.
To activate hard mode, you will need to have completed all 10 waves and killed the Penance Queen at least once, and then you can get the recruitment scroll from the waiting room and right click it to toggle Hard Mode.
Note that ALL team members must have done this in order for them to activate hard mode too.
In hard mode, instead of the Penance Queen, you will need to kill the Penance King at wave 10.
If this is your first time playing the game, you (of course) start at wave 1, although you might want to use the quickstart room just this one time for a small practice. From this point we recommend you to hop to this activity-themed world so you can find a team easier, unless you have your own!
Note: If you are unsure of your current wave process, you can check it using the blackboards found near Captain Cain or right next to the ladder after going down to the wave room lobby.
Once in the correct wave waiting room, you have the option to either look forth to getting recruited by an exisiting incomplete team or starting your own team.
To start your own, take a recruitment scroll from the table in the room and use them on the players of your choice to recruit them:
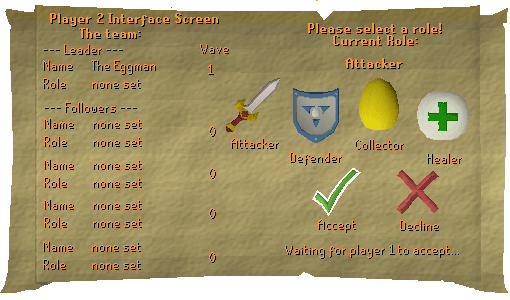
As the recruit, you will be shown an interface where you can select the role you want to be and send the request back to the team leader.
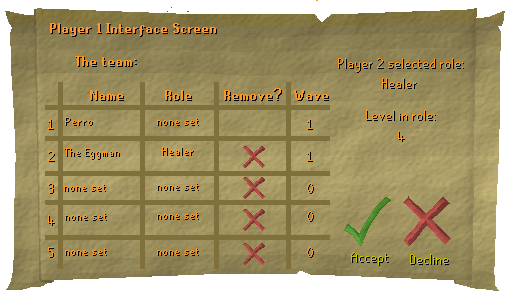
As the leader, you will be able to see the choice of the recruited person along with their role level (explained later) and the list of the current team members along with the option to remove any of them.
Each team must be formed of 5 players in all time to play this mini-game (If you are the leader you count as one already). If someone leaves the team in the middle of the game, the wave will automatically end and you will have to restart it. But back on the teams: 5 person per team, each one having a couple of very specific tasks to complete during the waves. These are the roles.
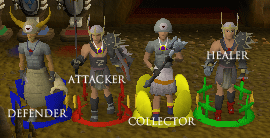
As you might have noticed, there are four roles and five needed people to form a team, which means there will be two people with the same role. They might sound confusing right now, but not to worry, the purpose and strategies for each role will be explained soon.
For the lower waves (1-5), it is recommended:
- 2 Attackers
- 1 Defender
- 1 Collector
- 1 Healer
For the higher waves (6-10), it is recommended to switch to:
- 1 Attacker
- 1 Defender
- 1 Collector
- 2 Healers
If the team's average combat level is low, it will probably be better to stick with the second team scheme during all the waves to avoid any deaths, since if anyone happens to die, nobody will lose any items, but you will be forced to restart the wave. But these are also nothing more but team structure suggestions, and you might find during the game another scheme that suits your team best.
Note: If someone happens to leave the waiting room while in a team, the person will be automatically removed from the team. Also, if the team leader happens to leave the waiting room, the whole team will be disbanded.
Once your team is complete, proceed to going down the ladder found in one of the corners of the waiting room to start the game!
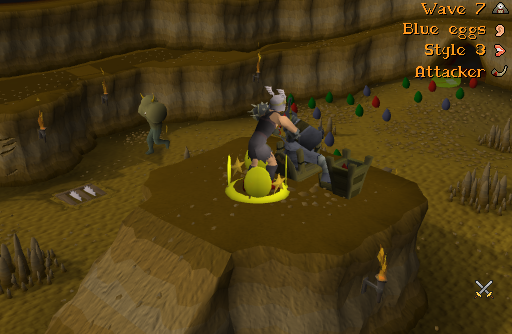
Now, what is the wave arena composed of? You'll find it here, and even if you won't find an explanation to all what is found inside it, do not worry, it will be explained later. Once inside the arena, you will find four coloured dispensers which provide the respective supplies according to the role chosen, with the exception of the Collector dispenser. West of the dispensers you will find a pool with holy water, and its use is exclusive to whoever performs the healer role. And east of the dispensers, you'll find the Horn of glory.
Now! Moving foward in the arena, you will spot two cannons placed at the top of small hills, these can be operated by anyone, but only the collector can load them with ammunition, along with a saw trap next to each hill which use if restricted to the Defender.
Pass this, you'll find the penance monster respawn caves, one for each kind of monster, and in front of these, just in the middle, a hammer and two normal logs are to be found, these are for the defender to use or by anyone to block the respawn caves (which is not recommended since you need to kill all the monsters to complete the wave).
Before adventuring in this activity there is one thing that you must be aware of and keep in mind. This activity is fully dependant of everyone's performance as a team. Your performance will affect the rest of the team, and the performance of the rest will affect you back. This is why calling is so important to succeed.
Each role depends on another role to obtain the crucial information needed to fulfill their purpose inside the penance arena. Players use the horn they are given at the start of each wave to transmit this information.
In the top right-hand corner of your screen, you will spot four icons which are for this purpose and are explained below:
 This icon states the level of the wave that you are currently in.
 This icon displays the call information that a fellow party member has just send you, which should be vital to receive, no matter your role.
 This icon displays the call information that you must pass to a fellow party member. The text will be white-colored as long as you haven't used your horn at all, this is to help you spot the call updates. The text will return to its normal color even if you make a wrong call - so be sure to recheck you didn't make a mistake and recall if you did!
Doing this is vital for your team to succeed, so keep this under constant vigilance!
This icon displays the call information that you must pass to a fellow party member. The text will be white-colored as long as you haven't used your horn at all, this is to help you spot the call updates. The text will return to its normal color even if you make a wrong call - so be sure to recheck you didn't make a mistake and recall if you did!
Doing this is vital for your team to succeed, so keep this under constant vigilance!
 This icon indicates which role is the one who is depending on you to succeed.
This cleared, we can move on to explaining the roles you can play with.
Stock up!
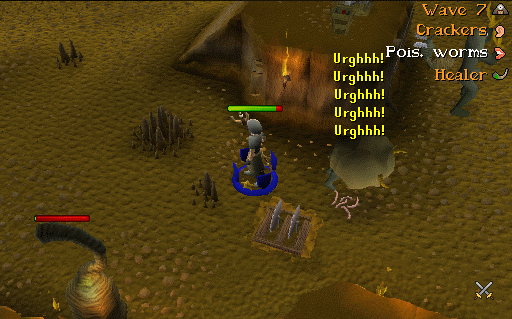
Once the wave has begun, start by using your Defender horn to call the type of poisonous food that the Healer needs to use and then proceed to stock up on Penance runner bait operating the Defender's dispenser found next to where you respawn: Worms, tofu and crakcers. Yummy!

Penance like a boss
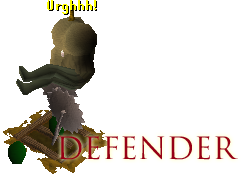
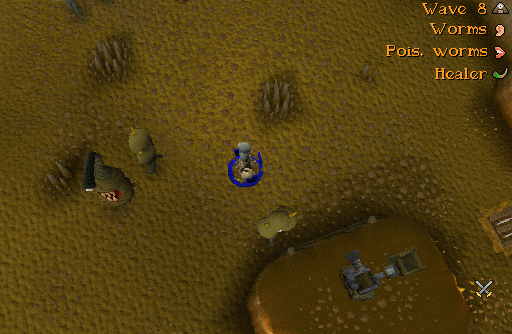
The defender is a role in which people will stop Penance Runners from going to the lure cave. Whenever a runner goes through the lure cave (which is located at the far south side of the area) your team will get some pretty harsh point reduction. Here is when the defender comes into play.
He uses bait (received from the Defender Dispenser) to lure the runners into eating the items and ultimately destroying them using the buzz sawtraps found near the small hills in the arena.
The trap is basically 2 saws which come up once a runner eats a piece of the correct lure item either ON the trap or around the trap (3x3).
The baits are practically meals for the runners, and they will try to eat it. The bait has a lure range of 4 squares, increasing to the max of 10 when you level the role.
The defender role is by many people considered the hardest role, however if you know what you are doing, the defender role is actually one of the faster, and easier roles.
There are a few strategies to defend, but we will cover the best one.
When you see the items pop up in your inventory (while getting stocked up on Penance bait from the Dispenser), that means you are able to move and call, in order to use this to your advantage, you will immediatly click directly north of you when the items show up.
When you are walking to the north, be sure to drop a few WRONG kinds of lure (nothing to worry about, this will not end up in you losing any points). The reason for this is to prevent the runners from going the undesired way: once they eat the wrong type of food they turn around and go back in their steps, effectively giving you a second chance to terminate them. To avoid the runners passing the hill with the cannon, which is the first thing you should avoid, go to the spot shown on the image:
Once you are there, drop about half your inventory of the current good lure items at that specific spot and go as fast as you can to ONE square right, north, or northeast of the trap, and stay there until all the penance runners are around you. This is thanks to the fact that you are standing on the food, so the runners will be blocked and will be unable to get the food, nor they will ever get unfocused from their goal of getting it.
Once all the runners are trying to get that food you're standing on, move away, so the runners eat the food, and get killed by the saw trap.
Now if this is a hard wave, you will need to fix the trap. If you have done it correctly, you have just moved away and killed a few runners, keep running towards the hammer and the logs, and grab one of each. Make your way back to the trap, lay another correct piece of food over it, and fix the trap. This will allow you to wait until all the runners gather again, and kill the remaining runners.
 The Defenders rely on the Healers to receive the correct kind of bait to use and the Healers rely on Defenders to know the right type of poisonous good to use, so be sure to always call the updates using your Defender's horn, automatically given to the Defenders at the start of a wave.
Role tips
Before venturing to fight the hordes of Penance monsters, set your window size either on Resizeable or Fullscreen if you are able to do so. That way you will easily spot the Penance Runners who are about to attempt to elude you!
Stock up!
Unless you are making use of Magic or Ranged to fight the penance hordes, you should ignore the Attacker dispenser and go staight to the battlefield for some glory! It is also strongly recommended to just use Magic or Ranged when you are a second attacker: There should be at least one Attacker using melee so the waves do not get slowed down.
Hot Mess
As an Attacker, even if you are given the options of using Magic and Ranged, we really recommend to stick with Melee, unless you really have no other choice but to use an alternate combat type.
The goal in this role is to slay all the Penance Figthers and Penance Rangers that spawn from the two caves at the northwest side of the arena.
Melee
It is suggested that you use the best melee armor and weapons that you can wear. As you enter the wave, you will have four different stances appear in your Constitution ability book. These abilities are:
- Aggressive
- Balanced
- Defensive
- Reckless
It's recommended you put these stances into your ability bar for faster switching.
Magic
Note: The use of the Ancient spellbook is forbidden by the Barbarians in this activity. Plus, the Lunar spellbook will be nothing but useless to you.
You will receive Elemental (counts for the four elemental runes) and Catalytic (counts as all the combat runes) runes, so it is a good idea to make use of magic damage boosting weaponry such as an Ancient staff, a Master wand, or a Staff of light. Damage boosting gear such as the arcane necklaces (Dungeoneering reward), plus magic robes with the highest defence bonuses you can access to, would also be an advantage.
Ranged
If you're going to play the Attacker role as a ranger, then you must know that you will be needing a bow, as the attacker dispenser will only provide you with arrows. You will need, at least, to be able to use up to mithril arrows (along with a bow that is able to use them) or else you won't be able to fulfill your purpose as an attacker.
Role tips
As an attacker, you will be heavily piled by the hordes of Penance fighters and rangers, this is why it is always a good idea to bring an Enchanced Exalibur with you in case a Healer is not available to get in time to you to avoid dying.
Attackers are fully dependant on the Collectors' calls and vice versa. Remember to always be under constant vigilance for call information updates - Collectors are going to be waiting for it!
Stock up!
The first thing you need to do when you start as a healer is to head to your respective dispenser get your healer items. As a healer, you are given a Healing vial and poison food (Poison meat, Poison tofu, and Poison worms).

Staying alive
Once stocked up, a healer has three tasks to perform during a wave:
- Healers need to keep themselves and the rest of the party alive to prevent the team from failing the wave.
They must be constantly observing the lifepoints of their party members using the lifepoints meters that display in the game screen.
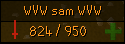
To heal a party member, first head to to the holy water pool next to the dispensers and fill the healing vial, (note that if a healer needs to recover their own lifepoints, they will have to return to this pool and drink directly) then use the vial on the desired teammate. The amount of lifepoints healed will be linked to the healer's role level: the better the level, the more lifepoints are healed.Sometimes one of your teammates might be in need of your help and will use the "Medic" option of their horn to draw your attention to them. This will make a green cross appear in the respective lifepoint meter:
- They will need to feed poisoned food to the Penance healers by using it on the monsters, in order to poison them so they eventually die. Healers depend on the Defender's calls to obtain the right type of food.

Role tips
- Always fill your Healing vial before venturing any further in the arena so you won't need to freak out at realizing someone has low lifepoints and your vial is empty.
- At the harder waves (5-10), to effectively use your first inventory of poisoned food start by poisoning as much Penance healers as you can by feeding them just one piece of food. When you have poisoned all of the current healers in the arena, start piling them with poisoned food to accelerate their death.
- During the hard waves, the whole number of healers to be killed won't be spawning in line ready to get killed. There will be batches of healers released, so it is always a good idea to keep an eye near the healer cave respawn (at the east) for new healers waiting to be poisoned. That way, you don't overlook them and have an unpleasant surprise when everyone has killed their monsters and there is still a healer roaming around!
Stock up...not!
Unlike the rest of the roles, a Collector does not require of any extra items than the Collector's bag and the calling horn at the start of a wave. The first thing a Collector should worry about is calling, since the Penance eggs that are meant to be picked up by whoever plays this role are dropped by the Penance monsters upon death.
The main source of these will be the Penance fighters and Rangers which are the Attacker's target. The Attacker depends on the Collector to do his task (and vice versa).
Your Collector's bag will hold a certain amount of eggs depending your role level. When full, the eggs will appear in your inventory: Note that they are not stackable!
Rambo time!
Now that you have the Penance eggs, you can do two things with them. First, you can run to one of the small hills found in the arena and load the Egg hopper with Penance eggs to get the heavy artillery going on! Then click on the Egg launcher to select both your monster type and egg type to be launched at them. The specific target will be randomly chosen from the possible ones near the cannon area. Each egg has a different kind of effect on the monsters:
- Red eggs will cause 30 Lifepoint damage on Penance monsters.
- Blue eggs will stun them and hold them in place for a few seconds.
- Green eggs will directly deal 10 Lifepoints damage and in addition to that it will poison your target.
Alternatively, before you take your eggs to the Egg launcher, you can first stop by the Collector's egg converter, located next to the item dispensers of the other roles. Note that this dispenser will convert only the eggs that you may have in your inventory:
- Blue eggs will have a chance of being converted to Green eggs.
- Green eggs will have a chance of being converted to Red eggs.
Of course, this device is not perfect and has a margin of error, and might fail, destroying your precious Penance eggs in the process. This is also where your Collector role level comes in action: the higher your role level is, the more likely it will be for the egg conversions to succeed.
 Collectors are fully dependant on Attackers to receive the correct type of egg to pickup, and so are Attackers dependant on Collectors to kill the monsters and provide them with Penance eggs as stated earlier. Never forget to keep calling during the waves!
Role tips
You can also boost the Honour points received at the end of wave by picking up eggs then cleaning your inventory. For this, it is recommended to set your window size on fixed, so you can easily do both picking up and inventory clearing tasks at the same time.
The Horn of Glory
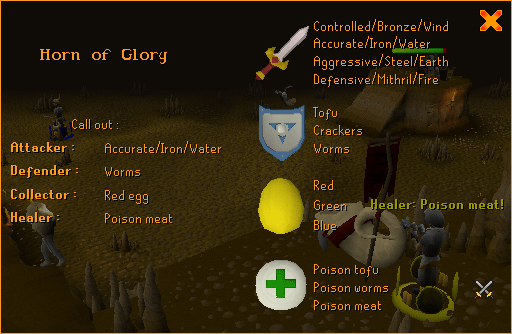
The Horn of Glory is always found in the south-eastern corner of the arena. The horn will allow you to do the calls for everyone in your team, no matter your role. Its use is not really recommended since everyone in the team has a specific role, although it is useful if someone in your team is not competent with the calling and you require of this to successfully complete your wave.
Also note that in the last wave (10th) once the Penance Queen emerges, the use of this horn will be blocked.
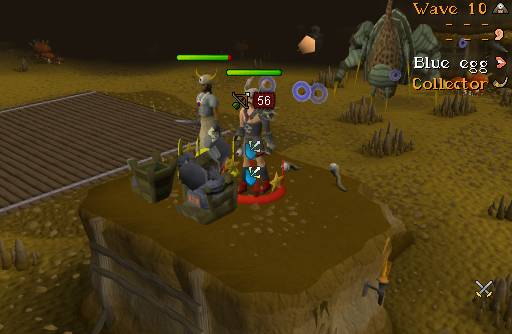
Wave 10 - Defeating the Penance Queen
Having reached the 10th and final wave, you will notice that your arena has slightly changed. You will still find all what you used to find in the same places, just that there is only one hill with cannon and a big plataform in the middle of the arena. This is where the Queen will emerge from.
Once the wave has started, you need to try to fulfill your role task as fast as you possibly can. As soon as you start you will have a handful of minutes to kill all the penance monsters before their Queen appears, even if all the rest of the monsters aren't dead yet! But why is it so important to kill the other monsters if what matters is the Queen though? You won't be able to do any damage the Queen unless all the wave monsters are dead, and it will be very annoying to kill wave monsters after the Queen has appeared, since she can easily hit everyone repeatedly with her ranged AoE (Area of Effect) attack (hence why it is recommended to have two good healers at this point).
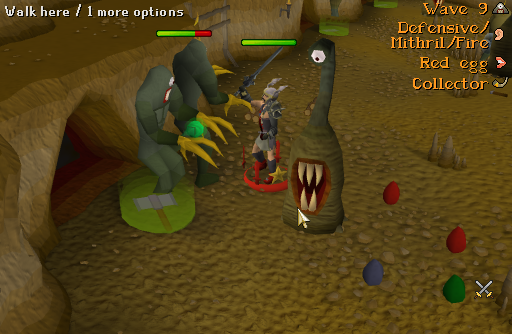
With the monsters dead, it is time to create the Penance Queen's doom: The Omega Egg! To complete this task, as all along the game, you will be required to work as a team. So! To kill the Queen you will need to shoot 8 Omega eggs at her, but how do you make them?
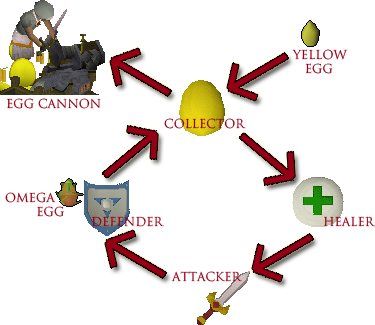
You can make one by simply following these steps:
- The Collector must start by picking up 8 Yellow Eggs that the Penance Queen spawns all around her randomly.
- The Collector must now pass the eggs to a Healer by using the eggs on the avatar. Once the healer has received the eggs the task is to poison the eggs by taking them to a poison pool found around the arena:

- With the eggs poisoned, the Healer must now pass them to an Attacker who will need to collect 8 spikes from Spiked mushrooms:

Then add them to the poisoned eggs by using the spikes on them. - The Attacker must now pass the eggs to a Defender which will need to dip them into a lava pool found around the arena as well, to complete the powerful Omega eggs:
Now that the Omega eggs are complete, the Defender must return them to the Collector, who will have to load the cannon with them so everyone can shoot them at the Penance Queen. Egg-tastic! After the 8 Omega eggs are shot, the Queen will die and you will be rewarded handsomely for your efforts.
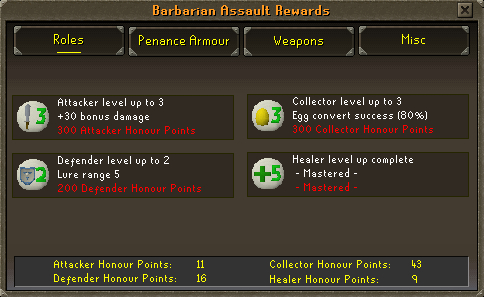
You can spend your earned Honour points on upgrading your role levels which will greatly increase your abilities inside the activity, making it easier and more enjoyable.
Everything is provided in the table below:
| Role level | Honour Points cost | Attacker | Healer | Defender | Collector |
| 1 | None | +10 added to damage inflicted | Heals 100 lifepoints per dose | Lure range increased to four spaces | Bag will hold 2 eggs and cannot convert eggs |
| 2 | 200 | +20 added to damage inflicted | Heals 150 lifepoints per dose | Lure range increased to 5 spaces | Bag will hold 4 eggs and 70% chance of success at Egg conversion |
| 3 | 300 | +30 added to damage inflicted | Heals 200 lifepoints per dose | Lure range increased to 6 spaces | Bag will hold 6 eggs and 80% chance of success at Egg conversion |
| 4 | 400 | +40 added to damage inflicted | Heals 250 lifepoints per dose | Lure range increased to 8 spaces | Bag will hold 7 eggs and 90% chance of success at Egg conversion |
| 5 | 500 | +50 added to damage inflicted | Heals 350 lifepoints per dose | Lure range increased to 5 spaces | Bag will hold 8 eggs and 100% chance of success at Egg conversion |
Penance armor
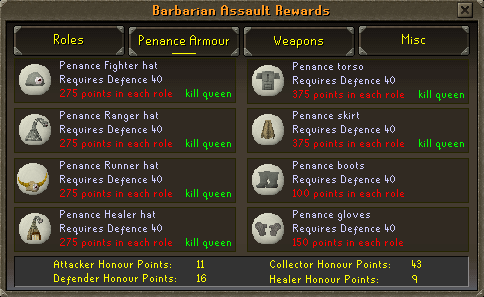
Apart from enchancing your role abilities, you can also purchase Penance armor with your Honour Points:
Wearing a full set of this special armor (Gloves, boots, torso, skirt, and any helm) will activate a special ability with the which your prayer will start to recover with time, just as seeing your hitpoints recover! But much slower, with a ratio of 3 Prayer points recovered per each minute elapsed.
Penance trident and weapon recoloring
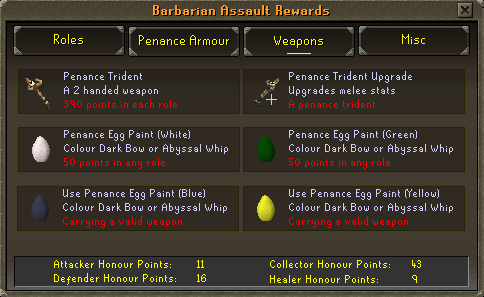
Now switching from defensive to offensive, Barbarian Assault also offers a Penace trident as a weapon for those willing to complete their Penance item set (this item is not needed to get the Prayer restoration ability activated) requiring 70 Magic to be used. Although it is not the most powerful weapon in the game, it possesses a special attack which can only be used (and prove to be fatal) against monsters with a combat level equal or inferior to 50. Along with a rune saving ability, which will allow the trident to attempt to save all the runes of one type needed to cast your spell or none at all.You can also upgrade your Penance trident to a Master Penance trident, upgrade which will only boost the trident's bonuses and elevate the requirement to 70 Attack to be used.
To give either your Abyssal whip or Dark bow a touch of color, you can unlock the ability to recolor them using your Honour points. Note that you will only need to make the payment once and the ability will remain unlocked and available for you to use as many times you want.
Note: Recolored weapons cannot be traded as long as they have the Penance egg paint on them! To remove the paint, simply use a Cleaning cloth (the item won't degrade after use) with your weapon of choice to revert it to its original color.
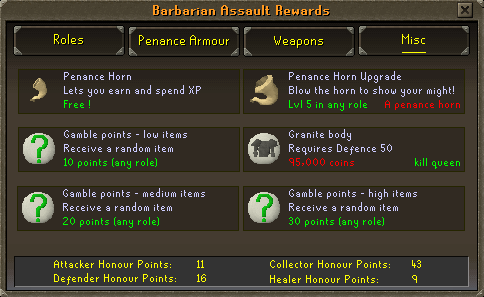
When you wield this item, it will allow you to obtain twice the normal amount of experience that you would be awared from performing actions in any of the following skills
- Firemaking (Only for burning logs)
- Agility
- Mining
But there is a catch! The horn must be filled with XP Potential which is obtained from completing Barbarian Assault waves. Which takes us to an additional catch! You will need to decide if you want either XP Potential for your horn or receive Honour points as a reward from your efforts during the activity. This selection can be toggled between each other anytime you want and as many times you want using the Reward statue found inside any of the Wave waiting rooms:
Note:You don't need to have your Penance horn with you or be wielding it during the multiple waves to add Potential XP to it. You simply need to have a horn, no matter if it is in your bank, and having the Reward statue set on "XP" to fill it.
After you achieve level 5 in any of the roles, you will be able to upgrade your Penance horn to the Master version of it for free! This upgrade will allow you to store even more XP Potential inside it and will allow you to perform an emote to show-off the number of roles in which you have level 5. This emote can also prove to be helpful when looking for a team to prove your expertise in one or more roles if needed.To fill a Master Penace horn, you will need to defeat around 11-13 Penance Queens, which comes to be around 110-130 waves.
If you like risking, you can also gamble your earned Honour points to obtain a reward! From an extremely disappointing one to a fabulously expensive one. As Jagex has stated, the high item gamble option has a chance to award you with Dragon chainbody! But, of course, the odds of this event to occur are comparable to seeing a pig suddenly take flight.
This Minigame Guide was written by crankytoad. Thanks to shaonic200, fox racer30, sheep01, gagan, ossie000, sir_bumpy, venomous, jakesterwars, poopy maths, Giac_Jr, scamfighter, isenblatter, andro_girl, JT133, Alk12, alfawarlord, burtonboy127, deathhawk144, Maon zhi, skidude609, ossie000, red arrow790, Gunslinger, Maonzhi, Chaosblade77, Senug5, 4399tina, Ralkal, tormeh, The Eggman, Ww Sam wW, McSwindler, Ege, DarkBlitz, Crablogger, ph4nt0mrun3, and McSwindler for corrections.
This Minigame Guide was entered into the database on Wed, Jan 17, 2007, at 02:29:10 PM by Alk12, and it was last updated on Fri, Mar 19, 2021, at 09:27:14 PM by Alk12.
If anything is incorrect or missing, or if you have any new information to submit to this database, please submit it to us on our Content Submissions Forums.
If you see this guide on any other site, please report it to us so we can take legal action against anyone found stealing our content. This guide is copyrighted by RuneHQ, and its use on other sites is expressly forbidden. Do not ask if you can use our guides or images, the answer is and always will be NO!
Print this page with images - Back to the Minigame Guide Index Page - Back to Top
