

Another Slice of H.A.M., Between a Rock..., Birthright of the Dwarves, Blood Runs Deep, The Branches of Darkmeyer, Contact!, The Curse of Arrav, The Death of Chivalry, Demon Slayer, Desert Treasure, Diamond in the Rough, Do No Evil, Dragon Slayer, Dream Mentor, Family Crest, Fight Arena, The Firemaker's Curse, The Fremennik Trials, Glorious Memories, The Great Brain Robbery, Haunted Mine, Holy Grail, Horror From The Deep, Legends' Quest, Lost City, Love Story, The Mighty Fall, Missing My Mummy, Monkey Madness, Mountain Daughter, My Arm's Big Adventure, Nomad's Requiem, One of a Kind, Recipe for Disaster, Ritual of the Mahjarrat, Shadow of the Storm, Spirits of the Elid, The Temple at Senntisten, TokTz-Ket-Dill, Troll Romance, Troll Stronghold, Vampyre Slayer, A Void Dance, The Void Stares Back, Wanted!, While Guthix Sleeps, and The World Wakes.
Table of Contents
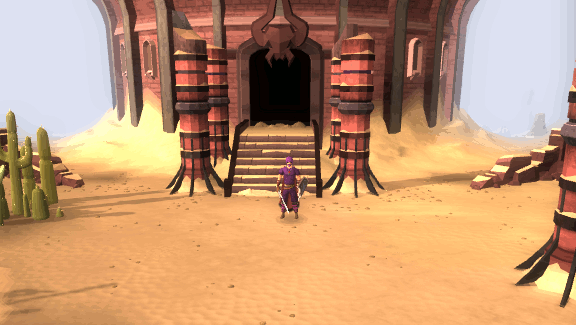
The Dominion Tower is a minigame that allows you to fight bosses from many of the quests you've completed.
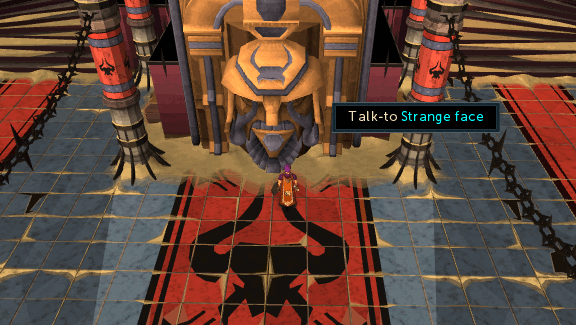
Once you get there, you must first talk to the Strange face to learn about the tower and gain access to the bank. You can also get a Dominion medallion from him, which can teleport you to the Dominion Tower up to 3 times a day.
There are 5 different modes in the tower: Climber, Endurance, Freestyle, Spectator and Special.

This mode consists of climbing through the floors, facing a random boss on each floor. You are able to bank for supplies and equipment between fights. However, before starting a floor you must spin the handicap wheel which will assign a handicap designed to make the fight more difficult to you for the duration of your climb. These handicaps stack until you will eventually have all available handicaps applied to you until you lose a fight or choose to end your climb by leaving via the chain next to the bank box.
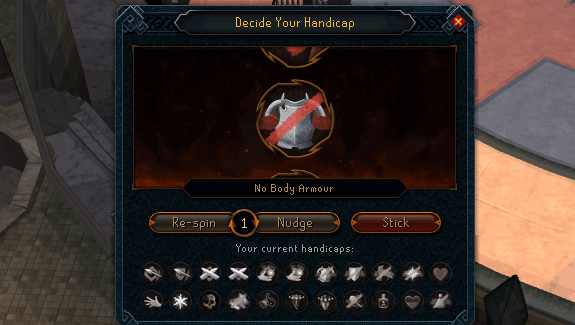
You have 3 chances to either "nudge" or "re-spin" the handicap wheel to possible get a more help handicap that could benefit you better than another.
Below you find a list of the handicaps. When you nudge a handicap, the tower will scroll UP. So if you nudge 'poison' the 'reduced ranged defence' handicap will be activated.
| Image | Handicap | Information |
 |
Life Saver | Once your life points drop too low, you will heal to full life points, full prayer points, full summoning points and full special attack energy. |
 |
No Potions | You are not allowed to use potions. Including saradomin brews, flasks and dominion potions. |
 |
No Power-ups | You are not allowed to use the helphorn or any of the bombs. |
 |
Reduced Ranged Defence | You will take more damage from Ranged attacks. |
 |
Poison | You are poisoned at the start of the fight. |
 |
Random Daze | Every 10-15 secondes you will stop fighting and Auto Retaliate will be swithed off. |
 |
Reduced Magic Defence | You will take more damage from magic attacks. |
 |
No Ultimate Abilities | You won't be able to be use any ultimate abilities in the match. |
 |
Reduced Adrenaline Gain | You will gain adrenaline at a lower rate. |
 |
Reduced Magic Attack | You magic attacks will be less effective. |
 |
Slippery Fingers | During the match your weapon will be occasionally unequipped and go to your inventory. When the message in your chatbox warns you the handicap will happen in a few moments, you can re-equip your weapon yourself. Or you can equip a second weapon which is already in your inventory and thus save time. Also, if your inventory is full, this handicap won't do anything. |
 |
No Prayers | You are not allowed to use prayers or curses. |
 |
Monster Stun | At the beginning of every match you enemy will be stunned for about 10 secondes. |
 |
No Familiar | You are not allowed to use a familiar. |
 |
Reduced Ranged Attack | You ranged attacks are less effective. |
 |
No Body Armour | At the beginning of every match, your body armour will be forced into your bank. If your bank is full, it will be forced into your inventory. If both are full, it will be dropped. |
 |
Halved Life Points | At the beginning of every match, your lifepoints will be reduced to half of your maximum life points. |
 |
Random Freeze | During the fight you will be random freezed. It is much like being hit by an ice spell, but without the damage. You won't be able to move for about 3 seconds. |
 |
Reduced Melee Defence | Melee attacks will hit you much harder. |
 |
No Food | You are not allowed to use food NOT including saradomin brews and healing special attacks. |
 |
No Shield | Your shield will be forced into your bank. If your bank is full, it will be forced into your inventory. If both are full, it will be dropped. It is a good idea to use a 2 handed weapon like a godsword or spear when suffering this handicap. Use super anti-fire potions when facing Elvarg. |
 |
Reduced Melee Attack | Your melee attacks are less effective. |
If you die while in a battle, you will gain significantly less Dominion Factor. If you want to stop, you can click the "hold on" button instead, and you claim your reward or go back down to the lobby.
Endurance consists of climbing through as many floors as you can without access to the bank. Therefore, you must bring everything you think you'll need to survive as long as possible, including any equipment or supplies not provided by the tower (e.g. Ice gloves for Desert Treasure bosses and elemental runes for Dagannoth Mothers). Unlike Climber, this mode does not have handicaps and is simply about completing as many floors as you can with limited supplies. Endurance awards far less Dominion Factor than Climber, but can be used to kill a large number of bosses quicker as you don't have to wait for the handicap spin each time. There is a cap of 250 floors in this mode.
Rumble mode is similar to Endurance in that the aim is to survive for as long as possible without banking, however, it differs in that you must fight multiple bosses at once which spawn endlessly in the same arena until you are killed. However, you can also choose to play this mode in an instance with up to 5 other players to help you, although it should be noted that the maximum number of bosses that spawn at once is dependant on the number of players in the instance:
- 1 Player - 4 bosses
- 2 Players - 7 bosses
- 3 Players - 9 bosses
- 4/5 Players - 10 bosses
The following rules also apply when fighting in Rumble Mode:
- All players must have joined the instance within 2 minutes of the host starting it.
- If a player dies in Rumble mode while part of a team, they will have the option to leave or spectate and the remaining players will still have to fight the same number of bosses at once unless they share less than 10 unlocked bosses in which case the round will end.
- Only bosses that every player has unlocked will spawn and the same boss will not spawn twice at once.
- Bosses that require special equipment, spells or other tactics to kill can be killed with normal weapons.
- Bosses that spawn in a group in other modes will spawn individually.
In addition to fighting the bosses, you will also have to look out for several random events that will occasionally appear:
- Evil Chickens: Evil chickens will spawn in the arena and attack players. They have low life points, so can be easily killed.
- The walls of fire used by Char will appear and must be dodged or players will be dealt high damage.
- Wizards will spawn in the arena and create an exploding portal which deals high damage to players. The Wizards should be killed before they can create the portal.
- Tornadoes similar to those used by Kree'arra will spawn in the arena and deal rapid damage to any player they touch.
- Sunfreet will appear and set fire to the arena.
However, power-ups will also occasionally spawn in the arena to help you:
- Dominion Potions - Prayer, Restore and Buff potions.
- Climber Mode Buffs and Debuffs - See Climber Mode.
- Heal Group - Restores everyone's life and prayer points by 25%.
- Random - Chooses from one of the above.
Freestyle allows you to choose the boss you want to fight and select any handicaps you want applied. You must have first defeated a boss in both Climber and Endurance to unlock access to them in Freestyle. This mode awards no Dominion Factor for beating your chosen boss.
| Fight | Description |
| Revenge of the Evil Chickens | Fend off 15 evil chickens. |
| Finish Him! | Defeat Arrav, Koschei the Deathless, General Khazard, Black Knight Guardian, the Kendal, and the Black, Grey and White golems. They start at 20% health. |
| Just Die Already | Defeat 6 Dagannoth sentinels. |
| No More Nomad' No More! | Face Nomad twice in a row. |
| I Eat Dagannoths For Breakfast | Fight both Dagannoth mothers and 2 Dagannoth sentinels. |
| Indigestion | Defeat the end bosses from Recipe for Disaster. |
| You'll Never Defeat Me! | Survive for 5 minutes in an arena with the Inadequacy, the Everlasting, the Illusive and the Untouchable. |
| Hey! Eat Power-up | Defeat all the class H and class G monsters using smart bomb power ups that spawn around the arena. |
| The Fire! It Burns! | Fight Sunfreet (level 160). Prayer, Powerups, Ultimate abilities and Familiars cannot be used. |
| The Fire! It Burns! (easy version) | Fight Sunfreet (level 70). Prayer, Powerups, Ultimate abilities and Familiars cannot be used. Can be attempted by players under level 160. |
You can use this mode to spectate any fight in which the player fighting has the option for spectators ticked.
These are the bosses that are in the tower. You need to complete the quest the boss is in to be able to fight them in the tower.
| Class A | ||
| Name | Quest needed to unlock |
Tips and tricks |
| Decaying Avatar | Nomad's Requiem | This actually is a very easy fight. Just take 2 or 3 prayer potions with you and pray Protect from Melee whilst melee'ing him. A defence reducing weapon like Goliath Gloves or Bandos Godsword would certainly help. Like in the quest three roots will spawn and the Avatar will try to eat them and heal himself. The spawn at 75%, 50% and 25% of his health at the North-West, North-East and South-West corner respectively. |
| Eruni, Ayuni and Leeuni | Do No Evil | Another hard fight. Together the three apes are more dangerous than Nomad. It is a good thing you can trap them. When the fight starts, run behind a pilar. Eruni won't move and can't hit you with her magic-ranged attack. Leeuni will be on the other side of the pilar and can't hit you either. Ayuni will teleport next to you and attack you whilst draining your prayer a bit. Kill her with ranged or melee. Then swith to ranged and use the accurate style of your bow. Hit Leeuni once and run back behind your pilar. Hit her again and run back again. If you do this fast enough, she won't hit half of the time. When she is dead, attack Eruni. When she spawns Lesser Demons, hide behind pilars and kill the Lessers with ranged from your safespot. When facing any ape, keep protect from magic on all the time. (Especially when using melee armour.) |
| Dagannoth Mother (v2) | Blood Runs Deep | The Horror From the Deep is back. Again. Hit her once with Balmung (provided in the arena) and use the attack style she is weak to. Pray whatever your armor is weak to. She uses all 3 sides of the combat triangle. Weakness: White: wind attacks Blue: water attacks Brown: earth attacks Red: fire attacks Green: ranged attacks Orange: melee attacks (NOTE: you can't walk her like the other Dagannoth Mother because she doesn't change colors randomly.) |
| Nomad | Nomad's Requiem | Even if you defeated him in the quest, Nomad remains a hard boss. I recommend you use the same strategy you used during the quest for this boss. Use high magic absorbing armor like Ganodermic and keep an eye out for his special attacks: - Flame Vortices: he spawns mines around you. Don't run on them! - Soul Blast: he throws an attack at you that will hit 750. Try to avoid this by running behind a pillar. - Mirror Image: he makes 3 clones of himself. The last one who attacks is the real Nomad. Hit him once and the others will disappear. OR run behind a pillar and wait a minute or so till the clones disappear. - Disintegrate: he teleports to the middle of the arena en starts charging his most powerful attack. Heal because the attack will hit with your maximum life points-1. |
| Pest Queen (plus drones) | The Void Stares Back | Unlike in the quest the Elite Defilers can't be trapped behind the Queen. You will have to tank their attacks. Only use the Korasi's sword provided in the arena. Also, don't bother about taking bomb power ups with you. They will NOT work on the queen. Get the attention of the two Defilers by attacking them once and tank their attacks for the entire fight. Now focus on the Queen. If she rears up, you must use either the Backhand or Kick abilities while wielding Korasi's sword or she will hit you and your helpers for up to 4,000 life points. Just keep attacking the Queen. |
| Zenevivia | Love Story | She will initially just attack you with blood based ancient magicks for a few moments before she will teleport onto one of the four pedestals in the room. While on the pedestal, she will activate anti-magic and anti-range prayers and create fires on the floor. These fires hit constant 30ss and will appear under you every 1-2 seconds; therefore you have to constantly move to avoid the damage. She will swap between standing on the pedestal and on the ground every 20-30 seconds. As her health gets lower, the fires she creates will get bigger.
If you try to attack her from the squares next to the pedestal, she will kick you away, which briefly stuns you. When she first goes onto the pedestal, it is recommended to initially attack with one ranged attack so that she switches her prayer to Ranged Protection. This will allow the Wise Old Man to attack her with his Magic attacks. Once her prayer has switched, you can use your melee weapon. It is highly recommended to use the Kick ability to kick her off the pedestal. This will make the fight a lot easier because she will not be able use that pedestal anymore. When she is on the ground, she will not use prayer and you may attack as normal. |
| Class B | ||
| Name | Quest needed to unlock |
Tips and tricks |
| Dagannoth sentinels | Blood Runs Deep | You have to kill these two friends together. It is highly recommended to alter you attacks between the two sentinels because they will heal each other if one of them is more damaged than the other. |
| Damis, Fareed, Kamil and Dessous | Desert Treasure | Make sure you pray Protect from Melee. Take Dessous out first because he will use a magic/ranged attack. Next is Kamil who will freeze you. Now take out Fareed. NOTE: you have to wear ice gloves or your weapon will be unequipped. Damis is last. He has two forms and the second one will hit through your prayer. Tip: Use Goliath Gloves as their stats reducing special will hit all enemies and they won't be unequipped by Fareed. |
| Karamel and Gelatinnoth Mother | Recipe for Disaster | Take out Karamel first because she will drain your stats with her ice magics. Then kill the Gelatinnoth Mother who uses the same protection as the Dagannoth Mothers. NOTE: You can "walk" the Gelatinnoth Mother just like the Dagannoth Mother (version 1). The trick is to put your run energy off and walk to the side of the arena which is behind the Mother. Once you arrive there, the Mother will change direction and you can walk to the other side again. Whilst using this tactic, she won't attack you. This is very useful if you forgot to bring runes. |
| Nezikchened | Legends' Quest | Just another demon. Pray Protect from Melee and melee him. OR use ranged or magic while praying Protect from Magic. |
| The Everlasting and The Illusive | Dream Mentor | Pray Protect from Melee and take out the Everlasting first. The Illustive will flee from you once you hit him once. He will re-appear somewhere on the western side of the arena. Just hunt him down. |
| The Untouchable | Dream Mentor | Untouchable maybe, but not Invincible. Use a melee weapon and pray Protect from Melee and you'll be fine. |
| Class C | ||
| Name | Quest needed to unlock |
Tips and tricks |
| Arrav | The Curse of Arrav | This fallen hero of Varrock uses melee so pray Protect from Melee. He will talk to you two times in battle so you have to use your spacebar during this match. |
| Balance Elemental | While Guthix Sleeps | This Guardian of the Stone of Jas is a strong boss. He uses very strong ranged attacks so Protect from Ranged is recommended. However you can swith your prayer according to his attack style. When he wields a bow in his hand, he will use ranged. When his hand is a huge club, he will use melee. And when he isn't wearing anything, he will use magic. He will randomly fire a magic spell even whilst using melee or ranged, so bring enough food with you. |
| Giant Roc | My Arm's Big Adventure | This little bird uses ranged and melee attacks. Protect from Ranged is recommended because she will also fire a huge rock at you which will hit as a ranged attack. She also does a stun attack which will knock you back for about 4 squares. |
| Ice demon | The Temple at Senntisten | He uses magic and ranged. But he uses magic far more often then ranged so Protect from Magic is recommended. He will also randomly freeze you and interrupt your combat. |
| Jungle demon | Monkey Madness | This demon switches attack styles according to your prayer. If you pray melee, he will use magic and vice versa. I recommend praying magic and wearing melee armor. OR you can stay at a distance whilst praying magic. You won't be hit this way because he doesn't move to you when you are out of melee range. |
| The Inadequacy (plus doubts) | Dream Mentor | The Inadequacy uses ranged from afar and melee when in close range. I recommend you melee him whilst praying melee because the four Doubts will also use melee. |
| Class D | ||
| Name | Quest needed to unlock |
Tips and tricks |
| Arrg | Troll Romance | Big troll. Just melee him. Protect from Melee could be useful. |
| Barrelchest (version I) | The Great Brain Robbery | You can't use prayer in this fight. However with good armor you won't need food whilst melee'ing him. You can also range him and run away if he comes to close. |
| Chronozon | Family Crest | This demon has to be hit with all four blast spells before you can kill him. Don't worry, runes are provided in the arena and your spellbook will switch to normal during the match. Just make sure you hit him with the spells before you kill him because he is quite weak. |
| Evil Chicken | Recipe for Disaster | Pray Protect from Magic and kill this little chick. |
| Flambeed, Agrith-Na-Na and Dessourt | Recipe for Disaster | Pray melee. First is Dessourt because he uses magic/ranged. Next is Flambeed who will sometimes use magic and last is Agrith-Na-Na, a pure melee user. |
| Giant Scarab | Contact! | He uses melee in close range and a poisonous ranged attack from afar. He summons melee, magic and ranged users to help him in the fight. Just ignore them as they will die once the Giant Scarab is dead. I suggest you pray whatever your armor is weak to. |
| Class E | ||
| Name | Quest needed to unlock |
Tips and tricks |
| Arzinian Avatar | Between a Rock... | He uses magic but prayers aren't necessary as he is only combat level 75. |
| Bouncer | Fight Arena | Pray melee and do whatever you want. It's just a little dog. |
| General Khazard | Fight Arena | He has two forms. Both use pure melee. Killing one of the forms takes about as much time as reading this. |
| Koschei the Deathless | The Fremennik Trials | He has four forms and will drain your prayer when you starts his last form. So I suggest you use all prayer points you got on the first forms and save your special attack weapon for his last and strongest form. He uses melee. |
| The Black Knight Guardian | A Void Dance | He uses pure melee but he will heal himself with your prayer points once his health is below 50%. |
| The Black Knight Titan | Holy Grail | Pure melee user. |
| Class F | ||
| Name | Quest needed to unlock |
Tips and tricks |
| Agrith Naar | Shadow of the Storm | Only Silverlight can kill this demon. (Weapon provided in the arena.) You can damage him with any weapon but the finishing blow has to be with Silverlight. |
| Black, Grey and White Golems | Spirits of the Elid | They use melee and are very strong against all styles except: Black=crush, Grey=slash and White=stab. You can kill them with another style, but it goes very slow. (About 5 minutes per kill.) |
| Dad | Troll Stronghold | This huge troll uses melee and will sometimes knock you back. |
| Dagannoth Mother (v1) | Horror From The Deep | To kill this big dagannoth you need to switch attack styles. White: air attack Blue: water attack Brown: earth attack Red: fire attack Green: ranged attack Orange: melee attack NOTE: You can walk the Dagannoth Mother. The trick is to put your run energy off and walk to the side of the arena which is behind the Mother. Once you arrive there, the Mother will change direction and you can walk to the other side again. Whilst using this tactic, she won't attack you. This is very useful if you forgot to bring runes. |
| Dramen Tree Spirit | Lost City | Another melee user. Now you can use something else than a bronze hatchet. |
| TokTz-Ket-Dill | TokTz-Ket-Dill | You have to crush his armor with a rune or dragon pickaxe with the crush attack style. Once his armor is broken, you can use any crush weapon. |
| Class G | ||
| Name | Quest needed to unlock |
Tips and tricks |
| Culinaromancer | Recipe for Disaster | This evil cook is only level 75 and uses magic only. |
| Draugen | The Fremennik Trials | Another weak melee user. |
| Elvarg | Dragon Slayer | The most famous dragon in Runescape. He uses dragonfire and melee. Make sure you have some kind of dragonfire protection or he will hit over 900. |
| The Kendal | Mountain Daughter | I'm not going to waste words on this one. Just kill him. |
| Treus Dayth | Haunted Mine | He summons pickaxes to kill you. They are very weak so don't mind them. Kill Treus Dayth. He will sometimes disappear. Just wait till he appears again. |
| Tumeken's shadow | Missing My Mummy | You have to fight the 5 forms of Tumeken's Shadow at the same time. The strongest one is combat level 72 and they use melee. |
| Class H | ||
| Name | Quest needed to unlock |
Tips and tricks |
| Count Draynor | Vampyre Slayer | Pick up the stake and hammer (provided in the arena) and kill him. Your character will use the items once the Count is at low life points. |
| Delrith | Demon Slayer | He can only be harmed with Silverlight (provided in the arena). So pick up the weapon and hit him. You will almost always kill him in one hit. |
| Melzar the Mad | Dragon Slayer | Watch out for the cabbages! They are more dangerous than Melzar. |
| Sigmund | Another Slice of H.A.M. | Pick up the Ancient mace (provided in the arena) and hit Sigmund. He will pray Protect from Melee. Now use the Special Attack ability (i.e. Favour of the War God) to disable his prayer and kill him. |
| Solus Dellagar | Wanted! | A mage who stabs with his staff? He won't hit you. You however will kill him in a few blows. |
| Tarn Razorlor | The Lair of Tarn Razorlor | Tarn himself is a very weak melee user. He has however 4 terrordogs to help him. Just pray melee and ignore his pets as they will disappear once Tarn dies. |
| Class X1 | ||
| Name | Quest needed to unlock |
Tips and tricks |
| Apep and Heru | Diamond in the Rough | |
| Dawn | The Death of Chivalry | |
| Char | The Firemaker's Curse | |
| Khazard and Lucien | Ritual of the Mahjarrat | |
| Vanstrom | The Branches of Darkmeyer | |
| Zemouregal and Enakhra | The World Wakes | |
| Class X2 | ||
| Name | Quest needed to unlock |
Tips and tricks |
| Chaos Grimsson and Hreidmar | Birthright of the Dwarves | |
| Dragon Hunters | One of a Kind | |
| Echo of Jas | One of a Kind | |
| Lol | The Mighty Fall | |
| Nial Swiftfing | Glorious Memories | |
| Yelps | The Mighty Fall | |
| Special | ||
| Name | Quest needed to unlock |
Tips and tricks |
| Sunfreet | None | The battle will start with Sunfreet flying up unto the air where it can't be attacked. Shortly after, 4 waves of fireballs will rain down on the arena and must be avoided. To avoid the first wave, stay put where you spawn within the middle ring on the arena floor. As soon as the first wave ends, run to the edge of the arena and wait for another two waves of fireballs. When the third wave begins to extinguish, run to the centre of the arena to avoid the final wave. If you fail to move or are too close to the fireballs, then they will hit rapid 200-600s on you (1-2s during the easy version). Sunfreet will now land and can be attacked.
It is recommended to kill Sunfreet with ranged from the centre of the arena as up close it will use a combination of melee and two special attacks, whereas with ranged, it will only use a mage attack (this is still capable of hitting well over 1,000 however). If you do choose to melee Sunfreet, then the first special attack is a roar that will stun you for a few seconds, but can be avoided by quickly turning your back to it when it crouches. The second is a tail swipe indicated by Sunfreet swinging its tail from side to side for several seconds, but this can also be avoided by moving at least two squares away. If you fail to move, this attack is capable of hitting over 3,000. After around 10 attacks, Sunfreet will take off and repeat its fireball attacks. It is the same pattern every time, so simply make sure you're safely within the middle ring before it starts and then move when required. If you manage to get Sunfreet down to 6,000 Life points, then it will go berserk and begin to attack more accurately and faster. Keep an eye on your Life points and finish it off to win the fight. |
| Name | Reward unlocked |
| Reach floor 5 in Climber mode | Extra aggressive taunt |
| Reach floor 10 in Climber mode | Extra comedy taunt |
| Reach floor 15 in Climber mode | Ability to receive Help horn as a reward |
| Reach floor 15 in Endurance mode | Extra submissive taunt |
| Reach floor 20 in Endurance mode | Ability to enhance your Dominion medallion into a Super dominion medallion |
| Reach floor 25 in Endurance mode | Ability to receive Dominion crossbow as a reward |
| Suffer reach and every type of handicap | Ability to receive Dominion sword as a reward |
| Use help horn and bomb power-ups | Ability to receive Dominion staff as a reward |
| Find half the Journal Pages | Ability to receive Diminutive bomb as a reward |
| Collect all the Journal Pages | Ability to receive Massive bomb as a reward |
| Dominion Factor of 10,000 and all journal pages | Ability to receive Colossal bomb as a reward |
| Kill 100 bosses | Able to claim a Dominion marker (stage 1) |
| Kill 200 bosses | Able to claim a Dominion marker (stage 2) |
| Kill 300 bosses | Able to claim a Dominion marker (stage 3) |
| Kill 400 bosses and fight all Special matches | Ability to buy 10 Dominion Mines for 10k gp |
| Kill 450 bosses and spectate a match | Dreadnips |
| Kill 500 bosses | Ascendancy Mines |
| Kill 500 bosses and all from set 1 | Goliath gloves |
| Kill 500 bosses and all from set 2 | Spellcaster gloves |
| Kill 500 bosses and all from set 3 | Swift gloves |
| Complete all other achievements | Able to claim a Dominion marker (stage 4) |
| Complete all other achievements | Ability to visit the top of the tower |
These are items that you can receive in the Rewards box. Some you can only get from the Dominion Tower, and those are only usable in the arena in the tower. The amount of rewards you get is based on how much Dominion Factor you have received from the Dominion Tower.
This Minigame Guide was written by Scott. Thanks to Greg, Jakeluv2slay, Darkblitz, Zaros Ultor, Javezz, Terri709, and Jarkur for corrections.
This Minigame Guide was entered into the database on Wed, Nov 02, 2011, at 02:51:37 AM by Scott, and it was last updated on Thu, May 24, 2018, at 04:53:08 AM by ChathMurrpau.
If anything is incorrect or missing, or if you have any new information to submit to this database, please submit it to us on our Content Submissions Forums.
If you see this guide on any other site, please report it to us so we can take legal action against anyone found stealing our content. This guide is copyrighted by RuneHQ, and its use on other sites is expressly forbidden. Do not ask if you can use our guides or images, the answer is and always will be NO!
Print this page with images - Back to the Minigame Guide Index Page - Back to Top
