

Table of Contents
- The Barrows area
- Suggested equipment sets
- The basics
- Playing the game
- The tunnels
- FAQ
- Rise of the Six
- The Rewards
- Reparing your armor
- Rise of the Six Rewards
There are multiple ways to get to the Barrows, as you'll be able to view on the following map where all these methods are displayed:
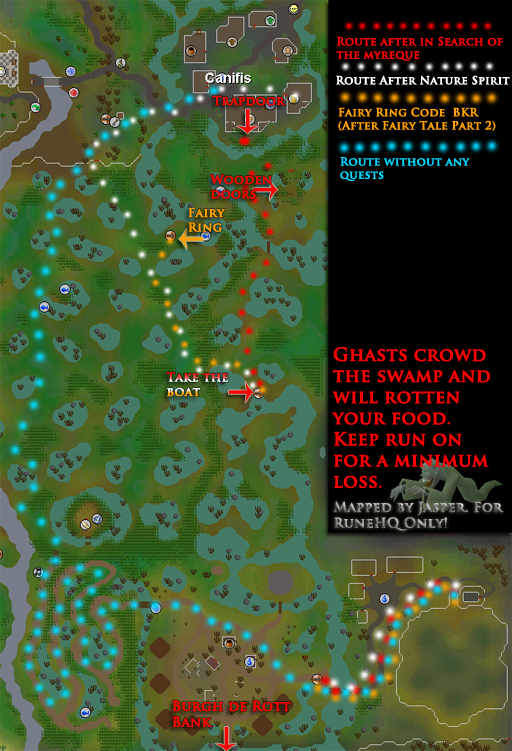
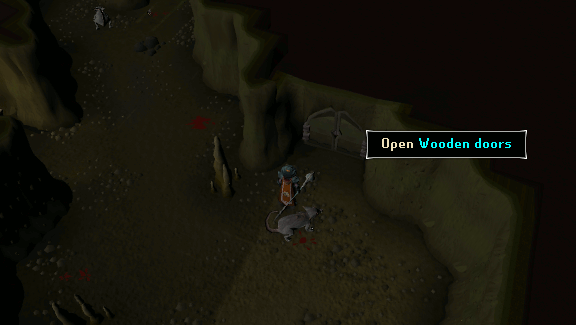
After you've done In Search of the Myreque, you will be able to access the route marked in red. Simply go down the trapdoor after using the Kharyll teleport (Ancient spellbook or POH portal), or using the DLS fairy ring code to access the dungeon there. If you used the fairy ring, go through the cave entrance to the south of it, then simply go through the cave entrance. Then you will find yourself in a larger dungeon, which will be the same one as the dungeon you will find yourself in after entering the trapdoor. Now you just need to head south and go through the wooden doors, and proceed to follow the red route.
Drakan's medallion:

After completing The Branches of Darkmeyer, you can use Drakan's medallion to teleport directly to the entrance of the Barrows.
Using a Magic setup is recommended to kill the brothers as the majority of them have a spell weakness. If you're using Magic, it is helpful to have access to at least Fire Wave (Level 75+ Magic). Ancient Magicks are also highly effective against the brothers.
Equipment:
- Helmet: Sea singer's hood/Virtus mask > Ganodermic visor > Ahrim's hood/Hood of subjugation > Batwing hood
- Body: Sea singer's robe top/Virtus robe top > Ganodermic poncho > Ahrim's robe top/Garb of subjugation > Batwing torso
- Legs: Sea singer's robe bottom/Virtus robe legs > Ganodermic leggings > Ahrim's robe skirt/Gown of subjugation > Batwing legs
- Gloves: Static gloves/Virtus gloves > Ganodermic gloves > Gloves of subjugation > Batwing gloves
- Boots: Ragefire boots/Virtus boots > Ganodermic boots > Boots of subjugation > Batwing boots
- Cape: God capes > Any skillcape > Blue/Red cape
- Amulet: Arcane stream necklace > Saradomin's hiss > Amulet of fury > Amulet of glory
- Weapon: Seismic wand/Chaotic staff/Virtus wand > Staff of light/Ahrim's wand/Wand of treachery > Master wand > Bat wand
- Off-hand: Seismic singularity > Virtus book > Ahrim's book of magic > Mages' book > Bat book
Inventory:
- 1-2 Overload (4)/Extreme magic (4) or Super magic (4)
- 150+ Death runes/Blood runes
- 300+ of each elemental rune
- 2-5 Prayer potions (4) and a Prayer renewal (4)
- 7-10 Pieces of food (Monkfish or better)
- Ranged and Melee weapon (Crystal bow or better and a level 60+ Stab weapon are recommended).
- Drakan's medallion
(Note: Although it is recommended to use the weaknesses of the brothers to your advantage, it can be fairly expensive to purchase the appropriate runes. Therefore, using a Polypore staff can be a cheap and still effective way to kill the brothers if you so choose).
Example Setup and Inventory:
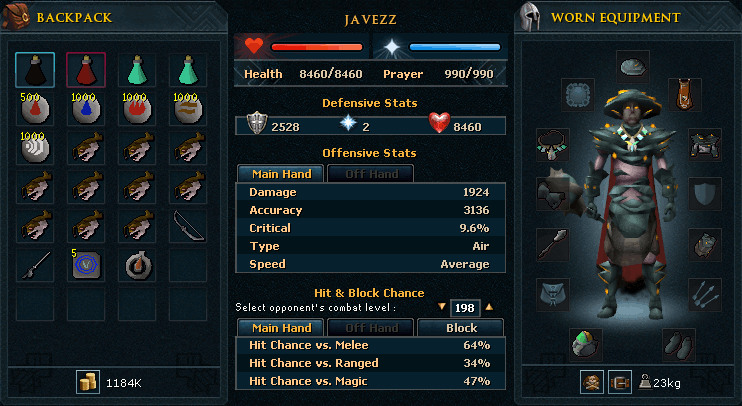
Click the image above to enlarge.
Equipment:
- Helmet: Tetsu helm/Torva full helm > Bandos helmet > Verac's helm > Other Barrows helms > Helm of neitiznot
- Body: Tetsu body > Torva platebody > Bandos chestplate > Verac's brassard > Other Barrows bodies
- Legs: Tetsu legs > Torva platelegs > Bandos tassets > Verac's plateskirt > Other Barrows legs
- Gloves: Pneumatic gloves/Torva gloves > Bandos gloves > Barrows gloves
- Boots: Steadfast boots/Torva boots > Bandos boots > Dragon boots
- Cape: TokHaar-Kal > Fire cape > Any skillcape > Blue/Red cape
- Weapon: Drygores > Chaotics > Godswords > Barrows weaponry
- Off-hand: Off-hand drygores > Off-hand Chaotics
Inventory:
- 1-2 Overload (4)/Extreme set or a Super set
- 2-4 Prayer potions (4) and a Prayer renewal (4)
- 7-10 Pieces of food (Monkfish or better)
- Ranged weapon (Crystal bow or better is recommended)
- Teleport method
- Drakan's medallion
Example Setup and Inventory:
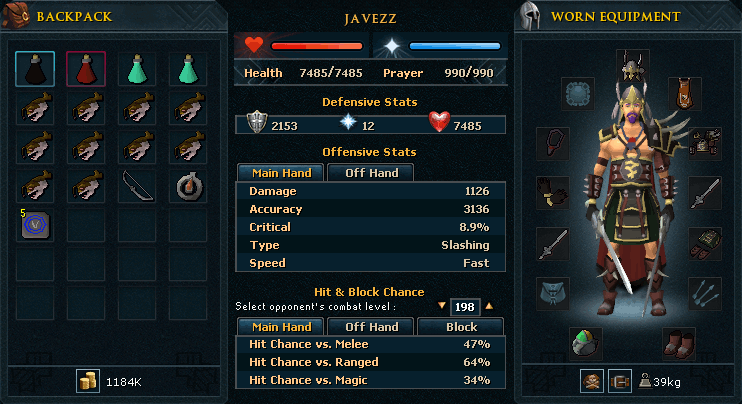
Click the image above to enlarge.
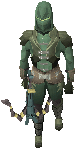
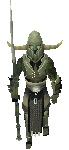
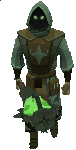
The Barrows Activity is inhabited by the spirits of six brothers who died long ago in battle. The warriors' souls, however, have been tainted, but that is no concern of yours; you most likely just want their armor and weapons. The six brothers include one mage, Ahrim, one archer, Karil, and four warriors: Verac (the flail user), Guthan (the spear user), Dharok (the great axe user), and Torag (the dual-hammer user). Ahrim and Karil are both able to max hit around 200, and the warriors can normally hit in the 200's, but Dharok is the biggest threat of the six brothers. Dharok has a special effect; he hits higher the lower his hit points get, and he can hit up in the 600s when very low on hit points.
Each of the brothers has their own special effect if they are able to hit you. Verac's special effect is that he can hit through any kind of armor, INCLUDING PRAYER, so he can hit very often. However, prayer can still be effective against Verac as not all hits will pierce armor and prayer. Torag drains your energy by 20% randomly. Karil lowers your agility by 20%. Ahrim lowers your strength very often and can also use spells to lower your attack and defense. Guthan heals the amount of damage inflicted on you when his special effect is activated (this can even heal him if you are praying, mind you). All of the NPCs except for Dharok can hit their special effects through your prayer.
One of the most important things you should know before going to the Barrows is that everyone has their own strategy, and there is no perfect way to go about getting items; it's totally and completely random, with an average chance of about 10% for an item at all. However, you will always receive coins and some missile runes from the chest, so it isn't a complete waste if you don't get barrows equipment. Before I lead you into the strategies, you might want to know what exactly that you are doing. When entering the barrows graveyard, there are a total of six mounds, one for each of the brothers. To enter one of their tombs, simply click on the spade supplied on every hill. This will take you into a small room that contains a crypt and a staircase. The staircase will take you back to the surface, and clicking on the crypt will do one of two things. The first thing it might do is awaken the spirit living in the crypt, one of the six brothers. This map gives information on which of the crypts belongs to which brother:

The second, is that you might find a tunnel entrance, this will be only the case for one of the six crypts though, so if you find this entrance prematurely, you might want to go back and kill the rest of the brothers first.
You might be wondering in what order you should attack the brothers. In order to use your prayer points wisely, we recommend to always start with Dharok first. As you might have noticed by now, he is the deadliest of all the Barrows brothers. Then move on and slay Karil, Verac, and Ahrim in the order you find the most convenient. Then finish by slaying Guthan and Torag. If you happen to find the tunnel entrance before having slayed the other five brothers, do exactly as it was previously stated above, just ignore it for the moment and finish the rest of the brothers, the crypt won't go anywhere.
Now, while playing this mini-game, there are two things you should always be aware of, as they are crucial for your success. These are your life points and your prayer points. Otherwise, you have a great chance of dying if you have a low defence level, or if you are simply fighting Dharok. While you are inside the brothers' crypts, or the tunnels below, you will or might get your prayer points drained. Ghostly faces of the brothers will appear in your screen, announcing this event, like in the picture below:
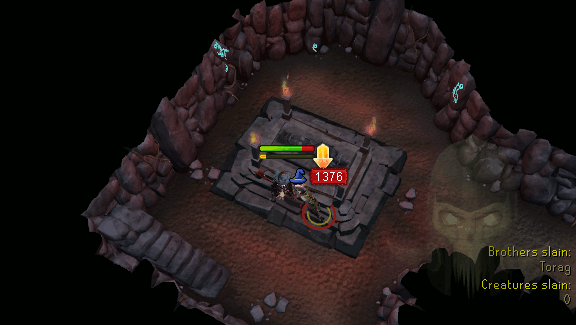
This is why having The Temple at Senntisten quest complete is a great advantage in this mini-game, since after having done this quest, there will be a chance your prayer points don't drain when the ghostly image appears. So, remember, keep an eye on your life point and prayer point counters all times!
No matter what combat style(s) you've chosen, you can still use the same order to kill the brothers, but how to kill them might differ slightly between them. Therefore, for your commodity, this section will be classified by brothers.
Dharok the Wretched (Weakness - Fire spells):
Dharok is the easiest brother to slay as long as you activate your Protect from Melee prayer or Deflect Melee curse and keep it on at ALL TIMES, until he is dead. Using a fire-based spell to kill him is recommended.
Brother's special attack: The lower hitpoints he has, the higher he can hit; to the point of dealing high damage (4000+).
Verac the Defiled ( Weakness - Earth spells):
Protect from Melee prayer is advised for this brother, although if you are using melee armor and have a high defence level (90+) you should be able to kill him without protection prayers, at the cost of bringing multiple pieces of food. Using an earth-based spell to kill him is recommended.
Brother's special attack: When activated, you'll get hit regardless of your armor defence bonus and/or protection prayers.
Ahrim the Blighted (Weakness - Arrows):

Protect from Magic prayer is advised for this brother; although, if you brought dragonhide armor with you and have a rather high magic level, you should be able to kill him without protection prayers, the cost bringing multiple pieces of food instead. Ranged attacks are recommended to kill him.
Brother's special attack: None, but will often cast curse spells on you to lower your attack, strength, and defence levels. Please note that the curse spells can still affect you with the magic protection prayer/curse on.
Torag the Corrupted (Weakness- Water spells):
Protect from Melee prayer is advised for this brother; although if you are using melee armor and have a high defence level (90+), you should be able to kill him without protection prayers, at the cost of bringing multiple pieces of food. Using a water-based spell to kill him is recommended.
Brother's special attack: When activated, his special attack will reduce your run energy by 20%. Note that his special attack can ignore your protection prayer/curse.
Karil the Tainted (Weakness - Stab):
Protect from Ranged prayer is advised for this brother; although, if you are using melee armor and have a high defence level (90+), you should be able to kill him without protection prayers, at the cost of bringing multiple pieces of food. Please keep in mind that Karil's attack are very accurate. Using a Stab weapon to kill him is recommended.
Brother's special attack: When activated, his special attack will reduce your agility level by 20%.
Guthan the Infested (Weakness - Air spells):
Protect from melee prayer is advised for this brother; although, if you are using melee armor and have a high defence level (90+) you should be able to kill him without protection prayers, at the cost of bringing multiple pieces of food. Using an air-based spell to kill him is recommended.
Brother's special attack: When activated, the special attack will restore of Guthan's life points. Note that if you have melee protection prayer or curse on, his special attack will ignore it as well and heal him, but you won't get damage.
Akrisae the Doomed (Weakness - Bolts)
It is advised to use protect from melee, as this brother is capable of hitting up to 1700 lifepoints.
Akrisae has the ability to use protection prayers and will switch these throughout the fight, according to your attack method. Therefore, it is necessary to use at least two combat styles when fighting him, preferably melee and ranged.
Brother's special attack: None, but he does have the ability to restore his prayer if he runs out during the fight.
Note: Akrisae can only be accessed after completion of Ritual of the Mahjaarat and his tomb is linked to Verac's.
Linza the disgraced (Weakness - Nothing):

Linza the disgraced is a sister of the barrows brothers. She is considered a tanker and is hard to kill no matter what attack style you use. She has 150,000 HP and there is no safe spot. Her attacks are frequent and hit decently hard. She can reflect damage to players(500-800hp).
Sister's special attack: If you have completed Sliske's Endgame, Linza has the ability to heal herself for small amounts of time if you dont kill her fast, or within the first 3 brothers.
Note: Linza can only be accessed after completion of Kindred Spirits and his tomb is linked to Ahrim.
3. The tunnels:
After you've slain as many barrows brothers as possible, in the sense of those that can be fought by just searching their coffin (you only need at least to kill one brother to claim a reward; however, killing all of them will increase your chances of reaping better rewards. Since each brother killed will unlock the chance of getting a piece of the respective barrow set), head to the coffin that offers you to enter the tunnels.
The chance of receiving better drops is increased by the Ring of fortune,
Enhanced luck potion, Collector's insignia (charged), or Luck of the dwarves.
Once you're in, your objective in these tunnels is to find the puzzle door available for you to unlock to gain access to the room where you'll find the chest in the which the barrows brothers keep their treasure; ready for you to loot it. But beware! You might find yourself with one or a few surprises.
Starting with the monsters! You didn't think it was going to be that easy, did you? Inside the tunnels, you'll find five kinds of monsters that will be permanently agressive to you, and as in the brother's crypts, spectral faces will appear in your game screen to make you aware that your prayer points are being drained. So be sure you are prepared before you enter. If you are low on supplies, do not worry. Feel free to go to a bank to restock, the game won't reset until you've looted the chest.
Note that your mini-map will be unavailable while inside the tunnels, however you can still be able to try to figure out your way through it using your in-game compass and the following map:
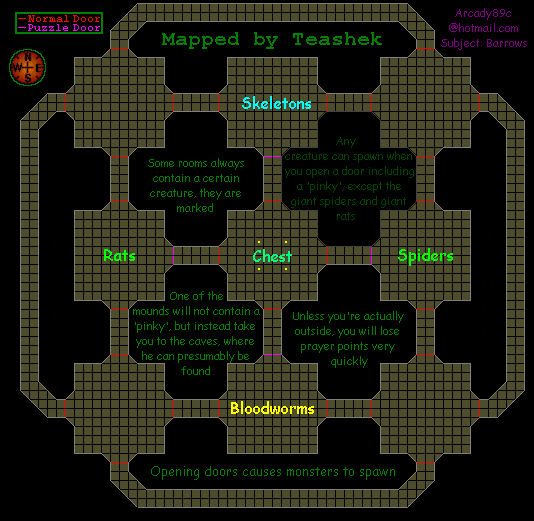
(Map made by Teashek, and edited by Sir karamu, original map by Coolgeekz)
Since your prayer will find itself drained inside the tunnels and you're likely to be inside for a few minutes, do not bother using up prayer restore potion before entering the tunnels, instead, enter the tunnels and wait you find the brother(s), according to how many you've slayed, to restore your prayer.
As mentioned on the map, these might appear when opening a door then you can decide to either fight it, or run away. You can also get attacked by a ghost when attempting to loot the brother's chest in the event where they are not all dead yet, however, you can still loot the chest after the ghost has appeared, there is no need to fight it to be able to claim your reward.
But to be able to claim your loot, you have to reach the chest room first. As you can see in the map, there are four entrances to the chest room, one for each main cardinal point. Only one of those four doors can be opened, the rest will remain unclickable, the openable door will be also placed at random.
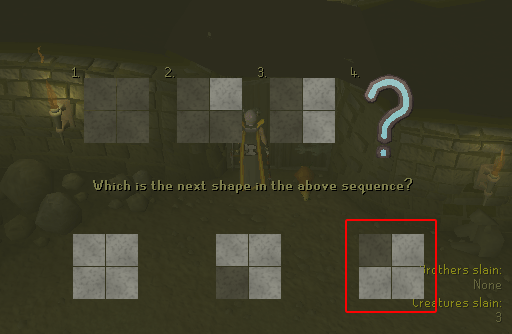
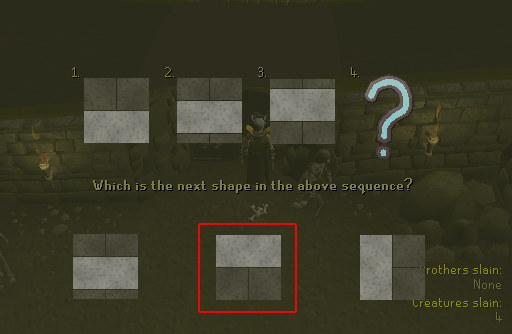
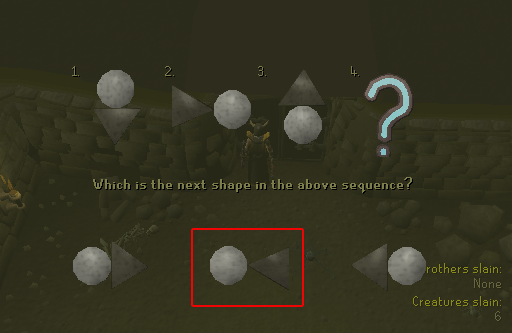
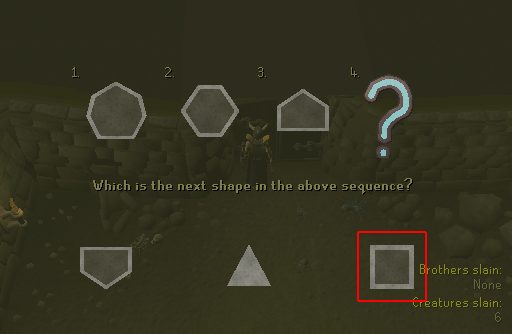
When you find the said door, you'll need to unlock it by answering correctly to an image puzzle that will be displayed in your screen, in the event where you select the wrong answer, the dungeon will reset itself, and the puzzle door will be relocated. Also, if you happen to be interrupted by a monster while you're solving the puzzle, when you click the door again, the puzzle that will appear will be random.
Nothing to freak out about though, since you will find below the solutions for the four puzzles that might display in your game screen:
Once the chest has been looted, there is only one thing left to do: ESCAPE! Quickly teleport out or find your way out through the tunnel, but note that from the moment you loot the chest the tunnel will start collapsing and you'll be dealt a small amount of damage from the falling rocks each few seconds, until you manage to get out.
Note:Fastest way to leave the ddungeon would be to use Drakon's medallion or a Games necklace.
- If I logout or leave the Barrows area, will I lose my progress? No, you won't! Your progress will be saved until your loot the brother's treasure chest and exit the tunnel.
- The higher killcount I get, then the more chances I'll have to get a Barrows equipment item? Disappointing perhaps, but no, the killcount will simply raise the amount of stackable items you get from the treasure chest.
- If I happen to die, will I keep my items? No, in the event of your death, a grave will be placed in the spot and you will have to get back there to pickup your items. Alternatively you can buy your items bac from Death for a price.
- Is it possible to get double Barrows equipment items from looting the chest? Yes, it is. However the chances of this event to happen are almost inexistent.
- Is there a rate to acquire barrows equipment? No, the rewards are random. For example, it might require one trip, or it might require 30 trips to get a piece.
Rise of the Six is a much harder, team based version of Barrows. The aim of this game is to take a team of four and face much more powerful versions of the six original Barrows Brothers all at once. Successfully surviving and defeating the brothers required good team work and the very best equipment. It is not recommended be at the very least level 120 combat with combat stats of level 80+ and to use level 80+ armor and weaponry, preferably mage equipment as 4 out of 6 brothers are melee based.
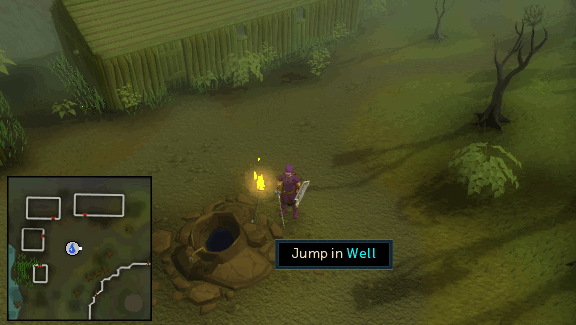
Entering the Shadow Dungeon
To play Rise of the Six, you will need to gain access to the Shadow Dungeon and to do so, you will need to obtain a Barrows totem from either the Barrows chest or another player. When you have a totem, head to the well in the abandoned town outside of the Barrows. Attempt to jump in and set up an instance for your fight.
Once done, you will find yourself in a long corridor. Make your way along it until you find four pressure plates for each member of your team to stand on and open the doors to the arena (Note: You team will be split in half here as the arena is divided into two sides. Two players will enter the west side of the arena and the other two enter the east side).
The Shadow Barrows Brothers
As mentioned, the brothers in Rise of the Six are much more powerful than in the standard Barrows. They are all level 240 and possess shared and individual special abilities. These are:
Shared Abilities:
- Spin attack (Dharok, Torag, Guthan and Verac): One of the brothers will spin his weapon around, dealing up to 2,500 damage every few seconds. This can be avoided by quickly moving out of range.
- Smash attack (Dharok, Torag and Verac): One of the brothers will run up the wall and push off it, smashing into the ground and dealing up to 3,000 damage to anyone stood nearby. Can be avoided by moving away from where the brother is going to land his hit.
- Energy attack (Ahrim and Karil): One of the brothers will spin around and unleash blasts of energy, hitting up to 1,500 on anyone stood nearby.
- Teleport attack (Ahrim and Karil): One of the brothers will teleport to the sides of the arena and attack players on both sides.
Individual Abilities:
Dharok:
- Damage absorb: Dharok will shout "Give me everything!" and any damage dealt to him for a brief period after will be added to his next attack (your attacks still reduce his life points). He will then target either player and unleash a potentially devastating attack on them.
Verac:
- Soul bind: Verac will bind his target's soul to a spot in the arena marked by arrows and their Prayer points will be rapidly drained until they stand in the centre of the arrows.
- Flying attack: Verac will fly using his flail and launch very powerful attacks to any nearby player.
- Flying attack 2: Guthan or Torag will throw Verac into the air and target a player, he'll then slam down on them and deal heavy damage.
Ahrim:
- Levitate: Ahrim levitates in the air and attacks players. He is immune to melee attacks and resistant to ranged while levitating.
- Lightning attack: Ahrim fires a bolt of lighting at the opposite end of the arena to where he's standing, hitting up to 1,500 on anyway caught by the bolt.
- Gas clouds: Ahrim will spawn either a red or purple gas cloud. Red clouds heal any of the brothers up to 500 and red hit up to 500 on any player that stands on it.
Torag:
- Smash attack: Torag smashes his target to the ground and then rapidly hits them with his hammer, hitting 250 each time. Another player must hit Torag from behind to knock him off the downed player.
Karil:
- Shadow portal: Karil will dash away into the shadows and leave behind shadow portal. Somebody must stand near the portal and it will disappear. If left alone, it will explode, dealing up to 6,000 damage to anybody stood close and less the further away you are.
- Surge: A brother will surge towards Karil and launch him into the air. Any player he passes over will be hit for up to 2,000 damage.
Guthan:
- Spear throw: Guthan will throw his spear at the player he isn't attacking. The player impaled on the spear will be hit for 500 damage every 2 seconds until Guthan has reclaimed the spear. To do so, they must run up to Guthan, allowing him to pull out the spear and deal 1,000 damage.
The Fight
When you're ready to start the fight, one person clicks on the Shadow portal in the centre of the arena and a mask of Sliske will ask you if you're ready. Accept and three brothers will spawn on each side.
When you kill a brother, all remaining brothers will be healed by 5% of their maximum life points and the dead brother will respawn with 50% of his maximum lifepoints unless another brother is killed immediately. This means that all six brothers must be killed in quick succession and the simplest way to do this is to get them all down to very low life points and then finish them off together.
At any point during the fight, one of the brothers may teleport you into the Shadow realm. Here you will need to lure the brothers into six of the fire pits to be sent back to the arena. If you get too close to any of the brothers, you will be hit for 500 damage every 2 seconds.
In the event that both players on one side of the arena are killed, the three brothers from that side will grow stronger and cross to the other to attack the two remaining players. This essentially means you've lost as fighting all six empowered brothers between two of you is next to impossible.
Rewards
If you successfully kill all six brothers, the shadow portal and barriers will collapse and the rewards chest will appear in the arena. Once looted, you will have 30 seconds to escape the dungeon via the corridor you came through earlier. However, you will now have to pass a number of obstacles. If you fail to escape in time, your screen will be flipped upside down the dungeon will begin to collapse and explode, dealing up to 2,500 damage per hit. For a full list of possible rewards, see the Rewards section below.
(Note: You can teleport out of the dungeon, but any Unstable malevolent energy you have will disappear).
Now you must be wondering which rewards are so good to make your trips worth it, so here we present you, the rewards! Starting by the Barrows armor equipment, note that getting Barrows equipment as reward is rare, so if you didn't get one don't feel disapointed, and keep trying.
- Ahrim the Blighted's Set (Magic)
- Dharok the Wretched's Set (Melee)
- Guthan the Infested's Set (Melee)
- Torag the Corrupted's Set (Melee)
- Verac the Defiled's Set (Melee)
- Karil the Tainted's Set (Ranged)
- Akrisae the Doomed's set* (Magic)
- Linza the disgraced (Melee set)
*Can only be obtained after completing Ritual of the Mahjarrat.
Other items you might get include:
- Barrows totem
- Bolt racks (Ammo for the Karil's crossbow; one time use only)
- Coins
- Mind rune
- Chaos rune
- Death rune
- Blood rune
- Elite clue scroll
- Shark (1-4)
- Dragon medium helm
- Tooth half of a key
- Loop half of a key
- Prayer potion (2)
- Restore potion (2)
- Super defence potion (2)
| Ahrim the Blighted's Set | |||||||||||||
| Name | Image | Armor bonuses | Weapon bonuses | ||||||||||
| Armor bonus | Life bonus | Accuracy | Damage | ||||||||||
| Ahrim's hood |  |
297 | 840 | N/A | N/A | ||||||||
| Ahrim's robetop |  |
341 | 1680 | N/A | N/A | ||||||||
| Ahrim's robeskirt |  |
326 | 1260 | N/A | N/A | ||||||||
| Ahrim's staff |  |
0 | 0 | 1486 | 0 | ||||||||
| Ahrim's wand |  |
0 | 0 | 1486 | 0 | ||||||||
| Ahrim's book of magic |  |
0 | 0 | 1486 | 0 | ||||||||
| Complete Set | 964 | 3780 | 1486 | 0 | |||||||||
| Set Effect | "Blighted Aura" - When you attack with any spell, you will have a chance to reduce your opponent's strength. |
||||||||||||
| Dharok the Wretched's Set | |||||||||||||
| Name | Image | Armor bonuses | Weapon bonuses | ||||||||||
| Armor bonus | Life bonus | Accuracy | Damage | ||||||||||
| Dharok's helm |  |
297 | 840 | N/A | N/A | ||||||||
| Dharok's platebody |  |
341 | 1680 | N/A | N/A | ||||||||
| Dharok's platelegs |  |
326 | 1260 | N/A | N/A | ||||||||
| Dharok's greataxe |  |
0 | 0 | 1486 | 1564 | ||||||||
| Complete Set | 964 | 3780 | 1486 | 1564 | |||||||||
| Set Effect | "Wretched Strength" - As your LP lowers, your strength increases. This stops when at 10% of your LP, which gives double strength. |
||||||||||||
| Guthan the Infested's Set | |||||||||||||
| Name | Image | Armor bonuses | Weapon bonuses | ||||||||||
| Armor bonus | Life bonus | Accuracy | Damage | ||||||||||
| Guthan's helm |  |
297 | 840 | N/A | N/A | ||||||||
| Guthan's platebody |  |
341 | 1680 | N/A | N/A | ||||||||
| Guthan's chainskirt |  |
326 | 1260 | N/A | N/A | ||||||||
| Guthan's warspear |  |
0 | 0 | 1486 | 1564 | ||||||||
| Complete Set | 964 | 3780 | 1486 | 1564 | |||||||||
| Set Effect | "Infestation" - You have a chance to get healed by the amount of damage you inflicted to your opponent. |
||||||||||||
| Torag the Corrupted's set | |||||||||||||
| Name | Image | Armor bonuses | Weapon bonuses | ||||||||||
| Armor bonus | Life bonus | Accuracy | Damage | ||||||||||
| Torag's helm |  |
297 | 840 | N/A | N/A | ||||||||
| Torag's platebody |  |
341 | 1680 | N/A | N/A | ||||||||
| Torag's platelegs |  |
326 | 1260 | N/A | N/A | ||||||||
| Torag's hammers |  |
0 | 0 | 1486 | 1564 | ||||||||
| Complete Set | 964 | 3780 | 1486 | 1564 | |||||||||
| Set Effect | "Corruption" - Your target's run energy may be drained at 20% a drain. But it will not add it to your energy. |
||||||||||||
| Verac the Defiled's set | |||||||||||||
| Name | Image | Armor bonuses | Weapon bonuses | ||||||||||
| Armor bonus | Life bonus | Prayer bonus | Accuracy | Damage | |||||||||
| Verac's helm |  |
297 | 840 | 1 | N/A | N/A | |||||||
| Verac's brassard |  |
341 | 1680 | 2 | N/A | N/A | |||||||
| Verac's plateskirt |  |
326 | 1260 | 1 | N/A | N/A | |||||||
| Verac's flail |  |
0 | 0 | 2 | 1486 | 1564 | |||||||
| Complete Set | 964 | 3780 | 6 | 1486 | 1564 | ||||||||
| Set Effect | "Defiler" - Your attack may hit through your opponents armor and prayer. It is also slightly more accurate. |
||||||||||||
| Karil the Tainted's set | |||||||||||||
| Name | Image | Armor bonuses | Weapon bonuses | ||||||||||
| Armor bonus | Life bonus | Accuracy | Damage | ||||||||||
| Karil's coif |  |
297 | 840 | N/A | N/A | ||||||||
| Karil's top |  |
341 | 1680 | N/A | N/A | ||||||||
| Karil's skirt |  |
326 | 1260 | N/A | N/A | ||||||||
| Karil's crossbow |  |
0 | 0 | 1486 | 892 | ||||||||
| Karil's pistol crossbow |  |
0 | 0 | 1486 | 0 | ||||||||
| Karil's off-hand crossbow |  |
0 | 0 | 1486 | 0 | ||||||||
| Complete Set | 964 | 3780 | 1486 | 892 (With 2h Crossbow) | |||||||||
| Set Effect | "Tainted shot" - There is a chance that you opponent's's agility will be lowered by 20%. |
||||||||||||
| Akrisae the Doomed's set | |||||||||||||
| Name | Image | Armor bonuses | Weapon bonuses | ||||||||||
| Armor bonus | Life bonus | Prayer bonus | Accuracy | Damage | |||||||||
| Akrisae's hood |  |
196 | 660 | 2 | N/A | N/A | |||||||
| Akrisae's robe top |  |
226 | 1320 | 2 | N/A | N/A | |||||||
| Akrisae's robe skirt |  |
216 | 990 | 2 | N/A | N/A | |||||||
| Akrisae's war mace |  |
0 | 0 | 2 | 1486 | 726 | |||||||
| Complete Set | 638 | 2970 | 8 | 1486 | 726 | ||||||||
| Set Effect | "Doom" - When full Akrisae's armor is worn, there is a chance that you will drain a percentage of your opponent's prayer points based on the damage you've dealt and restore a percentage of your own prayer points. |
||||||||||||
| Linza the disgraced set | |||||||||||||
| Name | Image | Armor bonuses | Weapon bonuses | ||||||||||
| Armor bonus | Life bonus | Accuracy | Damage | ||||||||||
| Linza's helm |  |
297 | 0 | N/A | N/A | ||||||||
| Linza's cuirass> |  |
442 | 0 | N/A | N/A | ||||||||
| Linza's greaves | |
423 | 0 | N/A | N/A | ||||||||
| Linza's hammer |  |
N/A | N/A | 1924 | 768 | ||||||||
| Linza's shield | |
384 | 385 | N/A | N/A | ||||||||
| Complete Set | 1633 | 285 | 1924 | 768 | |||||||||
| Set Effect | Wearing all 5 parts gives you 1/8 chance to relatiate dealing between 500-800 damage to your opponent. |
||||||||||||
*Note: All barrows monsters drop Ghost hunter gear.
Barrows armor will degrade over time through its use. Only in top condition or when completely broken can it be traded to others. In general you will get around 15 hours of combat use out of a piece in top condition before it needs to be repaired. There are 6 different levels that the armor can be at.
- Karil's top 100 - when this is displayed, the armor is still in top condition, but is not tradable. This happens as soon as you engage in combat.
- Karil's top 75 - the armor has degraded a bit.
- Karil's top 50 - the armor has degraded some more.
- Karil's top 25 - the armor is almost broken.
- Karil's top 0 - the armor is broken, and needs to be repaired. It is also tradeable in this condition. Note:If you drop the armor unnoted it will automatically deteriorate to 0
You can get the armor repaired in four different places at a cost.
- Bob in Lumbridge
- Dunstan in Burthorpe
- Tindel Merchant in Port Khazard
- The Squire at the Void Knight outpost
Costs for a full repair from 0:
- Weapons: 300k
- Bodies: 270k
- Legs: 240k
- Helmets: 180k
The armor can also be repaired using an armor stand in a POH. The cost for repairing it in this way is based on your Smithing level (99 smithing almost cuts the costs in half). You can also request assistance from someone who has a higher smithing level to be charged the same price that the person assisting you would pay for repairing it.
- Barrows amulet (3-10)
- Battlestaff (35-45) (Noted)
- Black dragonide (60-80) (Noted)
- Blue charm (4)
- Crimson charm (4)
- Dwarf weed seed (9)
- Green charm (4)
- Grimy dwarf weed (6-10) (Noted)
- Grimy lantadyme (6-10) (Noted)
- Magic logs (190-210) (Noted)
- Magic seed (2-4)
- Malevolent energy (unstable) (becomes stable Malevolent energy when you escape from the dungeon without teleporting)
- Malevolent kiteshield
- Merciless kiteshield
- Onyx bolts (50-60)
- Raw rocktail (120-150) (Noted)
- Rune platebody (6-10) (Noted)
- Vengeful kiteshield
This Minigame Guide was written by Sir Karamu, Tenseiken, coolgeekz, spydenie, evildemon86, Aerisje, manticore, uber, alex201285, G3m N M, Jasper, and Ralkal.. Thanks to 3048047, Kernite, DRAVAN, zhaksta, Baron Diaz, Fireball0236, Shinraz, TheRulnig, mullen781, Teashek, jibax, Xaero0010, Imperial G96, Ju_Jitse, Im4eversmart, ms wolf22, betatmw000, LogGamer, Koliatx, 12erwer, magikchicken, Zevenberge, Weirdonline_The_Ultimate, Alfawarlord, Steve-0, Jakeup07, Speedy0806, Pking_Pwn1, Jasper, Ralkal, Javezz, Crablogger, and Jarkur for corrections.
This Minigame Guide was entered into the database on Thu, May 12, 2005, at 06:30:38 PM by dravan, and it was last updated on Thu, Aug 24, 2017, at 07:20:47 AM by Numerous One.
If anything is incorrect or missing, or if you have any new information to submit to this database, please submit it to us on our Content Submissions Forums.
If you see this guide on any other site, please report it to us so we can take legal action against anyone found stealing our content. This guide is copyrighted by RuneHQ, and its use on other sites is expressly forbidden. Do not ask if you can use our guides or images, the answer is and always will be NO!
Print this page with images - Back to the Minigame Guide Index Page - Back to Top
