

50 Firemaking
50 Magic
53 Thieving
A high agility level will be a distinct advantage
The ability to defeat extremely tough opponents above level 120
Do No Evil
General's Shadow, The
Hopespear's Will
Recipe for Disaster
Temple at Senntisten, The
Wandering Ga'al
Keeping any type of once-click teleport option on you is great as an emergency escape, since your home teleport spell can be interrupted.
Discovering the 4 Diamonds of Azzanadra
Items Needed: 650 Coins, 12 Magic logs (Noted), 6 Steel bars (Noted), 6 Molten glass (Noted), Ashes, Charcoal, Blood rune, and Bones.
Items Recommended: 1K Coins (500 if you have a Ring of charos (a)), Digsite pendant, 2 Bandit camp teleports, and Waterskins.
Items Acquired: Etchings, Translation, and a Bandit's brew.
Instructions:
-
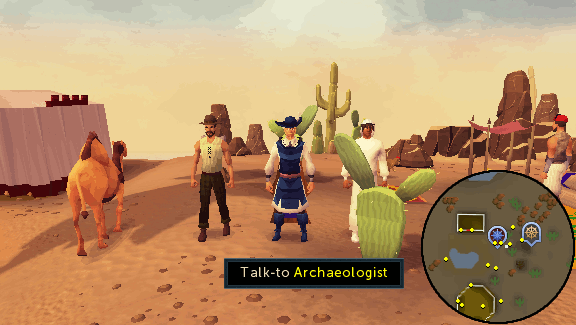
Travel to the Bedabin Camp, in the northwestern part of the desert, and speak with the Archaeologist in the center of the camp. He will tell you about an ancient stone tablet he found and requests that you take it to the Digsite for examination. Agree to help him and you will be given some Etchings.
Note: The easiest way to reach the Bedabin Camp is by taking a flying carpet ride from the Shantay Pass to the Bedabin Camp or by traveling to the Bandit Camp using a Bandit camp teleport and then running north.
-
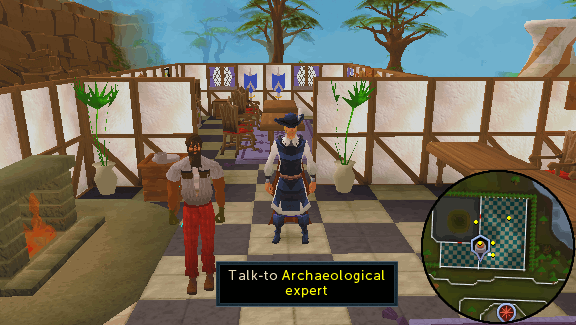
Head over to the Exam Centre in the southern part of the Digsite, east of Varrock, and talk to the Terry Balando. He will take the Etchings and begin to translate them. Speak with him again and he will give you a book, containing the Translation.
Note: The easiest way to reach the Digsite is by using the Digsite pendant's teleport option or by using the Varrock lodestone and then running east.
-
Return to the Archaeologist, at the Bedabin Camp, and give him the Translation. He will offer you a 50/50 share of the treasure if you help him find it. Accept his offer and he will tell you that he will look around the camp for more clues while you head south to investigate the Bandit Camp.
Note: The easiest way to reach the Bedabin Camp is by taking a flying carpet ride from the Shantay Pass to the Bedabin Camp or by traveling to the Bandit Camp using a Bandit camp teleport and then running north.
-
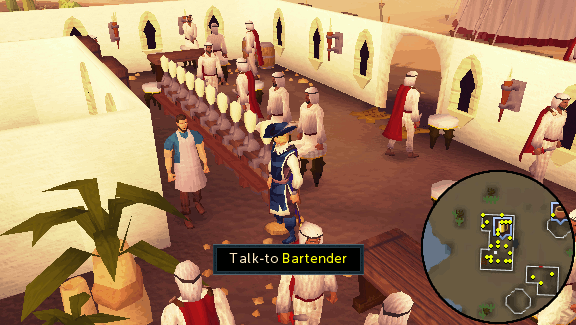
Head south of the Archaeologist to the Bandit Camp and speak with the Bartender in the pub. Buy a Bandit's brew from him and ask him about the 4 diamonds. The bartender will then suggest that you should talk to one of the village elders.
Note: Make sure you are not wearing any Saradomin or Zamorak item when setting foot in the camp or you will constantly be attacked by Bandits (level 78).
-
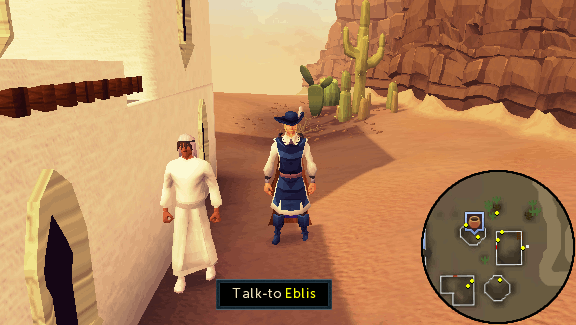
Head directly east to find Eblis wandering around and talk to him about the 4 Diamonds of Azzanadra. After a short conversation he will tell you that the warriors guarding the diamonds can be located with an ancient spell. He will then ask you to bring him the following needed items for the spell: 12 Magic logs, 6 Steel bars, 6 Molten glass, Ashes, Bones, Charcoal, and a Blood rune.
Note: Eblis accepts noted Magic logs, Steel bars, and Molten glass.
-
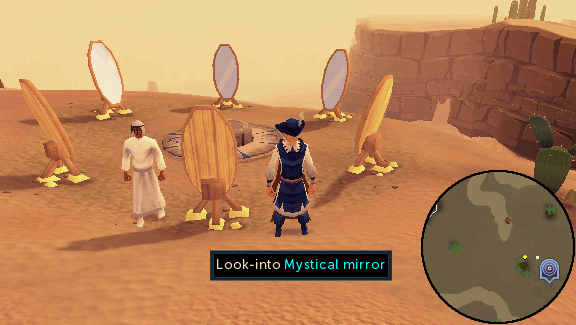
When you have used each of the items on Eblis, he will ask you to meet him in desert to the east. Head southeast of the camp until you spot Eblis and some mirrors. Speak to him again and he will explain that there are 6 mirrors, but only 4 diamonds. This means that 2 of the locations shown in the mirrors are false. The locations shown are as follows:
- North mirror: Ice gate, near Trollheim
- North east mirror: Canifis
- North west mirror: Picnic area, near the Fishing Guild
- South west mirror: Bandit Camp in the desert (false)
- South east mirror: Smokey well, near Pollnivneach
- South mirror: The pyramid (false)
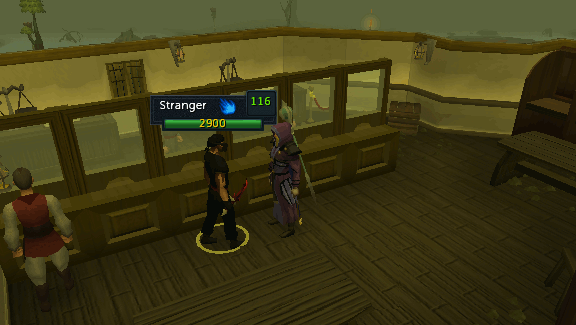
The Stranger:
When you have any of the 4 diamonds in your possession it is possible that a Stranger (level 116) will appear during the quest and attack you with a dragon dagger. Not every player will be visited by the Stranger, but it is recommended to bank any diamond as soon as possible to avoid the risk of him appearing.
Obtaining the Ice Diamond
Items Needed: Climbing boots OR Trollheim teleport method, Cake/Chocolate cake/Chocolate bar, Spiked boots, Magic armor, and Runes/Equipment to cast your best high-leveled Fire spell.
Items Recommended: 3 Super restore potions, 3 Prayer potions, 3 Super energy potions, and Food.
Items Acquired: Super restore (4), 2 Chocolate cakes, and Ice diamond.
Instructions:
-
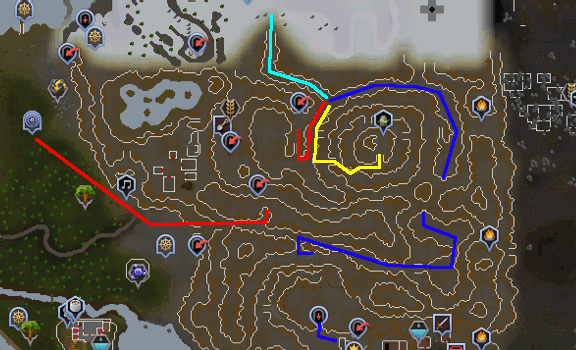
Travel to the northwestern edge of the Trollheim mountain, using one of the routes below:
Yellow route: Cast the Trollheim teleport spell and make your way down the mountain (requires 61 Magic and completion of the Eadgar's Ruse quest).
Red route: Start at the Rellekka lodestone and follow the path to the secret entrance of the Troll Stronghold (requires Rock/Climbing boots). You will find yourself on the bottom floor of the city. Head all the way north and up the stairs to the next floor. Then, run south through the long corridor and climb another set of stairs to the top floor of the stronghold. On the top floor, exit the city through an opening in the eastern wall to reach the surface, just west of Trollheim.
Blue route: Start at the Burthorpe lodestone and enter the secert passage in Sabbot's cave to the north. Make your away across the obstacles in the cave and once you've made it outside, follow the path until you reach the base of the Trollheim mountain. If you have 47 Agility, then you may use the shortcuts along the mountain to make it to the other side. If you do not have the required level, then turn on the Protect from Ranged prayer and follow the path along the northern part of the mountain, dodging the attacks of Thrower Trolls.
-
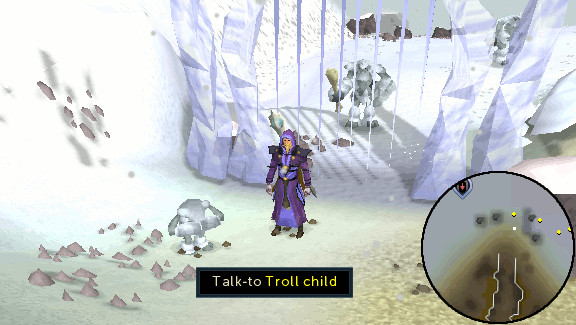
When you have made it to Trollheim, head northwest (Cyan path in the image above) until you reach an icy gate. Speak with the Troll child nearby to find out that he is upset and looking for something sweet. Give him a Cake, Chocolate cake, or Chocolate bar. Talk to him again and he will tell you that a bad man froze his parents because they stole his diamond. Offer to help him get his parents back in exchange for the Ice diamond.
-
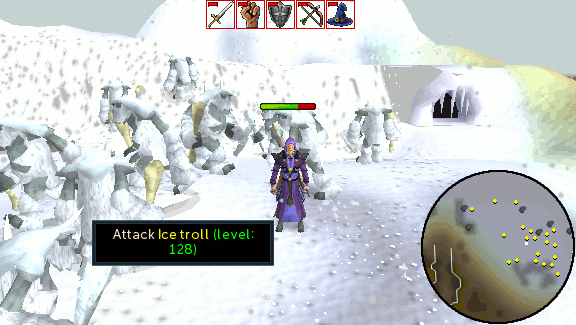
Step through the icy gate and head east until you reach a cave blocked off by 5 icicles. Kill 5 of the Ice trolls (level 120) wandering around in front of the cave to open it up.
Note: Upon passing through the icy gate, you will enter an area in which the icy rain will drain all of your stats. Every few seconds, the rain will drain every single stat by 1, deal 200 damage, drain your adrenaline by 10%, and reduce your run energy by 10. If at any point you are low on supplies, it is recommended that you teleport out and restock.
-
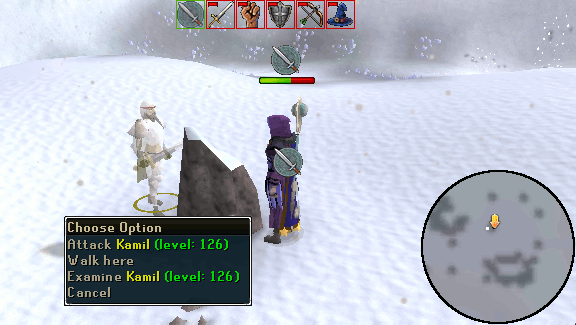
Enter the cave to the east and then follow the narrow path, filled with aggressive Ice wolves, until you reach an open area. Before entering the area, drink a Super restore potion to regain your stats and turn on the Protect from Melee prayer. As soon as you enter the open area, start casting Fire spells at Kamil. While fighting him, stay close to him. That way he will use melee attacks more often than his freezing spell, which he is able of casting several times per minute. When Kamil has been killed, pick up the Super restore (4) and 2 Chocolate cakes he drops.
Note: Keep an eye your stats during the battle as the icy rain will keep lowering your stats. If after the fight you are low on supplies, it is recommended that you teleport out and restock. You will not have to fight the trolls or Kamil again when you return.
-
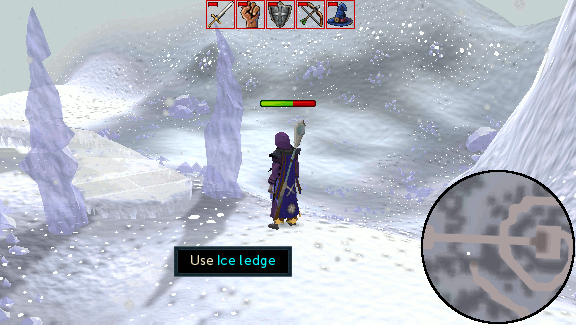
Head west and then north into a narrow corridor. Follow the spiral path until you reach an ice ledge. Put on the Spiked boots and climb up the ledge. Continue following the icy spiral path and step through the icy gate at the end onto a bridge
Note: If you slip and fall while making your way across the icy path, you will take 200 damage.
-
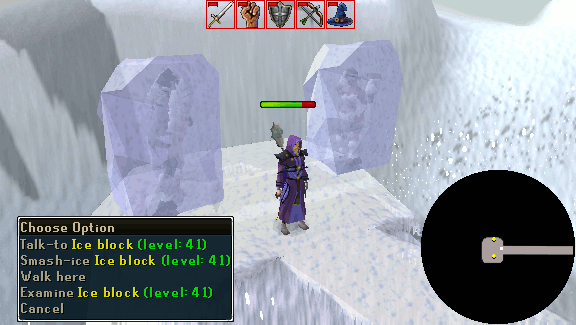
Walk across the bridge to reach a platform with 2 trolls trapped in blocks of ice. Smash both blocks to free them. Once you have freed them, the parents will take you back to the first icy gate and the Troll child will give you the Ice diamond.
Obtaining the Blood Diamond
Items Needed: Garlic, Silver bar, Spice, Magic armor, and Runes/Equipment to cast your best high-leveled Air spell.
Items Recommended: Amulet of glory (4), Silver sickle (b), Ouroboros/Druid pouch, Prayer potions, and Food.
Items Acquired: Silver pot, Blessed pot, Garlic powder, and Blood diamond.
Instructions:
-
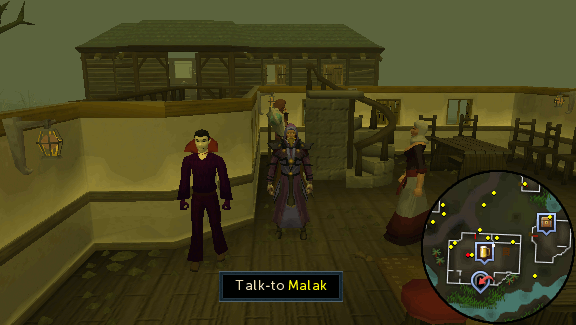
Make your way to the city of Canifis and enter the pub, just west of the bank. A cut scene will occur in which Malak, a vampyre lord, will demand a blood tithe from Roavar, the pub's owner. Speak with Malak and he tell him that you are looking for the Blood diamond. He will then offer you the diamond in exchange for killing Dessous. Accept his offer and ask him how you can kill Dessous. Malak will tell you that you need to obtain a Blessed pot of garlic and spiced blood to lure this creature out of its tomb.
Note: The easiest way to reach Canifis is by using the Canifis lodestone
-
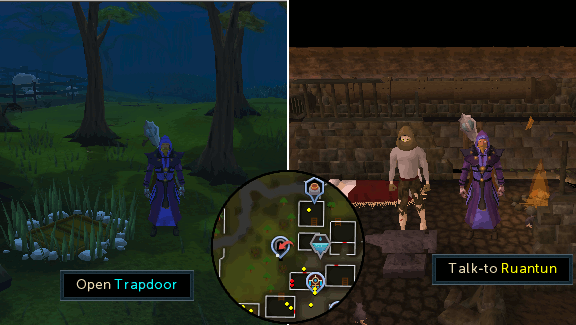
Head to Draynor Village and climb down the trapdoor, north of Aggie's house. Once inside the Draynor Sewer, head east and then north to find Ruantun. Give him the Silver bar and he will make you a Silver pot.
Note: The easiest way to reach Draynor Village is by using the Draynor Village lodestone or the Amulet of glory (4) teleport option.
-
Bank everything except for the Silver pot and head to the docks in Port Sarim. Take the boat to Entrana, at the pier just southeast of the
Player Owned Ports portal. Once on Entrana, ask to the High Priest, at the church east of the docks, to bless the pot.
Note: The easiest way to reach Port Sarim is by using the Port Sarim lodestone
-
Return to pub in Canifis with the Blessed pot, Spice, and Garlic. Speak to Malak and he will tell you that first you need to add fresh blood to the pot. He will then hit you for 50 damage to fill the pot. Now, crush the Garlic and add the Garlic powder along with the Spice to the pot.
Note: The easiest way to reach Canifis is by using the Canifis lodestone
-
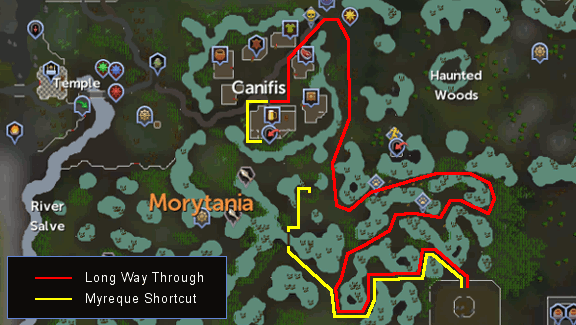
Head to Canifis' bank and prepare yourself to fight Dessous (level 120) with your best Air spells. Then, make your way to the graveyard southeast of the Mort Myre swamp. If you have completed the In Search of the Myreque quest, climb down the trapdoor behind the pub. Search the wall to the south to open a secret passage. Run through the tunnel and out the large doors at the end. From there, head southwest and follow the path (Yellow path in the image below). If you have not completed the In Search of the Myreque quest, you are forced to take the long route (Red path in the image below).
Note: Be aware of the swamp's decaying effect damaging you at a low rate and the Ghasts being able of decomposing food. Therefore, it is highly advised to have a Silver sickle (b) and a filled Druid/Ouroboros pouch with you to prevent your food from rotting.
-
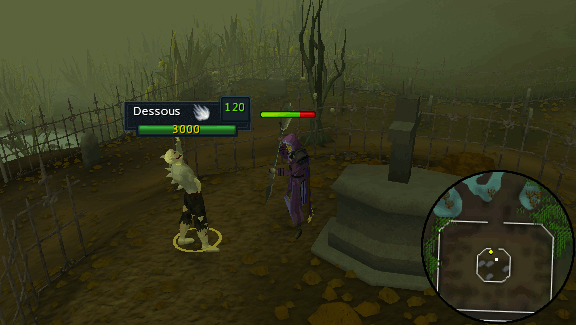
When you have made it to center the graveyard, use the Blessed pot on Dessous's tomb to lure him out and attack him with Air spells. Dessous changes his style of attack depending on which prayer you use. He will attack with Magic and Ranged if you turn on Protect from Melee, and vise versa. Because he has a strong melee attack, it is advised to turn on Protect from Melee. Once you have killed him, return to Malak and he will give you the Blood diamond.
Note: When you try to mage or him from behind the fence he will teleport next to you. If you do this 3 times or run away, Dessous will return to his tomb and you will need to obtain a new Blessed pot.
Obtaining the Smoke Diamond
Items Needed: Face mask/Masked earmuffs/Slayer helmet (any version), Magic armor, and Runes/Equipment to cast your best high-leveled Water spell.
Items Recommended: 1K Coins (500 if you have a Ring of charos (a)) OR Ring of slaying (8) OR Pollnivneach teleport, Super energy potions, Ice gloves (HIGHLY suggested!), Waterskins, and Food.
Items Acquired: Warm key and Smoke diamond.
Instructions:
-
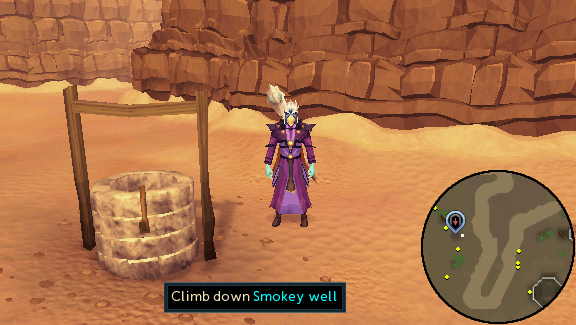
Travel to Pollnivneach in the desert and follow the ridge to the southwest of the city until you come to a smokey well. Before climbing down the well, make sure you have a Face mask, Masked earmuffs, or a Slayer helmet equipped. If you do not have one equipped while in the dungeon, you will take 200 damage every few seconds.
Note: The easiest ways to reach Pollnivneach are by using the Ring of slaying to teleport to Sumona or the Pollnivneach teleport scroll. Another option to reach the city is by taking a flying carpet ride from the Shantay Pass to the Pollnivneach.
-
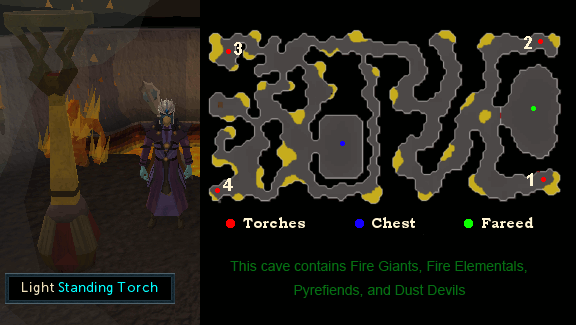
In the middle of the dungeon is a chest that can only be opened after the 4 standing torches, one each corner of the dungeon, have been lit simultaneously. It is recommended that you start with the torch in the northeast corner and then follow the numbers on the map below.
Note: Before you start lighting the torches, make sure your run energy is at 100% and keep Super energy potions ready for during the run. If you have completed the As a First Resort... quest, then it is recommended to use the salt-water spring in Oo'glog for unlimited run energy.
-
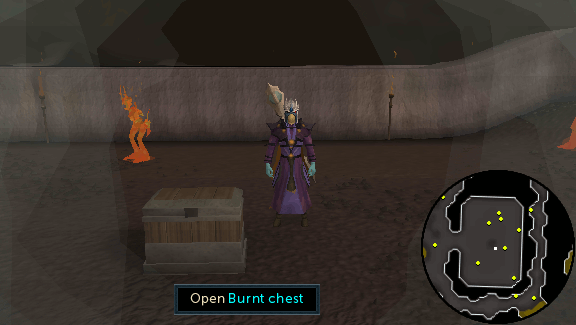
Once all the torches are lit, run to the square room in the center of the dungeon and open the chest to receive a Warm key. If you cannot open the chest, then you did not light all of the torches in time and will have to start over.
-
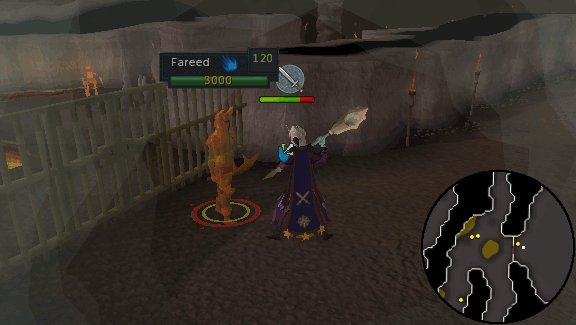
Now, head east through the dungeon until you reach a gate. Turn on Protect from Melee and open the gate using the Warm key. As soon as you enter through the gate Fareed(level 120), a demon who uses both Melee and Magic attacks, will appear. The demon forces you to unequip your main-hand weapon unless you are wearing Ice gloves. If you are not wearing the gloves, your weapon will appear in your inventory. Note that if your inventory is full, a low value item from your inventory will be banked in order to make space for your unequipped weapon. Since he is weak to Water spells, it is recommended to attack him with your best water spell. Once Fareed has been defeated, you will receive the Smoke diamond.
Note: Remember that you must wear Ice gloves to be able to wield a weapon during the fight (Requires completion of the Heroes' Quest). If you have not completed this quest, then your only options are to use off-hand magic weapons or a familiar to attack Fareed. Another option without the gloves is to cast a spell at him quickly, run away from him and equip your weapon again. Repeat this process until Fareed is dead.
Obtaining the Shadow Diamond
Items Needed: 10+ Lockpicks or Hair clips (Recommended), Magic armor, and Runes/Equipment to cast your best high-leveled Earth spell.
Items Recommended: 1K Coins (500 if you have a Ring of charos (a)) OR Bandit camp teleport, Waterskins, Antipoison potions, Prayer potions, and Food.
Items Acquired: Gilded cross, Ring of visibility, and Shadow diamond
Instructions:
-
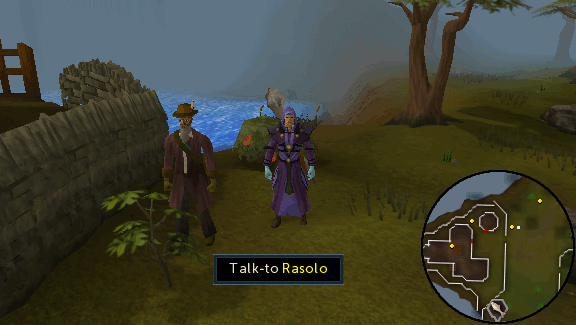
Travel to the house near the Baxtorian Falls, just west of the
Fishing Guild, and you will find Rasolo wandering around in front of it. Ask him about the diamonds of Azzanadra and he will tell you that the shadow diamond is protected by Damis, in a dungeon that can only be accessed with the Ring of visibility. He will then offer to give you the ring if you retrieved his Gilded cross.
Note: The easiest way to reach the Baxtorian Falls is by using a Skills necklace to teleport to the Fishing Guild and then walking west. Another way of reaching it is by using the Ardougne lodestone and then running northwest.
-
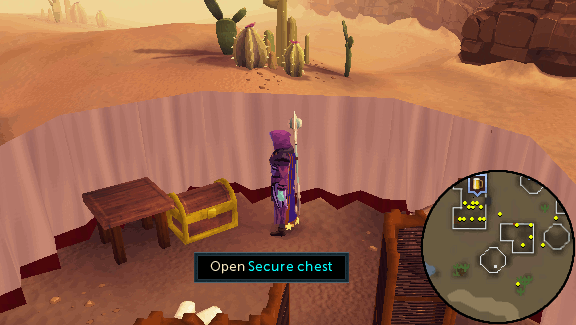
Head to the Bandit Camp in the desert and enter the most southwestern tent. Inside the tent, you will find the chest containing the Gilded cross. Use your Lockpick or Hair clip on it and your character will attempt to open the chest. If you fail, you will be poisoned and your lockpick will break. Once you have successfully unlocked the chest, open it and take the Gilded cross.
Note: Make sure you are not wearing any Saradomin or Zamorak item when setting foot in the camp or you will constantly be attacked by Bandits (level 78). The easiest way to reach the Bandit Camp is by using a Bandit camp teleport. Another option is by taking a flying carpet ride from the Shantay Pass to the Bedabin Camp and then running south.
-
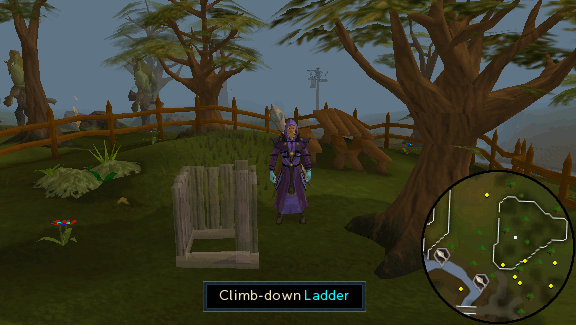
Return to Rasolo and give him the Gilded cross to receive the Ring of visibility. Put on the ring and head east into the picnic area, where a ladder will appear. Climb down the ladder into Damis' lair.
Note: The easiest way to reach the Baxtorian Falls is by using a Skills necklace to teleport to the Fishing Guild and then walking west. Another way of reaching it is by using the Ardougne lodestone and then running northwest.
-
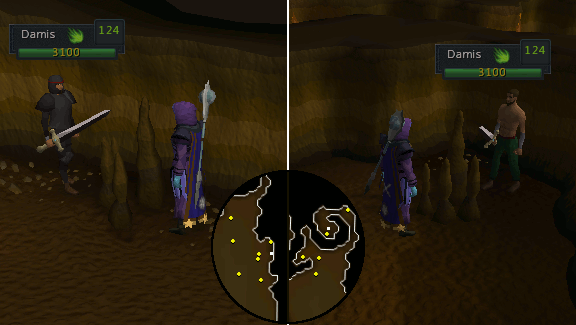
Inside Damis' lair, head southeast and make your way through the dungeon to reach the cavern where Damis resides (Red path in the image below).
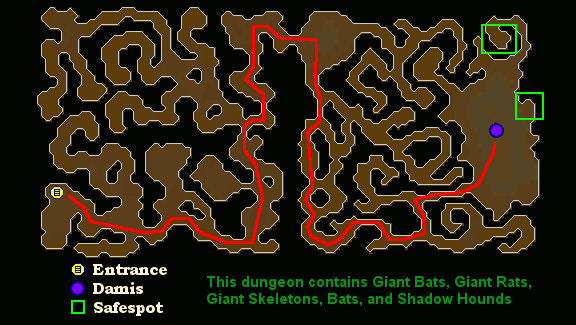
-
Once you have reached the cavern in eastern part of the dungeon, Damis (level 124) will appear. Decide to either use safespots or not (See the image above and below). Damis will transform into his second form when you kill him the first time. His first form only attacks with melee, while the second form will also drain your
Prayer level with 20-40 points every time he even attempts to hit you. Since he is weak to Earth spells, it is recommended to attack him with your best earth spell. When you have defeated both forms of Damis, he will drop the Shadow diamond. Pick it up and teleport out of the lair.
Note: While you run towards your safespot, Damis may disappear. When this happens, run into the maze for a few seconds and re-enter the cavern where Damis first appeared. If you are not using safespots, then it is recommended to use Prayer potions to maintain your Prayer points through the fight.
The Pyramid
Items Needed: Ice diamond, Blood diamond, Smoke diamond, and Shadow diamond.
Items Recommended: 1K Coins (500 if you have a Ring of charos (a)) OR Bandit camp teleport, Waterskins, Antipoison potions, Prayer potions, Super energy potions, and Food.
Items Acquired: None.
Instructions:
-
Once you have retrieved all 4 diamonds, return to Eblis at the mirrors just southeast of the Desert Bandit Camp. He will tell that the diamonds hold the power of Azzanadra, who has been trapped in the pyramid to the south. In order to set Azzanadra free, you must place a diamond on each of the obelisk surrounding the pyramid.
Note: The easiest way to reach the Bandit Camp is by using a Bandit camp teleport. Another option is by taking a flying carpet ride from the Shantay Pass to the Bedabin Camp and then running south.
-
Head south to the pyramid and use each diamond on the corresponding obelisk, surrounding the pyramid. The color of each obelisk will show you which diamond must be used on it. If you use the wrong diamond on it, you will receive a message that it is not the correct diamond. When all the diamonds have been placed on the obelisks, run to the top of the pyramid via the stairs along the north side of the pyramid and climb down the ladder.
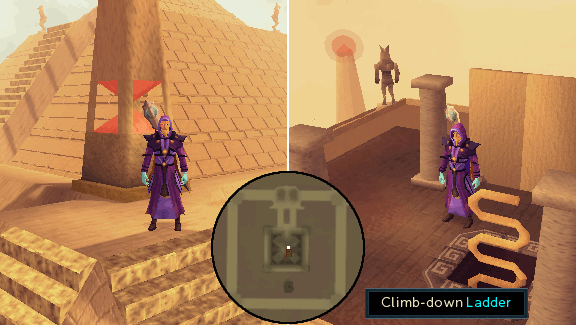
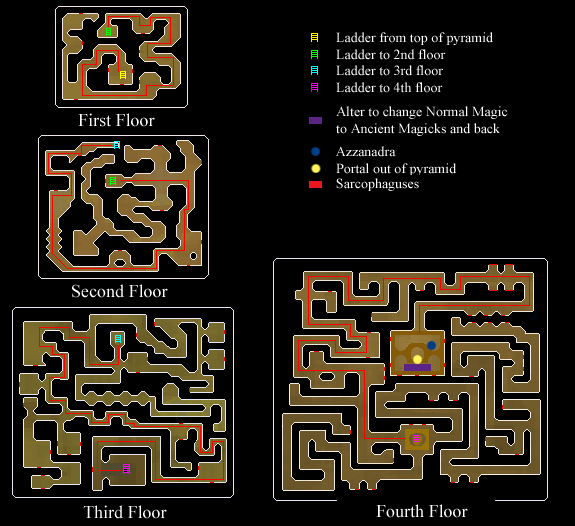
-
You will appear on the top level of the pyramid and will need to find your way to the center of the bottom floor. Turn on Protect from Melee and run to the ladder on each level to access the next level. During your traveling, you will encounter Mummies (level 110) wandering around or popping out of sarcophagi. Occasionally, Sarab swarms may appear out of nothing, which can poison you for 30 Life points. It is therefore advised to have Antipoison potions with you. The path to follow is covered by traps that can randomly activate. When this happens, you will appear outside and will have to start at the top floor again.
-
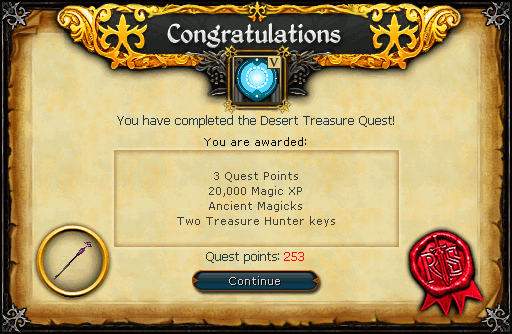
Once you have made it to the center of the bottom floor, open the door and speak with Azzanadra to receive your reward
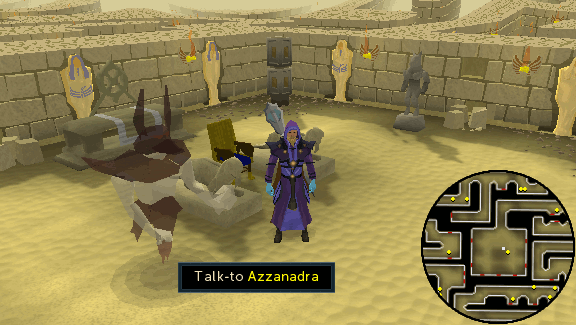
Congratulations! Quest Complete!
How to Switch Spellbooks:
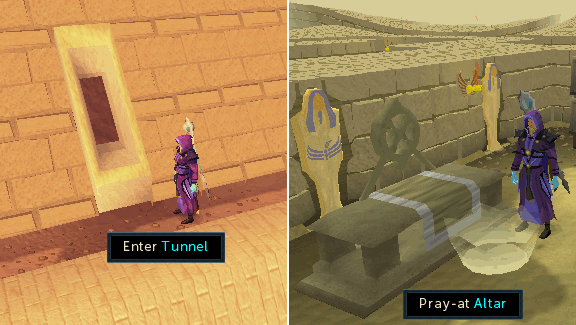
To change spellbooks (either from Ancient to regular, or vice versa), return to the pyramid. Unlike during the quest, you can easily access the center of the bottom floor by stepping through the tunnel along the southern edge of the pyramid. Once inside, pray at the altar to switch between spellbooks
Alternatively, players can also switch spellbooks by praying at the Elven grimoire found in Haf's Battlestaves shop in the Cadarn Sector of Prifddinas (Requires completion of Plague's End to access the city).
This Quest Guide was written by Alex201285. Thanks to Im4eversmart, KingT, Scorchy Devil, PKER2408, everlot11, occ ny, Lewt04, Innocence V, sir karamu, Blaze Amor, Sand Spinner, Galalad, Exxkaliber, Andross2000, Alrikthemad, killallx, Djw24, That__Guy, Slow Cheetah, Kurai_Okami, ASadEmoKid, meowmix686, Rae Maul, A Random, Guest_red death68, DarkBlitz, Yeldarb12, Im4eversmart, Skippmoonray, TallD88, Will778, HW_bengy, bloodyneck, draconix, tino pham, Farawin, Xbladez, tino pham, Ponteaus, chaosking22, Rapsak, sys_l0rd1214, 00 0000 00, Ghoulies, supertrek32, DRAVAN, Henry_n, sdthaman, Darkcut, Wilsonsox, Oberon Black, Carnage, Chaosblade77, King 0wnage, ZakAdder, Philip, Icedive, havfunonline, Iamanarab, andro_girl, Brenden, sw1ndla, Coolgeekz, Ponteaus, Link465, Inaithnir, Inuyasha3336, Saraime2003, Bectimir, Adamb53, watsermetjou, Osaka, xxlegitxx, Theamazingbender, Lament, Alex201285, Blazedman, Jayhawk2000, Smicks, Assfault2, 21Spyderking, andkomnodragon1, thehi, Siber170, Alfawarlord, Dornon2, pepman, Raquazaslash, DarkBlitz, Big noob 54, Javezz, DarkAdvisor, Blubberbets, Kedoumaru, Metallionus, Ahlor, Jarkur, Noble_K, and KRAZY for corrections.
This Quest Guide was entered into the database on Tue, Apr 26, 2005, at 10:02:26 AM by Lewt04, and it was last updated on Tue, May 30, 2017, at 05:46:54 AM by Numerous One.
If anything is incorrect or missing, or if you have any new information to submit to this database, please submit it to us on our Content Submissions Forums.
If you see this guide on any other site, please report it to us so we can take legal action against anyone found stealing our content. This guide is copyrighted by RuneHQ, and its use on other sites is expressly forbidden. Do not ask if you can use our guides or images, the answer is and always will be NO!
Print this page with images - Back to the Quest Guide Index Page - Back to Top
