

47 Agility is an advantage
Rescue Eadgar from the Troll Stronghold
Note: If you have completed Druidic Ritual prior to January 31, 2012, you will have to complete the updated version in order to do this quest.
| Climbing boots | Pineapple chunks | Vodka | 10 Wheat | ||||
| 5 Raw chicken | 2 Logs (regular) | Ranarr potion (unf) |
| Alco-chunks | Drunk parrot | Dirty robes | Troll thistle | ||||
| Dried thistle | Ground thistle | Troll potion | Fake man | ||||
| Burnt meat | Storeroom key | Goutweed |
-
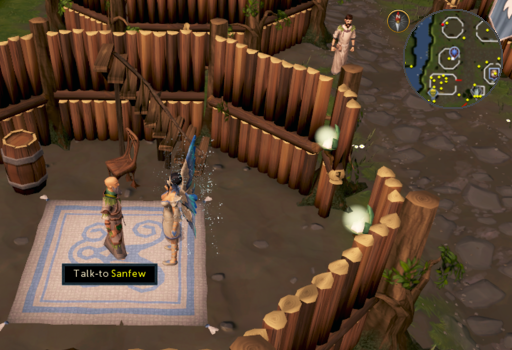
Ask Sanfew, located in the herblore shop on the East side of Taverley (directly North of the cow pen), if he has anymore work for you to help reclaim the circle. He will tell you that he wants you to obtain an herb called Goutweed, which he needs to perform the next part of the purifying ritual. Since only trolls know of its existence, he directs you to Mad Eadgar, who lives in a cave near the Troll Stronghold.
Note: The easiest way to reach Taverley is to use the lodestone network.
-
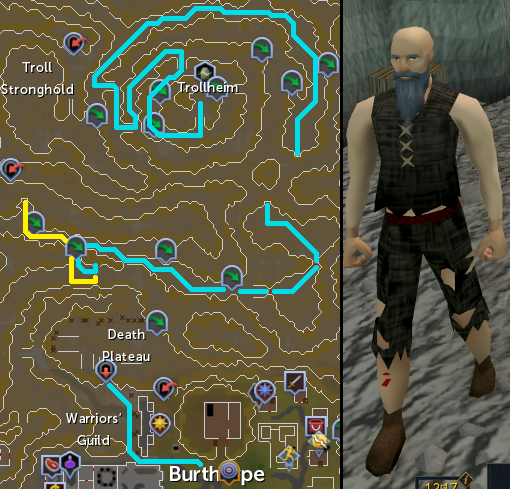
Head North West to Sabbot's cave. It is located on the West side of the Troll Invasion wall. Enter the cave and then enter the cavern in the West wall. Go through the Agility obstacles and exit through the Cliffside hole. Once you exit the cavern, immediately to the West there is a pile of rocks. Equip your Climbing boots and climb over the rocks. Head East climbing over some more rocks along the way until you reach the Arena gate. Pass through the Arena and follow the path to the North West until you come to a cave entrance.
Enter the cave and exit it on the North side. You will appear at the foot of the Trollheim mountain, which looks like a spiral. If you have 47 Agility, you may use the shortcuts along the mountain to reach the top. If you do not have the required Agility level, the spiral path (counterclockwise) to the top. When you notice a group of Thrower trolls on the North side, turn Protect from Missiles on and run by.
Another more safe route is to climb over the rock walls to the West, when you have exited through the Cliffside hole. Once across, enter the cave to the North and you will appear on the bottom level of the Troll Stronghold. From there, run North past the prison and go up the stairs to the next level. Make your way South, up another set of stairs and head North towards the stronghold exit. Once outside of the stronghold, walk South and follow the spiral path up the mountain.
When you have reached the top of the mountain, enter the cave and talk to Eadgar about the Goutweed herb. He will tell you that trolls often use it in their cooking and directs you to a troll cook.
Note: If you click on the top of the mountain, you will automatically walk through the spiral maze.
-
Leave the cave and enter the Troll Stronghold to the North West; enter the Cave entrance.
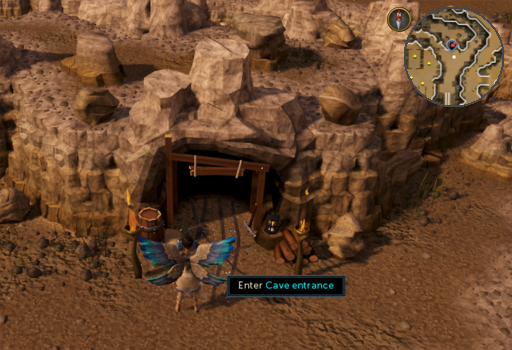
-
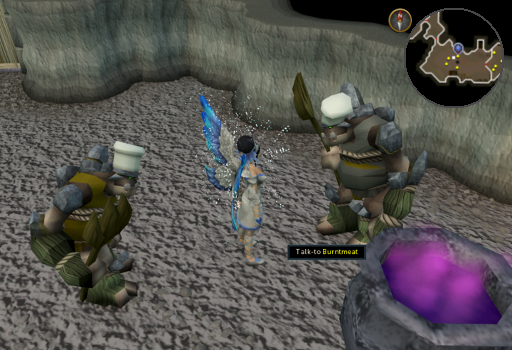
Once inside, descend a set of stairs to the South and ask Burntmeat, a troll cook, about the Goutweed.
In return for the information, he will ask for some tasty human as he is bored of goats.
-
Go back to Eadgar and talk about Burntmeat's offer. Eadgar will tell you he has a plan which requires you to get a parrot from the Ardougne Zoo.
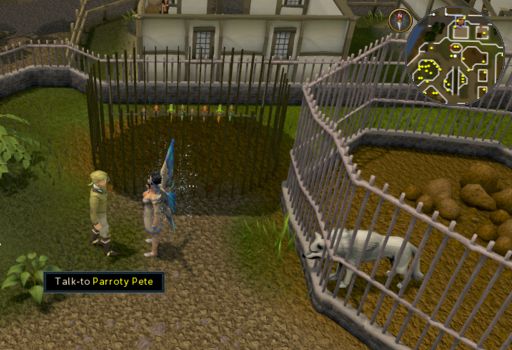
Teleport (or walk) to Ardougne and go to the zoo. Talk to Parroty Pete. Ask him what he feeds the parrots and when he added the aviary. Use the Pineapple chunks with the Vodka to produce Alco-chunks. Use these chunks on the aviary hatch and you will catch a Drunk parrot.
Note: The easiest way to reach Ardougne is by using the Ardougne teleport spell (requires completion of the Plague City quest).
-
Head back to Eadgar and give him the Drunk parrot. He will then tell you that you will need to create some sort of a scarecrow that looks like a human, smells like a human, tastes like a human, and talks like a human.
- Talks like a human: You will need to hide the Drunk parrot in the Troll Stronghold where it can learn to talk like the trolls expect him to.
- Looks like a human: You will need 10 Wheat and one log (any kind) for its body.
- Smells like a human: You will need to dress it in some Dirty robes, which Sanfew can provide.
- Tastes like a human: You will need to stuff the scarecrow with 5 Raw chickens, because everything tastes like chicken.
-
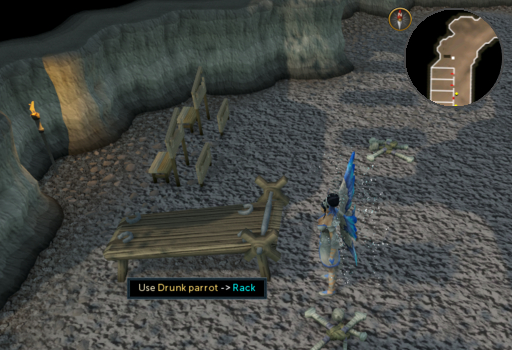
Enter the Troll Stronghold again and descend the stairs to the North. Once on the next floor, open the prison door and go down a set of stairs to reach the prison.
North of the prison cells you will find a rack that can be searched. Hide the Drunk parrot under the rack so it can learn how to talk like a human.
Note: If you accidentally drop the Drunk parrot, then talk to Eadgar. He will tell you that he has it and will give it to you.
-
Travel to Taverley and talk to Sanfew about the dirty robes.
He will tell you to go the lake South of Taverley and talk to Tegid, the druid washing his robes. When you ask him for his robes, he will refuse to give them to you. Tell him that Sanfew won't be happy and eventually he will give you some Dirty robes.
Note: The easiest way to reach Taverley is to either use the Games necklace and teleport to the Burthorpe Troll Invasion activity or use the Taverley Lodestone (if unlocked).

-
Visit Eadgar in his cave and give him the items listed in Step 5, excluding the Drunk parrot. He will tell you that you still need a troll truth potion, as the trolls may lie about the Goutweed. Head outside Eadgar's cave and look for a Troll thistle in the grass patches. Note that it spawns in a different grass area every time it is picked. If you search and cannot find it, try logging into a different world. Pick it up once found.
Note: Put the parrot in the rack to absorb the prisoner's speech before talking to Eadgar.

-
Light a fire and use the thistle on it to obtain a Dried thistle. Now grind Dried thistle and then use the acquired Ground thistle with a Ranarr potion (unf) to create the Troll potion.
Note: If you forgot to bring some logs, you can use the everlasting fire at the tents in front of the Troll Stronghold's entrance.
-
Give the Troll potion to Eadgar and he will tell you to fetch the Drunk parrot. Go back to the Troll Stronghold prison area and search the rack to retrieve the parrot. Take him back to Eadgar, who will give you a Fake man. (Eadgar evidently used the potion on the fake man.)
-
Enter the Troll Stronghold and give the Fake man to Burntmeat, who eats it.
He will reward you with a Burnt meat, the first thing he ever cooked. Ask him where you can find the Goutweed.
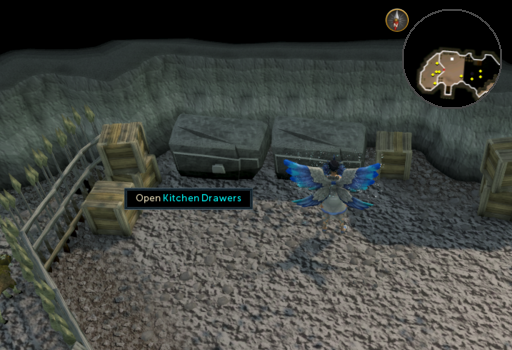
He will then tell you that the only remaining Goutweed can be found in the storeroom and that he hid the key in the fake bottom of one of the kitchen drawers.
Open and search both kitchen drawers to the East of Burntmeat to find a Storeroom key.
-
Descend the stairs to the North of the kitchen drawers and use the Storeroom key on the storeroom door.
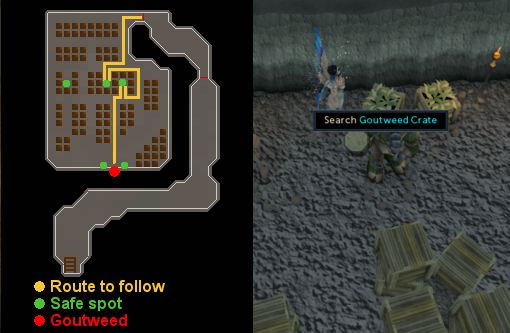
Now, you must make it to the other side of the storeroom without being seen by the guard.
To make it safely to the other side it is advised to follow the trolls around until you see some safe spots (see image below).
Wait there for a good moment and then continue further into the room.
When you have made it to the other side and searched the crate for the Goutweed, you will get caught by the trolls and thrown out of the room.
Note: The only time you will receive damage when you are caught attempting to 'steal' the goutweed is when you finally search the crate that contains it - and the guard deals 28 damage.
-
Return to Sanfew to collect your reward.
Congratulations! Quest Completed!
This Quest Guide was written by Im4eversmart, Leader of Darkness, and Terr002. Thanks to Lilroo503, Alk12, engekomkomme, Lair King, DRAVAN, Chroz, Princeman192, dragoon889, Kitty0333100, FireHazard772, diamondi3ack, ThomasRM, Mobstar777, Alfawarlord, Laiorai, Agent Bacon, Azte, Quick Art, Muri Master, Jarkur, RdRanger2020, Armahkarma, and Bluewaylon for corrections.
This Quest Guide was entered into the database on Wed, Oct 06, 2004, at 09:33:10 PM by Monkeymatt, and it was last updated on Sun, Feb 10, 2019, at 01:53:50 PM by Alk12.
If anything is incorrect or missing, or if you have any new information to submit to this database, please submit it to us on our Content Submissions Forums.
If you see this guide on any other site, please report it to us so we can take legal action against anyone found stealing our content. This guide is copyrighted by RuneHQ, and its use on other sites is expressly forbidden. Do not ask if you can use our guides or images, the answer is and always will be NO!
Print this page with images - Back to the Quest Guide Index Page - Back to Top
